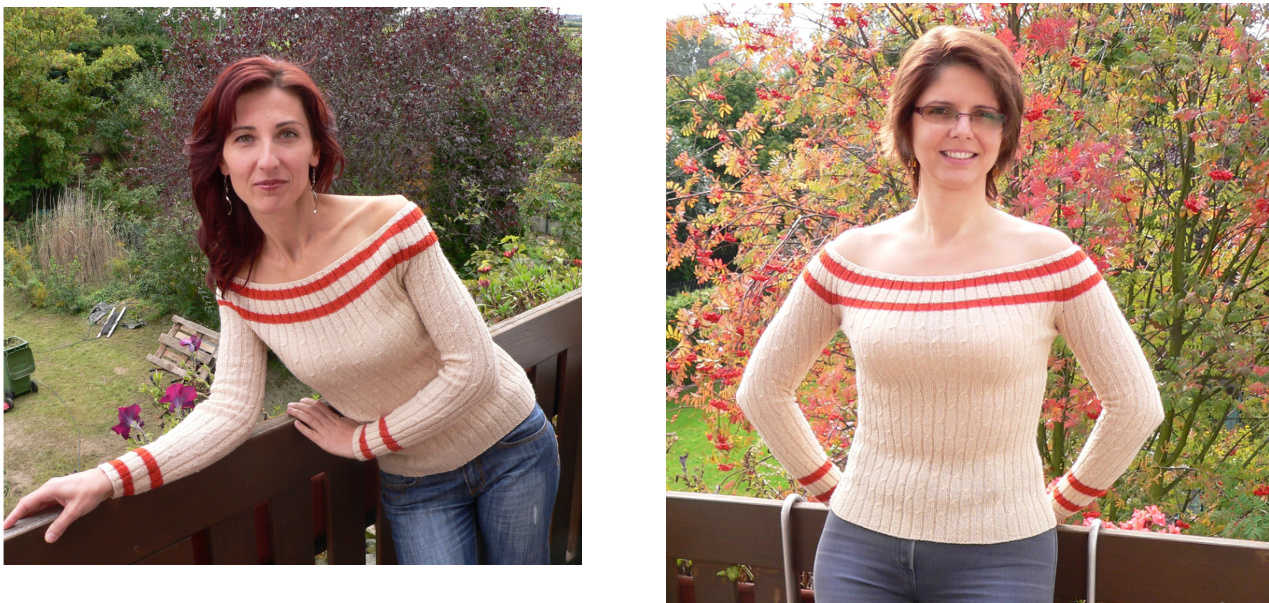
OFF SHOULDER BLOUSE
Sizes: 40/42/44/48. The pattern is written for size 40, the numbers in brackets apply to the other sizes. If only one number is mentioned, it applies to all sizes. Note: the pattern can be adapted easily to fit other sizes, by adding repeats of $4{+}2$ stitches. Materials: $250\mathrm{g}$ light fingering beige yarn, $25\mathrm{g}$ or less light fingering terracotta yarn scraps). Similar yarns: Schoeller+Stahl Fortissima Socka 100 Knitting Needles: $2{,}5\mathrm{mm}/\mathrm{~}1{,}5\mathrm{~l~}$ JS circular needles. (straight needle can be used till joining the pieces together, but then circular needles are required). Sew needle for joining the pieces together Cable needle, if necessary - I don't use it
Gauge:
On $2{,}5\mathrm{mm}$ needles, 40 stitches and 50 rows $=$ approx. 10x10 cm. Check your gauge before starting! Work front and back the same way till sleeve cut.
Pattern:
The pattern consist in 23 (24, 25, 26) repeats of $\mathrm{k4}$ p2 blocks (on the right side of the work). The cables are made on every second block (k4, p2, cable, p2, k4, p2, cable...), alternating the columns (blocks) at every cable repeat.
Front and back:
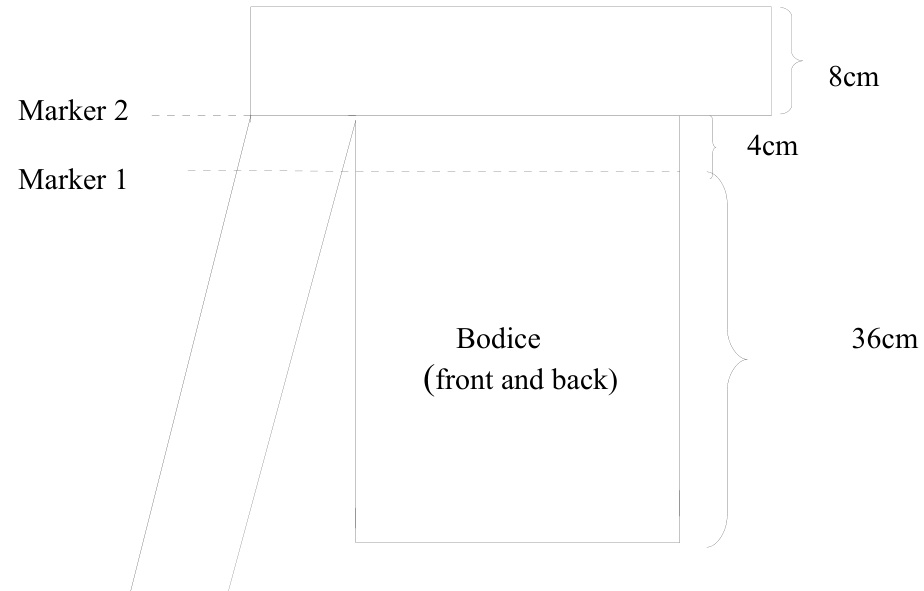
Cast 0n 140 (146,152, 158) stitches. Row1: $\ast\boldsymbol{1}_{\mathrm{k}\mathcal{2}}$ , $\mathsf{p}4^{*}$ till end of the row, then k2. Row2: p2, $\mathrm{k4}$ till end of row, p the last 2 stitches. This will be the right side of the blouse. Repeat rows 1 and 2 6 times each in that order - 14 rows; make one more Row 1 - 15 rows. The lower edge is now complete. Row 16 (right side): $\ast_{\mathrm{p}2}$ , s1 2, k2, then $\mathrm{k}$ the sl stitches from underneath the previously k2 - cable made, p2, $\boldsymbol{\mathrm{k}4^{*}}$ , repeat till end of row, p the last 2 stitches. Another way to knit this: p2, sl2 on cable needle, k2, now knit the 2 stitches from the cable needle from the back - cable to the right. Row 17: as row 1. Row 18: as row2. Repeat rows 1 and 2 in that order 7 more times, make one more row 1 - row33. Row 34: \*p2, k4, p2, sl2, k2, then k the previously sl 2 - cable to the right made\*, repeat till end of row, p the last 2 stitches. Row 35 as row 1. Row 36: as row 2. Repeat rows 1 and 2 in that order 7 more times, make one more row - row 51. From row 52: repeat from row 16 to row 33. Then repeat from row 34 to row 51. Knit 5 more times alternating in that order from row 16 to row 33, than from row 34 to row 51. At the sleeve cut, you should have a total of 6 cable repeats on each block, but the length of the blouse can be easily adapted by adding or cutting the number of cable repeats on each block (vertically). Length of the front and back till sleeve cut: $39\mathrm{cm}/15.35$ inches. DO NOT TAKE THE FRONT/BACK OFF THE NEEDLES! Or, if you need the needles, use a loose temporary bind off in some contrasting color, so it will be easy to unravel later. Place a marker (marker1) about $4\:\mathrm{cm}/1.57$ inches lower from where you decided the sleeve cut will be - by this point, work should measure $36\;\mathrm{cm}/14.17$ inches, and another marker (marker2) at the actual sleeve cut. Then knit straight up one more cable repeat on each block (a single repeat of rows 16 to 51). Then knit k4, p2 on the right side of the work for 7 more rows. Join the front and the back together by sewing the pieces from bottom up to the first marker you placed (marker1).
Upper edge (front and back)
With the pieces sewed together, turn the work with the right side outside, then knit the next row as it comes. At its end, cast on 44 (44/47/47/50) stitches, then continue knitting the front. At the end of the row, cast on another 4 (44/44/50/50) stitches. Please note that the number of stitches you cast on should be adapted to the chest+shoulders width of the intended person, which could be very different! Tip: At this point, you can either continue knitting in the round on circular needles, or you can make normal back and forth rows and knit the edge at the end of each row. I preferred the latest, because the sewing line is very fine, but it allows me to know which is the back of the blouse. Knit 4 more rows, conserving the block structure, then knit 6 rows with the contrasting color. Knit another 10 rows in beige, then 6 rows in terracota, and it ends up with 4 beige rows. At the $5^{\mathrm{th}}$ beige row (right side of the work) bind off. Bind off: Usually, the bind off uses every stitch, connecting the resulted chain with the next stitch, as if to crochet the bind off row. In order to maintain the top of the blouse on your shoulders and prevent it to slowly slide down, the bind off should be tighter, and that can be done by binding off 3 stitches at a time every 5 stitches. It won't show. The other bind off procedure consist in a normal knitted bind off, every stitch at a time, than adding a tighter single crocheted row to prevent sliding. Sleeves: After knitting the body as above described, you should now have an off-shoulder top with armholes - their edges consist of the later casted stitches and the back and front part above the sleeves cut marker. Pick up 78(78/78/84/84) stitches along that edge. The part between the sleeve cut marker and the marker below has no additional picked up stitches. The 44 (44/44/50/50) stitches in the middle of the new picked up row (now row 0, on the right side of the blouse) are actually the later casted on stitches, knitted as multiple of $4{+}2$ blocks. To preserve that number, begin to knit the sleeve blocks as follows: Row 1: as the row 1 of the body. This will be the wrong side of the sleeve. Row 2: as the row 2 of the body. This will be the right side of the sleeve. Repeat rows 1 and 2 in that order 6 more times - row 14. From this point on, follow the instructions for the front and back knitting, till you reach a total of 6 cable repeats on each block, than continue as for the front and back till the lower end of the sleeve. Bind off looser, knit the other sleeve as above described. Tip: if you want your sleeves to follow closely the arm line, you can try to decrease a stitch at each the end of every $15^{\mathrm{th}}$ row. After binding off, sew the sleeves vertically from bottom up to about 4 cm lower as the sleeve cut - together with the area defined by the sleeve cut marker on the bodice, you now have a 4x4cm surface between the two sewed lateral edges of the sleeves and the bodice. Cast on 20 stitches on beige (or main color and knit 30 rows on stockinette stitch, or a quadrant of $4{,}2\mathrm{x}4{,}2\ \mathrm{cm}/1.65\mathrm{\,x\}1.65$ inches. Bind off. Knit 2 such quadrants. This patches are to match the holes left after sewing the parts and the sleeves. They are necessary for an easier movement of the sleeves. Fit every corner of one patch in the corner of the space left between the bodice and the sleeve, then sew it on the wrong side of the blouse. This will release the tension of the upper part of the sleeves, making the blouse look better. Weave all the ends in. Your new blouse is now ready to wear!
For problems with the patten, corrections, questions, please feel free to contact me at any time: www.ravelry.com/people/ioana $\copyright$ 2008 Ioana-Cristina Petrus This design cannot be sold or published without my permission. The items made using that particular design can be sold with my permission.


