ITALIANMOPEDCAP

By Karen Mitchell
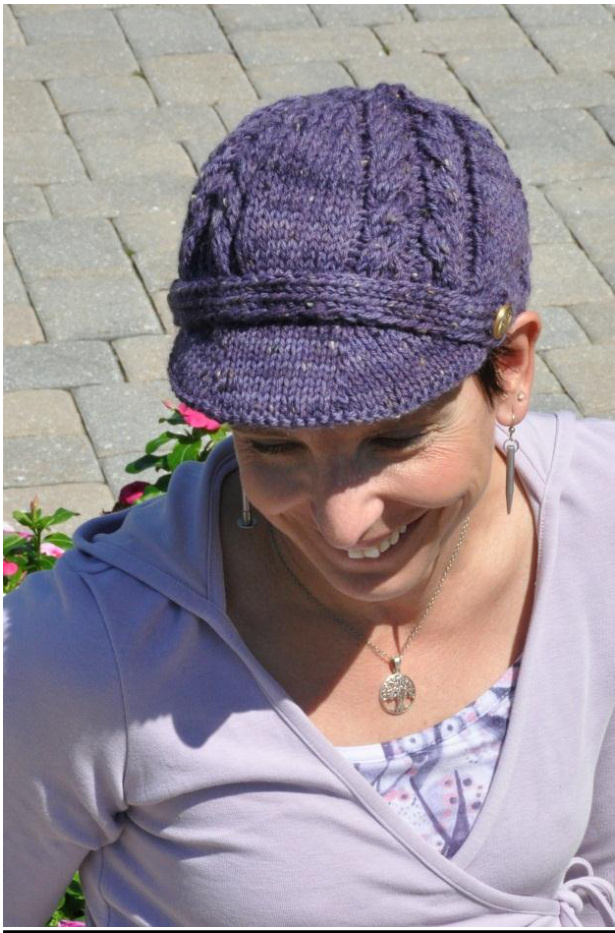
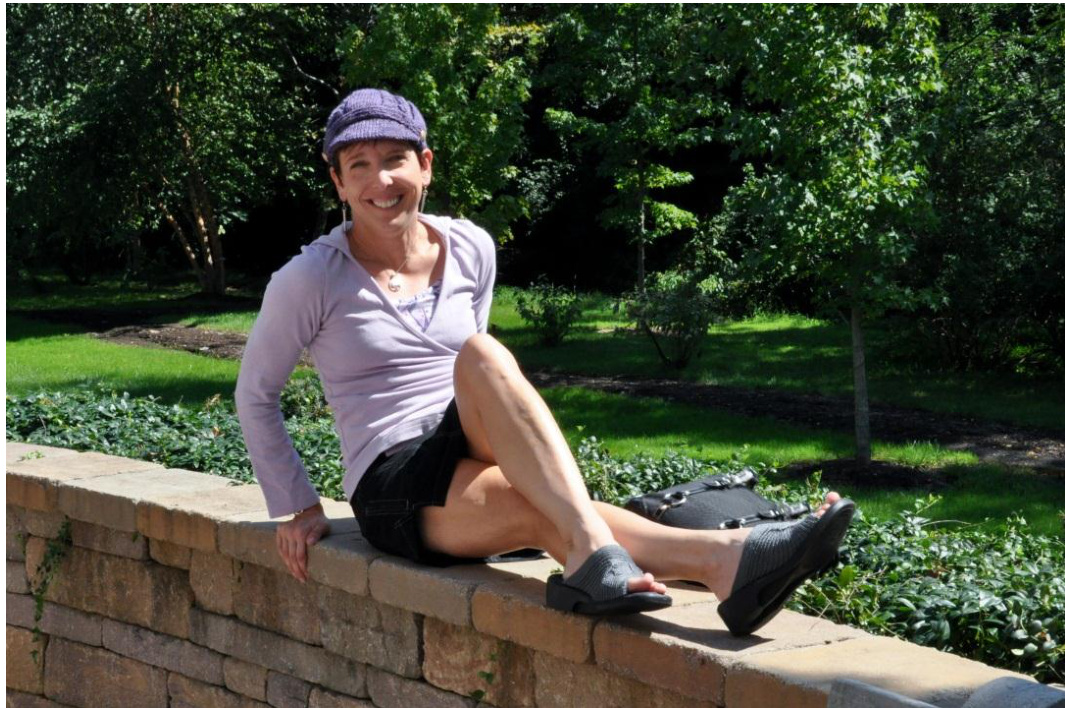
I am not a hat person. I love seeing hats on other women, but never seem to think hats look good on me. So I've come up with a hat that looks great on everyone - really. I can picture a lovely Italian woman wearing it as she drives her moped to work on an autumn morning. Or an American woman - in the city, in the country, or on a college campus as shown in these pics. Honestly this hat looks great on kids, too. The cap is brimmed and cabled and the band on the brim includesa button oneachend.The cables can be done with or without a cable needle. This is a quick knit - a weekend project. Enjoy - Size: One size fits most women Finished Measurement: Approximately 22" around the largest part of the cap
Materials:
Queensland Collection Rustic Tweed (65% wool, 27% alpaca, and 10% Donegal; 278 yards). 1 skein. Cap is knitted using two strands at once to make a thick fabric suitable for a cap. You may use any worsted weight yarn, held singly or doubly, that produces gauge. Heavy worsted weight will work with one strand. Less yardage will be needed if holding one strand rather than two. US 9 16" circular needle, or size needed to obtain gauge US 9 double-pointed needles, or size needed to obtain gauge (set of 4) US 7 16" circular needle, or two sizes smaller than larger needle Page |1 US 7 24" circular needle, or two sizes smaller than larger needle Cable needle if desired Plastic mesh for inside the cap brim Tapestry needle Two medium buttons for cap band Gauge: 16 stitches and 22 rows equals 4" in stockinette stitch on the larger needles
Directions
Knit Ribbing
Begin at bottom of cap by casting on 76 stitches, using smaller 16" circular needle. Place marker (pm) and join in the round, being careful not to twist the stiches. Work in K1, P1 ribbing for five rows or one inch. Change to larger 16" circular needle. Increase number of stitches to 112 in the next round: K4, M1; \*K2, M1; repeat from \* until 2 stitches remain. K2.
Page | 2
Knit one additional round. \*Note: M1 in this pattern is accomplished by using your right needle to pick up the strand between the stitch just knit and the next stitch from front to back. Lift this strand off of your right needle by inserting your left needle from front toback and dropping the strand from your right needle.Knit into theback of this newly created stitch.
Knit Cable Pattern
Begin cable pattern and complete it three times for an average cap, prior to beginning cap decreases. You may do the cable pattern an additional time if larger cap is desired or if you want the cap to cover yourears.
Cable Pattern
Rounds 1- 3: \*P2, K10, [P2, K6]2X; repeat from \* to end of round (three repeats, doing this pattern four times altogether in each round). Round 4: \*P2, K10, P2, c6f, P2, c6b; repeat from \* to end of round (three repeats, doing this pattern four times altogether in this round). Note: You may use a cable needle for this round and subsequent cable rounds. However, I recommend that you try cabling without a cable needle. Knitting cables is much easier, especially for a newer knitter, if you don't have to use a cable needle or an extra double-pointed needle. Please see the following links for c6f and c6b: www.grumperina.com/leftcable.htm and www.grumperina.com/rightcable.htm. C6f is the same as "left-twist cable" or holding stitches in front. C6b is the same as "right-twist cable" or holding stitches in back.
Begin Decreases to Shape the Top
Round 1: \*P2, SSK, K8, P2, K6, P2, K6; repeat from \* to end of round. Round 2: \*P2, K7, K2tog, P2, K6, P2, K6; repeat from \* to end of round. Round 3: \*P2, SSK, K6, P2, K6, P2, K6; repeat from \* to end of round. Round 4: \*P2, K7, P2 c6f, P2, c6b; repeat from \* to end of round. Round 5: \*P2, K5, K2tog, P2, K6, P2, K6: repeat from \* to end of round. Round 6: \*P2, SSK, K4, P2, K6, P2, K6; repeat from \* to end of round. Round 7: \*P2, K3, K2tog, P2, K6, P2, K6; repeat from \* to end of round. Round 8: \*P2, K4, P2, c6f, P2, c6b; repeat from \* to end of round. Round 9: \*P2, SSK, K2, P2, K6, P2, K6; repeat from \* to end of round. Round 10: \*P2, K2tog, K1, P2, K6, P2, K6; repeat from \* to end of round. Round 11: \*P2, SSK, P2, K6, P2, K6; repeat from \* to end of round. Round 12: \*P2, K1, P2 c6f, P2, c6b; repeat from \* to end of round. (76 stitches in the round) (Change to dpns in larger size when needed.)
Finish Shaping the Top of Cap
Round 16: \*K2tog, K11; repeat from \* to end of round. (48 stitches) Round 17: \*K2tog; repeat from \* to end of round. (24 stitches) Round 17: \*K2tog; repeat from \* to end of round. (12 stitches) Round 18: \*K2tog; repeat from \* to end of round. (6 stitches) Cut yarn leaving a tail approximately 10 inches long. Using a tapestry needle, loop the yarn through the remaining stitches, pull tight, and secure. Weave in the remaining tail on the inside of the cap.

Knit Brim
You will be centering the brim over one of the wide panels, so select the panel that you believe is knit most evenly. Find the center of the panel and mark with a safety pin on the cast-on edge. Switch to the smaller 24" circular needle. With cap upside down and right side of cap facing you, and beginning seven stitches from the safety pin, pick up and knit 14 stitches. Turn work to the wrong side and purl 1 row. You will be knitting back and forth using the circular needle. Turn work to the right side. Next row: K2, M1 (\*See Note Below), place marker, K10, place marker, M1, K2. Pick up (pu) 2 stitches from the cap's cast-on edge. Next row: P to end, pu 2 stitches from the cap's cast-on edge. Next row: Kto marker, M1, slip marker (sm), K10, sm, M1, Kto end, pu 2 stitches from the cap's cast-on edge. : the last two rows until the brim measures 2" at the center, ending with a purl row Turn work to the right side and purl one row. st stitch and bind off (BO) the first 2 stitches. Continue to purl to the end of the rov Next row: Slip first stitch and BO the first 2 stitches. Kto 2 stitches before the marker, SSK, sm, K10, sm, K2tog, K to end of row. Repeat last two rows until 14 stitches remain, ending with a knit row. Bind off remaining 14 stitches. Cut a piece of plastic mesh slightly smaller than the knitted brim, but the same shape as the brim. Insert the plastic into the brim pocket and using a tapestry needle, sew the edges closed.
Knit Band
With smaller circular needle, cast on 6 stitches. Work in K1, P1 ribbing until piece is the same length as the ribbing above the brim area. Slip the first stitch of each row (as if to purl) to make even edges. Bind off in ribbing pattern. Weave in edges. Pin the band to the ribbing above the brim. Loosely tack the band onto the cap and then sew each of the two buttons near the end of the band. Weave in all ends and enjoy wearing your moped cap!
About the designer:
Karen Mitchell has been knitting since she was six, when her mother asked her father to turn a Tinker Toy part into a small knitting machine. Although she had a knitting break of 35 years, she now knits all the time and teaches knitting classes in her local yarn shop. When not knitting she loves travel, photography and marathon running. If you have questions on this pattern, please contact Karen at runnerkmitchell@yahoo.com. @Thisdesignmaynotbereproducedinanymanner withouttheexpressedwrittenconsentofthedesigner.