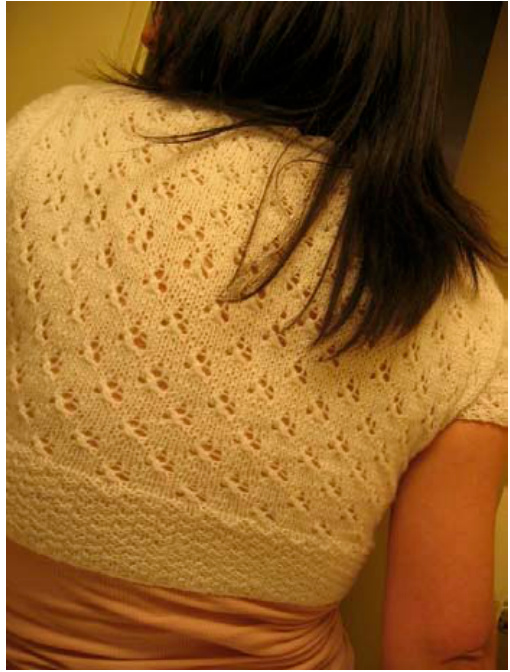
Anne Elliot
By CanarySanctuary http://canaryknits.blogspot.com

Please let me know if you see any glaring errors. I didn't keep the best notes going along. I hope this isn't too convoluted. Sized for a 36" bust. You can read my suggestions for pattern-improvement. Gauge: 7 sts/inch Yarn: Wendy - Peter Pan 4 ply Needles: 2.5 mm Extras: seven 1 cm buttons, tapestry needle. Warning: crochet ahead! Hook: 3 mm You can block the Spencer to make the lace look nicer. Just don't use pins that will rust! (yes, I did).
Double Seed Stitch:
Row $1\,-\,^{*}\mathrm{K}2$ , p2. Repeat from \* to end of row. Row 2 - As row 1. Row $3\mathrm{~-~}^{*}\mathrm{P}2$ , k2. Repeat from \* to end of row. Row 4 - As row 3.
Clover Lace:
Rows 1 and 7 - K Row 2 and all Wrong side rows - P Row 3 - K2, yo, sk1, k2tog, psso, yo, $^{*1}\mathrm{k}5$ yo, sll, k2tog, psso, yo\*, rep from \* to \*. Row 5 - K3, yo, ssk, $\ast1_{\mathrm{K6}}$ . yo, sk\*, rep from \* to \*. Row 9 - K1, $^{*1}\mathrm{k}5$ yo, sll, k2tog, psso, yo\*, rep from \* to \*. Row 11 - K7, \*yo, ssk, $\mathrm{k}6^{\ast}$ , rep from \* to \*.
Back CO 82 sts work 1x1 ribbing for 1 cm (0.5 inch) work double seed stitch for 6 cm (2.5 inches) Begin clover pattern, and begin increases. Increase 1 st on each side on the Front Side of the work until piece measures $23~\mathrm{cm}$ (9 inches) long. (I had to fudge the pattern for the increases. What I did was placed markers at the beginning stitches, and continued the pattern as normal within the markers. When there was enough stitches outside the markers - which is seven, I believe - I worked those in pattern).
Shaping armholes:
When piece measures $21~\mathrm{cm}$ (8 inches) long, begin shaping armhole by dec 2 sts on each side of Front of work for six rows. Then dec 1 st each side until piece measures $28\;\mathrm{cm}$ (11 inches). Arm holes are now shaped. Continue in clover pattern until piece is $36\;\mathrm{cm}$ (14 inches) long.
Front Panels:
Work two. Just remember to reverse the neckline and arm hole shaping! At this point, choose which side you want the buttons on, and which side the button holes. CO 38 sts (this is what I did, but I recommend casting on a few more. I found the front panels to be a bit small). Do the same shaping for the front panels as you did for the back, save for the 6 sts along what will be the buttonhole edge. Here I just kept the knitting in sockinette.
Button holes:
You create the first buttonhole on the first row of double seed stitch, and from then on place the buttonholes at approximately $2.5\;\mathrm{cm}$ (1 inch) intervals. All I did was work 2 sts on buttonhole edge, cast off 2, and continue in pattern. Then on the next row, you just CO 2 sts over the space created by the 2 you cast off. WHEN THE FRONT PANELS MEASURE 8 INCHES Begin neckline shaping. (this is also when you begin armhole shaping!)
Neckline Shaping:
Cast off 18 sts to create beginning of neckline. You should have about 30 sts left. Now you continue to shape the neckline edge by dec 1 st along neck edge every Front side row. Continue dec in this manner until you have 12 sts left. Work until front panels are same length as Back.
Sleeves:
Make two. CO 70 sts. Work 1x1 ribbing for 1 cm (0.5 inches). Begin clover pattern. Work in pattern until piece measures $4\;\mathrm{{cm}}$ (1.5 inches). Begin shaping sleeve. Dec. 1 st each side of Front of work until you have 2 sts left (my sleeves ended up being $16\;\mathrm{cm}/6.5$ inches long).
Finishing:
Sew up side seams, shoulders and sleeves. Place and sew buttons. Pick up sts along neckline (sorry, I didn't count them), and knit two rows in stockinette. This makes a nice edge for you to create the crochet trim upon. Neckline crochet: Starting at one edge of neckline, make 1 sc. Skip 2 sts. Make five dc in next st. Skip 2 sts. Slip-stitch this down. There you have the mini-shell that I used all the way around the neckline. Just continue the pattern til you get all the way around the neckline. I consciously kept my crocheting a little looser, because I was afraid it would pucker the knitting and look funny.
Suggestions for improvements to pattern:
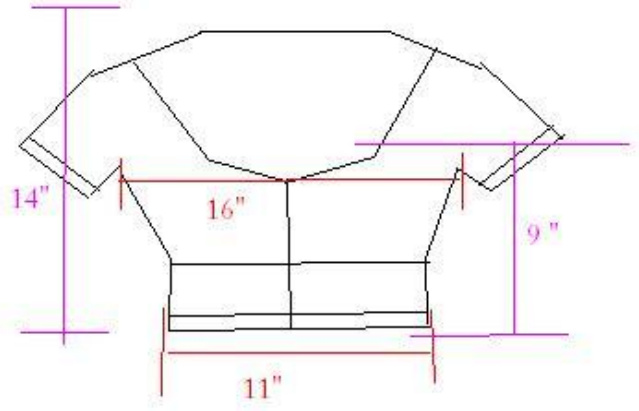
If I were making this pattern again, I would add an inch-worth of extra stitches to the bust area (I would spread this out across the front panels, so I'd add 0.5 inches to one side and 0.5 stitches to the other). I would also attempt to do it in the round, at least for the bottom half. I only suggest this because I dislike sewing seams. I suggest creating a row of garter stitch on the edge of the front panel where the buttons will be sewn. This will make the fabric want to lay flat, rather than curl under like the original does. Here is a pathetic Paint diagram of the measurement I took of the Spencer. If you can measure your own gauge, you can fit the pattern to you and your own yarn/needles/tension.