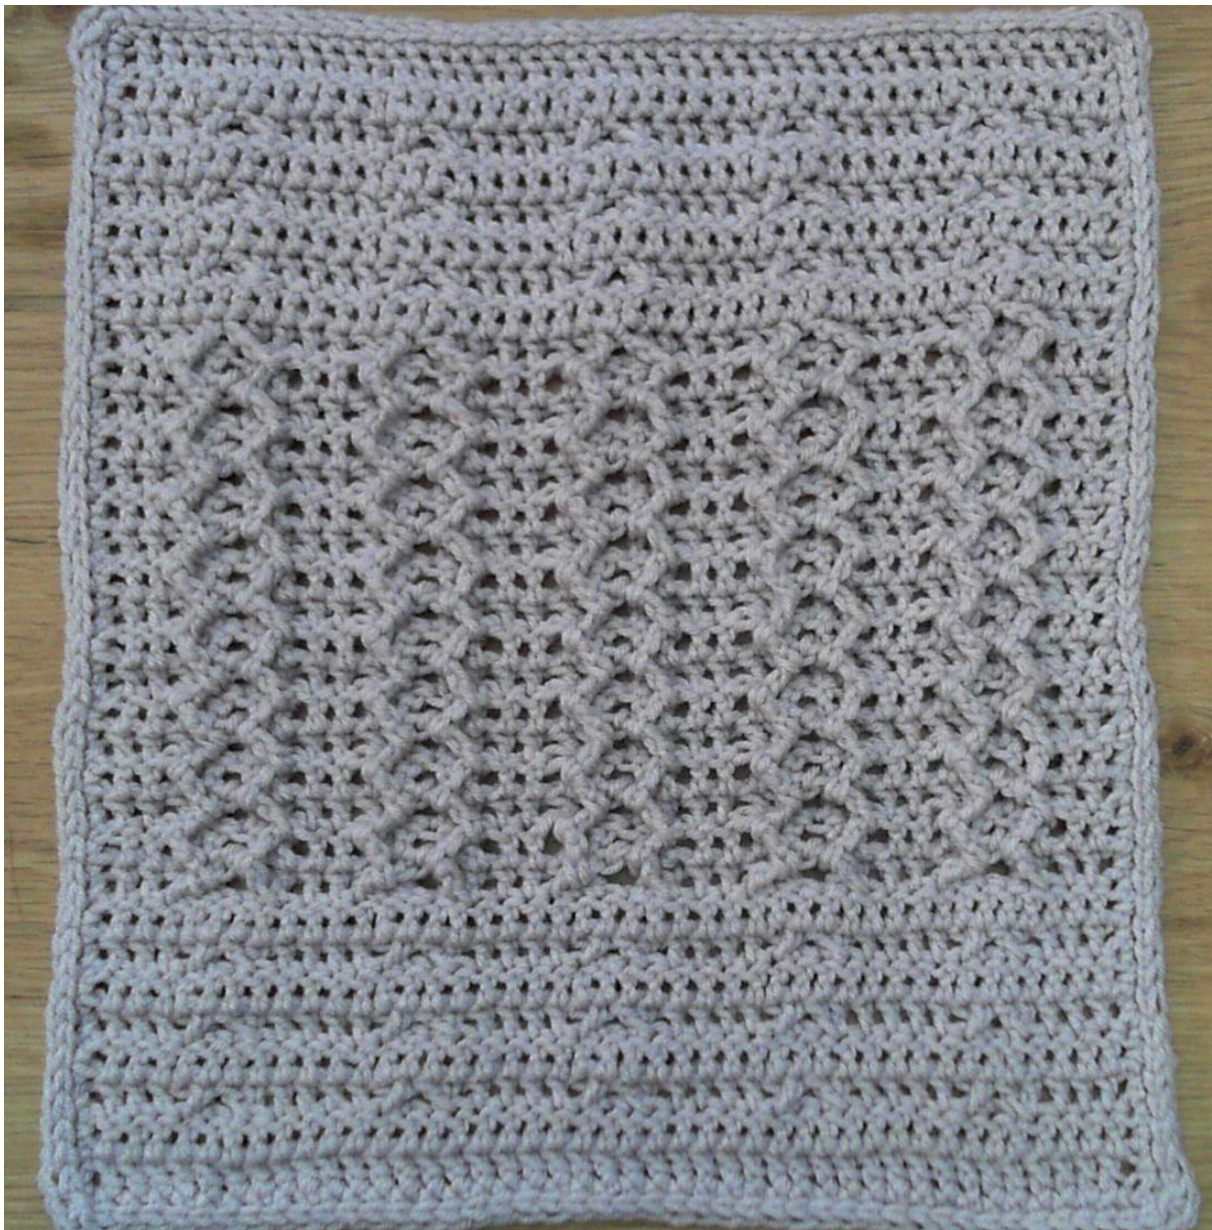
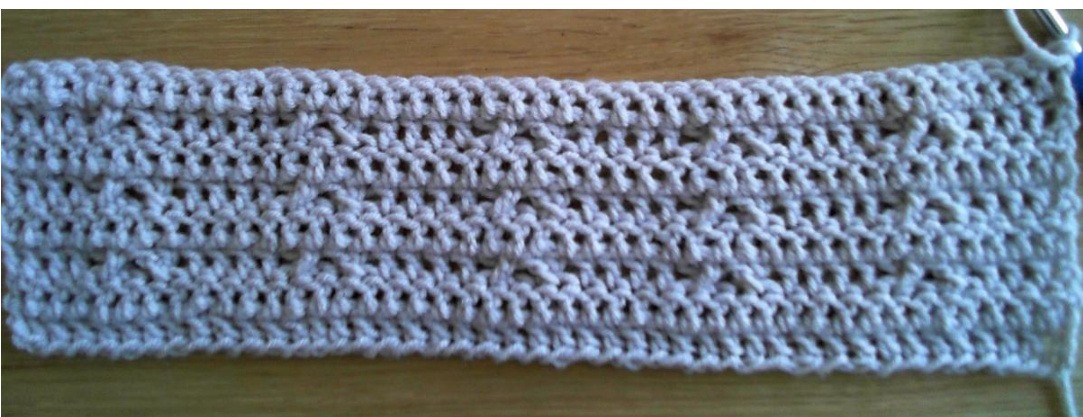
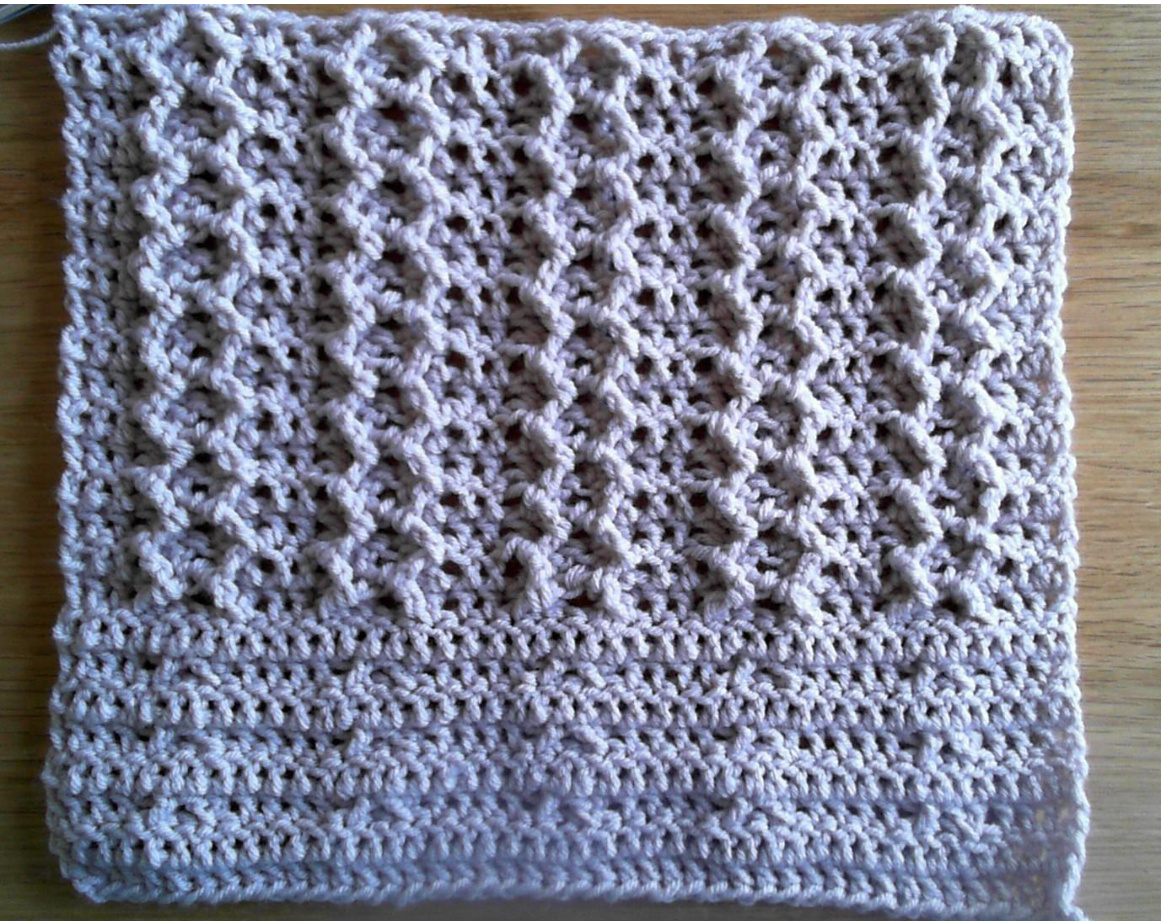
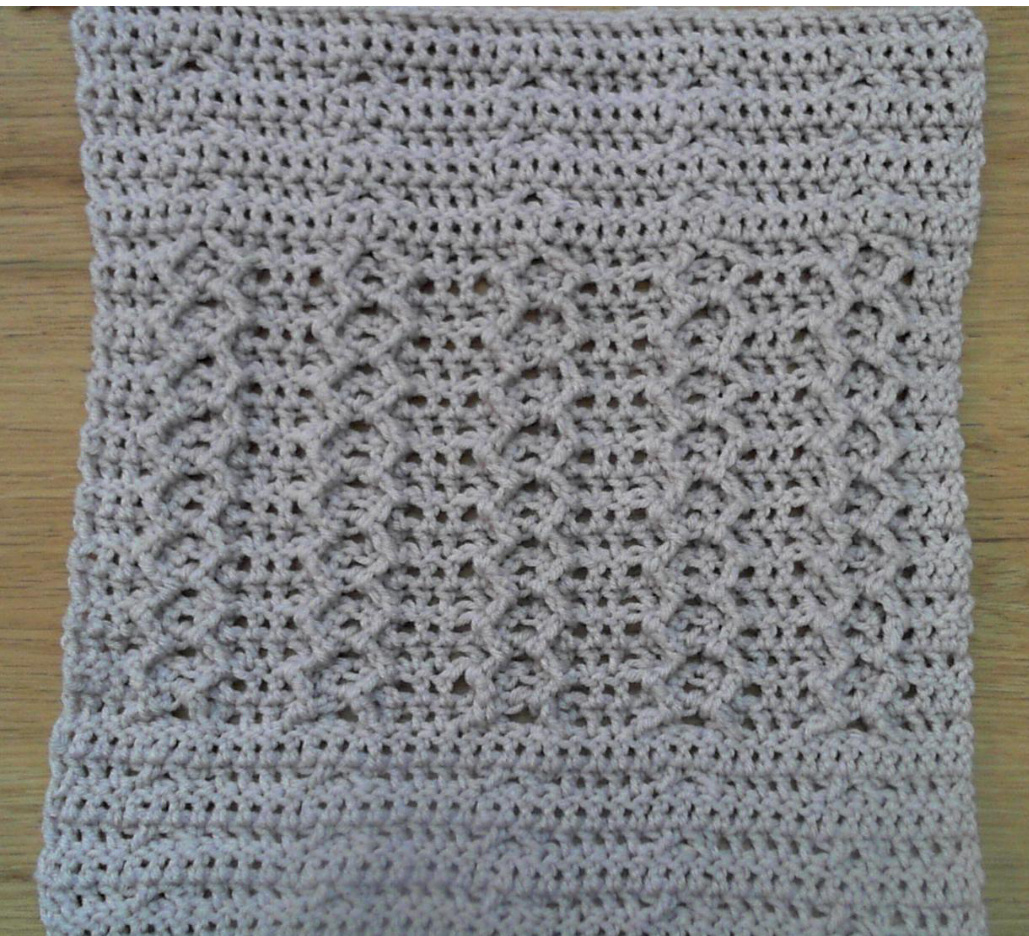
Welcome to Block 9 of Bilbie & Friends Blanket CAL. Beginning to feel the end? In block 9 we'll raise the difficulty level a little.. Don't be alarmed!! Not complicated cables, but a play of front and back crosses that require attention where to hook in, and which stitches to skip... This block (and all the other blocks) are made of 4 parts Part 1: 8 rows including a foundation row (explanation later) and a pattern row (repeated 3 times) and is usually a clue and some sort of practice for the cable. Make note, the pattern is different in each block. Part 2: 17 rows of the cable pattern in the block (mostly 2-4 rows that repeat themselves). Part 3: 8 rows repeating the first part. Part 4: 2 rows of edging around each block - the same in all the blocks. The block includes written instructions, photos and videos (in Hebrew) for special stitches. If this is your first time in this CAL, you can find explanations and schedule for Bilbie & Friends blanket in Ravelry here and in my Blog here. The Host Facebook group where you can share photos and advice CAL - Crochet A Long, as well as on my Facebook page "Hatchalot Simply Create", and you can also tag #Bilbie_friends_blanket on Instagram. So let's get started!!!
Block 9 - Sharon N.
Yarn needed:
About 130g (and almost 200g with the extension) when using 6 mm hook. About 100g when using 5 mm hook. You can use a different color for each block or one color for all the blocks.
Abbreviations (US):
st(s) = stitch(es) sp(s) = space(s) sl st = slip stitch ch(s) = chain(s) sc = single crochet dc = double crochet bpsc = back post single crochet fpdc = front post double crochet bpdc = back post double crochet fptr = front post treble crochet yo = yarn over hook pull = pull hook through stitch/loop DC foundation row: link to photo instructions in my blog
Remarks
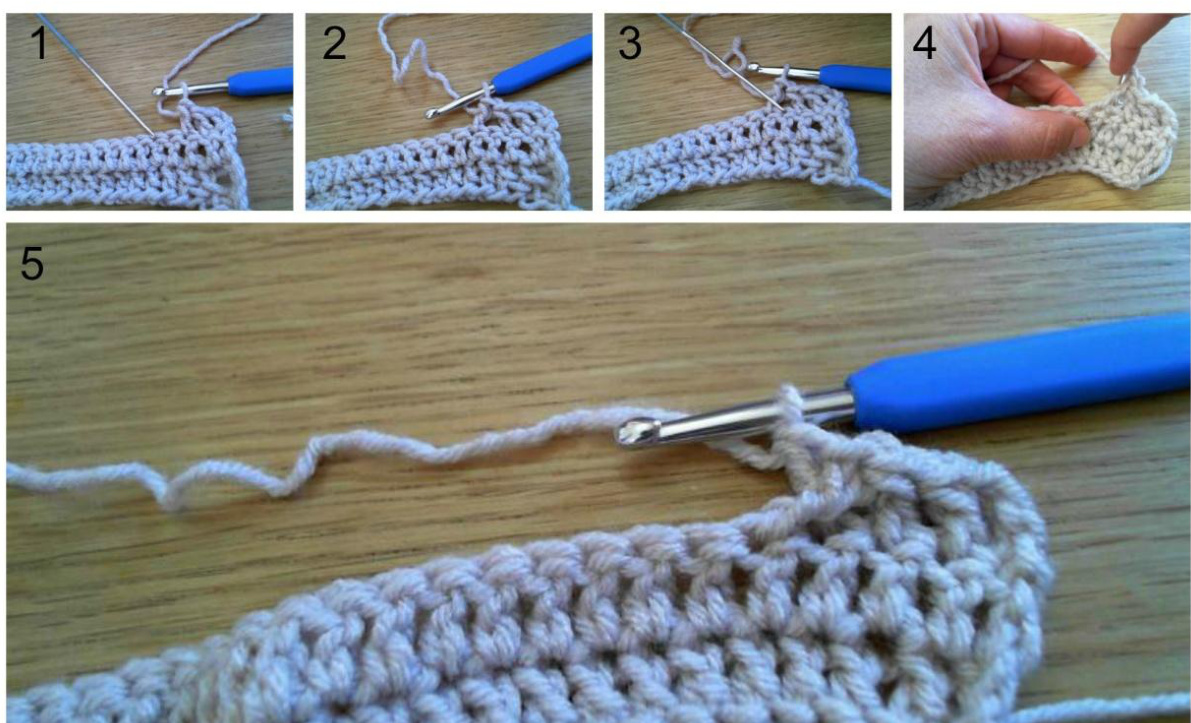
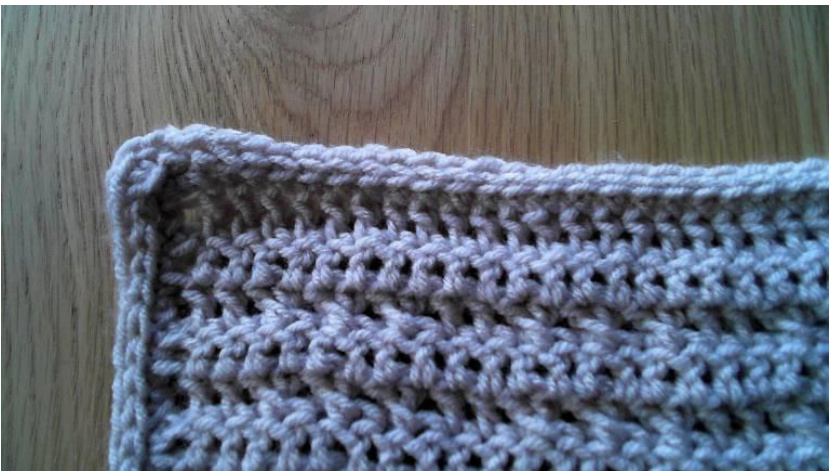
1. Row's beginning - I like to begin a row of dc's with ch-2 instead of ch-3. But I chose to write the instructions in the classic method of ch-3. If you decide to crochet as I do, switch the ch-3 to ch-2 at thebeginning of the row 2. First and last stitch in every row - ch-3 at the beginning of the row counts as first dc. The next dc is made in the next stitch (not at the base of the ch-3) [photo 1]. The last dc is made into the top of the ch-3 from the previous row [photo 2].
3. Block width - each block has 44 stiches across s0 as a rule each row has to count 44 stiches. I chose not to mention the stich count in every row. 4. Right and left sides - the right side of the work is the side where you see the pattern. If you start your block with a foundation row, the end of the yarn will be on your right. If you start with 44ch and a row of dcs, the end of the yarn will be on your left. All photos show the right side, unless stated otherwise. 5. Repeats - repeats of the same instructions will appear in two ways: · \* \* - execute the instructions between the asterisks, then repeat the number of times stated in this way: Repeat from \* to \* x times - execute the instructions from \* to \* and repeat them the number of times stated. This means that you repeat the instructions the number of times stated plus one more (the first one executed). · [] - execute the instructions between the brackets the number of times stated in this way: [... x times - execute the instructions in ... the number of times stated. 6. Please note - the last stitch of the cross stitches pull a little to the right, so after the cross make sure not to go into the stitch already used.
Special stitches:
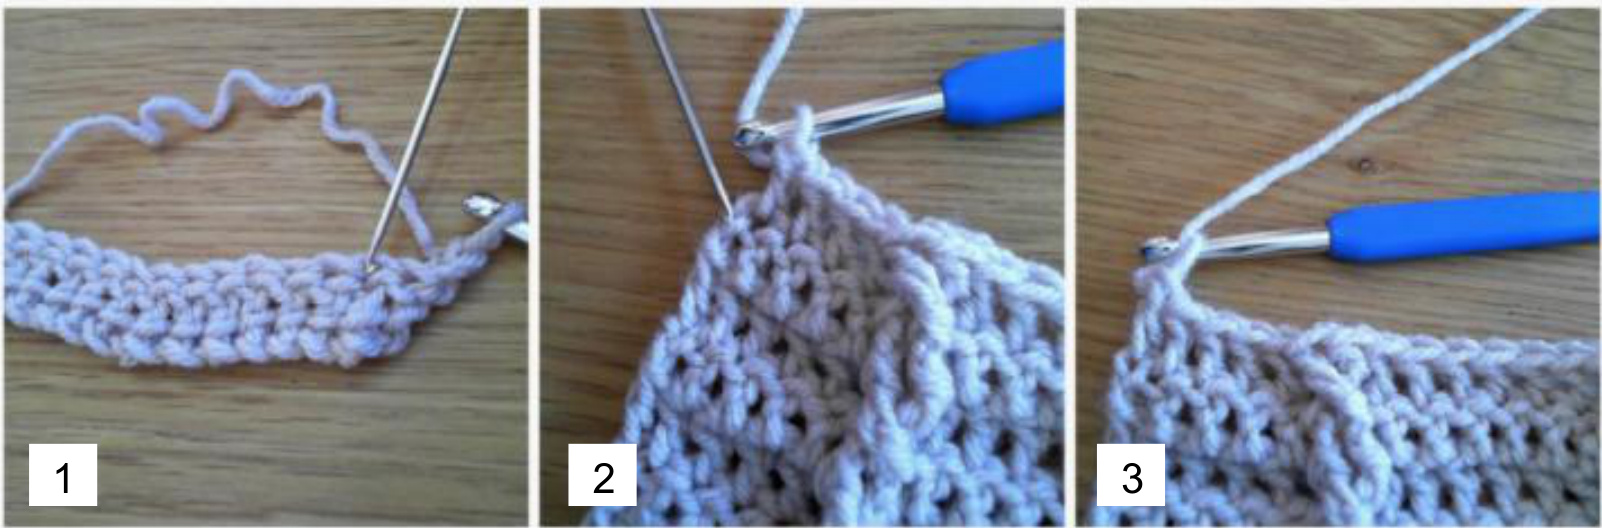
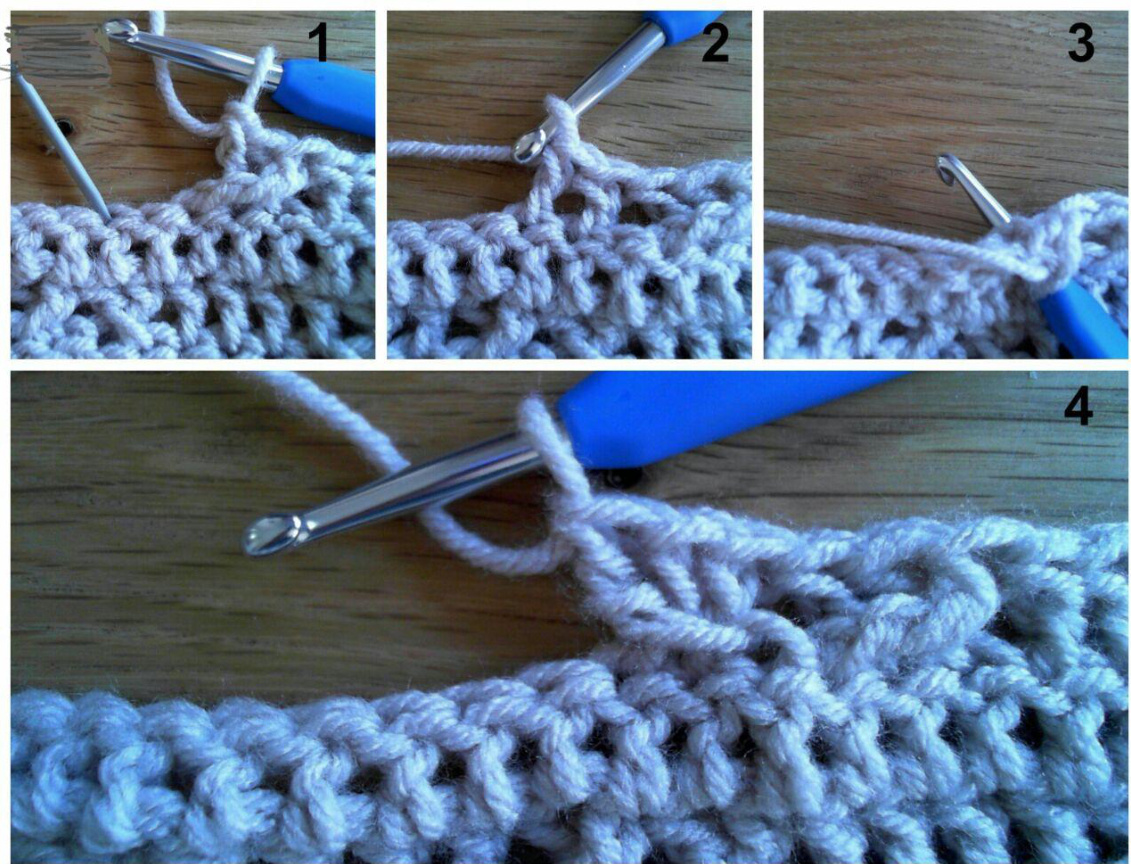
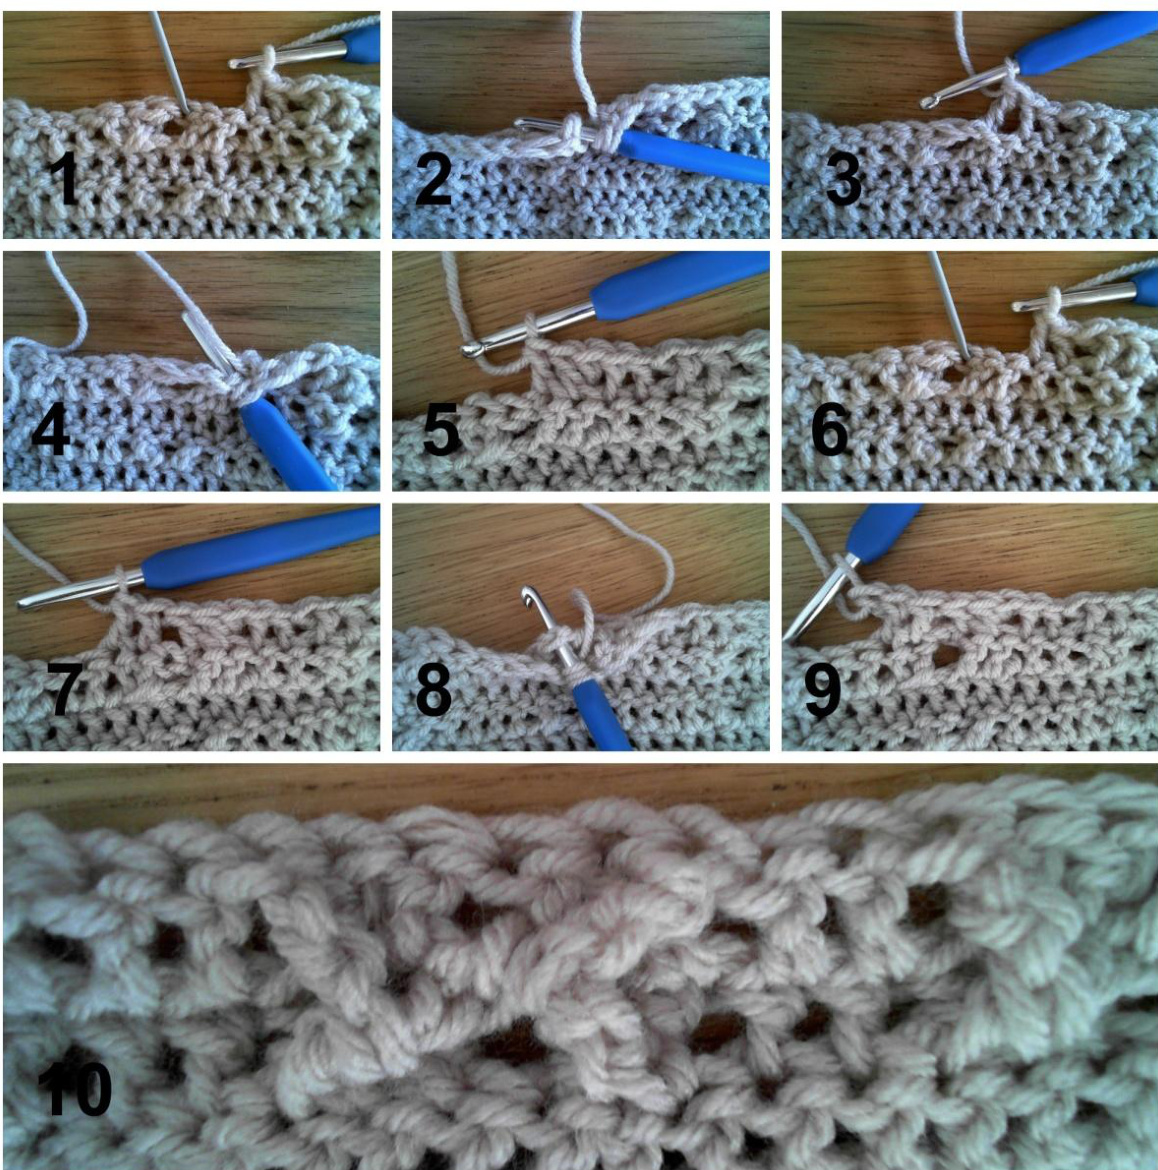
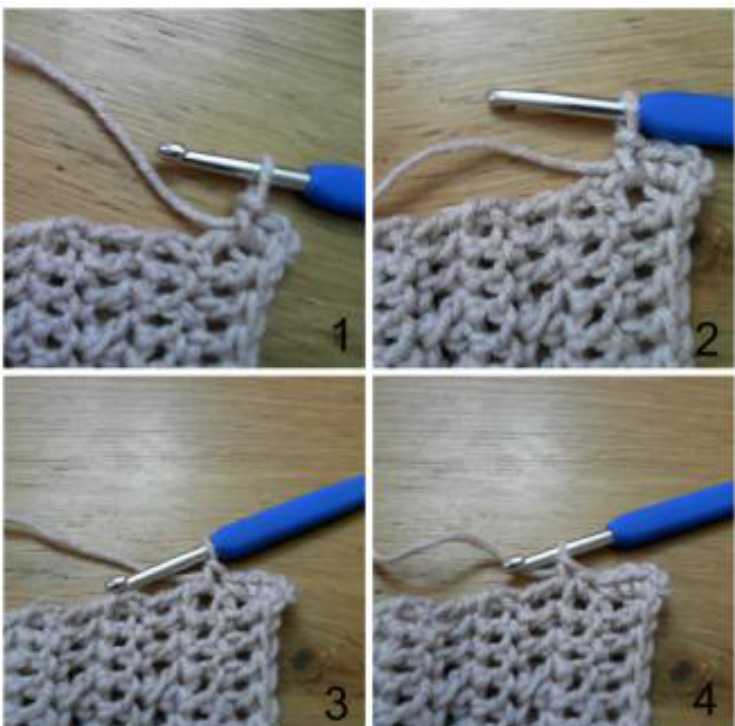
Front X : (Counts as 2 st). Skip one st [photo 1], dc in next st [photo 2], dc in skipped st in front of the last dc [photo 3], (insert hook from
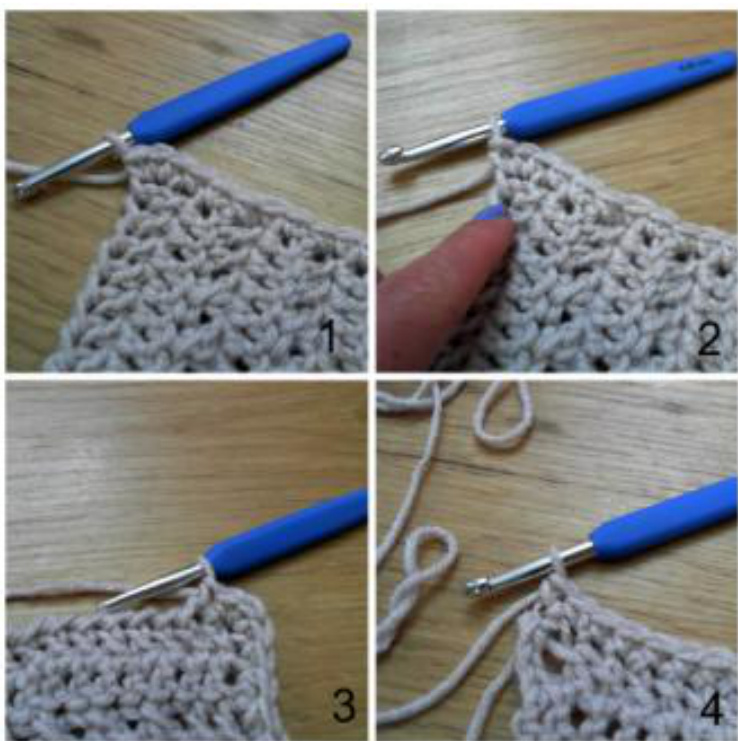
Back X: (Counts as 2 st). Skip next st [photo 1], dc in next st, dc in skipped st behind the last dc [photos 3,4,5] (insert hook from the back and work at the back of the last dc)
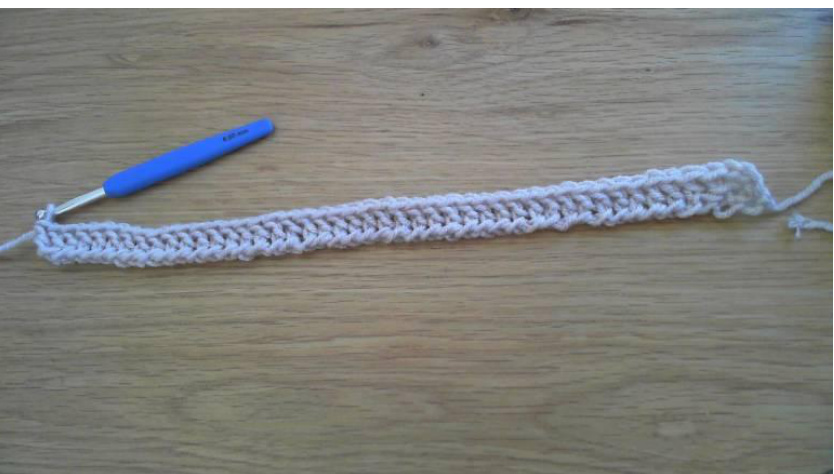
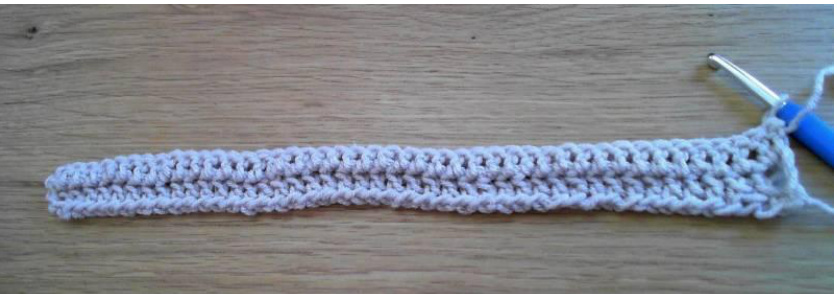
Row 1: 44 Double crochet foundation row. Row 2: ch 3, dc in next st and repeat to last.
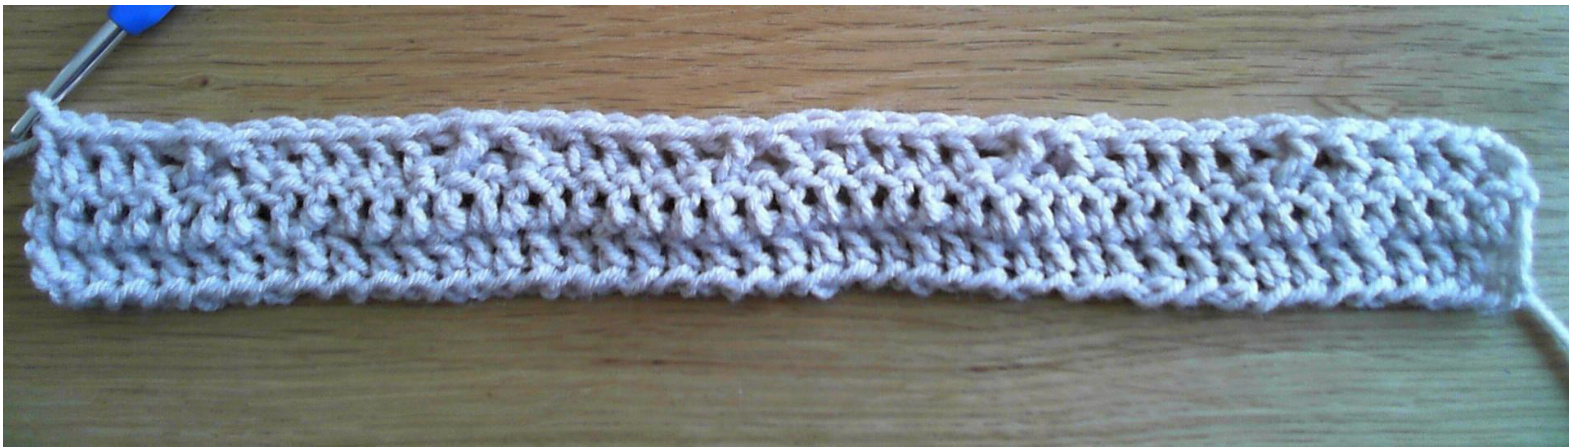
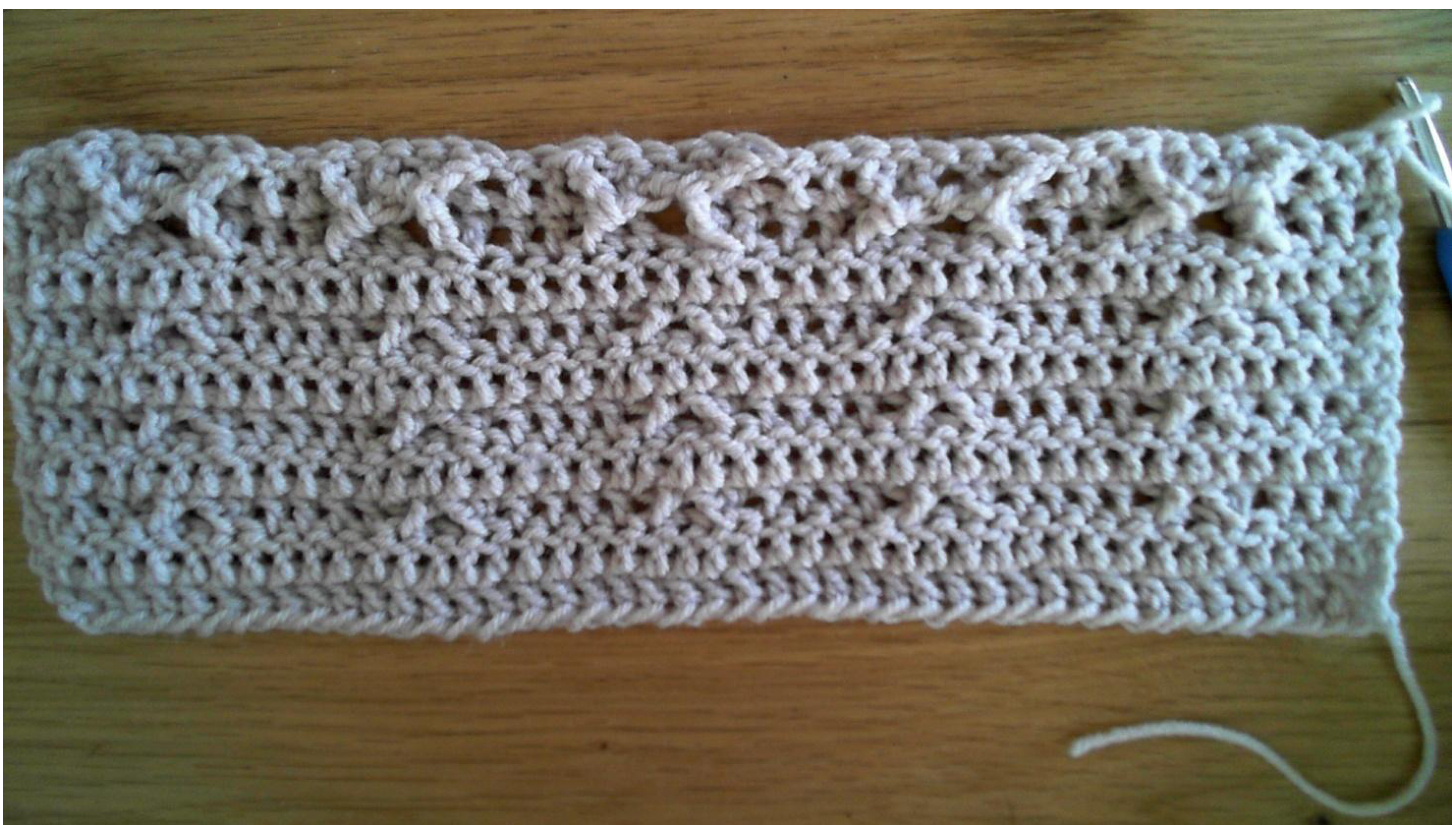
Row 3: ch-3, dc in next 3 st, \* Front X, Back X, dc in next 4 st \*, repeat from \* to \* 4 more times. (5 Front X, 5 Back X, 24 dc).
Original Design by Sarit Grinberg "Hatchalot Simply Create Copyright 2016All Rights Reserved. Row 4: Repeat row 2. Row 5: Repeat row 3. Row 6: Repeat row 2. Row 7: Repeat row 3. Row 8: Repeat row 2.
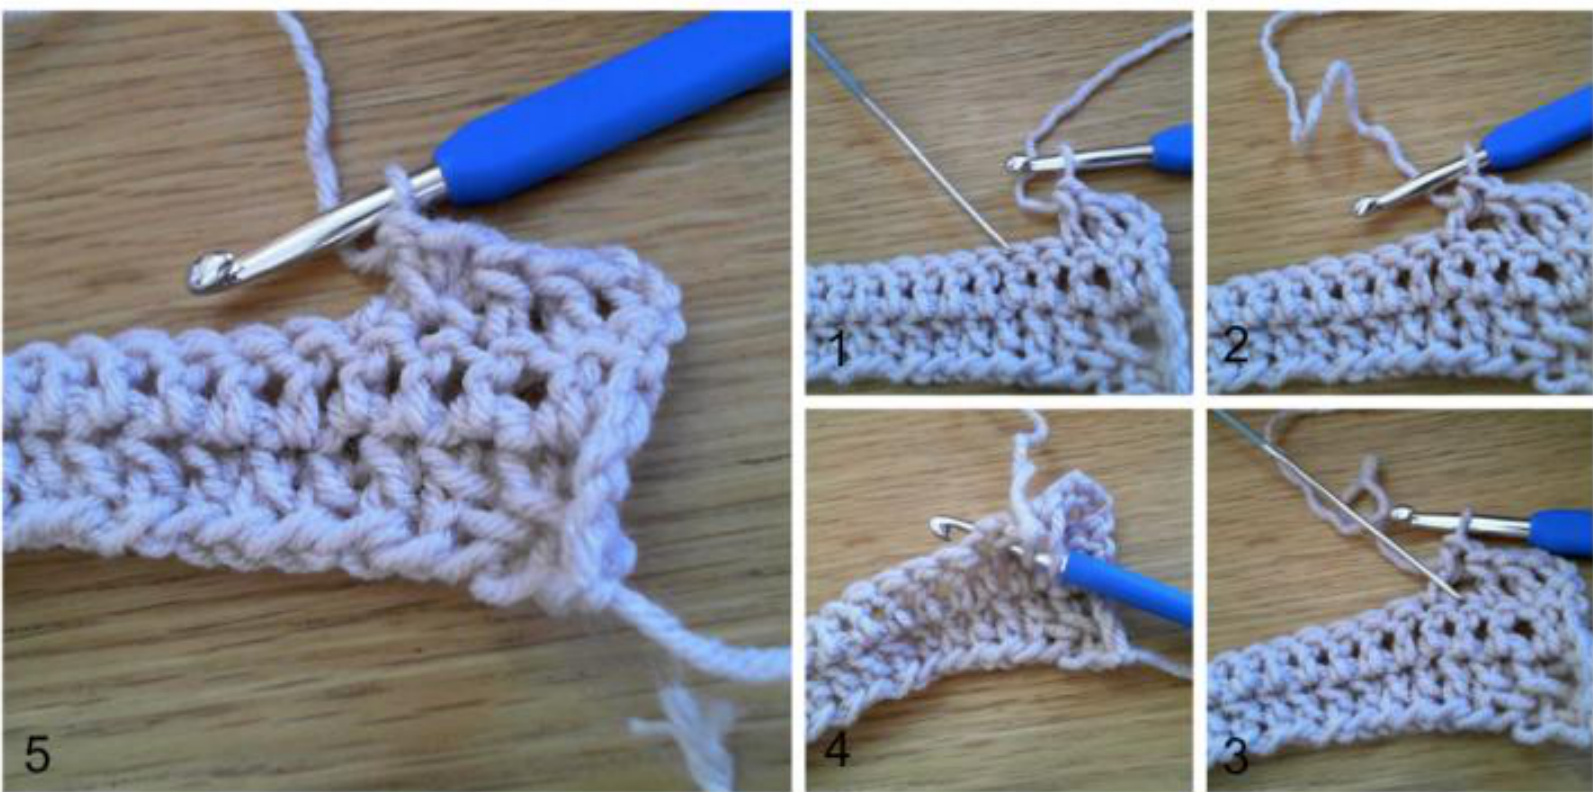
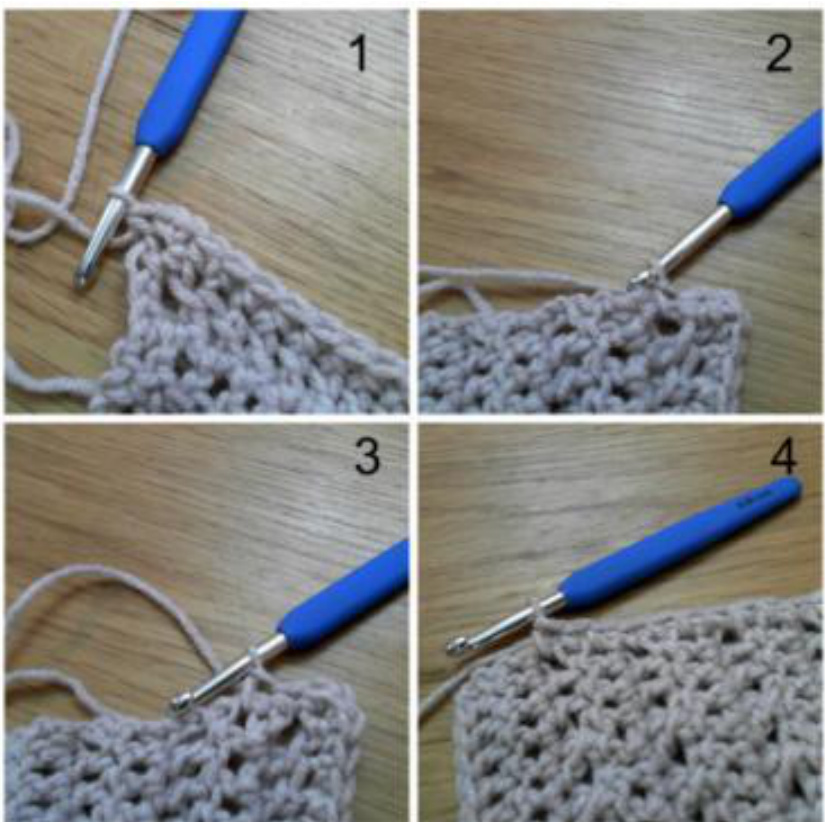
Row 9: ch-3, dc in next 2 st, \* skip next st [photo 1], dc in next 2 st [photo 2], infront of 2 dc just made, tr in skipped st [photo 3,4],
Original Design by Sarit Grinberg "Hatchalot Simply Create' Copyright @ 2016All Rights Reserved. skip next 2 st [photo 1], tr in next st [photo 2], in back of tr just made, dc in 2 skipped sts (note: to make it easier to work the dcs and find the stitches fold the tr towards you [photo 3]) [photos 4, 5, 6, 7],
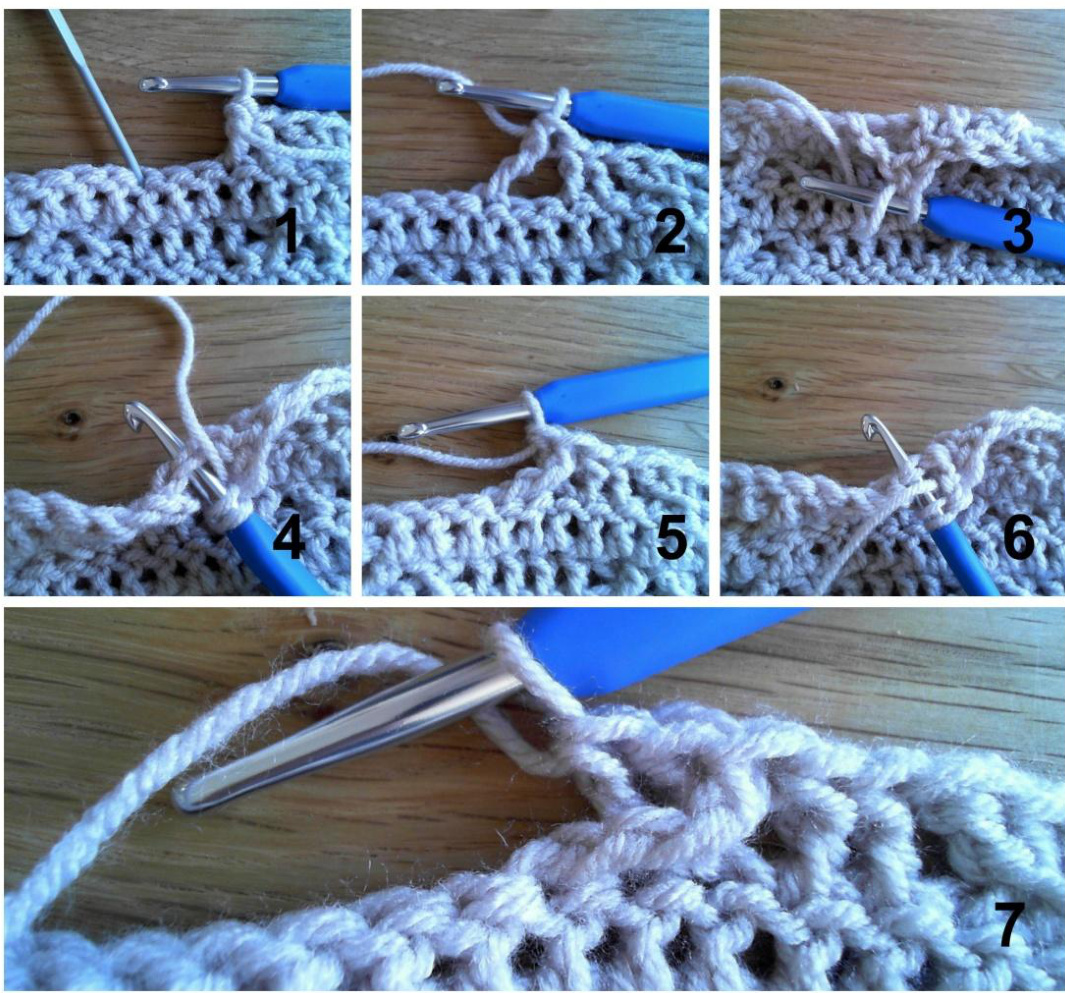
dc in next 2 st \*, repeat from \* to \* 4 more times, dc in next st. (10 tr, 34 dc (20 of them behind the trs)).
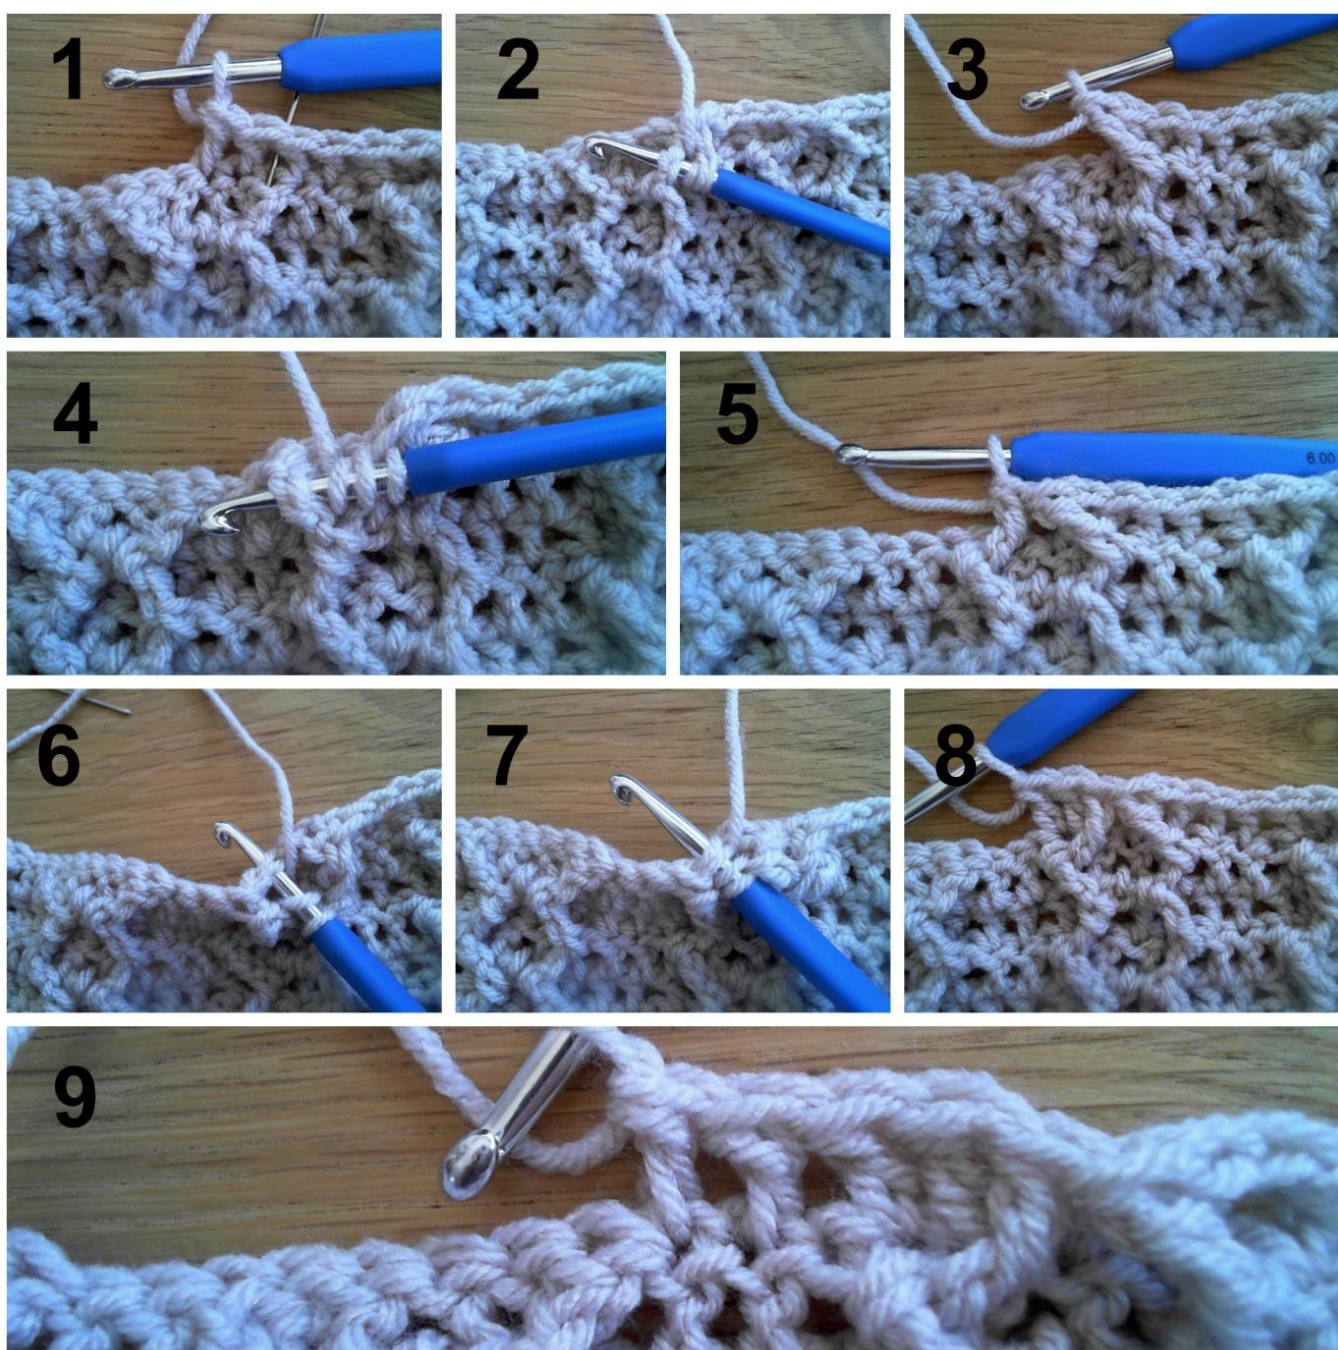
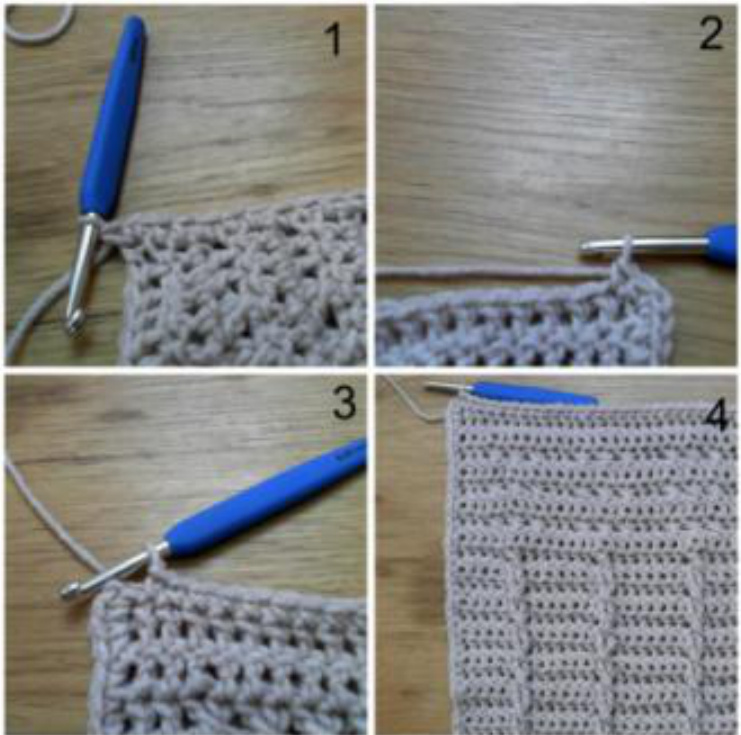
Row 10: ch-3, dc in next 2 st, \* skip next 2 st, [photo 1], bptr around tr from previous row [photos 2, 3], in front of the last bptr, dc in next 2 skipped st [photos 4, dc in next 2 st (be sure not to insert hook at the top of the bptrs - looks like skipping 2 st [the hook in photo 6 shows where to insert the hook]) [photo 7], bptr around tr from previous row [photos 8] dc in next 2 dcs \* repeat from \* to \* 4 more times, dc in next st . (34 dc, 10 bptr)
Row 11: ch-3, dc in next 2 st, \*skip next st, dc in next 2 dcs [photo 1], in front of 2 dc just made, fptr in next bptr from previous row [photos 2,3], skip next 2 st, fptr in bptr from previous row [photos 4,5], in back of fptr just made, dc in 2 skipped sts [photos 6,7,8], dc in next 2 dcs (note: do not insert into the top of the bptr from the previous row - work dcs above the dcs) [photo 9]\*, repeat from \* to \* 4 more times, dc in next st . (10 fptr, 34 dc (20 of them behind the fptrs))
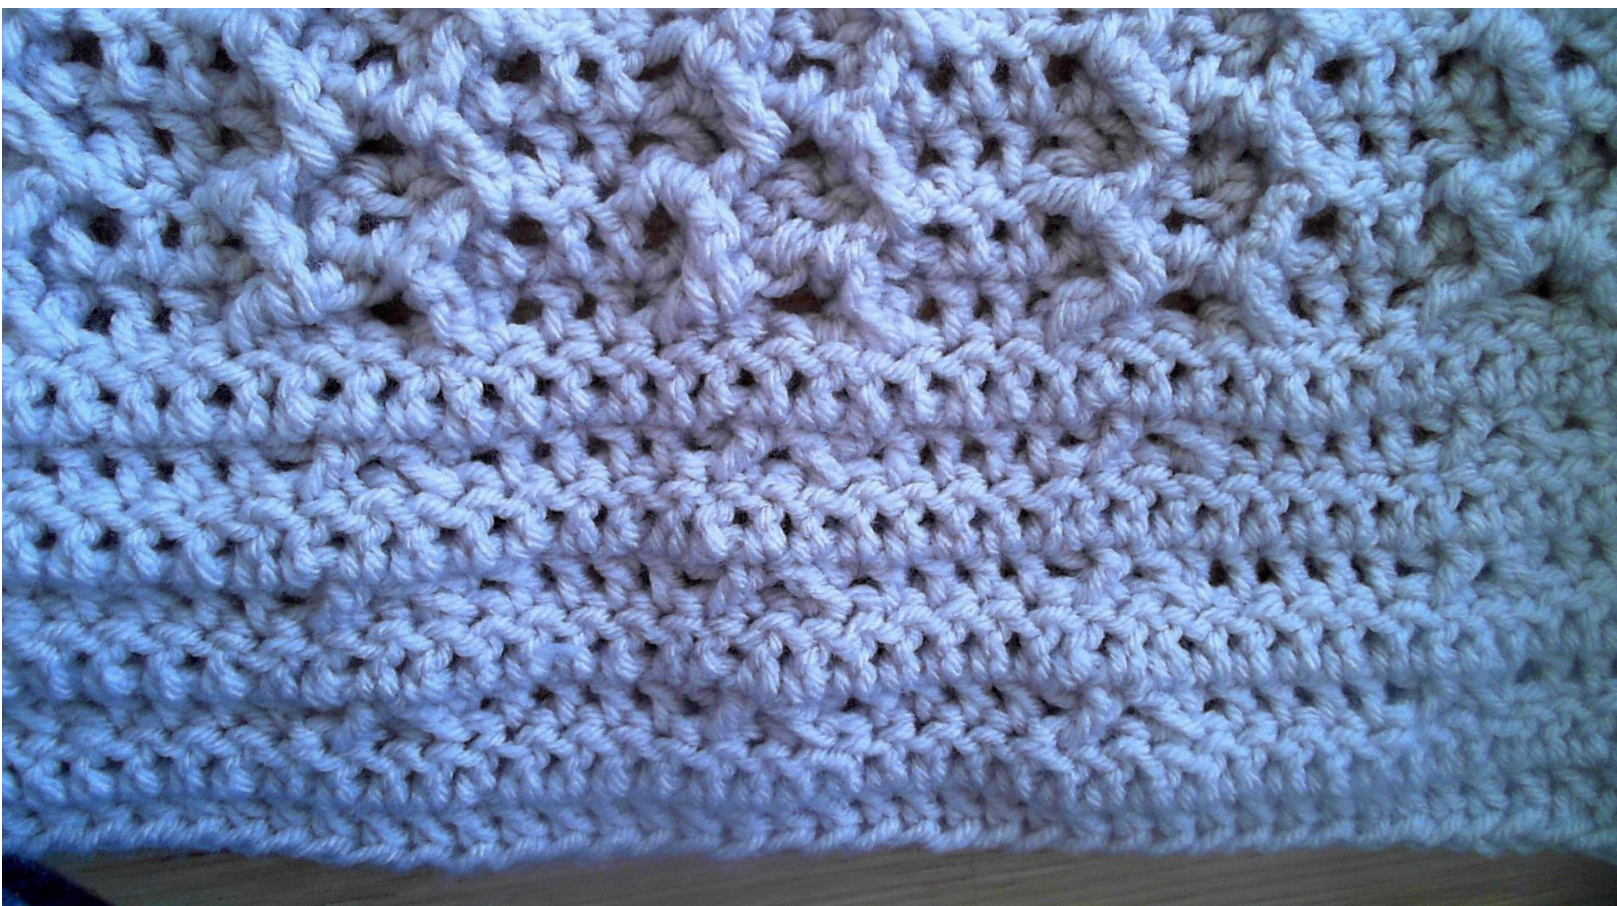
Row 12: Repeat row 10. Row 13: Repeat row 11. Row 14: Repeat row 10. Row 15: Repeat row 11. Row 16: Repeat row 10. Row 17: Repeat row 11. Row 18: Repeat row 10. Row 19: Repeat row 11. Row 20: Repeat row 10. Row 21: Repeat row 11. Row 22: Repeat row 10. Row 23: Repeat row 11. Row 24: Repeat row 10. Row 25: Repeat row 11.
Row 26: ch-3, dc in next st and repeat to last (same as rov Row 27: ch-3, dc in next 3 st, \* Front X, Back X, dc in next 4 st \*, repeat from \* to \* 4 more times. (5 Front X, 5 Back X, 24 dc). Row 29: Repeat row 27. Row 33: Repeat row 26, do not secure or cut your yarn.
Block edging:
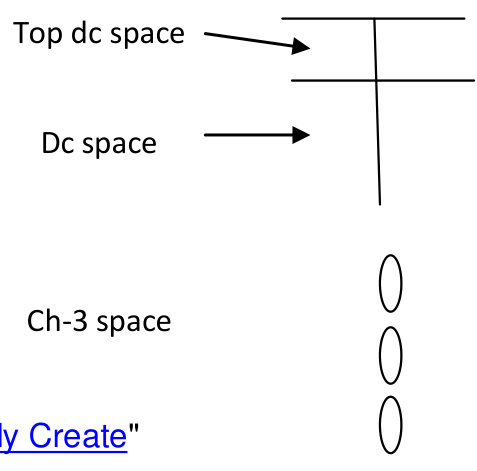
Remark: The edging rows are made around the block. Terms: Space - crocheting on the side of the rows will have 3 types of spaces. There will be 1 sc in each space, which means there will be 3 sc's along 2 rows.
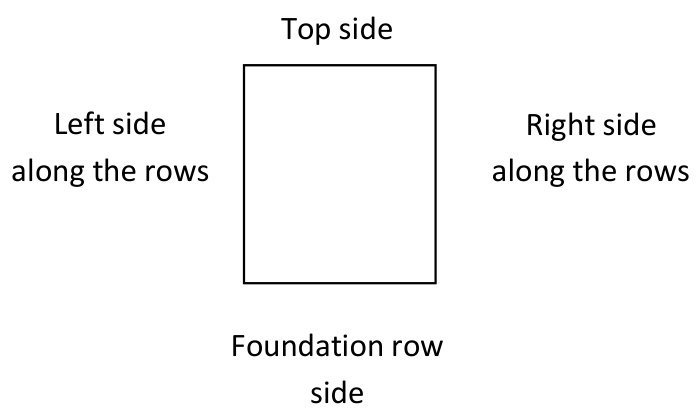
Page 16 of 21 Side - The edging row will be around the block - along the rows on the left side, at the bottom of the block (the foundation row side), along the rows on the right side and on the top row of the block.
Round 34:
\*\*\* Recommended to mark the second dc of the 3 dcs in the corner. This willbe used to make the corner in the next row. On the left side of the block (crochet along the side of the rows), ch-1, 3 sc at base of ch (space at top of dc) (first corner created) [photo 1], \* sc in next sp (dc space) [photo 2], sc in next sp (ch-3 space) [photo 3], sc in next sp (top dc space) [photo 4] \*, repeat from \* to \* 15 times more, (stitch count this side - 3 sc in first corner + 48 sc along the left side of the block),
Original Design py sarit Grinperg HatcnaiotSimpiyCreate Copyright @ 2016 All Rights Reserved. 3 sc in next sp (second cornet created) [photo 1], on foundation row side (crochet from other side of foundation row - in the ch-1 sp), sc in next st [photo 2,3], and in all sts to end of side [photo 4], (stitch count this side - 3 sc in second corner + 42 sc),
3 sc in first ch at the beginning of the block (beginning of foundation row) (third corner created) [photo 1], on the right side of the block (crochet along the side of the rows), \* sc in next sp (dc space) [photo 2], sc in next sp (top dc space) [photo 3], sc in next sp (ch-3 space) \*, repeat from \* to \* 15 times more [photo 4], (stitch count this side - 3 sc in third corner + 48 sc along the right side of the block),
Copyright @ 2uio All Kigns reserveu. on top row side (work in sts like a new row), 3 sc in next sp (forth corner created) [photo 1], sc in next st [photo 2], and in all st's to end of side [photo 3], (stitch count this side - 3 sc in second corner + 42 sc), sl st to first sc [photo 4].
\*\*\* At the end of the row it should have 192 st. Round 35: ch-1, bpsc at base of ch (actually this is the first st out of 3 of the corner from the previous row), 3 bpsc in next st (the one with the marker) (first corner created) (recommended to mark the second bpsc of the3 made), 50 bpsc, 3 bpsc in next st (second corner created) (recommended to mark the second bpsc of the 3 made), 44 bpsc, 3 bpsc in next st (third corner created) (recommended to mark the second bpsc of the 3 made), 50 bpsc, 3 bpsc in next st (forth corner created) (recommended to mark the second bpsc of the 3 made), 43 bpsc Join with sl st, fasten off, and secure ends. (Stitch count - 200 bpsc).
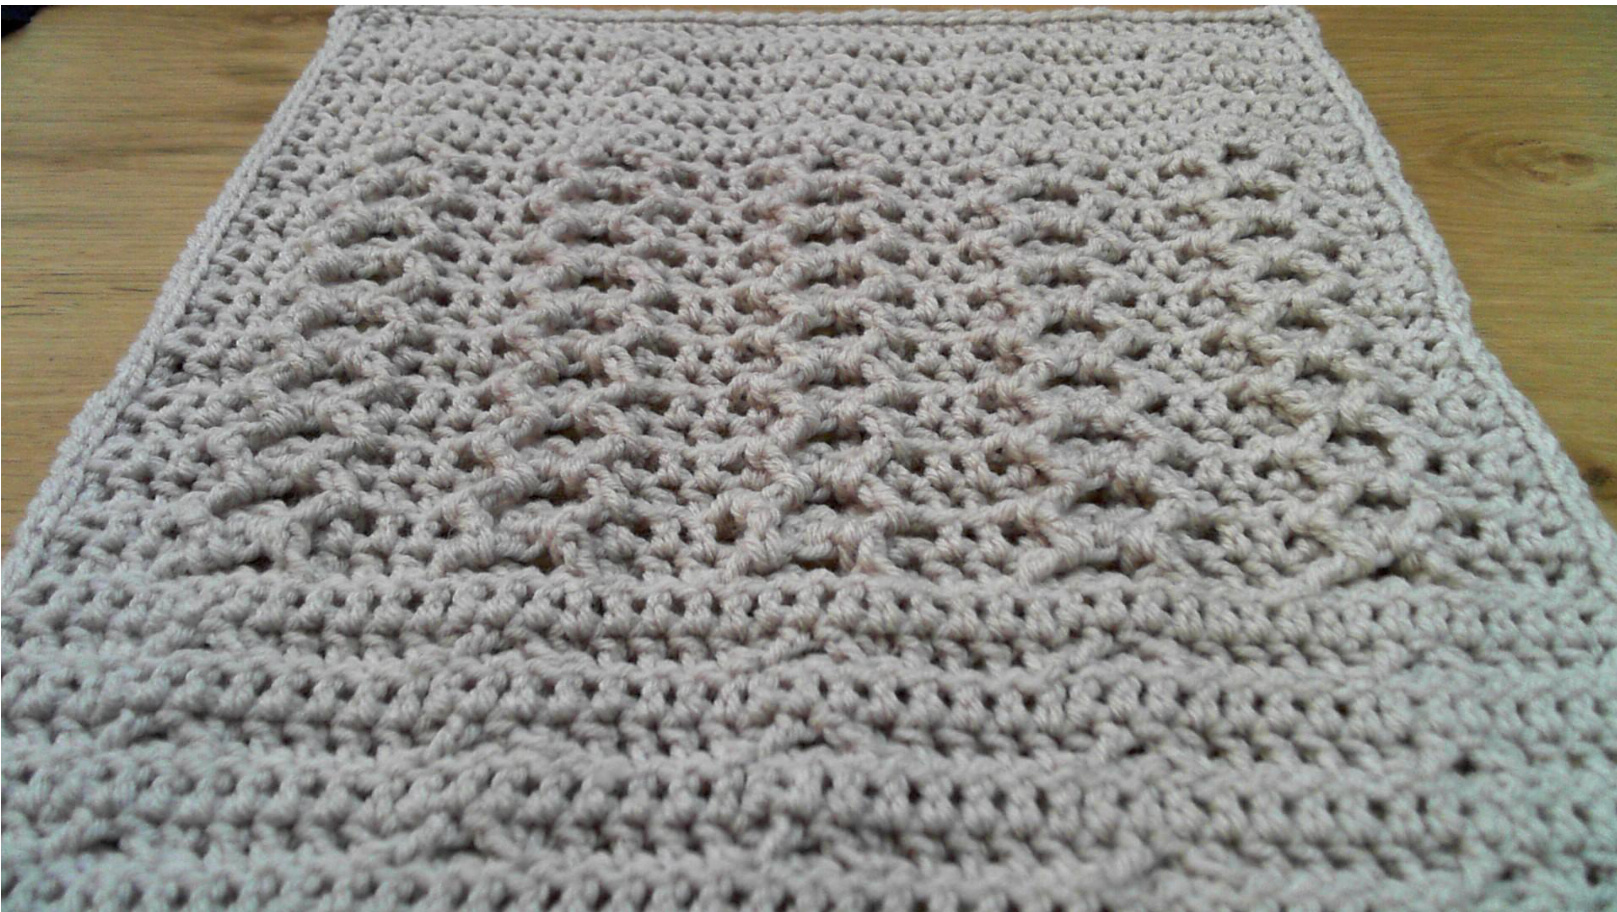
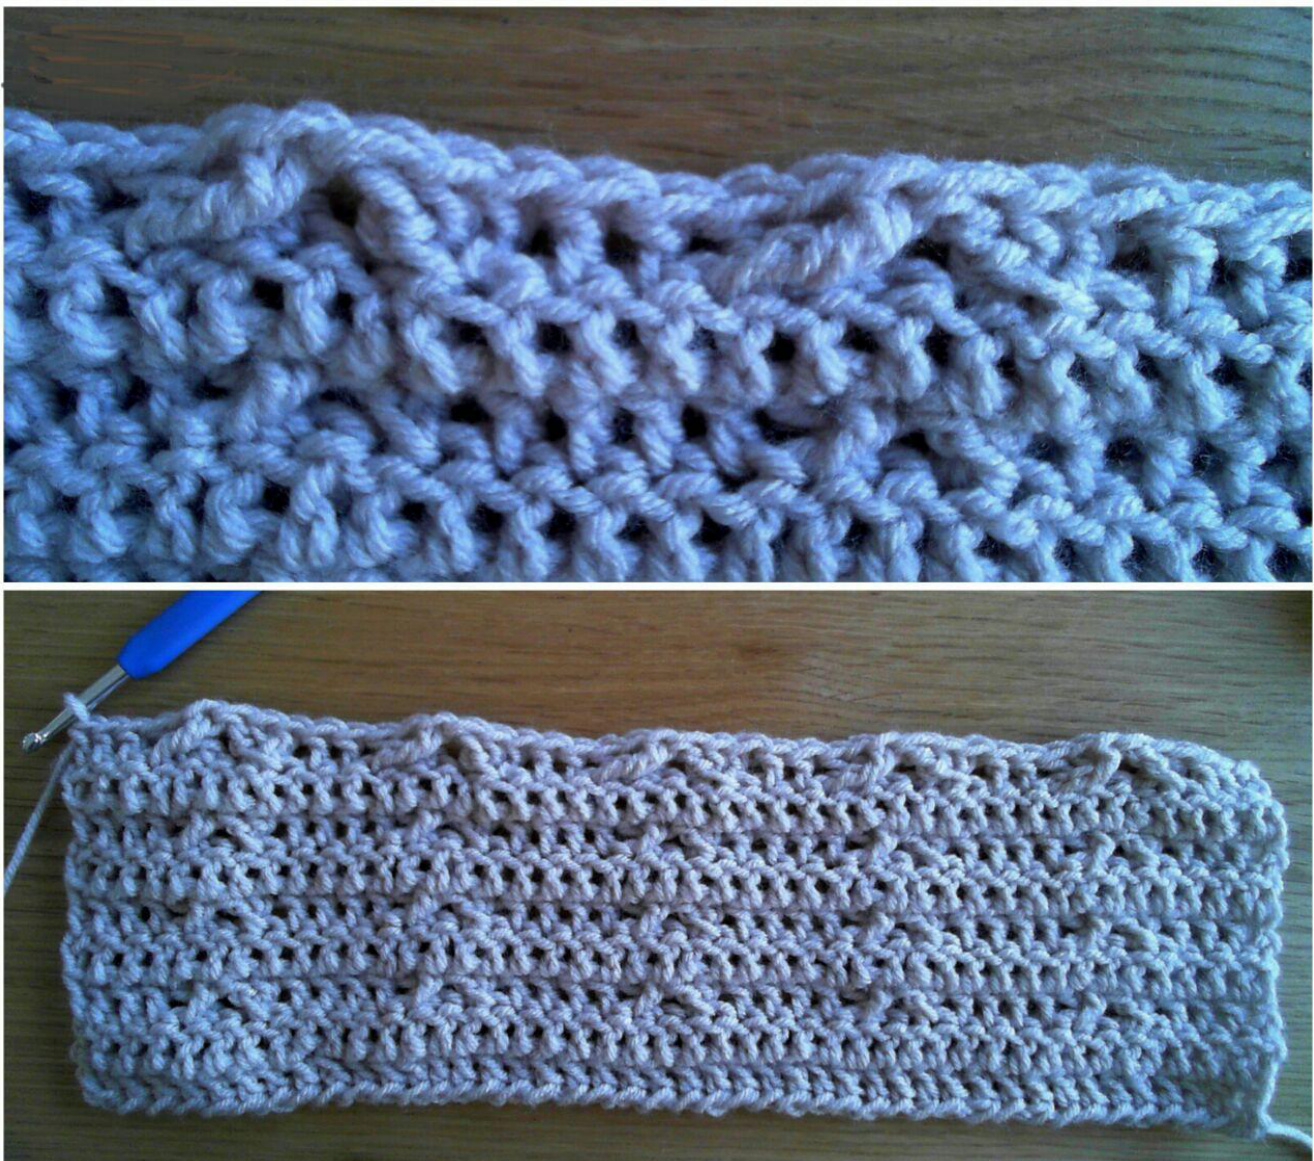
Did you manage? The easy and simple look of the cables is all the beauty in them.. See you for the tenth part on 7th July 2016. Simply create.... Sarit


