CORINNE'S KNITS
lci Paris
Description
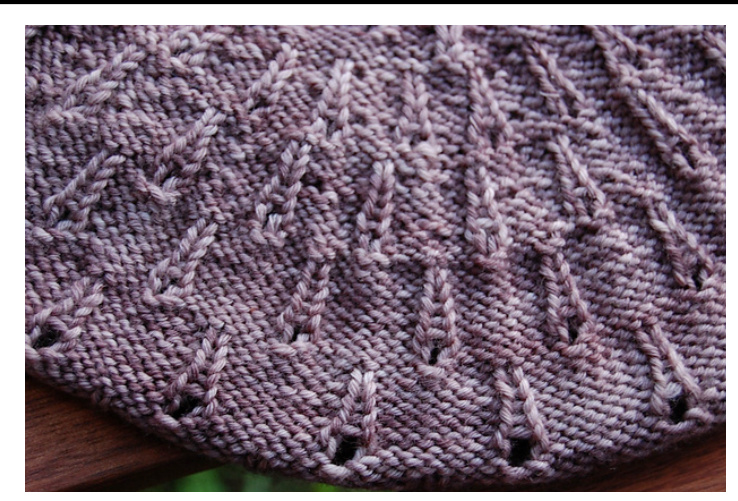
This winter beret is inspired by my native home Paris and its wintery colour, grey. As for the Eiffel Tower pattern, what better way to picture Paris, it is after all what most people think of first when Paris is mentioned. The beret is a very traditional French item. I just give it a little twist here, but the main features remain traditional, all the way to the little icord at the top. I also wanted to bring in my connection to England in the design. My partner is English, so the XOxO cable in the brim refers to that. This is something very English, writing XXXs and OoOs for hugs and kisses.
Difficuty
Intermediate
Yarn
About 185 (280) m / 200 (310) yards of sock yarn. Shown in Wollmeise Sockenwolle 80/20 Twin, colourway Feldmauschen
Notions
Needles
2.5mm/US1%2 size circular needle or dpns, or size needles needed to obtain gauge stitch marker, darning needle, cable needle
Necessary Skills
Provisional cast on, simple cable, knitting in the rd, Kitchener st, picking up sts, k2tog, sl sts, yo, kfb
Gauge
28 sts x 46 rows / 10 cm - 4" in "Eiffel Tower' stitch (mostly reverse stocking st)
Sizes
Women S/M (M/L): Brim circ: 46-58 (52-63) cm / 18-23 (20-241%2) inches
About The Designer
Corinne's passion for yarn started around age 8 when she started to knit. Today, she especially loves to design with sock yarn. Although French, she lives in Germany with her English partner and their two boys, where she can fully put her second passion, languages, to the test. Her patterns can be found on Ravelry on the Corinne's Knits designer page or on her blog: corinnesknits.wordpress.com. For pattern support, email: corinnesknits@googlemail.com.

Notes
Ici Paris has a cabled brim, made of XOxOs. The brim is knit first, flat, with a provisional cast on and grafted. Stitches are then picked up all along the brim to knit the beret in the round. As the pattern is knit in reverse stocking stitch and many knitters (including myself) dislike purling, the instructions are written so that the pattern is knit from the inside to minimise purling. It is finished at the top with a short i-cord in the fashion of the very traditional French beret. It has two versions, one traditional beret and one slouchy. The list of abbreviations used in the pattern is available on the last page.
Stitch Pattern
The XOxO cable is written and charted. The Eiffel Tower stitch is knit on a reverse stocking stitch background using yo and k2tog and is also written and charted. I found it in a 1960's French stitch collection that I inherited from my Nan, who knit for money and was the one who taught me to knit.
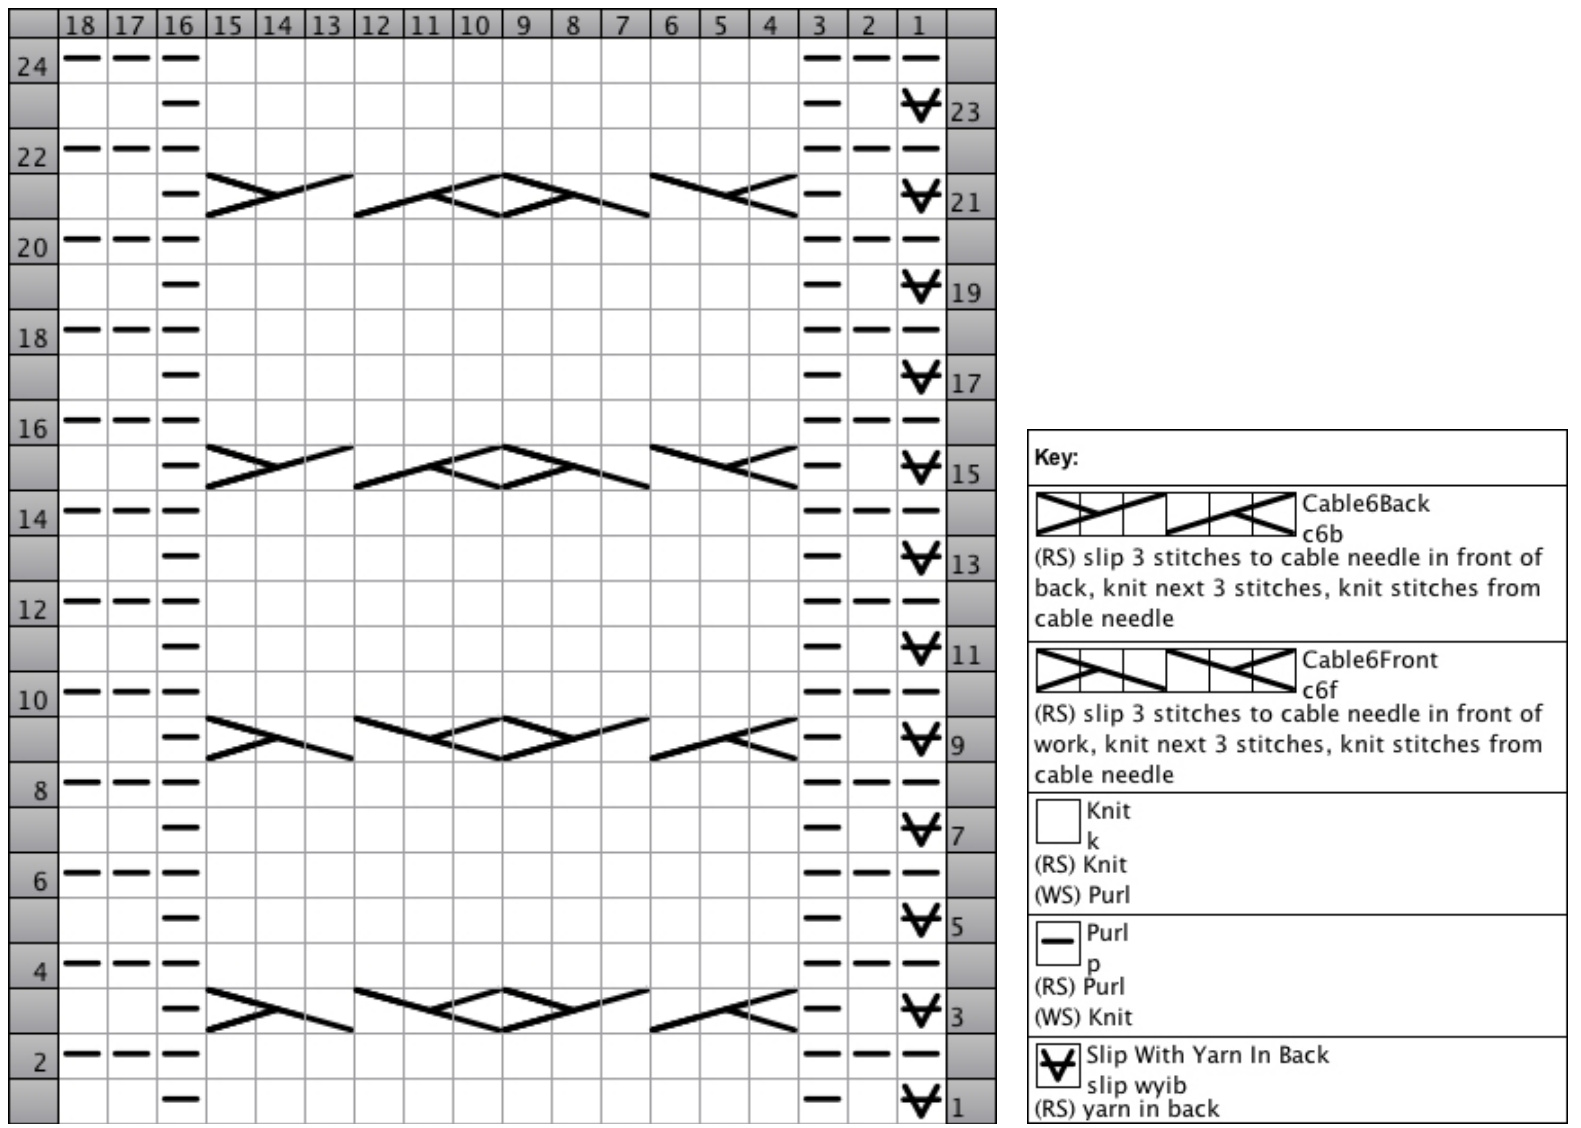
Cabled Brim
Using a piece of contrasting yarn and a provisional cast on of your choice, cast on 18 sts. Switch to your main yarn and begin knitting back and forth. Set up row (ws): k3, p12, k3 The next 24 rows form the pattern of the brim (see chart on page 6) Row 1 (rs): sl1 pw wyib, k1, p1, k12, p1, k2 Row 2 and all ws rows: k3, p12, k3 Row 3: sl pw wyib, k1, p1, c6b, c6f, p1, k2 Row 5: sl pw wyib, k1, p1, k12, p1, k2 Row 7: sl pw wyib, k1, p1, k12, p1, k2 Row 9: sl pw wyib, k1, p1, c6b, c6f, p1, k2 Row 11: sl pw wyib, k1, p1, k12, p1, k2 Row 13: sl pw wyib, k1, p1, k12, p1, k2 Row 15: sl pw wyib, k1, p1, c6f, c6b, p1, k2 Row 17: sl pw wyib, k1, p1, k12, p1, k2 Row 19: sl pw wyib, k1, p1, k12, p1, k2 Row 21: sl pw wyib, k1, p1, c6f, c6b, p1, k2 Row 23: sl pw wyib, k1, p1, k12, p1, k2 Row 24: k3, p12, k3 c6b - Cable 6 back: sl 3 sts to cable needle and hold at the back of work, k3 from left needle, k3 from cableneedle c6f - Cable 6 front: sl 3 sts to cable needle and hold at the front of work, k3 from left needle, k3 from cableneedle Rep these 24 rows another 8 (9) times. On the last repeat, stop at row 23 and graft both ends on the rs using Kitchener st.
Head
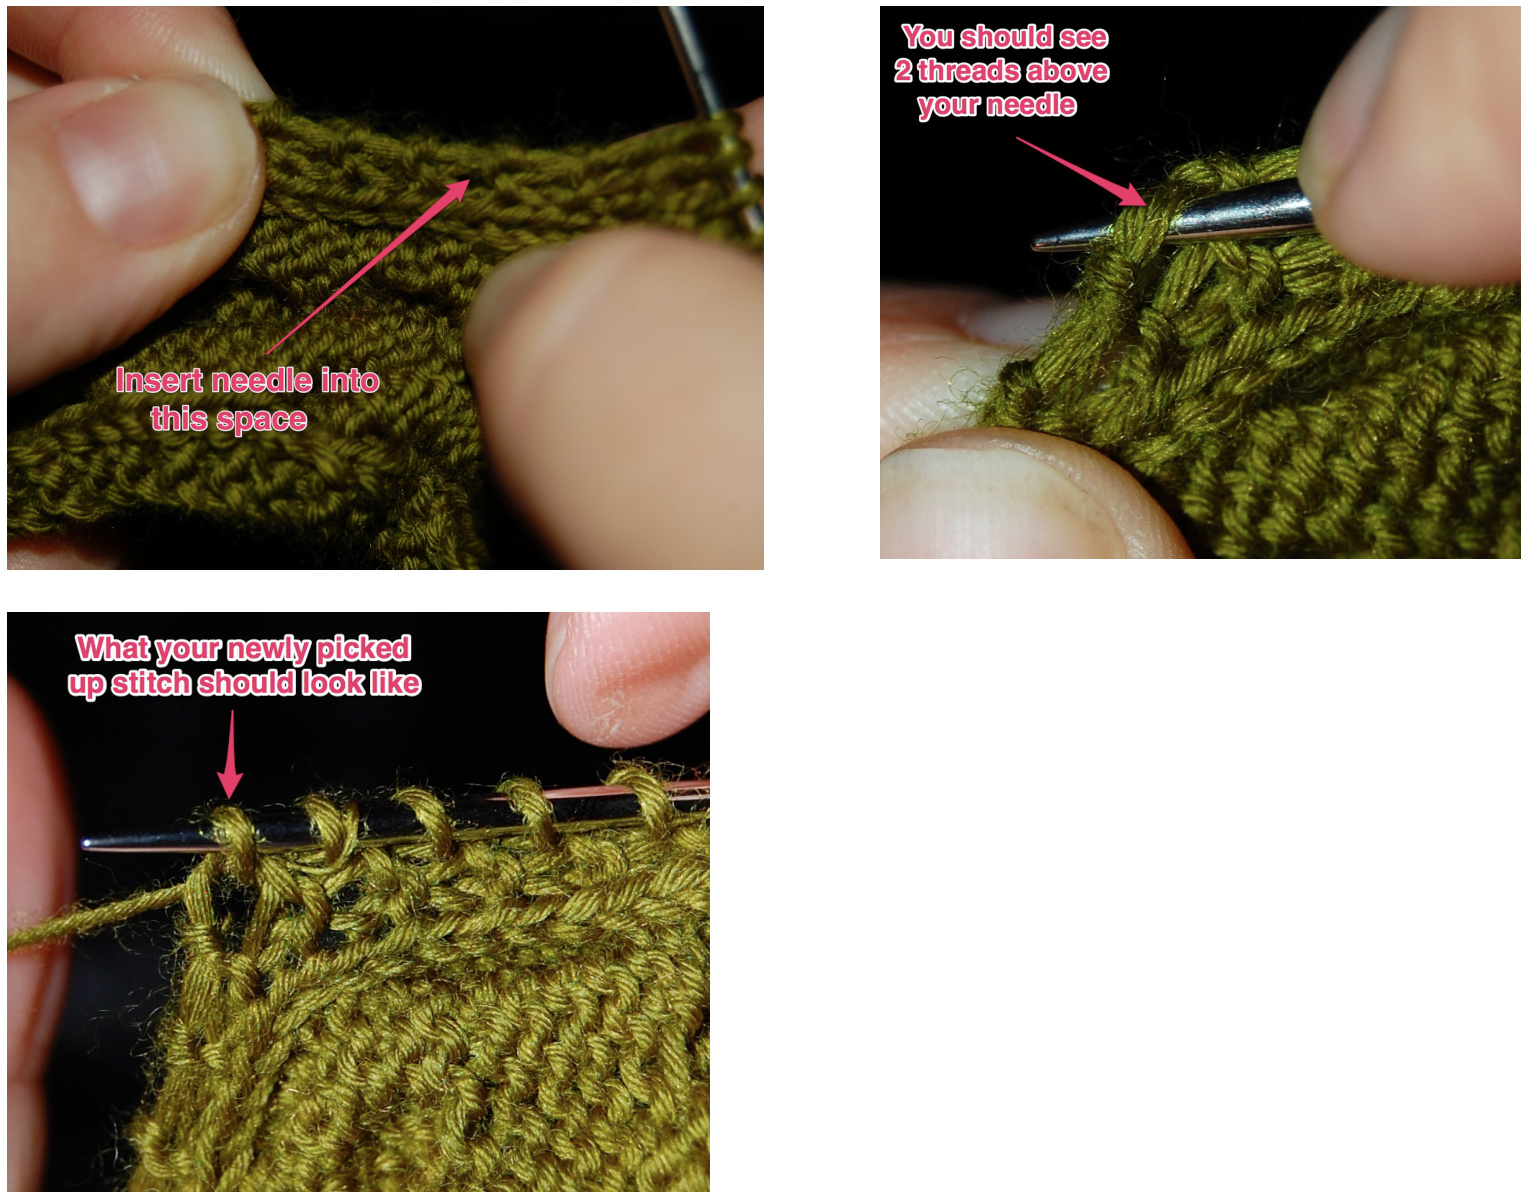
Turn the brim inside out to pick up sts on the ws of the cable brim. Find the side on which you slipped every first st of the row, this is the side where you need to pick up the sts. The slipped sts make an easily identifiable space where you need to insert your needle to pick up a st. Pick up 108 (120) sts around the brim, that should be 1 st per space. If it turns out that you have more or less sts after picking up 1 st per space, don't panic and just increase more or less on the set up rd, it shouldn't be noticeable.
The rest of the beret is knit in the rd, from the inside, i.e. you will always see the inside of the beret as you knit. So, when you read right side (rs) in the rest of the pattern, this is the inside of the hat. Join in the rd, placing a marker at the beginning of rd. Set up rd: kfb in each st (216 (240) sts) Knit 2 rds The next 16 rds form the Eiffel Tower pattern (see chart on page 7) Rd 1: \*yo, k2tog, k6\*, rep to end Rds 2-7: \*p1, k7\*, rep t0 end Rd 8: k across rd Rd 9: \*k4, yo, k2tog, k2\*, rep to end Rds 10-15: \*k4, p1, k3\*, rep to end Rd 16: k across rd Rep these 16 rds another time for the beret version or another 2 times for the slouchy version.
Crown shaping
Rd 1: yo, k2tog, k6, \*yo, k2tog, k2, k2tog, k2, yo, k2tog, k6\* rep to end (to last 8 sts, yo, k2tog, k2, k2tog, k2) (203 (225) sts) Rd 2: p1, k7, \*p1, k6, p1, k7\*, rep to end (to last 7 sts, p1, k6) Rd 3: p1, k2, k2tog, k3,\*p1, k6, p1, k2, k2tog, k3\* rep to end (to last 7 sts, p1, k6) (189 (210) sts) Rd 4: \*p1, k6\* rep to end Rd 5: p1, k6, \*p1, k2, k2tog, k2, p1, k6\* rep to end (to last 7 sts, p1, k2, k2tog, k2) (176 (195) sts) Rd 6: p1, k6,\*p1, k5, p1, k6\* rep to end (to last 6 sts, p1, k5) Rd 7:p1, k2, k2tog, k2,\*p1, k5,p1, k2, k2tog, k2\* rep to end (to last 6 sts, p1, k5) (162 (180) sts) Rd 8: k around Rd9: k2, yo, k2tog, k2, \*k2tog, yo, k2tog, k4, yo, k2tog, k2\* rep to end (to last 6 sts, k2tog, yo, k2to k2) (149 (165) sts) Rd 10: k2, \*p1, k4, p1, k5\* rep to last 4 sts, p1, k3 (to last 9 sts, p1, k4, p1, k3) Rd 11:k2,\*p1,k4,p1, k2tog, k3\*, rep to last 4 sts, p1, k2tog, k1 (to last 9 sts, p1, k4, p1, k2tog, k1) (135 (150) sts) Rd 12: k2, \*p1, k4\* rep to last 3 sts, p1, k2 Rd 13: k2,\*p1, k2tog, k2,p1, k4\* rep to last 3 sts, p1, k2 (to last 8 sts, p1, k2tog, k2, p1, k2) (122 (135) sts) Rd 14: k2,\*p1, k3, p1, k4\* rep to last 3 sts, p1, k2 (to last 7 sts, p1, k3, p1, k2) Rd 15: k2, \*p1, k3,p1, k2tog, k2\* rep to last 3 sts,p1, k2tog (to last 7 sts, p1, k3,p1, k2tog) (108 (120) sts) Size S/M, skip to Rd 17 Rd 16: \*k8, k2tog\* rep to end (108 sts) Size M/L, skip to Rd 18 Rd 17: k around Rd 18: \*k2tog, k9, p1\* rep to end (99 sts] Rd 19: \*k10, sl1 pw wyif\* rep to end Rd 20: \*k2tog, k3, yo, k2tog, k3, p1\* rep to end (90 sts) Rd 21: \*k4, p1, k4, sl1 pw wyif\* rep to end Rd 22: \*k4, p1, k2, k2tog, p1\* rep to end (81 sts) Rd 23: \*k4, p1, k3, sl1 pw wyif\* rep to end Rd 24: \*k2tog, k2, p1, k3, p1\* rep to end (72 sts) Rd 25: \*k3, p1, k3, sl1 pw wyif\* rep to end Rd 26: \*k3, p1, k1, k2tog, p1 (63 sts) Rd 27: \*k6, sl1 pw wyif\* rep to end Rd 28: \*k2tog, k4, p1\* rep to end (54 sts) Rd 29: \*k5, sl1 pw wyif\* rep to end Rd 30: \*k3, k2tog, p1\* rep to end (45 sts) Rd 31: \*k4, sl1 pw wyif\* rep to end Rd 32: \*k2tog, k2, p1\* rep to end (36 sts) Rd 33: \*k3, sl1 pw wyif\* rep to end Rd 34: \*k1, k2tog, p1\* rep to end (27 sts) Rd 35: \*k2, sl1 pw wyif\* rep to end Rd 36: \*k2tog, p1\* rep to end (18 sts) Rd 37: \*k1, sl1 pw wyif\* rep to end Rd 38: p2tog across rd (9 sts) Rd 39: \*p1, p2tog\* rep to end (6 sts) All you need to do now is to knit the i-cord on the top of the beret. First cut your yarn, leaving a tail of about %2 m/yard. Then, turn your hat "inside out", you will knit the i-cord on the actual outside of the hat. Before you start knitting the i-cord, you need to take your yarn tail through the hole between your remaining 6 sts so you can knit on the outside. This step can be a bit tricky as you can drop your sts in the process. The easiest is to put the sts on some scrap yarn and make a knot before you turn your hat "inside out", so that it won't happen. When you are done, proceed as follows: Place your 6 sts together on a dpn or circular needle. Knit all 6 sts. Don't turn the needle but slide the sts to the other side of the needle. The working thread should now be on the st furthest to the left of the needle again. Repeat until you have knit 5 rows. Break yarn. With darning needle, weave yarn through the sts, pull, secure and weave in. Weave in loose ends and block hat. The easiest way to block a beret, I find, is to use a plate, like this:
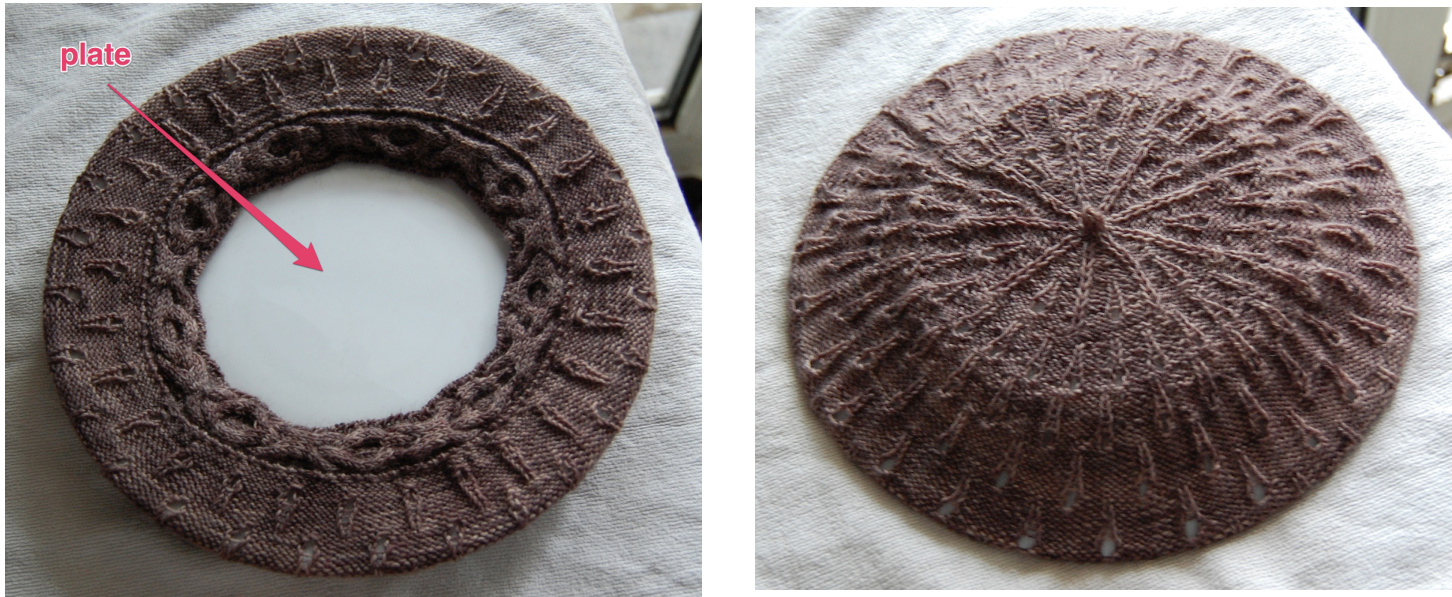
For the slouchy version, I find that using a balloon and inflating it inside the hat to the desired size is a good solution, like this:

Charts
Brim
Eiffel Tower
| 8 | 7 | 6 | 5432 | 1 | ||||
| 16 | ||||||||
| 二 | 15 | |||||||
| 二 | 14 | |||||||
| 二 | 13 | |||||||
| 二 | 12 | |||||||
| 二 | 11 | |||||||
| 二 | 10 | |||||||
| NO | 6 | |||||||
| 8 | ||||||||
| 一 | 7 | |||||||
| 一 | 6 | |||||||
| 二 | 5 | |||||||
| 一 | 4 | |||||||
| 一 | 3 | |||||||
| 二 | 2 | |||||||
| NO | 1 |
| Key: |
| Knit k (RS) Knit |
| Knit2Together k2tog (RS)Knit2stitches together |
| Purl P (RS) Purl |
| YarnOver |
| yo |
| (RS)Yarn Over |
Abbreviations
\*\*- Repeat instructions between \* \*s as noted circ - Circumference (unstretched-stretched) c6b - Cable 6 back c6f - Cable 6 front dpn(s) Double pointed needle(s) k - Knit k2tog - Knit 2 sts together p Purl p2tog - Purl 2 sts together pw - purl wise rd - Round rep - Repeat rs - Right side sl - Slip st(s) - Stitch(es) ws - Wrong side wyif - With yarn in front yo - Yarn over


