boreal constellations
A Shetland Tree & Star Cardigan for a Child
Designed by Tanya Everard Boreal Constellations
Description
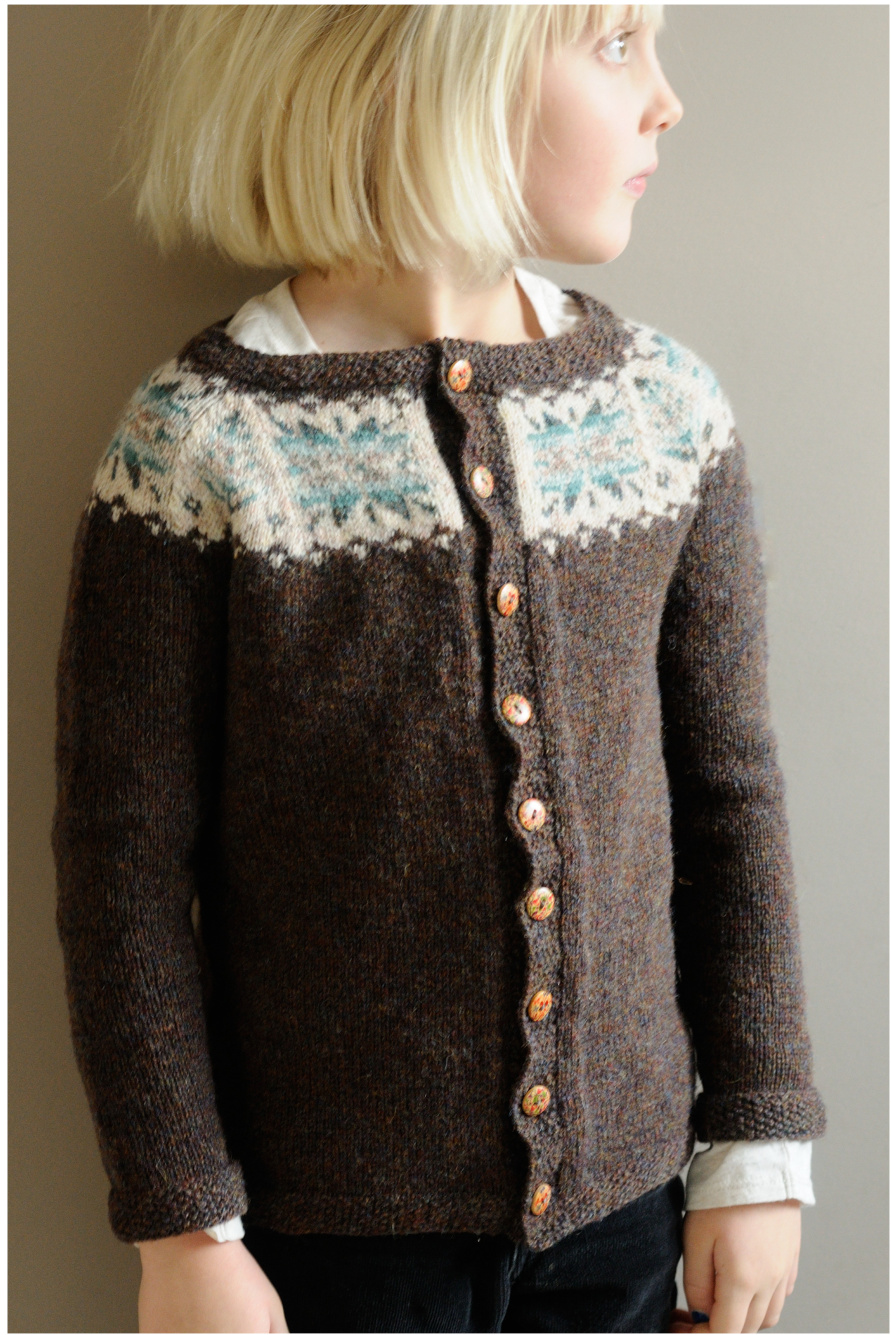
Boreal Constellations is a yoked cardigan that includes a Star & Tree motif, similar to traditional Shetland jumpers, using 6 colours of Shetland, 2-ply, fingering weight yarn. The body and sleeves are knit separately in the round from the bottom up. The three pieces are united at the underarm onto a single circular needle, and knit in the round to the neckline using decreases placed adjacent to the tree motifs. A steek is cut between crochet-reinforced stitches in the front of the body to create the cardigan opening. The cut edges are folded back and hand sewn to the inside of the cardigan, and a 2.5 cm (1 in) wide seed-stitch trim is picked up and knit along collar the folded front edges of the cardigan opening.
Finished Gauge
28 sts and 40 rows per 10 cm (4 in) For best results, it is recommended that you knit a swatch using 2.75mm needles in the round, wash, block, and allow it to air dry to determine your true knitting gauge. If your swatch does not meet gauge, adjust your needle size up or down accordingly and repeat until your gauge meets the pattern gauge. If your gauge does not match the pattern gauge, your cardigan will fit differently than intended. Use 2.5mm needles, (or 1 size down from whatever needles you're using to meet design gauge), for seed stitch trim along the sleeve cuff, body and collar.
Sizing
This pattern is for one size only: approximately Size 8 (North American) or a chest circumference of 26 - 28 in. Actual body measurements and finished cardigan dimensions are provided in Table 1 so you can figure out whether this cardigan will be of a suitable size or if it needs modifications for your project. The cardigan can be easily altered in length by increasing or decreasing the number of rows needed in the body or arms below the yoke. Altering the width; however, is another matter, as increasing or decreasing the chest and/or arm circumference stitches will require a change in the yoke pattern. If you are familiar with altering patterns to meet your sizing requirements, I encourage you to do so.
Table 1
| ActualBodyMeasurementsin cm (in) | Finished CardiganDimensionsin cm(in) | |
| ChestCircumference | 68.5 (27) | 76 (30) (Includes 2.5cm (1 in) of overlapping button band). |
| LengthfromWristto Underarm | 35.5 (14) | 38 (15) (Includes 2.5cm(1inch)cufffolded back |
| WristCircumference | 15.5 (6) | 15.5 (6) |
| UpperArmCircumference | 24 (9.5) | 25.5 (10) |
| LengthfromBodyTrim to Underarm | 35.5 (14) | 35.5 (14) |
Materials & Notionsl
Main Colour 195 g (820 m) of FC58 Jamieson and Smith 2-ply Jumper yarn (alternatively, Jamieson Shetland Spindrift Grouse 235 is a similar colour.
Contrast Colours
15 g (63m) of Jamieson Shetland Spindrift Sand 183 2 g (8.5 m) of Jamieson Shetland Spindrift Woodgreen 318 2 g (8.5 m) of Jamieson Shetland Spindrift Eucalyptus 794 2 g (8.5 m) of Jamieson Shetland Spindrift Green Mist 274 2 g (8.5 m) of Jamieson Shetland Spindrift Fog 272
Other Items
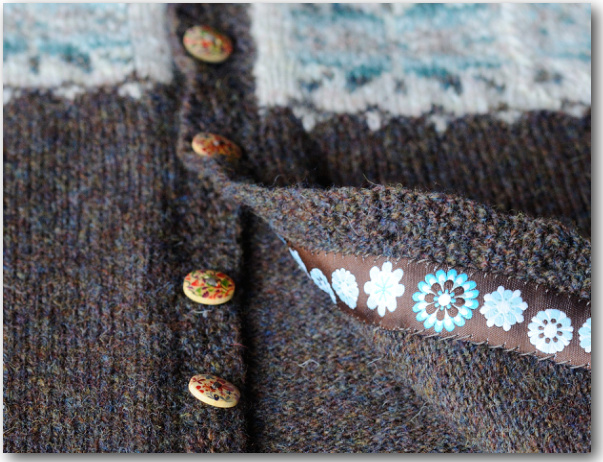
· 2.5mm and 2.75mm circular needles (or as required to meet gauge), 80cm for body. 2.5mm and 2.75mm dpns (optional) for sleeves and grafting. The 80cm long circular needles can be used for the sleeves if using the magic loop method. 2.5mm crochet needle for reinforcing steek sts; Stitch markers (at least 12); Darning needle to weave in loose ends; ·9 Buttons (15mm size); · Thread the colour of MC to sew on buttons; Waste yarn to hold underarm sts; ·Yarn of similar colour to MC (sock yarn is preferable, if available) for reinforcing steek sts; Small, sharp scissors for cutting steek; and, 1m (36in) of 2.5 cm (1 inch) wide decorative ribbon (optional) for covering the cut steek edge or the inside of the cardigan.
Abbreviations
CC: contrast colour cm: centimetres dpns: double pointed needles g: grams in: inches k2tog: knit next 2 sts together (1 stitch decreased) m: metres MC: main colour mm: millimetres m1: make 1 st by making a backwards loop, or, by lifting the bar between sts from front to back and knit through the back of this loop (1 stitch increased) p: purl puk: pick up and knit sm: slip marker ssk: slip 2 sts consecutively knitwise, knit 2 slipped sts together tbl St(s): Stitch(es) tbl: through the back loop
Special Techniques
Kitchener Stitch: There are many references around that describe the Kitchener stitch, including videos and/or written instructions. Knitty.com provides good instruction on how it is done: http://www.knitty.com/ISSUEsummer04/FEATtheresasum04.html. Magic Loop: Again, there are many demonstration videos on the internet if you are unfamiliar with this technique. p.4 Seed Stitch: Wherever seed stitch is referenced, it is done by \*(k1, p1)\* repeat from \* to\*, and on the following round by \* (p1, k1)\* repeat from \* to \*. Steeks: Excellent tutorials on how to do steeking can be found on Kate Davies' blog at the following address: http://katedaviesdesigns.com/tag/steek-tutorial/. I recommend having a look at these tutorials if you are feeling unsure of how to reinforce and cut a steek or need encouragement prior to cutting your knitting. If you know of another method and prefer to use it, please feel free to do so.
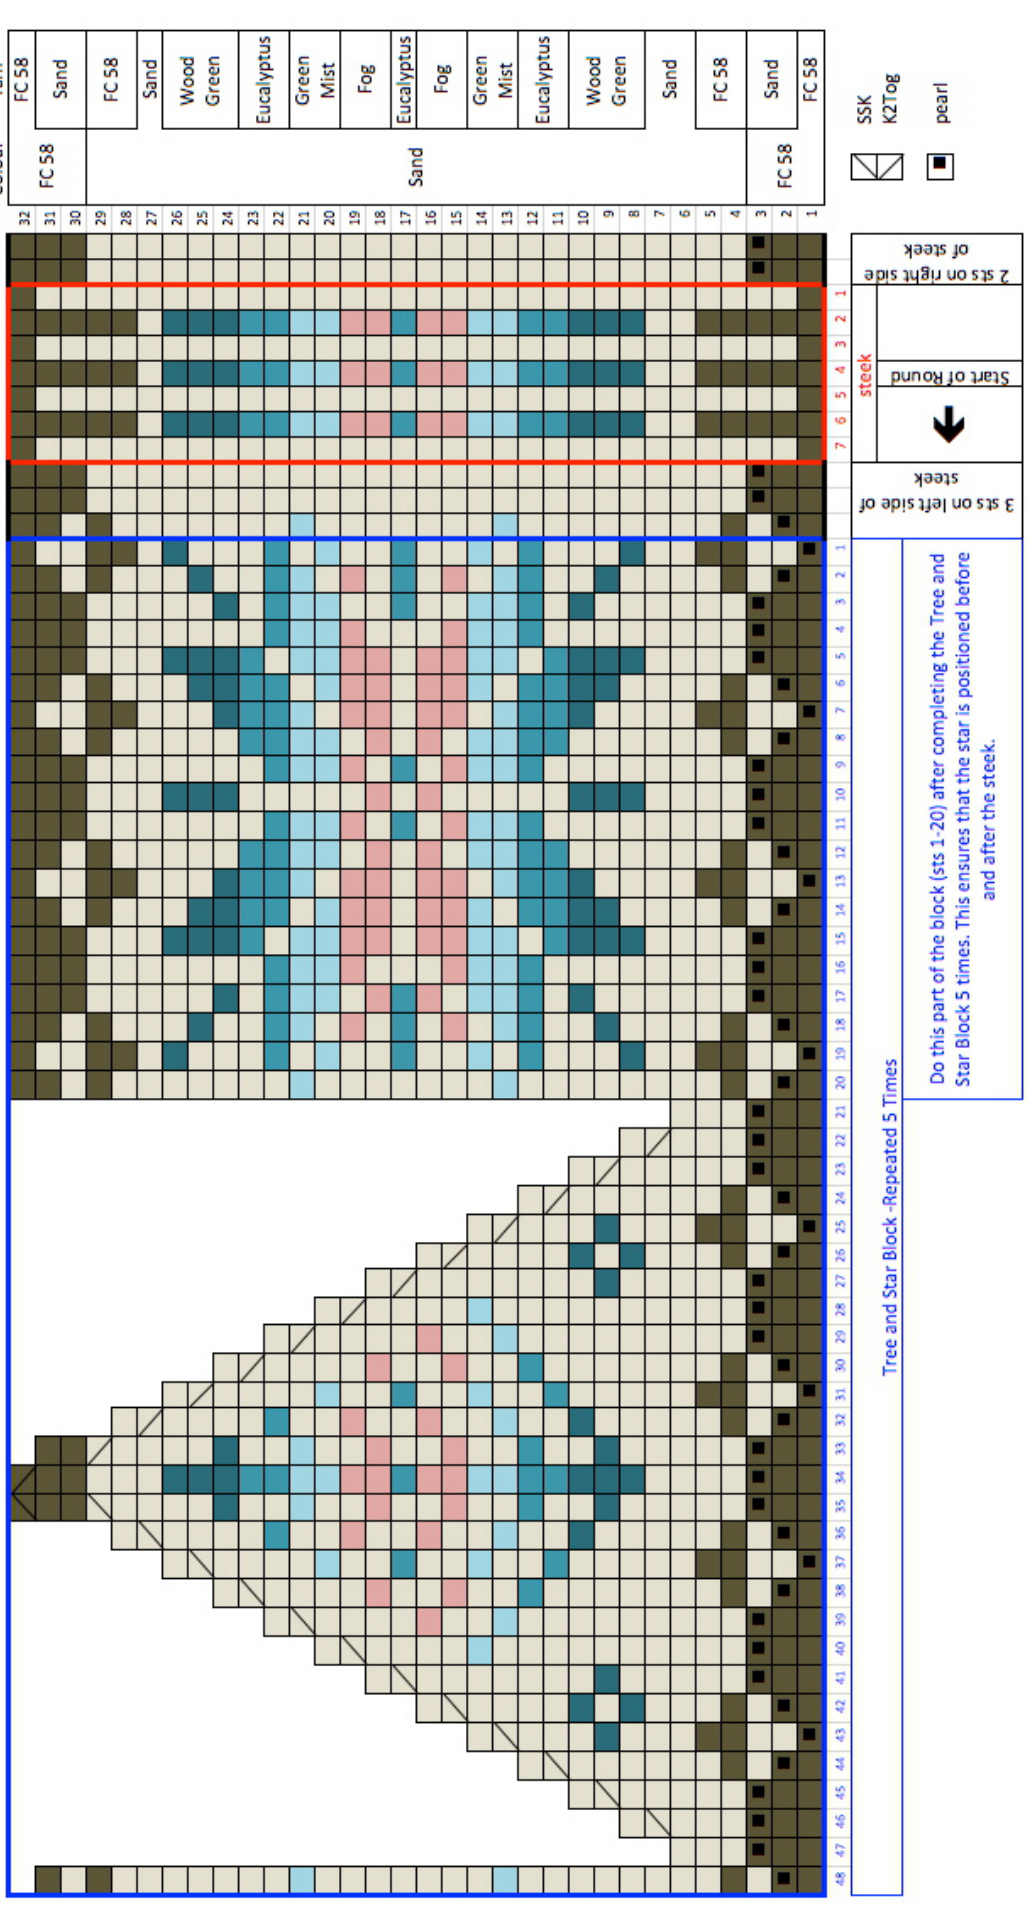
Chart
SIARTLACEPA1IERNWIiH3X4stCABLEDPANELS&SstEDGES(hotethatIhcreasesIntoa YOofpreviousrowareworkedkfb.)Thestitchrptforsubsequentpatternrptsareshown\*to\*.The sectionrptsareshown\*\*to\*\*,
Sleeves
Using MC yarn and 2.5mm dpns or circular needles (magic loop method), cast on 43 sts. Join without twisting and place a marker at the beginning of the round. Knit 10 rounds of seed stitch for the sleeve cuff as follows: Round 1: \*kl, p1\*, repeat \* to \* to end of round. Round 2: \*p1, k1\*, repeat \* to \* to end of round. Rounds 3-10: repeat rounds 1 and 2. Change to 2.75mm needles. Rounds 11-20: Knit in stocking stitch. Round 21: k1, m1, k to 1 st before end of round, m1, k1, slip marker. Continue knitting, increasing in the same manner, 1 st after and 1 st before the marker, every 11 rounds until there are 65 sts. Continue knitting until the sleeves are a total of 150 rounds (15 inch) long including the cuff (14 inches long with cuff folded back), or to desired length. Place stitches on a spare needle or waste thread, set aside, and repeat for the second sleeve.
Body
Using MC yarn and 2.5mm dpns or circular needles, cast on 199 sts + 7 steek sts (total 206 sts). Join in the round, taking care not to twist the sts. From the point on, you will work back and forth and NOT in the round. Round 2: k4 steek sts, sm1, \*p1, k1\*, repeat \* to \* until m2, sm2, k3 steek sts. End of round. Round 3: k4 steek sts, sm1, \*k1, p1\*, repeat \* to \* until m2, sm2, k3 steek sts. End of round. Repeat Rounds 2 and 3 for another 7 rounds for a total of 10 rounds of seed stitch trim.

Round 11: Switch to 2.75 mm circular needles, or needles to meet design gauge, and knit stockinette in the round until the total body length including bottom trim is 14 inches (140 rounds), or to desired length.
Yoke
Unite Body and Sleeve sts
Right Front: Using 2.75mm needles (or needles to meet gauge), slip 40 sts from steek marker m1.Place the next 16 sts (right underarm) onto waste yarn to hold the sts for grafting later. Right Sleeve: Transfer 16 sts from the underside of the sleeve (i.e. 8 sts before and after the end of round marker) onto spare yarn for grafting later. Remove the sleeve End of Round marker if you have not done so already. Transfer the remaining right sleeve sts onto the circular needle holding the body sts. The 16 body sts and 16 sleeve sts that are held for later grafting should lie against each Oother. Back of Body: Slip 87 sts. Place the next 16 body sts (left underarm) onto waste yarn to hold for grafting later. Left Sleeve: Transfer 16 sts (i.e. 8 sts before and after the end of round sleeve marker) onto waste yarn for grafting later. Remove the sleeve End of Round marker if you have not done so already. Transfer the remaining left sleeve sts onto the circular needle holding the body sts. The 16 body sts 16 sleeve sts that are held for grafting later should lie against each other. Body sts: 199 body sts+ 7 steek sts - 16 sts (right body underarm) -16 sts (left body underarm) = 174 body sts Right sleeve sts: 65 right sleeve sts - 16sts = 49 right sleeve sts Left sleeve sts: 65 left sleeve sts - 16sts = 49 left sleeve sts Total number of sts: 174+49+49 = 272 sts (including 7 steek sts.) Left Front: Slip 40 sts, sm2, slip 3 steek sts. You should be at steek stitch #4, as shown on the Yoke Pattern Chart. ls, incorporating all body and sleeve sts (272 sts total), ending at steek stitch #3.
Start Yoke Pattern
Start knitting Round 1 of the Yoke Pattern Chart as follows: a) k steek stitches #4, #5, #6 and #7; b) k the 3 sts to the left of the steek, as shown; c)k the yoke pattern chart stitches from #1 to #48 for a total of 5 times; d)k yoke chart pattern sts #1-#20, e)k the 2 sts to the right of the steek, as shown; and, f)k steek sts #1, #2, & #3. End of Round. Repeat parts a) to f) for each of the yoke pattern chart rounds. At Round 7, place markers between sts #20 & #21 and #47 & #48 of each block repetition to mark where decreases will take place. After completing the yoke chart, loosely cast off at the neckline, removing all markers as you come across them. There should be 142 sts. Turn the sweater inside out and use a darning needle to weave in any loose ends away from the steek stitches.
Graft Underarms
Right Underarm: with the cardigan right side out, place the stitches held on spare yarn for both the body and sleeve onto two 2.75mm dpns. There should be 16 sts on each needle with the needles held parallel. Graft together using the Kitchener Stitch method. If needed, pick up 1-2 sts at the beginning and end of each dpn for a neater seam, as long as there is the same number of sts on each needle. Repeat for the left underarm.
Steek
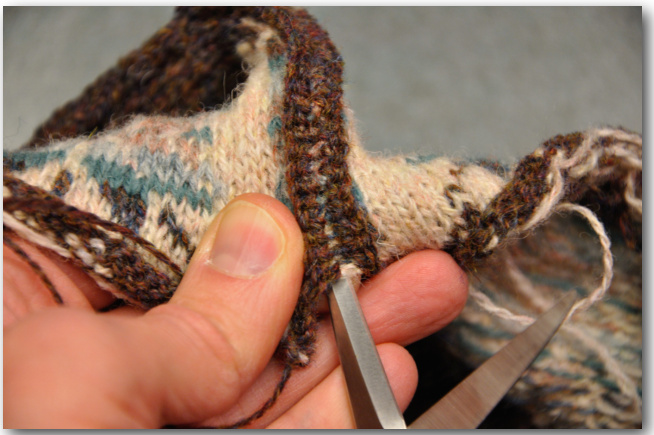
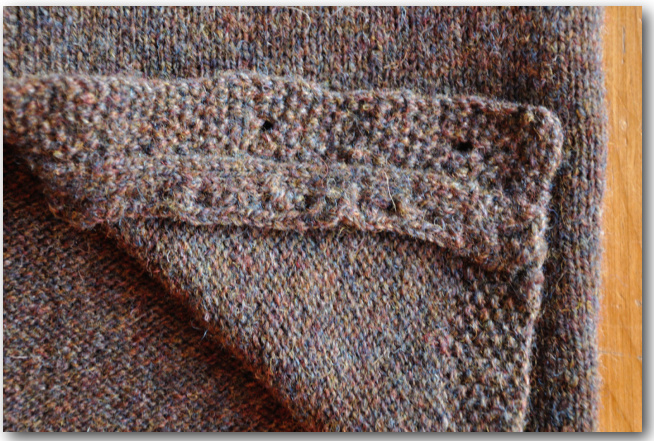
Reinforce the steek sts between steek sts #3 &4, and #4&5. (Refer to Kate Davies steek tutorial crochet method as an example of how this can be done: http://katedaviesdesigns.com/2012/04/29/ steeks-2-reinforcing-and-cutting/. Cut the steek using sharp, small scissors. Fold back the steeked edge along steek sts #1 and #7 and sew the steeked edge to the cardigan using a backstitch with a yarn (sock yarn is preferable) of similar colour to that of the MC.
Collar
Pick up and knit 115 sts spread evenly along the length of the collar using the smaller gauge needles. Knit the seed stitch (back and forth) for 4 rows while gradually tightening the gauge over these 4 rows (i.e. first row rather loose gauge, 2nd row a little tighter, etc.). Row 5: decrease by 1 st every 10 sts by K2tog on every 10th st while maintaining the seed stitch pattern. (104 sts). There will be two sts of the same type side by side wherever there is a decrease. Continue knitting the seed stitch back and forth until the 8th row. Row 8: decrease by 1 st every 9 sts by K2tog, while maintaining the seed stitch pattern (93 sts). Use your judgment as to how tight or loose you should knit these rows in order to keep the sts from buckling or puckering. The collar should gradually get tighter towards the top of the collar so that it doesn't fold backwards onto the yoke. On 1oth round, loosely cast off.
Cardigan Opening Seed Stitch Trim
Right side
Pick up and knit 3 out of every 4 row sts along the folded edge of the right side of the steek and collar edge using the smaller gauge needle (approximately 134 sts). The folded cardigan opening edge should be folded along steek stitch #1. Knit in seed stitch, back and forth, for 10 rows, and casting off on Row 11.
Left side
Pick up and knit 3 out of every 4 row sts along the folded edge of the right side of the steek and collar edge using the smaller gauge needle (approximately 134 sts). The folded edge should be along steek stitch #7. Knit in seed stitch, back and forth, for 3 rows. Row 4: Determine where you would like to have your buttonholes. Assuming that you have 9 buttons, and that you have 134 sts, then knit the following (while maintaining the seed stitch pattern) to create the button holes: K7, cast off 2, \*K13, cast off 2\*, repeat \* to \* 8 times, K7. If you don't have exactly 134 sts or 9 buttons, then adjust the spacing as evenly as possible. Row 5: Knit in seed stitch, casting on 2 sts in the form of a backwards loop wherever stitches were cast off inRow 4. Rows 6-10: Resume knitting back and forth in seed stitch. Row 11: Cast off.
Final Detailing
Weave in any remaining loose ends. Soak the garment in warm, mild soapy water for at least 20 minutes to allow the wool fibers to relax and bloom. Gently press out excess water between two towels, and block to air dry. Once dry, sew on buttons, and the steek ribbon bands (optional) Boreal Constellations
I hope all works out well and that the little one you knitted it for enjoys your Boreal Constellation cardigan. Photographs are copyright of Tanya Everard and are not to be used without expressed permission. @ 2014 Copyright agreement: This pattern is the property of Tanya Everard. It is copyrighted, and is for personal non-commercial use only. You may not sell, reproduce or otherwise distribute these instructions or charts. Nor may you sell any items made from this pattern. If you find an error, or have any questions regarding the pattern that you cannot solve on your own, please email teverard@telus.net. Thank you, and enjoy your Boreal Constellations!