An Invigorating Sock by Jill Bickers
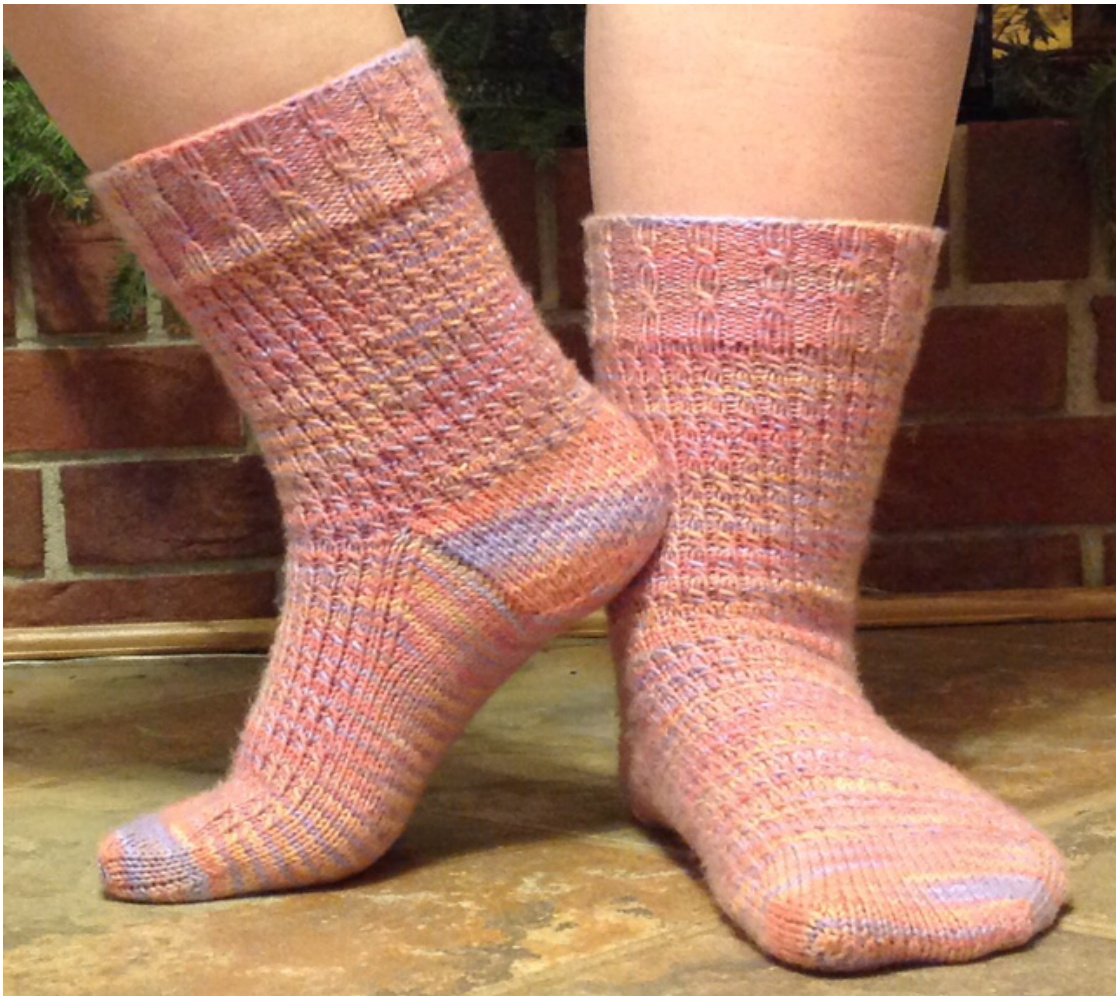
The inspiration for these socks came from a pattern for fingerless mitts that I saw in The Knitter. I thought they would make great socks, so I started playing with the pattern, adding, and improvising. I knit one pair for myself. I liked it, but thought it needed revising. So I went back to the drawing board, and tinkered a bit more. My husband pronounces them “invigorating." What he means is, these socks are quite clingy. They want to stay up on your leg and not move around! After making the prototype for my husband, I wrote the pattern as a Mystery Sock for the Sock Club at Knitwits Contemporary Yarn Shop in Crescent Springs, Kentucky (http://www.knitograms.com/). It has been knit several times, in several sizes. I am happy now to share it with you! Copyright Jill Bickers
Recommended Yarns:
· 5 oz of Yarn Love's Elinor Dashwood (about 413 yards to 5 oz) · OR 1 skein of Schaefer's Nichole (405 yards to 4.94 oz) if you are lucky enough to have somestashed. This sock will look good in just about anything. The pattern is designed to show off those beautiful variegated yarns you're not sure what to do with, or even self-patterning yarn. It is a unisex sock pattern.
Suggested Gauge:
About 7 stitches per inch on size 2s. If you are going to knit these socks at a smaller gauge (8 stitches per inch) on a finer yarn, you will want to knit a larger size. Please make sure you check your gauge and adjust your needles accordingly! Sizes: Small (8-8 12 inch foot circumference), Small/Medium (8 % -9 inch foot circumference), Ladies Medium/Large (9-9 1/ inch foot circumference), Large/Extra Large (9 /2- 10 inch foot circumference), Extra Large/XXL (10-10 / inch foot circumference)
Directions:
Note: These instructions are written assuming that you are using doublepoints, but there is no reason you can't use the Magic Loop, two circulars, or one small circular. Cast on 56 (60, 64, 68, 72) stitches and join for working in the round, taking care not to twist your stitches. If you are using doublepoints or a small circular, I find it helpful to use a marker to indicate the beginning of a round and recommend you do so as well.
Cuff Pattern:
Rounds 1-6: \*(k2 p2) Repeat from \* to the end of the round. Round 7: \* (sl 1 yo k1 psso p2) repeat from \* to the end of the round. Round 8: \*(k2 p2) Repeat from \* to the end of the round. Round 9: \* (sl 1 yo k1 psso p2) repeat from \* to the end of the round. Repeat Rounds 1-9 once, then repeat Rounds 1-6 ONLY to complete the cuff Copyright Jill Bickers
Leg Pattern:
Rounds 1-3: knit Round 4: \*s1 yo k1 psso (repeat from \* to the end of the round) Round 5: knit Round 6: \*s1 yo k1 psso (repeat from \* to the end of the round Repeat Rounds 1-6 until leg is desired length, or when you are ready to begin your heel. Your heel flap will be done 0ver the first 28 (30, 32, 34, 36) stitches, and will be worked back and forth over two needles. The remaining stitches (your instep) can be left on another doublepoint or stitch holder till the heel is complete.
Heel Flap Set Up Rows
Having just finished the Round 6, take up an empty needle. Slip the first stitch purlwise, and knit the across the next 27 (29, 31, 33, 35) stitches. Turn your work around. Slip the first stitch purlwise, and purl to the end of the row.
Heel Flap
Begin the Eye of Partridge Stitch for your heel flap: Row 1 (RS): \*slip 1 purlwise with yarn in back, k1. Repeat from \* to the end of the row. Row 2 (WS): slip 1 purlwise, purl to the end of the row. Row 3 (RS): slip 2 (\*k1 slip 1) Repeat from the end \* to the last two stitches. End row with K2. (WS): slip 1 purlwise, purl to the end of the row. Repeat Rows 1-4 for 26 (28, 30, 32, 34) rows. COUNTING YOUR HEEL FLAP SET UP ROwS, you have done 28 (30, 32, 34, 36) rows for your heel flap.
Heel Turn
Row 1: Slip 1 purlwise, k 15 (15, 17,18, 19) stitches, SSK, k1. Turn your work. Row 2: Slip 1 purlwise, p 5, p2tog, p1. Turn your work. Row 3: Slip 1 purlwise, knit across to one stitch before the gap created by the turn on the previous row, SSK, k1. Turn your work. Row 4: Slip 1 purlwise, purl to one stitch before the gap created by the turn in the previous row, p2tog, p1. Turn your work. Copyright Jill Bickers Repeat Rows 3 and 4 until all stitches are worked. You may or may not end with a k1 or p1 , depending on the size you do. You will have 16 (18, 18, 20, 20) stitches remaining.
Gusset and Foot
NOTE: The sock is designed to continue the leg patterning down the top of the foot. I think it is prettier, but if you wish to do a plain foot, you certainly can. If you choose to maintain the pattern, remember as you knit across the instep that you are beginning the first round of the pattern stitch from Clue #2. You'll want to track your rounds as yougo! Knit across the heel stitches. With an empty needle, pick up 14 (15, 16, 17, 18) stitches along the heel flap. With another empty needle, knit across the instep stitches . Pick up an empty needle, and pick up 14 (15, 16, 17, 18) stitches on the other side of the heel flap. Using the same needle you just picked up your gusset stitches on, knit across the first 8 (9,9, 10, 10) stitches of the heel. Slip the remaining heel stitches on to the needle which holds the gusset stitches from the other side. Needle 1 will have 22 (24, 25, 27, 28) stitches. Needle 2 will have 28 (30, 32, 34, 36 stitches). Needle 3 will have 22 (24, 25, 27, 28) stitches. Round 1: Needle 1: k to the last 3 stitches, k2tog, k1 Needle 2: work across Needle 3: kl, ssk, k to the end. Round 2: Knit across needle 1, work across needle 2, knit across needle 3. Alternate Rounds 1 and 2 till you have gotten back to your original 56 (60, 64, 68, 72) stitches. REMEMBER, IF YOU ARE MAINTAINING THE PATTERN DOWN THE FOOT, YOU WILL NEED TO TRACK WHICH ROUND YOU ARE ON. This is why the pattern says "work across" Needle 2 rather than “knit across." Copyright Jill Bickers Once you have returned to your original number, continue down the foot, keeping the instep stitches in pattern and the bottom of the foot in stockinette. Try the sock on when you think it is long enough. You will be ready to begin the toe when you your sock reaches the base of your big toe. If you are working in pattern, end after Round 1, 2, 3, or 5 (a plain round).
The Toe
When you are ready to begin your toe, divide your stitches onto three needles. Needle 1 should have 14 (15, 16,17, 18), Needle 2 should have 28 (30, 32,34, 36),and Needle 3 should have 14 (15, 16, 17, 18) stitches. Round 1: On Needle 1, knit to the last 3 stitches, k2tog, k1. On Needle 2, k1, ssk, knit to the last 3 stitches, k2tog, k1. On Needle 3, k1 , ssk, knit to the end. Round 2: Knit plain around on all 3 needles. Continue alternating Rounds 1 and 2 until your toe is the appropriate length. You will probably have 32 (32, 32, 28, 28) stitches remaining. Using Needle 3, knit to the end of Needle 1, and prepare to kitchener stitch your toe together. Are you invigorated? I hope so! Note: This pattern represents a lot of work and time. You are most welcome to make copies of this pattern for yourself, but please ask your friends to download their own copies. Please don't sell socks from this pattern without asking me first. If you knit these socks, I would love to see yourpicturesonRavelry! Copyright Jill Bickers


