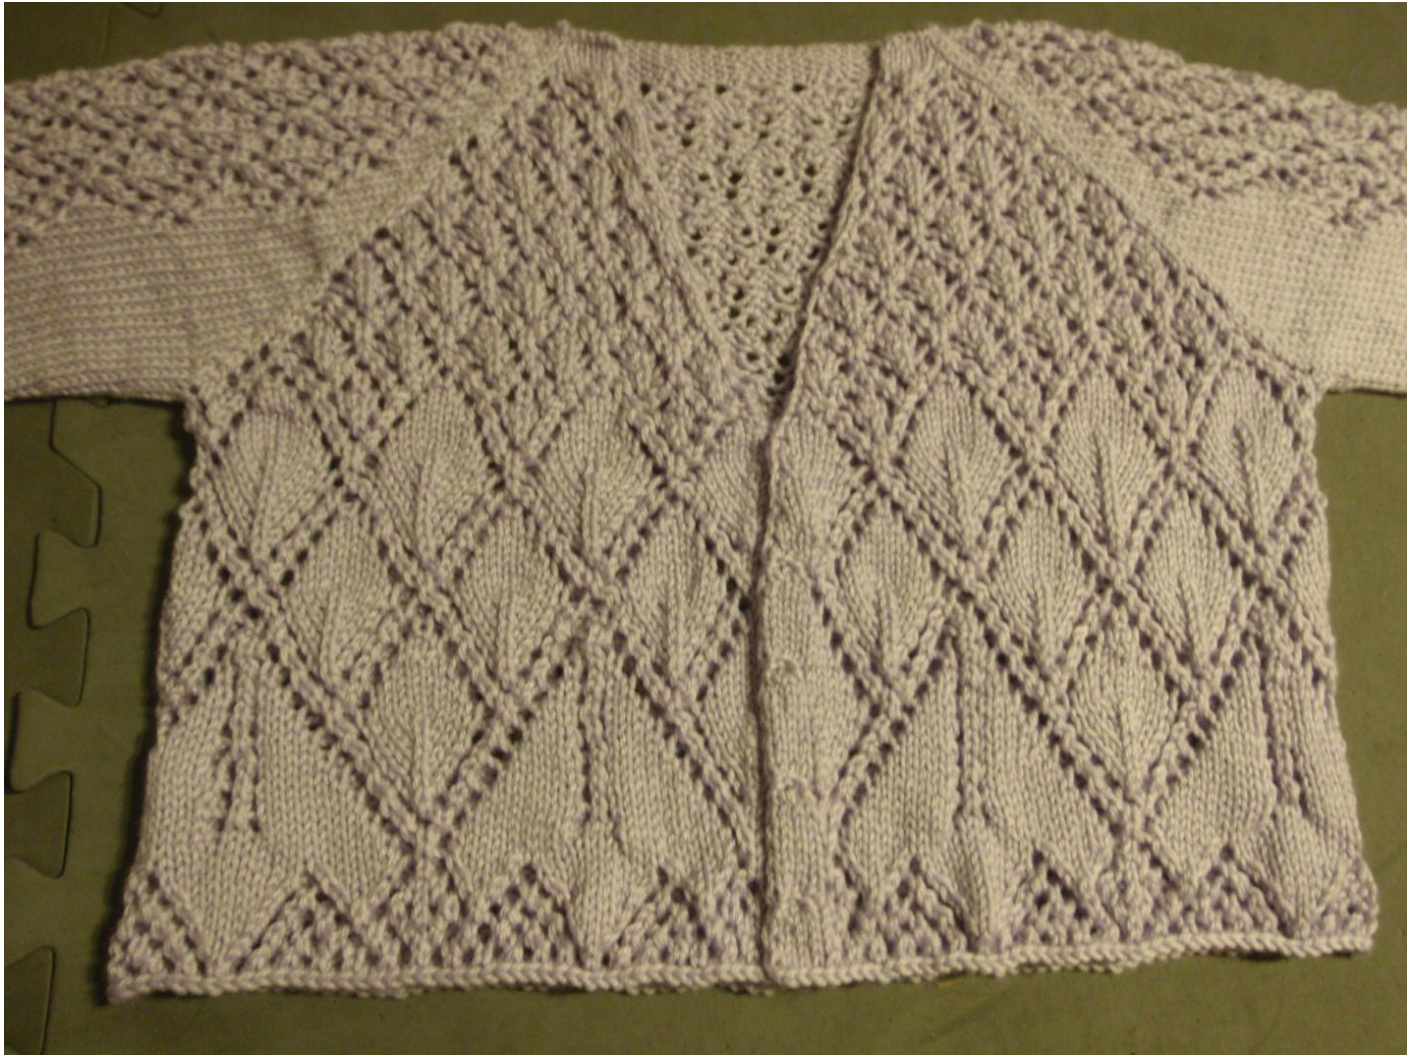
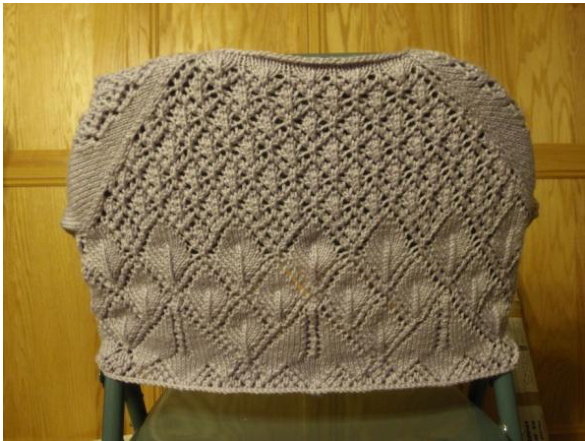
Garden Arbor
This short, v-neck sweater with an integrated button band and 34 length sleeves has an all-over lace design. Several slight variations are given because I'm always changing patterns to the point that I can't even leave my own patterns alone. This sweater is only given in one “size". However, blocking and shifts in gauge should give some variety of finished measurements. Below the armpits, the sweater is 170 stitches around. There are 54 rows in the raglan section and 54 rows following it. An addendum chart allows you to increase the length by 28 rows or 56 rows.
(as used for sample knit) Needles in sizes 8 (for body) and 9 (for sleeves) or size to obtain desired gauge \~600 yards of worst yarn (Cascade Yarns Pacific used) 4 matching buttons Tapestry needle
Gauge
Knit the Extra Length Chart repeat section to check gauge (this is the area of the lace with the least stretch). Choose a gauge to get the correct size for the stitch count given above. Sample is knit at 5 sts per inch and 7 rows per inch in a wool-acrylic blend. Final blocked measurements are \~10” at neck (just stitches not including the gap at front) with a 34" bust (there is no decreases after the bust), \~7 3/" vertically from neck to armpit and 7 3%" from armpit to sweater bottom. Sleeves are 11 /2” around at armpit, just over 8 /4? at wrist end and 11" long from armpit.
Increases
Specific, leaning increases have been chosen here for effect. However, the effect is subtle, so play around and substitute if it makes your life easier. Here is a definition of the increases used R=Make 1 Right=Insert the left needle into the bar between stitches from back to front and knit L=Make 1 Left=Insert the left needle into bar from front to back and knit through the back IL=Lifted Increase leaning left= Lift the right leg of the stitch below the stitch on the left needle andknit IR=Lifted Increase leaning right= Lift the left leg of the stitch below the stitch that was just knit (which is on the right needle) and knit through the back of the loop
Buttonhole
Single row button hole is recommended Knit to location of buttonhole, bring yarn to front, slip stitch purlwise, move yarn to back. \*Slip next stitch purlwise, pass previous slipped stitch over\* to length of button hole. Move last stitch on right needle back to left needle and turn work. Move yarn to back and cast on the number of passed over stitches plus 1. (Recommended to use a cable cast one method— \*insert needle into space between first and second stitches on the left needle, draw up a loop, place it onto left needle\*.) Turn work. With yarn in back, slip the first stitch from the left needle and pass the extra cast-on stitch over the needle. Work to end of row as usual.
Other Notes
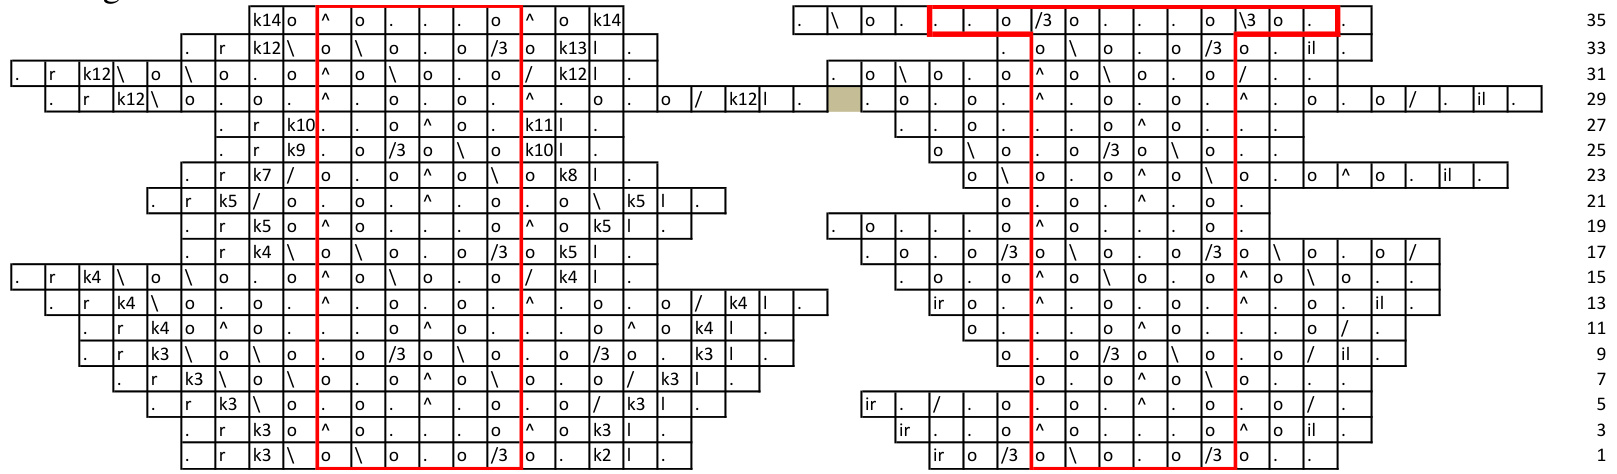
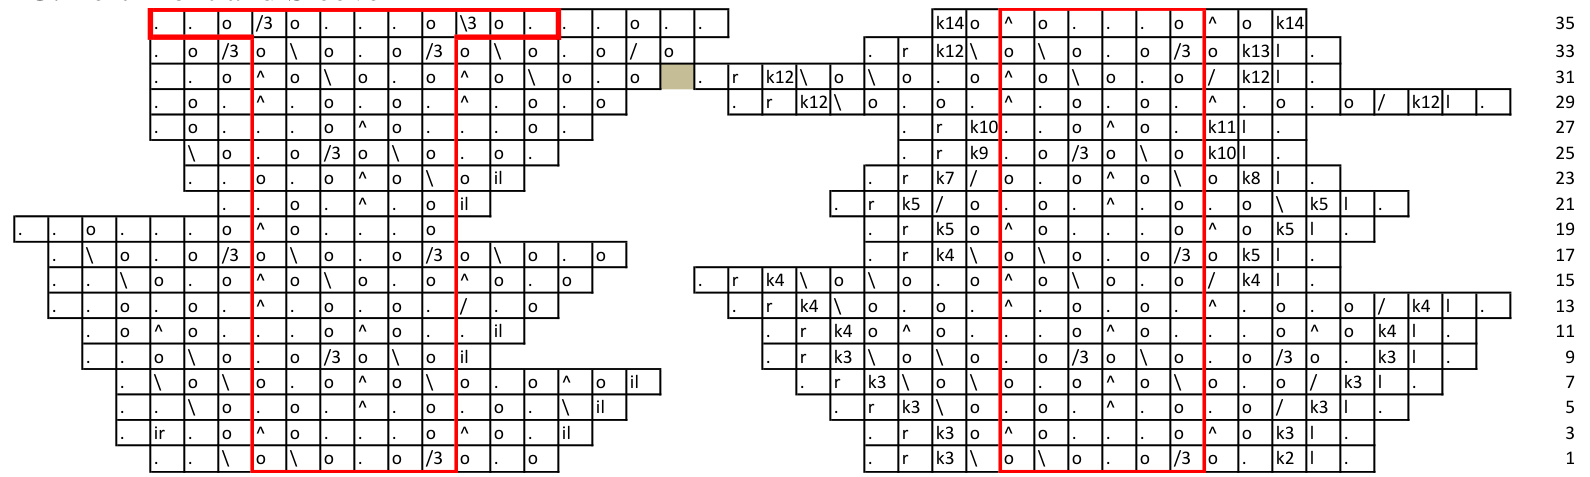
Purl all even rows with the following exceptions. Knit even rows of sleeves (worked in the round). Knit even rows (wrong side) of button band stitches, denoted in the chart by 'x'. (This last exception is optional—the sample was purled on the wrong side of the button band. However, if you do this you need to sew ribbon or fabric to the back side of the bands to prevent rolling. The sample also added a faux seam by a single crochet in picked up stitches. Having seen the results, I wouldn't recommend this approach because things get weird at the v-neck.) Pattern repeats are outlined in red. (Typical convention for charted shawls.) Separate charts are given for different sections of the sweater. The front left (and sleeve), back and front right (and sleeve) each have their own chart until the sleeves are moved to waste yarn. Because of this and the repeats being outline, the use of stitch markers between sections is imperative. (Sorry, the only way the charts fit onto standard paper is to chart this way.) @Malissa Ackerman Lightfoot, 2011 Pattern CO 49. Place markers after stitch 11 and after stitch 38. This differentiates the left, back and right into which the pattern charts are divided. Work through Charts 1 A thru C—work row 1 of A, then row 1 of B, then row 1 of C. Continue working in that order through all of Charts 1. (Row 18) Work Charts 2 A thru C in a similar manner through row 35. At the end of these charts 53 total rows will have been worked. Row 54: Purl 42 (left front), CO3, move sleeve stitches (55 sts—to marker) to waste yarn, CO2, Purl 77 (back), CO2, move sleeve stitches (55 sts) to waste yarn, CO3, Purl 41 (right front) Work Chart 3 followed by Chart 4, remembering to add button holes where desired. If you wish to increase the length of the sweater, insert the extra length chart between Chart 3 and Chart 4. Note that if you knit extra length you may want to reevaluate button placement: if button holes remain every 10" row then the last button will be 2 rows from the bottom, and many people find that to be too close to the end of a garment. Bind off Place one set of sleeve stitches back onto the needles. (If you knit in the round tighter than flat, remember to increase needle size here.) CO 2, Knit across stitches, CO2 and join in round. Work chart 5. Bind off. Repeat with other sleeve. Sew short gap under each arm. 1A: Right Front and Sleeve
| r | 0 | 0 | 0 | v | 0 | 0 | 0 | ||||||||||||||||
| r | 0 | 0 | * | A | * | * | 0 | / | * | ||||||||||||||
| r | 0 | A | 0 | * | 0 | v | 0 | ||||||||||||||||
| r | 0 | 0 | 0 | /3 | 0 | ||||||||||||||||||
| r | 0 | 0 | / | ||||||||||||||||||||
| r | 0 | 0 | |||||||||||||||||||||
| r | |||||||||||||||||||||||
| r | |||||||||||||||||||||||
1B: Back
| 0 | 0 | o | A | 0 | 0 | 0 | A | 0 | 0 | 0 | ||||||||||
| 0 | 0 | A | 0 | + | o | A | 0 | 0 | ||||||||||||
| ir | 0 | + | 0 | 0 | * | 0 | 0 | |||||||||||||
| 0 | 0 | 0 | /3 | 0 | 0 | 0 | / | 0 | ||||||||||||
| 0 | 0 | 0 | A | 0 | 0 | 0 | ||||||||||||||
| o | 0 | v | 0 | 0 | ||||||||||||||||
| ir | il | |||||||||||||||||||
| ir | ||||||||||||||||||||
| 27sts | ||||||||||||||||||||
| ir | 0 | v | 0 | 0 | 0 | v | 0 | 0 | 0 | 17 | |||||||
| ir | 0 | * | 0 | Λ | 0 | + | 0 | 15 | |||||||||
| ir | 0 | v | 0 | 0 | A | 0 | 13 | ||||||||||
| ir | 0 | 0 | 0 | /3 | 0 | * | 11 | ||||||||||
| ir | 0 | 0 | 0 | A | 0 | 9 7 | |||||||||||
| ir | 0 | 0 | V | 0 | |||||||||||||
| ir | * | 5 CC 1 | |||||||||||||||
| ir | |||||||||||||||||
| " | |||||||||||||||||
1C: Left Front and Sleeve
knit k\* knit \* stitches /k2tog 1 ssk (or skp) s2kp yarn over /3 k3tog 13 sk2p (or sssk) rmake 1 right ir lifted increase-right 1 make 1 left il lifted increase-left xbutton band bbutton hole

2A: Right Front and Sleeve
2B: Back
2C: Left Front and Sleeve
knit k\* knit \* stitches /k2tog ssk (or skp) s2kp 。yarn over /3 k3tog 13 sk2p (or sssk) rmake 1 right ir lifted increase-right make 1 left il lifted increase-left button band bbutton hole
3: Bottom part 1
| x | x | x x | x | 0 | A | 0 A | 0 | 0 | b | b | b x | ||||||||||||||||||||||||
| x | x ir | x x | 0 | 0 | 0 | /3 | 0 0 | 0 | /3 | 0 | * | 0 ! | x x | x il | x 19 x 17 15 13 | ||||||||||||||||||||
| x x ir | x x | x | 0 | 0 | / | 0 > | 0 | 0 | v 0 | 0 / | 0 | / | x x | x x | |||||||||||||||||||||
| x | x | x x | 0 | / | 0 | 0 | 0 | A | 0 | 0 | 0 | 0 | A | 0 | 0 | 0 / | 0 | x x | il x | ||||||||||||||||
| x x ir | 0 | 0 | 0 | 0 | A | * | 0 | 0 | 0 | / | 0 | A | 0 | 0 | 0 | ! 0 | / | x x | |||||||||||||||||
| x | x x | 0 | 0 v | 0 | * | A | * | 0 | 0 | 0 | A | 0 | 0 | 0 | * | / | x il | x 11 x | |||||||||||||||||
| x | + | * | 0 | 0 A | * | 0 | A | 0 | * | 0 | A | 0 | * | x x | 6 7 | ||||||||||||||||||||
| ir x x | + o | 0 /3 0 | 0 | 0 | 0 | 0 /3 | A 0 | 0 | 0 | 0 | 0 + /3 | A | 0 | * | il * | x 5 3 | |||||||||||||||||||
| ir | 0 | / | 0 | 0 | 0 | 0 / | 0 | A | 0 | 0 | 0 | 0 0 A | 0 | * | x | 1 | |||||||||||||||||||
| 0 | il | x |
4: Bottom part 2
| x x | x x x | o | o / O | A | O | A | O | 0 | 0 | O | 0 | 0 | o | x | x x x | x | ||||||||||
| X x X | x x | o | o A 0 | 0 / 0 | 0 | / o | 0 | o | 0 | 0 | 0 | 0 | 0 | 0 | o | 0 | o | x x | x x | 53 x 51 x 49 x 47 x 45 43 41 | ||||||
| x x x X x x | x x x x | o o / o | o o / | o / o / 0 / | 0 | o | o o | o v / | o | o | o | v o | o 0 | o | o | A | 0 | o | b b b x x | |||||||
| x x | x x x | o 0 \ | o o | 0 | o | o | / | o | o / | o | o / | o / | 0 x x x | |||||||||||||
| o | o | / | o | 0 | o | x x x | ||||||||||||||||||||
| x x x X x | x x | o A o | o | x / x x x | ||||||||||||||||||||||
| x x | x x x x x x | o √ 0 | o | A 0 | 0 /3 | o \ | o | A 0 A | 0 / | x x | x x x x X | |||||||||||||||
| X x | x x x | o 0 | A 0 0 | o 0 | 0 o | 0 1 | o | o | / o / | b b b x x 39 | ||||||||||||||||
| x x x | x x | o o | o | o A 0 A 0 | o | o | A | o | o | o | o A | o o | o | / o | x | x | x x x X 37 x x 35 x x 33 x 31 | |||||||||
| x x | x x | 0 | o √ 0 | A 0 | 0 ! | v | o | o | o A o A 0 | o | 0 / | o | x x x | |||||||||||||
| x x | x x x | o A | 0 A | 0 | A 0 | o | A o | o | o | 0 | A o | x x x x | ||||||||||||||
| X X | x x x | /3 0 | o A 0 | o | /3 o | o o o | o | /3 o | o | o | o /3 | o | o | x b b b | ||||||||||||
| x x | x x x | o o o v | 0 o A 0 | o | / | v | o 0 | + 0 | o / | o - o | o o o | o | o | √ | 0 | x x x 29 x x x x x 27 | ||||||||||
| x x | X x x | o / | 0 o | o | o | o | o | / o | v | o | 0 | o | v | o | 0 | x | x x x x 25 | |||||||||
| x x | x x x | o | o o | 0 0 | A | 0 | o 0 | / | o | A | 0 | o o | // o | A | 0 o | x | x x x x 23 | |||||||||
| X x | x x x o | A 0 | O | 0 | A | 0 | 0 x x | x x x 21 | ||||||||||||||||||
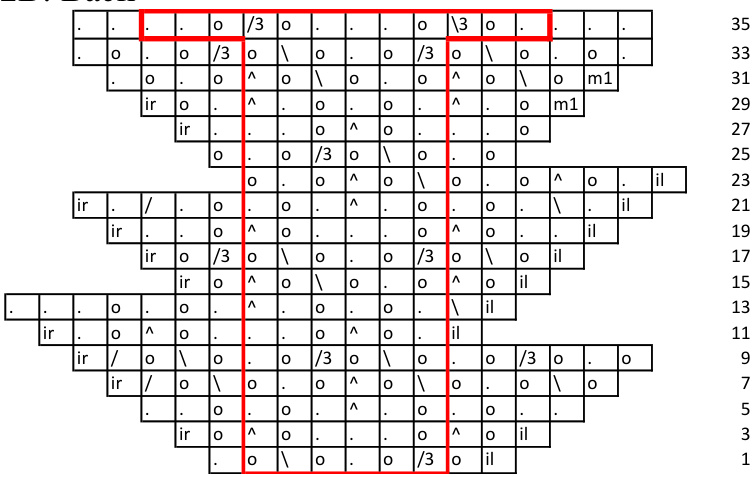
Extra Length / Gauge
| x | x | x | x | x | 0 | o | A | 0 | 0 | A | x | x | x | x | x | |||||||||||||||||||||||||||||||||||||
| x | x x | x | x | x | 0 | /3 | 0 | /3 | 0 | x | x | x | x | x | 27 25 | |||||||||||||||||||||||||||||||||||||
| x | x | x | x | 0 | 0 | / | o | v | 0 | 0 | o | 0 | A | 0 | 0 | 0 | / | 0 | x | x | x | x | x | 23 21 | ||||||||||||||||||||||||||||
| x x | x x | x | x | x | x | 0 | 0 | 0 | 0 | 0 | 0 | 0 | 0 | v A | 0 | 0 | 0 | / | x | x | x x | x x | x x | 19 | ||||||||||||||||||||||||||||
| x x | x x | x | x x | 0 | 0 | o | o | A | 0 | o | 0 | 0 | 0 | o | A | o | 0 | 0 | 0 | o | 0 | x x | x x | x | x | x | 17 | |||||||||||||||||||||||||
| x | x | x | x | x | 0 | 0 | o | > | 0 | > | 0 | x | x | x | x | x | 15 | |||||||||||||||||||||||||||||||||||
| x | x | x | x | x | o | o | > | o | 0 | > | 0 | x | x | x | x | x | 13 11 | |||||||||||||||||||||||||||||||||||
| x x | x | x | x | x | 0 | /3 | 0 | 0 | 0 | /3 | 0 | 0 | 0 | /3 | o | 0 | x | x | x | x | x | |||||||||||||||||||||||||||||||
| x | x x | x x | x x | x x | 0 | o | / | o | 0 | > > > v | 0 | o | o o | 0 | 0 | 0 A | 0 | / 0 | o / 0 | / 0 | 0 | > | 0 | o | 0 0 | 0 0 | x x x x | x | x x x x x | x x x x x | x x x x x | x x x x x | 9 7 5 3 1 | |||||||||||||||||||
| x x x | x x x | x x x | x x x | x x x | 0 / | 0 / 0 | 0 / o | / 0 | 0 | 0 | 0 0 | n 0 - | A | 0 | 0 | 0 |
.knit k\* knit \* stitches / k2tog \ssk (or skp) ^ s2kp oyarn over /3 k3tog (3 sk2p (or sssk) xbutton band ir lifted increase-right b button hole il lifted increase-left 5: Sleeve
| 59 | k8 | . | o | o | 0 | 0 | / | . | k8 | ||||||||||||||||||||||||
| 57 55 | k8 | . | . | . | o | o | o | 0 | . | . | k8 | ||||||||||||||||||||||
| 53 | . | k8 | . | . | o | o | . | 0 | 0 | . | o | ^ | 0 | . | . | k8 | |||||||||||||||||
| 51 | k9 | . | . | o | o | 0 A | o | o | o | o | o | 0 | o | . | . | . | k9 | k9 m m m m m 2 1 | |||||||||||||||
| 49 47 45 43 41 39 37 35 33 31 29 27 25 23 21 19 17 15 13 11 6 7 5 3 1 | k9 k9 . k10 k10 k10 . k11 k11 k11 k12 k12 k12 . k13 k13 k13 k14 k14 k14 . k15 k15 k15 | k12 I | - . k9 ! o k10 . · . k11 . . k12 . o o . . k14 o | . 0 0 0 o o | 0 o o o . 0 0 o 0 o o 0 | . o o / o o . o o o I o . . . o /3 /3 o o ^ 0 o o A /3 o | 0 o 0 . o / o o o 0 | . . . . . . . o o o /3 o . o o o /3 0 o | . 0 ^ . 0 . A A A | . o . o o o . o o 0 o 0 | o . . . . . o o . . o o /3 0 0 0 o /3 0 | 0 0 o 0 . o . o / / o o . o 13 0 o I A ^ 0 0 0 A o A | o . o o /3 o . . . o 0 /3 o o o | A o o A 0 A 0 | o . 0 . o o o 0 0 o 0 0 | o / o . o o . . . 0 /3 o 0 0 0 /3 0 | 0 o . o o . . o /3 o . o ^ o A | 0 . o o . . o / 0 0 0 0 0 | o . . o o o /3 o . o o /3 o o | A A A . . . 0 . ^ o ^ . 0 . ^ 0 ^ o | 0 . . 0 . 0 0 0 0 0 o o o 0 | o 0 . . o ! o / . o o /3 o 0 0 0 0 /3 o | o o . o / o . . o 13 o A . 0 o A | . o . o / o 0 0 0 0 | o o ! o ! . o 0 o /3 o / 0 o | . . o o . o . ^ 0 o | . 0 0 | . . k9 k9 . k10 . k10 . k10 k10 ! . k11 . k11 . k11 k11 . k12 . k12 . k12 k12 . k13 . k13 k13 k13 . k14 . k14 . k14 k14 k15 k15 k15 |
knit k\* knit \* stitches /k2tog 1 ssk (or skp) s2kp 。yarn over /3 k3tog (3 sk2p (or sssk)


