Eddard
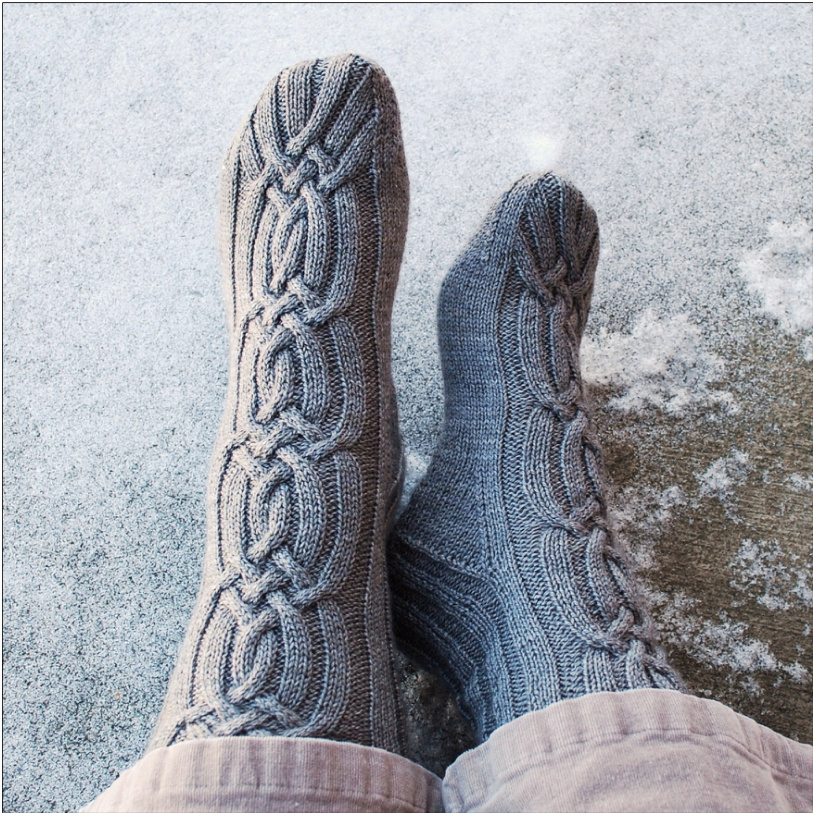
A sock pattern by Kimberly Pieper This pattern was inspired by the character Eddard of House Stark from George R. R. Martin's book series A Song of Ice and Fire (titled Game of Thrones on HBO). Known as “Ned" to his friends and allies, he is the honourable and no-nonsense Lord of Winterfell and Warden of the North. I like to imagine these simply plaited socks would help keep him warm on a cold morning's walk through the godswood. After all, winter is coming...
Cuff:
Cast on 74 (84) stitches using the long-tail method and distribute the stitches as follows:
Magic loop:
Front needle: 38 (42) stitches Back needle: 36 (42) stitches DPNs: Needles 1&2 (front of leg): 19 (21) stitches each Needles 3&4 (back of leg): 18 (21) stitches each
Yarn:
Approx. 350-450 yards of solid or semi-solid fingering wt yarn. The sample was knit with Fleece Artist Sea Wool in Pewter (70% merino, 30% plant fiber, 382 yds/115 g)
Other Materials:
2.50mm sock needles (or size required to obtain gauge), cable needle, tapestry needle
Gauge and Sizing:
8 stitches per inch in plain stockinette. Two sizes are provided: Men's S (L) with circumferences of approx. 8 (9) lightly stretched inches around the leg. Some negative ease is desired to keep the cabling flat at the ankle
Abbreviations:
sts stitches kknit ppurl sl slip k2tog knit 2 together p2tog purl 2 together ssk slip slip knit Work the following round twelve times: Small: Front: k2, p3, (k3, p2) x6, p1, k2 Back: k2, (p2, k3) x6, p2, k2 Large: Front: k2, p5, (k3, p2) x6, p3, k2 Back: k2, (p2, k4) x6,p2, k2
Leg:
Front: k2, p3 (5), work left or right cable chart, p3 (5), k2 Back: knit in ribbed pattern established in the cuff section for your size Continue until the desired leg length is reached - do not knit across the back portion on the final row worked. Some test knitters for the pattern suggested ending for the heel flap somewhere between rows 20 to 25 on the chart so that the bulk created by the cable motif is not placed directly over the ankle. For knitters using thinner sock yarns and with some negative ease in the sock at this point, there doesn't seem to be as much of an issue.
Heel Flap:
The heel flap is worked back and forth over the next 36 (42) stitches and is the same for both socks.
Small:
Row 1 (RS): sl1, k1, (p2, k1, sl1, k1) x6, p2, k2, turn Row 2 (WS): sl1, p1, (k2, p3) x6, k2, p2, turn Large: Row 1 (RS): sl1, k1, (p2, sl1, k2, sl1) x6, p2, k2, turn Row 2 (WS): sl1, p1, (k2, p4) x6, k2, p2, turn Repeat these 2 rows 15 (17) times or until the flap reaches desired length.
Heel Turn:
Row 1: (RS) sl1, k20 (24), ssk, k1, turn Row 2: (WS) sl1, p7 (9), p2tog, p1, turn Row 3: (RS) sl1, kto 1 stitch before gap, ssk to close gap, k1, turn Row 4: (WS) sl1, p to 1 stitch before gap, p2tog to close gap, p1, turn & 4 until all heel stitches have been worked. 22 (26) heel stitches remain.
Gusset & Foot:
Knit across the heel stitches and then pick up one stitch in each chain stitch along the edge of the heel flap to form one side of the gusset. In order to prevent a hole from forming, you may find it useful to pick up an extra stitch at the junction of the gusset/instep on either side of the foot. Continue across the instep stitches according to the cable pattern established for the front of the leg. Pick up stitches along the remaining edge of the heel flap and knit across the remainder of the heel and gusset stitches to the instep. This point will become the new end of round. Be sure the stitches are arranged on the needles as follows:
Magic Loop:
Needle 1: Instep stitches Needle 2: All gusset and heel stitches DPNs: Needles 1&2: Instep stitches Needles 3&4: All gusset and heel stitches Work the gusset decreases as follows: Row 1: work instep stitches according to established leg pattern, k1, ssk, k to 3 sts before end of round, k2tog, k1 Row 2: work instep, k to end of round Repeat these two rows until 36 (40) sole stitches remain. Continue working only row 2 until you are 2.0 (2.25) inches from the desired final length. Note: If you complete a braided cable motif (ending with row 17 on the chart) within an inch or so of reaching the desired foot length before the toe, do not start another. Instead, continue to repeat the ribbed pattern established in row 18 until the foot section is complete. If you are somewhere in the middle of a cable motif when you reach the toe, continue working in that pattern until you reach row 17 on the chart.
Toe:
Set-up Round: k1, ssk, work instep stitches in established cable or rib pattern to 3 stitches before end, k2tog, k1, k across all sole stitches (72 (80) stitches remain). Row 1: work instep in cable/rib pattern, k all sole stitches Row 2: Instep: k1, ssk, work instep in pattern to 3 sts before end of instep, k2tog, k1 Sole: k1, ssk, k to 3 sts before end k2tog, k1 Repeat these 2 rows until 32 (36) stitches remain. Repeat row 2 only until 16 (20) stitches are left. Graft the toe closed with the kitchener stitch and weave in ends. This knitting pattern, including allinstructions, charts and photographs are ? 2012 by Kimberly Pieper. This pattern may not be copied or offered for sale without the permission of the designer. Please feel free to contact me as purrlescent on Ravelry or at kimberlypieper@gmail.com with any questions or problems you may encounter with the pattern. Many thanks to my excellent test knitters: doubleargee, keikihula, missro, ozifarmer, sanita60, sdpixy, sjoella, sunshineb and walden121!
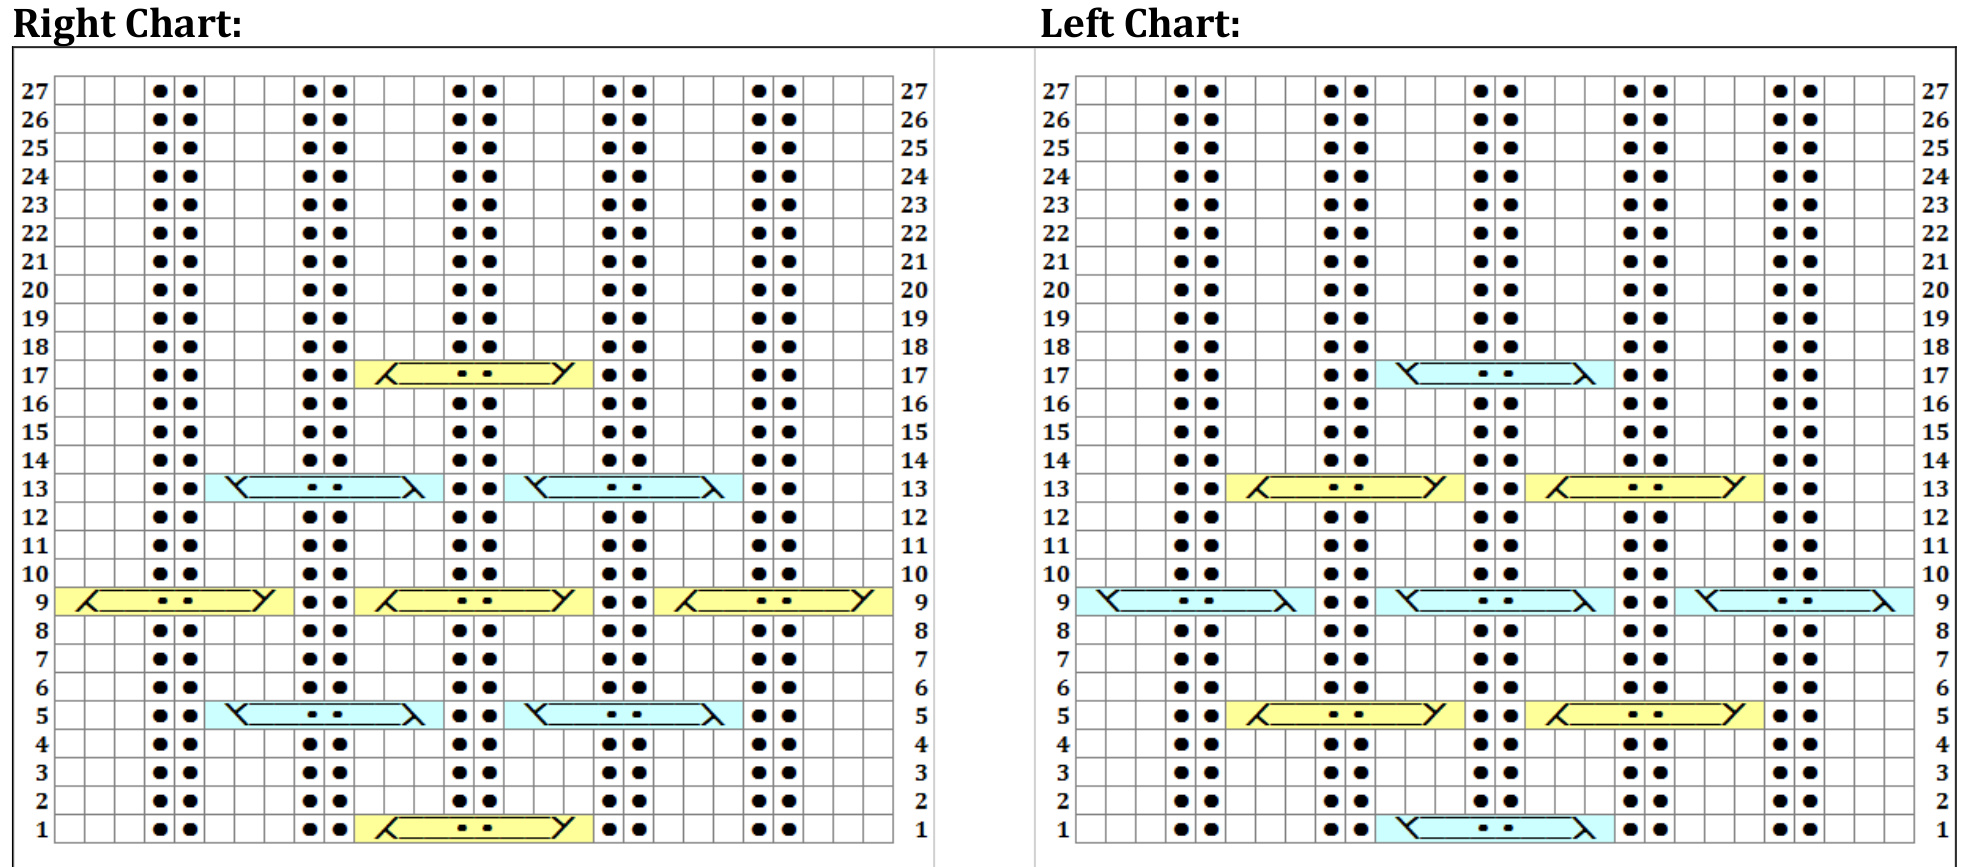
Note: You will end up knitting some purl stitches and purling some knit stitches in the middle of these cables - don't fret! The crossing of the cables will hide this and everything will look as it should in the end. RPC = right purl cable LPC = left purl cable


