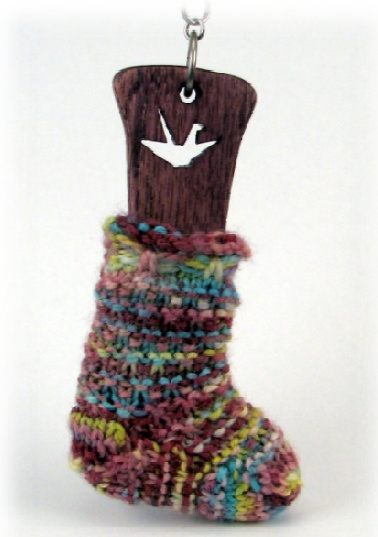
Origami is the traditional Japanese art of paper folding. Take a square of paper, fold it just so, and a crane or a frog or a flower springs to life in your hands. The wee tiny origami sock was suggested by my oldest daughter, who loves origami. “Mom, could you design a wee tiny origami sock? There are many full size sock patterns knit flat and folded up, so this wee pattern follows in that tradition. A curious shape, knit flat, is folded up and seamed to form a sock. The beautiful variegated yarn and slipped stitch pattern together form an intricate fabric reminiscent of fine washi paper, the traditional material for origami. Legend holds that if you fold one thousand origami cranes, you will be granted one wish. I wish you happy knitting!

Sunshine Yarn Classic Sock, about 15 yards Dragonfly (MC) Set of 2 US size 1 (2.25 mm) needles Tapestry needle for seaming pattern and photos ① 2010 Meg Bakewell for personal use only
ablreviatiors
YF: Bring yarn to the front. YB: Bring yarn to the back. Sl: Slip the stitch, purlwise unless otherwise indicated. SSK: Slip the next 2 sts individually, knitwise, then knit them together through the back loops. KFB: Knit into the front and back of the next st. MBK: (make bow in a knit row) Slip RH needle under the 4 strands at the front of the work. Knit the next st on the LH needle normally. Pull the RH needle with the new st back under the 4 strands, trapping them inside the newly formed st. Snug up the new st on the needle before continuing. MBP: (make bow in a purl row) Just as for MBK, but the 4 strands are at the back of the work instead of the front, and you will purl instead of knit.
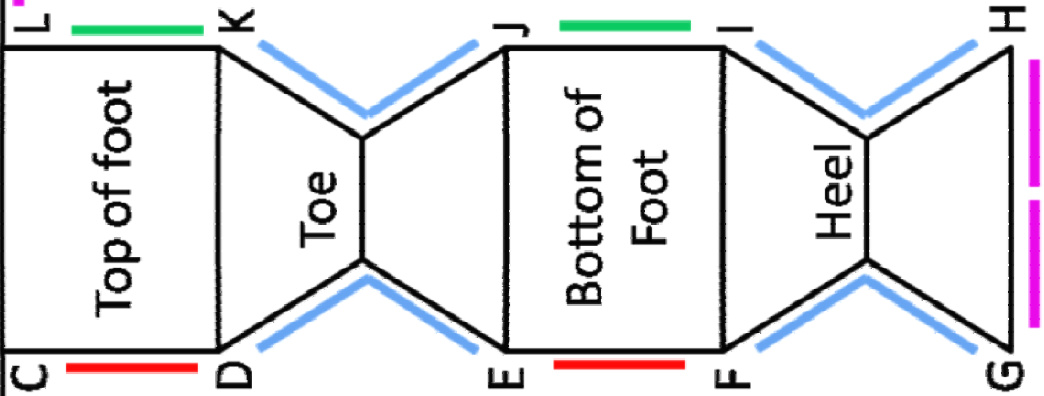
Note: Yourfinisbed sock will be approximately the same size as this diagram before folding, so you can lay it on top of this to visualize the parts of the sock.
Begin Pattern
Using MC and leaving a tail of about 18", cast on 22 sts. The entire sock is worked back and forth in rows, so do not join in the round! Note: Tbe strands of yarn are carried across tbe work wben certain sts are slipped in rows 1-8. All of these strands areon thefront oftbework. Row 1 (RS): Knit 6, YF, sl5, YB, k5, YF, sl5, YB, k1. Row 2: P6, YB, sl5, YF, p5, YB, sl5, YF, p1. Rows 3-8: Repeat rows 1-2 3 more times. Row 9: k8, MBK, k9, MBK, k to end. Row 10: p8, MBP, p9, MBP, p to end. Row 11: K10, kfb, k11. (23 sts) Row 12: Knit. Row 13: k1, (sl1, k1) to end. Row 14: k1, (YF, sl1, YB, k1) to end. Rows 15-16: knit. Row 17: k2, (sl1, k1) to last st, k1. Row 18: k2, (YF, sl1, YB, k1) to last st, k1. Row 19-20: Knit. Row 21-35: Repeat rows 13-20 two more times, leaving off the last Row 20.
Foot
Row 36 (WS): BO 5, k13, BO 4. There should be 13 live sts in the center of the needle, and the last st at the end of the row. The rest are bound off. Break yarn and pull through the last st. (13 sts remain) Join a new piece of yarn to begin Row 37. Row 37 (RS): k2, (sl1, k1) to last st, k1. Row 38: k2, (YF, sl1, YB, k1) to last st, k1. Row 39-40: Knit. Row 41: k1, (sl1, k1) to end. Row 42: k1, (YF, sl1, YB, k1) to end. Row 43-44: Knit. Row 45-48: Repeat rows 37-40. Row 49: K1, ssk, k to last 3 sts, k2tog, k1. (11 sts) Row 50: Purl. Rows 51-56: Repeat rows 49-50 three more times. (5 sts remain after row 56) Row 57: Kfb, k to last 2 sts, kfb, k1. (7 sts) Row 58: Purl. Rows 59-64: repeat rows 57-58 three more times. (13 sts after row 64) Row 65-92: Repeat rows 37-64. Bind off all sts. Break yarn leaving 10" tail.
Finiahing
Weave in tails from Row 36/37. Note: Use mattress stitcb for all seaming. Refer to the diagram for color and letter coding used in the seaming instructions. Use bind off tail to sew the heel seams (shown in blue in diagram). Bring F to G and sew seam between them, and H to I and sew the seam between them. Use cast on tail to sew remaining seams. Begin at top of cuff, bring point A to N and B to M, forming the tube of the leg. Sew down leg seam (yellow on diagram). B now lines up with the center of the bind off edge between G and H. Join point G to C and sew a short seam along half of the top of the heel (purple) Join D to E and C to F. Sew side seam (red). Sew toe seam (blue) starting with point D/E down toward tip of toe, weave across toe and sew up to J /K. Join L to I and sew other side seam (green). Join M to H and sew other side of heel top (purple).


