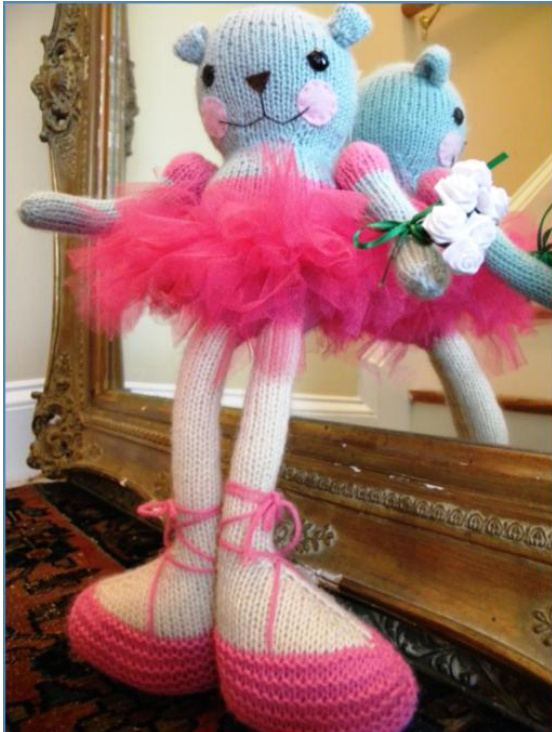
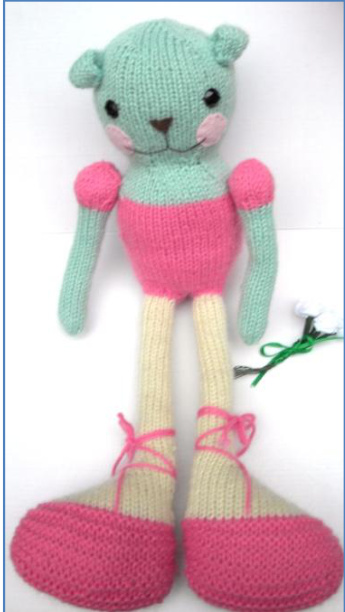
Princess Ursa Minor By Nancy Anderson
MATERIALS
Yarn
Any worsted weight yarn of choice. (Model used remnants from various stash yarns). Light blue MC, approx 70 yards, medium pink A, approx. 36 yards, off white B, approx. 30-36 yards.
Needles & notions
US Size 4 (3.5 mm) DPNs or circular needles, stitch marker, (2) %" black sew-on cabochons or buttons for eyes, 6" square light pink felt scrap, tiny brown felt scrap & matching embroidery floss & needle, tapestry needle, stuffing fiber o1 choice, optional knee-high hose if using custom stuffing technique found at the end of this pattern, materials for tutu including 1 yd dark pink tulle, sharp fabric scissors, 12" elastic cord.
Size
Measures approx. 15"tall from foot to top of head & 7" tall when measured in seated position.
Gauge
Gauge is not overly important, but stitches must be tight enough to prevent the stuffing showing through. Use any size needles to achieve this tight gauge. Stuff as outlined in the stuffing tutorial enclosed with this pattern,using fiber filled hose, or stuff normally as rounds are worked. If using post & washer (safety eyes) instead of buttons make certain to add them before opening in head becomes too small for fingers to fit inside. Warning: Please do not use buttons or post & washer eyes if toy is tobe given toa baby as these could come off& possibly present a choking hazard. Use heel afterthought technique to make leg attachment openings. Using a piece of same weight waste yarn, knit the specified number of sts. Immediately re-knit the stitches just made using the working yarn and continue rounds as directed. Wasteyarnwillberemoved later&thelivestitcheswill be used for creating thelegs. For more information see this afterthought heel video by The Knit Girlls-http://www.youtube.com/watch?v=7Wvvc1Afgpu
ABBREVIATIONS
BO =bind off Co = cast on K =knit Kfb = increase whereby one knit into the front & back of a st. K 2 tog = decrease by knitting 2 sts together. P =purl PM = place marker Acknowledgements:Many,many thanks to thewonderful people from the Ravelry group “The Testing Pool", who test knit & tech edited this pattern; Cmuralidhara,brncow, Maddieknits,Sarahsh123,n8kpl,KnittingSM&DublinDoll
Pattern Notes
Please read through the instructions and stuffing tutorial before starting this project. Head, body, & legs are worked in the round as one.Arms & ears areworkedseparately.All canbeworkedoneither circular needles using the magic loop method or with DPNs, depending upon preference.
HEAD&TORSO
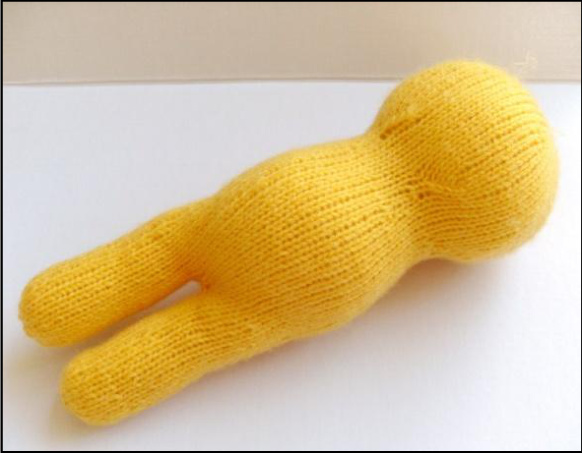
Beginning at the top of the head & using MC yarn, CO 6 sts. Rnd 1: Kfb in ea st around, joining carefully to avoid twisting, PM, (12 sts) Rnd 2: K each st around. Rnd 3: \*K1, kfb; repeat from \* around, (18 sts). Rnd 4: K each st around. Before proceeding too far,use yarn tail from cast on end to closeholein center of the 6cast on stitches. Rnd 5: \*K2, kfb; repeat from \* around, (24 sts). Rnd 6: K each st around. Rnd 7: \*K 3, kfb; repeat from \* around, (30 sts). Rnd 8: K each st around. Rnd 9: \*K 4, kfb; repeat from \* around, (36 sts). Rnd 10: K each st around. Rnd 11: \*K 5, kfb; repeat from \* around, (42 sts). Rnd 12: K each st around. Rnd 13: \*K 6, kfb; repeat from \* around, (48 sts). Rnd 14-33: K each st around for 20 rounds. Rnd 34: \*K 6, K2tog; repeat from \* around, (42 sts). Rnd 35: K ea st around. Rnd 36: \*K 5, k2tog; repeat from \*around, (36 sts). Rnd 37: K ea st around. If using fiberfilled hosetechnique,place stuffed head insert as directed in the stuffing tutorial at the end of this pattern. Otherwise, stuff firmly as rounds are completed. Rnd 38: \*K 4, k2tog; repeat from \*around, (30 sts). Rnd 39: K each st around. Rnd 40: \*K 4, kfb; repeat from \* around, (36 sts). Rnd 41: K each st around. Rnd 42: \*K 5, kfb; repeat from \* around, (42 sts). Rnd 43: \*K 6, kfb; repeat from \* around, (48 sts). Rnd 44-46: K each st around for 3 rnds. Rnd 47-71: Finish off MC & add A. Using A, K each st around for 25 rnds, (48 sts). Rnd 72: Make leg opening using “afterthought heel technique" as follows; using waste yarn k 16 sts, re-knit sts just made using working yarn, k remaining 32 sts using working yarn, (48 sts). Rnd 73: K each st around. Rnd 74: \*K6, k2tog; repeat from \* around, (42 sts). Referring to the stuffing tutorial,finish stuffing hose fortorso portion of the stuffing insert &tie off or proceed with stuffing asroundsarecompleted. Rnd 75: \* K 5, K2tog; repeat from \* around, (36 sts). Rnd 76: \* K 4, k2tog; repeat from \* around, (30 sts). Rnd 77: \* K 3, k2tog; repeat from \* around, (24 sts). Rnd 78: \* K 2, k2tog; repeat from \* around, (18 sts). Rnd 79: \* K 1, k2tog; repeat from \* around, (12 sts). Cut yarn. Weave yarn end through live stitches & close hole to finish off. Trim ends. Additional stuffing can be added, as needed when legs are worked. Completed torso reference - afterthought heel shown in light blue yarn.
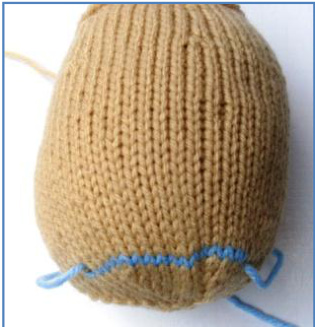
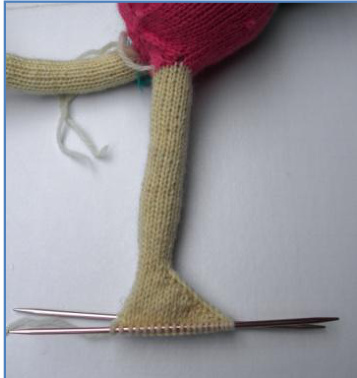
LEGS&FEET Eachleg is worked over13stitches.There are8stitches between the legs, (4 sts in front & 4 sts in back ). Inpreparationforworking thelegs,beginning oneitherside, carefully remove 6 sts from the waste yarn, (from afterthought heel at rnd 72), which will actually give you12 sts.Place these livestsforthe1't leg onto needles whileleaving therest of the live sts on the waste yarn, as pictured in thefollowing photo. Makecertaintopickup a stitch at thecorner edgeof eachleg tomakeatotalof13sts.
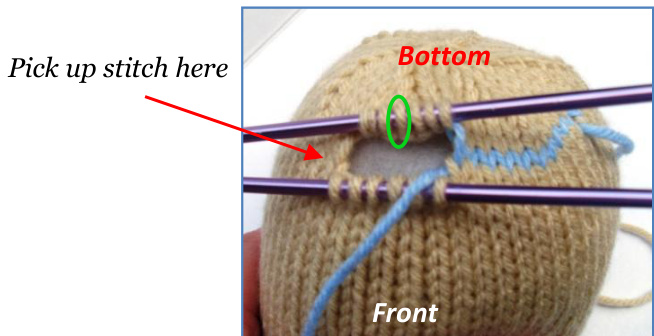
Attach B yarn to 3'd st located in the bottom row of sts, (indicated by green oval in photo above, this will be the back of the leg),Join toknit in rnd &PM.

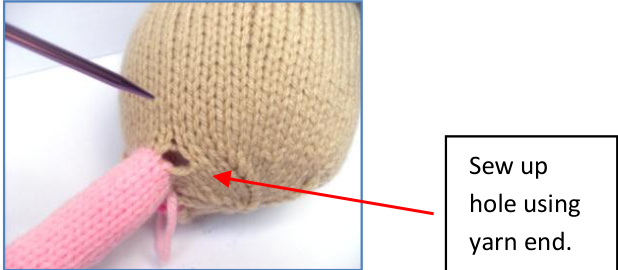
Rnd 1-40: K ea st around for 40 rounds, (13 sts), stuffing as rounds are completed. Tip: There may still be an open space even after picking up the stitch along the side,(see following photo).Useyarnendfromlegtoclosethishole.
Feet are worked flat. In order for the feet to be positioned properly the beginning/ending sts of the leg should be roughly at the middle back of the leg, which is why instructions were given to attach the B yarn to the back middle st. If this is not the case knit to that middle st & proceed with the foot as follows; Row 41: Begin working in flat rows, turn your work at the starting st, (located in the middle back of the leg) & P ea st across, (13 sts). Row 42: K 5, kfb, K 1, kfb, k 5, across, (15 sts). Row 43: P 6, kfb, P 1, kfb, P 6, (17 sts). Row 44: K 7, kfb, K 1, kfb, k 7, (19 sts). Row 45: P 8, kfb, P 1, kfb, P 8, (21 sts). Row 46: K 9, kfb, k 1, kfb, k 9, (23 sts). Row 47: P 10, kfb, P 1, kfb, P 10, (25 sts). Row 48: K 11, kfb, k 1, kfb, k 11, (27 sts). Row 49:P 12, kfb,P 1, kfb,P 12, (29 sts). Row 50: K 13, kfb, k 1, kfb, k 13, (31 sts). Row 51: P 14, kfb, P 1, kfb, P 14, (33 sts). Row 52:K 15, kfb, k 1, kfb, k 15, (35 sts). Row 53: P 16, kfb, P 1, kfb, P 16, (37 sts). Row 54: K 17, kfb, k 1, kfb, k 17, (39 sts). Row 55: P 18, kfb, P 1, kfb, P 18, (41 sts). Row 56: Add A,finish off B & begin working in garter stitch rows; K 19, kfb, k 1, kfb, k 19, (43 sts). Row 57: K 20, kfb, k 1, kfb, k 20, (45 sts).
Row 58: K 21, kfb, k 1, kfb, k 21, (47 sts).
Foot progress photo - top portion of foot worked in stockinette stitch rows.
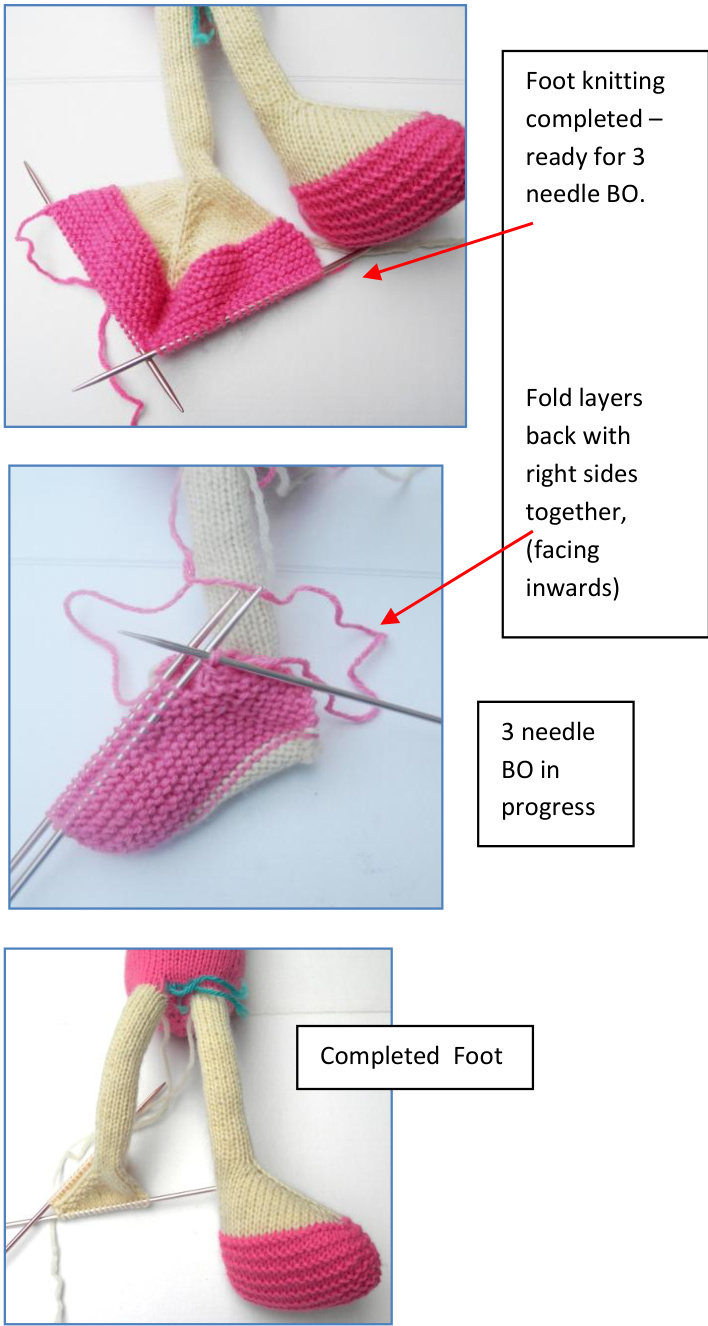
Row59-71:K ea stitch acrossfor 13rows. Row72:K22 sts,k2 tog,k remaining 23,(46sts). Prepare for 3 needle BO. Fold finished foot with right sides facing inwards, making certain that the sts are divided evenly on the 2 needles & do a 3 needle bind off, (see following photos).Turn right side outwards,stuff &seam thebackedges usinggarter stitchmattressstor stofchoice.
Alternate seaming: If you choose not to do a 3 needle BO, the feetcanbefinished off&seamed asfollows;aftercompleting all of thefootknitting rows,BO thestsleavingalongyarn end forseamingfoot.Threadyarnend ontotapestryneedleand holding endstogether seam using whip st or garter st mattress stitch),http://www.knitty.com//ssuEspring04/mattress.html Stufffirmlywhenseamis almostcompleted.Finishseaming, weaving&trimmingyarnends. Second Leg: Skip 1st 4 sts on stitch holder (waste yarn), place next 6 sts on needles, pick up st at edge of opening, pick up next 6 sts, skip last 4 sts, leaving them on st holder.Add B to the stitch immediately following the center 4 stitches. Repeat steps & rounds for 2"" leg & foot. After completing the 2"d foot, remove the 4 sts from the waste yarn, (this will actually give you 8 sts), & seam together using matching yarn with grafting or stitch of choice.
ARMS (make 2)
Using A worsted weight yarn CO 8 sts,joining carefully to avoid twisting, PM. (Arms are worked from the top downwards. Stuff as rounds are completed). Rnd 1: \*K1, kfb; repeat from \* around, (12 sts). Rnd 2: \*K1, kfb; repeat fom \* around, (18 sts). Rnd 3: \*K2, kfb; repeat from \* around, (24 sts). Before proceeding toofar,use yarn tail from cast on end to close hole in center of the 8 cast on stitches. Rnd 4-6:K each st around for 3 rnds. Rnd 7: \*K2, k2tog; repeat from \* around, (18 sts). Rnd 8: \*K1, k2tog; repeat from \* around, (12 sts). Rnd 9:K each st around,finishing off A&addingMC at end of rnd, stuff upper arm section firmly. Rnd 10-39:K each st around for 30 rnds, continue to stuff arm as rnds are completed, (12 sts). Rnd 40: \*K 1, k 2tog; repeat from \* around, (8 sts). Cut yarn, using tapestry needle, weave yarn through live sts at end , remove knitting needles, pull tightly to close hole. Weave & trim yarn end. Repeat for 2" arm. See finishing instructions for information on attaching the arms to the body.
EARS (make 2)
Using MC yarn , CO 8, (leaving long tail for sewing ear to head), joining carefully to avoid twisting, PM. Rnd 1-2: K each st around for 2 rnds, (8 sts). Rnd 3: \*K 3, Kfb; repeat from \* twice, (10 sts). Rnd 4-7:K ea st around for 4 rounds. Rnd 8: \*K 3, K 2 tog; repeat from \* twice, (8 sts). Rnd 9-11: K each st around for 3 rnds. Cut yarn & thread onto tapestry needle. Weave yarn through live sts, anchor & trim excess. Do not stuff. Repeat all steps for 2nd ear. Referring to photos attach ears widely set apart, at approximately Rnd 14 of the head, using yarn end & tapestry needle. Fold & pin ears forward. Tack ears in place using yarn end. Copyright @ Nancy Anderson, yarnjulepsontheveranda.com, September 18, 2013
FINISHING
Attaching Arms
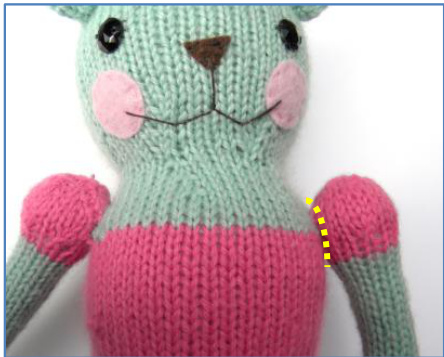
Using a tapestry needle threaded with matching yarn, sew arms toupper sides,with puffed“sleeve”situated so that half of it touches the skin and half touches the bodice color, as shown in following photo. Sewing stitches indicated by dotted yellowline.
Toe Shoe Laces
Referring to the following photos attach & wrap toe shoe laces. Thread tapestry needle with about 18 "of matching yarn.
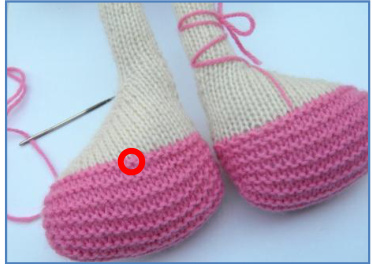
Insert needle into last row of shoe, about halfway between the toe & heel, as indicated by the red circle. ..then through to the other side as in following photo.
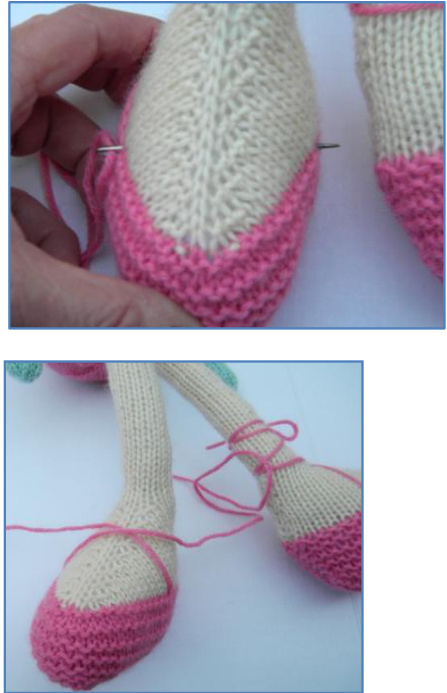
Begin wrapping the laces in crisscross fashion, around the foot &lowerleg.
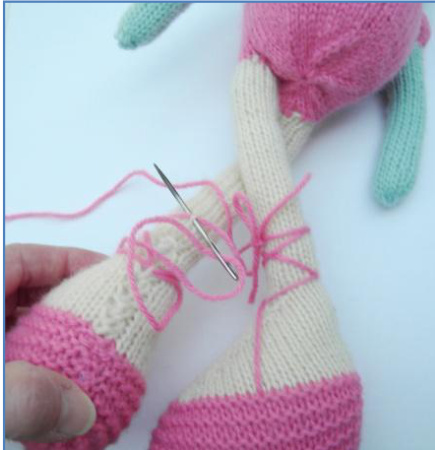
Insertneedlethroughastitchinbackof thelegtohold the lacesinposition.Dothisforeachlaceatthebackcrisscrosses. Tie lace in a bow & trim even.

Face
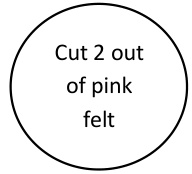
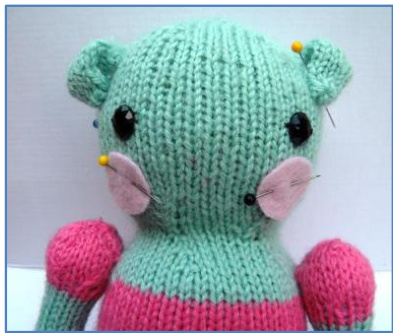
Sew eyes, widely spaced,(about 9 stitches apart), onto face halfway down the head, as shown in following photo. Using following template cut 2 cheek circles out of light pink felt.
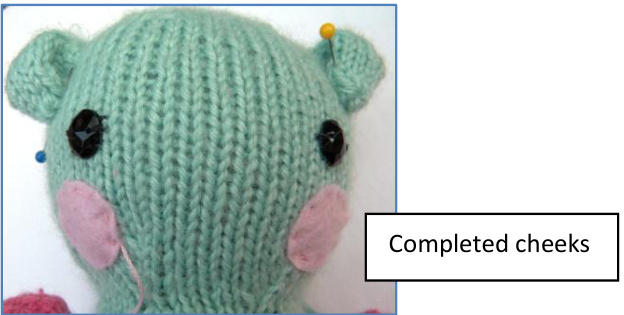
Pin cutouts widely spaced, (about 7 stitches apart), to lower portion of face, (approximately 2 rows down from eyes), as shownbelow. Pin felt cheekcircles onto face.
Cheek &Muzzle Embroidery
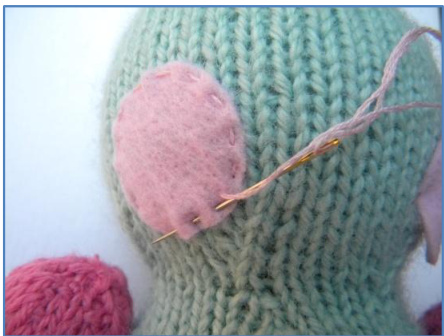
Using3strandsofthepink6strandedembroideryfloss&a sharp embroideryneedle,attachcheekstofaceusing arunning stitch,(or stitch of choice), as pictured in previous photo. Procedure: Attach floss to any area underneath the cheek cutout. Bring needle up through the felt, as close to the edge of the cutout as possible, then weave the tip of the needle, evenly spaced,in&out alongtheborder of the cutout for a couple of stitches, (as shown inprevious photo), pull floss through stitches & repeat procedure around the entire shape. Finish by inserting needle down through cheek at last stitch & through to the back of the head. Knot floss, weave end & trim excess. Tip: Do not try for embroidery perfection, rustic-looking stitches givethedollpersonality&character.
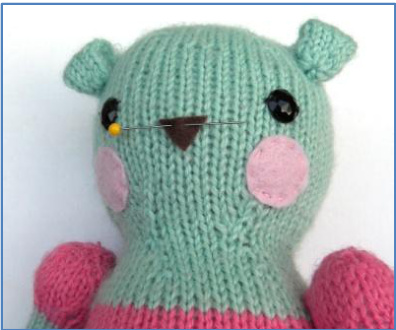
Cut the corner edge from a piece of brown felt to form nose. Pin nose cutout in place as shown. Attach nose with running stitch using 3 strands of brown floss. Do not trim floss when finished. Floss tail from beginning to be woven&trimmed later.
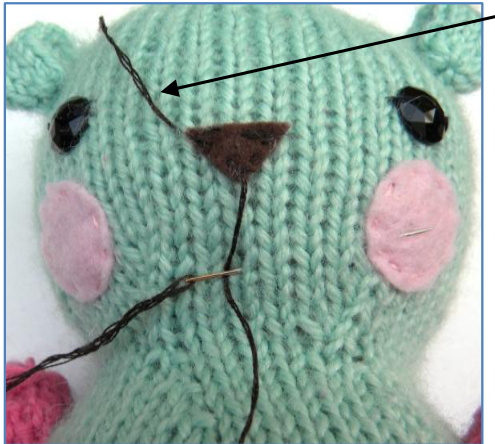
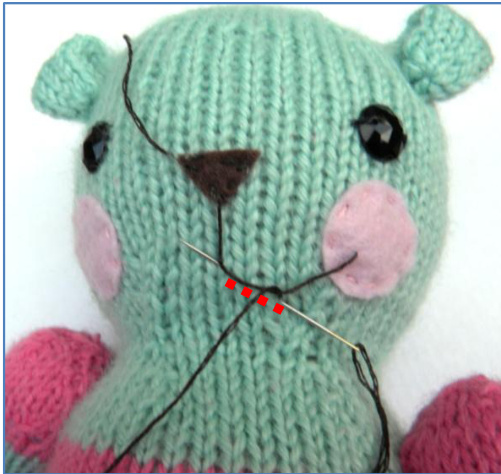
Bring floss out at bottom of nose triangle. Skip about 4 rows down and insert needle as shown... ...and back out again through the cheek as pictured.
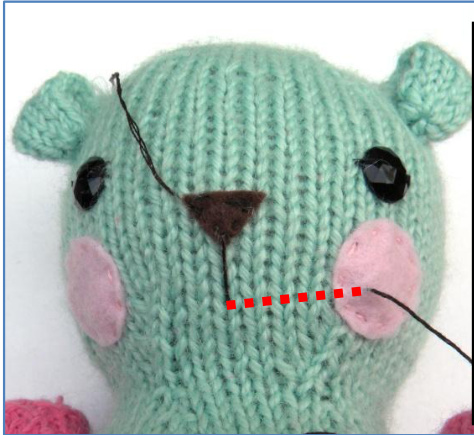
(Red dotted line denotes when floss is being woven through the underside of the face) Repeat process for 2nd half of muzzle.
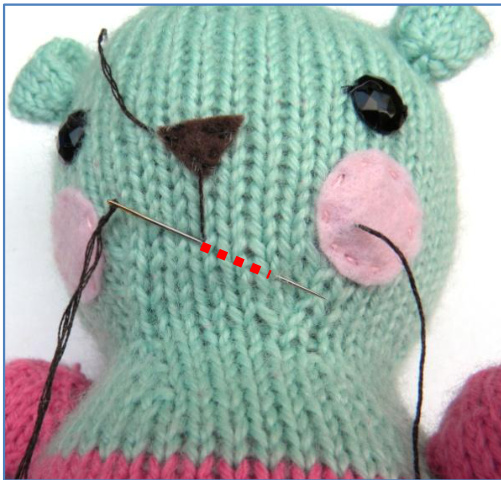
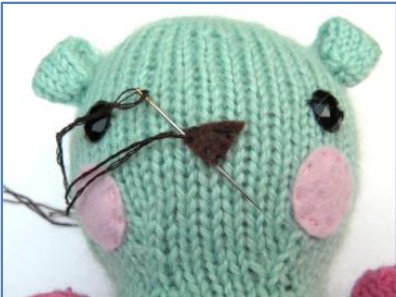
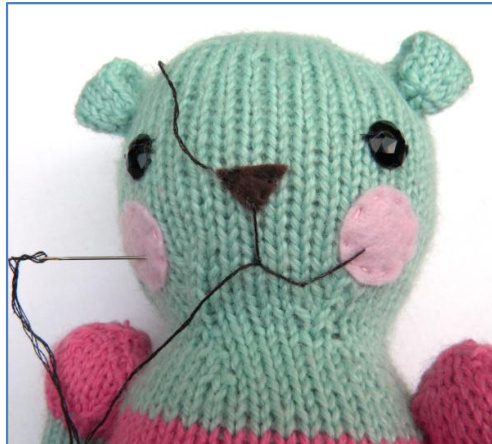
Bring needle back to the point where vertical muzzle line ended& through the face at an angle for the distance of 2 knit sts, as shown. Do not pull the floss taut.
Pull floss through until you have a loose length of about 1 %" left. Loop needle around the floss & back into same stitch & out through the beginning point. Gently finish pulling the floss to tighten.
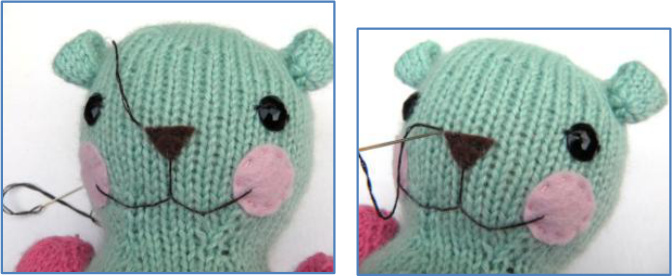
After making the last stitch of the 2nd portion of the muzzle, insert needle into face & out through to the back of the head.Knot,weave & trim end.Likewise,weave & trim floss tail from the beginning of the stitching.
Tutu Tutorial Materials:
1 yard small gauge tulle in color to match body yarn (shown in darkpink) 14" length small elastic cord Sharp fabric scissors Yard stick or ruler Tutu is comprised of 1"x 8"tulle strips, attached to an elastic cord by looping the tail end through the folded middle, as for making fringe on a knit scarf. For best results use most of the full yard of tulle.
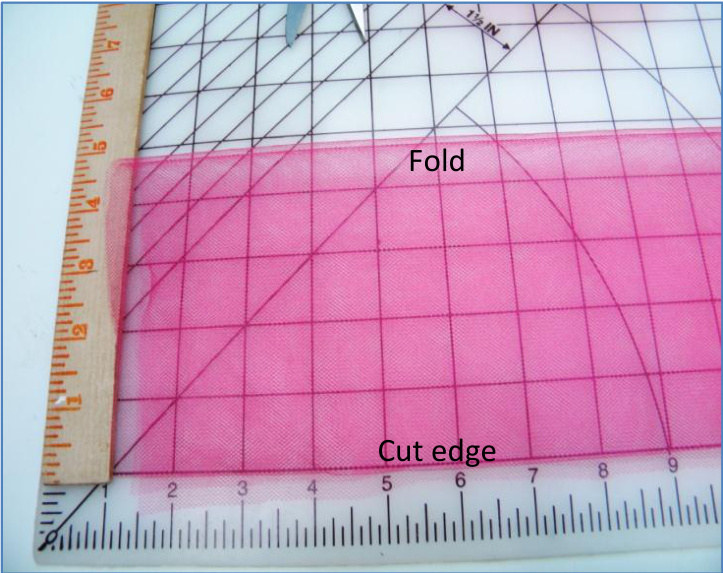
Figure 1:Fold tulleover twiceto about4-5"tall fromfold tocut edge.
Figure 2: Cut tulle in 1" wide strips.
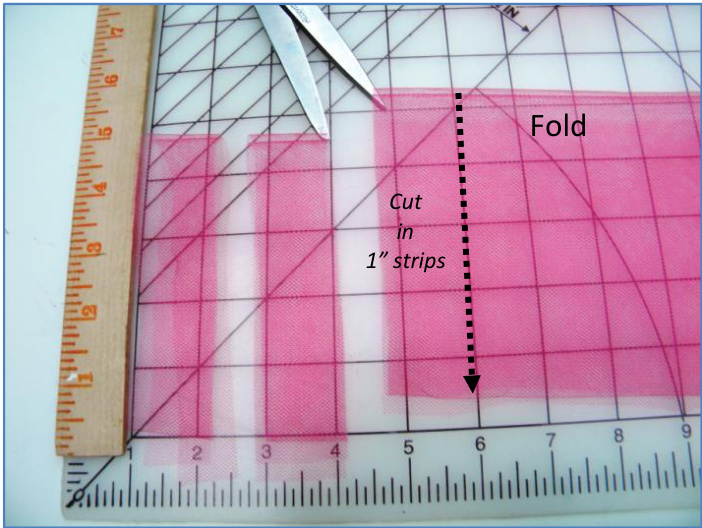
Figure3:Using4stripsatatime,openthefoldendofthetullestrip toform a loop.Working around theelasticinserttheendsthrough theloop in the samemanner as if adding fringe to a knit scarf.
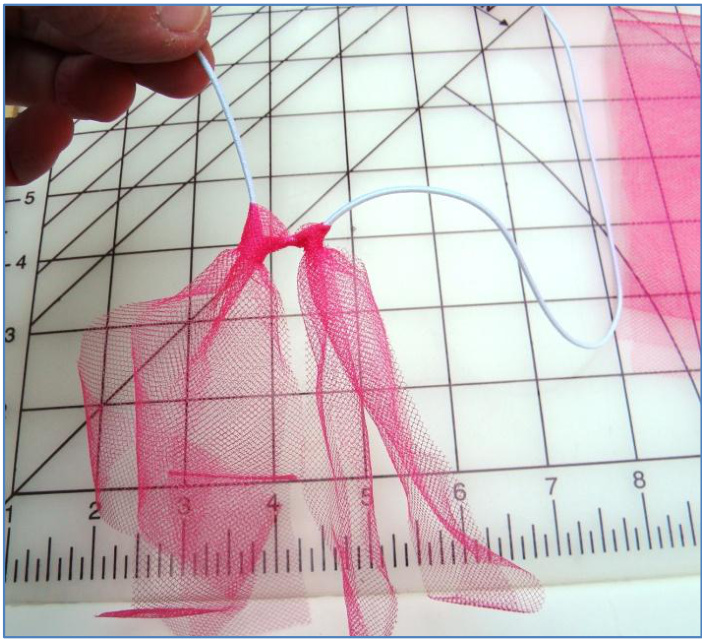
Figure 4:Continue adding strips until desired fullnessis achieved, (model used mostof thefull yard of material),pushing the looped stripstogether ontheelasticband.
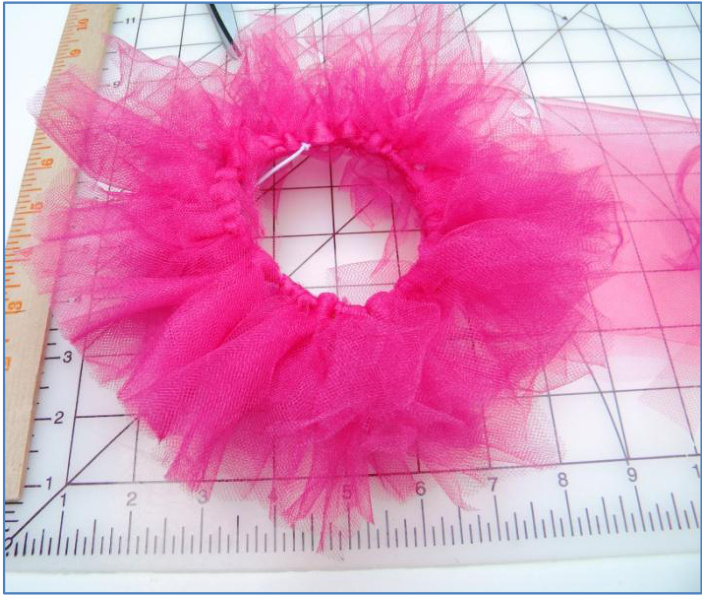
Figure5:Wrapfinished tutu around doll body&tie tightlyina secure knot,making certain thatthereisstill enoughstretchforremoval of thetutu,asneeded.Trimelasticends.
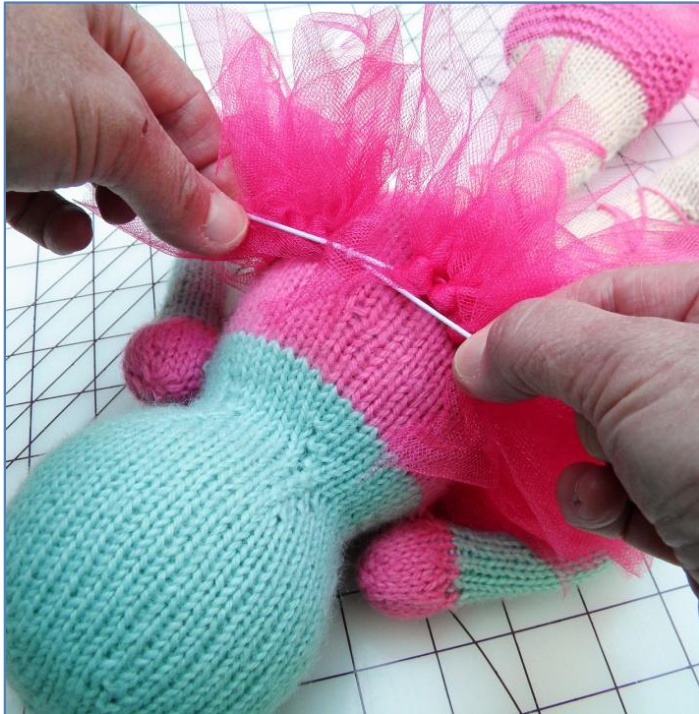
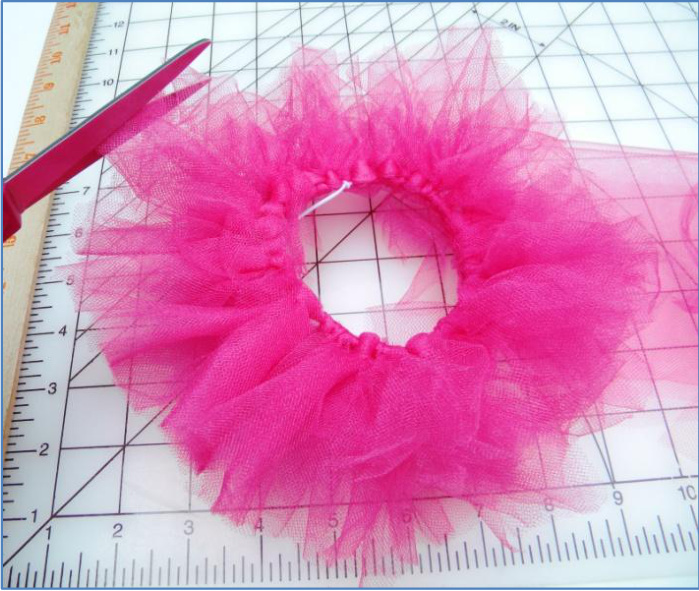
Figure 6:Removetutu&trim edges as needed.Place back ondoll & fluff tulleoutfor a full, superfluffyprima ballerinatutu.
Thank you for purchasing my pattern. I hope that you will enjoy knitting it as much as I enjoyed designing it. Please contact me with questions or concerns at nanderson360@gmail.com. And come visit me at yarnjulepsontheveranda.com or on Ravelry where my user name is Missjulep. Finally,thisisyourpattern,you purchased it.Icannotprevent you from selling individual finished projects, in fact Iencourage it and I hope you make a lot of"yarn money". However, this is a copyrighted pattern so do not make unauthorized copies or sell my patterns without my express permission. Copyright @ Nancy Anderson, yarnjulepsontheveranda.com, September 18, 2013
What's on the Inside Really DOES Matter: Better Shaping for Knit Toys
Written By Nancy Anderson
Introduction:
So you've knit up the cutest toy only to find that the stuffing has made all of that careful shaping almost nonexistent due to the stretching out of the knitted fabric. But firmly stuffing toys prevents them from becoming floppy over time and use, so now what? This simple tutorial will show the reader how to get optimal shaping using stuffing filled knee high hose and can be used for ANY toy pattern that is knit in the round with the head & body worked as one continuous piece.
Materials/Supplies:
Knitted toy work-in-progress Fiber stuffing of choice, (model used poly-fil stuffing) Knee high hose, (Tip: use dark or light depending upon yarn color)
Procedure:
Gathermaterialsbeforestarting toy asstuffingwillbeinserted asrounds areworked. Most of my knitted toys start at the top of the head. So, starting at the top of the head knit all rounds until you get to a few rounds past the neck. Firmly stuff the toe portion of the knee high, to fit the knitted head only and NoT the neck. Contrary to stuffing the toy the "old" way, the neck will not have stuffing in it with this procedure, thus maintaining its' indented shape. Don't worry; it won't droop if hose is stuffed firmly. Before knotting the hose, try it "on for size" by holding the end of the hose closed & inserting it into the knitting. Add or remove stuffing as needed to maintain good shaping. Stuffing should stop about 1 or 2 rounds before the neck shaping begins. Remove hose insert from knitting, adjust the stuffing once more & knot the hose tightly. Replace stuffed insert inside of the knitted head portion.DO NOT TRIM OFF THE EXCESS HOSE.
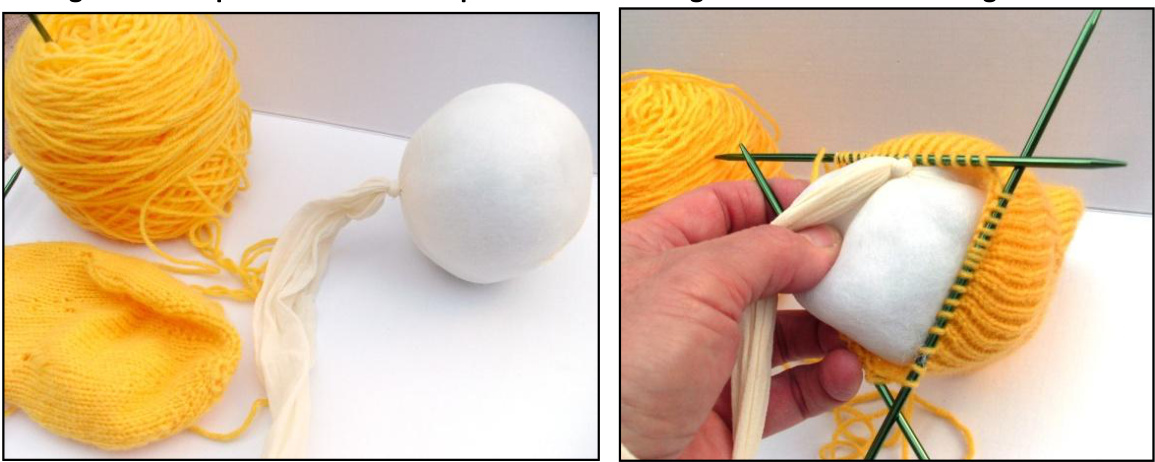
Fig 1: Ball shaped insert for head portion Fig 2: Insert head stuffing into head Make certain that the knot from the head portion is centered within the body, at the neck part of the rounds, (as demonstrated in the following photo, Fig 3). The remainder of the hose will serve as the stuffed insert for the torso portion of the toy. Leaving the stuffed hose insert in place with the un-stuffed portion of the hose hanging freely from inside the knitting, continue to knit the torso portion of the toy as per directed in the pattern, (Fig 4).
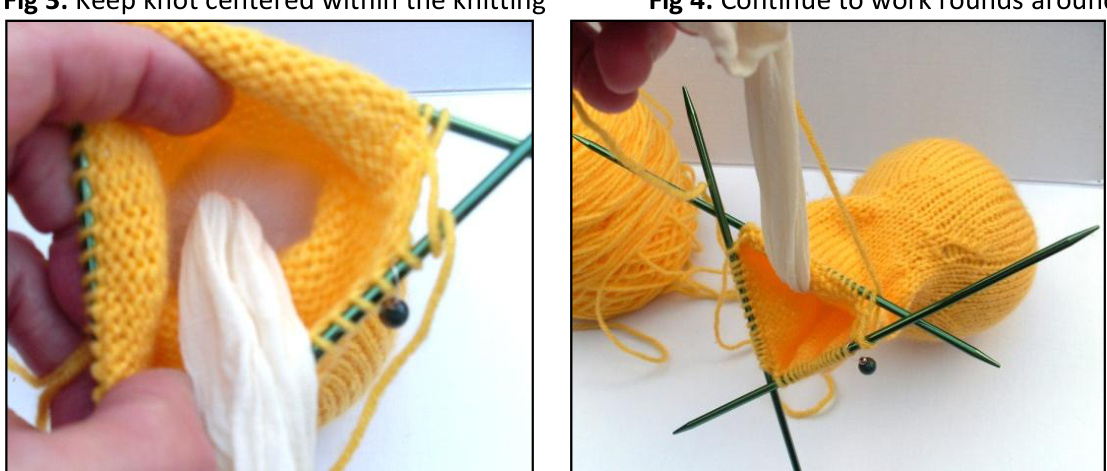
Fig 3: Keep knot centered within the knitting Fig 4: Continue to work rounds around hose Fig 5: Push knit torso back to reveal knot at neck of toy. Begin stuffing firmly. Complete all knitting rounds of torso/body before stuffing the torso section of the hose insert. Once all rounds are knitted, stuff the hose, adjusting for size & shape. Make certain to stop the stuffing 2 or 3 rounds before the end of the torso rounds, in order to make room for the legs of the toy, (this is ilustrated in Fig 8). Once shape & firmness is satisfactory, knot the hose tightly & pull the knitted torso back over the stuffing insert. See figures 5-8below.
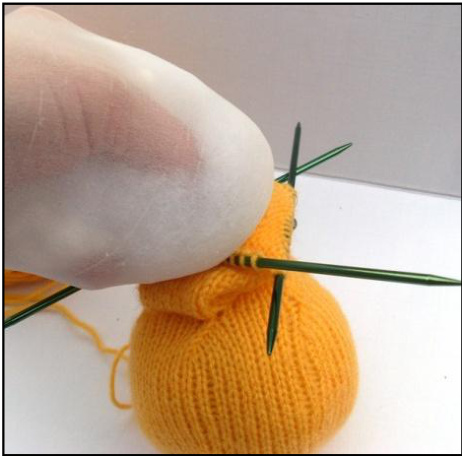
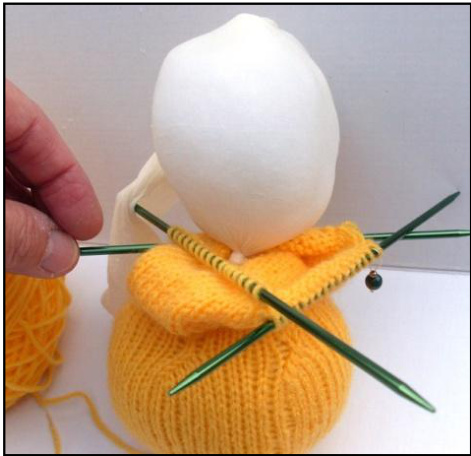
Fig 6: Side view - torso stuffing in progress
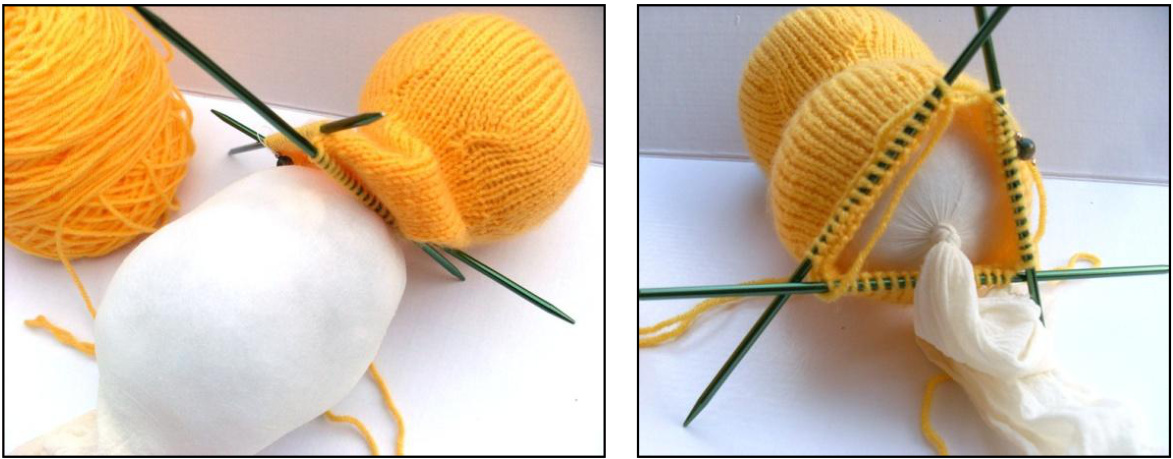
Fig 7: Body portion of stuffing insert finished & knotted. Fig 8: Torso stuffing stops a few rounds before end of torso rounds to allow room for legs. After completing the head & torso and assuring that the stuffing is satisfactory, cut the remainder of the hose at the knot, (Fig 9). Inserts are not necessary for arms & legs. Therefore continue knitting the toy as directed by the pattern. Many of my patterns are knit with head, torso & legs as one piece so I've included a photo of how the stuffing insert looks relative to the divided legs.
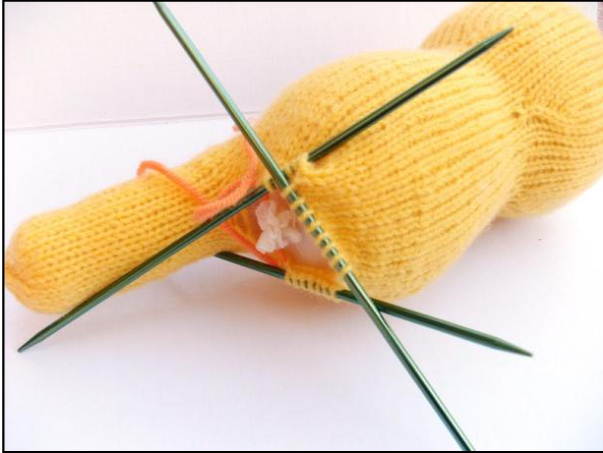
Fig 9: Stuffed insert with excess hose trimmed
The finished product...a wonderfully shapely toy! Thank you for using my stuffing tutorial. I hope it will help to solve shaping concerns in your knitted toys. Please direct your questions or comments for me at nanderson360@gmail.com


