PLAIN TALK SOCKS
How to knit a basic sock By Terry Liann Morris - SailingKnitter These instructions are for a simple women's size sock. Many of the detailed directions were gleaned from the personal knitting notes of brand new sock knitters. These socks have the traditional heel flap, "Dutch" heel cup shaping and gussets. Enjoy!
MATERIALS
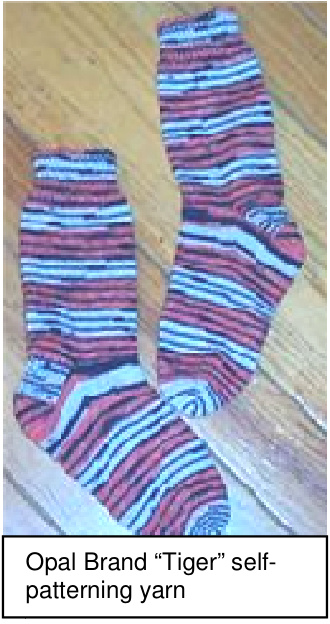
Sock Yarn - about 100 grams (Regia, Opal, Trekking XXL, etc.) US Size 1 or $1\ 1/_{2}$ double pointed needles
GETTING STARTED
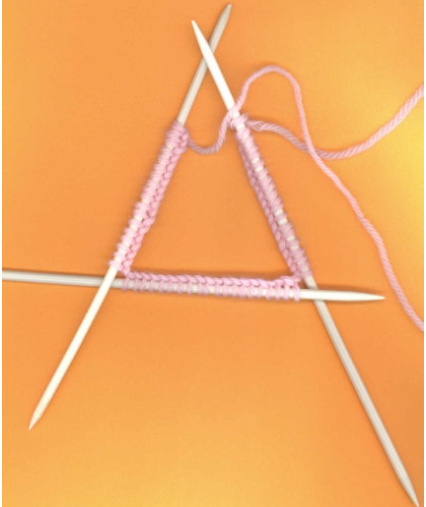
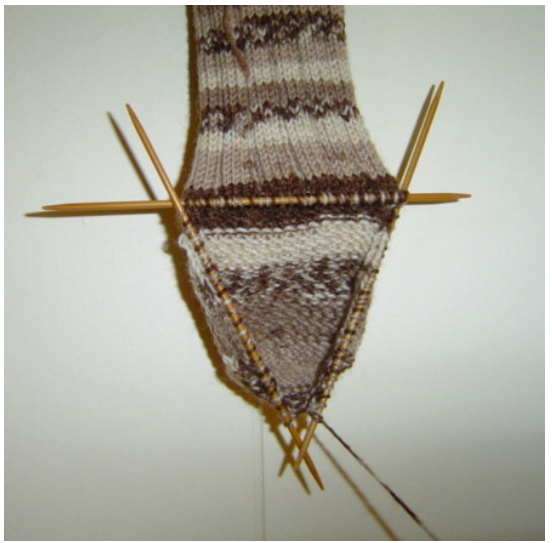
Cast on 60 stitches LOOSEL Y to one double-point needle. An easy way to keep the cast on loose is to use a needle one to two sizes larger - such as US size 2 or 3 and don't pull so tightly on the yarn that the stitches snuggle up against each other. Give a little “breathing room" between cast on stitches, enough so that you can see the needle in-between the stitches. Next, you need to Rearrange these stitches to 3 double pointed needles as follows: Pick up an empty needle. Slip (as if to purl) 20 cast on stitches off to this new needle. Pick up another empty needle. Again, Slip (as if to purl) 20 stitches to this needle. You should have 20 stitches remaining on your cast on needle. ( $3\times20=60$ stitches total) If you used a larger sized needle to cast on, then slip these last 20 stitches to a third size 1 or $1\ 1/_{2}$ doublepoint. Join to make a circle as follows: First, lay work down on a flat surface. Look at the stitches and move them around to make sure that they are not twisted around the needles- that is the nicer-looking cast-on edge is on the inside of the circle. Make a triangle like the picture with the opening (loose ends) at the top. Scrunch the stitches up on the 2 needles that have loose ends so that the empty tips are just about $^1\!/\!_{2}$ inch long.
Use the criss-cross method to join these ends as follows: Slip (as if to purl) the first stitch of the right side needle over to the left side needle. Next, slip what used to be the first stitch on the left side needle, but is now the $2^{\mathsf{n d}}$ stitch, up and over the stitch you just brought over from the other needle and place it on the right side needle. This is a similar motion to binding off except you don't let the stitch drop - instead you put it on the right side needle. This crosses the two stitches and makes for a neater join. Think of it as an exchange of the first stitch from eachneedle. Yank on both of the yarn ends - the tail and the live yarn to the skein. Now you're ready to begin the cuff of your sock.
BEGIN KNITTING CUFF
Work 2x2 (Knit 2. Purl 2) ribbing for 1 14 inches as follows: Now, pick up an empty needle. Carefully Knit the first two stitches of the left hand needle, pulling the yarn tight to tighten up the join. Make sure you are using the right yarn - the yarn to the skein and not the short yarn tail. Re-position the yarn thru the needle tips purl the next two stitches. Continue to work knitting 2 stitches and purling 2 stitches. After you have done this 5 times you should have worked all 20 stitches on your needle. Hmmmm....now you have an empty needle. Shift your empty needle to your right hand and let go of the needle that was in your right hand (move the stitches to the center of the needle so they won't slip off). Now, begin to K2, P2 the stitches on the following needle to the left. The yarn will stretch across the gap between the needles. Yank on the yarn as you begin each of the needles to eliminate a gapping/loose stitch between needles. Continue to knit 2 purl 2 and switch needles - you will be working in a circle. Hold your work so that you are always looking at the outside (public side, right side) of the sock which is on the outside of the tube you are making. Knit until the cuff measures 1 14" from the cast on edge. Stop when you get to the dangling yarn tail which indicates the beginning of a round. (We callit “round" instead of "row" because we are working around a circle - spiraling the yarn around and up the tube).
KNIT THE LEG
StockinetteStitchfor $5\,\%$ inches as follows: Simply start knitting every stitch working around and around until you have $5~\%$ " (about 7" from cast on edge). This is one of the easy parts where you can watch TV. Give the yarn that extra yank between needles.
HEEL FLAP
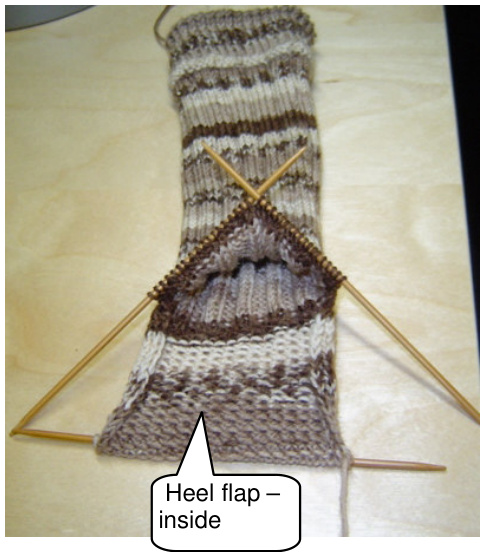
Rearrange your stitches on your needles so that you have 30 stitches on one needle, 15 on each of the other two needles. The easiest way to do this is to knit the next 10 stitches of the next needle without using your “free" needle - just use the right-hand needle that already has 20 stitches on it $(20+10{=}30$ stitches). Now you have one needle with 30 (this is the first row of your heel flap), one needle with 10, and one with 20. So, now with the needle that has 10 stitches on it, use it to slip (as if to purl) 5 stitches off of the last needle. This will give you one needle with 30 stitches on it and the active yarn tail hanging off of the far left side, and 2 needles with 15 stitches each. Start Knitting/Purling back and forth on 2 needles for a total of 28 rows: You have already knit row one when you were rearranging the stitches. STOP. TURN your work. You will ignore those 2 needles that have 15 stitches each on them. Now, with the purl bumps (inside of sock) facing you, Row 2: slip the first stitch as if to purl, purl 29 (to the end of the row). TURN Row 3: slip the first stitch as if to purl, knit 29 (to the end of the row). TURN This is a picture of your goal - a square heel flap hanging down from the leg. The two needles with the 15 stitches each have been ignored for while.
Try this Alternative heel flap pattern: Some people, including me, like to work a different stitch pattern on the heel flap that helps to pull the heel in a little tighter and makes a thicker, better wearing fabric. To do this simply replace the Row 3 above with: slip the first stitch as if to purl, knit 1, repeat this slip1, knit1 pattern to end of row.
TURN THE HEEL
Now we are ready to make the little cup that fits over the bottom of the wearer's heel. We use a technique here called “short rows" to make this shape. It is called short rows because we do not knit all of the stitches on the needle - instead we stop short and turn the work somewhere in the row before reaching the end of the stitches. The last row you worked was a purl row, so you are now ready to knit. Row 1: Slip 1 stitch as if to purl, Knit 18, Slip 1 as if to knit, Knit 1, Pass the slipped stitch over the knit stitch. STOP. TURN. Row 2: Slip 1 as if to purl, Purl 8, Purl 2 stitches together. STOP. TURN. Row 3: Slip 1 as if to purl, Knit 8, Slip 1 as if to knit, Knit 1, Pass slipped stitch over. STOP. TURN. Repeat rows 2 and 3 until all side stitches are gone and you have only 10 stitches left on your needle. You will begin to notice that you are doing your P2tog (purl 2 together) and s1k1psso (slip1, knit1, pass slipped stitch over) across a small gap in the stitches of your needle. This is correct. If you see the gap and you are decreasing over it you are doing the right thing. You are "eating up" a stitch off of each side of your heel on every row.
CONNECT the HEEL TO the INSTEP
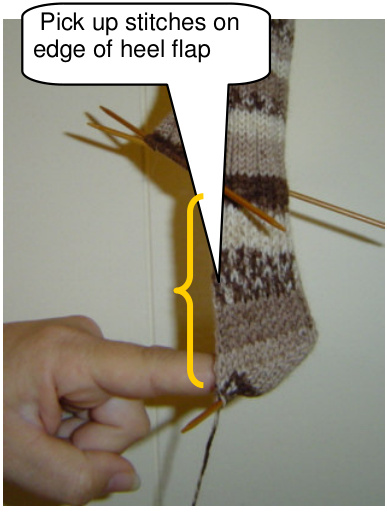
You will notice that you have 10 stitches on the heel needle, and 2 needles with 15 stitches each( $(10+15{+}15=40$ stitches).Wenow need to add stitches to the needles so that we will have enough stitches to fit from the bottom of the foot, up and over the instep, and back down to the bottom again. This is the widest part of a person's foot so we need to have more stitches here than on the cuff & leg portion. We do this by picking up stitches along the edges of the heel flap. Pick up 15 stitches on first side: Your active yarn tail should be on the right hand side of your turned heel. With the right (outside) of the sock facing you, knit 5 of the 10 stitches of the heel. Now, pick up a “free" needle and knit the remaining 5 stitches. You are now ready to start picking up the 15 stitches to add to this needle. When you made the 28-row heel flap, you slipped the first stitch of every row. This creates a double-sized loose stitch at the edges. You should have 14 of these. The heel flap fabric will tend to curl under at the side edges. Use your fingertips to uncurl the edge to see these loops. Now, continue with the right (outside) of the sock facing you. Use a "free" needle to “pick up" the first large loop by inserting the needle tip from the front under both strands of the edge stitch. Next, using your right-hand needle that has the 5 stitches on it, knit these as one Stitch. Continue picking up stitches along the edge. Remember to roll the edge to see the loops clearly. As you approach the end of the heel flap edge, count your stitches to ensure that you will have picked up 14 stitches along the edge. If you are over or short 1 stitch - just relax and forget about it. The corner stitch: After you have your 14 (give or take 1) stitches, you will need to pick up - or “create" a stitch in the corner between the end of the heel flap and the needle at the top of the instep that has 15 stitches on it. This is where the infamous hole usually appears in hand-knitted socks. Using the same picking up technique, lift a strand between stitches and knit it. You will now have 20 stitches on this needle. We will call this needle #1.
INSTEP (Top of Foot at the ankle)
Using a “free needle", Knit across the 15 stitches of the first instep needle. Then, keep knitting across the 15 stitches of the next needle without using another “free" needle so that you will have 30 stitches on this one needle. To do this, just bring the needle tips together and use the right-hand needle to knit off the second 15-stitch instep needle. This is called needle#2.
Pick up 15 stitches on last side: This is just like you did before, but reversing the order - corner stitch first, pick up 14 heel flap edge stitches, then knit the 5 stitches of the heel. Using the needle that has the remaining 5 stitches from your heel on it, “create" your corner stitch like you did before (or you can use a “free" needle if you prefer). Pick up the 14 loose heel flap edge stitches and knit them, then knit the 5 heel stitches. This is needle #3. You should now have needle #1 with 20 stitches, needle #2 with 30 stitches, and needle #3 with 20 stitches. Your stop and start point where you count rounds will always be at the bottom of the foot between needles #1 and #3. Total Stitches $=70$ . Hmmm...more than we started with for the cuff. This is the widest point of your sock so that it fits over your ankle/heel/instep area. Now, you'll need to decrease back down to the original 60 stitches.
Ready, Set, Go for the Gussets!
"Gussets" are the little triangle shapes made from a series of decrease stitches all in the same place on the needles.
GUSSETSDECREASES
Round 1: Knit all 70 stitches (one lap around) Round 2: Knit all 70 stitches Round 3: Decrease round:
needle#1 - knit until there are only 3 stitches left on the needle, then knit 2 together, knit the last stitch. needle #2 - knit all 30 stitches needle #3 - knit 1, slip 1 (as if to knit), knit 1, pass slipped stitch over, knit to the end of the needle. Continue these 3 rounds until you have only 15 stitches on both needle #1 and #3. There will be no change in the number of stitches on needle #2. The diagram below matches the picture which is looking at your sock from the toe to the heel, looking back into the inside of thesock.
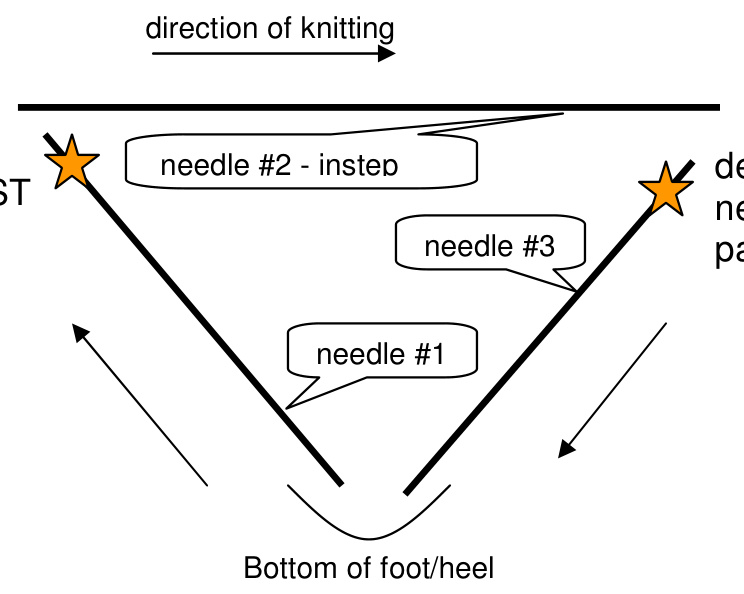
decrease at LAST 3 stitches: knit 2 together, knit 1 decreaseatBEGINNING of needle: knit 1, slip1, knit 1, pass slip stitch over
KNIT THE FOOT
Ahhh... Relax and simply knit until the foot measures about 2 inches shorter than your foot. Remember that we want some stretch/cling in the sock so gently stretch the sock a bit when you estimate this.
SHAPE THE TOE
The toe is shaped with decrease rows similar to how we worked the gussets, but with more decreases in each round, and varying number of plain knit rounds between the decrease rounds. We now will work 2 decreases on needle #2 when we have a decrease row. All decrease rounds used to shape the toe are the same. Each decrease round reduces the total number of stitches by 4 stitches. No decreases are worked on the bottom of the foot because these would be uncomfortable to walk upon.
Begin with a decrease round - Round 1:
Decrease round:
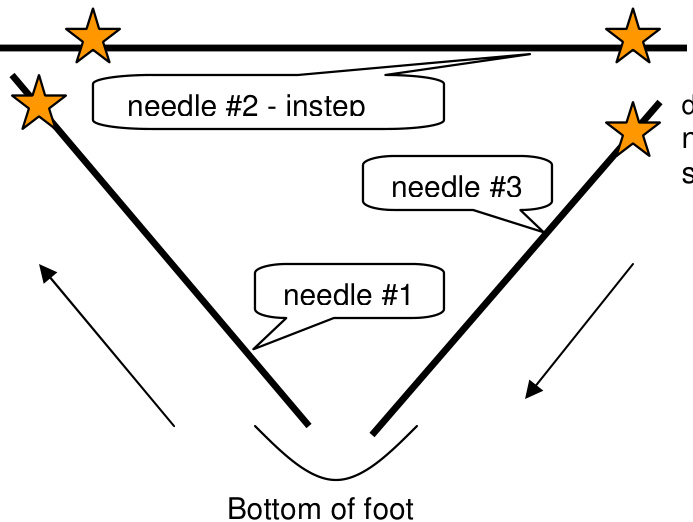
needle#1 - knit until there are only 3 stitches left on the needle, then knit 2 together, knit the last stitch. needle#2 - knit 1, slip 1 (as if to knit), knit 1, pass slipped stitch over. knit until there are only 3 stitches left on the needle, then knit 2 together, knit the last stitch. needle #3 - knit 1, slip 1 (as if to knit), knit 1, pass slipped stitch over, knit to the end of the needle. Notice that the instructions for needles #1 and #3 are the same as when we worked the gussets. The difference now is that we have 2 decreases on needle #2 where before we had none - (see diagram below.) decrease at BEGINNING of needle #2: knit 1, slip 1, knit 1, pass slip stitch over decrease at LAST 3 stitches of needle #2: knit 2 together, knit 1 decrease at LAST 3 stitches of needle #1: knit 2 together, knit 1 decrease at BEGINNING of needle: knit 1, slip1, knit 1, pass slip stitch over
Round 2: knit (count 56 stitches) Round 3: knit Round 4: knit Round 5: work decrease round Round 6: knit (count 52 stitches) Round 7: knit Round 8: work decrease round Round 9: knit (count 48 stitches) Round 10: knit Round 11: work decrease round Round 12: knit (count 44 sts) Round 13: work decrease round Round 14: knit (40 sts) Round 15: work decrease round Round 16: knit (36 sts) Round 17: work decrease round (32 sts) Round 18: work decrease round (28 sts) Round 19: work decrease round (24 sts) Round 20: work decrease round (20 sts) Round 21: work decrease round (16 sts) Don't fret if you are off by 1 or 2 stitches! We all do it! Keep going. If you have too many stitches, then do a decrease on a round where the instructions say to just knit. If you have too few stitches, then just skip a decrease. Where? Your goal is to have $^{1}\!/\!_{2}$ as many stitches on each of needles #1 and #3 as there are on needle #2.(i.e. 11-22-11, 0r 8-16-8) Needles #1 and #3 should have the same number of stitches at the end of each round (bottom of foot).
CLOSEUP THETOE
You should have 4 stitches on needle #1, 8 stitches on needle #2, and 4 stitches on needle #3 for a total of 16 stitches. Put away your empty needle. Now, put needle #1 in your left hand, and needle #3 in your right hand. It will look like you are in the middle of a row. Knit the 4 stitches of needle #1 with the #3 needle. You will now have 8 stitches on needle #3 and an empty #1 needle. Put away this empty needle. Okay, you now have 2 needles, each having 8 stitches. Line these 2 needles up parallel to each other and flatten the sock. Cut your yarn leaving a 12" tail. Thread this onto a darning needle.
Work Kitchner Stitch / Grafting across the 8 pairs of stitches.
Hold your sock so that the needle with the stitches you just knit in BACK and the yarn is dangling from the right-hand side of the back needle. You will have the top of the foot facing you. 1) Swoop your yarn needle down across the front of the 2 parallel needles and insert it into the first stitch on the FRONT needle as if to KNIT pull yarn through and SLIDE the stitch OFF (carefully pick it off the needle with your fingernail). Insert the yarn needle into the next stitch on the FRONT needle as if to PURL , pull yarn through and leave it ON. 2) Swoop yarn needle down across the front of the 2 parallel needles and insert it into the first stitch on the BACK needle as if to PURL, pull yarn through and SLIDE the stitch OFF. Insert the yarn needle into the next stitch of the BACK needle as if to KNIT, pull yarn through and leave the stitch on. Repeat these 2 steps until you have used up all of the stitches. Poke yarn to inside just under the last 2 grafted stitches and weave in. Weave in cast on tail.
FINAL STEP
While your needles are still warm, cast on for the matching sock! This prevents the dreaded SSS (Single Sock Syndrome).


