Straioht Needle Zra口
Contents
| Description | Page Number |
| Contents | 1 |
| 0:1 Introduction | 2 |
| 0:2 Yarn Used | 2 |
| 0:3 Gauge | 2 |
| 0:4 Needles | 2 |
| 0:5 Notions | 3 |
| 0:6 Sizes | 3 |
| 0:7 Abbreviations | 3 |
| 0:8 Hints & Tips | |
| Chapter 1: 5 Sets of Needles | 3 |
| 1:1 Main Body | 3-4 |
| 1:2 Ribbed Edging | 3-4 |
| 1:3 Fastenings | 4 |
| Chapter 2: 8 Sets of Needles | 4 |
| 2:1 Main Body | 4 |
| 2:2 Ribbed Edging | 4 |
| 2:3 Fastenings | 4 |
| Chapter 3: 10 Sets of Needles | 4 |
| 3:1 Main Body | 4-5 |
| 3:2 Ribbed Edging | 4-5 |
| 3:3 Fastenings | 5 |
| Chapter 4:18 Sets of Needles | 5 |
| 4:1 Main Body | 5 |
| 4:2 Ribbed Edging | 5 |
| 4:3 Fastenings | 5 |
| Chapter 5: 20 Sets of Needles | 5 |
| 5:1 Main Body | 5-6 |
| 5:2 Ribbed Edging | 5-6 |
| 5:3 Fastenings | 6 6 |
| Chapter 6: Finishing | 6-7 |
| 6:1 Turn Down for Needle Head Holders | 6 |
| 6:2 Divisions for Needle Head Holders | |
| 7 | |
| 6:3NeedleHolders&Tie Cords | 7 |
| Chapter 7: The Finished Wrap | 8 |
me. Please ask permission before re-publishing this pattern. Not for Resale
0:1 Introduction
This needle wrap was designed to hold my 18 pairs of 14"/36cm bamboo needles (This e-book pattern has been written up for 5 different lengths of needles). It is worked as a flat piece and does require some sewing together at the end.
0:2 Yarn used
Various double knit yarns. Iused left over Patons DK FAB Aqua, Teddy Avril DK (Dark Green, Yellow, Turquoise) and an unbanded blue-grey DK.
0:3 Gauge
20st x 26rws 4"/10cm in stst
0:4 Needles
4mm US6 Straight Needles 14"/36cm two 4mm US6 dpn I used bamboo, but choose whatever you feel comfortable with - it could also be worked on one set of circular needles if your straight needles are not long enough. me. Please ask permission before re-publishing this pattern. Not for Resale
0:5 Notions
tape measure blunt needle
0:6 Sizes
7"/18cm, [10"/25cm, 12"/30cm, 14"/36cm, 16"/40cm]
0:7 Abbreviations
| Approx.-approximately bo-bind-off/cast-off co - cast on dpn - double pointed needles k - knit k2tog - knit two together m - make pm - place marker | rem - remaining rpt - repeat rw-row rws-rows st-stitch/es stst - stocking stitch ttrs - Thread through remaining stitches and secure wile-weave einlooseends |
0:8 Hints & Tips
To get the stripe effect I have on my wrap, you can knit and cut the yarn at the interval of your choice or if you find it easier to knit as one piece, cut and join the yarn first. I used my yarn in random lengths of stripes. However if you wished to have the yarn in two row stripes I worked out you would need to cut and join the yarn at approx. 115"/290cm intervals, joining by tying yarn in a small knot. You may then roll the yarn into a ball and work your main body using your very own custom made multi-coloured ball.
Chapter 1: 5 Sets of Needles
Instructions: 1:1 Main Body: Co 35 [55, 65, 75, 85] st Rw 1-6: k1, p1 rib Rws 1, 3, 5: k1, p1 Rws 2, 4, 6: p1, k1 Rws 7-36: stst - k odd rws, p even rws. Rws 37, 39, 41: k1, p1 me. Please ask permission before re-publishing this pattern. Not for Resale
4 of 8
Rws 38, 40, 42: p1, k1 Rw 43: bo.
1:2 Ribbed Edging:
Pick-up 42 stitches from one side of work then work as follows (starting rw1 on the right side). Rws 1, 3, 5, 7, 9, 11, 13, 15, 17: right side (knit side of main) k2, p1. Rws 2. 4,6, 8, 10, 12, 14, 16, 18: wrong side (purl side of main) p2, k1. Rw19:BO. Turn work and rpt for opposite side. 1:3 Fastenings (Tie Cords, m4): co 2st, k rw turn needle and rpt until measures approx. 28.5"/72.5cm, boff ttrs.
Chapter 2: 8 Sets of Needles
Instructions: 2:1 Main Body: Co 35 [55, 65, 75, 85] st Rw 1-6: k1, p1 rib Rws 1, 3, 5: k1, p1 Rws 2, 4, 6: p1, k1 Rws 7-54: stst - k odd rws, p even rws. Rws 55,57, 59: k1, p1 Rws 56, 58, 60: p1, k1 Rw 61: bo. Pick-up 60 stitches from one side of work then work as follows (starting rw1 on the right side). Rws 1, 3, 5, 7, 9, 11, 13, 15, 17: right side (knit side of main) k2, p1. Rws 2, 4. 6, 8, 10, 12, 14, 16, 18: wrong side (purl side of main) p2, k1. Rw19:BO. Turn work and rpt for opposite side. 2:3 Fastenings (Tie Cords, m4): co 2st, k rw turn needle and rpt until measures approx. 31.5"/80cm, boff ttrs.
Chapter 3: 10 Sets of Needles
Instructions: 3:1 Main Body: Co 35 [55, 65, 75, 85] st Rw 1-6: k1, p1 rib Rws 1, 3, 5: k1, p1 Rws 2, 4, 6: p1, k1 me. Please ask permission before re-publishing this pattern. Not for Resale
5 of 8
Rws 7-66: stst - k odd rws, p even rws. Rws 67, 69, 71: k1, p1 Rws 68, 70, 72: p1, k1 Rw 73: bo.
3:2 Ribbed Edging:
Pick-up 72 stitches from one side of work then work as follows (starting rw1 on the right side). Rws 1, 3, 5, 7, 9, 11, 13, 15, 17: right side (knit side of main) k2, p1. Rws 2, 4,6, 8, 10, 12, 14, 16, 18: wrong side (purl side of main) p2, k1. Rw19:BO. Turn work and rpt for opposite side. 3:3 Fastenings (Tie Cords, m4): co 2st, k rw turn needle and rpt until measures approx. 33.5"/85cm, boff ttrs.
Chapter 4: 18 Sets of Needles
Instructions: 4:1 Main Body: Co 35 [55, 65, 75, 85] st Rw 1-6: k1, p1 rib Rws 1, 3, 5: k1, p1 Rws 2, 4, 6: p1, k1 Rws 7-114: stst - k odd rws, p even rws. Rws 115, 117, 119: k1, p1 Rws 116, 118, 120: p1, k1 Rw 121: bo. 4:2Ribbed Edging: Pick-up 120 stitches from one side of work then work as follows (starting rw1 on the right side). Rws 1, 3, 5, 7, 9, 11, 13, 15, 17: right side (knit side of main) k2, p1. Rws 2, 4, 6, 8, 10, 12, 14, 16, 18: wrong side (purl side of main) p2, k1. Rw19:BO. Turn work and rpt for opposite side. 4:3 Fastenings (Tie Cords, m4): co 2st, k rw turn needle and rpt until measures approx. 41.5"/105cm, boff ttrs.
Chapter 5: 20 Sets of Needles
Instructions: 5:1 Main Body: Co 35 [55, 65, 75, 85] st Rw 1-6: k1, p1 rib me. Please ask permission before re-publishing this pattern. Not for Resale
6 of 8
Rws 1, 3, 5: k1, p1 Rws 2, 4, 6: p1, k1 Rws 7-126: stst - k odd rws, p even rws. Rws 127, 129, 131:k1, p1 Rws 128, 130, 132: p1, k1 Rw 133: bo.
5:2 Ribbed Edging:
Pick-up 132 stitches from one side of work then work as follows (starting rw1 on the right side). Rws 1, 3, 5, 7, 9, 11, 13, 15, 17: right side (knit side of main) k2, p1. Rws 2. 4., 6, 8, 10, 12, 14, 16, 18: wrong side (purl side of main) p2, k1. Rw19:BO. Turn work and rpt for opposite side. 5:3 Fastenings (Tie Cords, m4): 0 2st, k rw turn needle and rpt until measures approx. 43.5"/110cm, bofftr
Chapter 6: Finishing
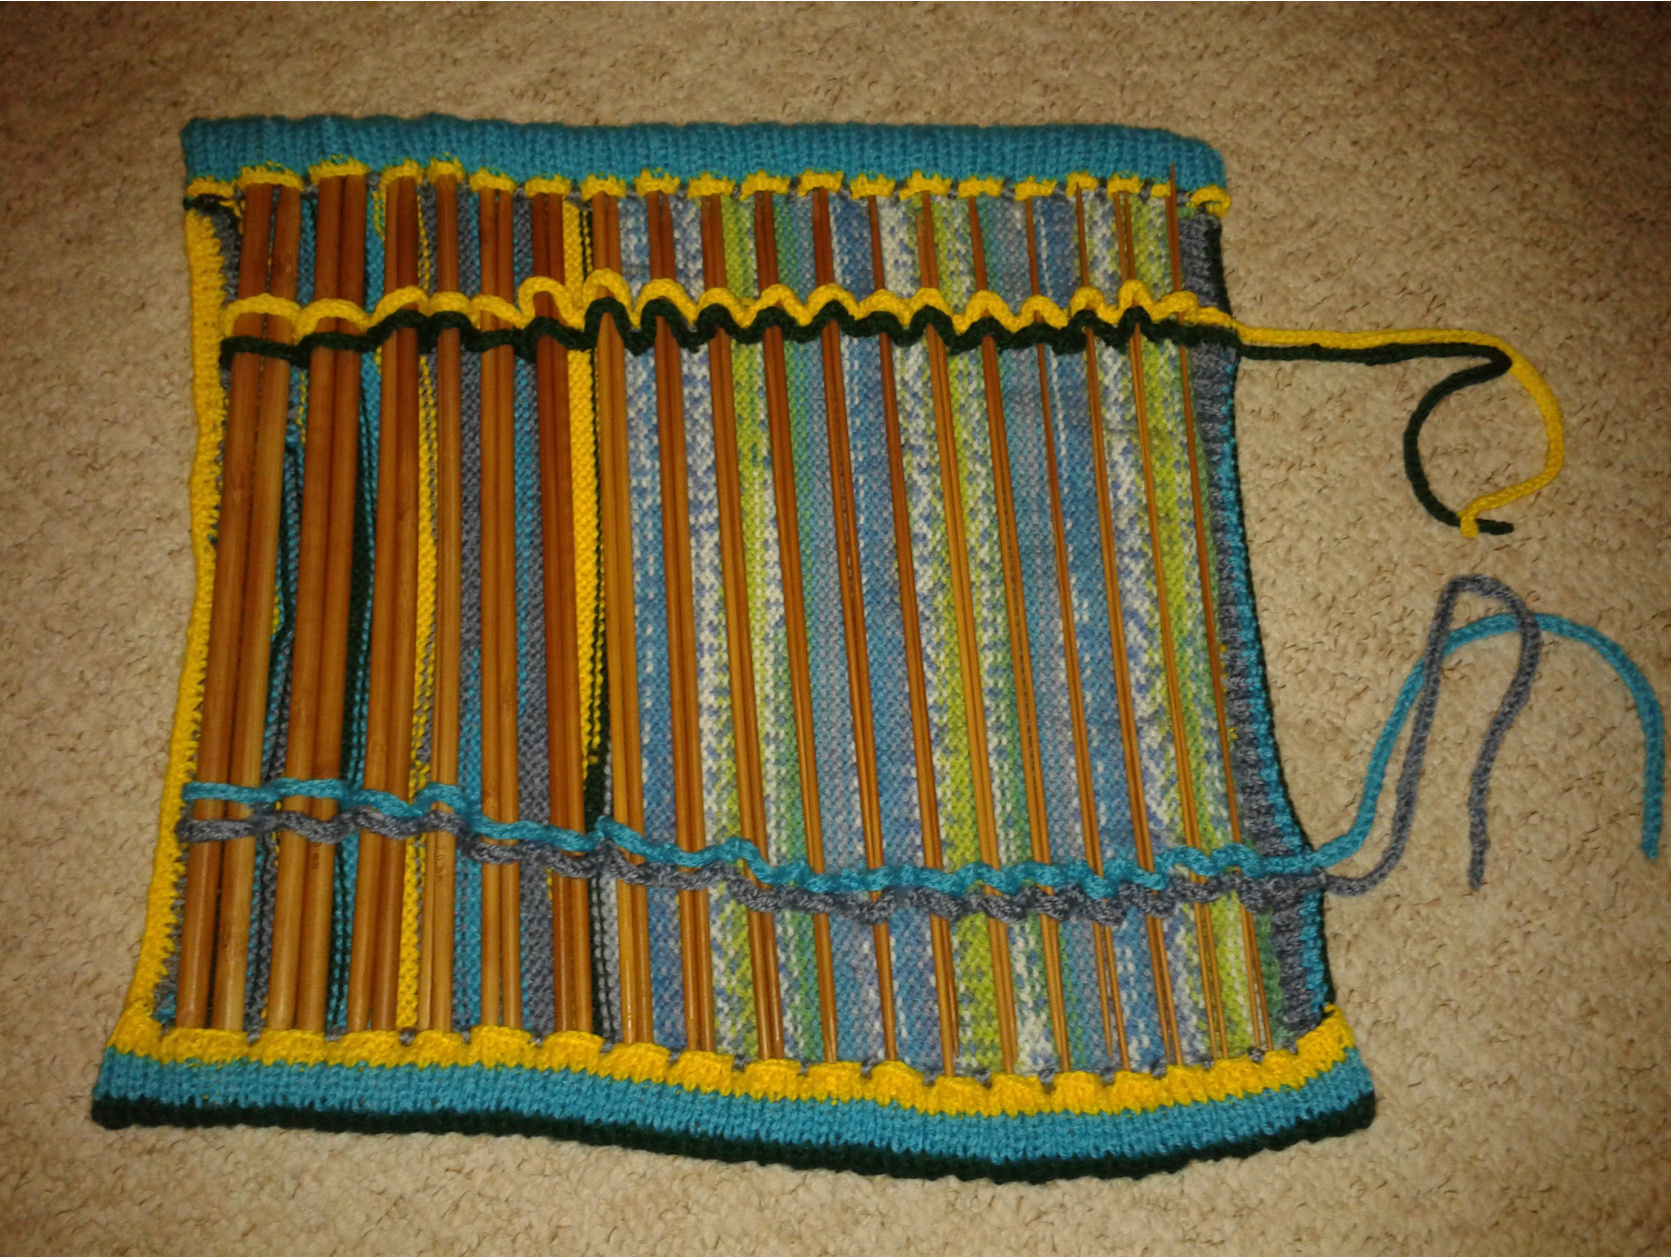
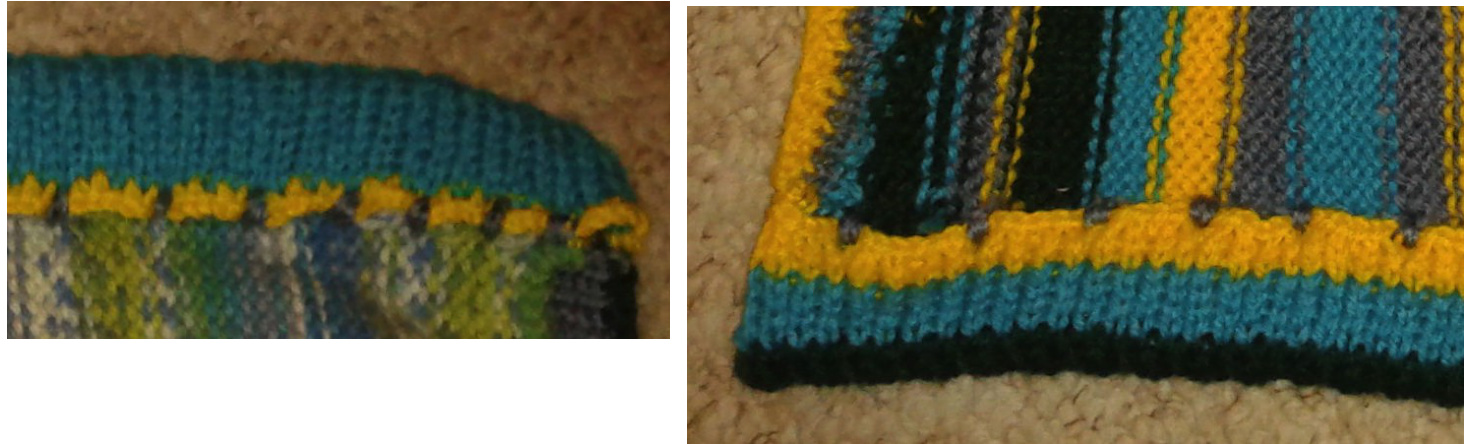
6:1 Turn Down for Needle Head Holders
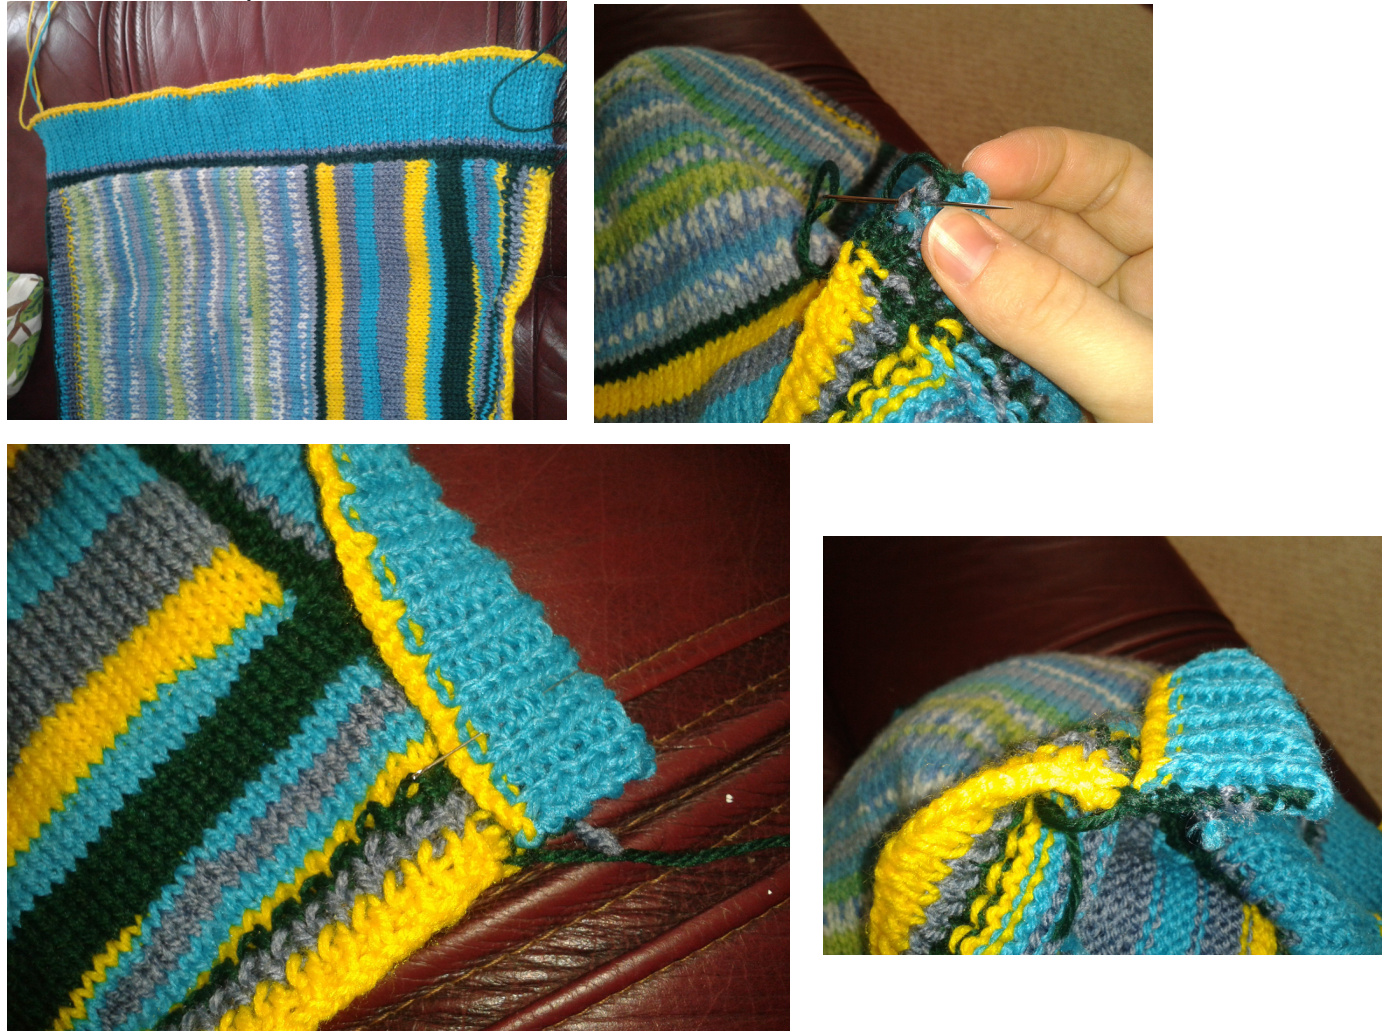
Fold down wide ribbed sides (inside-out so you sew on the inside) and sew along edges to secure. See pictures below.
me. Please ask permission before re-publishing this pattern. Not for Resale
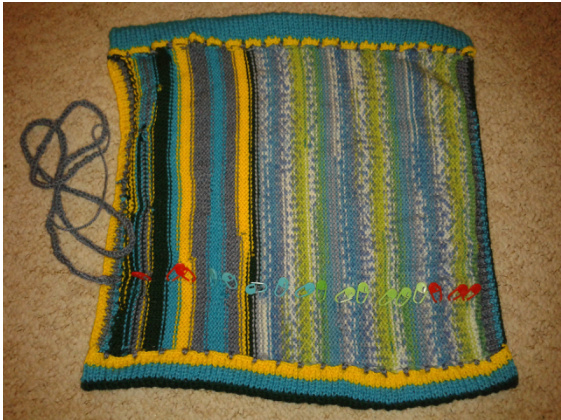
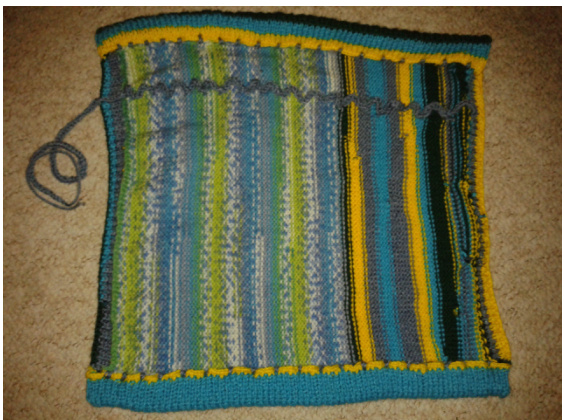
6:2 Divisions for Needle Head Holders
Now sew down at the beginning of the main work/edge of ribbing and then at intervals of every 6 stitches to allow a space to secure the needle heads. See the pictures below (l used the blue-grey yarn to sew).
6:3 Needle Holders & Tie Cords
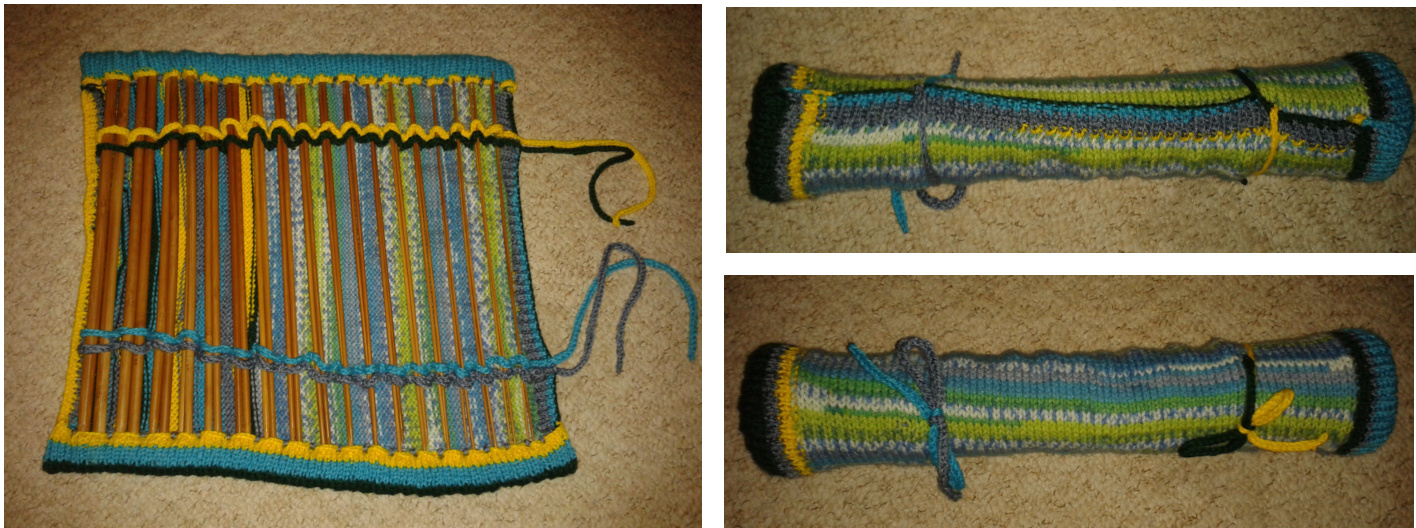
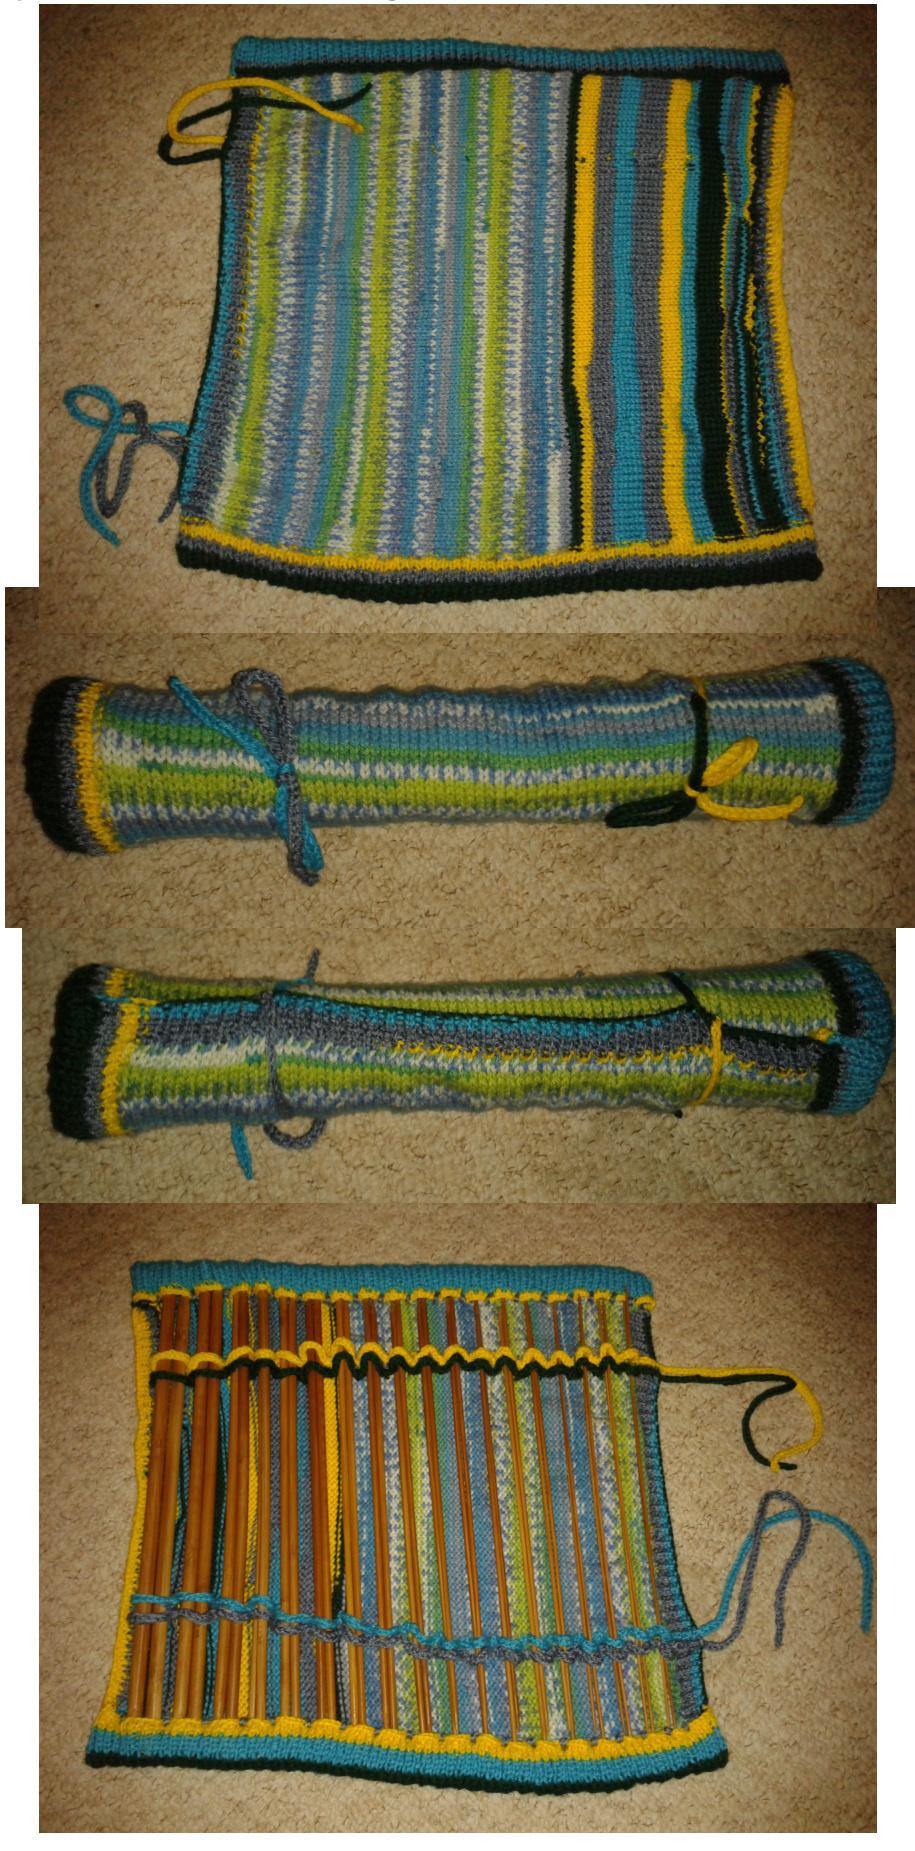
Now, attach the cords starting at the edge of the ribbing/start of the main work as in pictures. I would recommend marking the position of attachment so the work is even. Once the last sew-tacking is secured finish by sewing cord to the edge of the work by sewing. from end of main work/beginning of ribbing. Once all four cords are attached (see third picture below) you are ready to insert your needles and away you go!
me. Please ask permission before re-publishing this pattern. Not for Resale
8 of 8
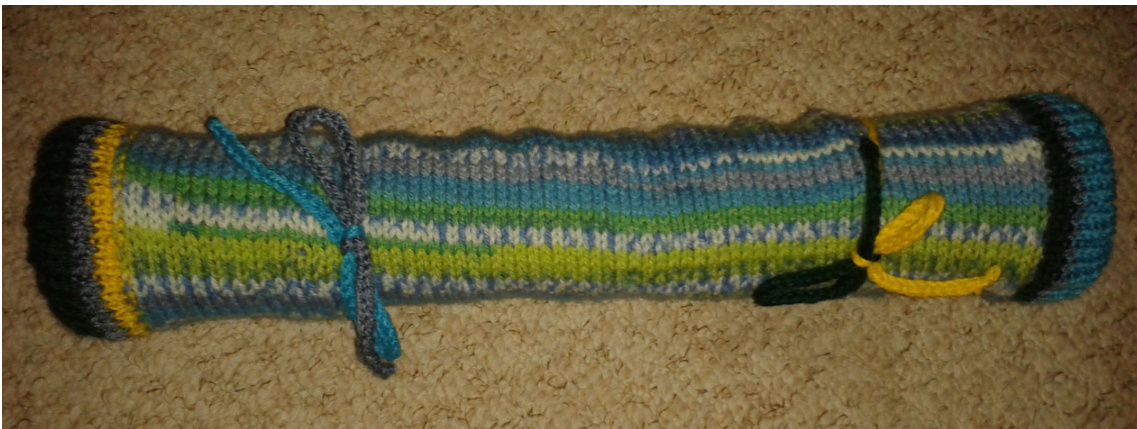
Chapter 7: The Finished Wrap
Your finished wrap should look something like this:
me. Please ask permission before re-publishing this pattern. Not for Resale


