"LOVELY BESSIE"
A Lace Shawl Designed By Priscilla White-Tocker
This heart-shaped shawl is inspired by my paternal grandmother, Bessie White, born Harriet Bessie Paine. Bessie lived well into her nineties and was a no frills, salt of the earth Yankee woman who grew up on a farm and was a calm, kind and generous "people person". It seems that I remember Bessie describing everyone she knew as a being a "lovely person", so here is my opportunity to pay tribute to her loveliness as well. The lace patterns are inspired by farming themes - the two sets of yarn overs at each edge and on either side of center columns are inspired by the Ploughed Acre lace stitch, and the geometric patterns in the main body of the shawl evoke acres of farmland and smaller garden plots. Also, the simple diamond lace design (shown in Chart B of this pattern) has been known throughout history as "Queen Bess's Lace", thus making it the perfect choice for a shawl in her memory. Bessie always shunned brightly colored clothing for herself, so the beautiful warm earth tones of this yarn make it a perfect choice, and the attached diamond lace edging gives it a touch of femininity., This pattern uses a triangular shawl construction and can be easily customized. If you wish, you can knit the shawl using just Chart B or just Chart C, and you can repeat each chart as many times as you like. You could even potentially knit the shawl alternating each chart -although I didn't actually try this to see what it would look like. You could also decide to eliminate the edging, and just bind it off when you run out of yarn - I would recommend a stretchy lace bind-off or you could also choose a decorative picot bind-off. So go ahead and adapt the pattern however you like - Bessie wouldn't mind!
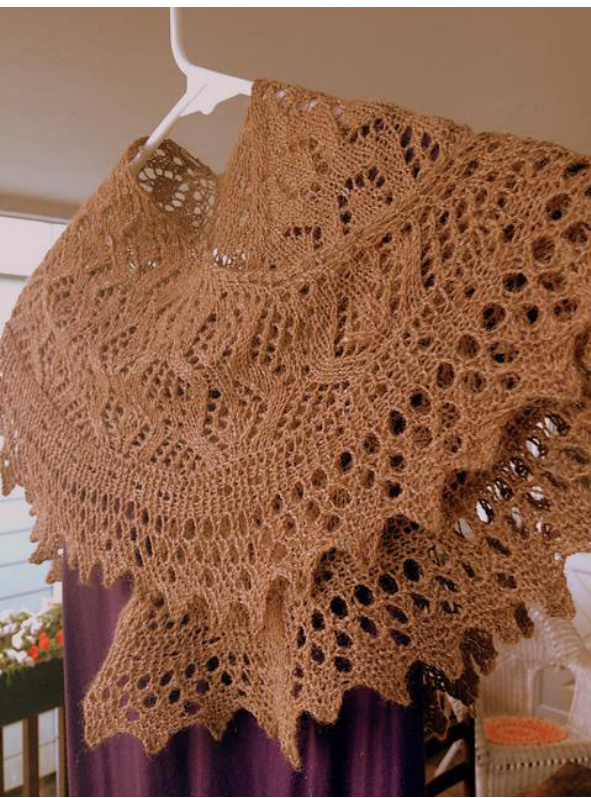
This pattern is designed to be knit with any weight/gauge of yarn and any size needles to whatever measurements you desire. The suggested materials and gauge provided in the instructions were used to create the shawl in this photo, which was made by working Charts B and C twice and measures 17" from the top center back to tip, with a 37" wingspan. This pattern assumes that the knitter has experience working all of the types of stitches in this shawl, particularly yarn overs, and is also familiar with the use of lifelines and with blocking finished pieces. It also assumes familiarity with reading charts, although written instructions for each chart appear in the Addendum. The instructions are meant to provide detailed guidance for knitters who have never created a triangular lace shawl with multiple repeats. If you would like additional instruction on how to work any of the stitches, there are excellent instructional videos on www.knittinghelp.com
INSTRUCTIONSFORTHESHAWL
Suggested Materials: (used for shawl in the photo) ·Yarn: Foxhill Farm Cormo Laceweight 825.0 yards (754.4m grams per skein); shown in light brown using 1 skein · Needles: US# 4 circular, at least 16". Also one US#4 double point needle, or size for desired gauge. Shawl in photo knit to gauge of 9" per inch (unblocked) in stockinette ·Round stitch markers to mark off sections and repeats of the patterns · Waste yarn (optional)- several yards, if you wish to add lifelines ·Blocking board and rust-resistant T- pins for blocking out the shawl when completed
\*\*Before you start to knit, please note:\*\*
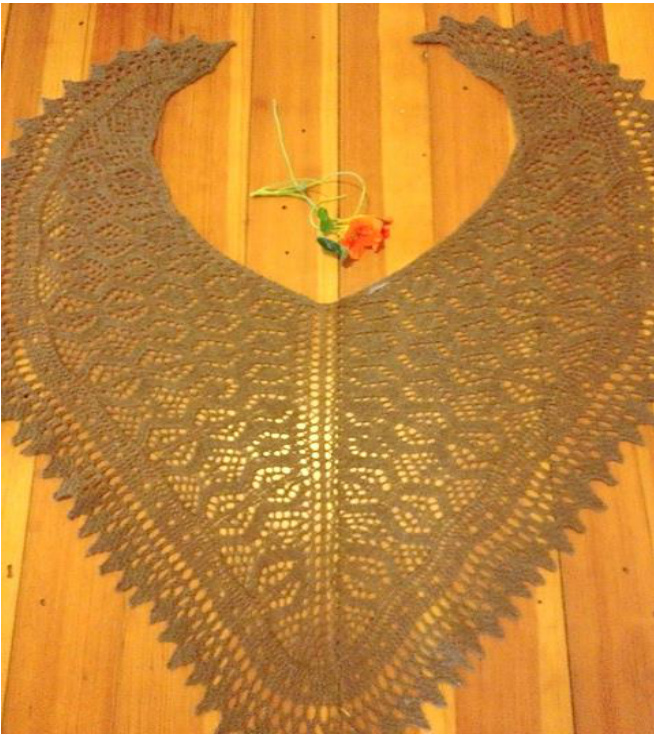
. While most of the right side rows will increase by 8 stitches (i.e., 4 extra yarn overs on each half of the shawl), row 15 of Charts B and Chart C will increase by 12 stitches (or 6 extra yarn overs on each half). . 1 highly recommend that you place stitch markers after the first 2 stitches on the right edge of the shawl, before the last 2 stitches on the left edge, and on either side of the 2 stitch center column (these are all knit as P2 on the right side). Also place markers before and after each of the sets of repeated stitches designated by the blue shading. Doing this will make it much easier for you to keep track of your stitch count and to identify where any mistakes may have occurred so that you can make adjustments. Keep slipping the markers upward as you go and add additional markers as your shawl widens. . The 2 stitches which make up the center column of the shawl should always line up directly above one another to make a straight column dividing the two halves of the shawl (see photo on the last page of this pattern)
General Instructions for Using the Charts:
Ictions preceding it; however here are some general notes to review before startine For Charts A, B, and C, the right side ( Rs) rows are read from right to left and worked upward from the bottom right hand corner of each chart. Wrong side (Ws) rows of these charts (even numbered rows) are purled straight across from left to right. Charts are written to show all of the stitches as they appear on the RS, so when you are knitting the WS rows the K stiches are done as P, and vice versa (see Legend).. · The blue shaded areas in Charts B and C indicate the sets of stitches that are worked multiple times per row. The blue area is worked only once the first time you knit Chart B, but is worked multiple times in subsequent repeats of this chart and Chart C. · The gray shaded areas indicate where there are no stitches, so you willskip across these areas and work the rows as if they were not there. · For Chart D, which is the edging, row 1 (RS) starts at the top right hand corner and you will read the chart downward. RS rows (odd numbered) are read from R to L and Ws (even numbered) rows from left to right. As with the other charts, the symbols indicate how the stitches will appear on the RS of the edging so nav nartirular attention to the I egend when voll are knitting the W/S rows nf the edging
LEGEND
| K =knit (P =purlon WSrows) | |
| P =purl(K=knit onWS rows) | |
| 0 | YO=yarnover |
| K2ToG=knittwostitchestogether | |
| (K2TOGonWSrows-seeChartDrow4) | |
| S1-K2TOG=Slip 1 stitch as if to knit, knit the next two stitches together, pass slipped stitch back over them from right to left | |
| x | BO=bindoff |
| + | StitchleftonneedleafterBOstitches |
| No stitch | |
| Sectiontoberepeatedacrossrow | |
Starting to Knit:
Cast 8 stitches onto your circular needle. Purl three rows, then: 1. (RS) K1, YO, K2, YO, K2, YO, K2, YO, K1 (12 stitches) 2. (WS) P across 3. (RS) K1, YO, K3, YO, K4, YO, K3, YO, K1 (16 stiches) 4. (wS) P across You will now begin Chart A, starting in lower right hand corner with Row 1. Remember to work Row 1 and all RS rows from right to left, and row 2 and all WS rows from left to right, remembering to follow the Legend for how the stitches are worked on the RS and WS rows. You will knit Chart A once only. \*\*If you prefer using written instructions rather than charts, you will now proceed to the Addendum section of this pattern.\*\*
C hart A (Set-Up Chart)
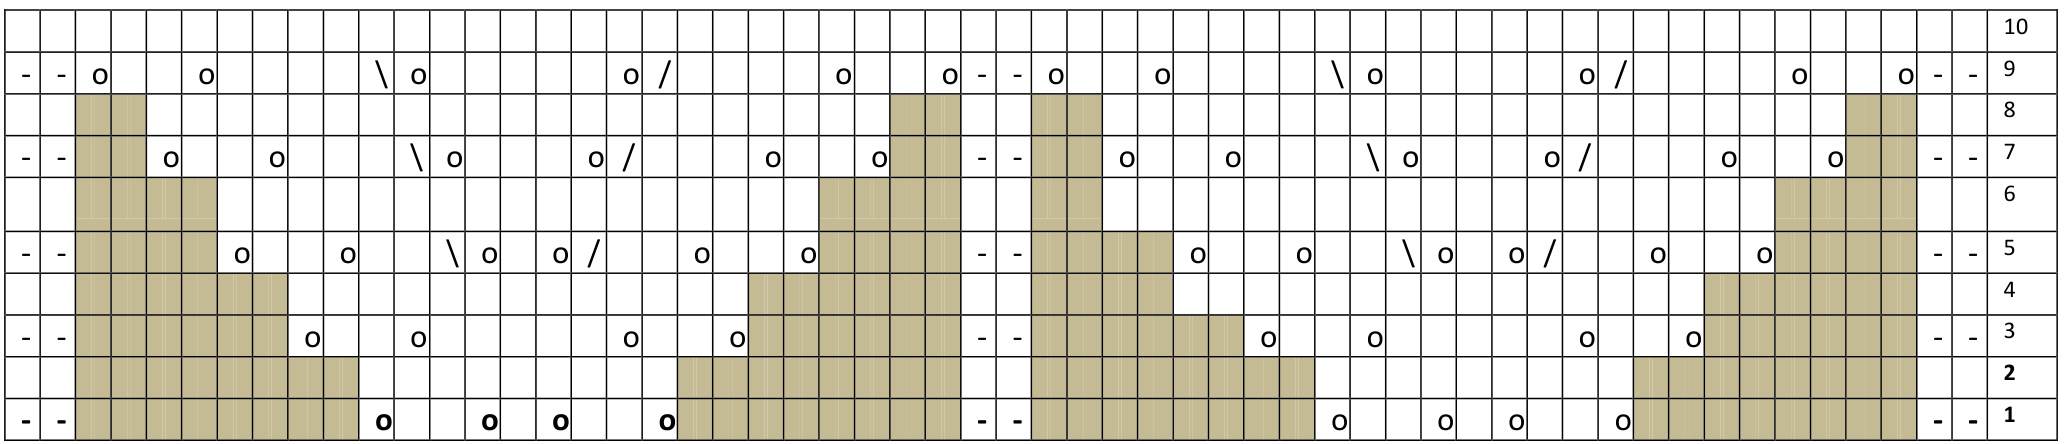
Chart B- Body of Shawl Pattern 1
This chart represents just one half of the shawl (without showing the P2 stitches that you will continue to knit at each edge and down the center of every RS row), as both halves are identical. The RS rows are the odd numbered rows which you willstart from the bottom right corner, You will start each Rs row with a P2, then work across the row on the chart from right to let, then P2 for the center column, then repeat the row again from right to left, then finish with another P2. If you have marked off these 3 columns with stich markers, this will help you to remember to keep knitting these P2's as you knit across each RS row. All of the WS rows are purled straight across. The first time you knit this chart, you will knit the blue shaded area only once on each half of the shawl, and then you will knit it multiple times in subsequent repeats of the chart in order to complete the row. For example, the second time you knit Chart B you will repeat the blue shaded area 3 times on each half, the third time you would repeat it 5 times, etc.
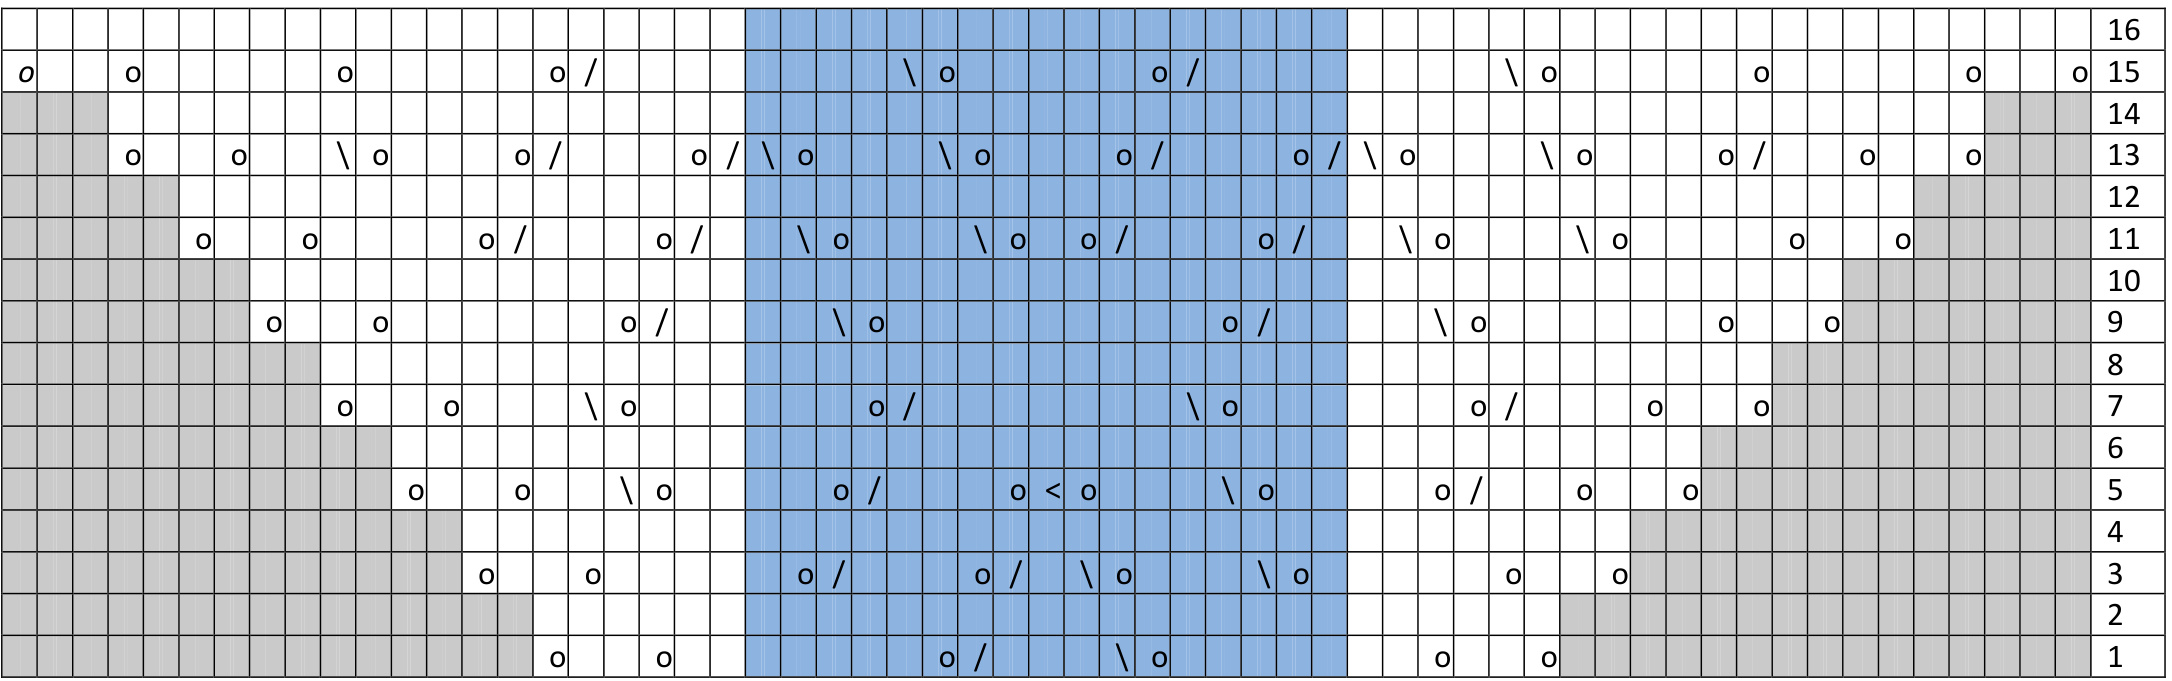
First time completing Chart B will give you 124 stitches. Repeat Chart B as many times as you wish, ending on row 16 before transitioning to Chart C.
Chart C - Body of Shawl Pattern 2 ^
When you have repeated Chart B as many times as desired, you may transition to Chart C. As with Chart B, this chart also represents just one half of the shawl, as both halves are identical. The right side rows are the odd numbered rows which you will start from the bottom right corner, As with Chart B, you will start each right side row with a P2, then work across the row on the chart from right to left, then P2 for the center column, then repeat the row again from right to left, then finish with another P2. All of the WS rows are purled straight across. The blue shaded area will be repeated as many times as necessary to complete each row. Repeat this chart until you reach your desired length, allowing for the edging. Break off the yarn, allowing enough to weave in the ends.
| 16 | ||||||||||||||||||||||||||||||||||||
| 0 | 0/ //o | 0 / 0 /0 / 0 | 0/o /o/ | 0 | 0 | 0 | 15 | |||||||||||||||||||||||||||||
| 0 | 14 | |||||||||||||||||||||||||||||||||||
| o | o | / | o/ | 0 | 0 | 0l | //o\ | ol | o | 0 | 13 | |||||||||||||||||||||||||
| 12 | ||||||||||||||||||||||||||||||||||||
| o | o | 0l | o | o | oN | 0 | / | 0 | o | o | o | 11 | ||||||||||||||||||||||||
| 10 | ||||||||||||||||||||||||||||||||||||
| 0 | 0 | o | o/ /No V0 | 0 | 0 | /o/o/Vo\o | 0 | 9 | ||||||||||||||||||||||||||||
| 8 | ||||||||||||||||||||||||||||||||||||
| 0 | 0 | 0 | o | 0 | o | 0 | 7 6 | |||||||||||||||||||||||||||||
| o | o | o | 5 | |||||||||||||||||||||||||||||||||
| 0 | 0 | 0 | 4 | |||||||||||||||||||||||||||||||||
| 0 | o | o | 0 | 0 0 | ol 0 | 0 | o | 0 | 0 | 3 2 1 |
Instructions for the Edging: (both written and charted)
With new ballof yarn, cast 13 stitches onto the Size 4 DPN. With the RS of the shawl facing you, hold the leftside of the circular needle tip in your right hand. Begin edging pattern by knitting Row 1, passing stitches from DPN to circular needle as you knit. Turn shawl to the WS, so that the circular needle tip is now in your left hand. Knit row 2 and pass the stitches back onto the DPN. While the last stitch of all of the even (Ws) rows is written as K1, you will actually be knitting this stitch together with a shawl body stitch, thus attaching the edging directly to the shawl as you work. Cast on 13 stitches. As with the shawl, the right side rows are worked from right to left, and the wrong side rows from left to right. . The number of stitches in each row changes, although you will begin and end each repeat with 13 stitches. Row 1 (RS): S1, K4, YO twice, K2-tog, YO twice, K2-tog, K4 Row 2: (WS) K6, P1, K2, P1, K5 Row 3 (RS) S1, K14 Row 4: (WS) K12, YO, K2-tog, K1 Repeat untilallof the body of the shawl stitches have been attached to the edging. Since your number of bind-off stitches will vary depending on the size of your shawl, you may not end with Row 8 of the edging, but it willook fine if you stop with whichever wrong side row attaches the last stitch and then bind off the edging stitches as if knitting a right side row. Weave in all ends and block.
CHART D- Edging
S= Slip Stitch
| 0 | / | S | 1 | |||||||||||||||
| 0 | 0 | 0 | ||||||||||||||||
| - | - | - | 2 | |||||||||||||||
| S | 3 | |||||||||||||||||
| - | 0 | 4 | ||||||||||||||||
| ! | 0 | 0 | 0 | 0 | / | 0 | 0 | S | 5 | |||||||||
| 1 | 6 | |||||||||||||||||
| S | 7 | |||||||||||||||||
| x | x | x | x | x | + | 8 |
ADDENDUM
Written Instructions for Charts:
Please note that in these written instructions, your P2 center column will be highlighted in yellow, This will help to orient you in the instructions and will enable you to keep track of the divide between the two halves of the shawl.
Chart A: (Set-Up Chart)
Row 1: P2, YO, K2, YO, K1, YO, K2, YO, P2, YO, K2, YO, K1, YO, K2, YO, P2 (24 stitches) Row 2 (and all other WS rows) - P straight across Row 3: P2, YO, K2, YO, K5, YO, K2, YO, P2, YO, K2, YO, K5, YO, K2, YO, P2 (32 stitches) Row 5: P2, YO, K2, YO, K2, K2TOG, YO, K1, YO, SSK, K2, YO, K2, YO, P2, YO, K2, YO, K2, K2TOG, YO, K1, YO, SSK, K2, YO, K2, YO, P2 (40 stitches) Row 7: P2, YO, K2, YO, K3, K2TOG, YO, K3, YO, SSK, K3, YO, K2, YO, P2, YO, K2, YO, K3, K2TOG, YO, K3, YO, SSK, K3, YO, K2, YO, P2 (48 stitches) Row 9: P2, YO, K2, YO, K4, K2TOG, YO, K5, YO, SSK, K4, YO, K2, YO, P2, YO, K2, YO, K4, K2TOG, YO, K5, YO, SSK, K4, YO, K2, YO, P2 (56 stitches) End with Row 10 - P straight across
Chart B: (Body of Shawl Pattern 1)
The first time you knit these rows that are represented in Chart B, the blue bolded stitches on each half of the shawl (that correspond to the blue shaded areas of the Chart) will be worked only once. RoW 1: P2, YO, K2, YO, K2, K5, YO, SSK, K3, K2TOG, YO, K5, K2, YO, K2, YO, P2, YO, K2, YO, K2, K5, YO, SSK, K3, K2TOG, YO, K5, K2, YO, K2, YO, P2(64 stitches) Row 2 (and all WS rows): - P straight across Row 3: P2, YO, K2, YO, K4, K1, YO, SSK, K3, YO, SSK, K1, K2TOG, YO, K3, K2TOG, YO, K1, K4, YO, K2, YO, P2, YO, K2, YO, K4, K1, YO, SSK, K3, YO, SSK, K1, K2TOG, YO, K3, K2TOG, YO, K1, K4, YO, K2, YO, P2 (72 stitches) Row 5: P2, YO, K2, YO, K2, K2TOG, YO, K2, K2, YO, SSK, K3, YO, S1-K2TOG-PSSO, YO, K3, K2TOG, YO, K2, K2, YO, SSK, K2, YO, K2, YO, P2, YO, K2, YO, K2, K2TOG, YO, K2, K2, YO, SSK, K3, YO, S1-K2TOG-PSSO, YO, K3, K2TOG, YO, K2, K2, YO, SSK, K2, YO, K2, YO, P2 (80 stitches) Row 7: P2, YO, K2, YO, K3, K2TOG, YO, K3, K3, YO, SSK, K7, K2TOG, YO, K3, K3, YO, SSK, K3, YO, K2, YO, P2. yO, K2, YO, K3, K2TOG, YO, K3, K3, YO, SSK, K7, K2TOG, YO, K3, K3, YO, SSK, K3, YO, K2, YO, P2 (88 stitches) Row 9: P2, YO, K2, YO, K6, yYO, SSK, K2, K2, K2TOG, YO, K9, YO, SSK, K2, K2, K2TOG, YO, K6, YO, K2, YO, P2, YO, K2, YO, K6, YO, SSK, K2, K2, K2TOG, YO, K9, YO, SSK, K2, K2, K2TOG, YO, K6, YO, K2, YO, P2 (96 stitches) Row 11: P2, YO, K2, YO, K4, YO, SSK, K3, YO, SSK, K1, K1, K2TOG, YO, K3, K2TOG, YO, K1, YO, SSK, K3, YO, SSK, K1, K1, K2TOG, YO, K3, K2TOG, YO, K4, YO, K2, YO, P2. YO, K2, YO, K4, YO, SSK, K3, YO, SSK, K1, K1, K2TOG, YO, K3, K2TOG, YO, K1, YO, SSK, K3, YO, SSK, K1, K1, K2TOG, YO, K3, K2TOG, YO, K4, YO, K2, YO, P2 (104 stitches) ROw 13: P2, YO, K2, YO, K2, K2TOG, YO, K3, YO, SSK, K3, YO, SSK, K2TOG, YO, K3, K2TOG, YO, K3, YO, SSK, K3, YO, SSK, K2TOG, YO, K3, K2TOG, YO, K3, YO, SSK, K2, YO, K2, YO, P2, YO, K2, YO, K2, K2TOG, YO, K3, YO, SSK, K3, YO, SSK, K2TOG, YO, K3, K2TOG, YO, K3, YO, SSK, K3, YO, SSK, K2TOG, YO, K3, K2TOG, YO, K3, YO, SSK, K2, YO, K2, YO, P2 (112 stitches) Row 15: P2, YO, K2, YO, K5, YO, K5, YO, SSK, K4, K4, K2TOG, YO, K5, YO, SSK, K4, K4, K2TOG, YO, K5, YO, K5, YO, K2, YO, P2, YO, K2, YO, K5, YO, K5, YO, SSK, K4, K4, K2TOG, YO, K5, YO, SSK, K4, K4, K2TOG, YO, K5, YO, K5, YO, K2, YO, P2, (124 stitches) Row 16: P straight across Repeat Rows 1-16 of this chart as many times as you wish, working the blue sets of stitches multiple times to complete each row. For example, the second time you knit Rows 1-16, you will work the blue set 3 times per row on each half of the shawl; the third time you knit these rows, you will work the set five times per row on each half, etc. You must complete all 16 rows of this Chart B section before transitioning to Chart C. Note that stitches per row will not be given for Chart C, as they will vary depending upon how many times you have repeated Chart B.
Chart C: (Body of Shawl Pattern 2 )
RoW 1: P2, YO, K2, YO, K2, K4, SSK, YO, K5, YO, K2TOG, K4, K2, YO, K2, YO, P2, YO, K2, YO, K2, K4, SSK, YO, K5, YO, K2TOG, K4, K2, YO, K2, YO,P2 Row 2 (and all other WS rows) - P straight across Row 3: P2, YO, K2, YO, K4, K1, YO, SSK, K2, SSK, YO, K3, YO, K2TOG, K2, K2TOG, YO, K1, K4, YO, K2, YO, P2, yO, K2, YO, K4, K1, YO, SSK, K2, SSK, YO, K3, YO, K2TOG, K2, K2TOG, YO, K1, K4, YO, K2, YO, P2 Row 5: P2, YO, K2, YO, K2, K2TOG, YO, K2, K2, YO, SSK, K2, SSK, YO, K1, YO, K2TOG, K2, K2TOG, YO, K2, K2, YO, SSK, K2, YO, K2, YO, P2, YO, K2, YO, K2, K2TOG, YO, K2, K2, YO, SSK, K2, SSK, YO, K1, YO, K2TOG, K2, K2TOG, YO, K2, K2, YO, SSK, K2, YO, K2, YO, P2 Row 7: P2, YO, K2, YO, K3, K2TOG, YO, K2TOG, YO, K1, K1, YO, SSK, YO, SSK, K7, K2TOG, YO, K2TOG, YO, K1, K1, YO, SSK, YO, SSK, K3, YO, K2, YO, P2, YO, K2, YO, K3, K2TOG, YO, K2TOG, YO, K1, K1, YO, SSK, YO, SSK, K7, K2TOG, YO, K2TOG, YO, K1, K1, YO, SSK, YO, SSK, K3, YO, K2, YO, P2 Row 9: P2, YO, K2, YO, K2, YO, K2, SSK, YO, SSK, YO, SSK, K2TOG, YO, K2TOG, YO, K2TOG, K2, YO, K1, YO, K2, SSK, YO, SSK, YO, SSK, K2TOG, YO, K2TOG, YO, K2TOG, K2, YO, K2, YO, K2, YO, P2, YO, K2, YO, K2, YO, K2, SSK, YO, SSK, YO, SSK, K2TOG, YO, K2TOG, YO, K2TOG, K2, YO, K1, YO, K2, SSK, YO, SSK, YO, SSK, K2TOG, YO, K2TOG, YO, K2TOG, K2, YO, K2, YO, K2, YO, P2 Row 11: P2, YO, K2, YO, K2, K2TOG, YO, K1, YO, K2, SSK, YO, SSK, K1, K1, K2TOG, YO, K2TOG, K2, YO, K2TOG, YO, K1, YO, K2, SSK, YO, SSK, K1, K1, K2TOG, YO, K2TOG, K2, YO, K2TOG, YO, K3, YO, K2, YO, P2, YO, K2, YO, K2, K2TOG, YO, K1, YO, K2, SSK, YO, SSK, K1, K1, K2TOG, YO, K2TOG, K2, YO, K2TOG, YO, K1, YO, K2, SSK, YO, SSK, K1, K1, K2TOG, YO, K2TOG, K2, YO, K2TOG, YO, K3, YO, K2, YO, P2 Row 13: P2, YO, K2, YO, K3, K2TOG, YO, K2TOG, YO, K1, YO, K2, SSK, YO, SSK, K2TOG, YO, K2TOG, K2, YO, K2TOG, YO, K2TOG, YO,K1, YO, K2, SSK, YO, SSK, K2TOG, YO, K2TOG, K2, YO, K2TOG, YO, K2TOG, YO, K4, YO, K2, YO, P2, YO, K2, YO, K3, K2TOG, YO, K2TOG, YO, K1, YO, K2, SSK, YO, SSK, K2TOG, YO, K2TOG, K2, YO, K2TOG, YO, K2TOG, YO,K1, YO, K2, SSK, YO, SSK, K2TOG, YO, K2TOG, K2, YO, K2TOG, YO, K2TOG, YO, K4, YO, K2, YO, P2 Row 15: P2, YO, K2, YO, K4, YO, K1, YO, K2TOG, YO, K2TOG, YO, K2TOG, YO, K2, SSK, K1, K1, K2TOG, K2, YO, K2TOG, YO, K2TOG, YO, K2TOG, YO, K1, YO, K2, SSK, K1, K1, K2TOG, K2, YO, K2TOG, YO, K2TOG, YO, K2TOG, YO, K1, YO, K4, YO, K2, YO, P2, YO, K2, YO, K4, YO, K1, YO, K2TOG, YO, K2TOG, YO, K2TOG, YO, K2, SSK, K1, K1, K2TOG, K2, YO, K2TOG, YO, K2TOG, YO, K2TOG, YO, K1, YO, K2, SSK, K1, K1, K2TOG, K2, YO, K2TOG, YO, K2TOG, YO, K2TOG, YO, K1, YO, K4, YO, K2, YO, P2 Row 16: P straight across. When you have repeated Chart Cas many times as desired, break off yarn, leaving enough to weave in the ends. With the remaining ballof yarn, attach the edging (refer to both the charted and written edging instructions which appear previously).


