KRAUT
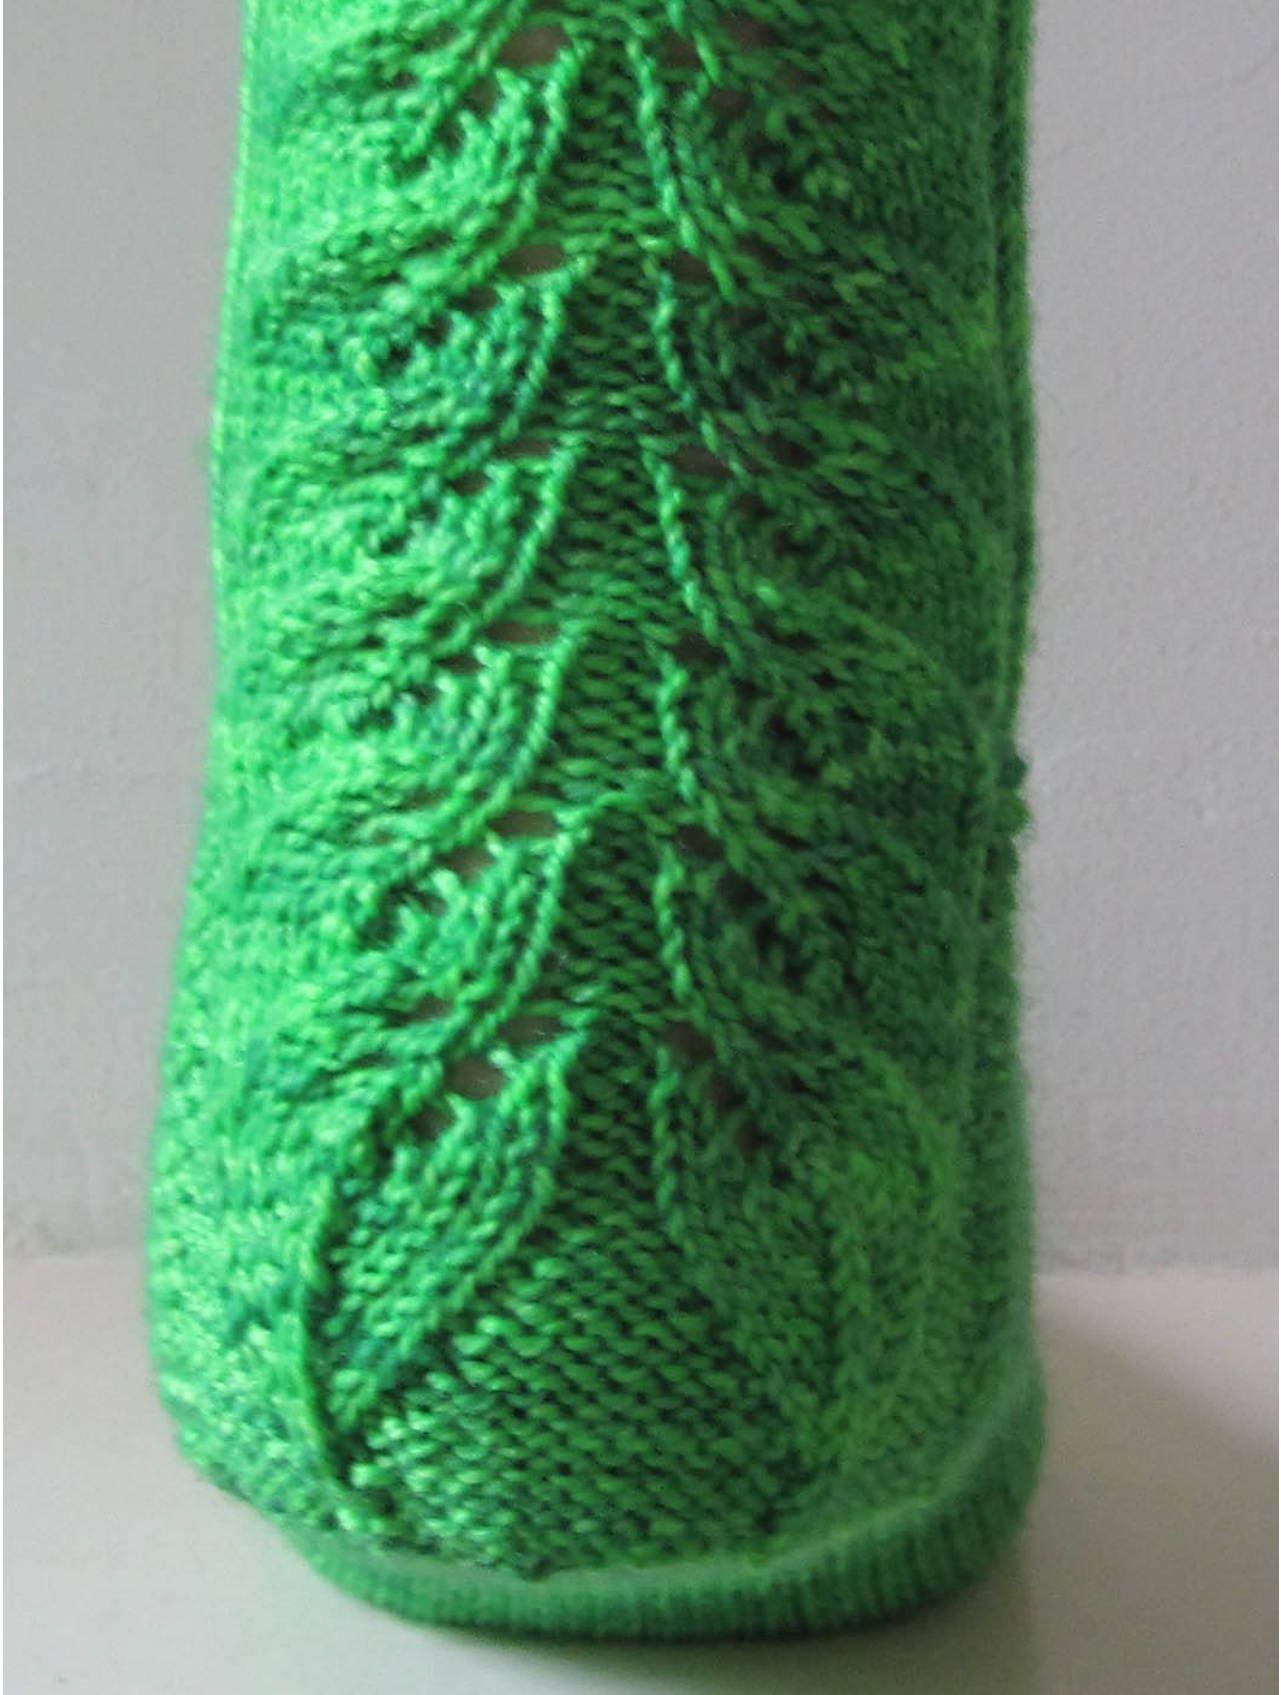
COPYRIGHTOGENERALHOGBUFFER2011 Funny how most people immediately think of Sauerkraut when they hear the term, seeing as Sauerkraut, strictly speaking, is not Kraut but cabbage... Kraut can mean several things, like a herb, or the leafy parts of root vegetables, or an overgrown lettuce, so I figured it would make a good name for a sock that is first and foremost meant to look leafy and vegetative.
Please make sure to read the whole pattern through before you start; there are a few optional modifications along the way and at the end, and you may want to make a choice.
Size:
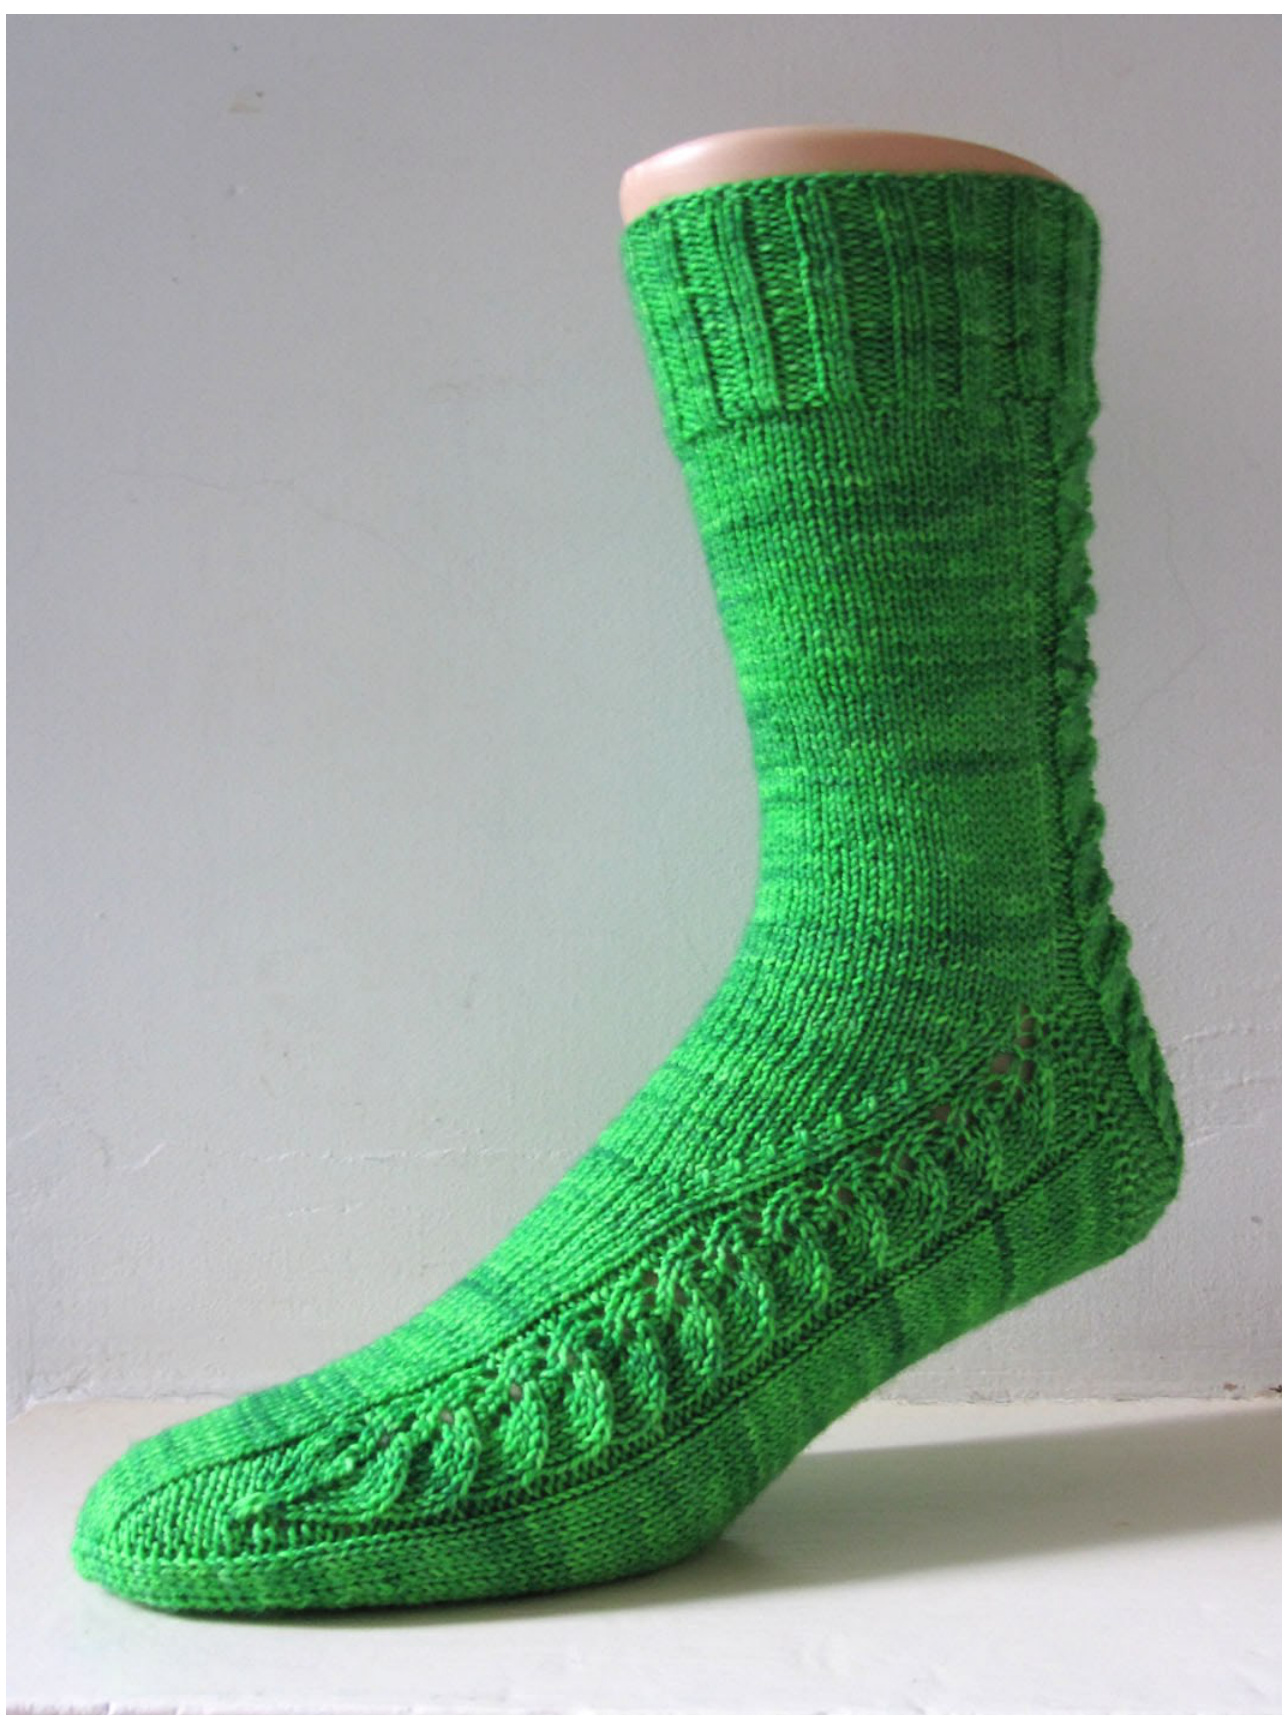
Like all my patterns, this is written for a 64 stitch sock, but as there is a lot of plain stocking stitch in the sock, it is very easily made wider and slimmer, just make sure the main pattern is centred on the back leg.
Material:
100gr sock wool in 4 ply / fingering weight. I have used Madeline Tosh Tosh Sock in col Seaglass, since it is fairly highly twisted and gives a very good stitch definition, but I guess anything wil do...
Needle size:
2.5 mm or size needed to get the right dimensions. I worked mine on two circulars, but feel free to substitute magic loop or DPNs, since this is a fairly basic sock construction. Further requirements: Tapestry needle
Cuff:
Using your favourite cast-on method, cast on 72 sts and close to a round, taking care not to twist thecast-on. Work K2, P2 rib for as many rounds as you would like your cuff to be, I did 24 rounds for my sample. Next row, shift 1 st st onto second needle by knitting it, \*K5, [K2tog, K6] 3 times, K2tog, K5, repeat from \* for second needle. 64 sts I have a fairly high instep, and shapely (!) calves, so although I wear a 64 st sock, a 64 st cast-on and rib is too tight for me. However, if you find that this is fine for you, then just cast on 64 st and omit the decrease row. You will then have to shift the LAST stitch from needle 2 onto needle 1, or the pattern will not line up.
Leg:
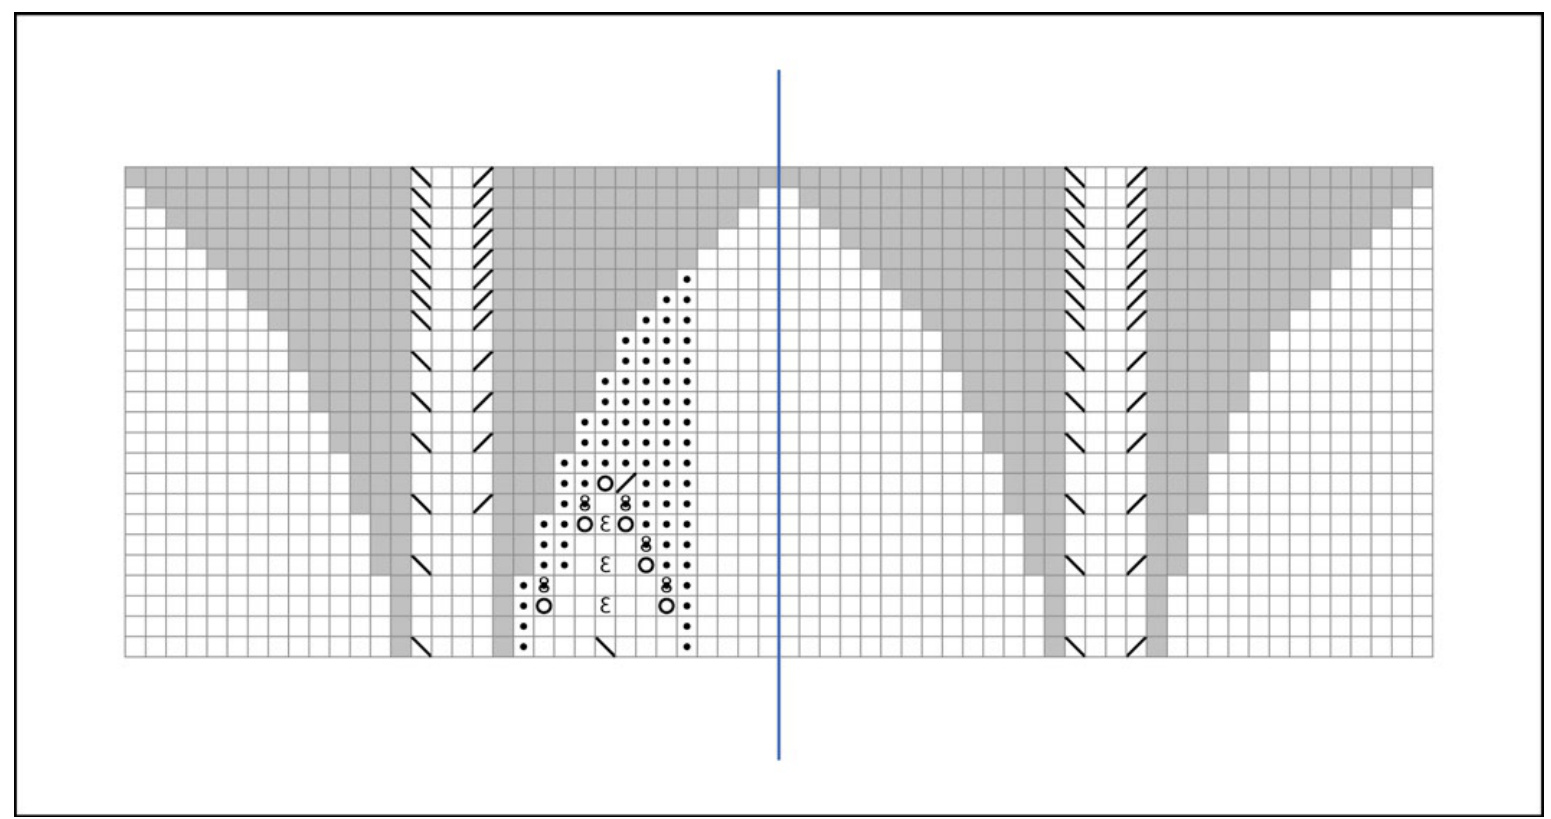
If you are working on 2 needles, the first needle will be the back of the leg, the second will be the front. Work the sts on needle 1 according to the leg chart, and K all sts on needle 2. Following this princliple, work the set up row 0 once, and then work the rows 1-8 of the pattern for as long as you would like your leg to be. Work rows 1-4 once again.
Heel:
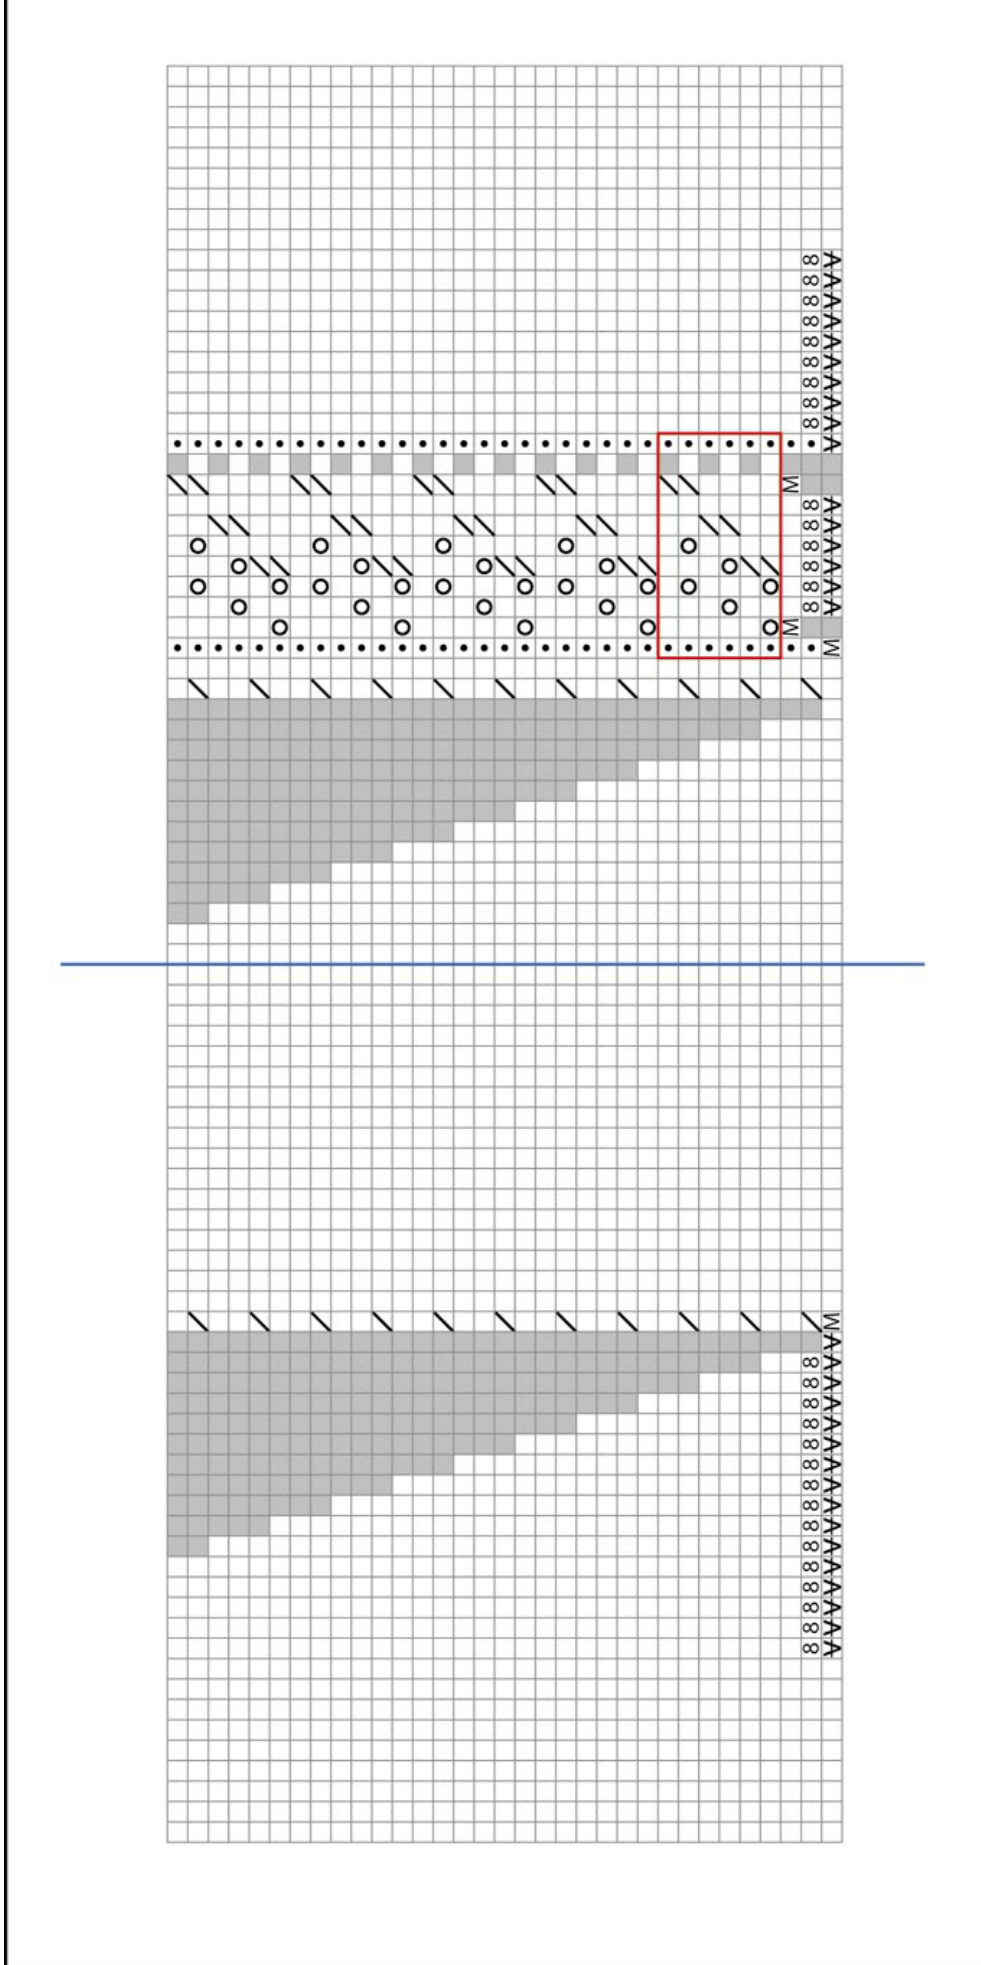
Working on Needle 1 only, and working in rows back and forth, work the 32 rows of the heel chart. If you find you need a longer heel flap, repeat the last row until you reach the desired length. If you need to shorten the flap, you will need to shorten the flap at the top. Let's say you want only 28 rows, that's 4 less than the chart. Therefore work 4 more rounds on the leg, stopping after row 8 of the leg chart, and start the heel in row 5 instead. Turn the heel as follows: Row1: sl1, P15, K1, SSK, K1 turn (leaving 12 sts unworked) Row2: sl1, P3, P2tog, P1, turn (leaving 12 sts unworked) Row3: sl1, K to 1 st before gap, SSK, K1, turn Row4: sl1, P to 1 st before gap, P2tog, P1, turn Repeat rows 3 and 4 until you have used up all the sts either side. You should be ready to work a K row, with 18 sts on your needle. K 9 sts, this is the centre back and the new beginning of the round.
Gusset:
On Needle 1, K9, pick up and K 1 st in each slipped st along the side (16 sts in my example), M1 in the gap before the instep sts, K across the instep, M1 in the gap before the flap, pick up and K 1 st in each of the slipped sts along the second side of the flap (make sure you have the same number as on the previous side), K9. This is the first round of the gusset chart. Follow the rest of the chart to complete the gusset decreases and bring the foot back to 64 sts. If you are working with a different number of sts, or if you need more or less sts on your foot than on your leg, you will need to monitor the decrease rounds, and stop decreasing when you have reached the required number of sts. If you need to decrease further than shown in the chart, make sure the decreases line up with the ones worked in previous rounds, this should be fairly obvious. The decreases for the gusset are done in reverse to what is most frequently done, as I didn't want to create a clear and defined line but rather an unobtrusive decrease that would not interrupt the plain knitting too much. However, if you prefer a strong line of decreases, simply swap the K2tog and ssK's around, and you will have a more classic look to your gusset.
Foot:
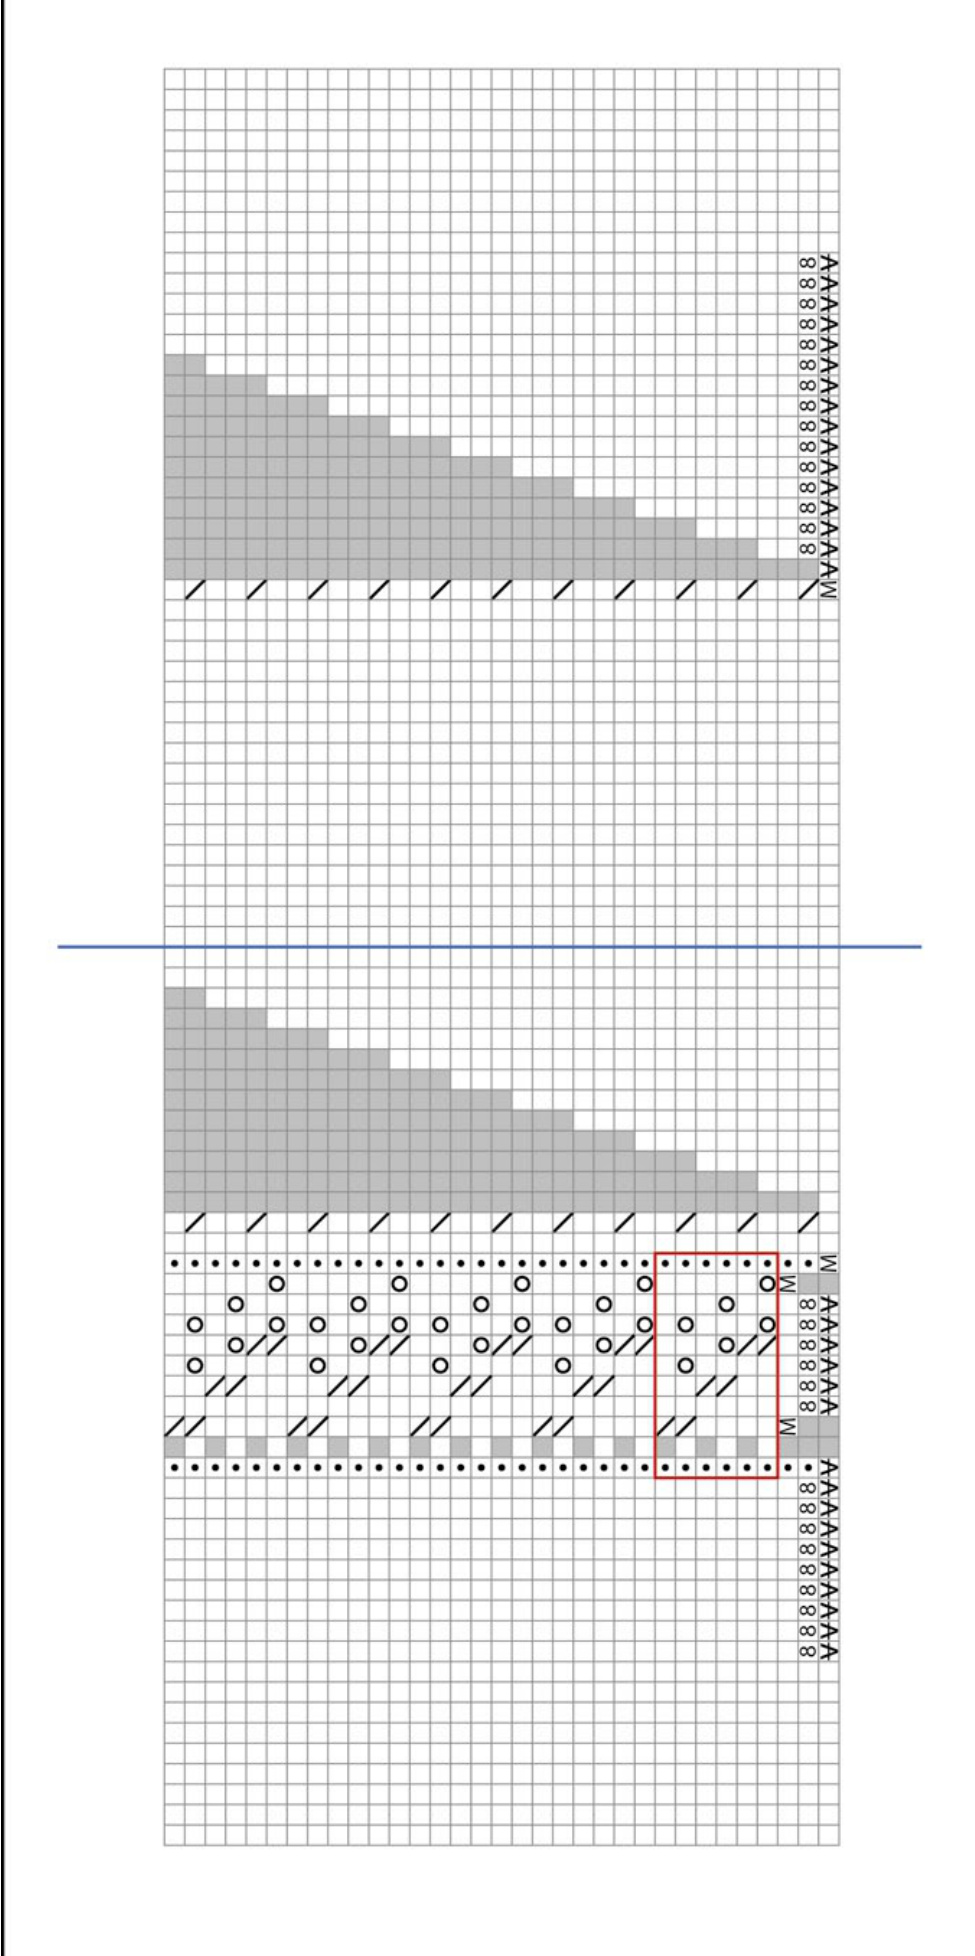
Without decreasing further, work the leaf chart as established and K all other sts. Please bear in mind that you may have to continue on a different row of the chart if you have decreased more or less sts for the gusset. Work the foot until you have 5 cm / 2 inches less than your desired sock length.
Toe:
Work the toe as charted. You should end up with 8 sts, 4 on each needle. Cut the yarn, leaving a 20 cm / 4 inch tail and graft the toe closed. You could also thread the yarn through the 8 sts twice and draw together, but that won't be quite as nice.
Options:
"here are a few simple ways to work different socks from the same design: You could have the main pattern on the front rather than on the back, if you do not like patterned heel flaps. Simply work a plain flap, and continue the pattern down the foot. You could leave off the small leaves running down the foot and work the foot plain. Alternatively, you could have the smalleaves running along both sides. Simply combine the relevant halves of the foot and the toe chart. You could also do the main chart twice, front and back. This will produce a fairly densely patterned sock.
Glossary:
St, sts stitch, stitches Kknit Ppurl SI slip Tbl through the back loop K2tog knit 2 stitches together SSK slip, slip, knit. Slip 2 stitches separately as if to knit, insert left needle into these two stitches from the right and knit onto right needle. P2togpurl 2 stitches together
Glossary of symbols used:

knit on right side, purl on wrong side

purl on right side, knit on wrong side

no stitch

knit 2 tog on right side, purl 2 tog on wrong side

slip, slip, knit on right side, slip, slip, purl 2 tog tbl on wrong side

yarn over

make one, by lifting the thread between sts and knitting it tbl

centred double decrease: sl 2 as if K2tog, K1, lift the two slipped sts over

slip stitch purlwise

pick up and knit one stitch knit st through back loop purl st through back loop
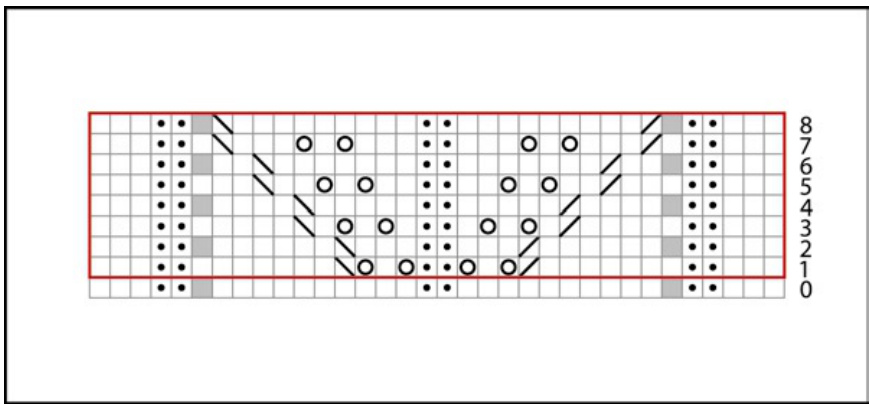
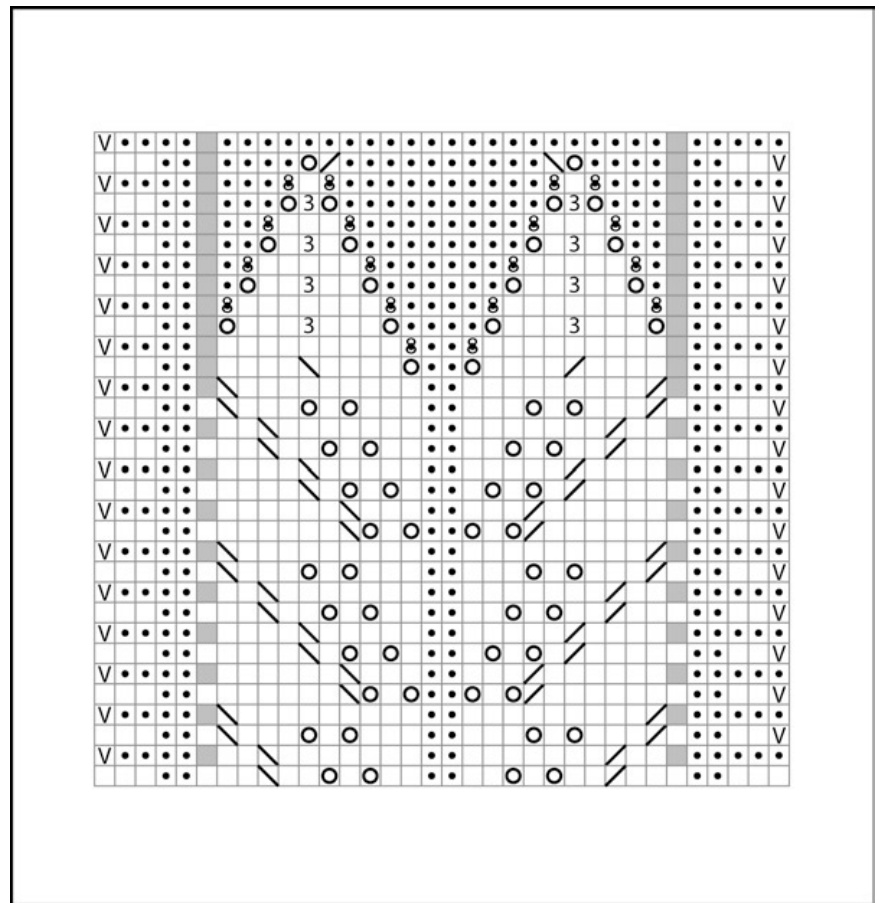
LEG CHART
KRAUT
KRAUT
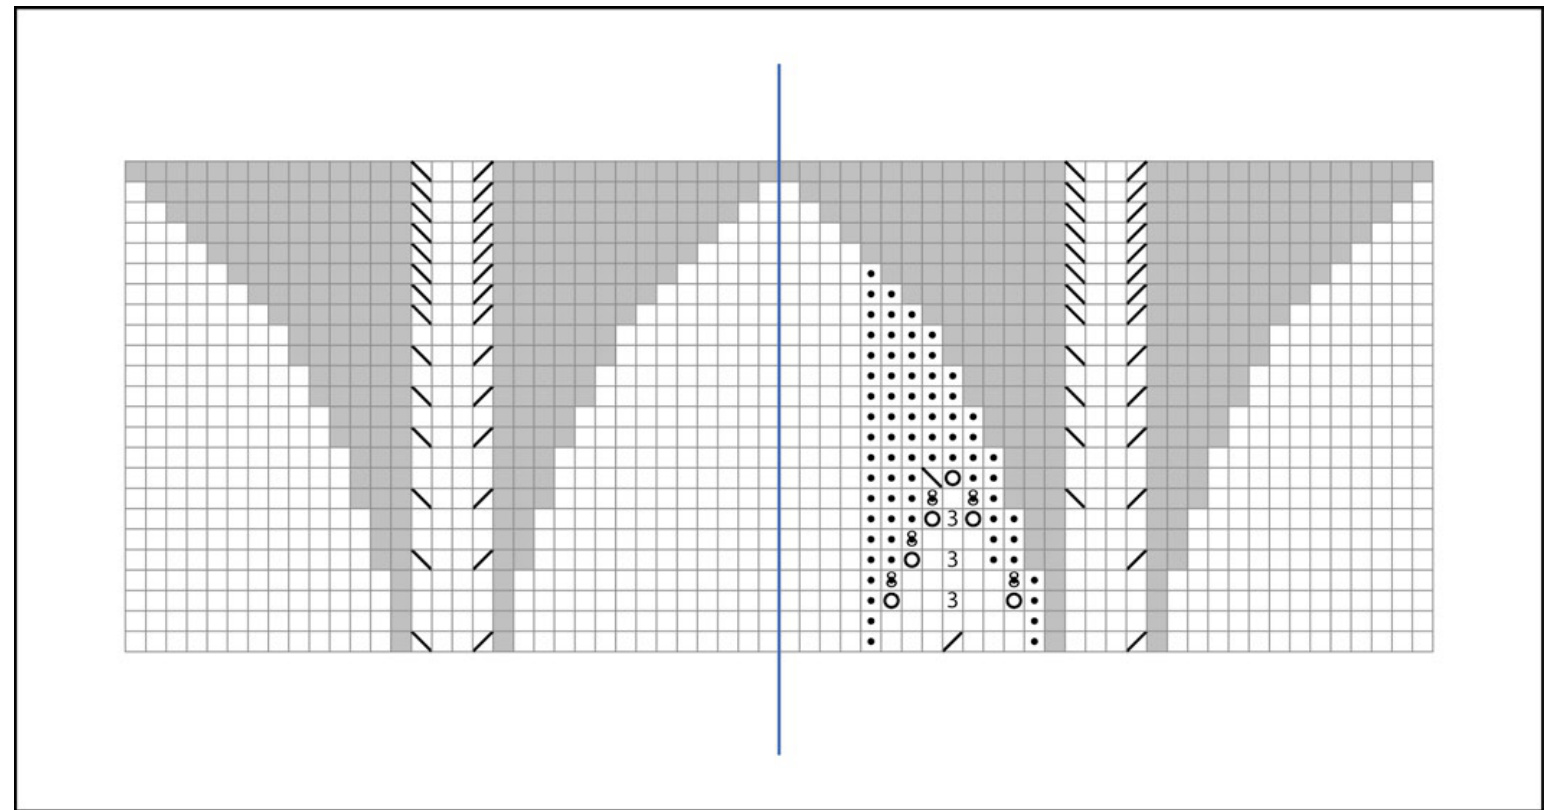
TOE CHART (RIGHT FOOT)
TOE CHART (LEFT FOOT)