I hear it althe time: Why isn't there a sock pattern that will let me make a lot of ptbl or, even better, p2togtbl? I don't care which, I just want to do contortionist knitting stitches. So few patterns allow me to exercise this talent. Opus 24 is here to meet that need. I hope you enjoy it.
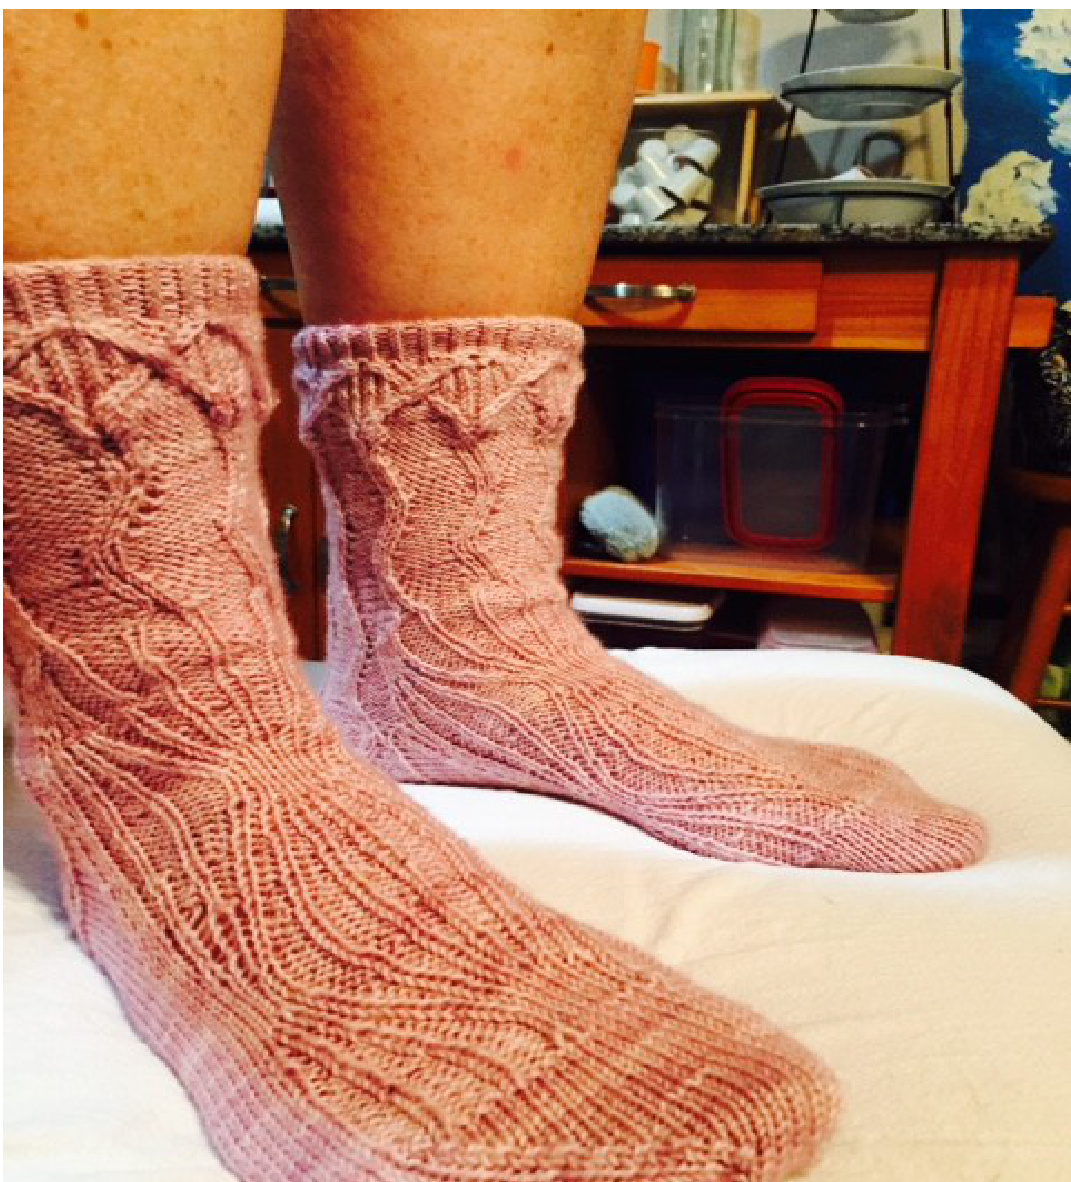
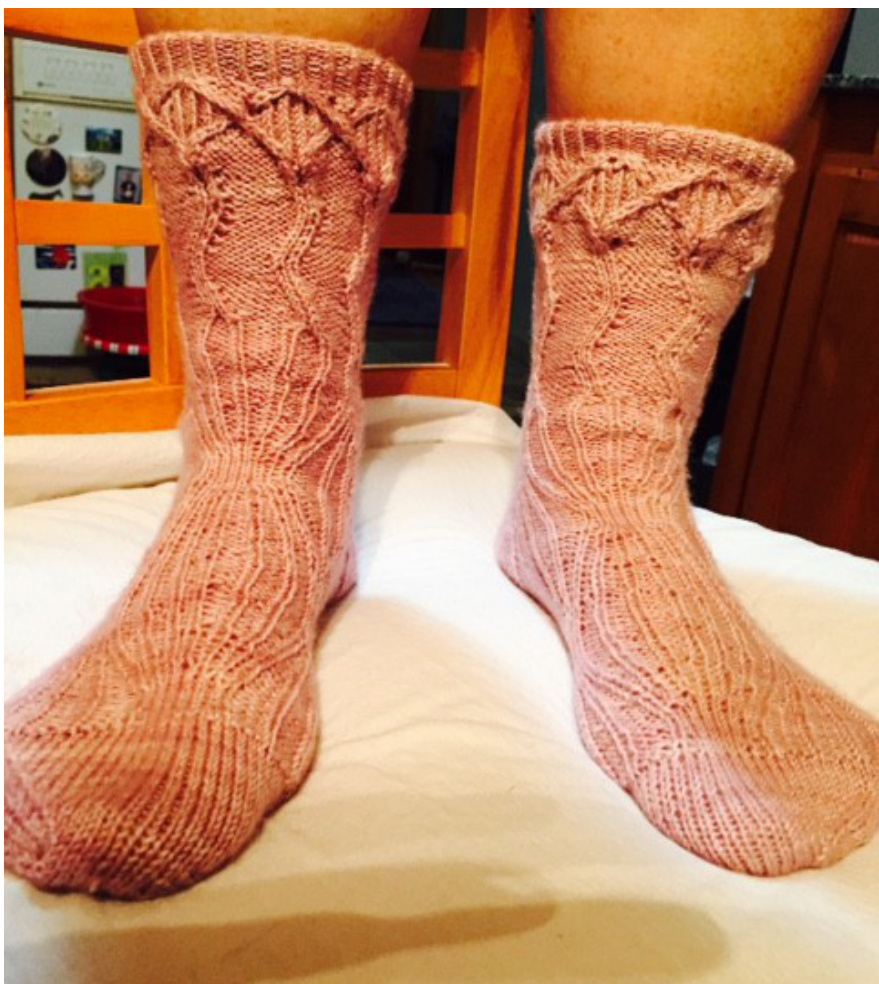
Opus 24 A cuff down sock pattern inspired by the waltz from Eugene Onegin, an opera by Pyotr llyich Tchaikovsky. The music rises and falls and the dancers move apart and move together. A masterpiece.
Opus 24
Yarn
Use your favorite sock yarn. A solid or semi-solid will work best. With a lively yarn full of different colors, the interesting stitches you'll make to create the texture might be hard to see. Then again, if you have a wonderful idea, I guess you must follow up on it.
Needles
I always use 2.0 mm/Us#0 needles to knit socks. I don't usually measure gauge. I know, I'm bad and that's not giving you much of a guideline. If you've never knit socks before, I suggest starting with size 2.25 mm/Us#1 needles. You may use double point needles (dpn's) or magic loop, or any other sock knitting system with which you're comfortable. If you've knit socks before you know what you like.
Gauqe
My gauge turns out to be 8 spi on Chart 2. This sock has inc rows and dec rows so sometimes you'll be working with 9 sts/repeat, which means this sock will have more ease. This sock is very loose around the upper cuff, which might be wonderful for people who have a problem with tightness on their legs.
Cast On
Cast on 64(72) sts using your favorite cast on. I always use the knitted on cast on, but a lot of people like something more stretchy. Join for working in the round.
Cuff
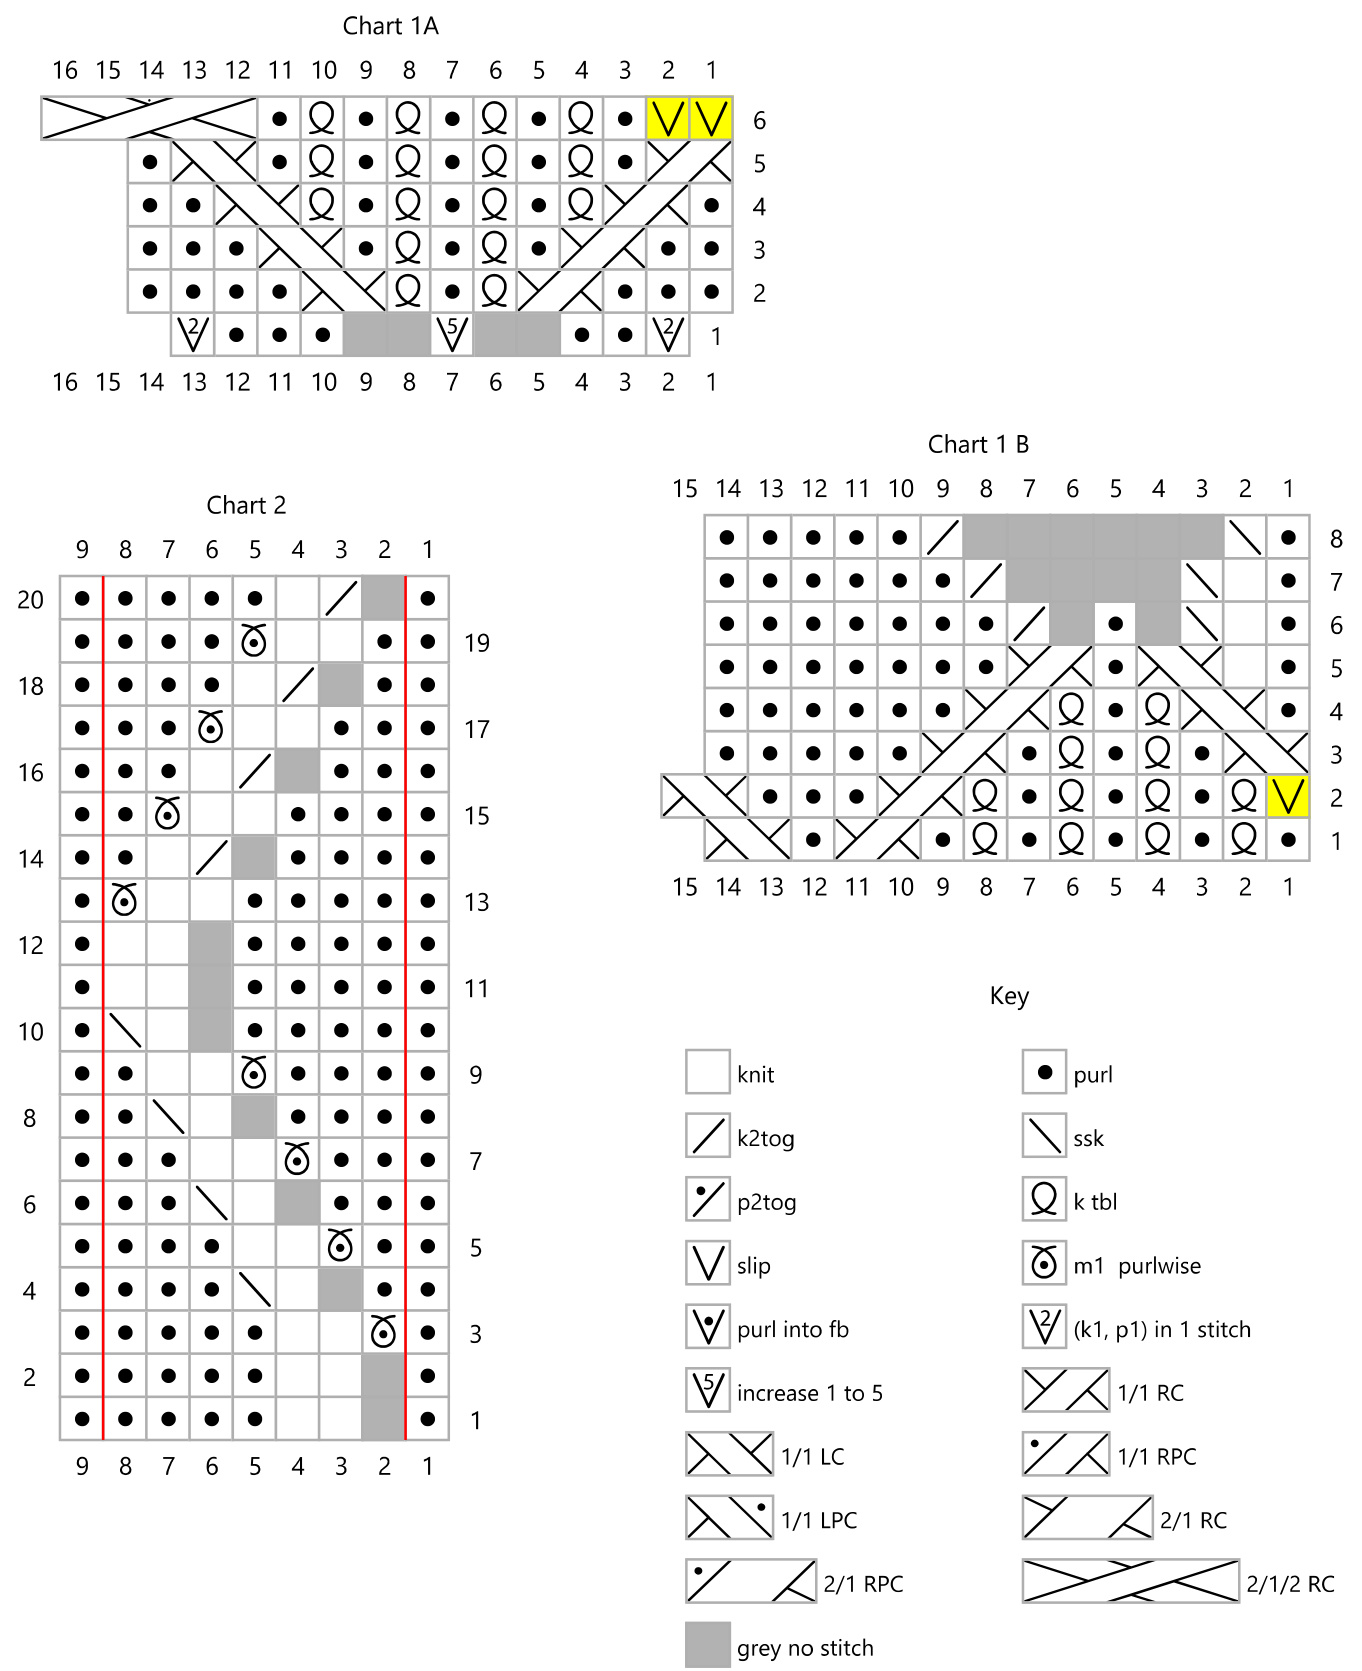
Work one inch of cuff ribbing: \*k1tbl, p1\* repeat from \* to \* around until 1" from cast on. If you like to use markers, you can set them at every 8 sts on the last row of ribbing. While working Charts 1A and 1B you will have a varying number of sts between repeats, but by the time you finish the chart you will be back to 8 sts.
Leg
Work Chart 1A, sts 1-14, 8(9) times. Special note: At the beg of Rnd 6, with yarn in back, sl the first two sts (VV on chart) to the rh needle making this a new Beginning of Round. Work Rnd 6. The slipped stitches happen only on the first repeatofRnd6. Work Chart 1B repeating all sts 1-14 8(9) times. Special note: At the beg of Rnd 2, with yarn in back, sl the first st (V on chart) to rh needle. Work around, keeping the end of the repeat in between the two sts of the 1/1 LC cable. After you cross the last cable, sl the last st you knit from the rh needle back to its place on the Ih needle. You will cross this st to the left immediately as you begin Rnd 3. The slipped stitch happens only on the first repeat of Rnd 2. Continue on to Chart 2, working 8(9) repeats around cuff. Work once through chart, and then work Rows1-10. Size M Now you will begin working Chart 3 on the front (first) 32 stitches, and continue working Chart 2 on the back (last) 32 stitches. Chart 3 has a Row 0 that is gray this is a copy of the last row of the previous chart. Do not knit it again, just use it to get your bearings. Beginning with Row 1 (not the gray Row 0 ) of Chart 3, work all 32 sts of Chart 3 on front sts, then work four repeats of Chart 2 on the back sts. Continue on until Row 19 of Chart 3 is knit. The red lines on Chart 2 do not apply to Size M, you may ignore them. You will now begin knitting the heel flap.
Size L
Before beginning Chart 3, sl the last two sts from the RH needle to LH needle, place marker for new beginning of round. Return the two sts to RH needle. Place another marker. Begin Chart 3 on Row 1 (not Row O which is only there to help you get your bearings). At the end of R1 on Chart 3, pm, k2, pm. These 36 sts will remain the instep stitches throughout the rest of the sock. While working Chart 3 you will always \*k2, work Chart 3 sts, k2\* across the 36 instep sts. The first and last repeat of Chart 2 will now have only 6/7 sts because we have shifted 2 sts to the front of the sock from the first repeat, and from the last repeat. From here, for every row on back 36 sts, work Chart 2 sts between the red borders (center 6 sts) once, repeat all sts of Chart 2 three times, then work center 6 sts again. 36 sts. Continue on until Row 19 of Chart 3 is knit. To make this clear, here is R11 written out: P4, k2, (p5, k2, p1) three times, p4, k2 Also, R20 may be tricky. Here is R20 written out: K2tog, k1, p4, (p1, k2tog, k1, p5) three times, k2tog, k1, p4 You will now begin knitting the heel flap.
Heel Flap
If you want to do another design on the heel flap, like Eye of Partridge, feel free.
Size M
Working back and forth on the back (last) 32 sts only and sl the first st of every row, begin working on Row 9, Chart 2. Continue until heel flap measures 2.5" (or your desired depth), ending with a WS row. On last WS row do not work any inc. 32 st.
Size L
Working back and forth on the back (last) 36 sts only, and sl the first st of every row except Row 10 (see \* below) begin working on Row 9, Chart 2. Continue until heel flap measures 2.5" (or your desired depth), ending with a WS row. On last WS row, do not work any inc. 36 sts. \*R10 (Ws): P2tog, p1, k4, (k1, p2tog, p1, k5) three times, p2tog, p1, k4. (You do not slip this first st.) Turn Heel One of the most satisfying maneuvers in allof knitting. Begin on RS row: Row 1: sl1, k 18(20), ssk, k1, turn. Row 2: sl1, p7, p2tog, p1, turn. Row 3: sl1, k to 1 st before gap, ssk across the gap, k1, turn. Row 4: sl1, p to 1 st before gap, p2tog, p1, turn. Repeat Rows 3 and 4 until no sts remain beyond the gap. 20(22) sts remain. With RS facing, k10(11), place stitch marker for new beginning of round. K10(11). Pick up sts along heel flap. I pick up only the back loop of the slipped sts along the edge. You may pick up these sts any way you like - I know there are many ways, I've tried a lot of them, I like to pick up only the back loop. How many to pick up? This will vary, too, depending on exactly how long your heel flap is. I picked up 15 and then I picked up two more by jabbing my needle into the sts in the crotch between the flap and the instep - about two rows down - k these two stitches together. Write down the number of sts + crotch sts you picked up so you can do the same number on the second side of the heel flap. (I wrote down 15 + 2 -I know, when I knit the two together I'll only have 16 sts, but this is how I write it to remind myself to pick up two and then knit them together). Place marker. Resume work on instep with Row 20 of Chart 3. Place marker. Beginning with the two picked up sts in the crotch, k these together, then pick up the same number of sts along the second side of the heel flap as you picked up on the first side. Knit to beginning of round marker. You have just resumed working in the round.
Gusset
Next row: Knit across 10 (11) sole sts. K to last three gusset sts. K2tog, k1tbl. Continue on with Chart 3 across instep sts. On second gusset, k1tbl, ssk, k to marker. Next row: K across all sts to one st before gusset marker, k1tbl. Continue on with Chart 3 across instep sts. On second gusset, k1tbl, k across to marker. Repeat these two rows until you once again have 64(72) sts on your needles - 32(36) on the front (instep) needle, 32(36) on the back (sole) needle. If you have trouble remembering whether to k2tog or ssk, just remember that the dec sts on the gusset always point toward the sole of the sock. K2tog leans to the right and points back toward the beginning of round marker; ssk leans to the left and points forward toward the beginning of round marker. You will find that you are dec on the odd Chart 3 rows. Continue on, working Chart 3 on the instep sts and st st on the sole sts. Work the 46 rows of Chart 3, then repeat Chart 3 starting with R4. Work to desired foot length minus 2" for toe sts. You may find that you need to start Chart 3 with R4 for a third time if you're knitting a longer size.
Begin Toe
With end of round marker still in the middle of the sole sts, arrange your sock so that there are markers between the 32(36) sole sts and 32(36) instep sts. K to three sts before first marker (you will be on the left side of your sock if you were wearing it), Row 1: k2tog, k1, sl marker, k1, sl1k1psso. K across instep to three sts before marker, k2tog, k1, sl marker, k1, sl1k1psso, k to end of round. Row 2: K all sts. Repeat these two rows until 16 sts remain (8 on front needle, 8 on back needle). Graft these sts together. You're done with one sock. Quick, cast on sock number two before anything new and shiny
| 3231302928 | 272 | 26 | 25 | 24 | 20 | 19 | 18 | 16 | |||||||||||||||||
| 46 | |||||||||||||||||||||||||
| 45 | |||||||||||||||||||||||||
| 44 | |||||||||||||||||||||||||
| ? | 43 42 | ||||||||||||||||||||||||
| ? | 41 | ||||||||||||||||||||||||
| 40 | |||||||||||||||||||||||||
| ? | 39 | ||||||||||||||||||||||||
| 38 | |||||||||||||||||||||||||
| ? | 37 | ||||||||||||||||||||||||
| ? | 36 | ||||||||||||||||||||||||
| ? | 35 | ||||||||||||||||||||||||
| 34 | |||||||||||||||||||||||||
| 33 | |||||||||||||||||||||||||
| . | ? | 32 | |||||||||||||||||||||||
| · · · . | 31 30 29 28 27 26 25 24 23 22 21 20 19 18 17 16 15 14 13 12 11 10 6 8 7 9 5 4 3 2 一 0 | ||||||||||||||||||||||||
| . ? | ? ? | ? | ? | ? | ? ? | . | ? | ? . |
knit purl Knit on right side, purl on wrong side Purl on right side, knit on wrong side k2tog p2tog Knit two stitches together on rs, p2tog on ws Purl two stitches together ktbl grey no stitch Knit through back loop Grey no stitch is showing to help keep sts aligned Vsip Slip stitch as if to purl ≤ssk Slip two stitches to right hand needle, knit them together n1 purlwise Make one stitch by picking up bar that runs between the stitch just worked and the next stitch by inserting left needle under it from front to back. Purl into back of the picked up bar on rs, k into back of the picked up bar on ws purl into fb Purl into front and back of next stitch (k1, p1) in 1 stitch Knit one and then purl one in the same stitch increase 1to5 Knit, purl, knit, purl, knit in same stitch <1/1 RC Slip first stitch to cable needle, hold in back, knit next stitch, knit the stitch from the cable needle 1 LC Slip first stitch to cable needle, hold in front, knit next stitch, knit the stitch from the cable needle < 1/1 RPC Slip first stitch to cable needle, hold in back, knit next stitch, purl stitch from cable needle 1/1 LPC Slip first stitch to cable needle, hold in front, purl next stitch, knit stitch from cable needle <2/1 RC Slip first stitch to cable needle, hold in back, knit next two stitches, knit stitch from cable needle <2/1 RPC Slip first stitch to cable needle, hold in back, knit next two stitches, purl stitch from cable needle

Slip next 3 stitches to cable needle and place at back of work, k2, slip left-most stitch from cable needle to LH needle, move cable needle with remaining stitches to front of work, k1 from LH needle, then k2 from cable needle.


