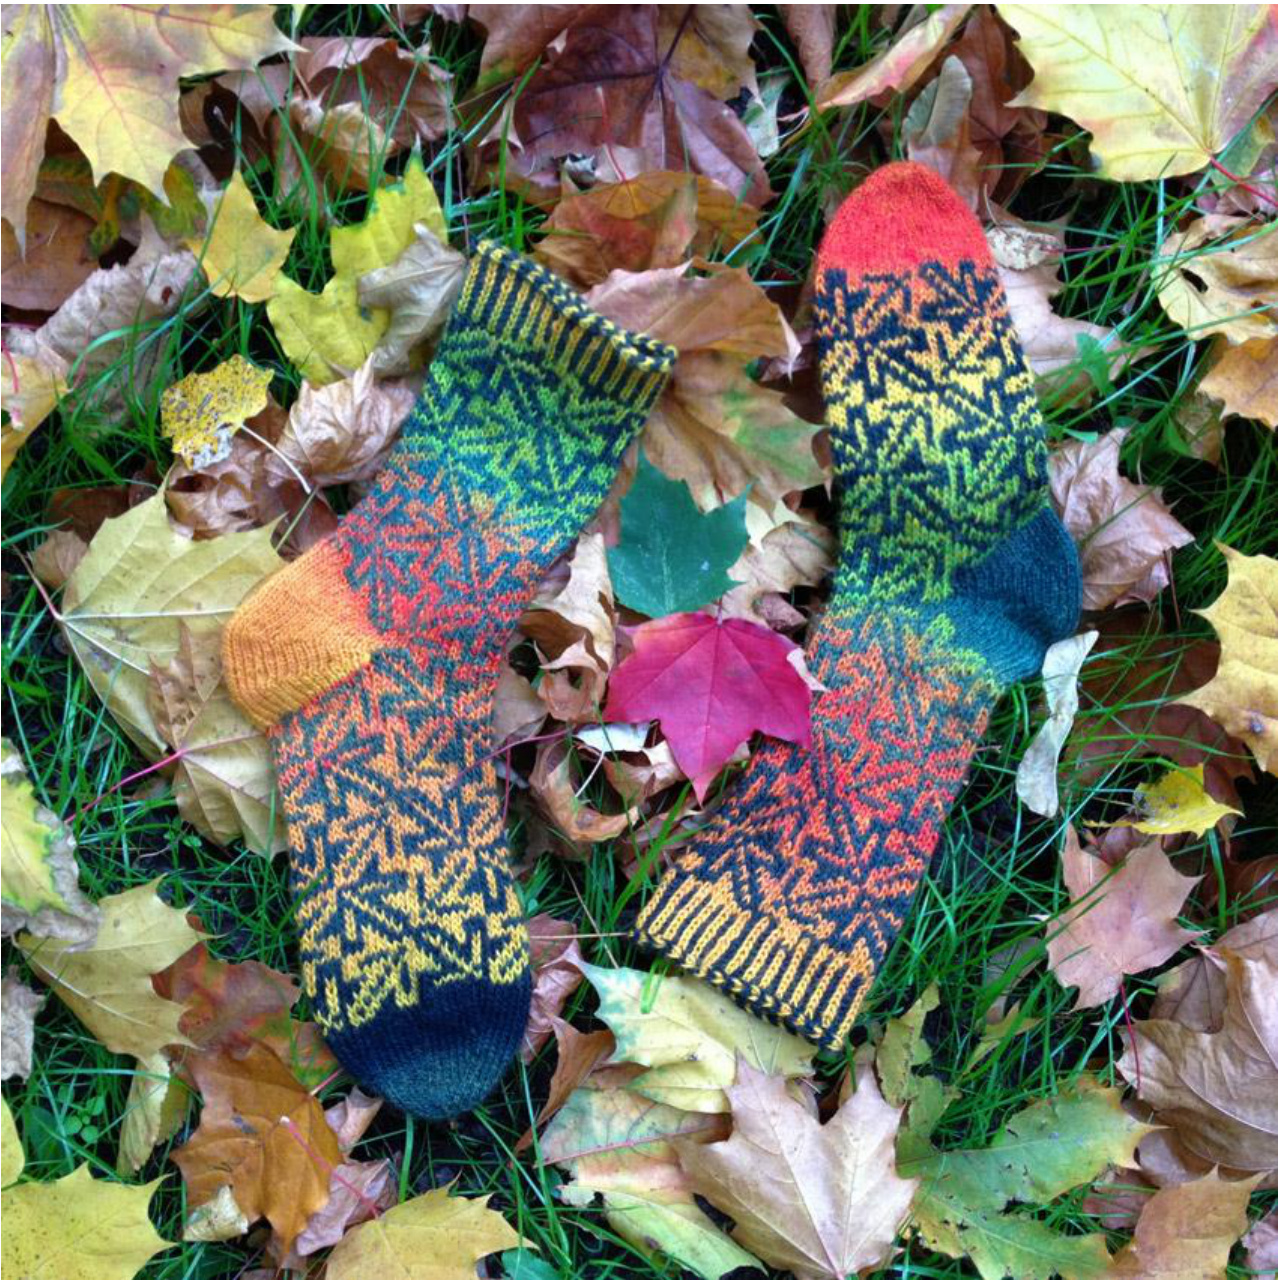
MAPLE QUILT SOCKS
BY NATALIA VASILIEVA
SKILL LEVEL: EXPERIENCED. TECHNIQUES USED: MAGIC LOOP, STRANDED KNITTING, WEAVING FLOATS (OPTIONAL), FOLLOWING CHARTS, JUDY'S MAGIC CAST-ON, LIFTED INCREASES, BOOMERATO HEEL, SHORT ROWS (ANY), TWO-COLORED DOUBLE-CHAIN BIND-OFF.
FINISHED MEASUREMENTS
Sock length: 83/4" /10" (22/25 cm), to fit foot length 91/4" /101/2" (23.5/26.5 cm). Sock circumference: 7" /91/2" (18/24 cm), to fit foot circumference 8"/10" (20/25 cm). g length (from cuff edge to bottom of heel): 8%/4" /10" (22/25 cm).
TOOLS AND MATERIALS
· Lang Yarns Jawoll Magic (75% wool, 25% polyamide (nylon); 436 yds (400 m) per 100 g): 1 skein of #59 (yellow-orange-red-green) and 1 skein of #99 (forest green). About a third/half of each skein will be used (depends on a color scheme chosen) ·Circular needles US 1.5 (2.5 mm) or size to get the gauge; at least 32" (80 cm) length
GAUGE
Stranded Leaves chart: 18 sts x 18 rows = 21/4" x 2/4" (6 x 6 cm). You may, if you wish, use thinner yarn at a tighter gauge for 72-sts socks to get a smaller size, or thicker yarn at a looser gauge for 54-sts socks to get a bigger size. In this case adjust for desired length of foot and leg accordingly; please note this may affect the colors of Heels and call for a different Cuff Transition Charts as a result.
PATTERN NOTES
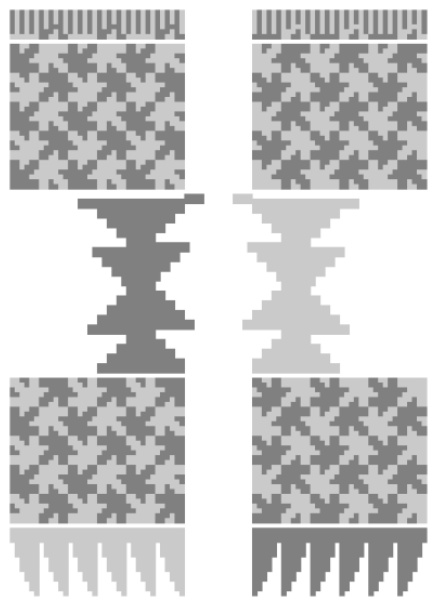
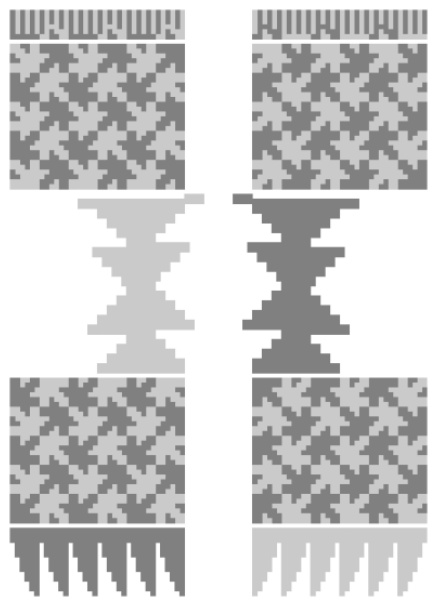
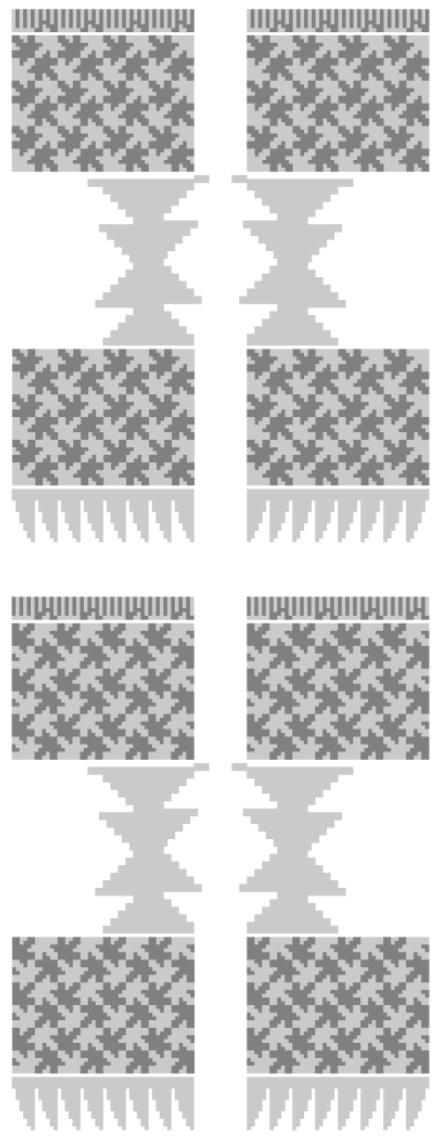
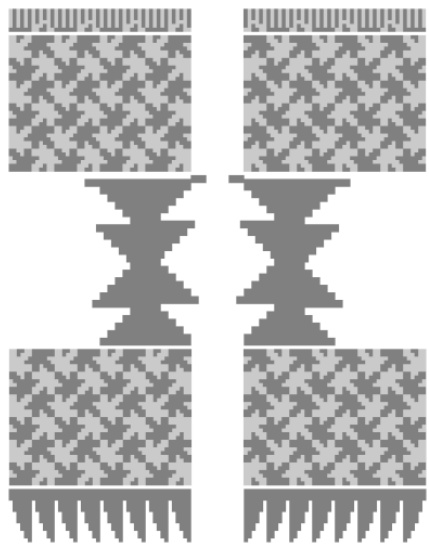
These socks are worked in Magic Loop technique with the beginning of the round (BOR) at the inner side of the leg. You may utilize any other technique of your choice preserving BOR position. Socks are worked toe-up starting with JMCO and round toe. Foot and leg are all over patterned with maple leaves inspired by 3x3 quilt block. Boomerato heel is a hybrid of hourglass (aka "Boomerang") and Cat Bordhi's "Sweet Tomato" short-row heels, and is worked in four shallow wedges. Please note this heel is somewhat tight at the instep (specifically in smaller size), so if you have issues with regular short-row heel fit in general, you may want to replace it with a suitable heel of your choice. The corrugated ribbing of the cuff flows around the remnants of maple leaves and is bound off in two-colored double chain. Charts are presented in several versions: for both socks to look more or less the same, mirrored, or in reversed colors.
STITCH PATTERN NOTES
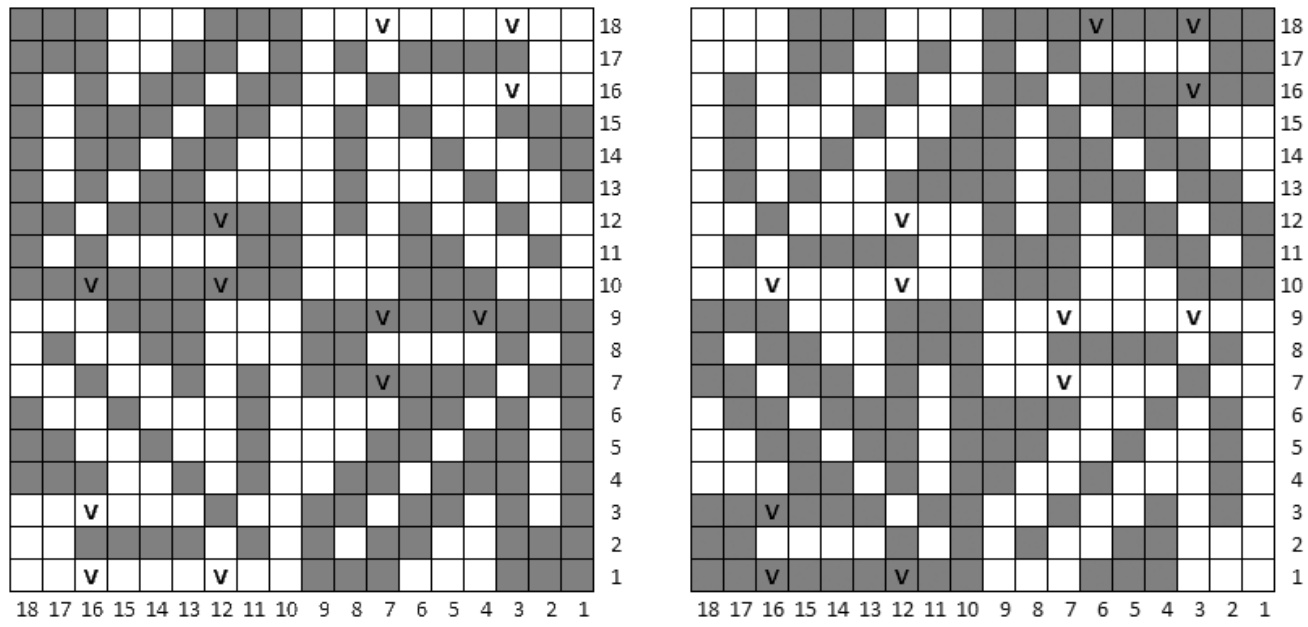
For original socks, yarns were switched between adjacent "maple leaf" motifs for so-called "yarn domination" to enhance leaf ribs. If you don't experience this effect when knitting stranded, then there is no need in such a switching, so you may carry both yarns the same throughout. You may also weave in 9- and 6-sts floats along horizontal parts of leaves, if you wish. Suggested stitches are marked "V" on the chart. These socks may be done in different color schemes: I) Continuous: the second sock is knitted so the patterning to look uninterrupted throughout the pair. I) Identical: both socks look the same. III) Mirrored: motifs on right and left socks are symmetrical. IV) Reversed: the second sock uses the same chart, but in opposing colors; colors of toes and heels are also switched. V) Identical Reversed: as the name suggests, this will be a combination of II) and IV). VI) Mirrored Reversed: as the name suggests, this will be a combination of III) and IV), and will actually look like somewhat misbalanced II). Sample socks were made this way. Choose your preferred design (pp.14-23 for 54-sts socks, pp.24-30 for 72-sts socks) and manage colors accordingly (see note on toes and heels below the charts). Please note not all possible variations are provided. For this pattern, on the first (left) sock yarn A is used for the toe and the second leaf, and yarn B for the first leaf. In each leaf, CC is the dominant yarn used for the ribs, and is held below the MC for the leaf itself. You may need to switch to compensate for dominant yarn in each leaf, unless you are one of those fortunate knitters who don't need to. If that's the case, this will be a faster knit! (Remember that lighter, brighter colors tend to advance and dominate visually, so if you treat the darker, duller color as the dominant yarn, you may not need to compensate.)
DIRECTIONS
TOE:
Leaving 4"/6" (10/15 cm) tail, cast-on 3+3/4+4 stitches using JMCO with yarn of Toe color (see note below the charts for your chosen color scheme). In order to make the following step easier, you should form the first stitch on the bottom/closer needle with ball yarn; tail yarn is used to form the stitches on the top/farther needle. Holding working yarn and cast-on tail together, knit one round with both strands = 6/8 double sts. Next round: Knit, considering each double stitch as two separate stitches = 12/16 sts. Increase round 1: \*) K1, lift the left leg of the stitch two rows below the stitch just worked and knit it (=Left-leaning Lifted Increase, LLInc), k1, repeat from (\*) across x5/7 times = 6/8 sts increased. Next round: Knit Increase round 2: (\*) K1, LLInc, k2, repeat from (\*) across x5/7 times = 6/8 sts increased.
Next 2 rounds: Knit.
Note the number of stitches after LLinc corresponds with the numbering of Increase roundsthemselves. Repeat the last increase sequence 2 more times, increasing 6/8 stitches evenly spaced at the beginning of each Round Toe sector on each following Increase round; then repeat it 3 more times working 3 plain rounds between Increase rounds, until there will 54/72 stitches in the Toe (20 rounds).
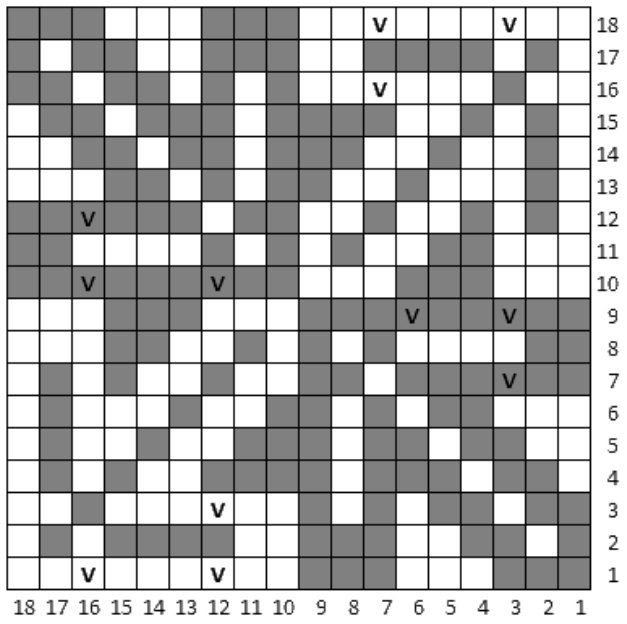
FOOT:
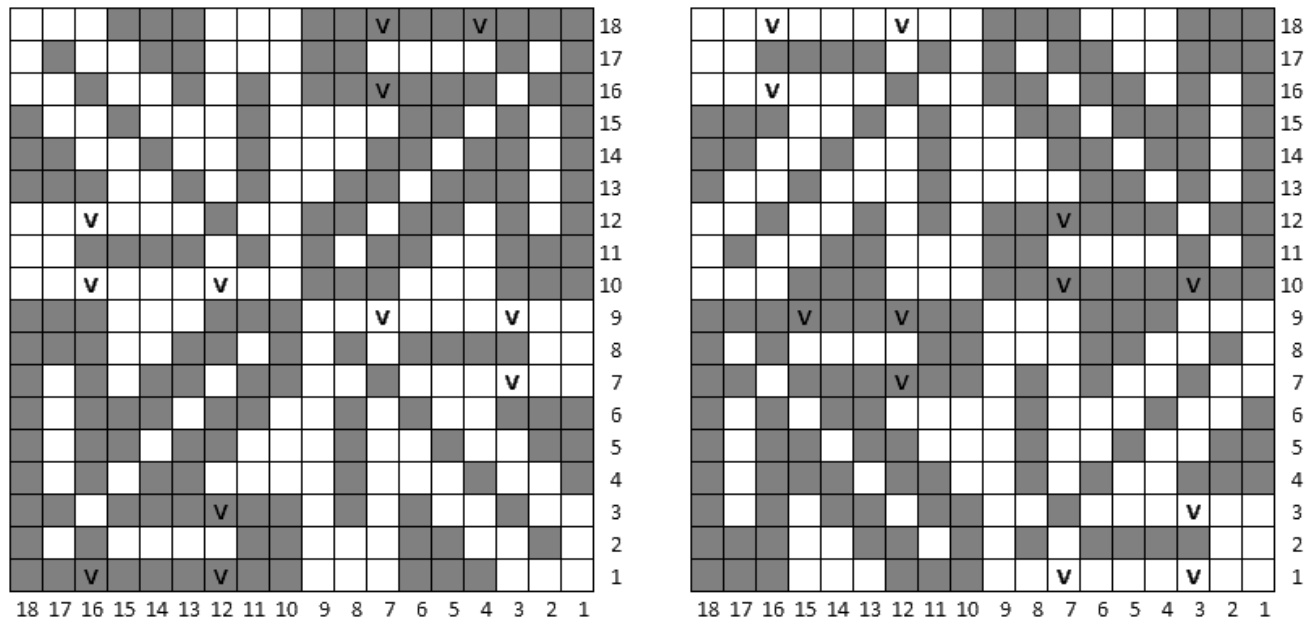
Proceed to Stranded Leaves Chart for your chosen color scheme. Repeat the chart for 3/4 times around the leg, weaving 9- and 6-sts floats if needed ("V" on the chart). Switch yarns between motifs if you chose so for leaf ribs to be more prominent. You'll soon notice it's possible to twist the yarns in one direction for 3 rounds, then twist them in the opposite direction for the next 3 rounds to prevent tangling (the specific direction depends on a specific chart. Experiment to find out which direction suits you better). Work the chart for 2.5/3 times along the foot or until desired length of foot (sock in progress should hit the hinge of foot). It's highly recommended to work a whole number of leaf tiers (5/6/etc.) before Heel so it to infuse between motifs seamlessly.
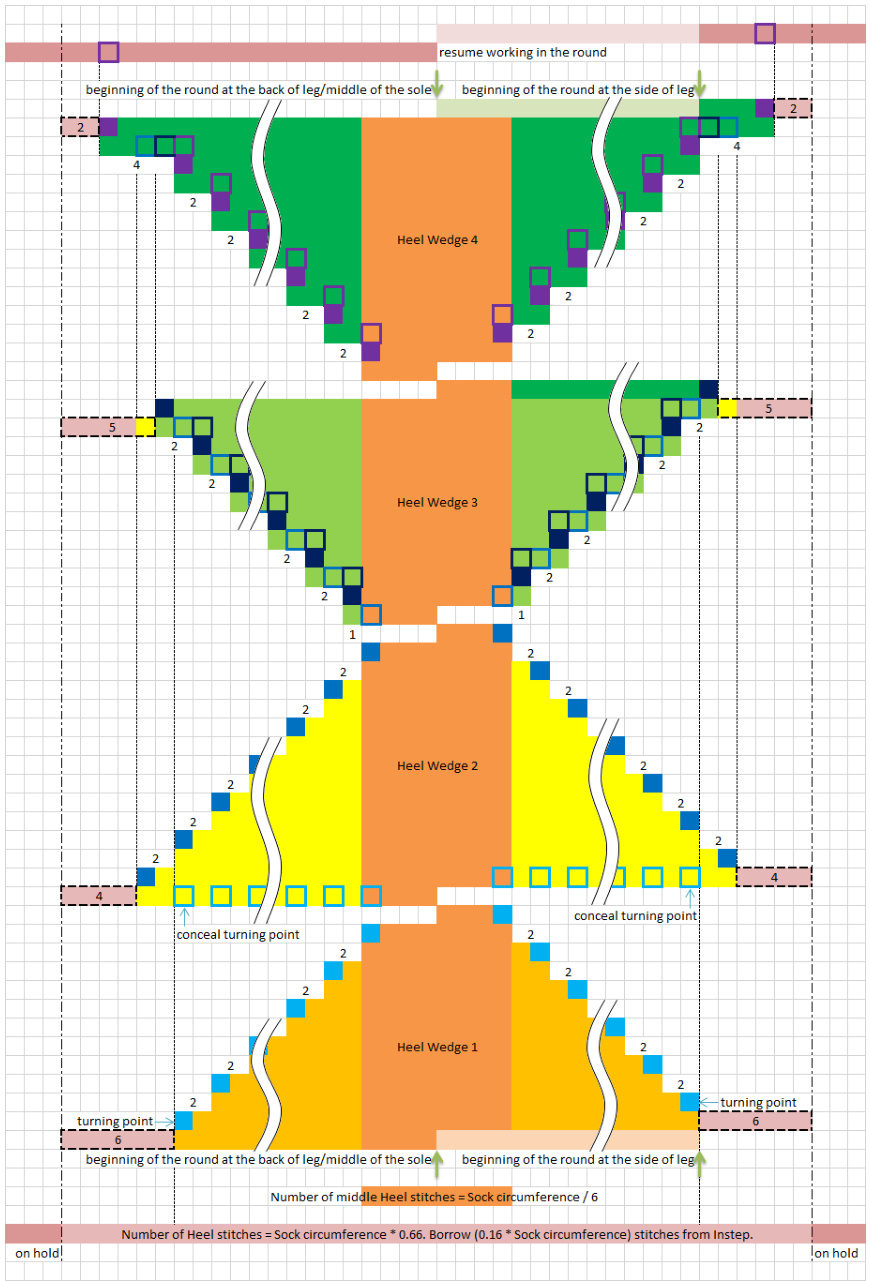
HEEL:
The Boomerato Heel consists of four shallow wedges, two narrowing and two widening. (Photo-tutorial can be found here: http://www.ravelry.com/projects/skeincharmer/mc-boomerato-heel) For narrowing wedges you make each following row 2 stitches shorter, and for widening wedges you make each following row 2 stitches longer, managing turning points according to your preferred short-row technique. Instructions are written for Cat Bordhi's "Thanks Ma" method. Transfer leftmost and rightmost 6/8 stitches from Instep nedle (Magic Loop Needle 2) onto Heel needle (Magic Loop Needle 1) = 15/20 sts on Instep needle, (6+27+6)/(8+36+8) sts on Heel needle. Slide instep stitches onto cable and hold intact while working a Heel.
HEEL WEDGE 1:
Preparations: Holding the work with RS facing, slip first 6/8 sts onto right needle if needed to get to the position of the beginning of the round (where the tail of yarn in color for Heel may hang). If you worked Foot for 1 or 3 leaf tiers longer or shorter than directed, you should use the opposite color than your color scheme says; if you added or subtracted 2 or 4 leaf tiers, use the prescribed color.
Row 1 (RS): Knit to last 6 sts, turn.
Row 2: Slip 1 inserting the needle from behind (as for ssp) and pull the yarn tight, purl to last 6 sts, turn. Row 3: Slip 1 knitwise pulling the yarn tight, knit to 2 sts before previous turning point (it will be a small gap there), turn. Row 4: Slip 1 from behind and pull the yarn tight, purl to 2 sts before previous turning point (it will be a small gap there), turn. : rows 3/5 times more = 7/12 sts between last turning points/gaps
HEEL WEDGE 2:
Set-up Row 1 (RS): Slip 1 knitwise, (\*) knit to 1 st before gap; lift the right leg of the stitch one row below the slipped stitch on the left needle onto needle, insert the right needle through both lifted stitch and stitch on the needle and knit them together (="Thanks Ma" on RS), repeat from (\*) to last 6 sts, k2 past the first gap, turn. Set-up Row 2: Slip 1 from behind, (\*) purl to 1 st before gap; lift the purl bump of the stitch one row below the slipped stitch on the left needle onto needle, insert the right needle through both lifted stitch and stitch on the needle from behind (as for ssp) and purl them together (="Thanks Ma" on WS), repeat from (\*) to last 6 sts, p2 past the first gap, turn. Then repeat Heel Wedge 1 slipping the 1st stitch of Row 1 from behind.
HEEL WEDGE 3:
Row 1 (RS): Slip 1 knitwise, knit 5/10, work "Thanks Ma" on RS at 7th/12th stitch (before gap), k1 (i.e. the stitch between two turning points), turn. Row 2: Slip 1 from behind, purl 6/11, work "Thanks Ma" on WS at 8th/13th stitch (before gap), p1 (i.e. the stitch between two turning points), turn. Row 3: Slip 1 knitwise, knit past the closest RS gap working "Thanks Ma" on RS at both turning points as you pass them, k1, turn. Row 4: Slip 1 from behind, purl past the closest WS gap working "Thanks Ma" on WS at both turning points as you pass them, p1, turn. Repeat last 2 rows 4/6 times more = (4+31+4)/(4+44+4) sts.
HEEL WEDGE 4:
Row 1 (RS): Slip 1 knitwise, knit 18/27, turn. Row 2: Slip 1 from behind, purl 6/11, turn = 7/12 sts between two turning points. Row 3: Slip 1 knitwise, knit to the closest RS gap working "Thanks Ma" on RS at turning point (before gap) as you pass it, k2 past the gap, turn. Row 4: Slip 1 from behind, purl to the closest WS gap working "Thanks Ma" on WS at turning point (before gap) as you pass it, p2 past the gap, turn. Repeat last 2 rows for 4/6 times more = (6+27+6)/(6+40+6) sts. Next RS row: Slip 1 knitwise, knit to last 2 stitches working "Thanks Ma" on RS at remaining turning points (before gaps) including those from previous wedges, turn. Next WS row: Slip 1 from behind, purl to last 2 stitches working "Thanks Ma' on WS at remaining turning points (before gaps) including those from previous wedges, turn = (2+35+2)/(2+48+2) sts. Next RS row: Slip 1 knitwise, knit 3/5 to get to the position of the beginning of the round = (2+31+4+2)/(2+42+6+2).
LEG:
Transfer leftmost and rightmost 6/8 stitches from Heel needle back onto Instep needle = (27+27)/(36+36) sts. Resume working in the round, continuing from the according row of Stranded Leaves Chart and working "Thanks Ma" on RS at remaining turning points as you pass them (nearest one before gap, all the rest after gaps). Repeat Stranded Leaves Chart for another 2.5/3 times or until desired length of leg.
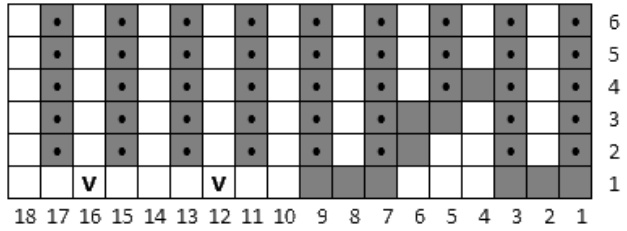
CUFF:
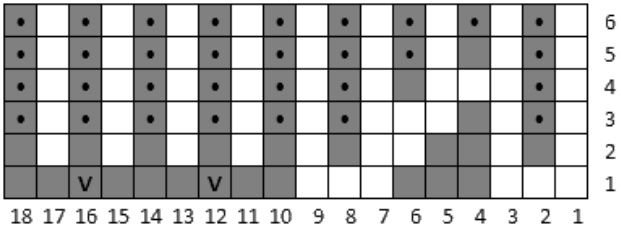
Proceed to Cuff Transition Chart depending on your color scheme; if you worked more or less leaf tiers than directed, you may need another Cuff Transition Chart - consult with color schemes I) Continuous. After end of chart Work in corrugated ribbing (=Row 6 of Cuff Transition Chart) till the desired height of cuff. Sample socks have 5 rounds above the transition pattern. Bind-off in Two-Colored Double Chain as follows (photo-tutorial can be found here: http://www.ravelry.com/projects/skeincharmer/mc-double-chain-bindOoff): OA. If the first stitch is in yarn A, make a yarnover with yarn A, purl the first stitch with yarn B and pass a yarnover over it. OB. If the first stitch is in yarn B, make a yarnover with yarn B, purl the first stitch with yarn A and pass a yarnover over it. 1. If the next stitch is in yarn B, make a yarnover with yarn B, purl the next stitch with yarn A and pass both a yarnover and a stitch in B over it. Tighten yarn A if needed. 2. If the next stitch is in yarn A, make a yarnover with yarn A, purl the next stitch with yarn B and pass both a yarnover and a stitch in A over it. Tighten yarn B if needed. Repeat steps 1-2 till the end of round, cut both yarns, pass the yarn from the last stitch around the first stitch and back into the last stitch joining the bind-off into one continuous chain.
SECOND (RIGHT) SOCK
: worked the same, but replace Increase rounds for the Toe with the following: Increase round 1: (\*) K1, lift the right leg of the stitch one row below the stitch on the left needle and knit it (=Right-leaning Lifted Increase, RLInc), k1, repeat from (\*) across x5/7 times = 6/8 sts increased. and Increase round 2: (\*) K2, RLInc, k1, repeat from (\*) across x5/7 times = 6/8 sts increased. to work RLIncs at the end of each Round Toe sector on the following Increase rounds. For Foot and Leg follow the companion charts for the second (right) sock according to your chosen color scheme. Please note, charts are paired with structural symmetry of finished socks in mind, which leads to that Heel is worked "inside out" starting from WS row as described below: Transfer leftmost and rightmost 6/8 stitches from Instep needle (Magic Loop Needle 1) onto Heel needle (Magic Loop Needle 2) = 15/20 sts on Instep needle, (6+27+6)/(8+36+8) sts on Heel needle. Slide instep stitches onto cable and hold intact while working a Heel.
HEEL WEDGE 1:
Preparations: Holding the work with WS facing, slip first 6/8 sts onto right needle if needed to get to the position of the beginning of the round (where the tail of yarn in color for Heel may hang). If you worked Foot for 1 or 3 leaf tiers longer or shorter than directed, you should use the opposite color than your color scheme says; if you added or subtracted 2 Oor 4 leaf tiers, use the prescribed color. Row 1 (WS): Purl to last 6 sts, turn. w 2: Slip 1 knitwise pulling the yarn tight, knit to last 6 sts, turn Row 3: Slip 1 from behind and pull the yarn tight, purl to 2 sts before previous turning point, turn. Row 4: Slip 1 knitwise pulling the yarn tight, knit to 2 sts before previous turning point, turn. Repeat last 2 rows 3/5 times more = 7/12 sts between last gaps.
HEEL WEDGE 2:
Set-up Row 1 (WS): Slip 1 from behind, purl to last 4 sts (=2 sts past the first gap) working "Thanks Ma" on WS at turning points (before gaps) as you pass them, turn. Set-up Row 2: Slip 1 knitwise, knit to last 4 sts (=2 sts past the first gap) Working "Thanks Ma" on RS at turning points (before gaps) as you pass them, turn. Then repeat Heel Wedge 1 slipping knitwise the 1st stitch of Row 1.
HEEL WEDGE 3:
Row 1 (WS): Slip 1 from behind, purl 5/10, work "Thanks Ma" on WS at 7th/12th stitch (before gap), p1 (i.e. the stitch between two turning points), turn. Row 2: Slip 1 knitwise, knit 6/11, work "Thanks Ma" on RS at 8th/13th stitch (before gap), k1 (i.e. the stitch between two turning points), turn. Row 3: Slip 1 from behind, purl past the closest WS gap working "Thanks Ma" on WS at both turning points as you pass them, pl, turn. Row 4: Slip 1 knitwise, knit past the closest RS gap working "Thanks Ma" on RS at both turning points as you pass them, k1, turn. Repeat last 2 rows 4/6 times more = (4+31+4)/(4+44+4) sts.
HEEL WEDGE 4:
Row 1 (WS): Slip 1 from behind, purl 18/27, turn. Row 2: Slip 1 knitwise, knit 6/11, turn = 7/12 sts between turning points. Row 3: Slip 1 from behind, purl to the closest WS gap working "Thanks Ma" on WS at turning point (before gap) as you pass it, p2, turn. Row 4: Slip 1 knitwise, knit to the closest RS gap working "Thanks Ma" on RS at turning point (before gap) as you pass it, k2, turn. Repeat last 2 rows for 4/6 times more = (6+27+6)/(6+40+6) sts. Next WS row: Slip 1 from behind, purl to last 2 stitches working "Thanks Ma" on WS at remaining turning points (before gaps) including those from previous wedges, turn. Next RS row: Slip 1 knitwise, knit to last 2 stitches working "Thanks Ma" on RS at remaining turning points (before gaps) including those from previous wedges, turn = (2+35+2)/(2+48+2) sts. Next WS row: Slip 1 from behind, purl 3/5 to get to the position of the beginning of the round, turn = (2+4+31+2)/(2+6+42+2) sts.
FINISHING
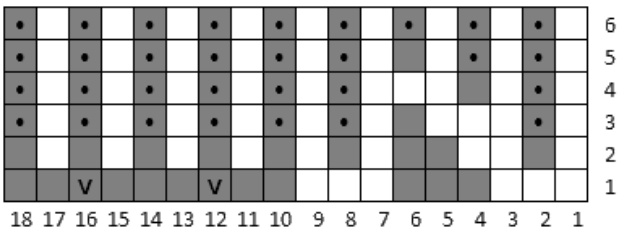
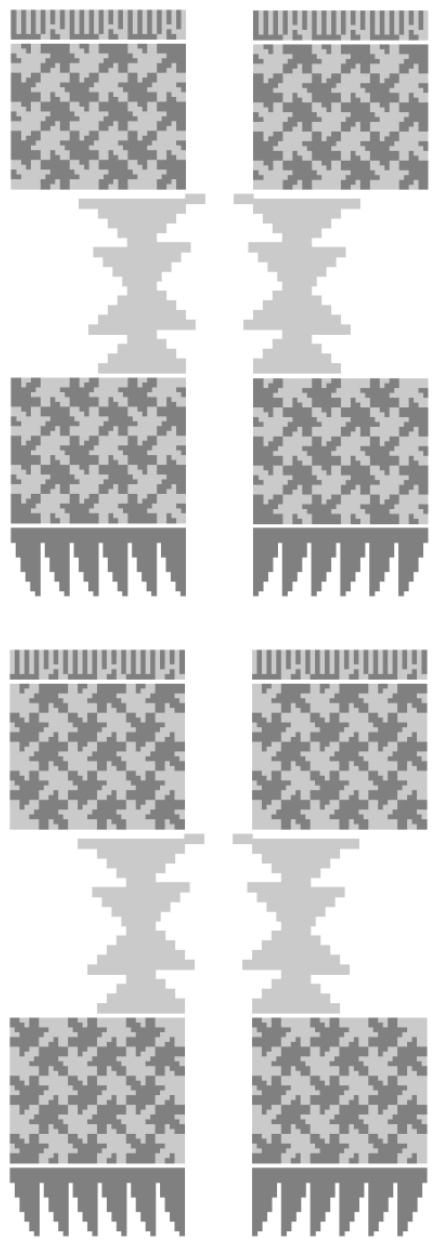
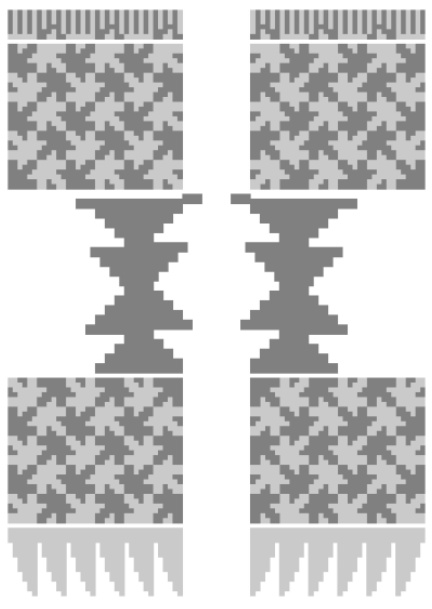
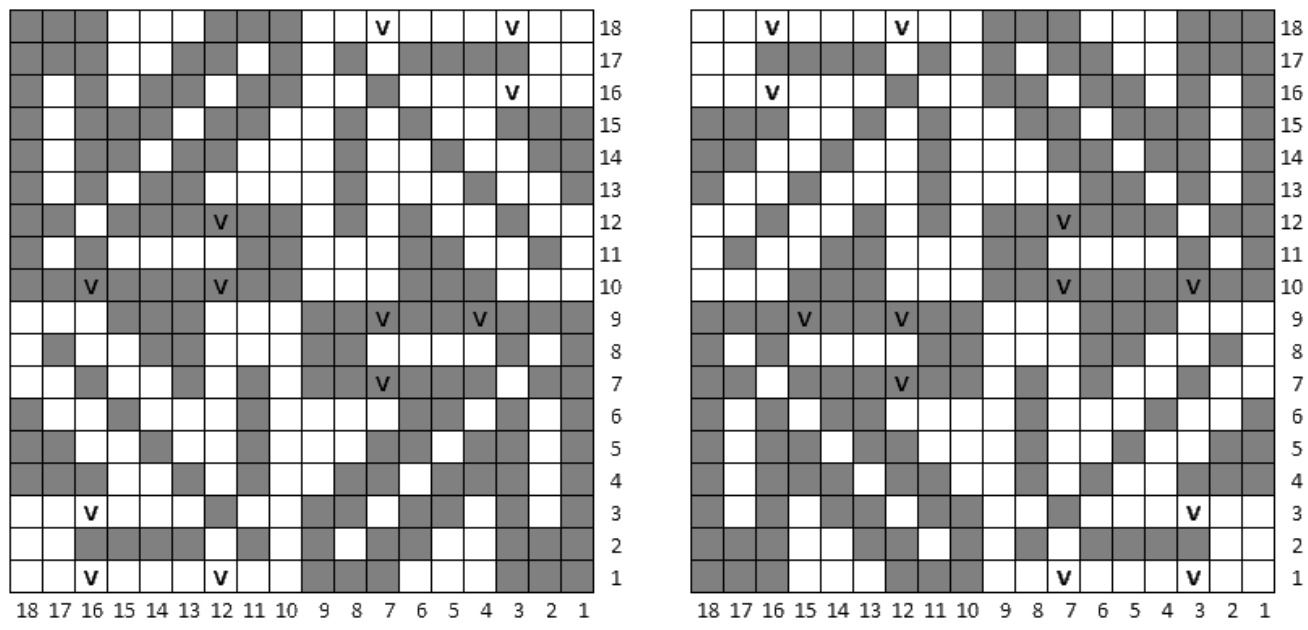
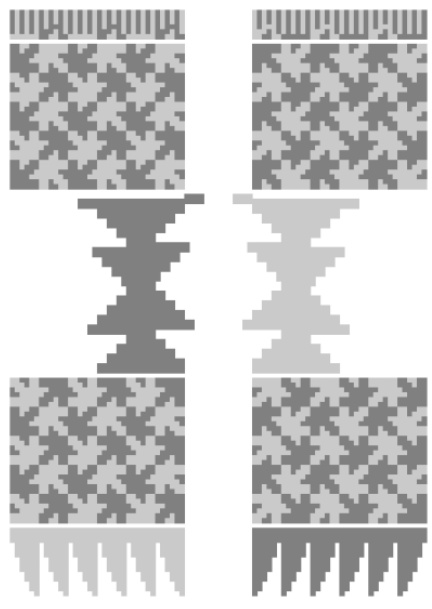
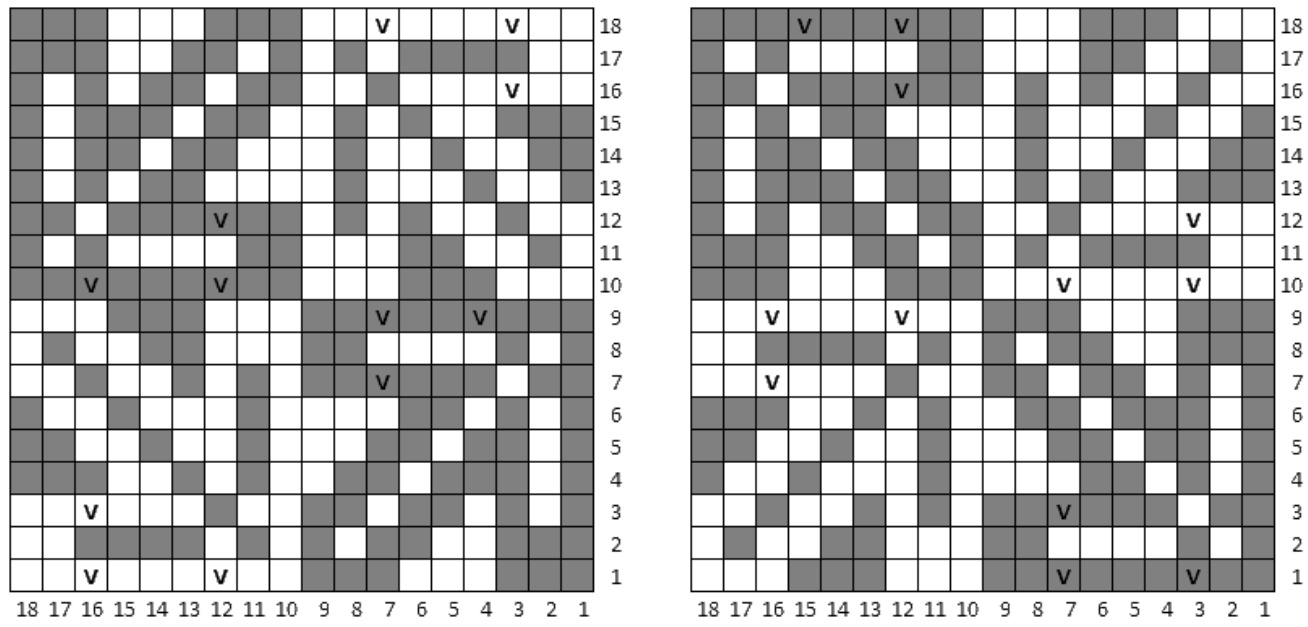
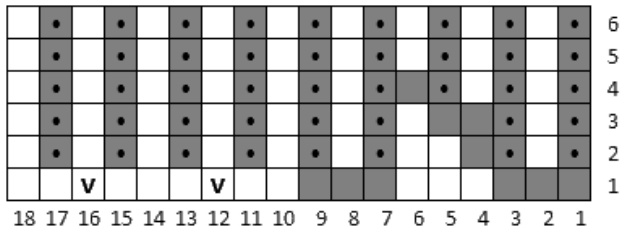
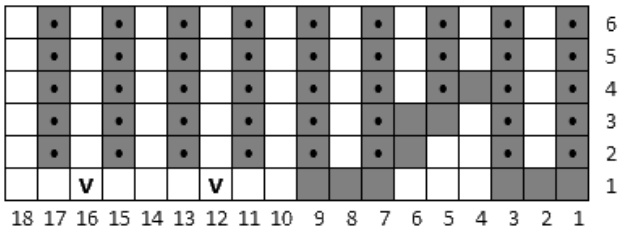
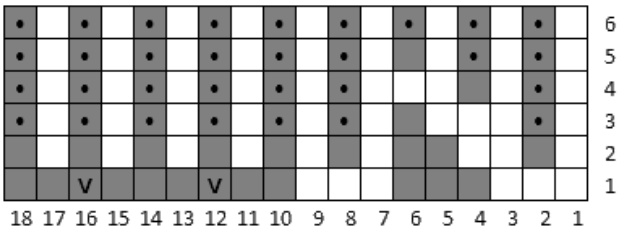
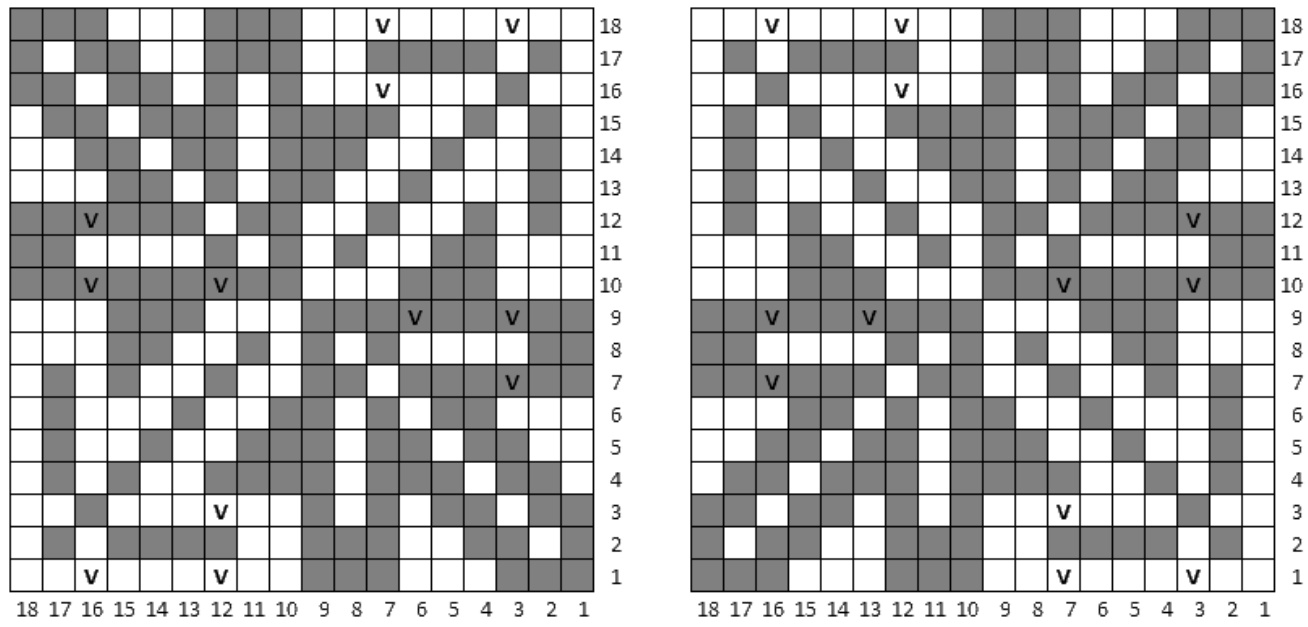
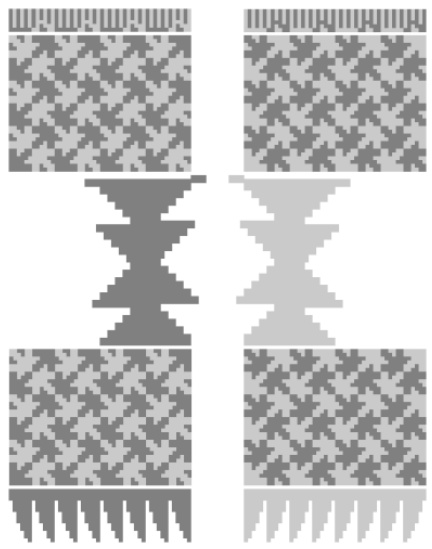
Weave in all ends. Block if desired. COLOR SCHEME I) CONTINUOUS FOR 54-STS SOCKS, VERSION A CUFF TRANSITION CHART, TYPE 1 CUFF TRANSITION CHART, TYPE 2

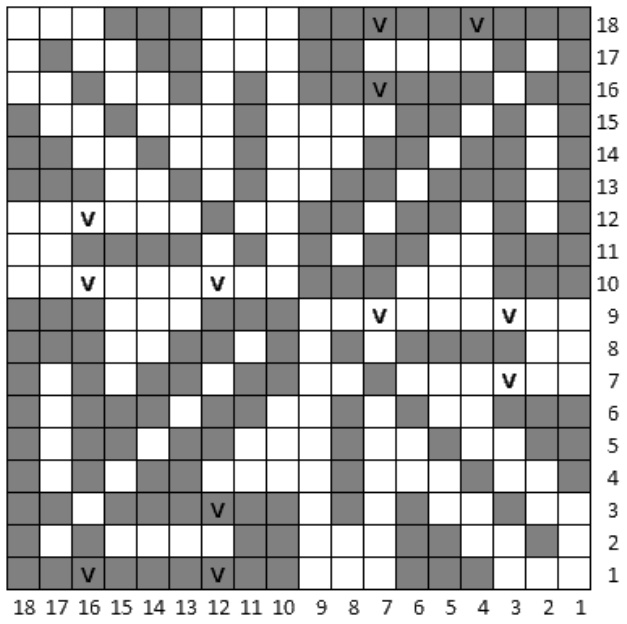
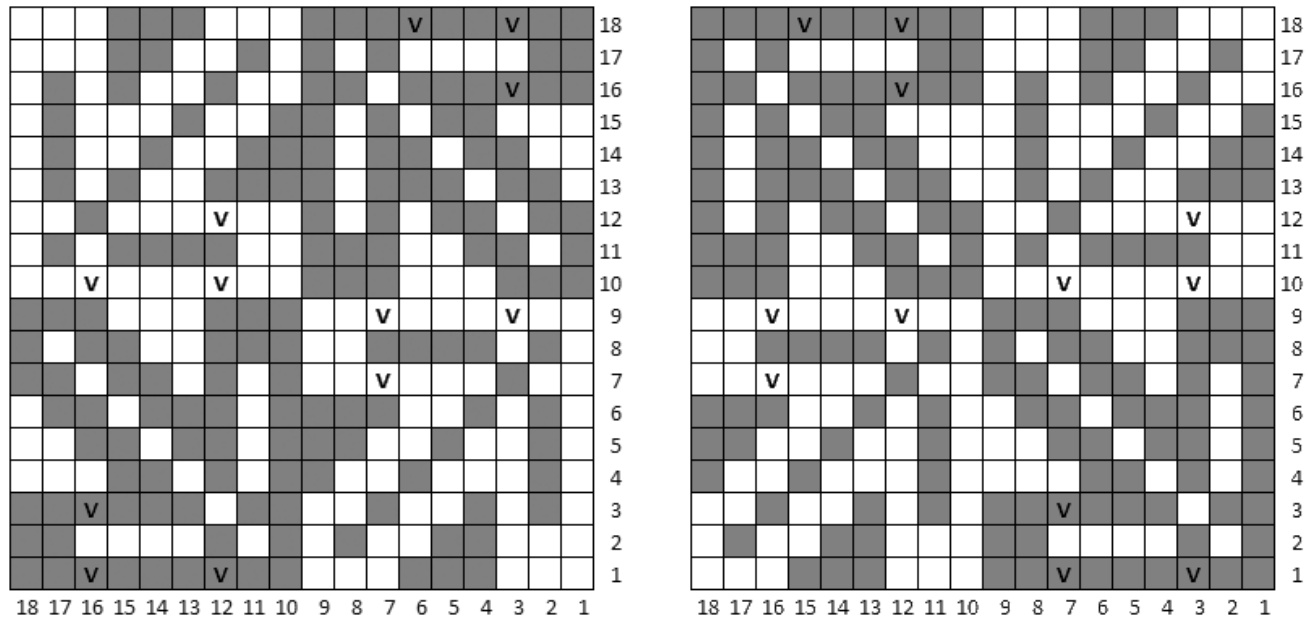
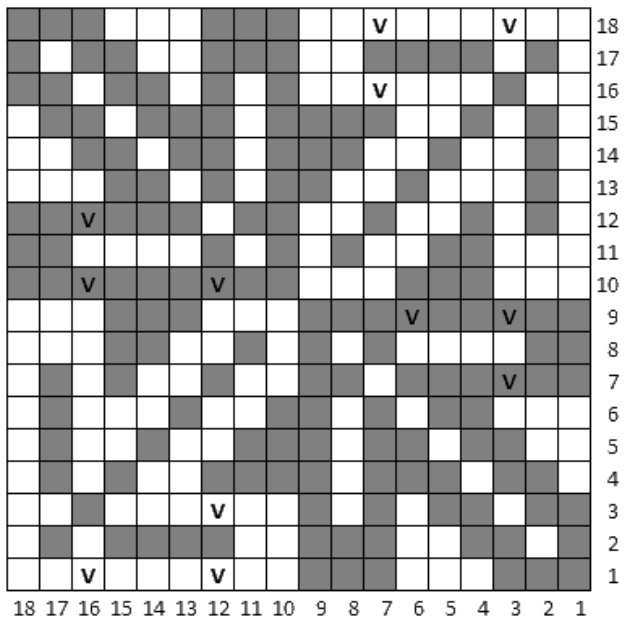
STRANDED LEAVES CHART, TYPE 2

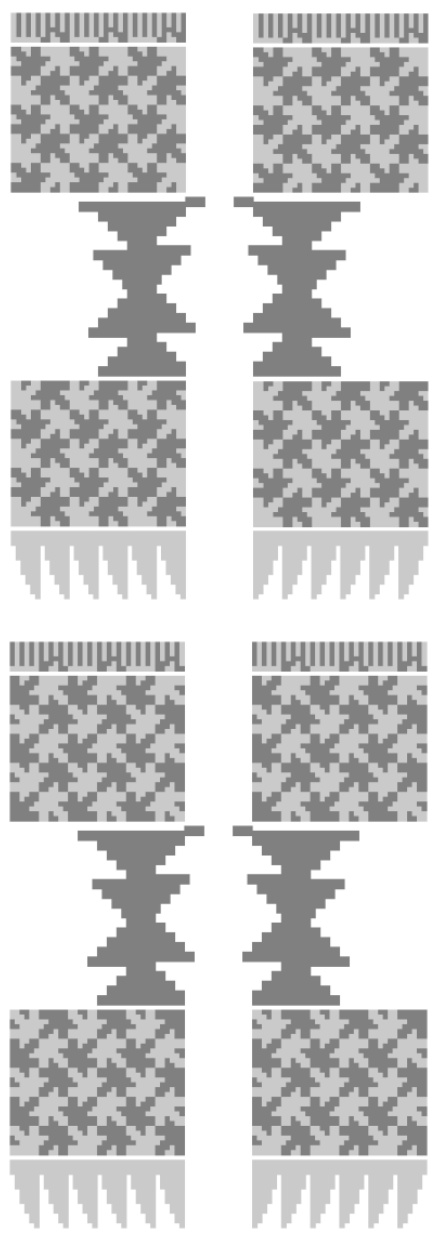
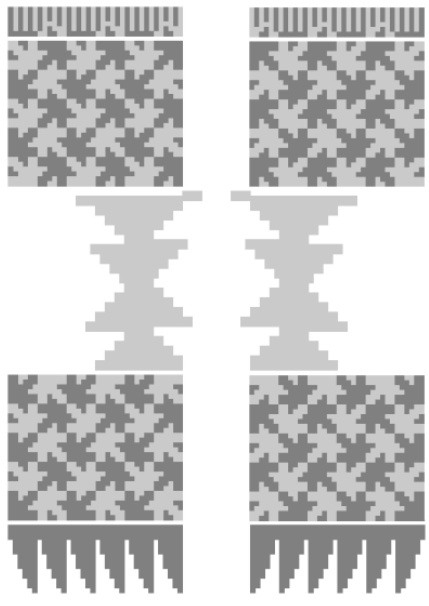
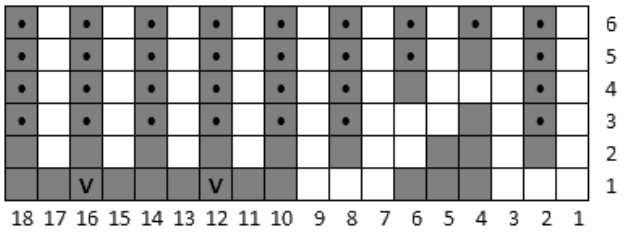
Toes on both socks should be in color A, Heels in color B. k1with A k1 with B weave unused B while k1 with A (optional) weave unused A while k1 with B (optional) p1with B COLOR SCHEME I) CONTINUOUS FOR 54-STS SOCKS, VERSION B CUFF TRANSITION CHART, TYPE 1 CUFF TRANSITION CHART, TYPE 2

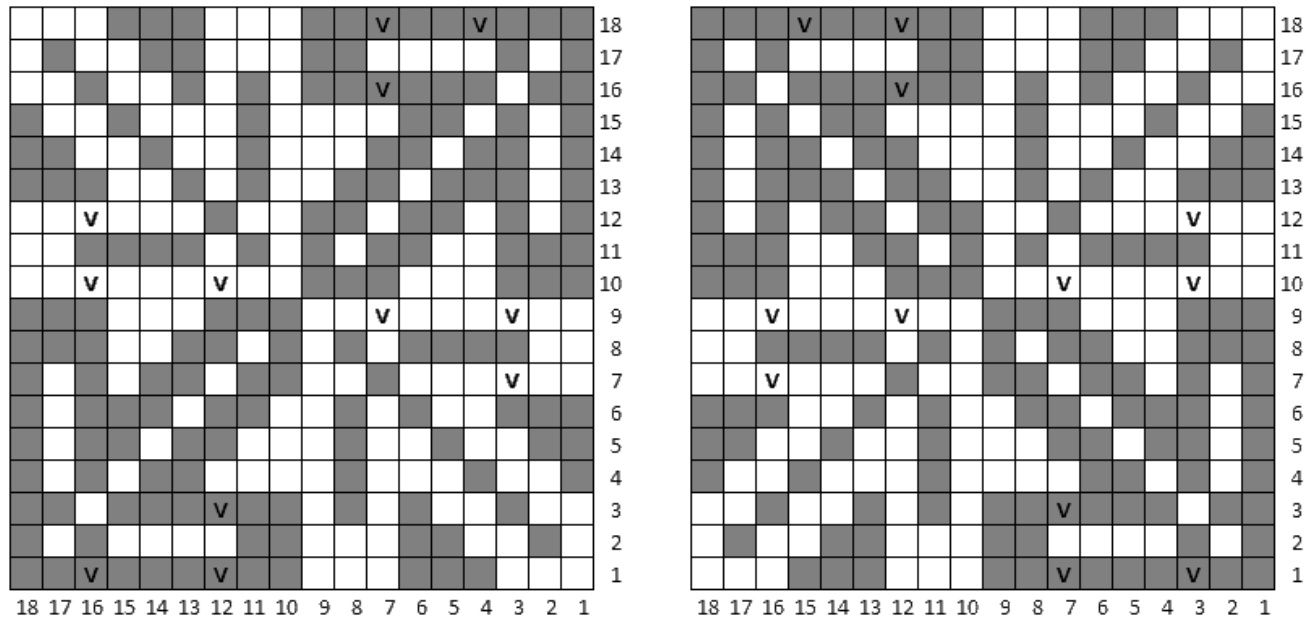
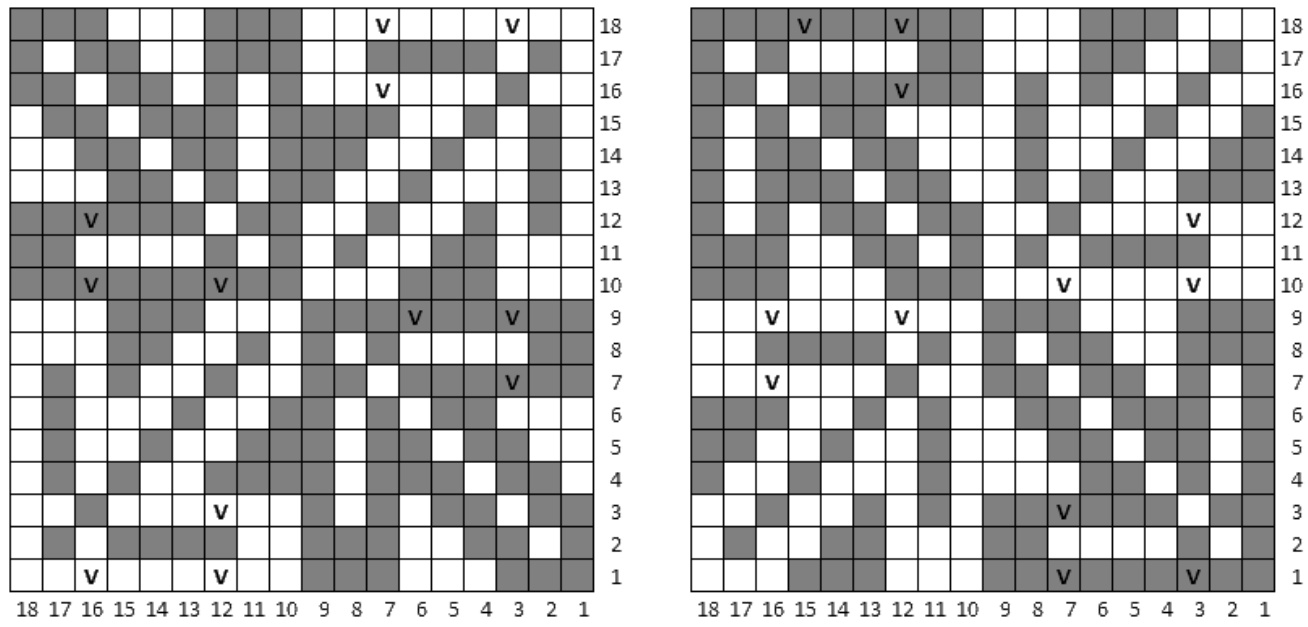
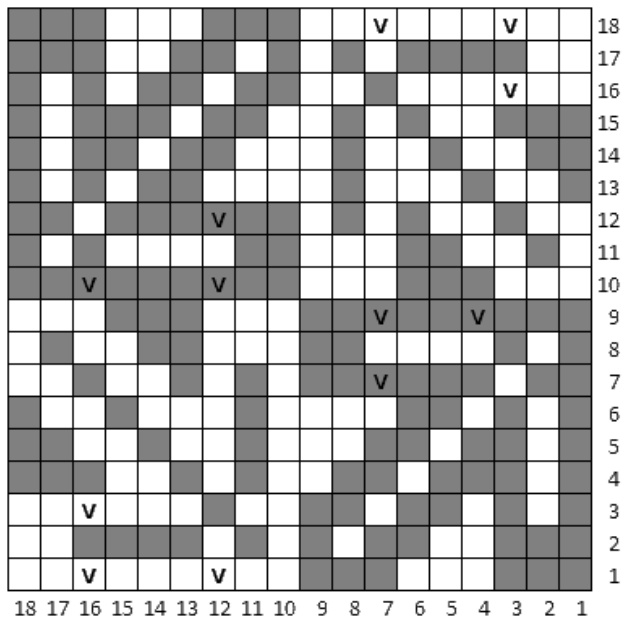
STRANDED LEAVES CHART, TYPE 2
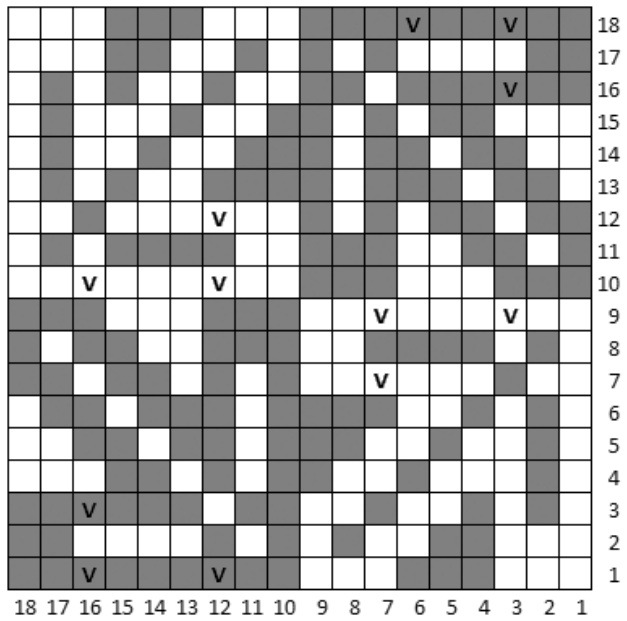
Toes on both socks should be in color B, Heels in color A. k1 with A k1 with B V weave unused B while k1 with A (optional) weave unused A while k1 with B (optional) p1withB
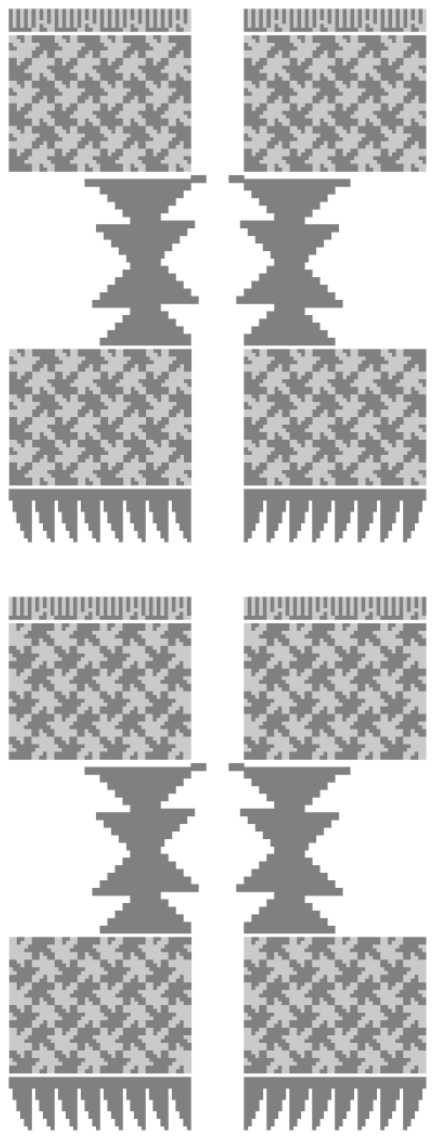
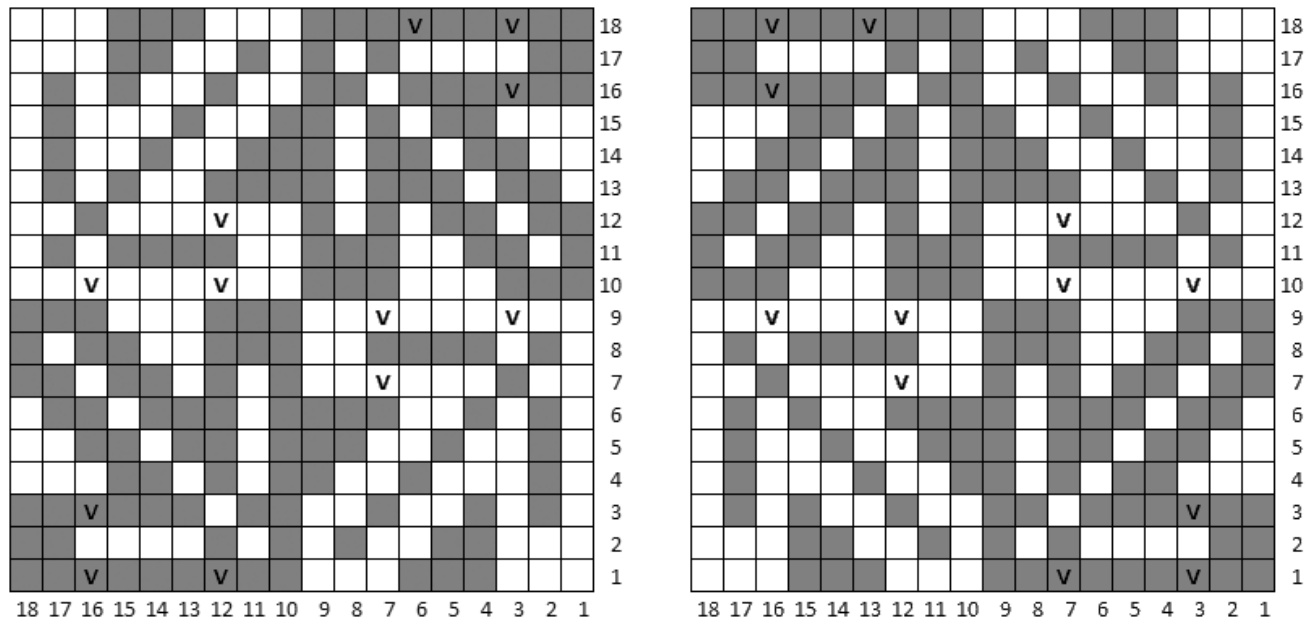
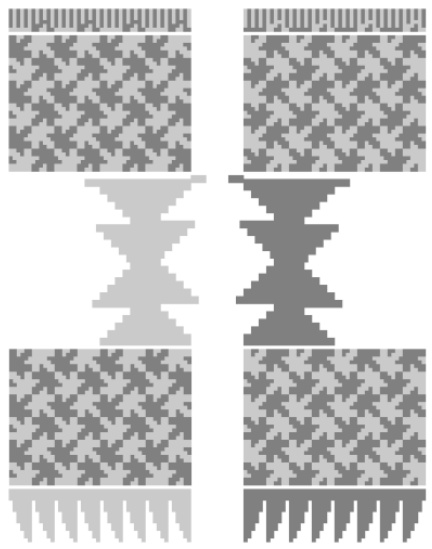
COLOR SCHEME II) IDENTICAL FOR 54-STS SOCKS, VERSION A, TYPE 1
FF TRANSITION CHART RIGHT CUFF TRANSITION CHART
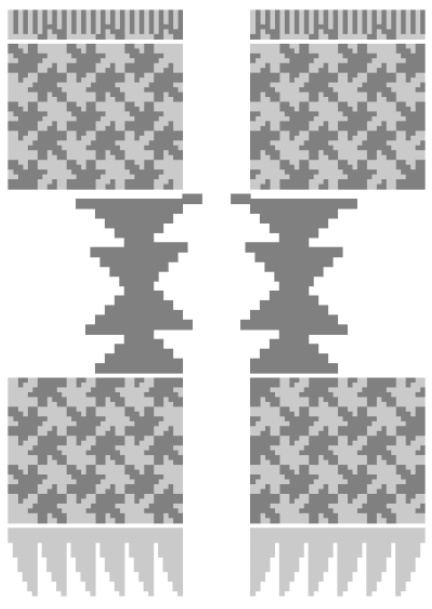

STRANDED LEAVES CHARTS

Toes on both socks should be in color A, Heels in color B. k1 with A k1 with B V weave unused B while k1 with A (optional) weave unused A while k1 with B (optional) p1withB
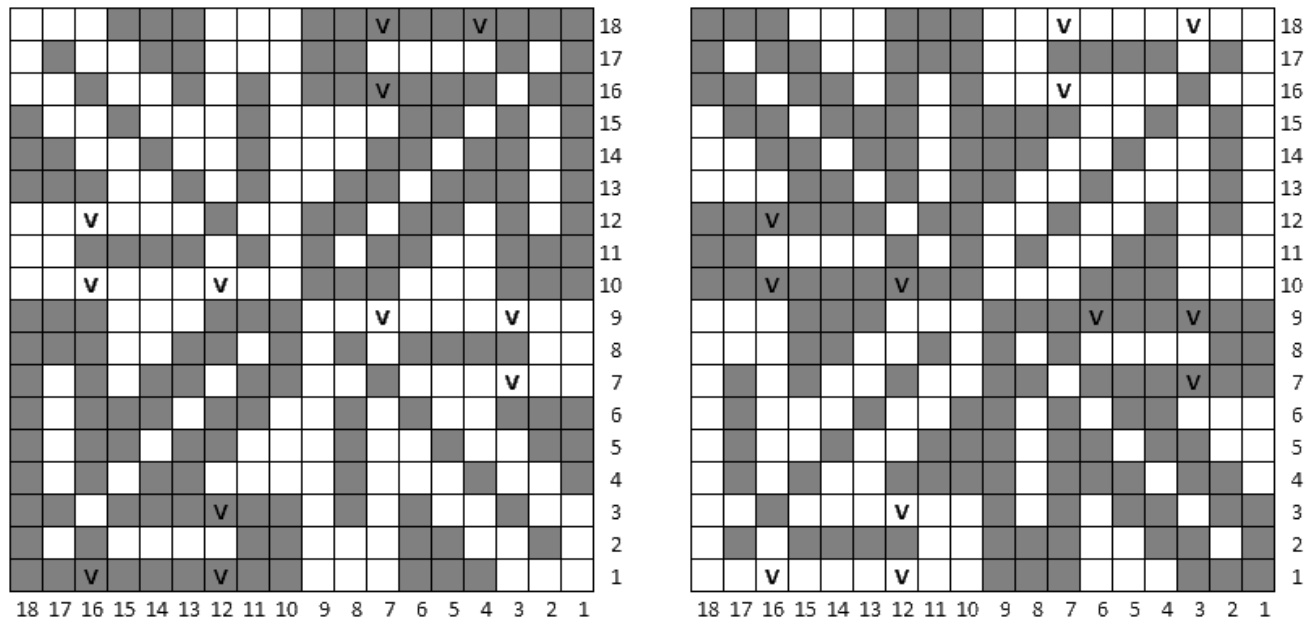
COLOR SCHEME II) IDENTICAL FOR 54-STS SOCKS, VERSION B, TYPE 2
FF TRANSITION CHART RIGHT CUFF TRANSITION CHART
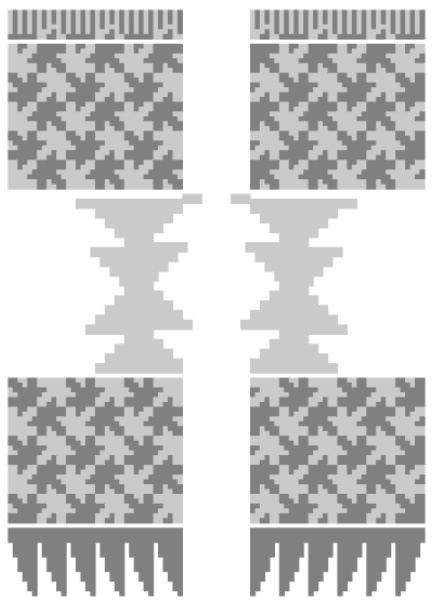

STRANDEDLEAVES CHARTS
Toes on both socks should be in color B, Heels in color A. k1 with A k1 with B V weave unused B while k1 with A (optional) weave unused A while k1 with B (optional) p1withB
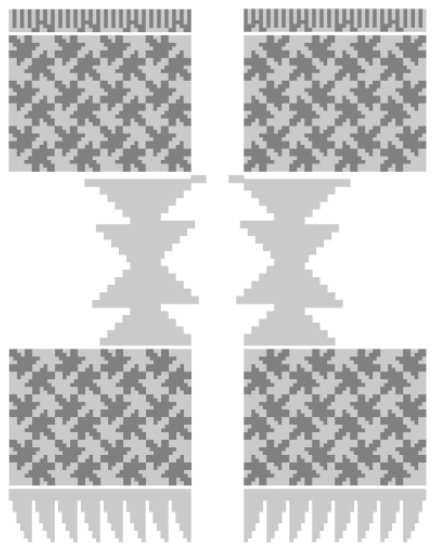
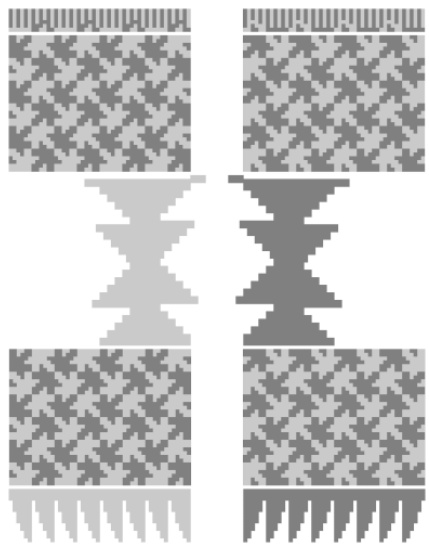
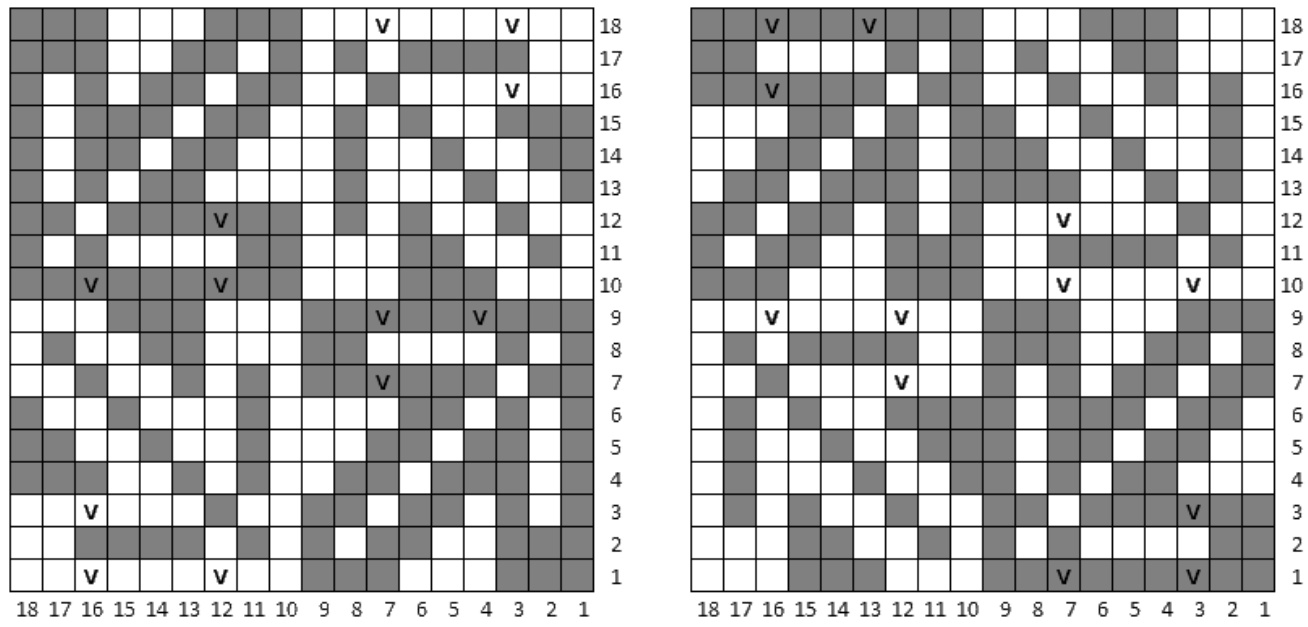
COLOR SCHEME III) MIRRORED FOR 54-STS SOCKS, VERSION A, TYPE 2
FF TRANSITION CHART RIGHT CUFF TRANSITION CHART

STRANDED LEAVES CHARTS
Toes on both socks should be in color A, Heels in color B. k1 with A k1 with B V weave unused B while k1 with A (optional) weave unused A while k1 with B (optional) p1withB
COLOR SCHEME III) MIRRORED FOR 54-STS SOCKS, VERSION B, TYPE 1
FF TRANSITION CHART RIGHT CUFF TRANSITION CHART

STRANDEDLEAVES CHARTS
Toes on both socks should be in color B, Heels in color A. k1 with A k1 with B V weave unused B while k1 with A (optional) weave unused A while k1 with B (optional) p1withB
COLOR SCHEME IV) REVERSED FOR 54-STS SOCKS, TYPE 2
EF TRANSITION CHART RIGHT CUFF TRANSITION CHART
STRANDED LEAVES CHARTS

On Left Sock Toe should be in color A, Heel in color B; on Right Sock Toe should be in color B, Heel in Color A.
k1 with A k1 with B V weave unused B while k1 with A (optional) weave unused A while k1 with B (optional) p1withB
COLOR SCHEME V) IDENTICAL REVERSED FOR 54-STS SOCKS, TYPE 1
FF TRANSITION CHART RIGHT CUFF TRANSITION CHART

STRANDED LEAVES CHARTS
On Left Sock Toe should be in color B, Heel in color A; on Right Sock Toe should be in color A, Heel in Color B. k1 with A k1 with B V weave unused B while k1 with A (optional) weave unused A while k1 with B (optional) p1withB
COLOR SCHEME V) IDENTICAL REVERSED FOR 54-STS SOCKS, TYPE 2
FF TRANSITION CHART RIGHT CUFF TRANSITION CHART

STRANDED LEAVES CHARTS
On Left Sock Toe should be in color A, Heel in color B; on Right Sock Toe should be in color B, Heel in Color A. k1 with A k1 with B V weave unused B while k1 with A (optional) weave unused A while k1 with B (optional) p1withB
COLOR SCHEME VI) MIRRORED REVERSED FOR 54-STS SOCKS, TYPE 1
FF TRANSITION CHART RIGHT CUFF TRANSITION CHART


STRANDED LEAVES CHARTS
On Left Sock Toe should be in color A, Heel in color B; on Right Sock Toe should be in color B, Heel in Color A. k1 with A k1 with B V weave unused B while k1 with A (optional) weave unused A while k1 with B (optional) p1withB
COLOR SCHEMES I) CONTINUOUS, II) IDENTICAL FOR 72-STS SOCKS, VERSION A
CUFF TRANSITION CHART, TYPE 1
CUFF TRANSITION CHART, TYPE 2
STRANDED LEAVES CHART, TYPE 2
Toes and Heels on both socks should be in color A. k1 with A k1 with B V weave unused B while k1 with A (optional) weave unused A while k1 with B (optional) p1withB
COLOR SCHEMES I) CONTINUOUS, II) IDENTICAL FOR 72-STS SOCKS, VERSION B
CUFF TRANSITION CHART, TYPE 1
CUFF TRANSITION CHART, TYPE 2
STRANDED LEAVES CHART, TYPE 2


Toes and Heels on both socks should be in color B. k1with A k1with B V weave unused B while k1 with A (optional) weave unused A while k1 with B (optional) p1withB
COLOR SCHEME III) MIRRORED FOR 72-STS SOCKS, VERSION A, TYPE 1
FF TRANSITION CHART RIGHT CUFF TRANSITION CHART

STRANDED LEAVES CHARTS
Toes and Heels on both socks should be in color A. k1 with A k1with B V weave unused B while k1 with A (optional) weave unused A while k1 with B (optional) p1withB
COLOR SCHEME III) MIRRORED FOR 72-STS SOCKS, VERSION B, TYPE 2
FF TRANSITION CHART RIGHT CUFF TRANSITION CHART

STRANDED LEAVES CHARTS
Toes and Heels on both socks should be in color B. k1 with A k1 with B V weave unused B while k1 with A (optional) weave unused A while k1 with B (optional) p1withB
COLOR SCHEMES IV) REVERSED, V) IDENTICAL REVERSED FOR 72-STS SOCKS, TYPE 1
FF TRANSITION CHART RIGHT CUFF TRANSITION CHART

STRANDED LEAVES CHARTS
On Left Sock Toe and Heel should be in color B; on Right Sock Toe and Heel should be in color A.
k1with A k1 with B V weave unused B while k1 with A (optional) weave unused A while k1 with B (optional) p1withB
COLOR SCHEMES IV) REVERSED, V) IDENTICAL REVERSED FOR 72-STS SOCKS, TYPE 2
FF TRANSITION CHART RIGHT CUFF TRANSITION CHART

STRANDED LEAVES CHARTS
On Left Sock Toe and Heel should be in color A; on Right Sock Toe and Heel should be in color B.
k1with A k1 with B V weave unused B while k1 with A (optional) weave unused A while k1 with B (optional) p1withB
COLOR SCHEME VI) MIRRORED REVERSED FOR 72-STS SOCKS, TYPE 2
FF TRANSITION CHART RIGHT CUFF TRANSITION CHART

STRANDED LEAVES CHARTS
On Left Sock Toe and Heel should be in color A; on Right Sock Toe and Heel should be in color B. k1 with A k1 with B V weave unused B while k1 with A (optional) weave unused A while k1 with B (optional) p1withB


