BABY LOTUS HAT

Baby Lotus Hat
By John Horigan This hat was inspired by Cat Bordhi's Reversible Lotus Hat. The moebius band has been replaced by extra lotus petal rows and the cuteness factor has been increased by using green yarn for the top and ending with an i-cord loop. Finished Size: 13" head circumference and 4" tall. Yarn: Fingering weight sock yarn in pink and pastel green, 25g each. Needles: Size 2 (2.75mm) set of 5 doublepointed needles (dpn). Notions: tapestry needle Gauge: 32 stitches to 4" in stockinette.
Pattern:
Cast-on 120 stitches, evenly distribute stitches onto four dpns, and join for working in the round.
Row 1: Purl
Row $z^{\star}\,\mathsf{K}\,\mathsf{I}$ , p9, repeat from Work chart 1 three times (24 rows total). After each chart 1 repeat, purl four stitches from the first needle onto the last needle. The slip four stitches from the second needle onto the first needle, the third needle onto the second needle, and the forth needle onto the third needle. This causes the columns of double increases and double decreases to line up from one chart repetition to the next. If you are working on a circular needle then just remove marker, purl four stitches, and place marker.
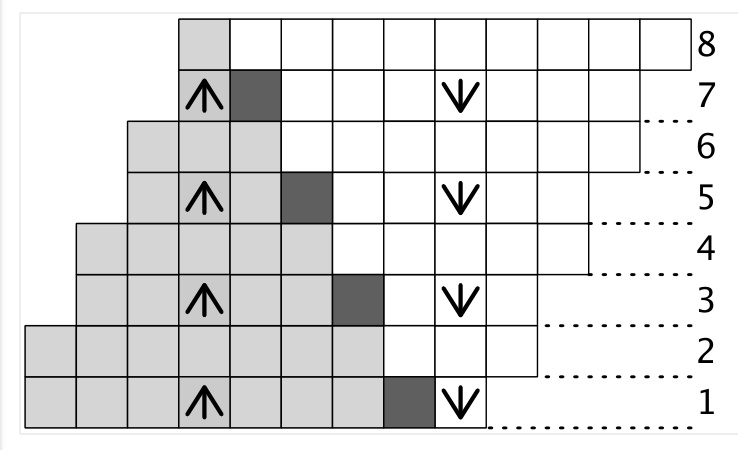
Chart 1: Lotus Corolla
Crown Decrease:
Now work chart 2 to decrease the crown to a point (after having completed the third 4-stitch shift). One row 8 switch from pink to green and knit across (no purls). Between row 8 and row 9 purl three stitches from the first needle onto the last and slip three stitches from the other three needles. If you elected to do a centered double-increase then for row 9 I encourage you to attempt a M1R-K-M1L double increase. It will look better.

Chart 2: Lotus Calyx
Top Loop:
After completing chart 2 you will have 12 stitches left, three on each needle. CDD across to reduce to four stitches. Transfer stitches to one dpn and work an i-cord for 112". Break yarn, leaving a 9" tail Now we will attach the end of the i-cord to the top of the hat near the bottom of the i-cord, making a small loop. It is not sufficient to simply thread the tail through the four stitches and attach it to the surface of the hat. The loop will be tugged on a lot and this will pull out quickly. Instead we will graft the four i-cord stitches to four stitches on the hat body. Select four stitches near the base of the i-cord, two in one row and two in the next row. Thread the tail through the first i-cord stitch as if to purl. Loop this around the legs of the first hat body stitch. Thread the tail through the first i-cord stitch as if to knit. Take first i-cord stitch off the needle and gently tug yarn to pull out slack. Repeat for the next three i-cord and hat body stitches. Finishing: Weave in ends. Block hat.
Stitch Notes:
Figure 1 provides a key for the chart symbols. Centered double decrease, knit: slip two stitches together as if to k2tog. Knit one stitches. Pass two slipped stitches over knit stitch.
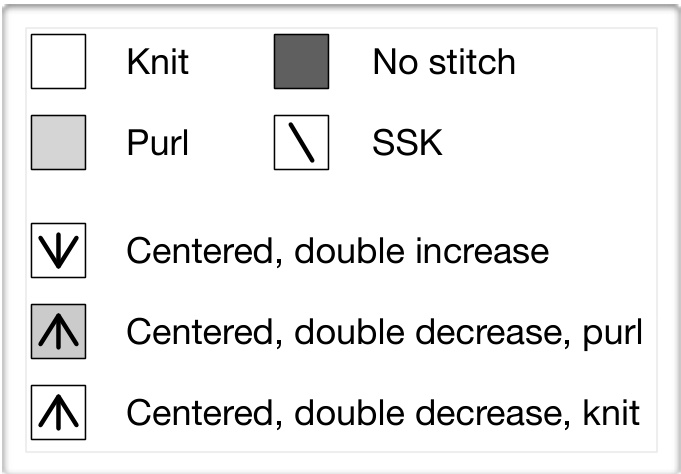
Centered double decrease, purl: slip one purl-wise, slip two knit-wise separately. Stick left needle through last two stitches from right to left and slip them back to the left needle. Slip the first stitch back to the left needle purlwise. P3tog these stitches. With practice this becomes easy. But if you can't get the hang of it then just p3tog the stitches as they are.
Figure 1: Chart Symbols
Centered double increase: There are several options for this stitch. For best results work a M1R before the center stitch, knit the center stitch, then work a M1L after the center stitch. If you find this too hard in fingering weight then knit the center stitch through the back loop and then through the front loop. Take the center stitch off the left needle and then stick the left into the vertical bar between the two new stitch. Pull this loop up and knit it through the back loop. Or just search Youtube for "centered double increase". M1R: From the back, lift the bar between the stitches with the left needle. Knit into the front of the loop. It helps to insert the right needle as if to purl through the front loop, tug the loop open a little, then insert needle as if to knit through the front loop and complete the knit. M1L: From the front, lift the bar between the stitches with the left needle. Knit into the back of theloop.


