HYDRA LIGHT
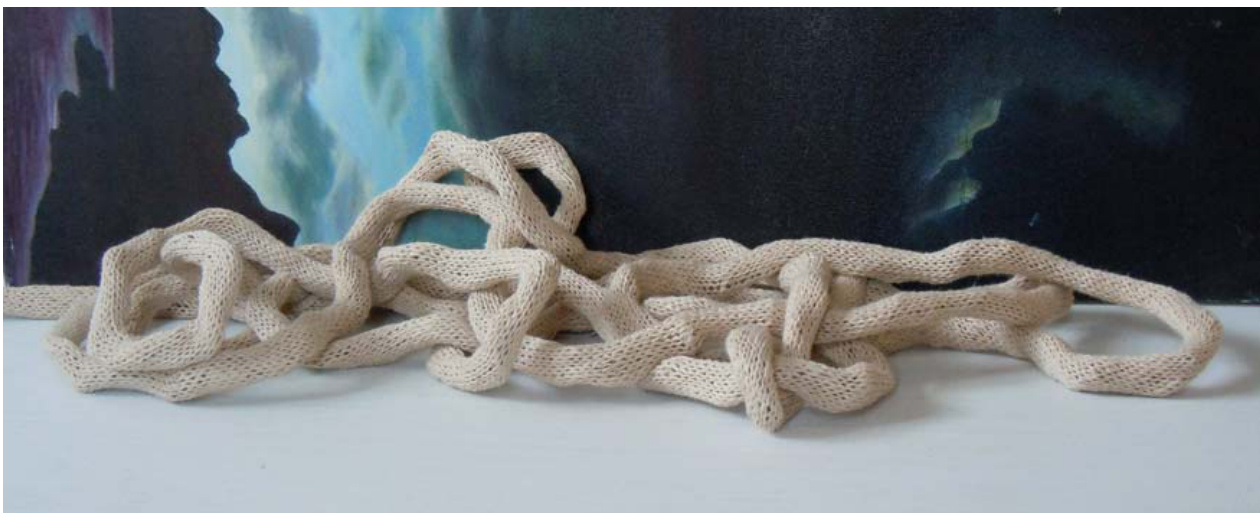
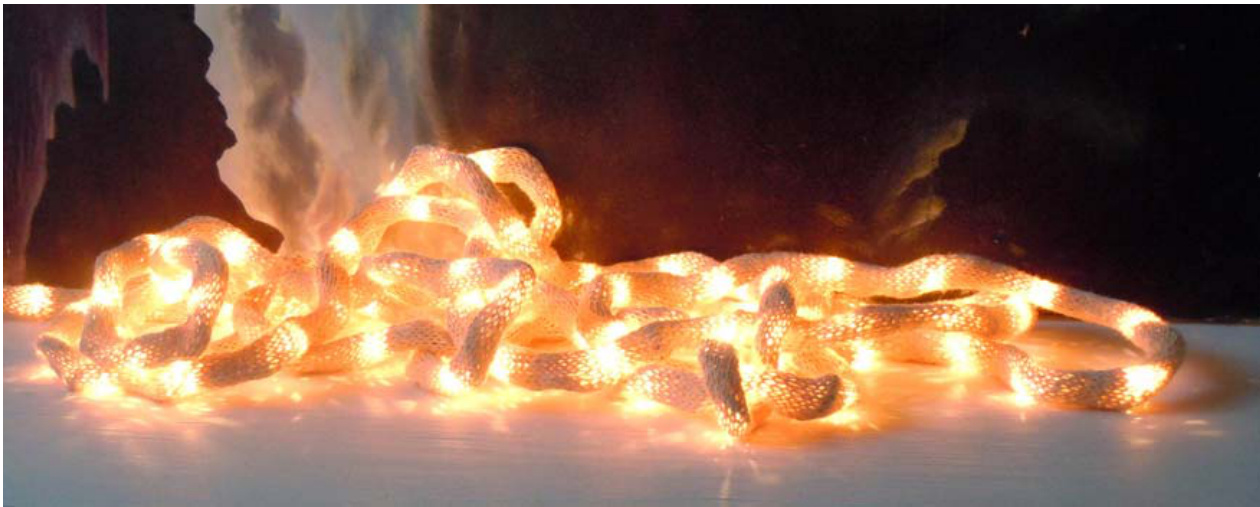
Named after the largest constellation, Hydra, this project is easy way to fancy up an unwanted string of Christmas lights. The light filtered through the knitted tube makes a gentle twinkling effect, and the long tube is an interesting object in itself when not plugged in. CAUTIONARY NOTE: PLEASE USE A NON-FLAMMABLE YARN FOR THIS PROJECT, AND PLEASE DO NOT LEAVE LIGHT UNATTENDED! Due to the heat generated by the bulbs, it's best to choose the yarn with the lowest flammability you can find (a quick internet search on fiber flammability should help you determine if your yarn is suited to this project). Bear in mind especially that if you plan to drape the light into a clump, there will be more heat concentrated in a smaller area—PROCEED wITH CAUTION! If you're using unmarked or recycled yarn, this wikipedia article will help you figure out exactly what you have: http://en.wikipedia.org/wiki/Yarn weight This table from the Craft Yarn Council of America is also a handy reference tool for matching your yarn with an appropriate needle size: http://www.craftyarncouncil.com/weight.html Gauge: 5 stitches and 5.5 rows per 1"/ approx. 2.5 cm in stockinette. Your gauge will be relatively loose, but it's a good idea to knit a small swatch to make sure it's not so loose that the lights poke through. Finished measurements: approx. 2.25"/5.7 cm around; length will vary according to your light string Yarn: any fingering weight yarn WITH LOw FLAMMABILITY Supplies/notions: US 6 (4 mm) double-pointed needles (3-4 depending on your preference) crochet hook or tapestry needle for weaving in ends string of small Christmas/ fairy lights Abbreviations: \*.... Repeat instructions between asterisks KKnit KFB Knit front and back (knit into front of stitch and then again into back of same stitch) Instructions Cast on 12 stitches and join to knit in the round. Since this is such a small tube, you may find it easier to use only two needles at a time. Rows 1-6: \*K1, P1\* Following rows: knit all stitches After you have knit about 1"/ 2.5 cm, check to be sure that your tube fits over the female plug end of the light string (not the end that will be plugged into the wall). Since these can vary in size, you'll save yourself grief by making sure now that your tube will fit. It's also a good idea to test your tube for fit one more time when it's gained a little bit of length, just to be sure. If you'd like, you can begin working the tube onto the light string as you knit. This has the advantage of showing your progress and not saving that part of the task for the end (it does take a while); on the other hand, it changes the project from highly portable to not very portable. In any case, I advise working your tube completely onto the light string when it looks like you have almost enough length, so you'll be sure your length is right (the tube may Stretch once it's on the light string). Tips for inserting the light string in the tube: ·Start working the tubing over the light string at the female end of the plug (the end with no prongs). You will need the "“live" end of the knitting to be here at the very end in order to finish things off. Be patient and slow, since your tube may catch on the lights as you go. If you feel that it's caught, instead of tugging forward, gently tug outward in the area of the catch, and it should come free. It may help to manipulate your lights just before working the tube on. Pushing them flat against the wires in the direction you're moving the tube will help keep them from catching. Once the tubing is completely on, the lights should rest fairly flat against the wires You may find some lights poking up through the tubing as you thread the tube on. Don't worry, just push them back down against the wires—it shouldn't be a problem when the project is finished, as long as your gauge is not excessively loose. Having said that, if you find that every single light seems to be poking through, you may want to adjust to a tighter gauge by moving to a smaller needle (and probably adding a couple of stitches to make up for the area lost by tightening your gauge). This is another reason to test the fit of your tubeearly on. Continue knitting until your tube is the length of the lighted portion of the string plus about 2"/ 5 cm after the end of the last light (you will be leaving about 1 foot/ 30 cm just before the wall plug-in bare). You will now add a couple of stitches to accommodate the plug end, work a few rows with this bigger circumference, and then reduce your stitches to completely enclose the plug. Increase row: K3, KFB, K2, K2, KFB, K3 (14 st.) Knit for 6 rows, or until you have reached the end of the plug. Decreaserows: \*K2tog\* Continue decrease rows until you have only one stitch. Break off the yarn, leaving 1.5"/ 4 cm or so of yarn, and pull the yarn end through the remaining stitch. Weave in ends. Enjoy your lamp safely—don't leave unattended!


