Autumn Leaves
desian by Jenny Snedeker
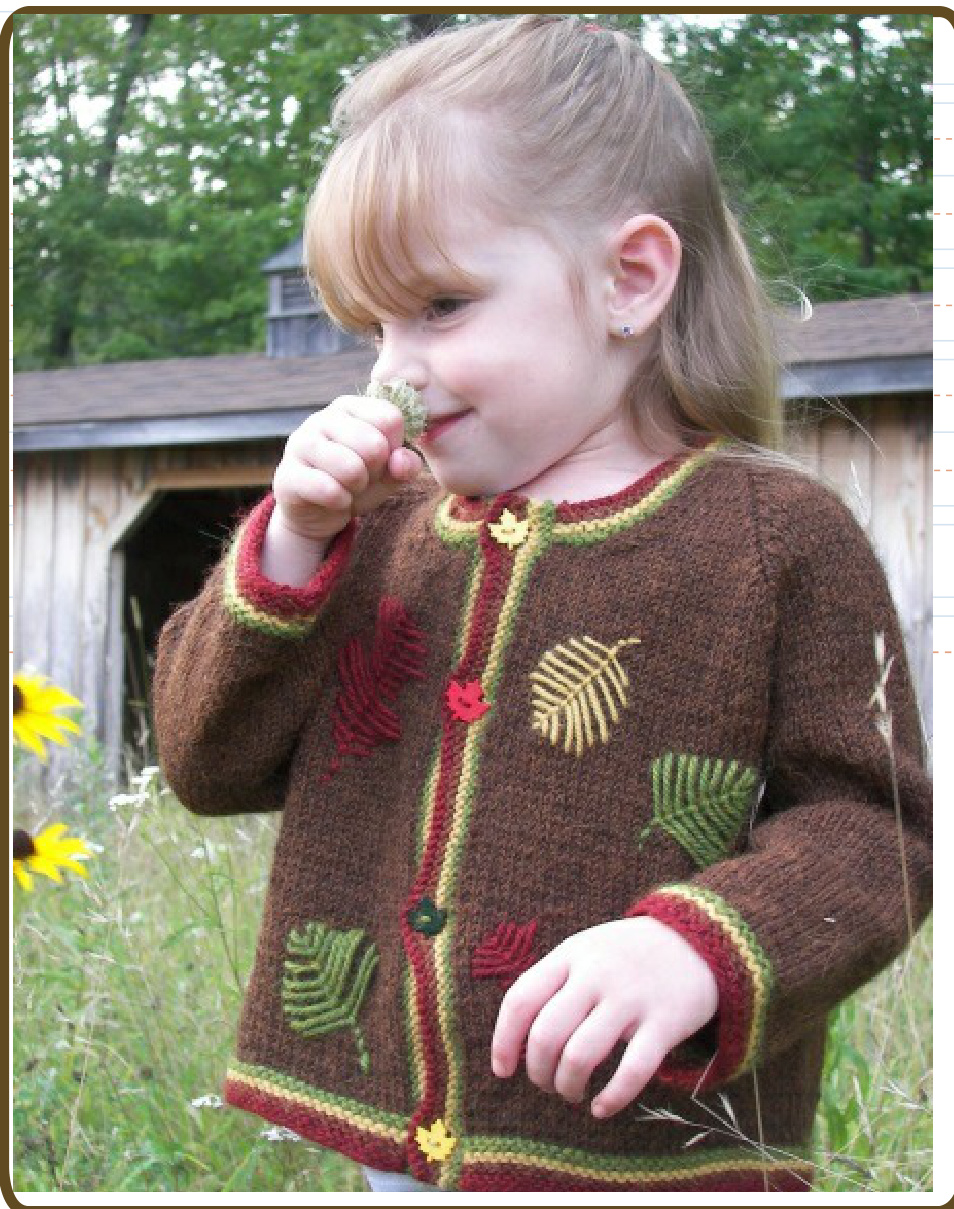
The colors of the yarn inspired this sweater; the soft, fall colors reminded me of walking through the woods with the leaves swirling down. I am a big advocate of personalizing things that I make, and I wanted to give others a chance to make this design their own. I left the sweater plain for the most part, so that the detail could be added later with embroidery, as the knitter desires.
Sizes:
NB [3, 6/12, 18, 24, 36] months
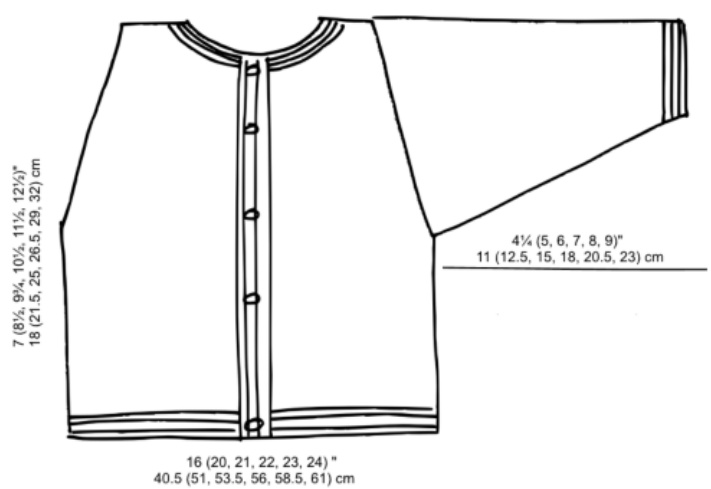
Finished measurements:
Chest: 17%4 [20%2, 213/4, 223/4, 24, 26] Length: 7 [8/2, -93/4,-10%, -11%2, 12/]"--
Materials
Berroco Ultra Alpaca [50% Peruvian Wool, 50% Super Fine Alpaca; 215 yds/198 meters per 3.5 oz/100 gm hank]; #6279 Potting Soil Mix [MC]; 2 skeins ;: #6281 Redwood Mix [CC1]; 25 yards; #6280 Mahogany Mix [CC2]; 25 yards; #6253 Dijon [CC3]; 25 yards; #6275 Pea Soup Mix [CC4]; 25 yards
Needles
US #4/3.5mm 24" circular needle and set of 4 dpns US #5/3.75mm 24” circular needle and set of 4 dpns
Gauge
;21 sts and 31 rows = 4 inches in St st on : larger needles after blocking: : [Ultra Alpaca relaxes after washing and : blocking. Pattern calculations are based ; on the post-washing gauge.] ;To save time, be sure to check your Igauge. Supplies. Stitch markers, Tapestry needle 4-6 one half inch buttons Skill Level: Intermediate Skills needed: Knitting in the round, simple color changes
Abbreviations
CC - contrasting color dec - decrease dpns - double pointed needles garter stitch - knit every row garter stitch in the round - knit one round, purl one round inc - increase k - knit k2tog - knit 2 stitches together as one knit wise - as if to knit MC - main color p-purl pm - place marker purl wise - as if to purl rep - repeat rnd (s) - round (s) RS - right side sm - slip marker ssk - slip first stitch kwise, slip second stitch pwise, place left needle into both sts and k2tog sl - slip st st - stockinette stitch st (s) - stitch (es)
Pattern Notes:
This cardigan is worked from the bottom up, with no seams. Body is worked to the underarms, then placed on hold while the sleeves are worked and then attached to the Body, then yoke is worked as one piece to the neck. Neck and Button Bands are picked up and knit later.
Stripe Sequence
CC1: Knit 2 rows CC2: Knit 2 rows CC3: Knit 2 rows CC4: Knit 2 rows
INSTRUCTIONS
LOWER BAND
With smaller circular needle and CC1, cast on 89 [106, 112, 118, 124, 135] sts. Rows 1-8: Work 8 rows in Garter st (knit every row) following stripe sequence.
BODY
Change to larger circular needle and MC and work in St st until piece measures approximately 414 [51/4, 6, 6/4, 7/, 7%]" [11 (13.5, 15, 17, 18.5, 19.50 cm] from cast on edge, ending with a WS row. Set aside.
SLEEVE
With smaller dpns and MC, cast on 30 [38, 40, 42, 44 46] sts. Being careful not to twist sts, join to work in rnd. Place marker. Rnds 1-8: Following stripe sequence, work 8 rnds in Garter st (knit 1 rnd, purl 1 rnd). Change to larger dpns and MC and work in St st until Sleeve measures 4%4 [5, 6, 7, 8, 9]" [11 (12.5, 15, 18, 20.5, 23) cm] from cast on edge, ending with a WS row. Place last 8 [8, 8, 8, 10, 10] sts on a piece of waste yarn (underarm) to hold for grafting; slip remaining 22 [30, 32, 34, 34, 36] sts onto second strand of waste yarn and set aside. Repeat for second Sleeve; do not slip last 22 [30, 32, 34, 34, 36] sts onto waste yarn.
YOKE
Row 1 (Joining): Beginning at right front, k18 [22, 23, 25, 25, 28] sts, slip next 8 [8, 8, 8, 10, 10] sts onto waste yarn, pm; with RS of Sleeve facing, k22 [30, 32, 34, 34, 36] from second sleeve, pm, k37 [46, 50, 52, 54, 59], slip next 8 [8, 8, 8, 10, 10] sts worked onto waste yarn, pm, with RS of first Sleeve facing, left needle and knit across, k18 [22, 23, 25, 25, 28]: 117 [150,160, 170, 172, 187] sts. Rows 2-8: Work even in St st. [NOTE: Raglan decreases and Neck Shaping are workedAT THESAMETIME.Pleasereadallinstructionsbeforestarting this section.] Raglan Decrease Row: \* Knit to within 2 sts of first marker, ssk, slip marker, k2tog; repeat from \* 3 more times, knit across: 109 [142, 152, 162, 164, 179] sts. Continue decreasing in same manner every RS row 4 [4, 5,5,5,6] more times: 77 (110, 112, 122, 124, 131) Sts.
Neck Shaping
Continue to work raglan decreases every RS row and AT THE SAME TIME, work Neck Shaping as follows: Bind off 6 sts at neck edge of next 2 rows. Next Row: Dec 1 st at each neck edge, every row 4 [5, 6, 7, 8, 8] times: 33 [56, 56, 56, 56, 63] sts.
FINISHING
Neck Band
Change to smaller size circular needle. With CC4 and beginning at right front edge, pick up sts evenly along neck edge, knit across sts on needle, pick up sts evenly along left neck edge. Row 1: Knit. Rows 2 and 3: With CC3, knit. Rows 4 and 5: With CC2, knit. Rows 6 and 7: With CC1, knit. Bind off all sts loosely knit-wise.
Button Band
[Tip: Work buttonholes on both sides. You will be able to change buttons for a boy or girl. For Girls, work buttonholes on right front; for boys, work buttonholes on left front.]
Mark front edge for buttonholes, having the first marker a half inch from bottom and the last marker a half inch from top and desired number of remaining buttonholes evenly spaced in between. With RS facing and CC4, pick up 4 sts for every 5 rows along front edge. Row 1: Knit. Row 2: With CC3, \* knit to buttonhole marker, k2tog, yo; repeat from \* across, knit to end. Rows 3-7: Work same as Neck Band. Bind off all sts loosely knitwise. Repeat for second side, working buttonholes if desired. Using Kitchener st, graft underarm sts together. Sew buttons to front band opposite buttonholes.
EMBROIDERY
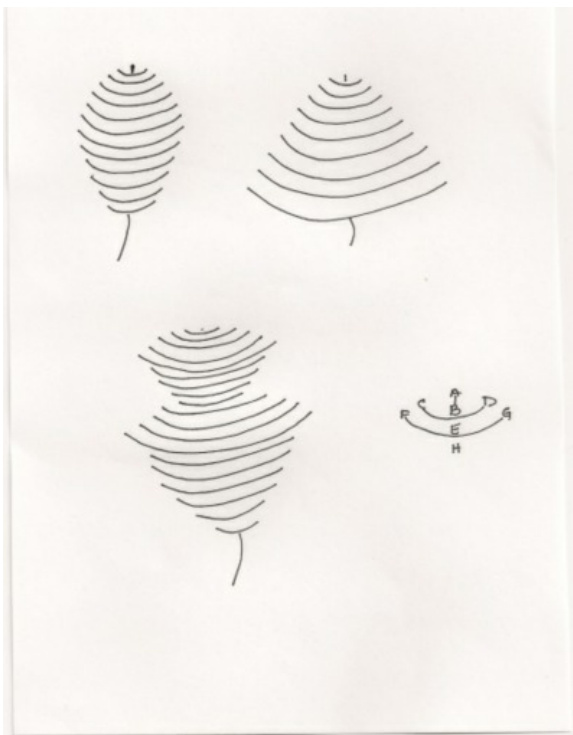
Leaves
Using tapestry needle and contrasting colors and referring to charts, embroider leaves as follows: Bring needle up at A and down at B (about 1%" away). Bring needle up at C and, leaving a small loop, insert down at D. Bring up at E and back down at B to anchor the stem stitch. Repeat as many times as desired by slightly widening each loop and then bringing stitches closer together to form a leaf shape. Simple designs for embroidering the leaves have been included. Make the leaves as large or as small as you wish, or be creative and make up some of your own!