Blue Anemone Girl
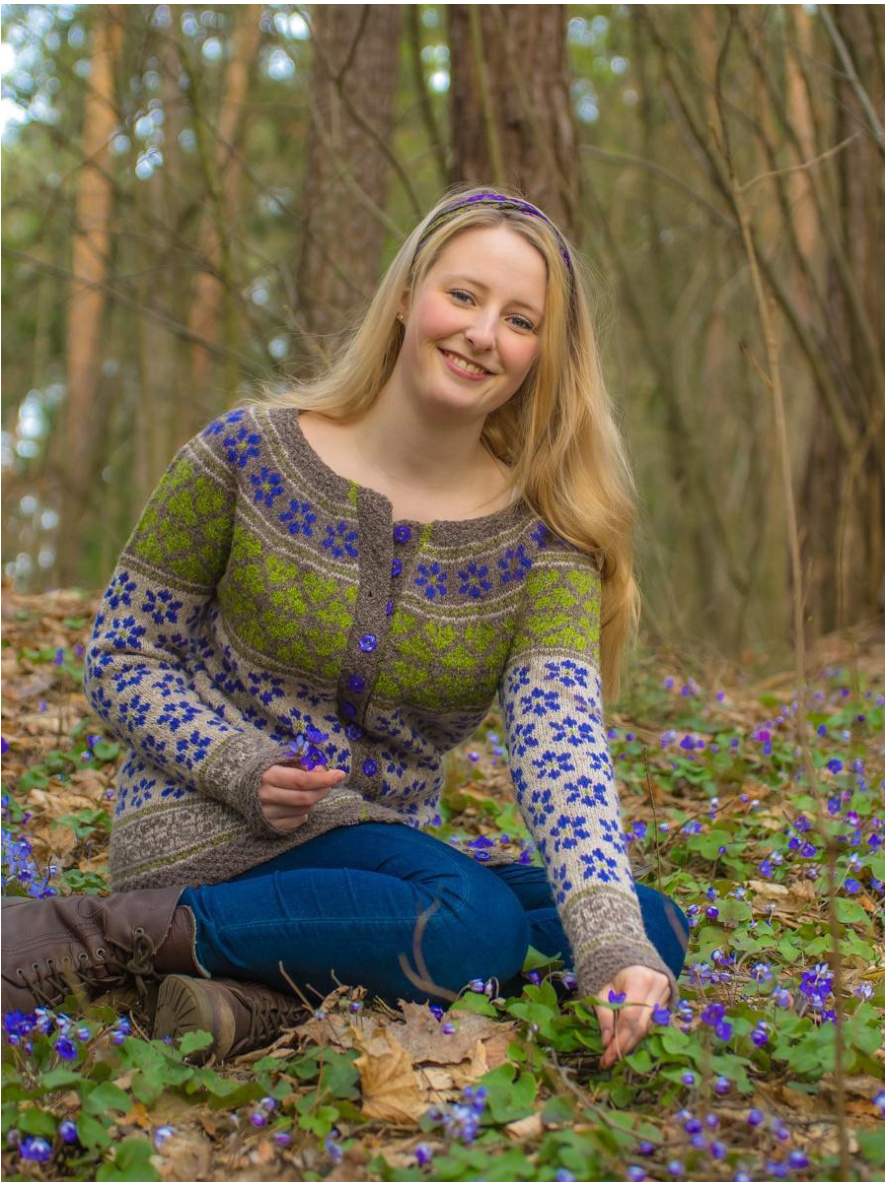
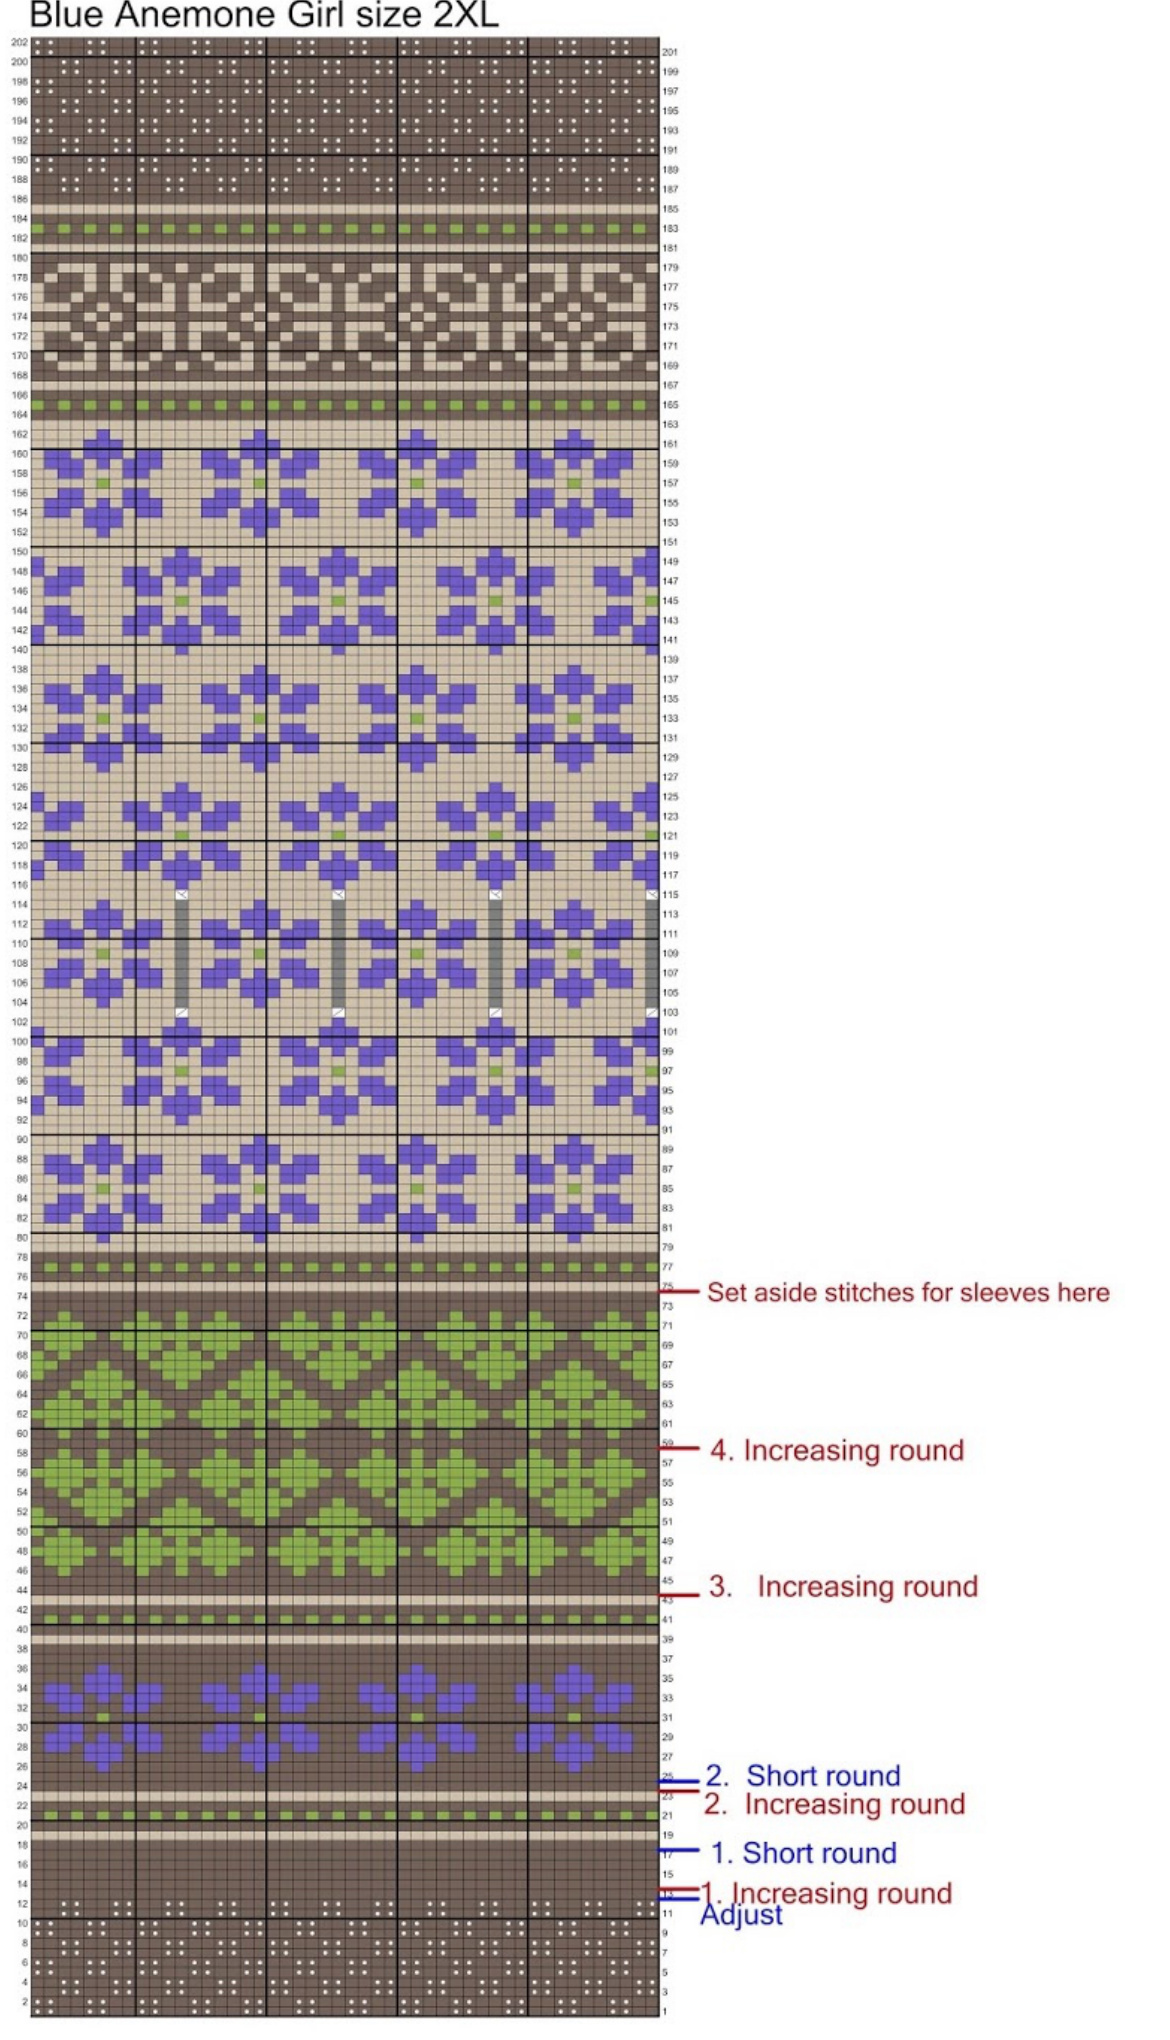
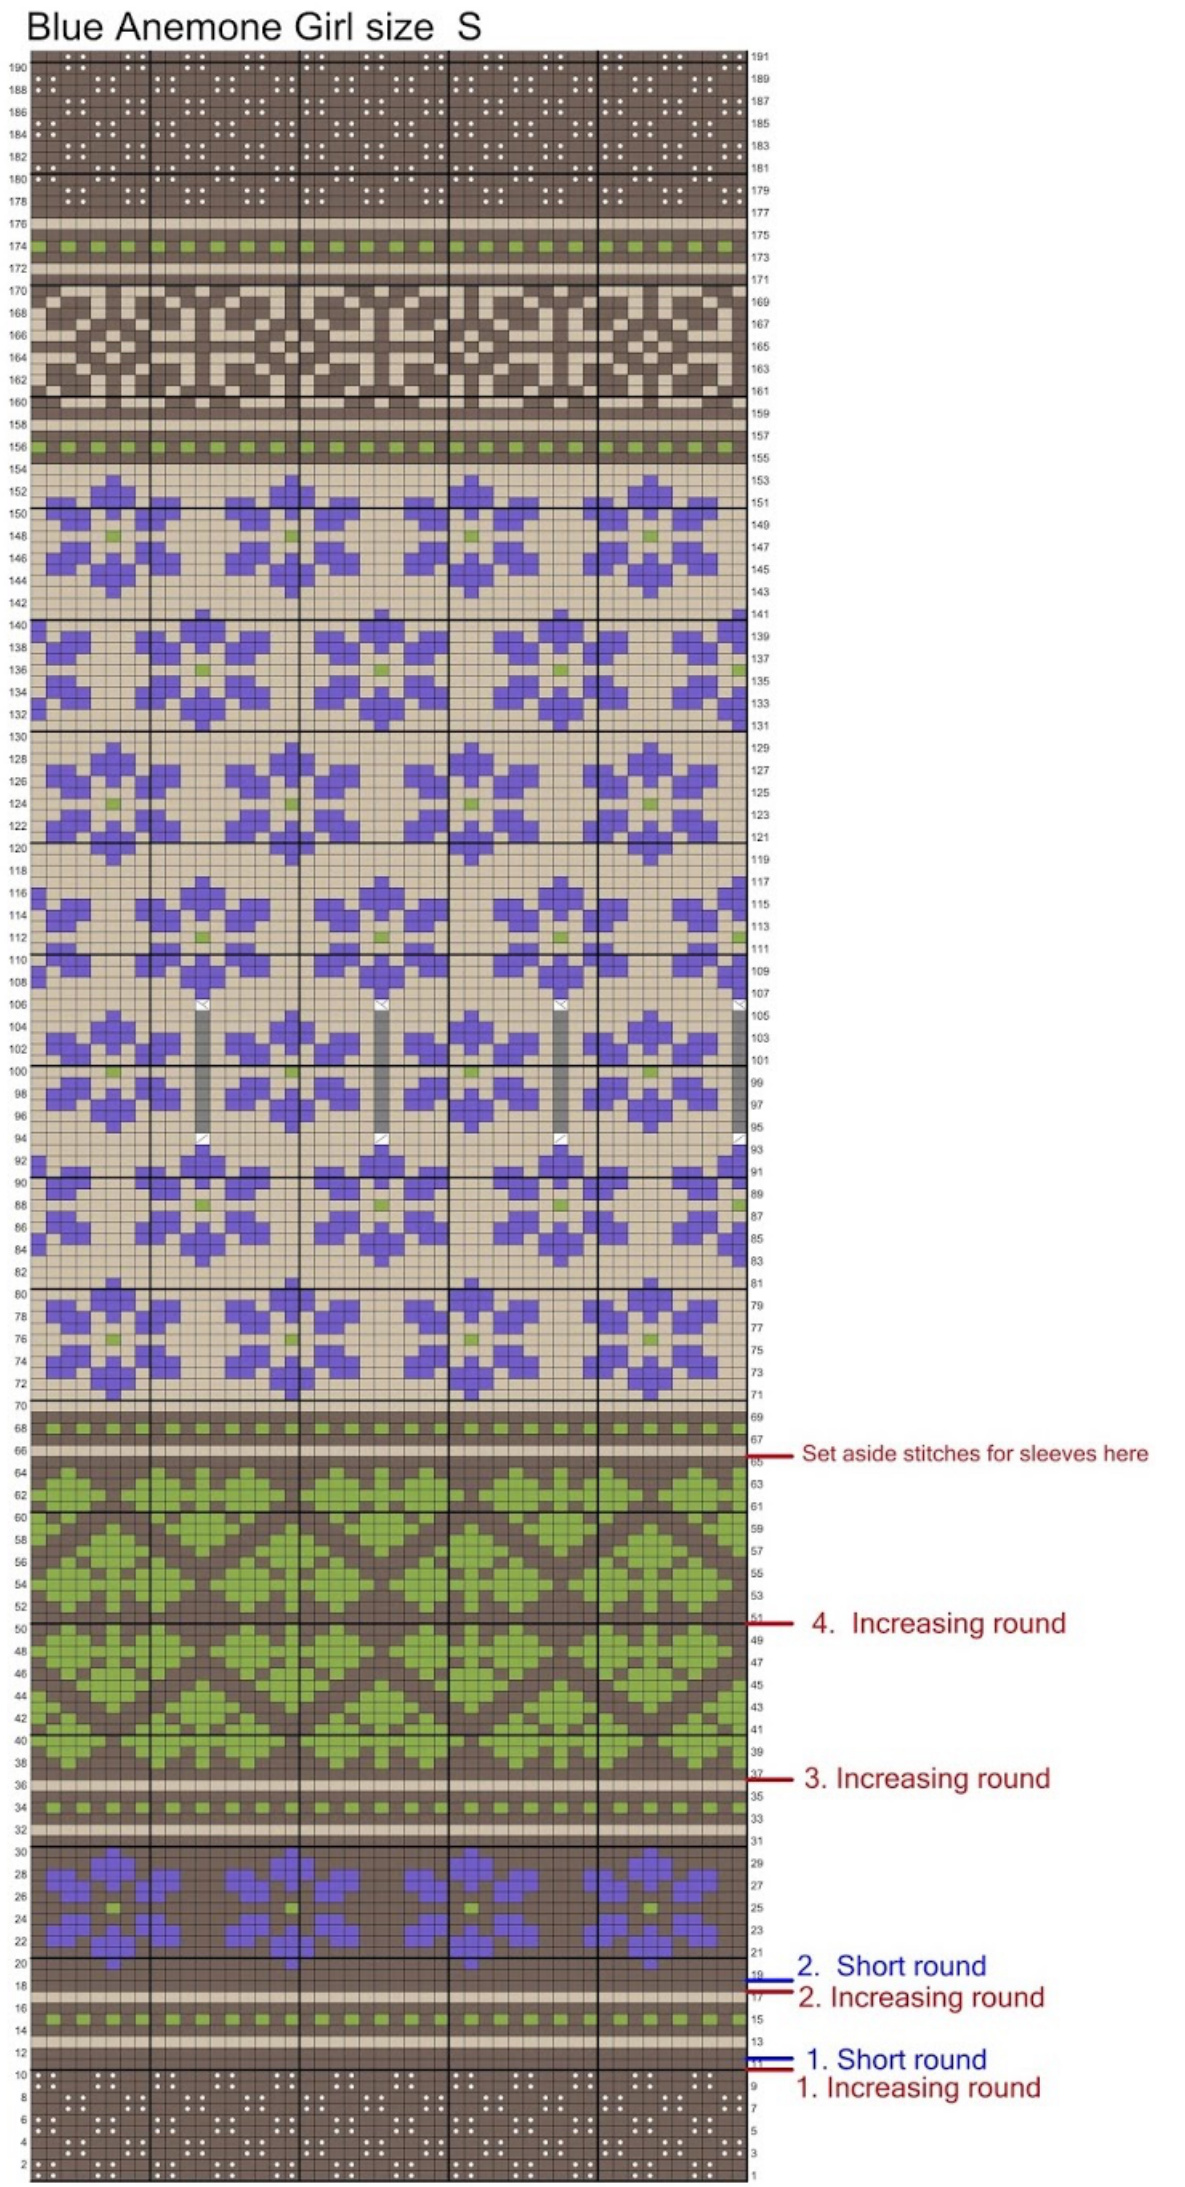
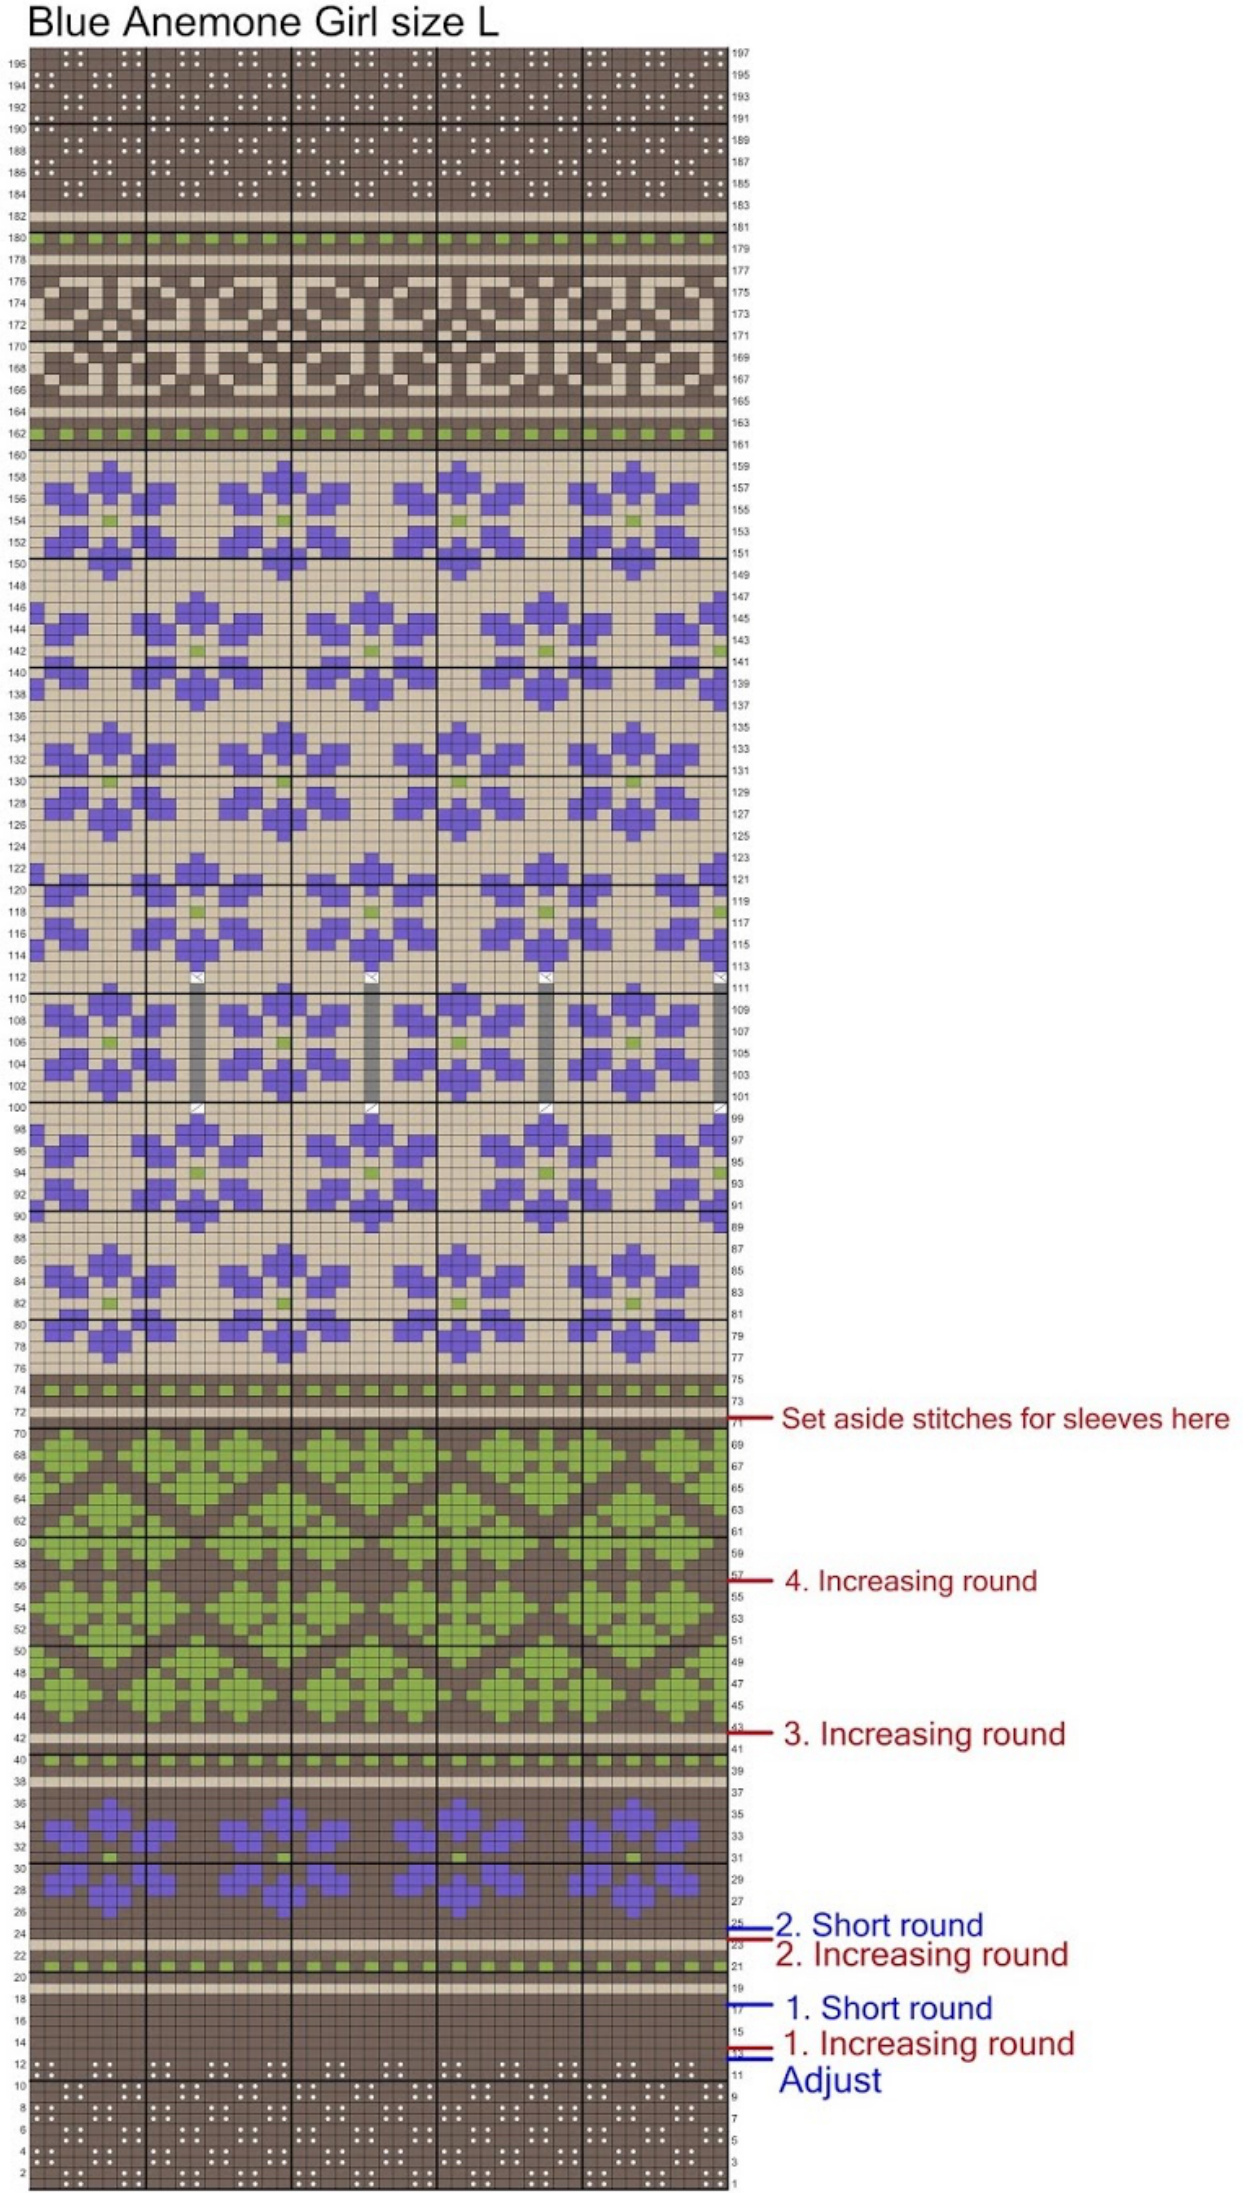
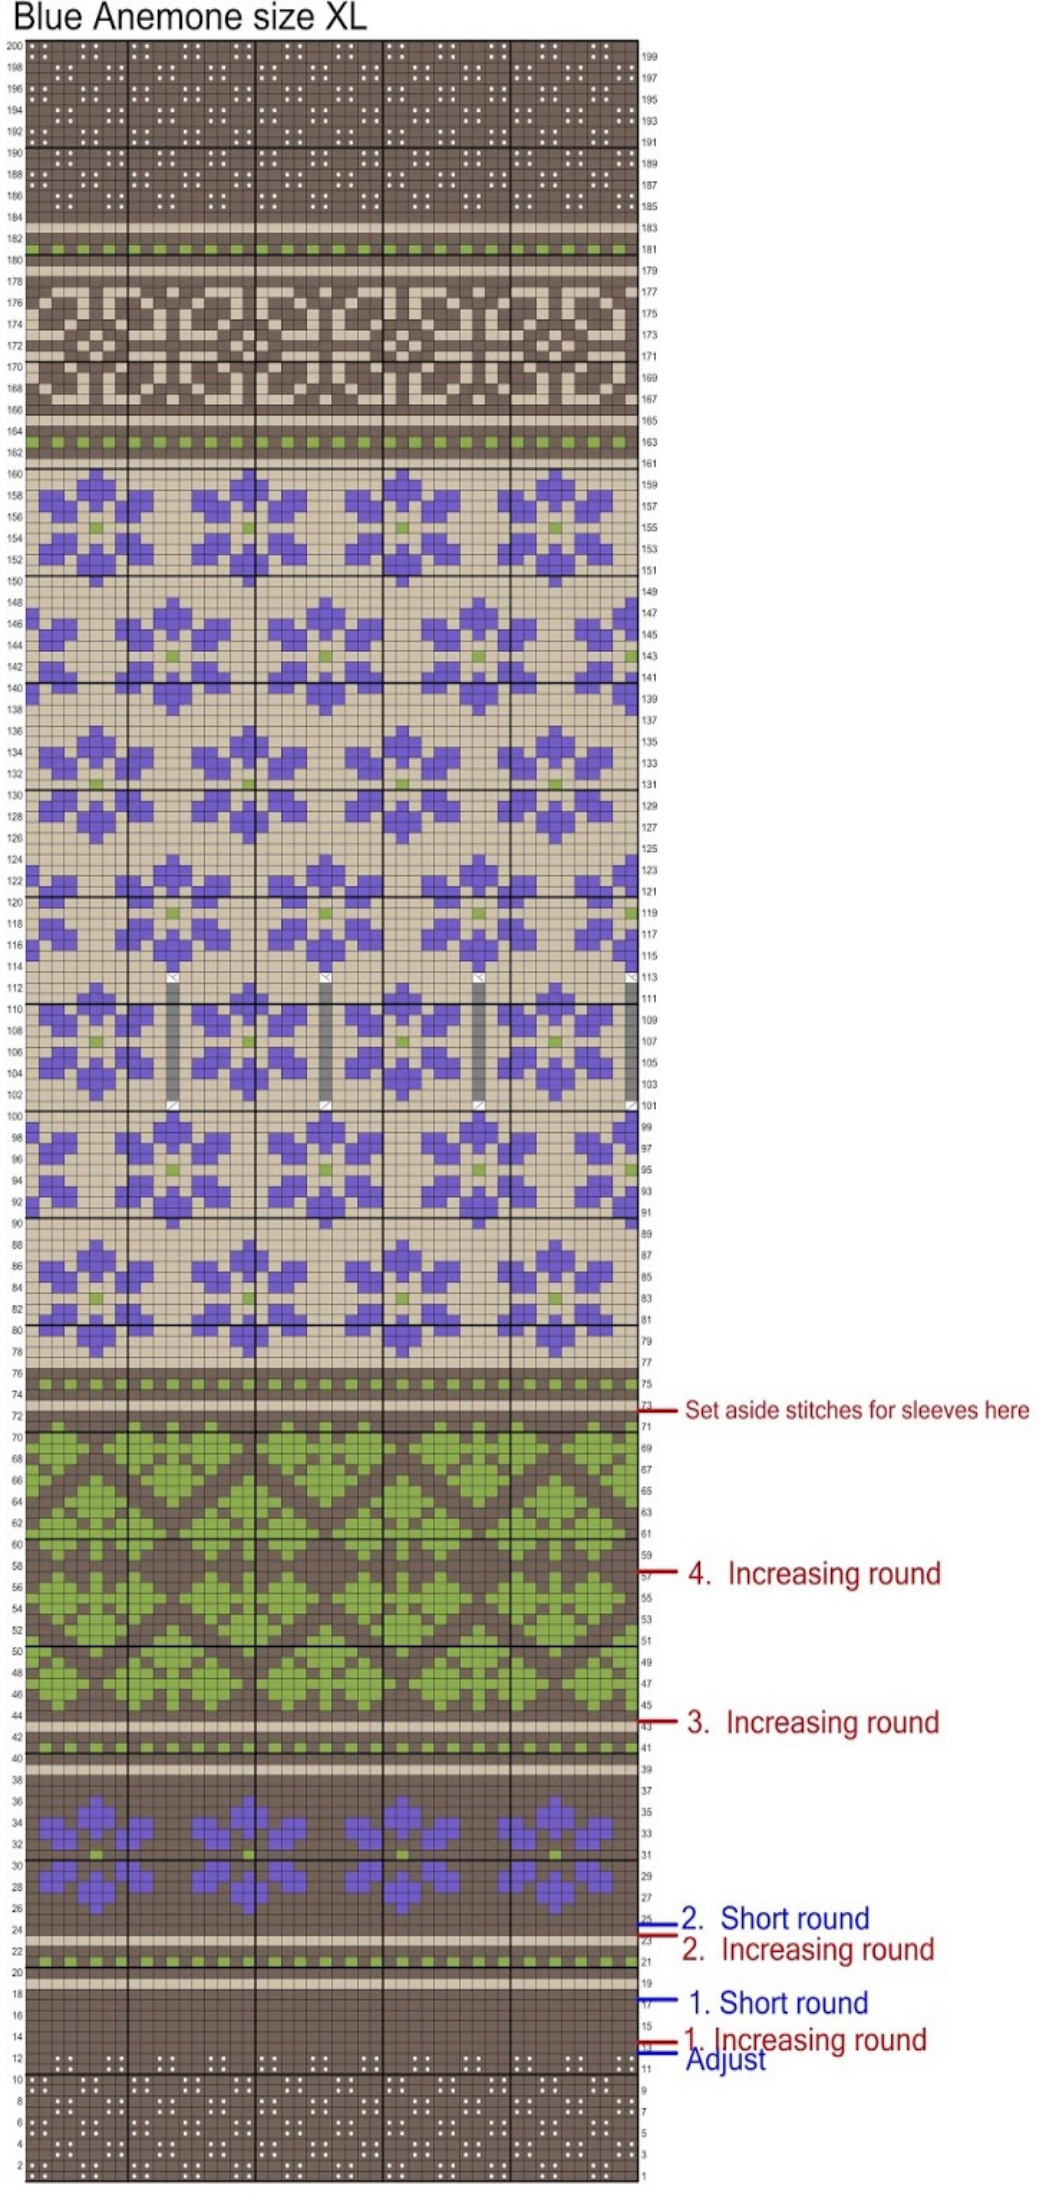
Filled with expectation, we made this cardigan for the upcoming spring. We were looking forward to seeing the spring flowers appearing among the withered leaves on the sunny slopes. In particular, the blue Anemone has a beautiful colour, which we found in the wool yarn by Hifa. We also found a fresh apple-green color that makes a nice contrast, and fits well with both, as Anemone leaves and the center of the flowers. At the bottom of the body and sleeves we have made a border of grey-brown - withered leaves - that show where the blue Anemone often grows. The small borders with green dots we have imagined to be new, small shoots on their way up out of the ground. It was fun to put these borders together for a beautiful cardigan. A joy to knit - the flowers appearing in border after border. The cardigan is knitted from the top down. It is easy to try on the jacket while underway, and to see how it fits. It is slightly fitted below the yoke. It is recommended to read through the whole pattern before you begin. In the charts the green Anemone borders are drawn symmetrically. But since there is an increasing round between the two leaves' borders, they will not become symmetrical when you knit. The charts are made with equal length from the sleeves and down in all sizes. Adjust to the length you prefer by removing or adding an Anemone border. The Anemone border is approximately 4 cm/1.5".
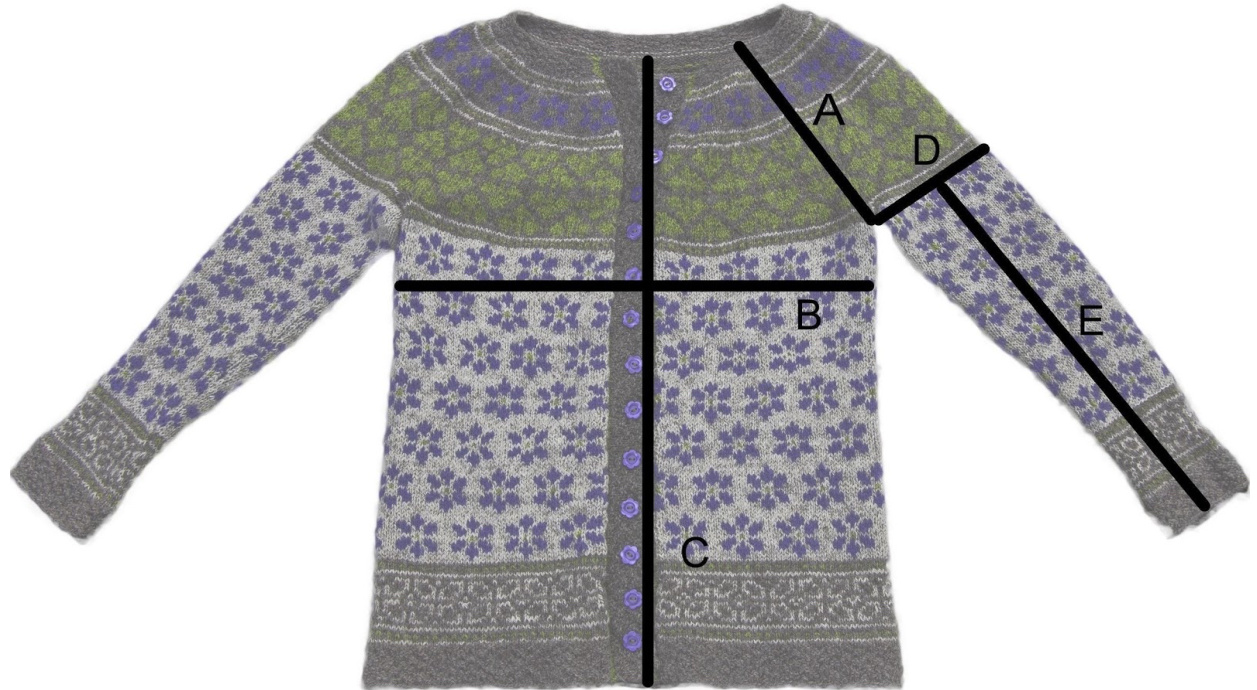
| Sizes: | S | M | L | XL | 2XL |
| A.Yokelengthcm/inches: | 23/9 | 24/9.5 | 25/9.75 | 26/10.25 | 26/10.25 |
| B.Bust cm/inches: | 90/35.5 | 95/37.5 | 105/41.25 | 115/45.25 | 125/49.25 |
| C. Length cm/inches: | 68/26.75 | 69/27.25 | 70/27.5 | 71/28 | 72/28.25 |
| D. Upper sleeve width cm/inches: | 32/12.5 | 35/13.75 | 38/15 | 42/16.5 | 44/17.25 |
| E.Sleevelength cm/inches: | 45/17.75 | 45/17.75 | 45/17.75 | 46/18 | 46/18 |
Yarn and yarn amounts
We have used Ask by Hifa (100% wool, 100 g, 315 m/345 yds), but you can use any Sport/5 ply yarn with a gauge of 24 stitches and 28 rounds in stranded color work measuring 10 cm/4" square.
| Color suggestions | S | M/L | XL/2XL | |
| 6058 Melange Light Brown | 2skeins | 2skeins | 3.5 skeins | |
| 6102Melange Brown | 2 skeins | 2skeins | 3.5skeins | |
| 6063BluePurple | 1 skein | 2skeins | 2skeins | |
| 6588Melange Clear Apple Green | 1 skein | 1 skein | 1.5 skein |
Notions
14 Blue Purple buttons (approximately 20 mm/0.78"), 160 cm/63" ribon for interfacing of the cuting edge. Sewing thread for attaching the buttons, sewing thread for attaching the ribon, sewing needle, markers, waste yarn and darning needle.
Needles
3 mm/US 2.5 and 3.5 mm/US 4 circular needle (40 cm/16" and 80 cm/32") 3 mm/US 2.5 and 3.5 mm/US 4 double pointed needles Adjust needle size as needed to match gauge.
Crochet hook
3.25 mm/D/3
Gauge
stitches and 28 rounds in stranded colorwork using 3.5 mm/US 4 measures 10 cm/4" squar s to Cecilie Kaurin and Linn Bryhn Jacobsen. The pattern was first published in Norwegian in April 2015. The : copied nor given away without our permission.
Yoke
Using Melange Brown and 3 mm/US 2.5 short circular needle, cast on 88 (92) 100 (100) 100 stitches. Work back and forth in Double Seed stitch as shown in chart for your chosen size. Work as follows in all rounds: knit 1, work in chart to last stitch, slip 1 stitch. Work as established according to chart. When the Double Seed stitch border in the chart is finished, change to 3.5 mm/US 4 short circular needle and cast on 7 stitches for steek at center front. Join for knitting in the round, being careful not to twist. Work steek stitches using the colors indicated in the chart. The steek stitches are not included in the chart and are worked as follows: Purl 1, knit 5, purl 1. The purl stitches makes the interfacing lay on the Wrong Side after it has been cut open. Continue working in chart at the same time as you increase stitches according to the chart and the increasing table in your chosen size shows below. Join in contrast colors as necessary and change to large circular needle as the stitch number increases.
Short rounds
After the first increase according to the chart, work short rounds on the back, see the mark in the chart. Short rounds are rounds where you turn before you have worked the round to the end, and work back so that you will make a few short extra rounds at the center back. This makes the cardigan higher at the back neck than the front and makes it fit better. These rounds are optional, depending on your preferences and you may skip this paragraph. First short round (see mark in chart) is worked as follows:
| S | M | L | XL | 2XL |
| Work 94 stitches, wrap & turn | Work 98 stitches, wrap & turn | Work 112 stitches, wrap & turn | Work121stitches, wrap & turn | Work 130 stitches, wrap& turn |
| Purl 56 stitches back, wrap & turn | Purl 59 stitches back, wrap & turn | Purl 68 stitches back, wrap & turn | Purl 74 stitches back,wrap&turn | Purl 80 stitches back, wrap & turn |
| Work 61 stitches, wrap & turn | Work 64 stitches, wrap & turn | Work73 stitches, wrap & turn | Work 79 stitches, wrap & turn | Work 85 stitches, wrap & turn |
| Purl 66stitches back, wrap & turn | Purl69stitches back, wrap & turn | Purl 78 stitches back, wrap & turn Work to end and remove each wrap by knitting them together with its stitch. | Purl 84 stitches back,wrap&turn | Purl90stitches back, wrap & turn |
Second short round (see mark in chart) is worked as follows:
| S | M | L | XL | 2XL |
| Work134stitches, wrap & turn | Work143stitches, wrap & turn | Work 161 stitches, wrap & turn | Work 179 stitches, wrap & turn | Work 188 stitches, wrap & turn |
| Purl 76 stitches back, wrap & turn | Purl 82 stitches back, wrap & turn | Purl 94 stitches back, wrap & turn | Purl 106 stitches back, wrap & turn | Purl 112 stitches back,wrap & turn |
| Work 81stitches, wrap & turn | Work87stitches, wrap & turn | Work99stitches, wrap & turn | Work111stitches, wrap & turn | Work117stitches, wrap& turn |
| Purl 86 stitches back, wrap & turn Work to end and remove each wrap by knitting them together with its stitch. | Purl 92 stitches back, wrap & turn | Purl 104 stitches back, wrap & turn | Purl 116 stitches back, wrap & turn | Purl 122 stitches back, wrap & turn |
s to Cecilie Kaurin and Linn Bryhn Jacobsen. The pattern was first published in Norwegian in April 2015. The : copied nor given away without our permission. To avoid holes when turning, make a wrap. You wrap a stitch by slipping the stitch purlwise, bring the yarn towards you to front of the work, slip the stitch back to the left needle and turn work and work back. On the next round you remove the wrap by working it together with the stitch as one stitch to avoid making a hole. See a video ofhowto do this here: http://www.garnstudio.com/lang/us/video.php?id=72&sort=2&thumbnails=on
Yoke increases
There are many different ways of increasing the number of stitches on a round. In the table you will find how many stitches are increasing according to size as well as a suggestion on how to increase to make the increases evenly placed. The cardigan might appear uneven due to all the increases at the top, but it will even out with washing and wearing. The neatest way of increasing a stitch is by picking up the thread between two stitches from the round below, twist it and knit it as a new stitch = make 1
| XL | 2XL | ||||
| Increasing round | S | M | 100 stitches | 100 stitches | 100 stitches |
| Stitches at beginning Adjust to | 88 stitches 88 stitches | 92 stitches 92 stitches | 104 stitches | 112 stitches | 116 stitches |
| 1. Increasing | 44 stitches | 46 stitches | 52 stitches | 56 stitches | 64 stitches |
| round, increase How to increase | (work 2, make | (work 2, make 1) | (work 2, make 1) repeat to end | (work 2, make 1) repeat to end | (work 2, make 1) |
| Stitches after 1. | 1) repeat to end 132 stitches | repeat to end 138 stitches | 156 stitches | 168 stitches | repeat to end 180 stitches |
| increasing round 2. Increasing | 60 stitches | 66 stitches | 72 stitches | 84 stitches | 84 stitches |
| round, increase How to increase | Work 6 (work 2, make 1) 60 | Work 3 (work 2, | Work 6 (work 2, make 1) 72 times, | (work 2, make 1) rep to end | Work 6 (work 2, make 1) 84 |
| Stitches after 2. | times, work last 6 192 stitches | make 1) 66 times, work last 3 204 stitches | work last 6 228 stitches | 252 stitches | times, work last 6 264 stitches |
| Increasing round 3. Increasing | 72 stitches | 72 stitches | 84 stitches | 84 stitches | 96 stitches |
| round, increase How to increase | (work 3, make | (work 3, make 1 = | (work 3, make 1) = 304, adjust by | (work 3, make 1) repeat to end | (work 3, make 1) = 352, adjust by |
| 1) = 256, adjust by adding 8 extra stitches evenly placed | 272, adjust by adding 4 extra stitches evenly placed | adding 8 extra stitches evenly placed | adding 8 extra stitches evenly placed | ||
| Stitches after 3. Increasing round 4. Increasing | 264 stitches | 276 stitches | 312 stitches | 336 stitches | 360 stitches |
| round, increase How to increase | 60 stitches Work 12 (work | 72 stitches (work 4, make 1) = | 72 stitches Work 12 (work 4, | 72 stitches Work 24 (work 4, | 84 stitches Work 12 (work |
| 4, make 1) 60 times, work last 12 | 245, adjust by adding 3 extra stitches evenly placed | make 1) 72 times, work last 12 | make 1) 72 times, work last 24 | 4, make 1) 84 times, work last 12 | |
| Stitches after 4. Increasing round | 324 stitches | 348 stitches | 384 stitches | 408stitches | 444 stitches |
s to Cecilie Kaurin and Linn Bryhn Jacobsen. The pattern was first published in Norwegian in April 2015. The : copied nor given away without our permission. Continue working cardigan according to the chart for your chosen size. When you set the stitches for the sleeve aside, you have 324 (348, 384, 408, 444) stitches remaining on needle.
Set aside stitches for sleeves
Follow the table according to your size. Work 7-stitches steek first, then work as follows:
| S | 48 stitches, place 65 stitches on waste yarn, cast on 11 stitches (underarm), work 98 stitches, place 65 stitches on waste yarn, cast on 11 stitches (under arm) and work last 48 stitches on |
| M | 51 stitches, place 72 stitches on waste yarn, cast on 12 stitches (underarm), work 102 stitches, place 72 stitches on waste yarn, cast on 12 stitches (under arm) and work last 51 stitches on |
| L | 57 stitches, place 78 stitches on waste yarn, cast on 12 stitches (underarm), work 114 stitches, place 78 stitches on waste yarn, cast on 12 stitches (under arm) and work last 57 stitches on round. Now you have 252 (+ 7-stitches steek) stitches on your needle. |
| XL | 60 stitches, place 83 stitches on waste yarn, cast on 17 stitches (underarm), work 122 stitches, place 83 stitches on waste yarn, cast on 17 stitches (under arm) and work last 60 stitches on |
| 2XL | 66 stitches, place 89 stitches on waste yarn, cast on 17 stitches (underarm), work 134 stitches, place 89 stitches on waste yarn, cast on 17 stitches (under arm) and work last 66 stitches on round. Now you have 300 (+ 7-stitches steek) stitches on your needle. |
Continue working the body according to the chart for your chosen size.
Shaping
When you have worked 2 borders of Anemone, you can shape the cardigan if you prefer. Decrease 18 (19, 21, 23, 26) stitches, by working knit 2 together every 12th stitch: \*Knit 2 together, work 10 stitches; repeat from \* to end of round, see chart. Now you have 198 (209, 231, 253, 274) stitches + 7-stitches steek on your needle. Work one or two Anemone borders with this stitch number. In these borders there are two stitches between each Anemone. Before the next border, increase again the 18 (19, 21, 23, 26) stitches. \*Make 1, work 11 stitches; repeat from \* to end of round. Now you have 216 (228, 252, 276, 300) stitches + 7-stitches steek on yourneedle.
Bottom Border
Before you reach the bottom border of Double Seed stitch, bind off the 7-stitches steek and change to 3 mm/US 2.5 long circular needle. Work back and forth in Double Seed stitch according to the chart. Remember to knit first stitch and slip last stitch as on the beginning of the yoke. Bind off.
Sleeves
Move the 65 (72, 78, 83, 89) stitches from the waste yarn to a 3 mm/US 2.5 short circular needle. Using Melange Brown, cast on 11 (12, 12, 17, 17) stitches on the inside of the sleeve, altogether 76 (84, 90, 100, 106) stitches. Place marker and join for working in the round. Work in pattern as for the body without the shaping. After working one Anemone border, begin decreasing on the sleeve. Decrease 1 stitch on each side of marker every 7. (6., 5., 4.-5., 4.) round 14 (16, 19, 22, 23) times, now you have 48 (52, 52, 56, 60) stitches remaining on your needle. Count and adjust the placing of the pattern so that the Anemones will appear in the right relation to each other, except for on the inside of the sleeve. Change from the circular needle to double pointed needles when the circular needle becomes too small. Each Anemone border measures approximately 4 cm/1.5", adjust the length by working an Anemone border (or a half) more or less, if you prefer. Work the Double Moss stitch border at the bottom using 3 mm/US 2.5 double pointed needles. Bind off and work the second sleeve identical. s to Cecilie Kaurin and Linn Bryhn Jacobsen. The pattern was first published in Norwegian in April 2015. The : copied nor given away without our permission.
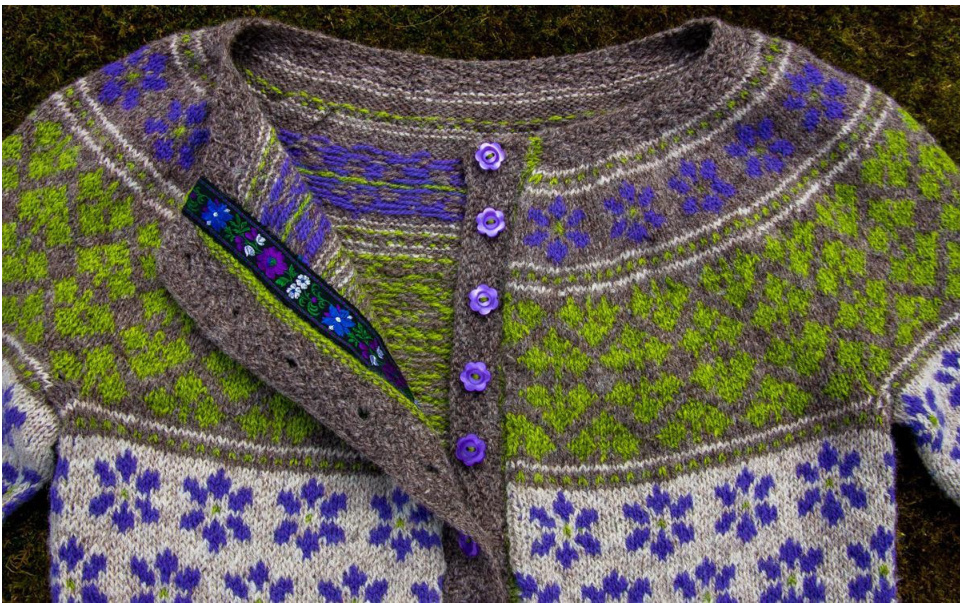
Button bands
Work the button bands before you steek the body. Work left button band first, since it is without buttonholes. Using the crochet hook and Melange Clear Apple-green yarn, beginning at the edge stitch of bottom border, pick up and knit evenly into the knit stitches along steek up to the neck edge and move stitches a few at the time onto a 3 mm/Us 2.5 long circular needle. Adjust the number of stitches you pick up to your gauge but two stitches per three rounds or three stitches per four rounds should be sufficient. Work the button band in rows, back and forth. Using Melange Clear Apple-green, begin by working a purl row (knit row on the right side), before you change yarn to Melange Brown and work 12 rows in Double Seed stitch. Remember to knit the first stitch and slip the last stitch for an even edge. Bind off. Pin to mark each buttonhole on the left button band. The first is 2 cm/0.75 from the bottom edge and the last is 2 cm/0.75" from the neck edge, space out the remaining 12 buttonholes evenly in between. Pick up and knit the right buttonhole band, work as left button band, but work buttonholes, beginning on row 6. Adjust the buttonhole size to your button size, we have used 20 mm/0.78" and worked the buttonholes as follows: Bind off 2 stitches, and cast on 2 stitches above the ones bound off, on the next row. We worked 8 stitches between each buttonhole. Work 5 rows more in Double Seed stitch, a total of 12 rows have been worked, as on left button band.Bind off.
Steeking of body
Using a sewing machine, sew a seam on each side of the center stitch in the steek stitches. Using sharp scissors steek (cut open) the center stitch. Sew the ribbon over the raw edge. See also the Needle Lady's blogpost about how to attach the ribbon:http://pinnehobby.blogspot.no/2015/03/sy-pa-pynteband.html Using sewing thread, sew on the buttons opposite the buttonhole marked by pins. Sew in ends, wash or steam the cardigan and shape while damp. Leave it to dry flat. Key No stitch Knit stitch on Right Side, purl on Wrong Side Purl stitch on Right Side, knit on Wrong Side Decrease: Knit 2 together Increase: Make 1 stitch
s to Cecilie Kaurin and Linn Bryhn Jacobsen. The pattern was first published in Norwegian in April 2015. The : copied nor given away without our permission.
s to Cecilie Kaurin and Linn Bryhn Jacobsen. The pattern was first published in Norwegian in April 2015. The : copied nor given away without our permission.

s to Cecilie Kaurin and Linn Bryhn Jacobsen. The pattern was first published in Norwegian in April 2015. The : copied nor given away without our permission.
s to Cecilie Kaurin and Linn Bryhn Jacobsen. The pattern was first published in Norwegian in April 2015. The : copied nor given away without our permission.
s to Cecilie Kaurin and Linn Bryhn Jacobsen. The pattern was first published in Norwegian in April 2015. The : copied nor given away without our permission.