Poinsettias and Steel
This is a Norwegian-style pullover in one size (Women's 22-24 or Men's XXL) with dropped shoulders, long sleeves, and a Mandarin collar. The neck has a slit which is closed with a matching zipper. The entire sweater is worked in two-color stranded knitting, with the exception of the hems and facings. Steeks are used for the neck slit, armholes, and sleeve seams. There is a contrast hem option. Needles: Size 4 in DPNs and several lengths of circular Yarn: Knitpicks Gloss DK 70% Merino Wool, 30% Silk; 123 yds; 50 grams per skein MC: Tranquil (Turquoise) 10 balls (add an extra if not using contrast hem option) CC: Scarlet (Red) 11 balls A1: Black (Black) 1 ball (optional) A2: Celestial (Cobalt Blue) 1 ball (optional) A3: Costal Grey (Grey) 1 ball (optional) Gauge: 7 rows and 6 sts per inch in colorwork or stocking stitch Notions: 7' zipper in color to match CC, sewing thread to match zipper. This pattern is inspired by “robot fair isle mashup tank" by elf518, particularly the large floral design and the color scheme.
Abbreviations:
BO: Bind off. CO: Cast on. K: Knit. K2tog: Knit 2 together. Ml: Make one. P: Purl one. P2tog: Purl 2 together. PM: Place marker. PU: Pick up. SM: Slip marker. YO: Yarn over.
Sweater Hem Facing:
Option A: Using long circular, cast on 260 in MC. Join in round. Knit 14 rows. Option B: For contrast hem, using long circular, cast on 260 in A1. Knit 2 rows. Do the following 2 times: [Knit 2 rows in A2. Knit 2 rows in A3. Knit 2 rows in A1.] There are a total of 7 stripes. Switch to MC. Do the following 24 times: [Knit 10. M1.] Knit to the end of the row. There are now 284 stitches. For the next row, repeat the following to the end: [K2tog, YO]. When you sew down the hem facing after knitting the sweater, fold on this row to form a picot edge.
Body:
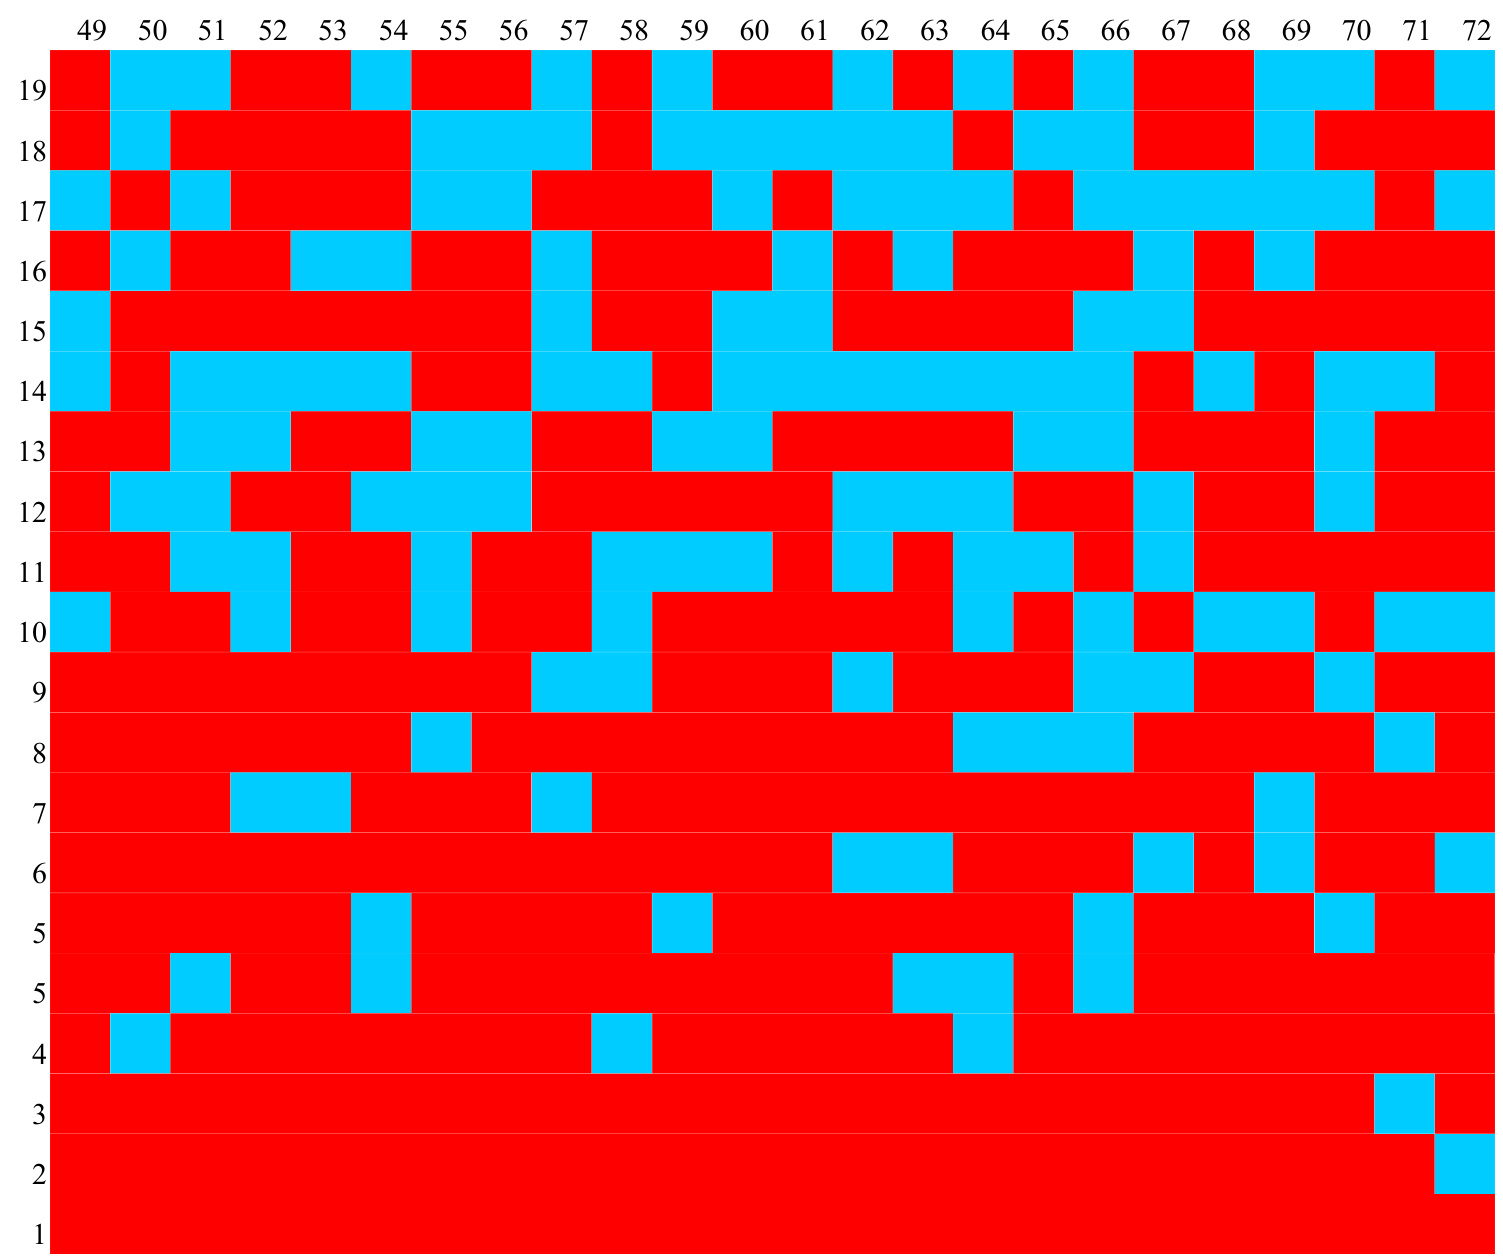
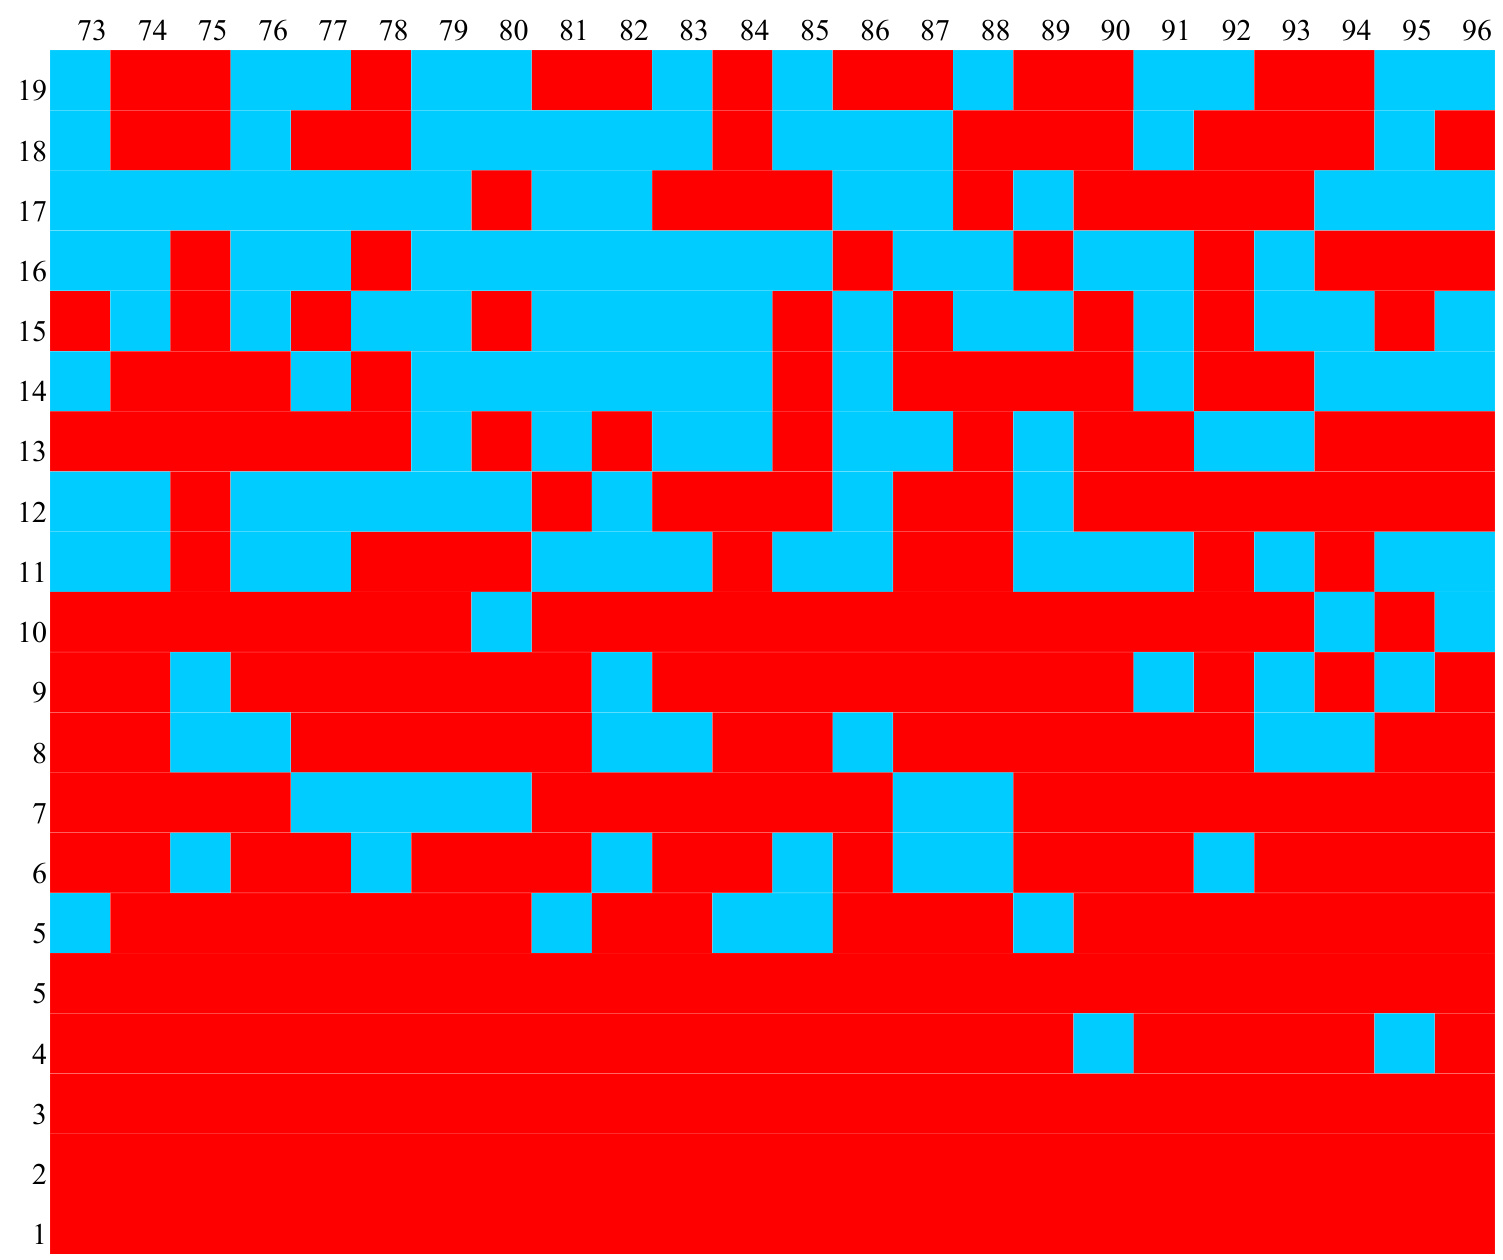
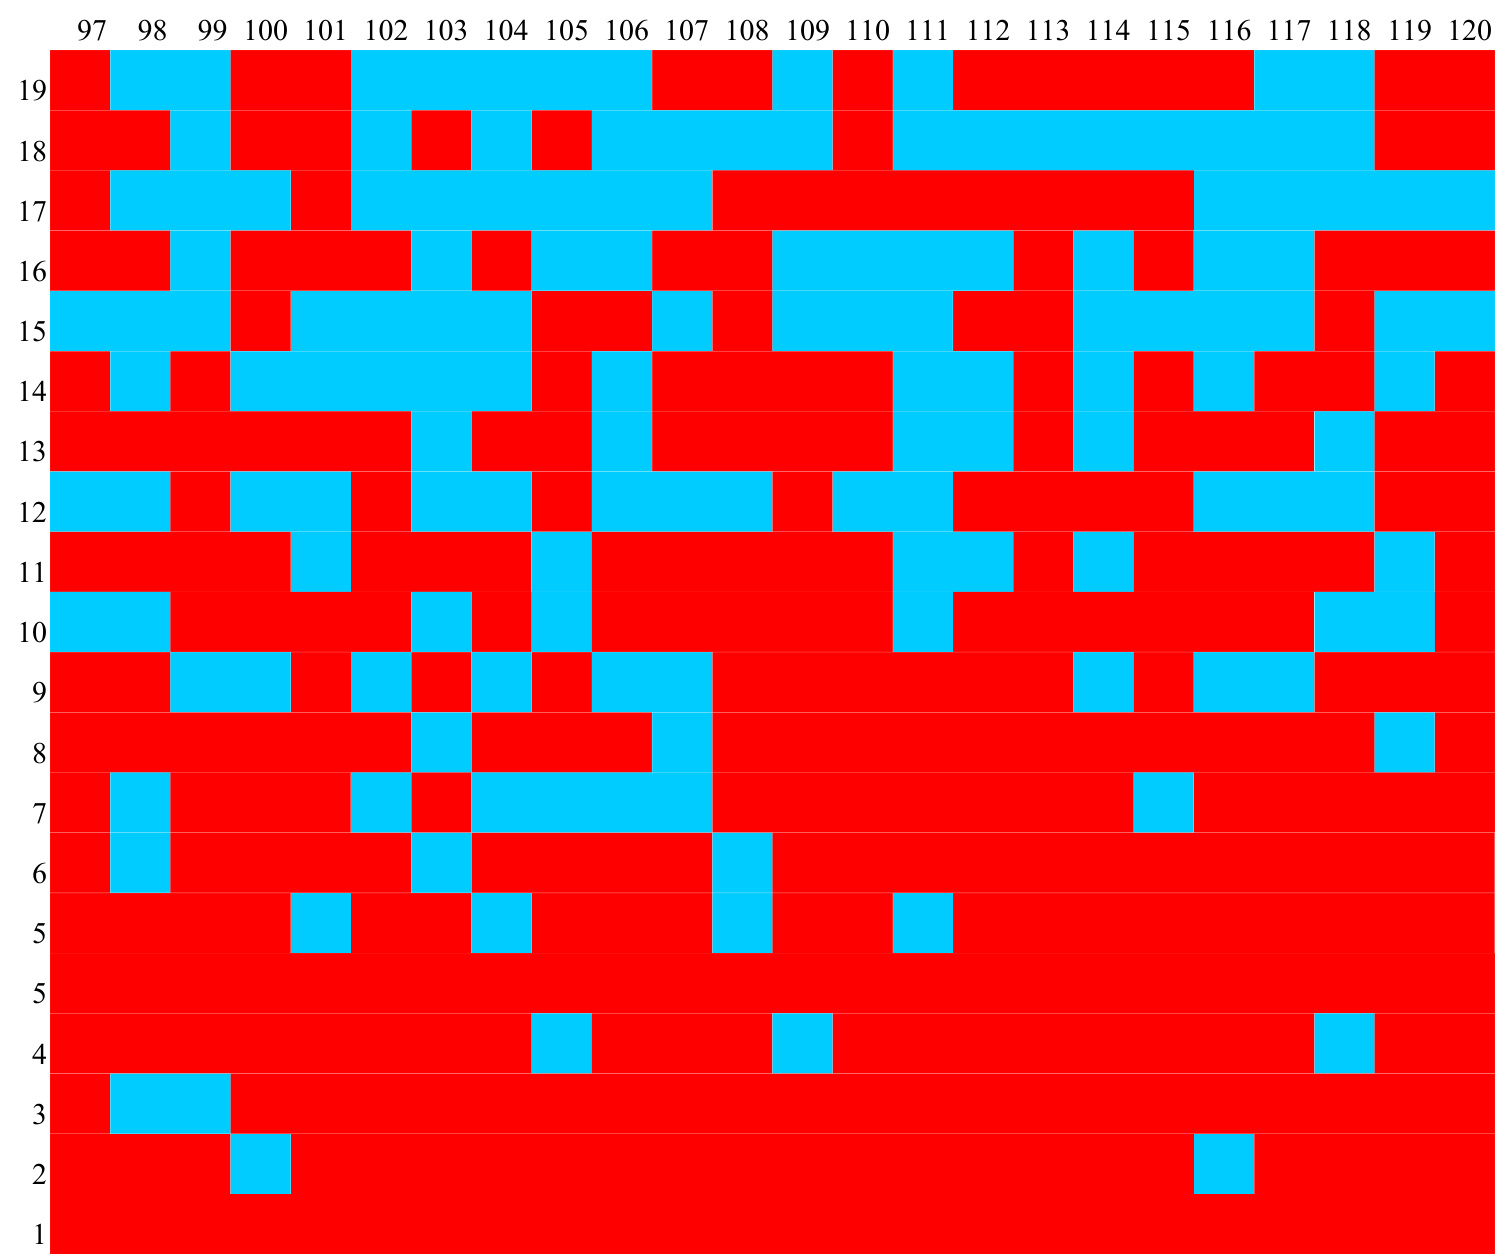
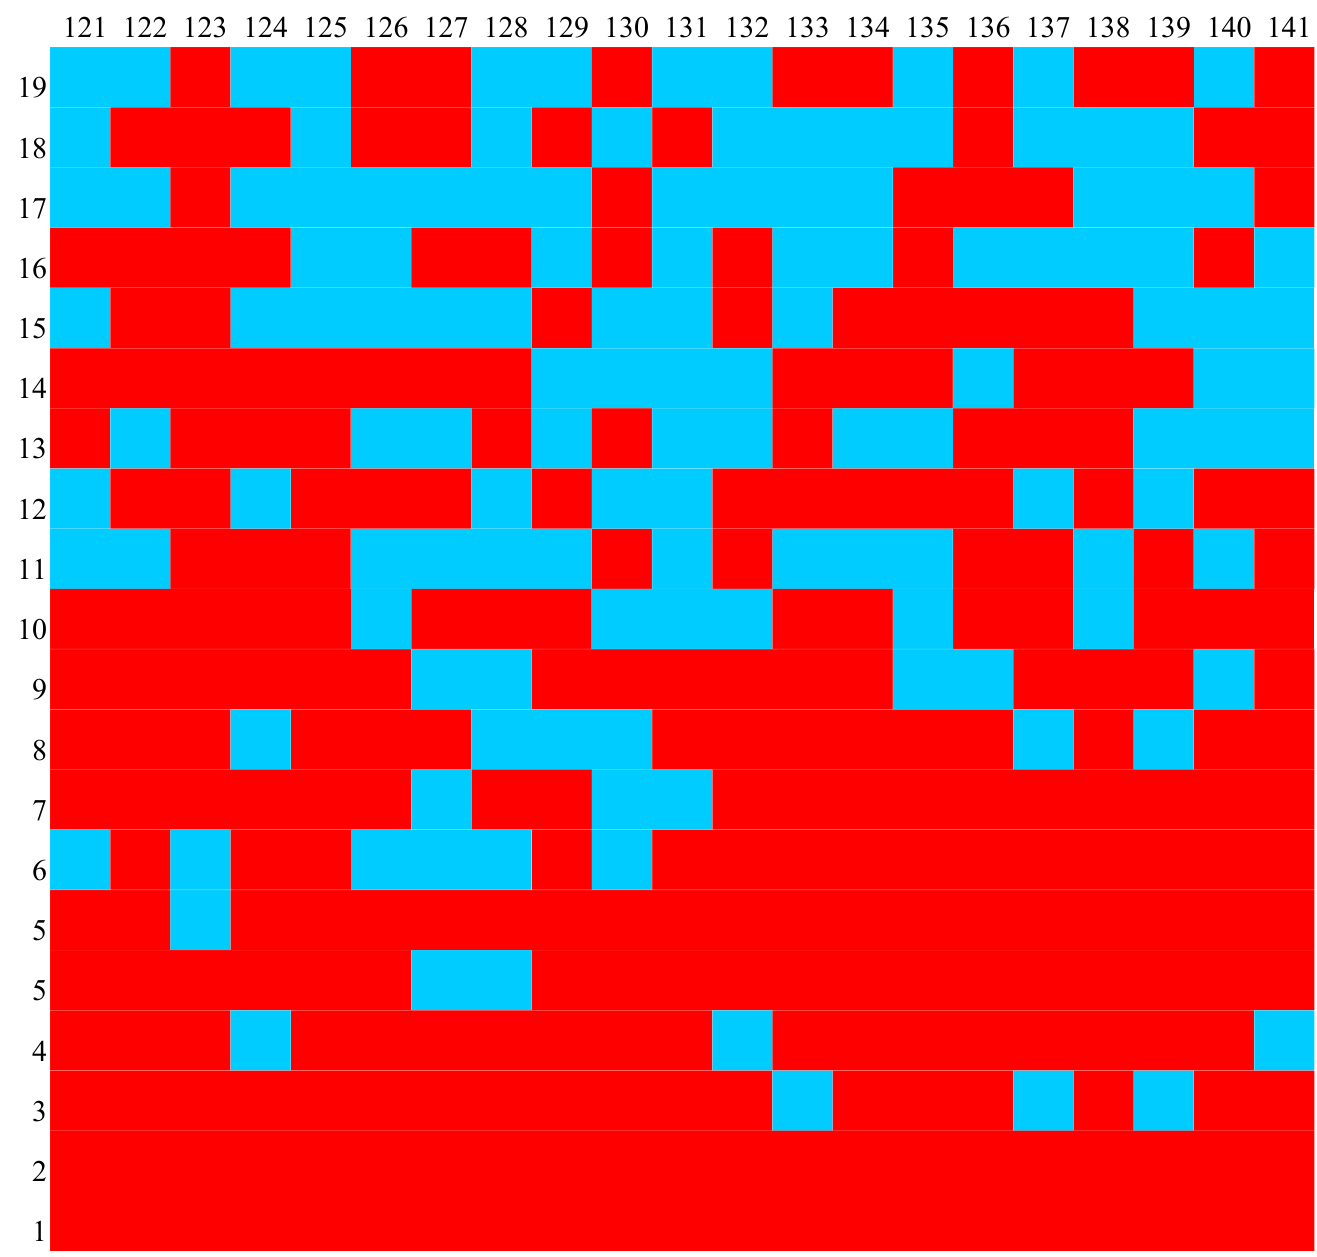
NOTE: When working the body, work in the round from the bottom up to the top of the neck slit. The armholes will be cut later. When working steeks, always knit them in a checkerboard pattern, alternating MC and CC, for maximum strength. Attach CC. Work the bottom row of the front chart over 141 sts. P1 in CC to form false side seam. Work the bottom row of back chart over 141 sts. P1 in CC. (Optional: I worked the first three rows of the chart in CC only, then added the MC stitches later using duplicate stitch embroidery.) Continue to work charts as established and false seam as established to row 84. (Optional: On row 84 and onward, I changed the false seams to P1 in MC. I worked row 84 and the next three rows in CC stocking stitch, then added the MC colors later using duplicate stitch embroidery. This may make this section easier.) Continue to work the charts as established to row 104, the row 1" row of the neck slit. On this row, knit to the center stitch. Knit the center stitch together with the next stitch to decrease one. Turn the work and cast on five stitches using an e-loop cast-on, alternating colors, for the steek. Turn to right side. Knit the steek stitches, knitting MC stitches in CC and CC stitches in MC. Knit to the end of the round, then knit the next round. On this round, you will see a small hole at the beginning of the steek stitches. This will be covered up later. Simply knit across the steek stitches and continue knitting in the round to the top of the neck slit. The neck area is knitted flat. On row 147, knit to the blue area indicating the neck. Slip the 25 neck stitches to a holder. Turn and work back on the wrong side, then continue to work the back, then the left side of the front to the left neck edge. Turn and work the next row on the right side, starting with the left front, then the back, then the right front. Continue in pattern, working flat. Where the pattern indicates that a stitch is not knitted on this row, slip the stitches to the holder. You should end with 51 stitches on the holder, including the steek stitches. When you reach row two, you will knit the left and right sides of the pattern separately. Slip the 47 stitches for the back neck to a holder, and finish one shoulder at a time. Slip the front shoulder stitches and back shoulder stitches to four separate DPNs, including the false seam stitches with the front shoulders.
Finishing the Body:
Place right sides of left shoulder together and bind off all 47 sts using three-needle bind-off. For the first stitch of the bind-off, include the false seam stitch (you will have three stitches to knit together in the first stitch). Cut yarn. Bind of the right shoulder in the same way. Sew in all loose ends. Do not close holes at the bottom of the neck slit steek or at the shoulder. BO the steek stitches in the center of the collar front, dividing the remaining stitches onto two holders, then sew in those ends. Turn the hem to the wrong side, turning on the YO row, and sew down each cast-on stitch with extra yarn. Set the body aside.
Sleeve Hem Facings:
NOTE: The sleeves are worked together in the round with steeks in between them. After knitting, the steeks are cut, and the underarm seam is sewn on both sleeves. Option A: With MC, CO 55 stitches for right sleeve, then CO 5 stitches for steek, then 55 stitches for left sleeve, then 5 stitches for steek. Join in round. Knit 14 rows. Option B: For contrast hem, with A1, CO 55 sts for R sleeve. CO 5 for steek. CO 55 sts for L sleeve. CO 5 sts for steek. Join in round. K 2 rows in A1. Do the following two times: [K 2 rows in A2, K 2 rows in A3, K 2 rows in A1] for a total of seven stripes. Attach MC. For the increase row, do the following 2 times: [K6, M1, K6, M1, K7, M1]. Do the following twice: [K6, M1]. K5 to end of R sleeve. The 55 stitches of the right sleeve are increase to 63. K 5 stitches for steek. Repeat the right sleeve instructions for the 55 stitches of the left sleeve to increase to 63. K 5 stitches for steek. 136 stitches. For the turn row on the right sleeve, do the following 30 times: [K2tog YO] 31 times, then K 1. Knit the 5 steek stitches. Repeat these instructions for the left sleeve.
Sleeves:
The sleeves are knitted from the hem to the shoulder. For increase rows, make the first and last stitch of each sleeve by knitting in the indicated color into the row below. This increases the row by four stitches each time. At the end of the sleeve pattern, cut MC. Purl 5 rows to form a shoulder seam facing. BO in purl.
Finishing the Sleeves:
Sew in all ends. Do not sew down hem yet. With strong thread, machine-stitch on either side of the center stich of each steek. Stitch again close to each of these lines of stitching. Cut each steek down the center of the middle stitches. With lengths of yarn, stitch the underarm seams on each sleeve with edges right-sides-together, using the steek stitches as a seam allowance. Turn the sleeves inside out and lightly press the seams open with a hot iron. Turn the hems to the wrong side and sew down each stitch of the cast-on row with yarn.
Other Steeks:
Machine stitch four lines, two on either side of the center stitch of the steek for the neck slit, making sure to stitch all the way to the hole formed by the decrease at the base of the neck slit. Do not clip this steek yet. Measure the width of the top of the finished sleeves and mark an armhole of the same size from the top of the shoulder of the body down the false side seams. On both sides of the sweater, machine stitch four lines from the hole at the shoulder to the marked location, two on either side of the false seam stitches. Machine stitch twice across the bottom of the steek. This location will receive a lot of wear, so make sure it is secure. Clip the false seam stitches inside the armholes.
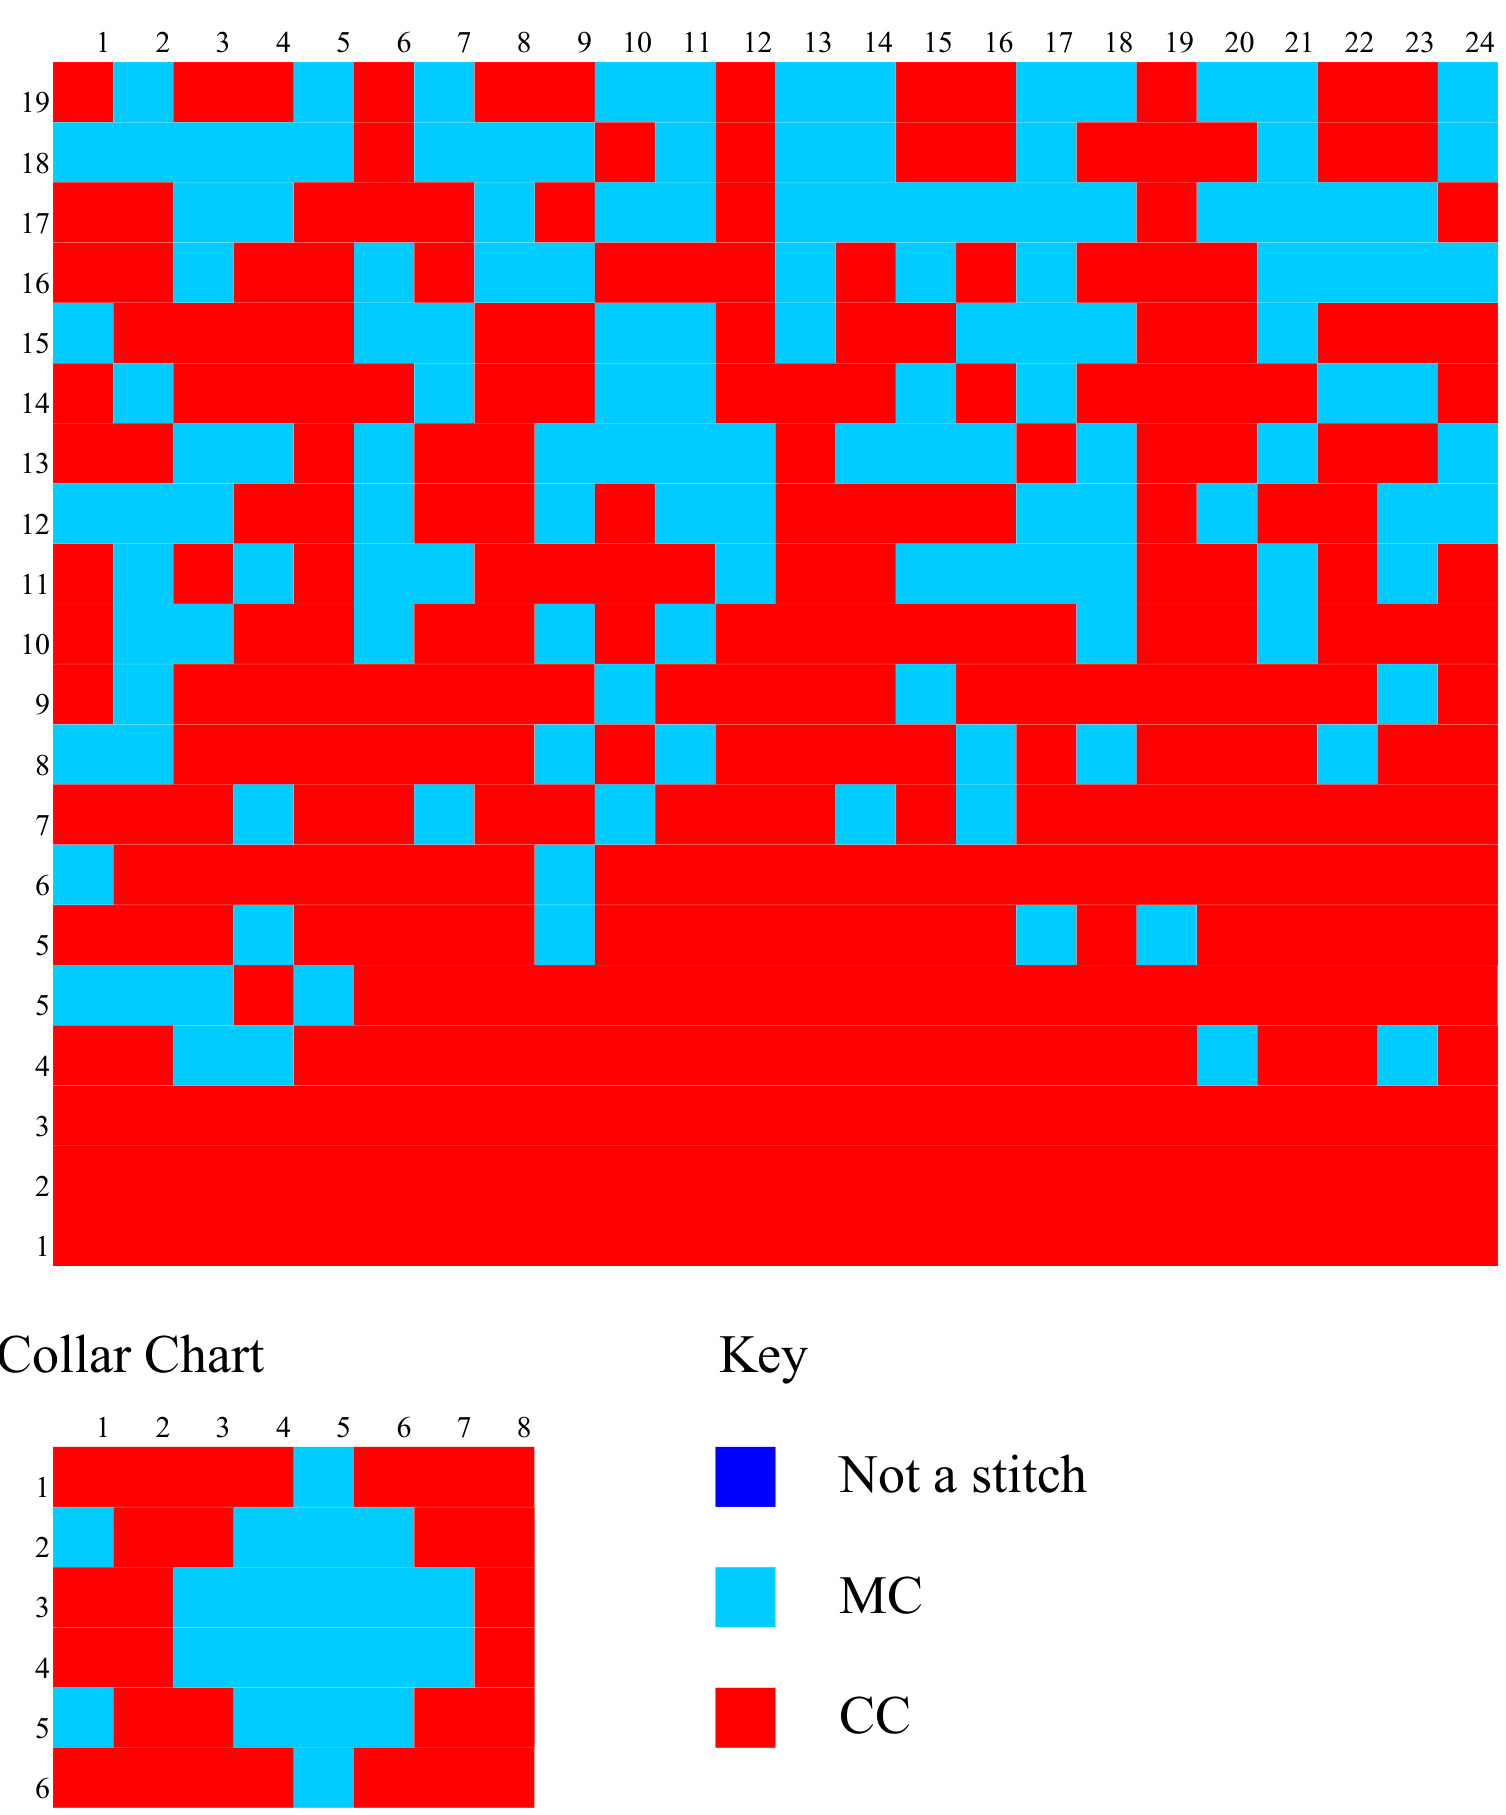
Collar:
Starting at the right front center, place 10 stitches on a small circular needle from the holder. Do the following five times: [PU 1 from neck edge, place two stitches on the needle from the holder]. Do the following three times: [PU 1 from neck edge, place 1 stitch on the needle from the holder]. PU six stitches from the front right neck edge. PU 2 stitches from the back right neck edge. Transfer the 47 stitches from the back neck holder to the needle. PU 2 stitches from the back left neck edge. PU 6 stitches from the front left neck edge. Do the following three times: [place 1 stitch on needle from left front stitch holder, PU 1 from left front neck edge]. Do the following five times: [place two stitches on the needle from the holder, PU 1 from neck edge]. Transfer the remaining ten stitches from the front left holder to the needle. Attach CC yarn at left neck front, and knit one row. For the next (wrong side) row, repeat the following to the last stitch: [P2, P2tog], then purl the last stitch. 94 stitches. Knit one row. On the next (wrong side) row, P 20, P2tog, P2tog, P2tog, P 42, P2tog, P2tog, P2tog,P 19. P2tog. 87 stitches. Attach MC. Knit the first row of the collar chart 11 times, omitting the last stitch on the final repeat. Continue in pattern to end of collar chart. ish the right side of the collar with two rows of stocking stitch in CC. Cut C( For the turning row that starts the collar facing, in MC, repeat the following to the last stitch: [K2tog, YO]. K1 to finish the row. Purl one row. For the next row, repeat the following seven times: [K9, K2tog]. K 10 to finish the row.80 sts. Continue in stocking stitch until the collar facing is the same size as the collar. BO all stitches. Turn the collar facing to the wrong size and sew it to the back of the collar with MC yarn. Sew the left front edges of the collar and collar facing together. Sew the right front edges of the collar and collar facing together.
Attaching the Sleeves:
Turn the body of the sweater inside out. Place the right sleeve in the right armhole right-sides-together, matching the underarm seam to the base of the armhole. Place the steek edge at the BO edge, and stitch around with yarn at the base of the shoulder seam facing. Pull the sleeve inside out, and stitch down the shoulder seam facing on the body over the steek. Repeat these two seams for the left sleeve.
Neck Slit and Zipper:
Clip the center stitches for the neck slit between the lines of machine stitching, being sure to cut all the way to the hole at the base of the neck slit. Turn the steek stitches to the wrong side, and lightly press. For the neck slit facing, starting at the right top of the neck slit, PU and K 28 stitches to the base of the neck slit. PM. PU and K 2 stitches at the base. PM. PU and K 28 stitches on the left edge. Purl one row. Knit to marker. SM. M1. Knit to marker. M1. SM. Knit to end. Purl one row. Knit to marker. SM. M1. Knit to marker. M1. SM. Knit to end. BO in purl. Turn facing to inside, covering the steek stitches. With yarn, sew each stitch down. Pin or baste the zipper in place. (If your neck slit is not exactly seven inches long, purchase a longer zipper and cut to fit.) With matching thread on the right side, sew the zipper to the neck slit edge. On the wrong side, sew the edge of the zipper to the neck slit facing.
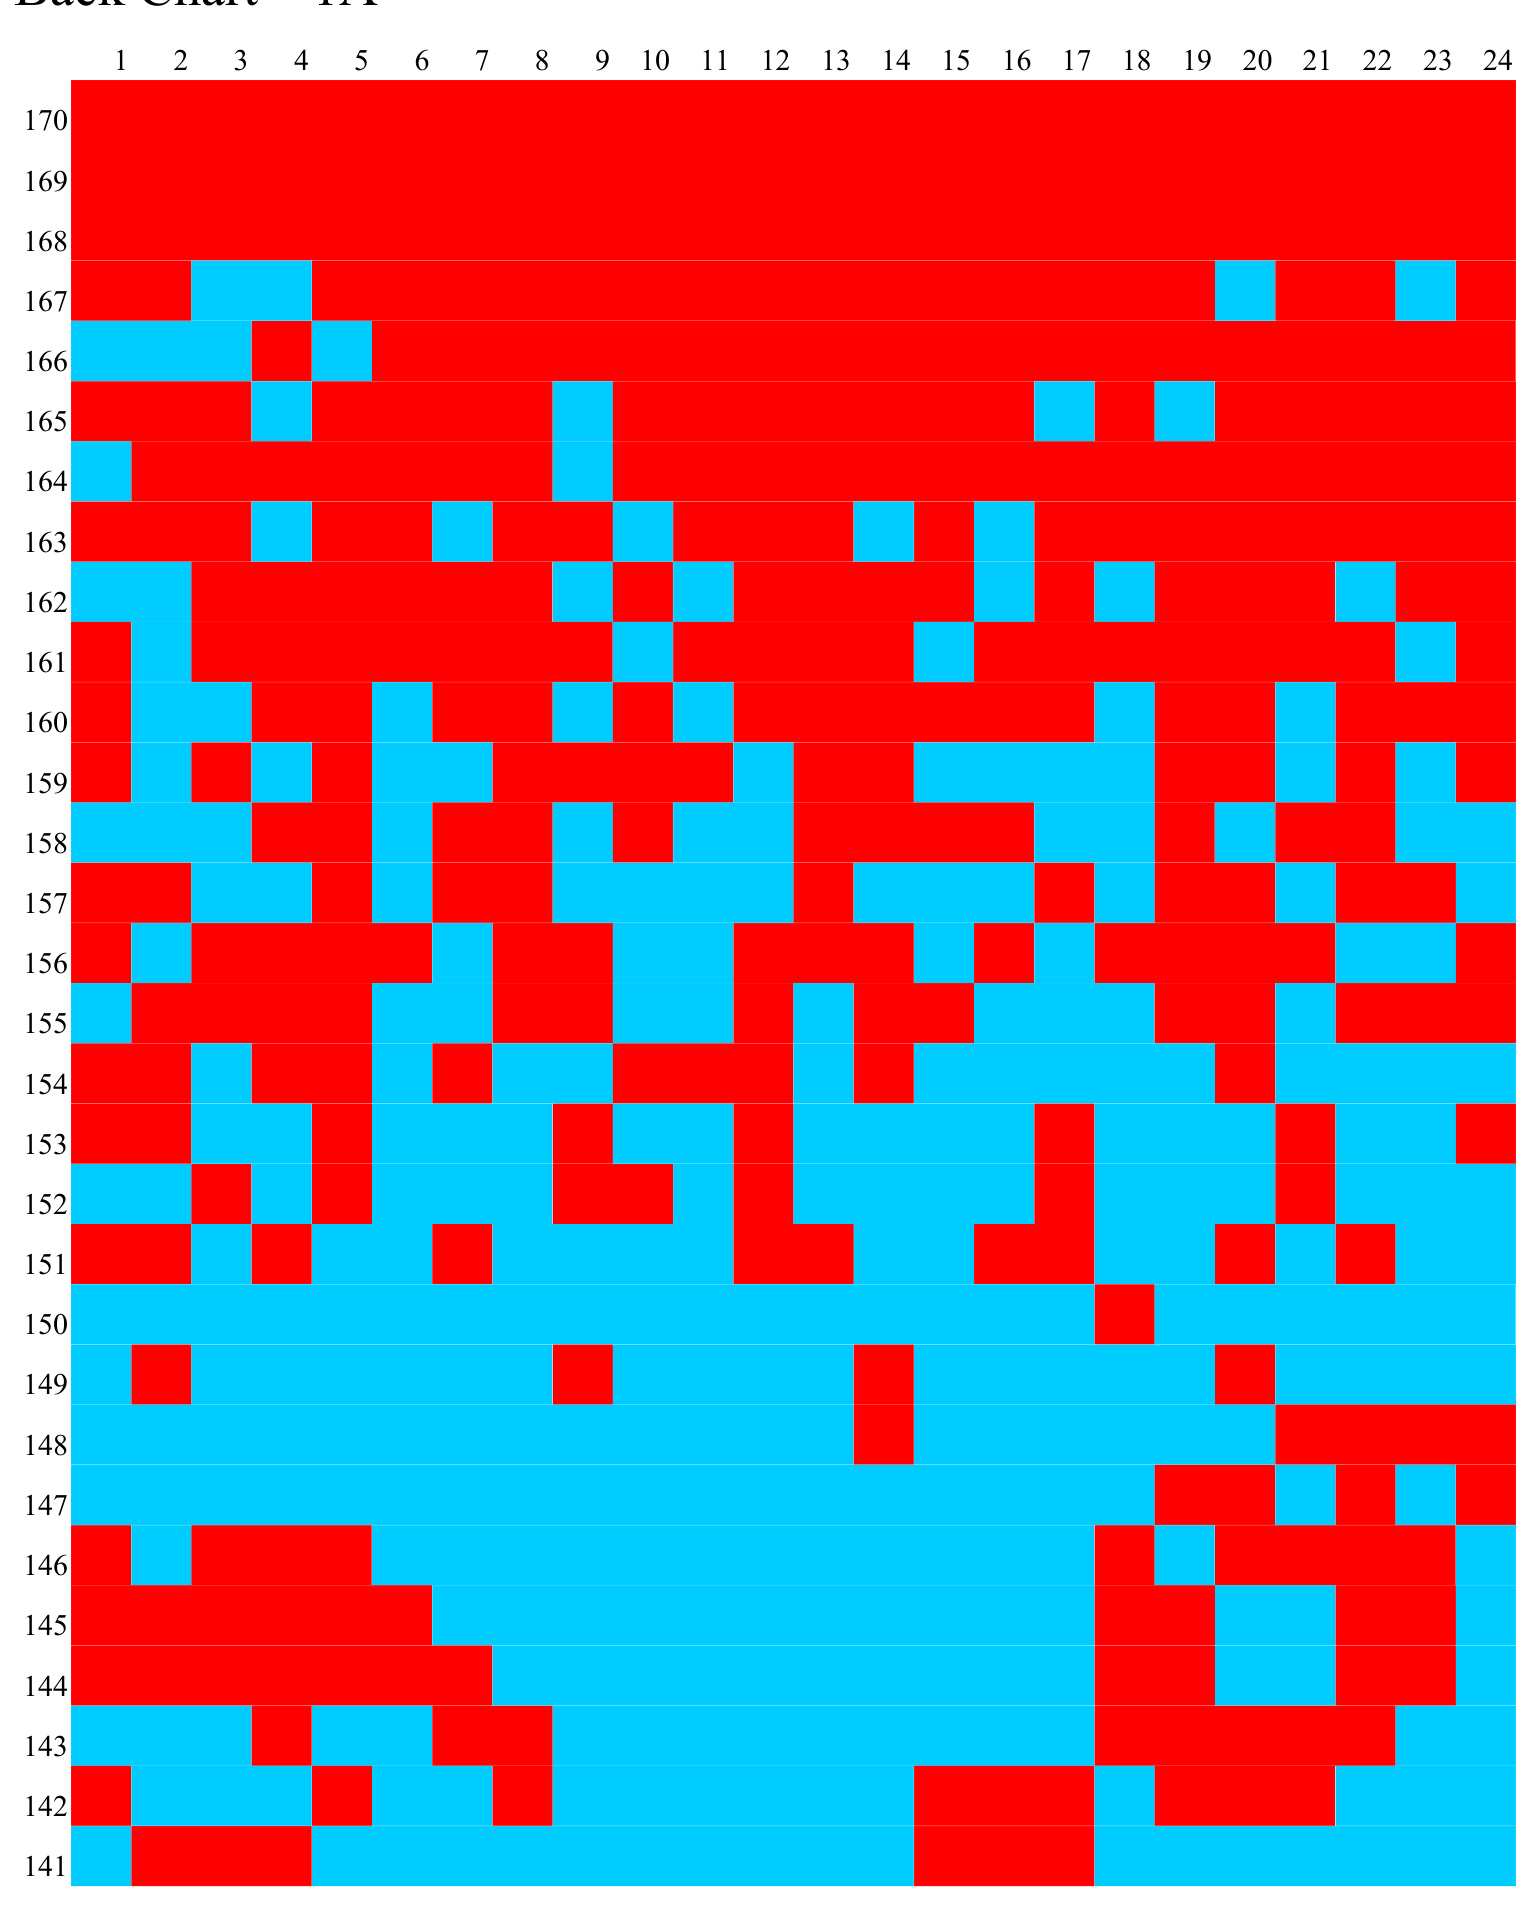
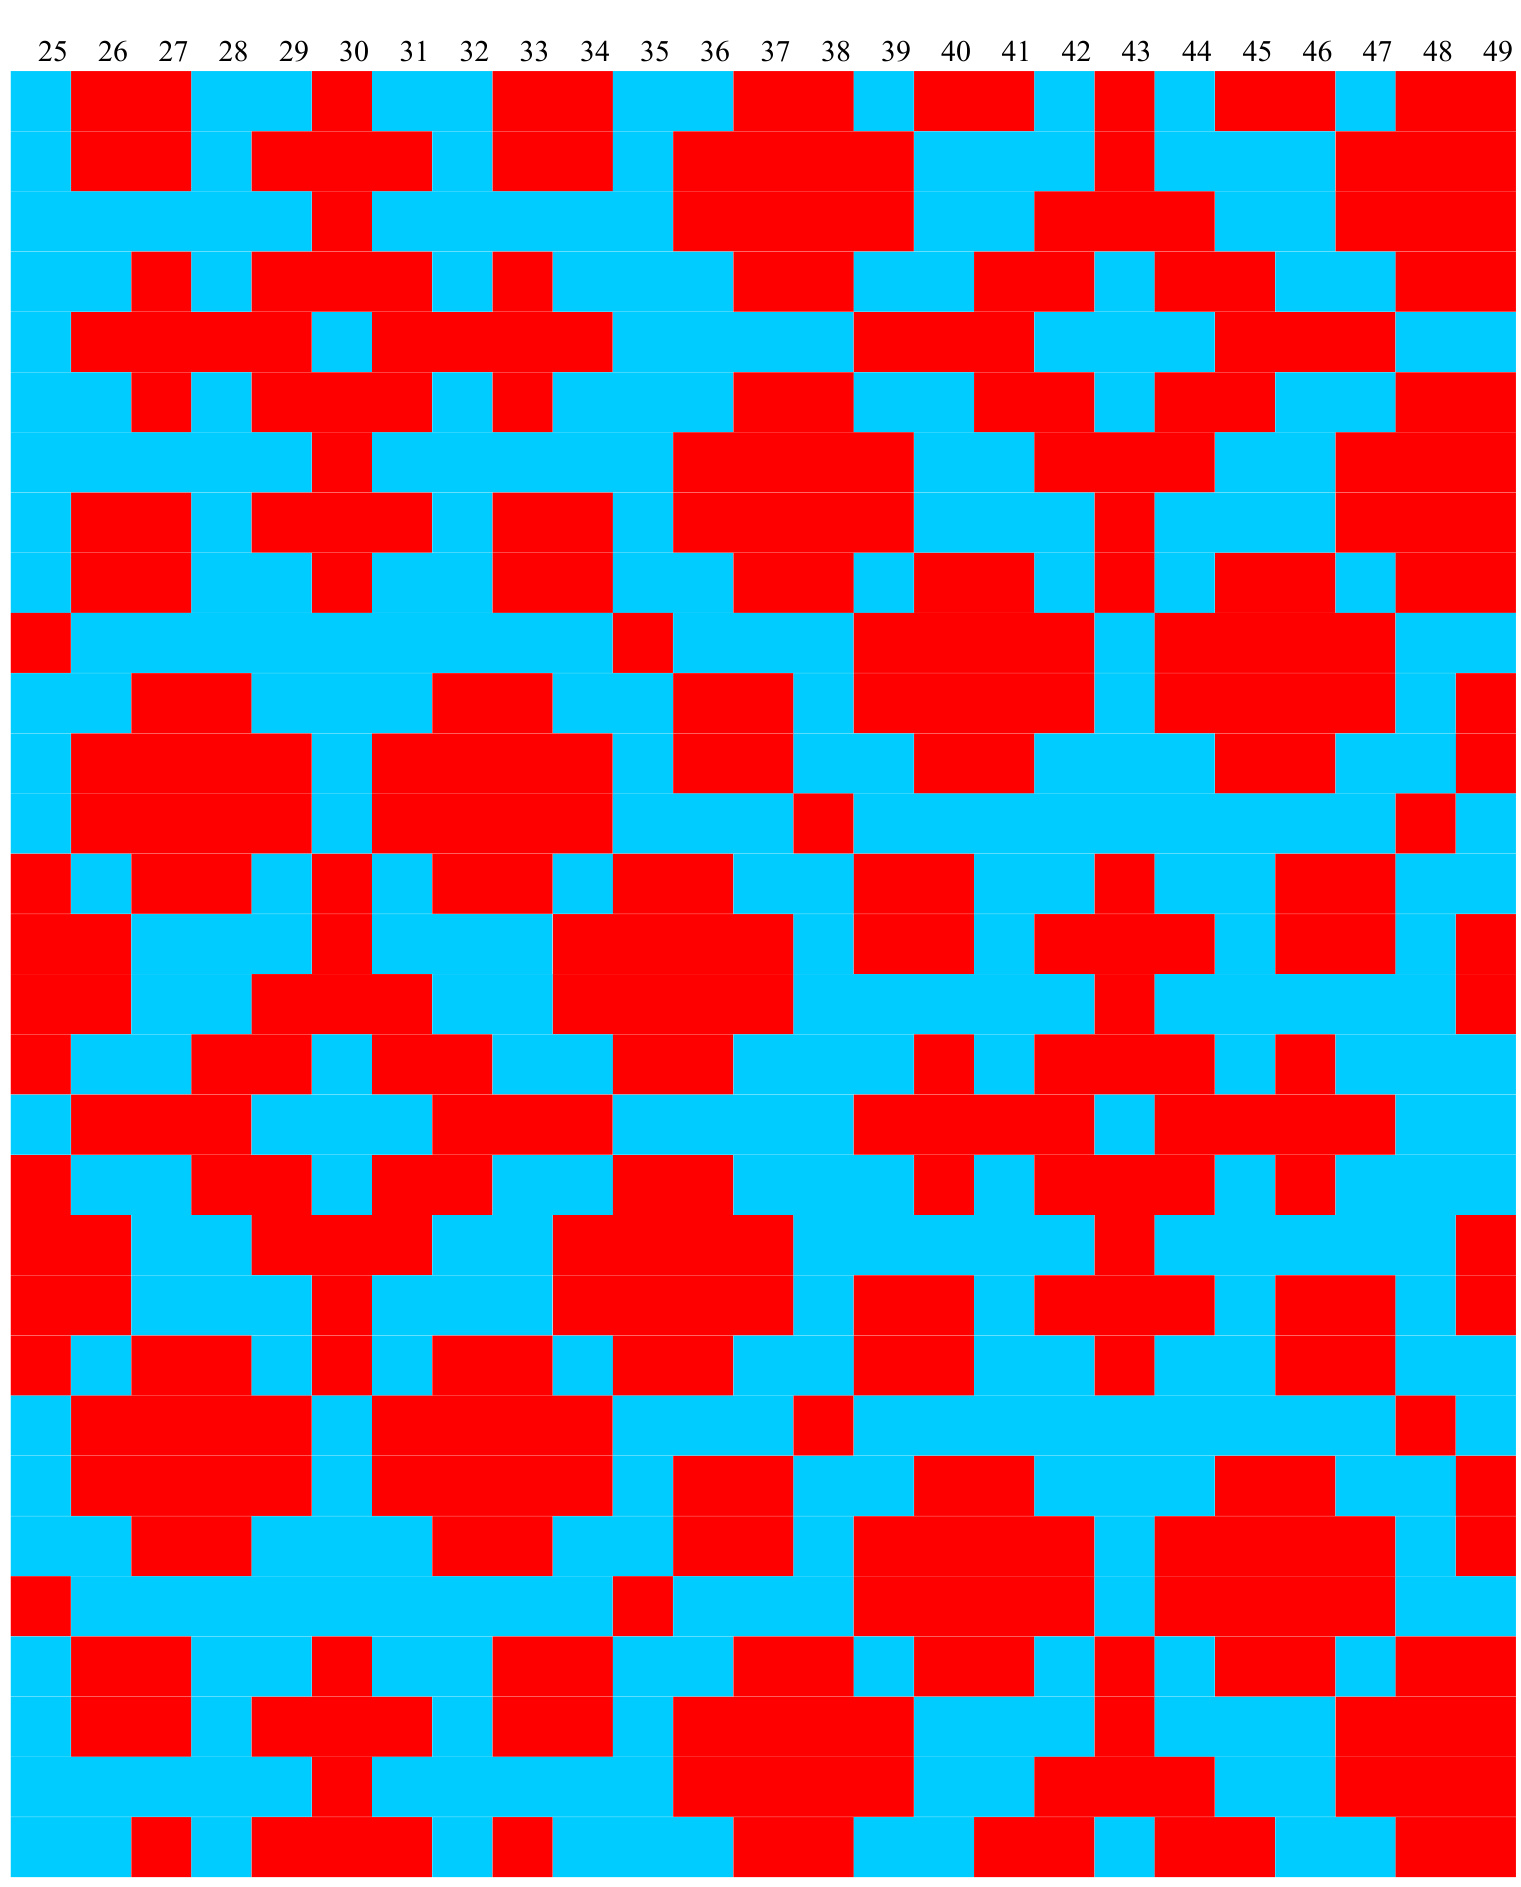
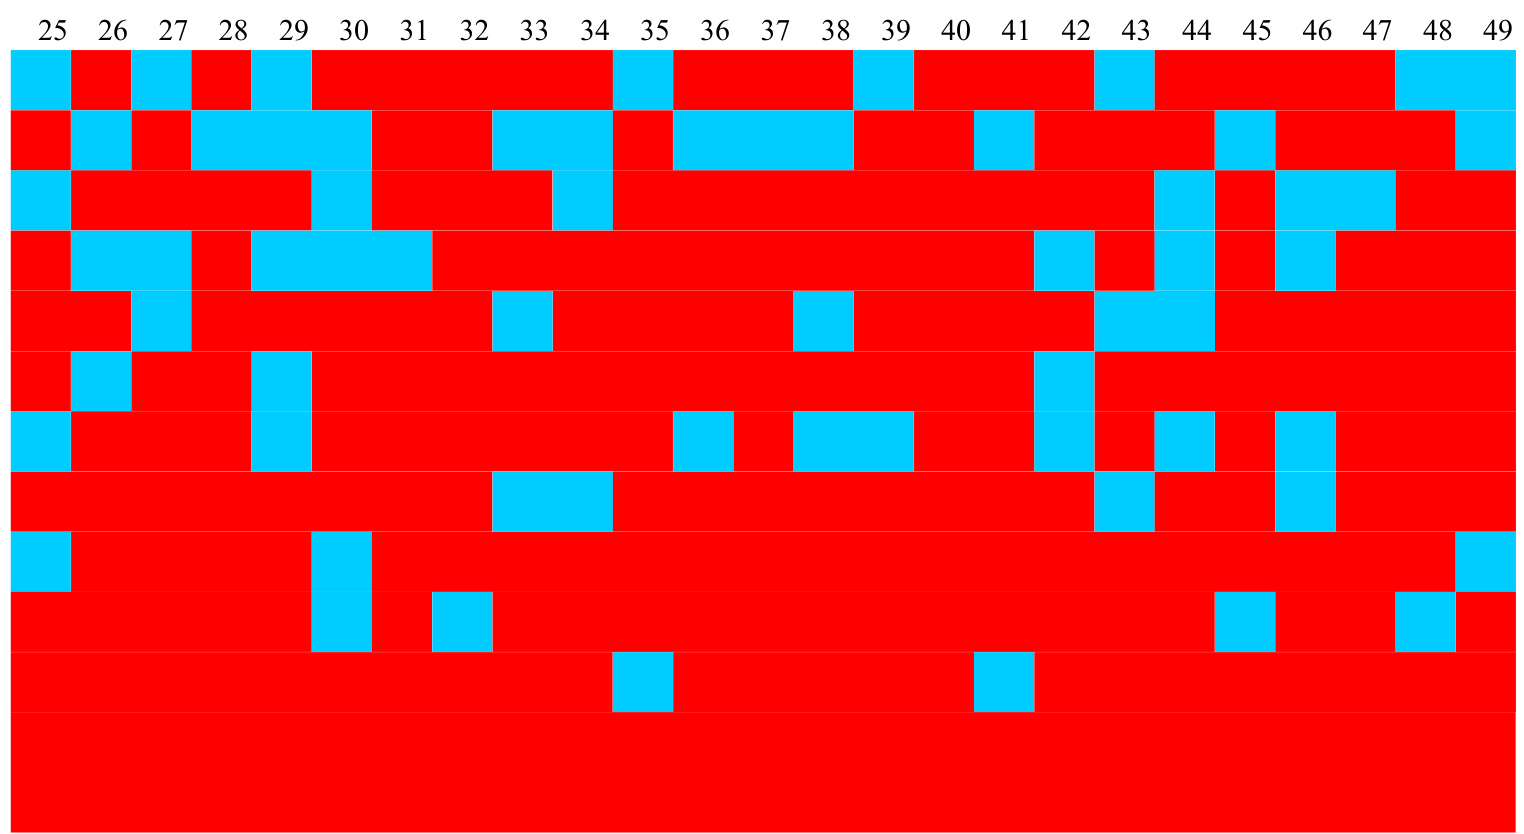
Back Chart—1A
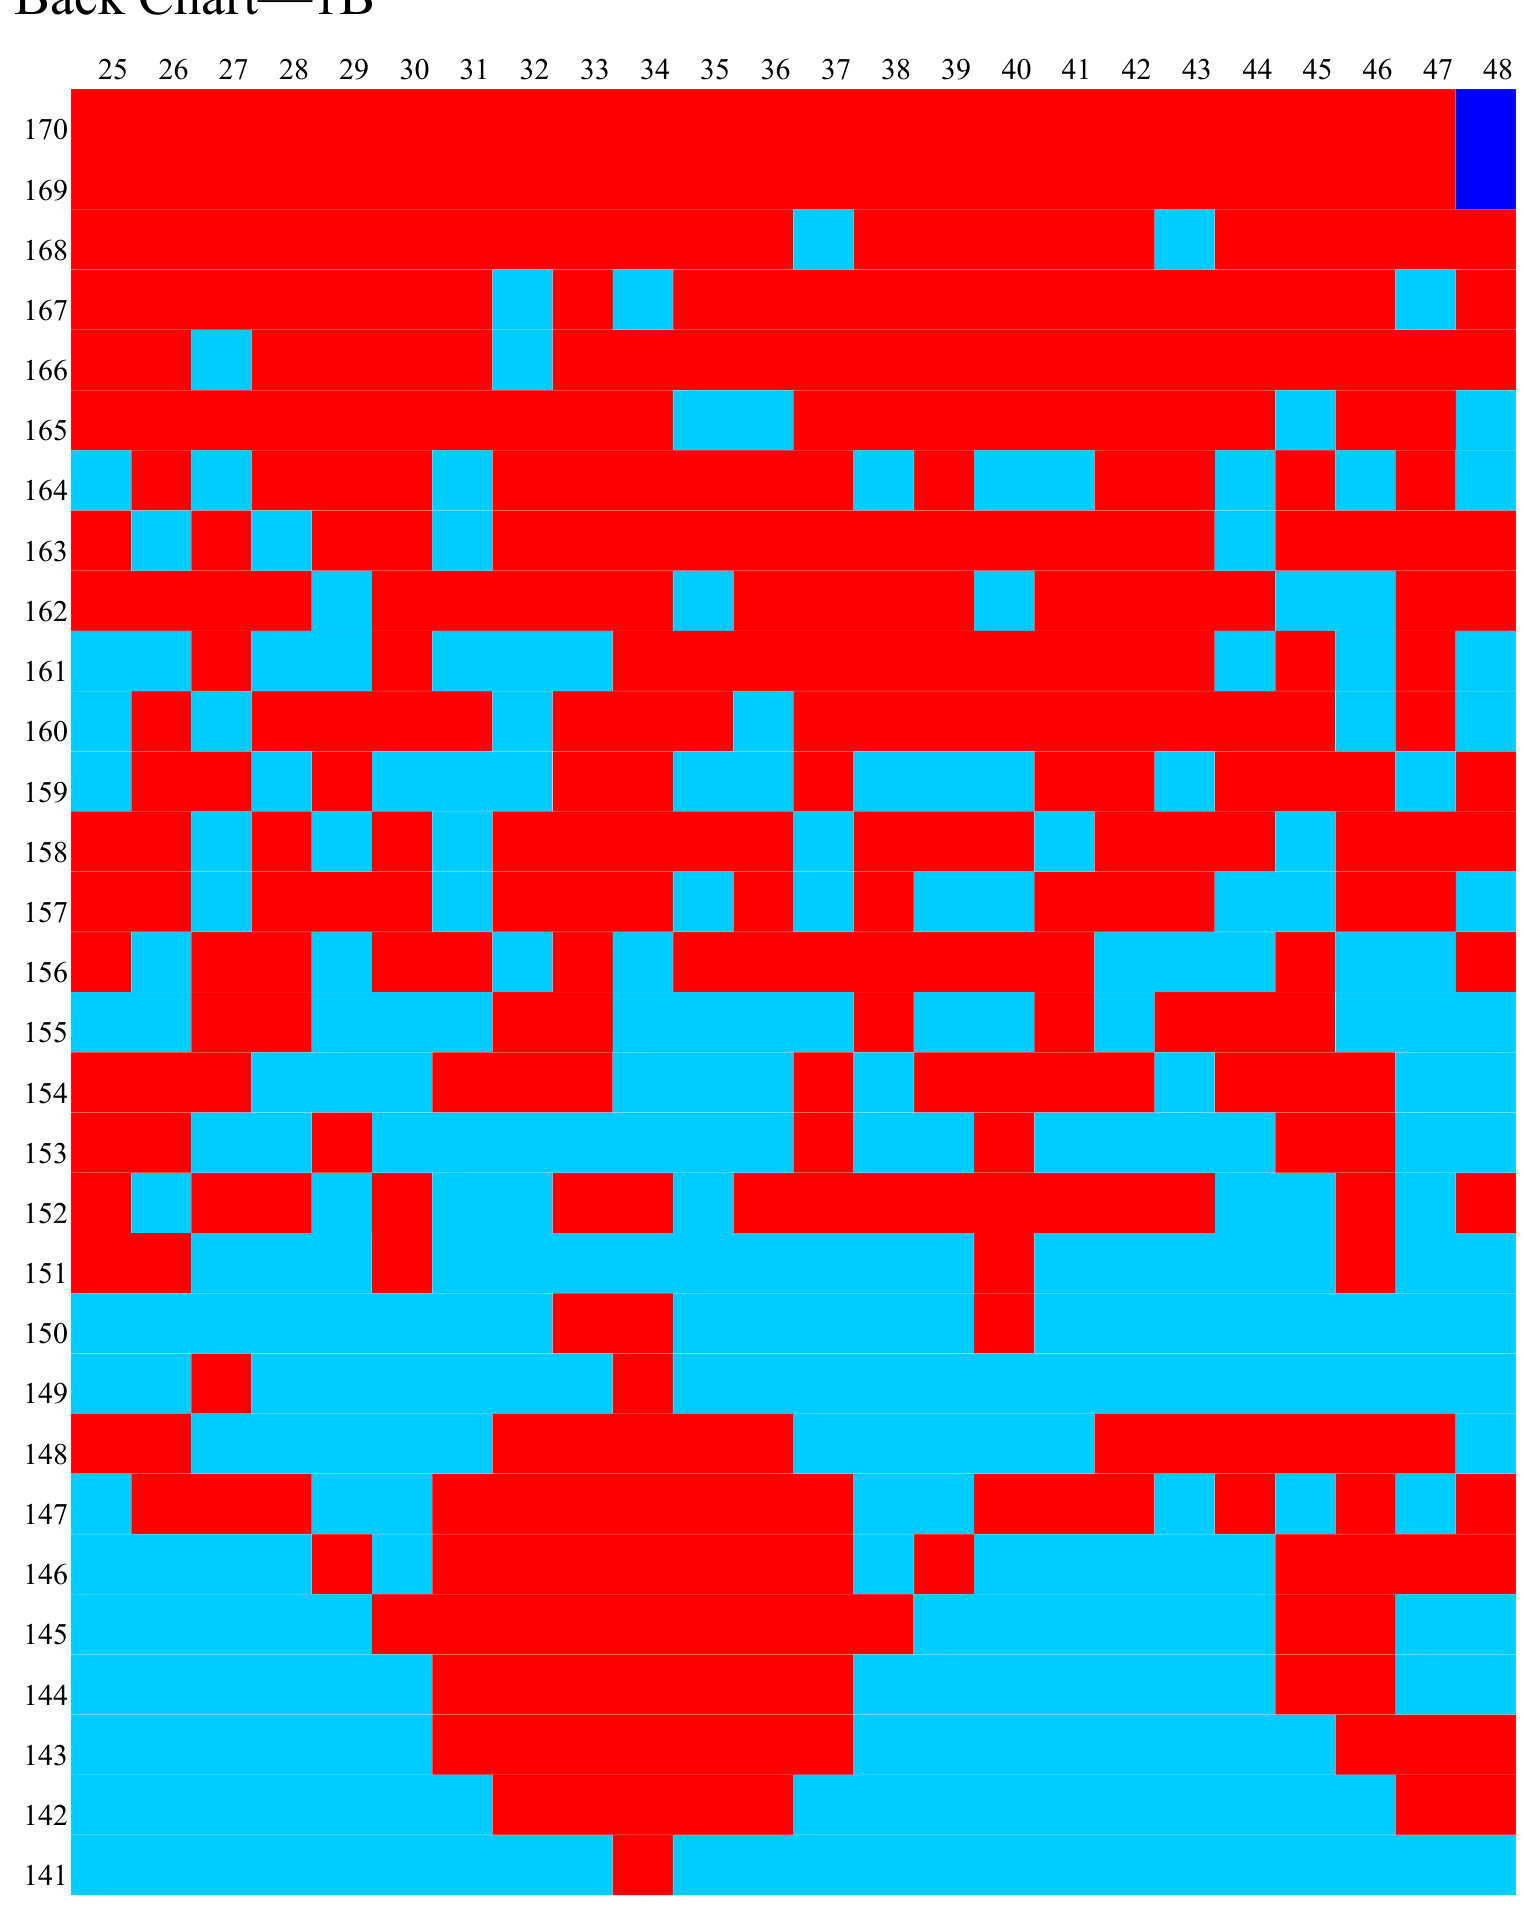
Back Chart—1B

Back Chart—1C
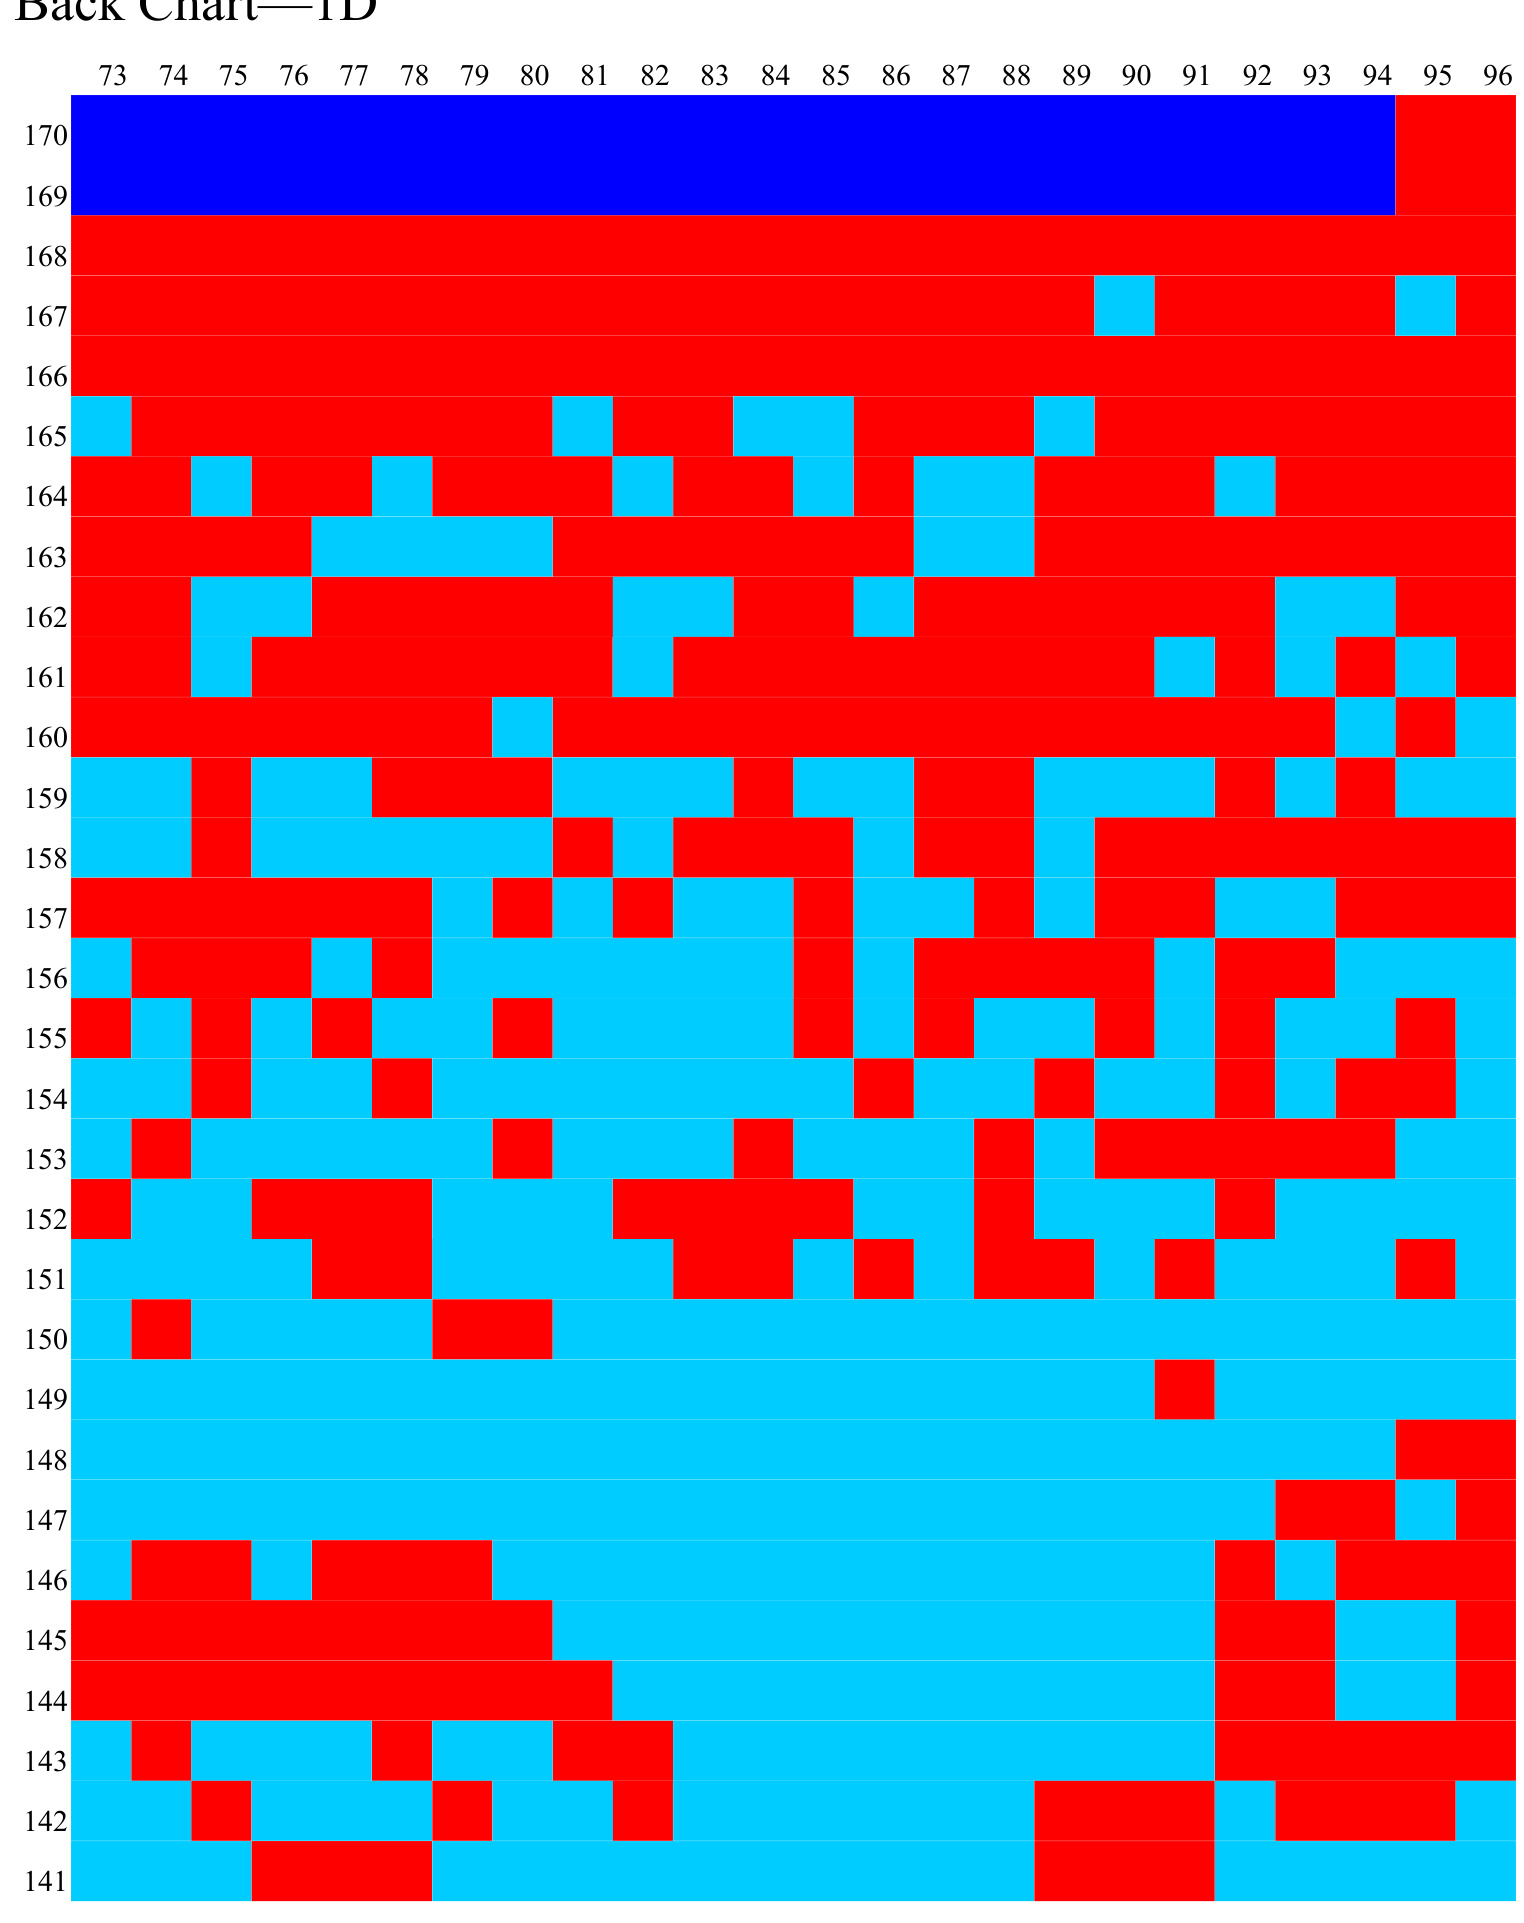
Back Chart—1D
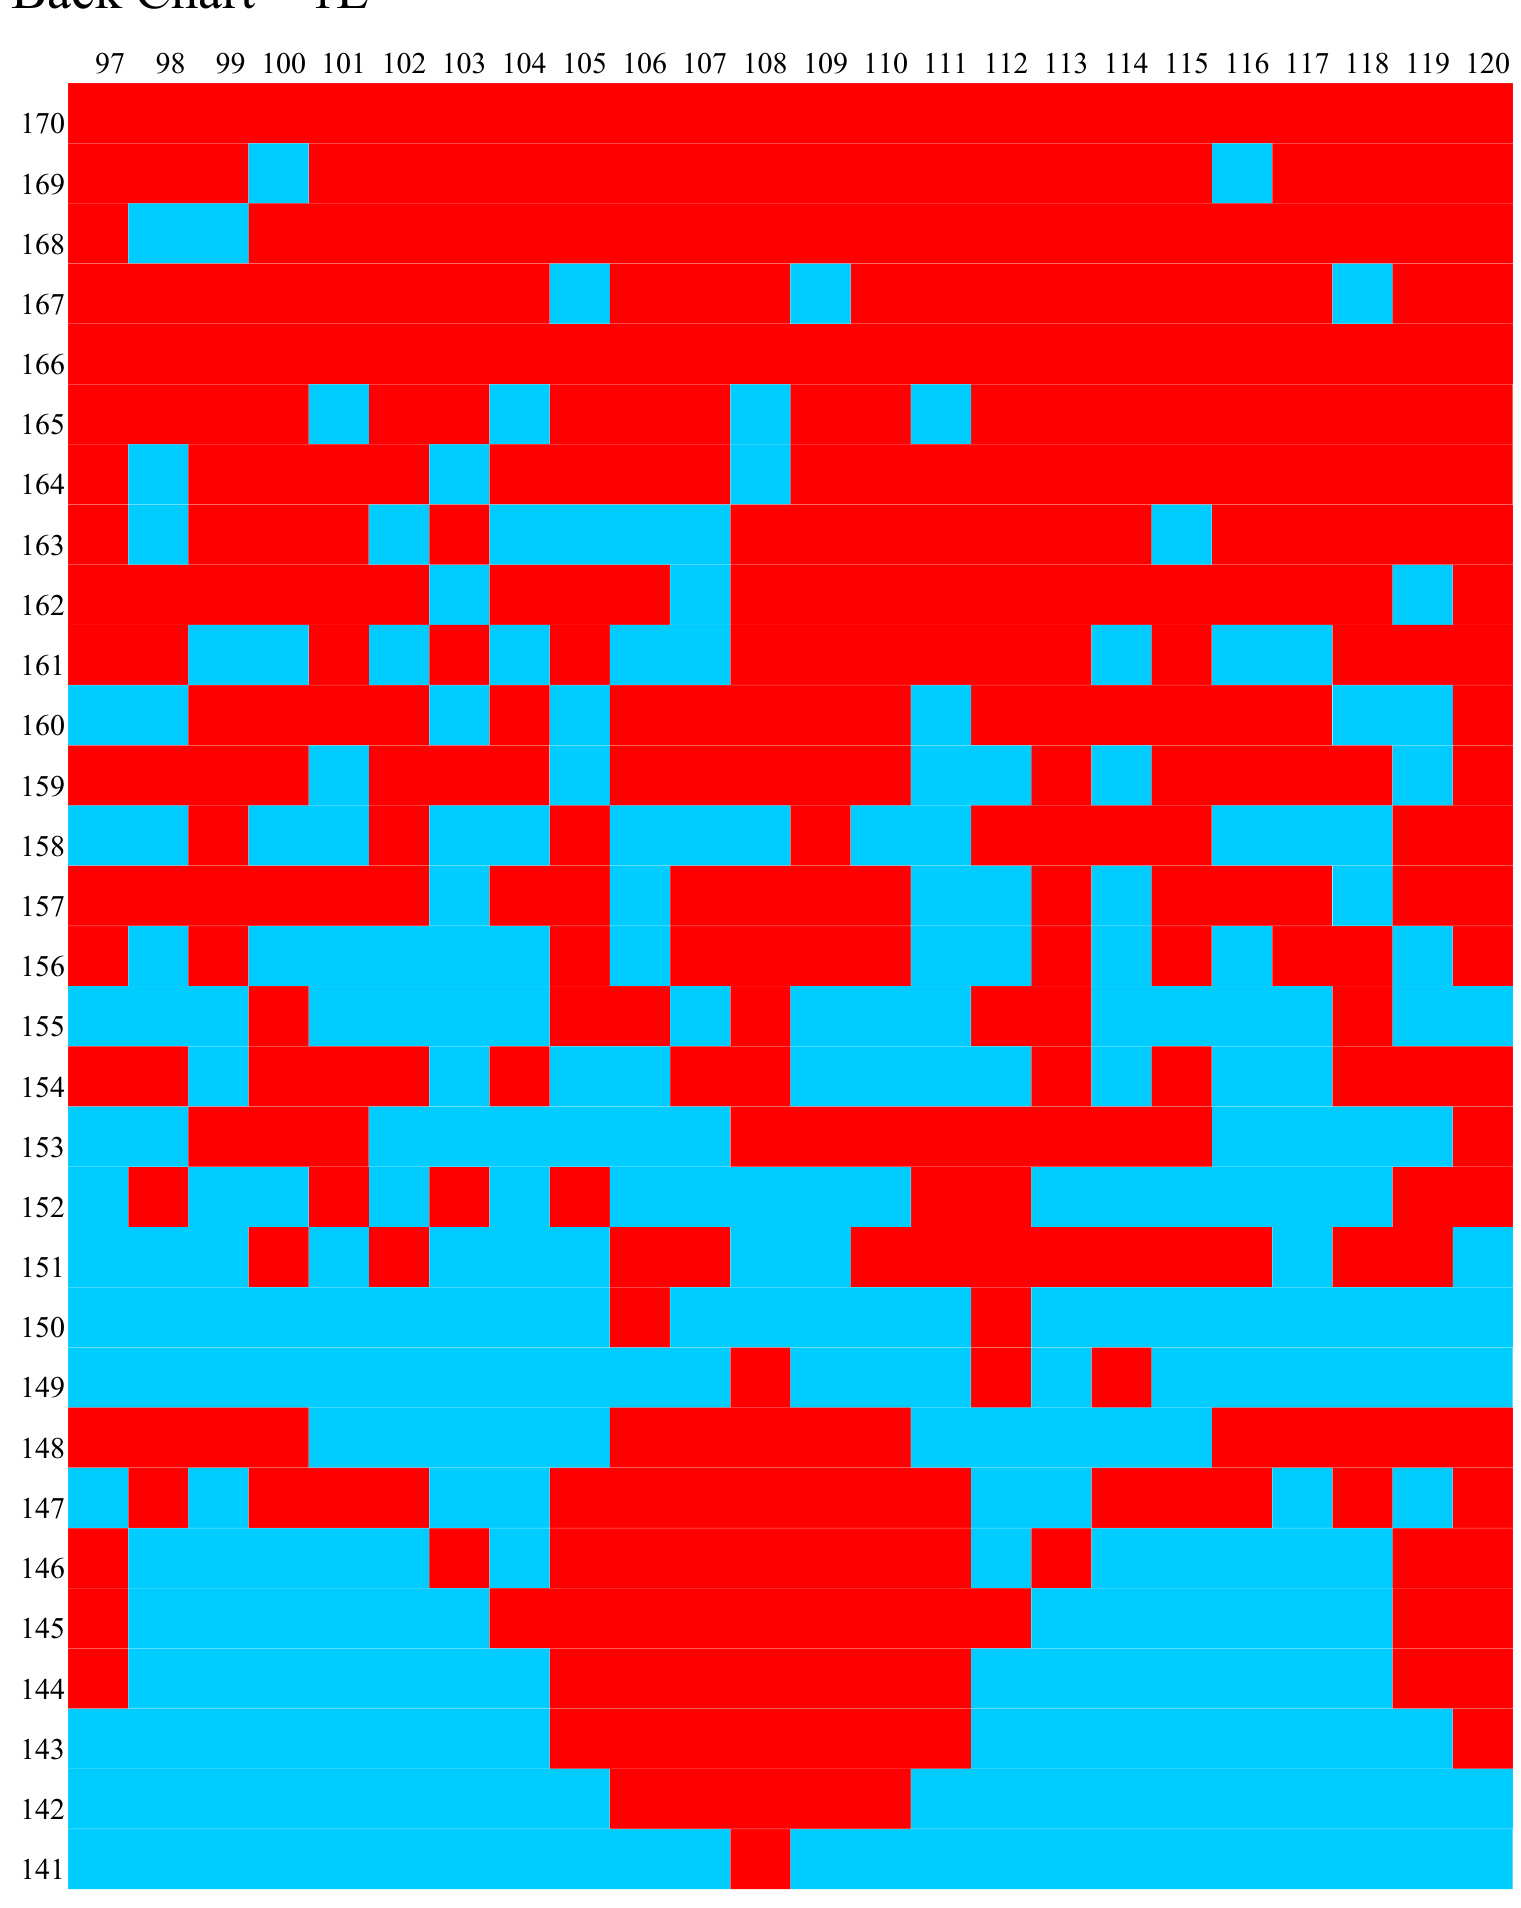
Back Chart——1E
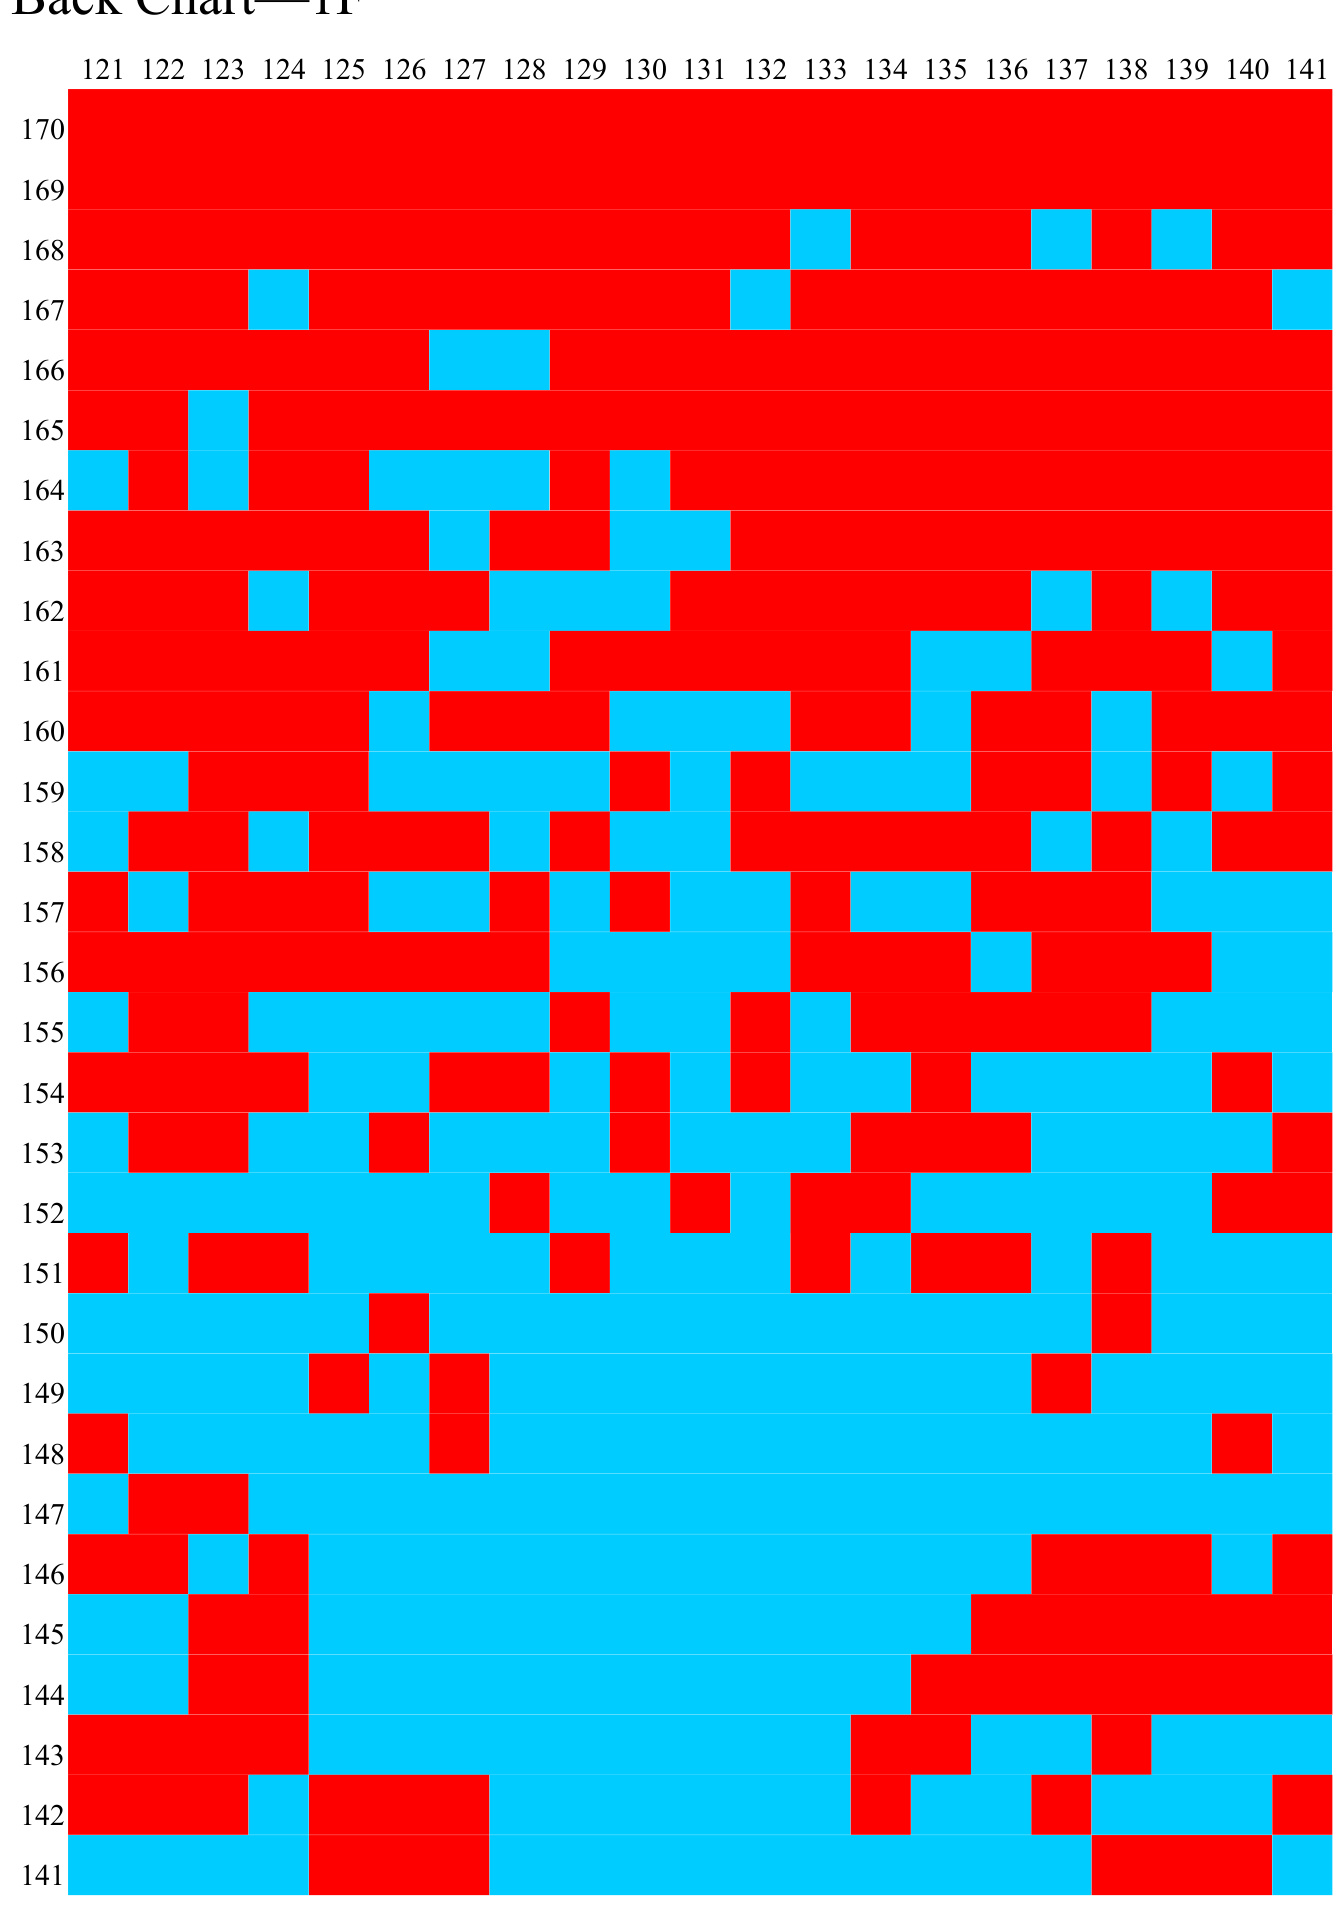
Back Chart—1F
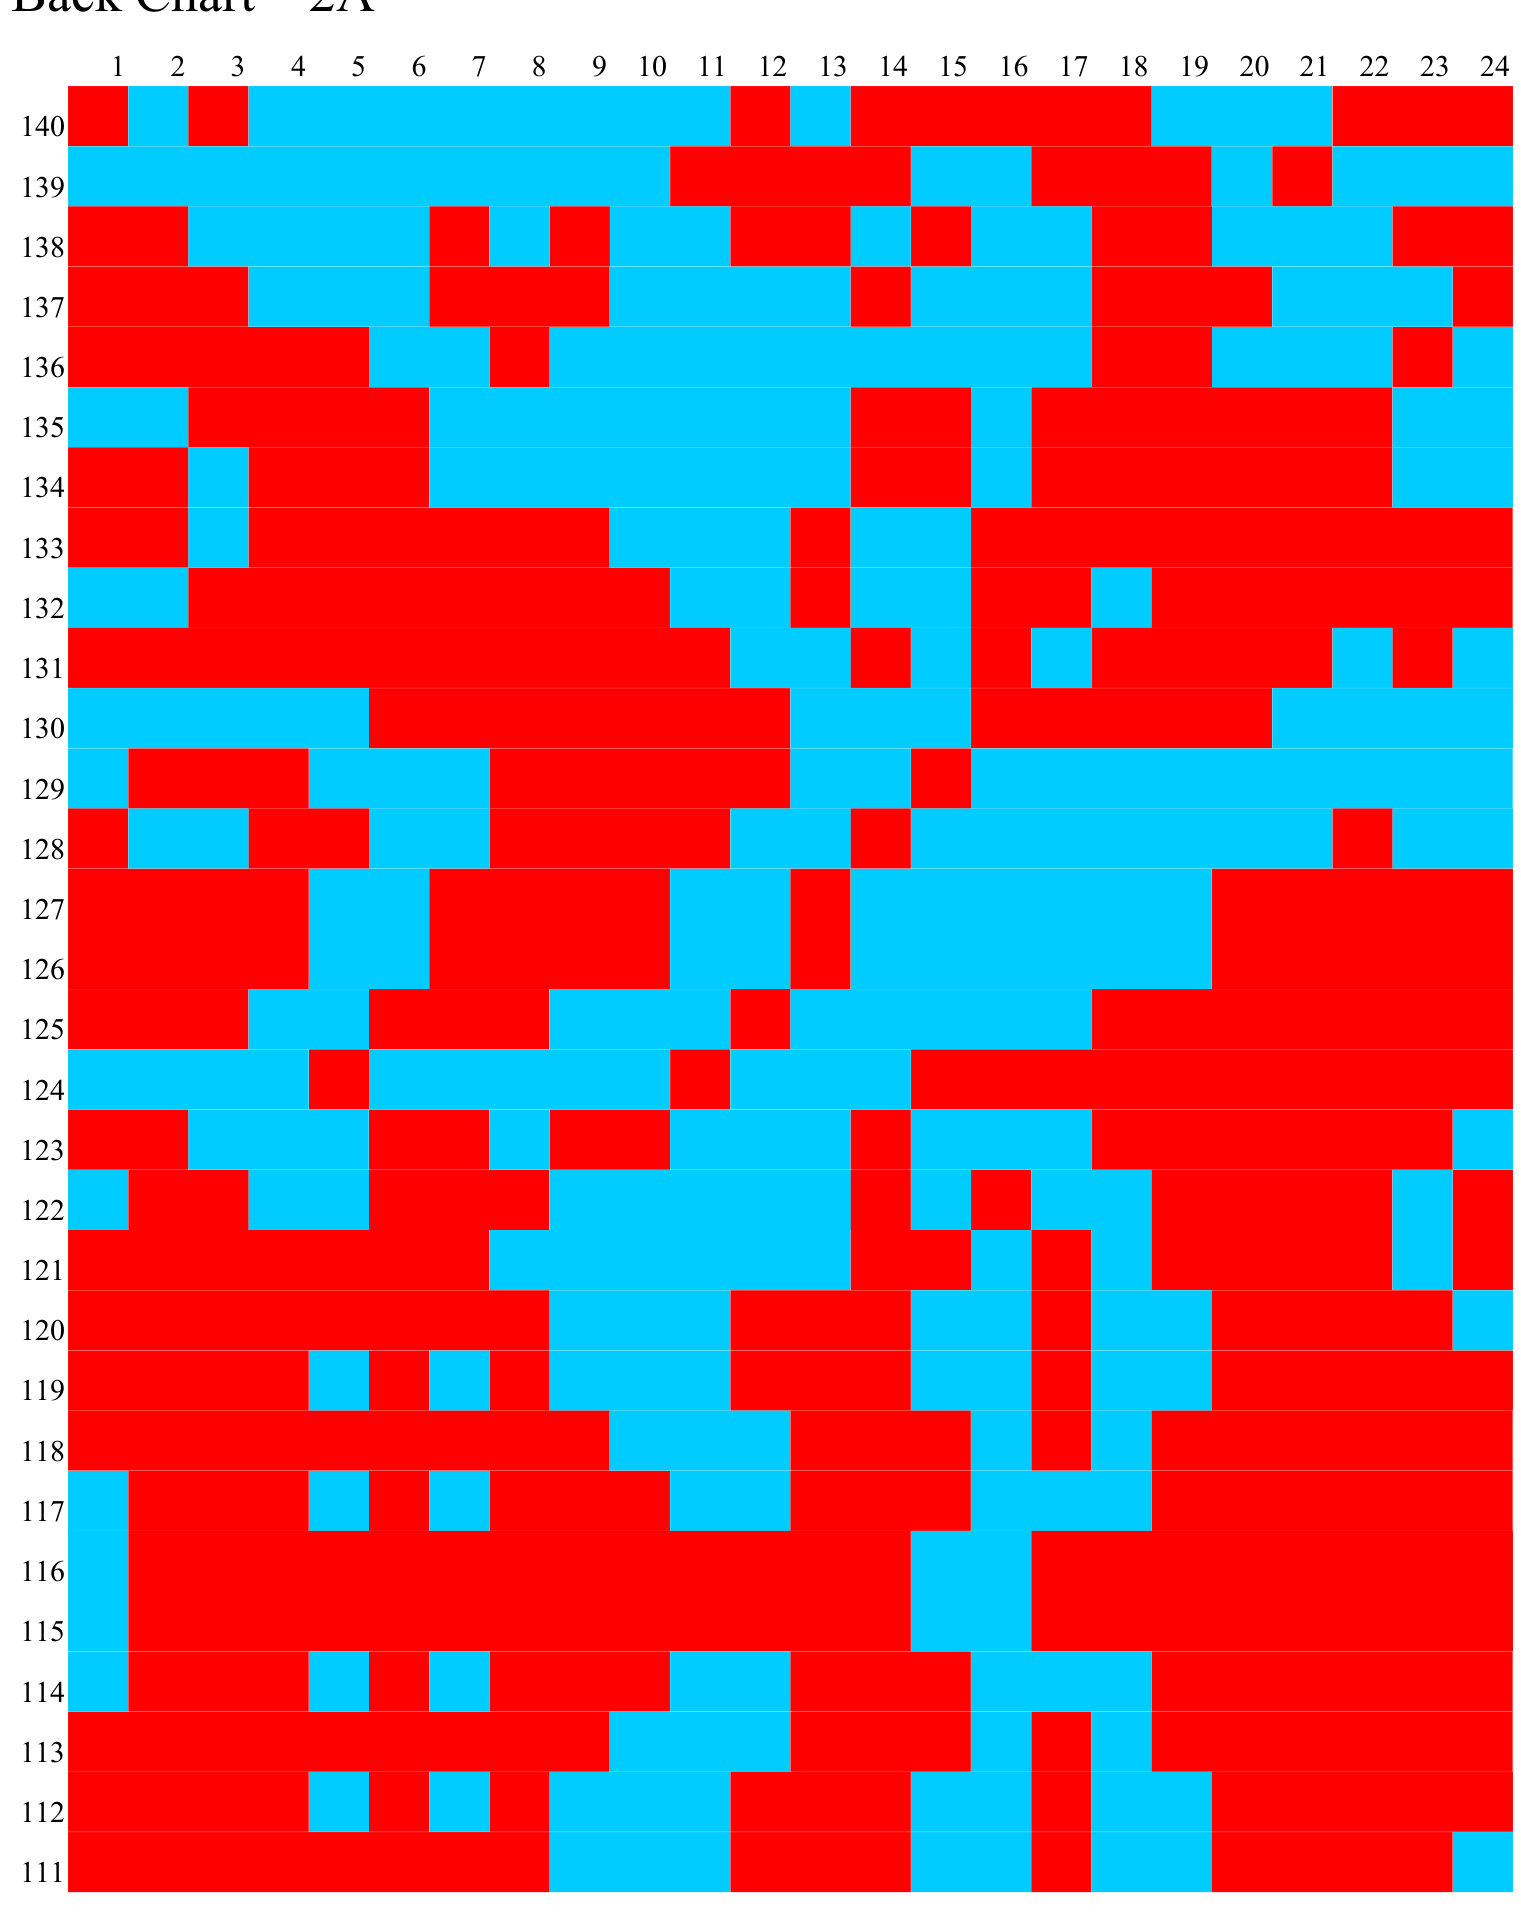
Back Chart—2A

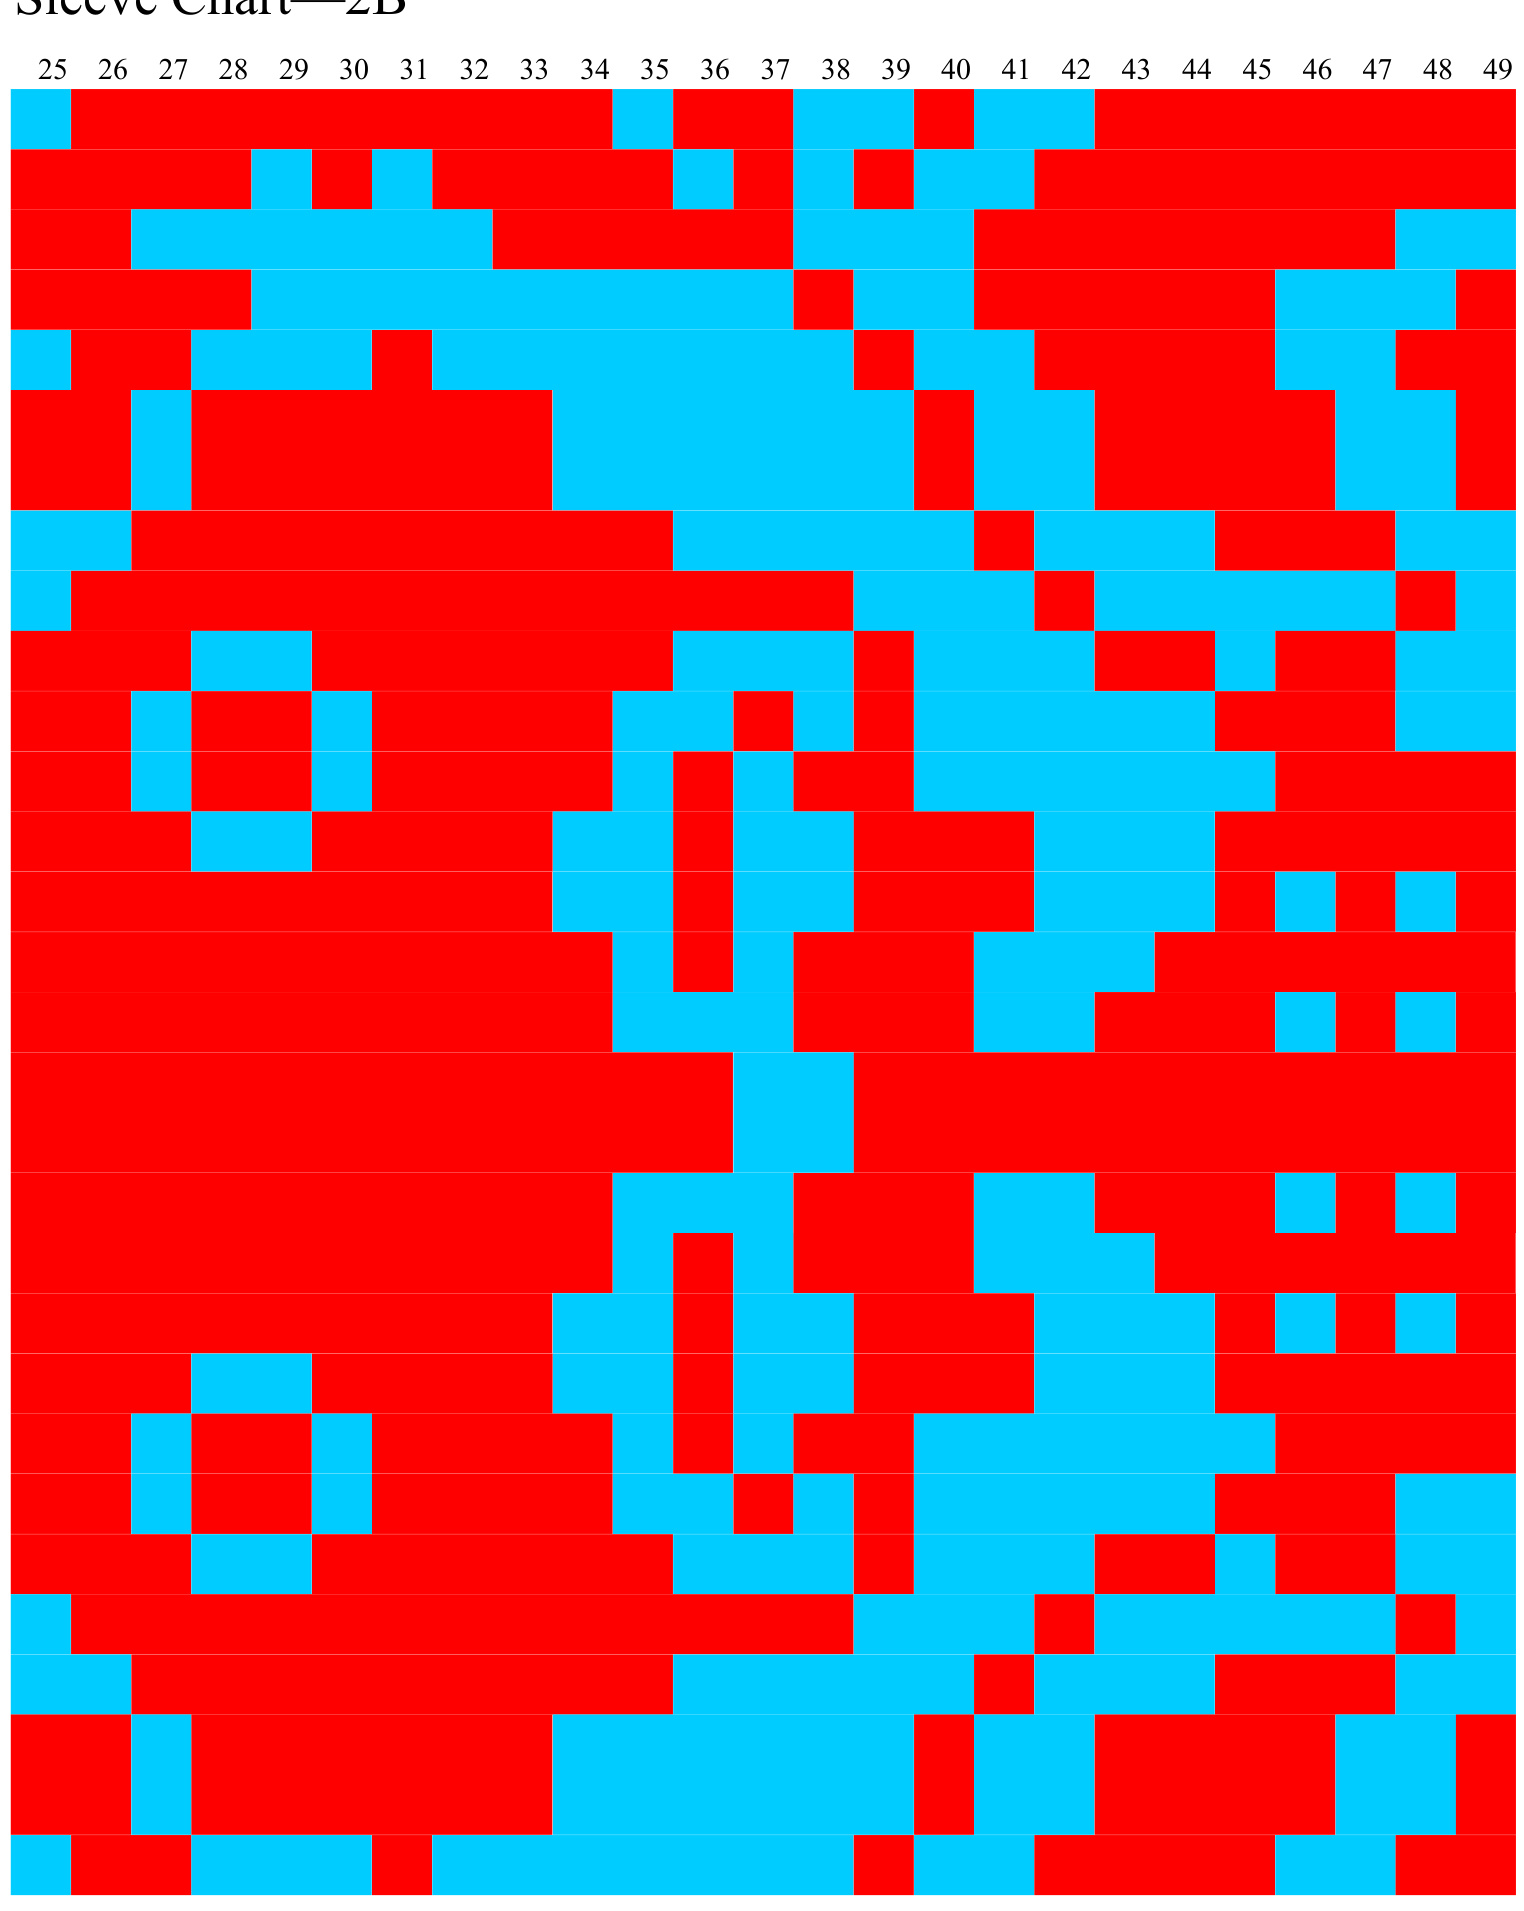
Back Chart—2B
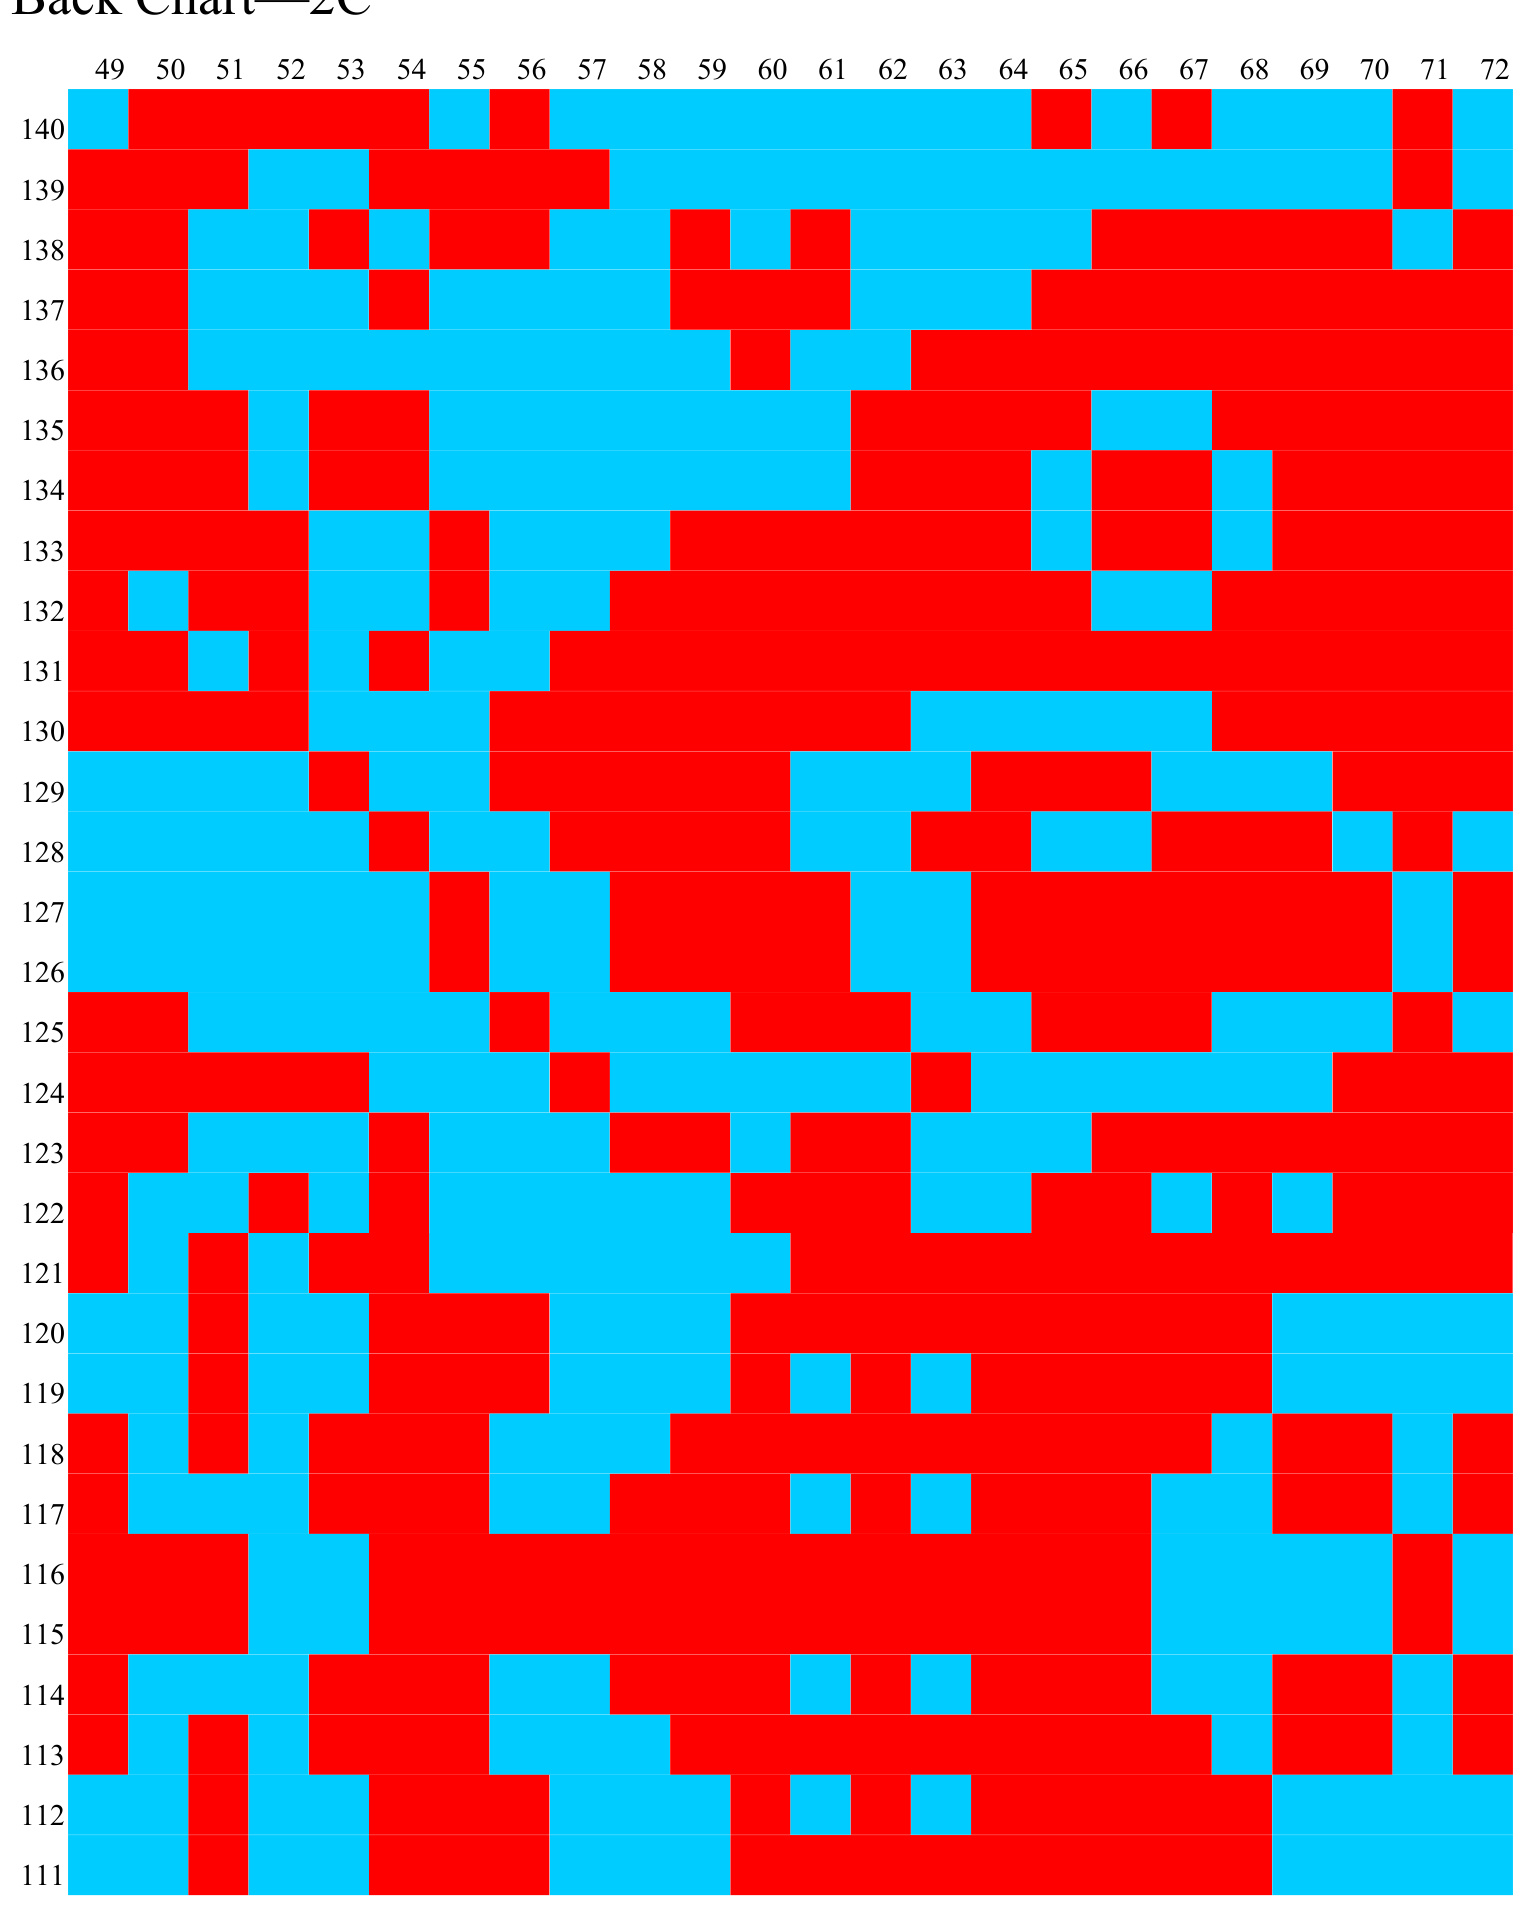
Back Chart—2C
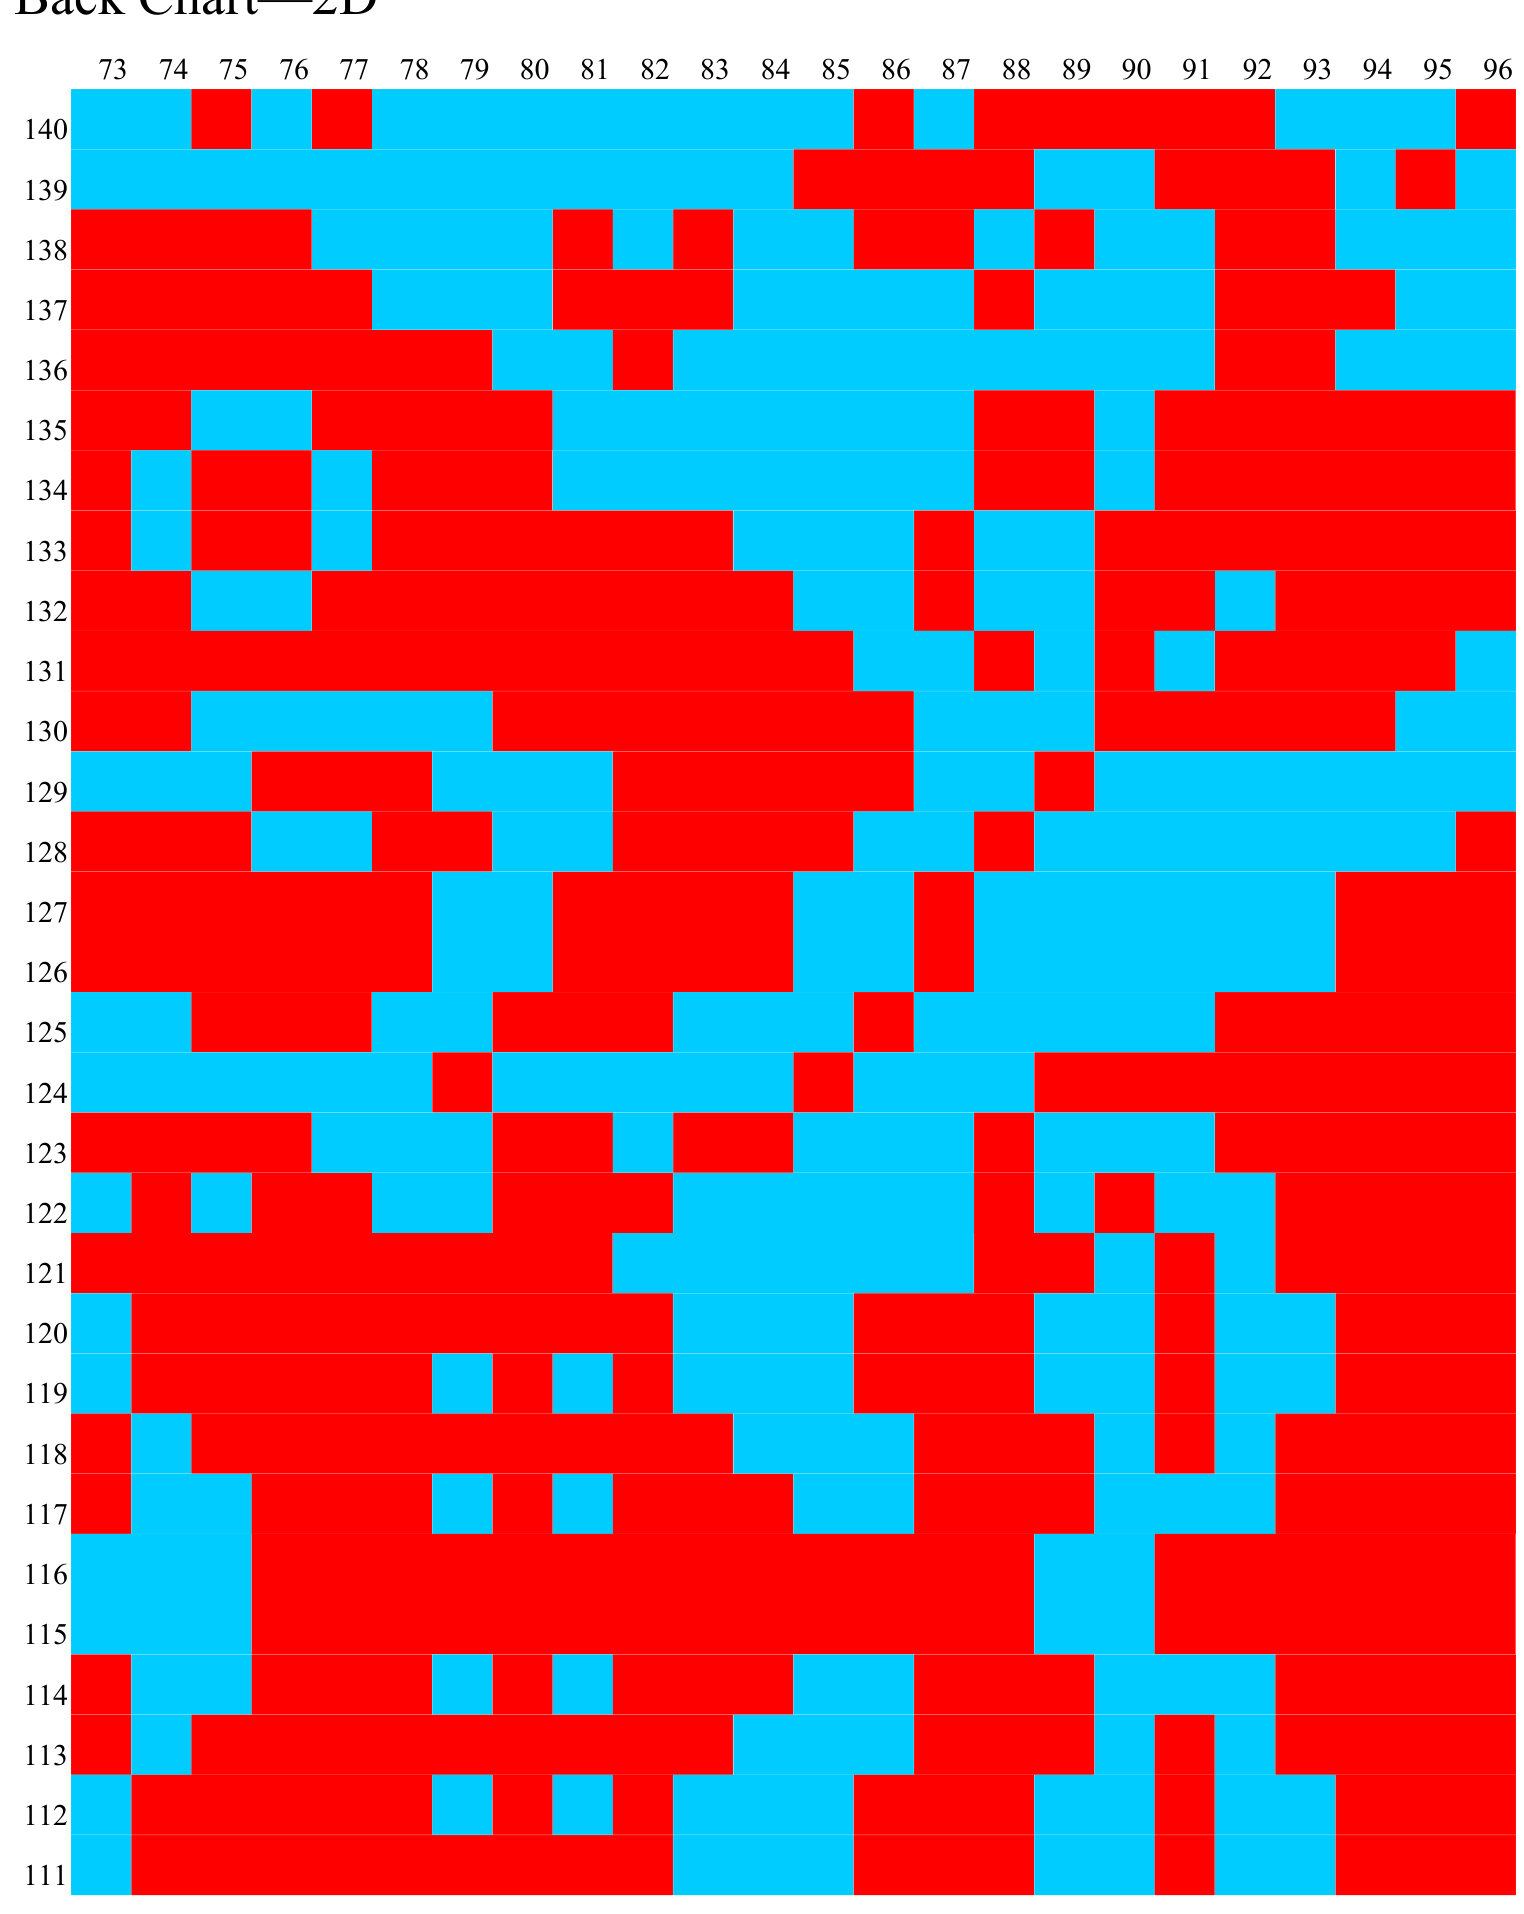
Back Chart—2D
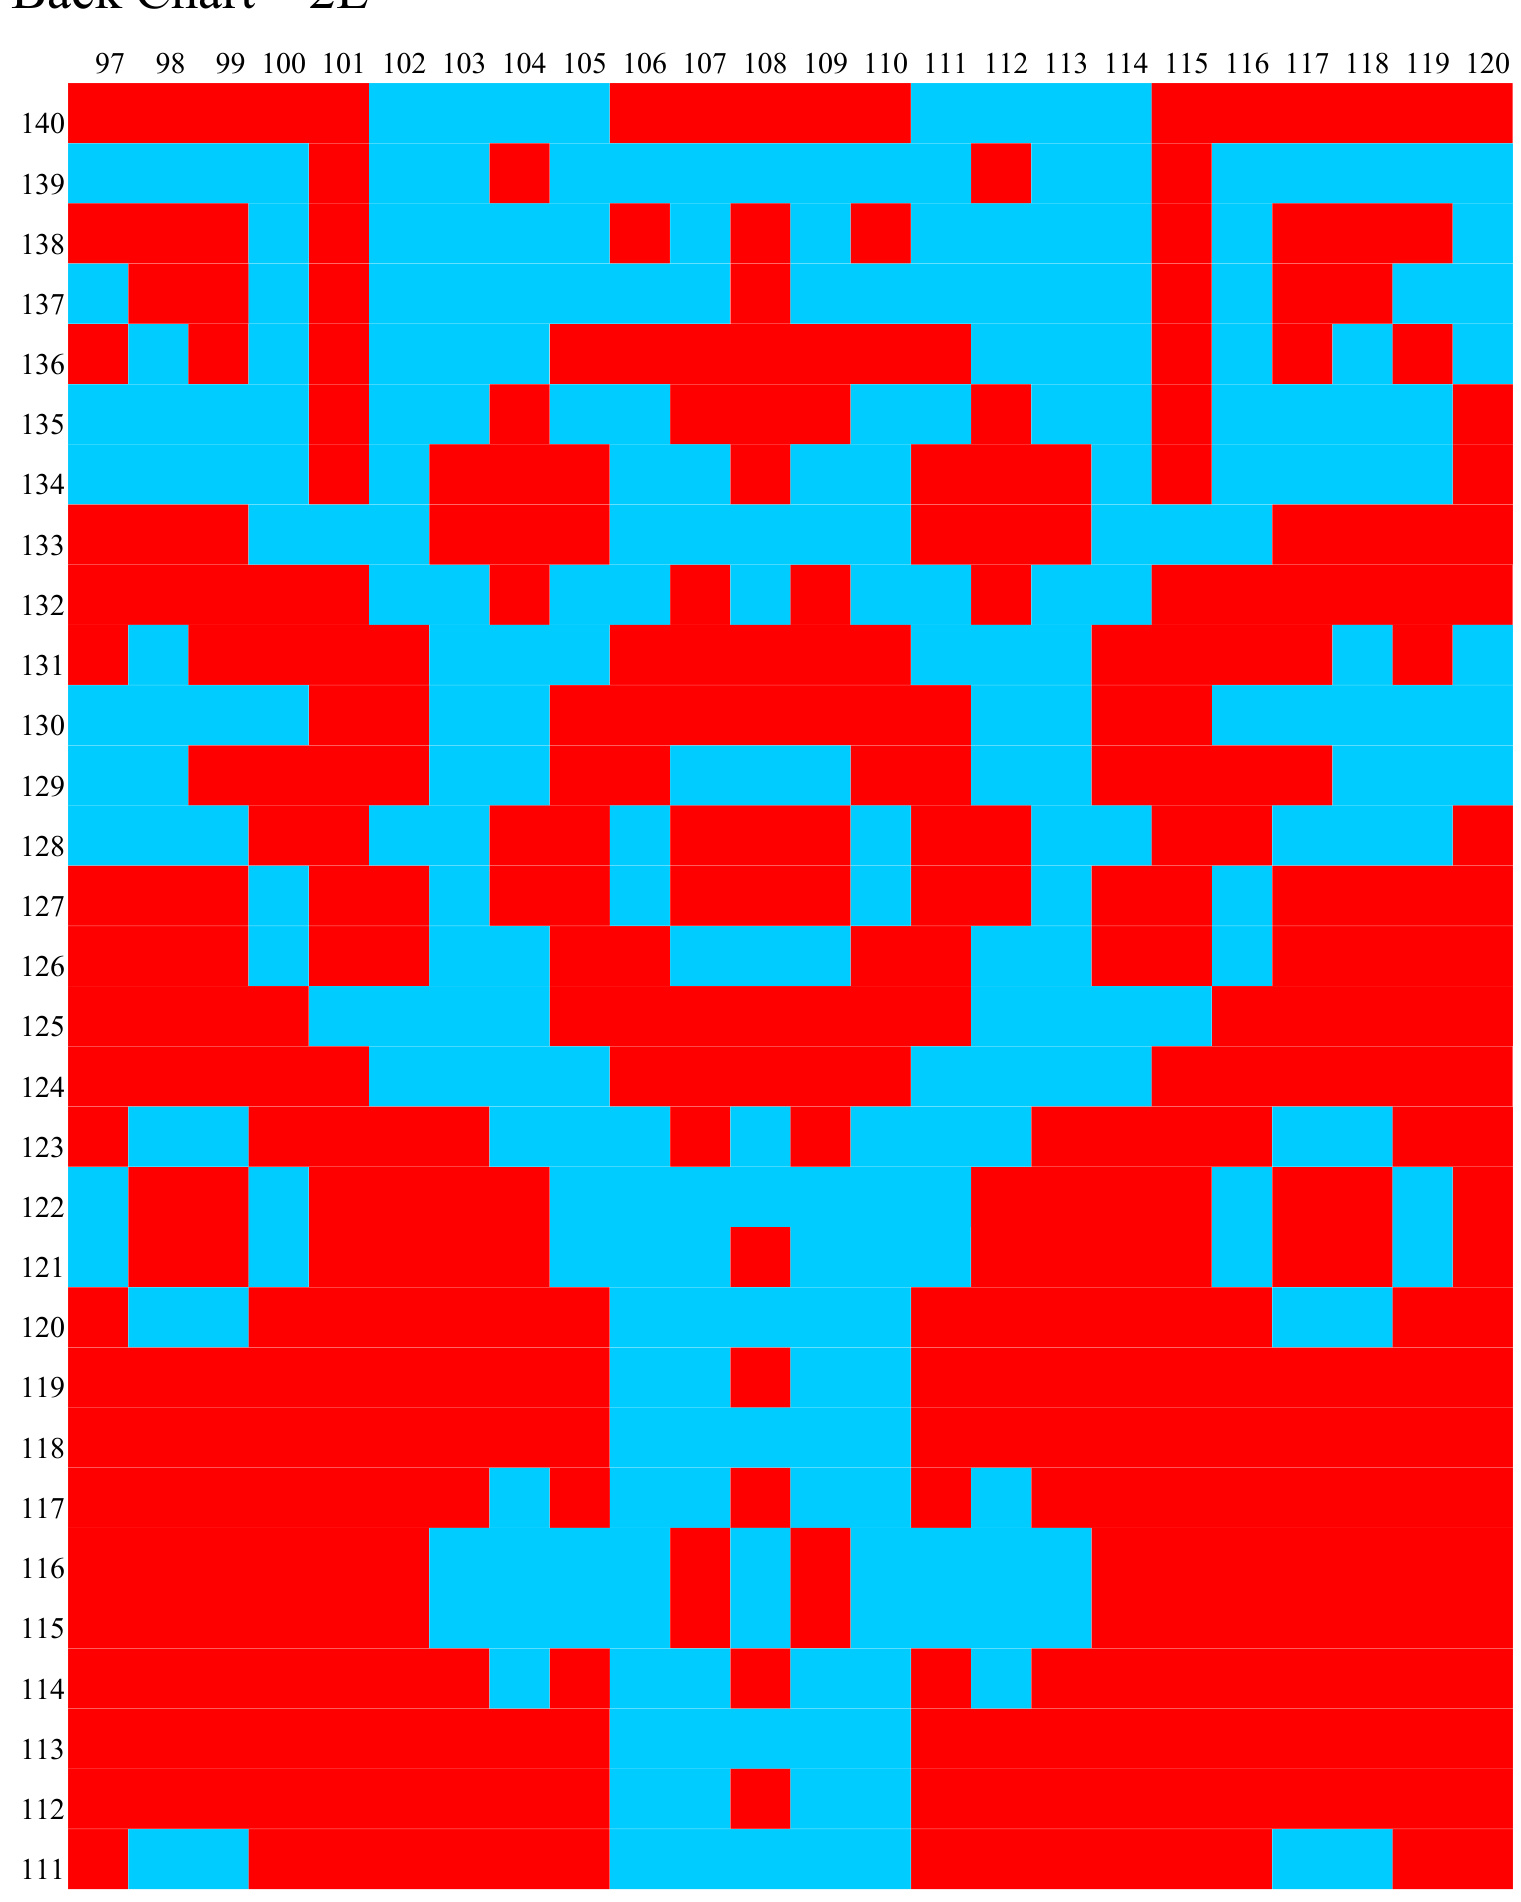
Back Chart—2E
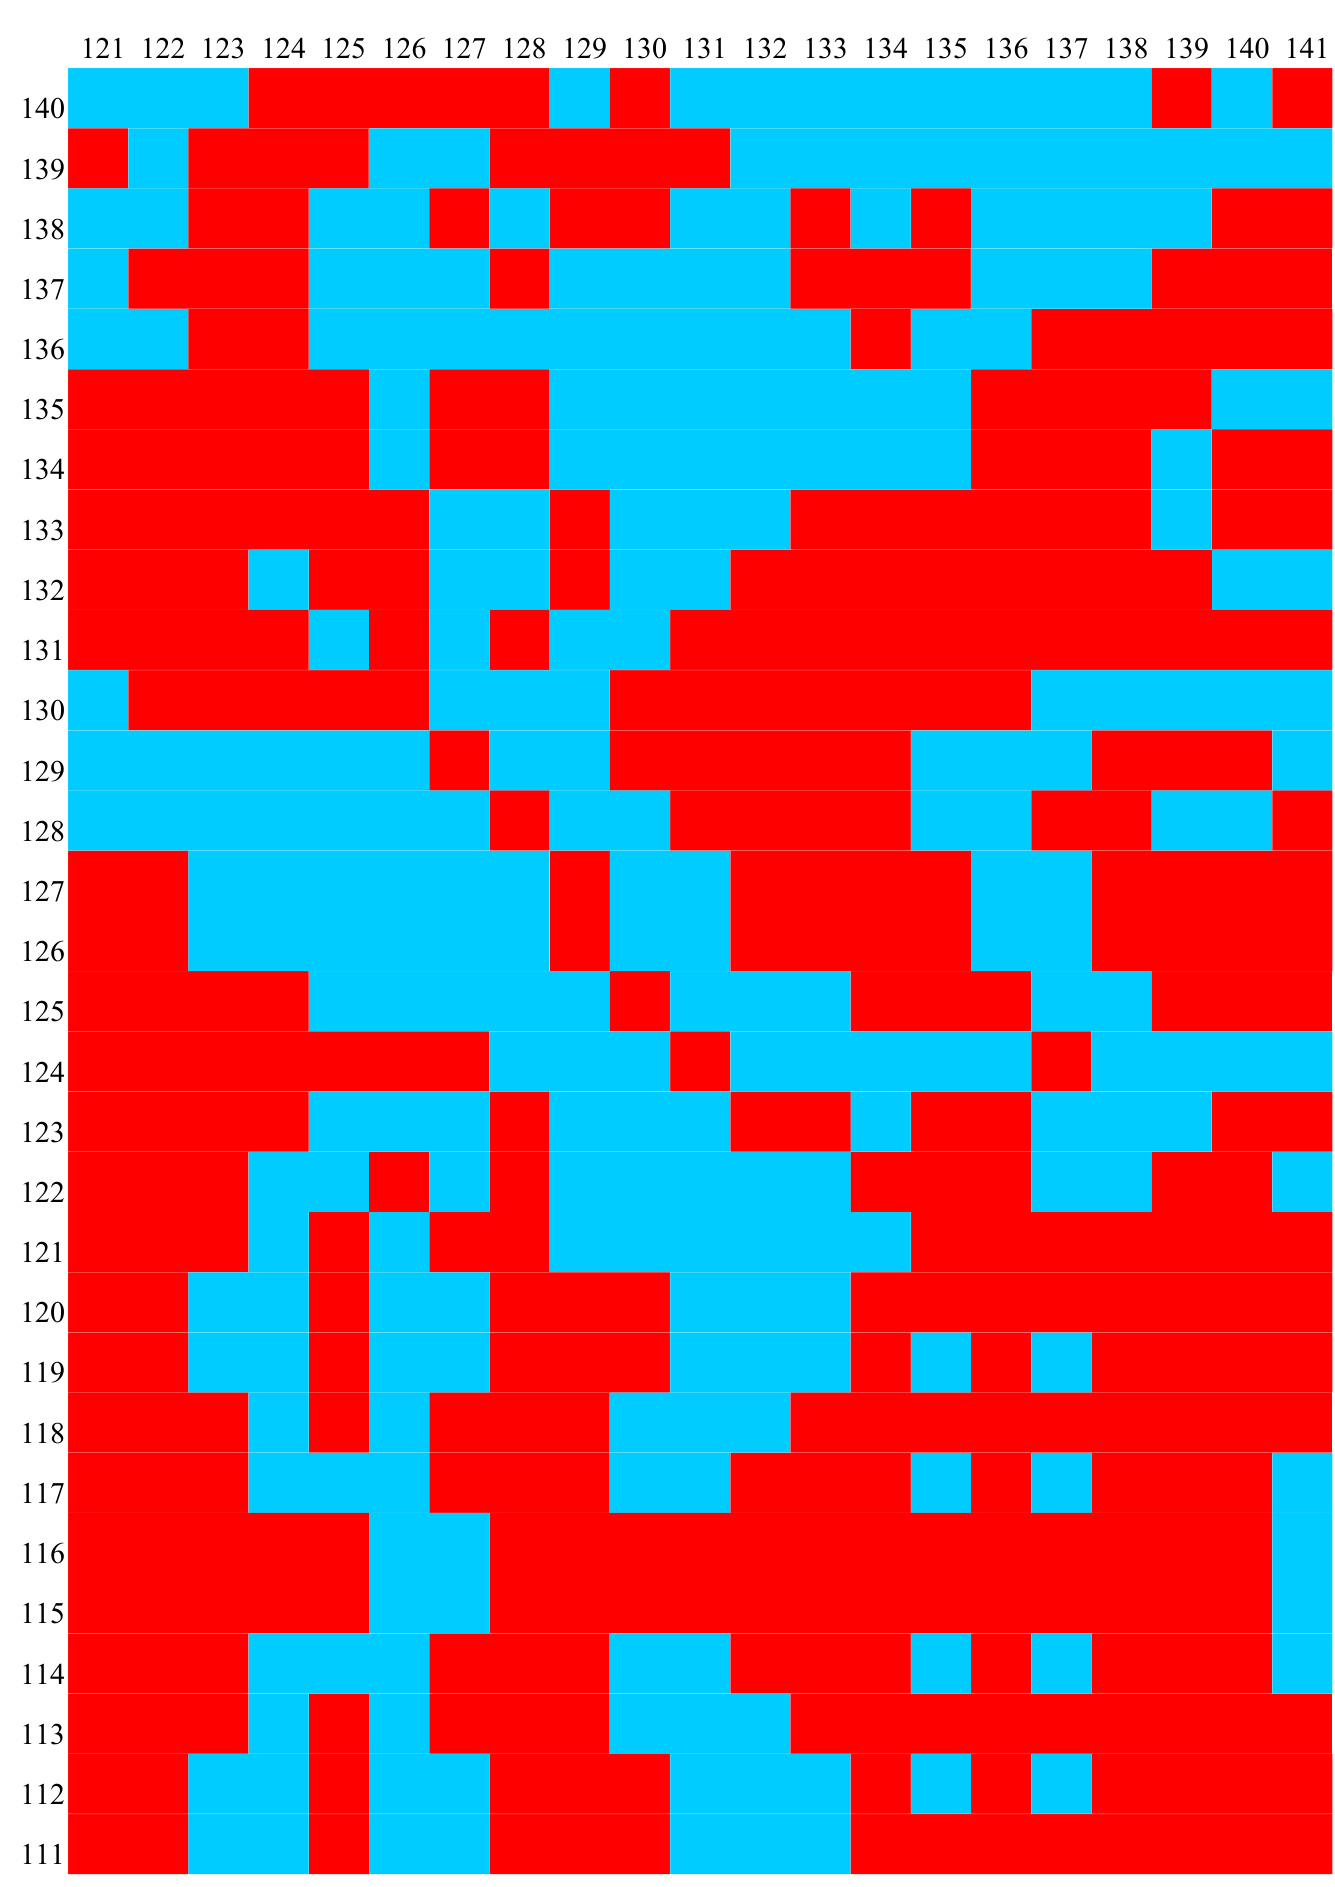
Back Chart—2F
Back Chart—3A

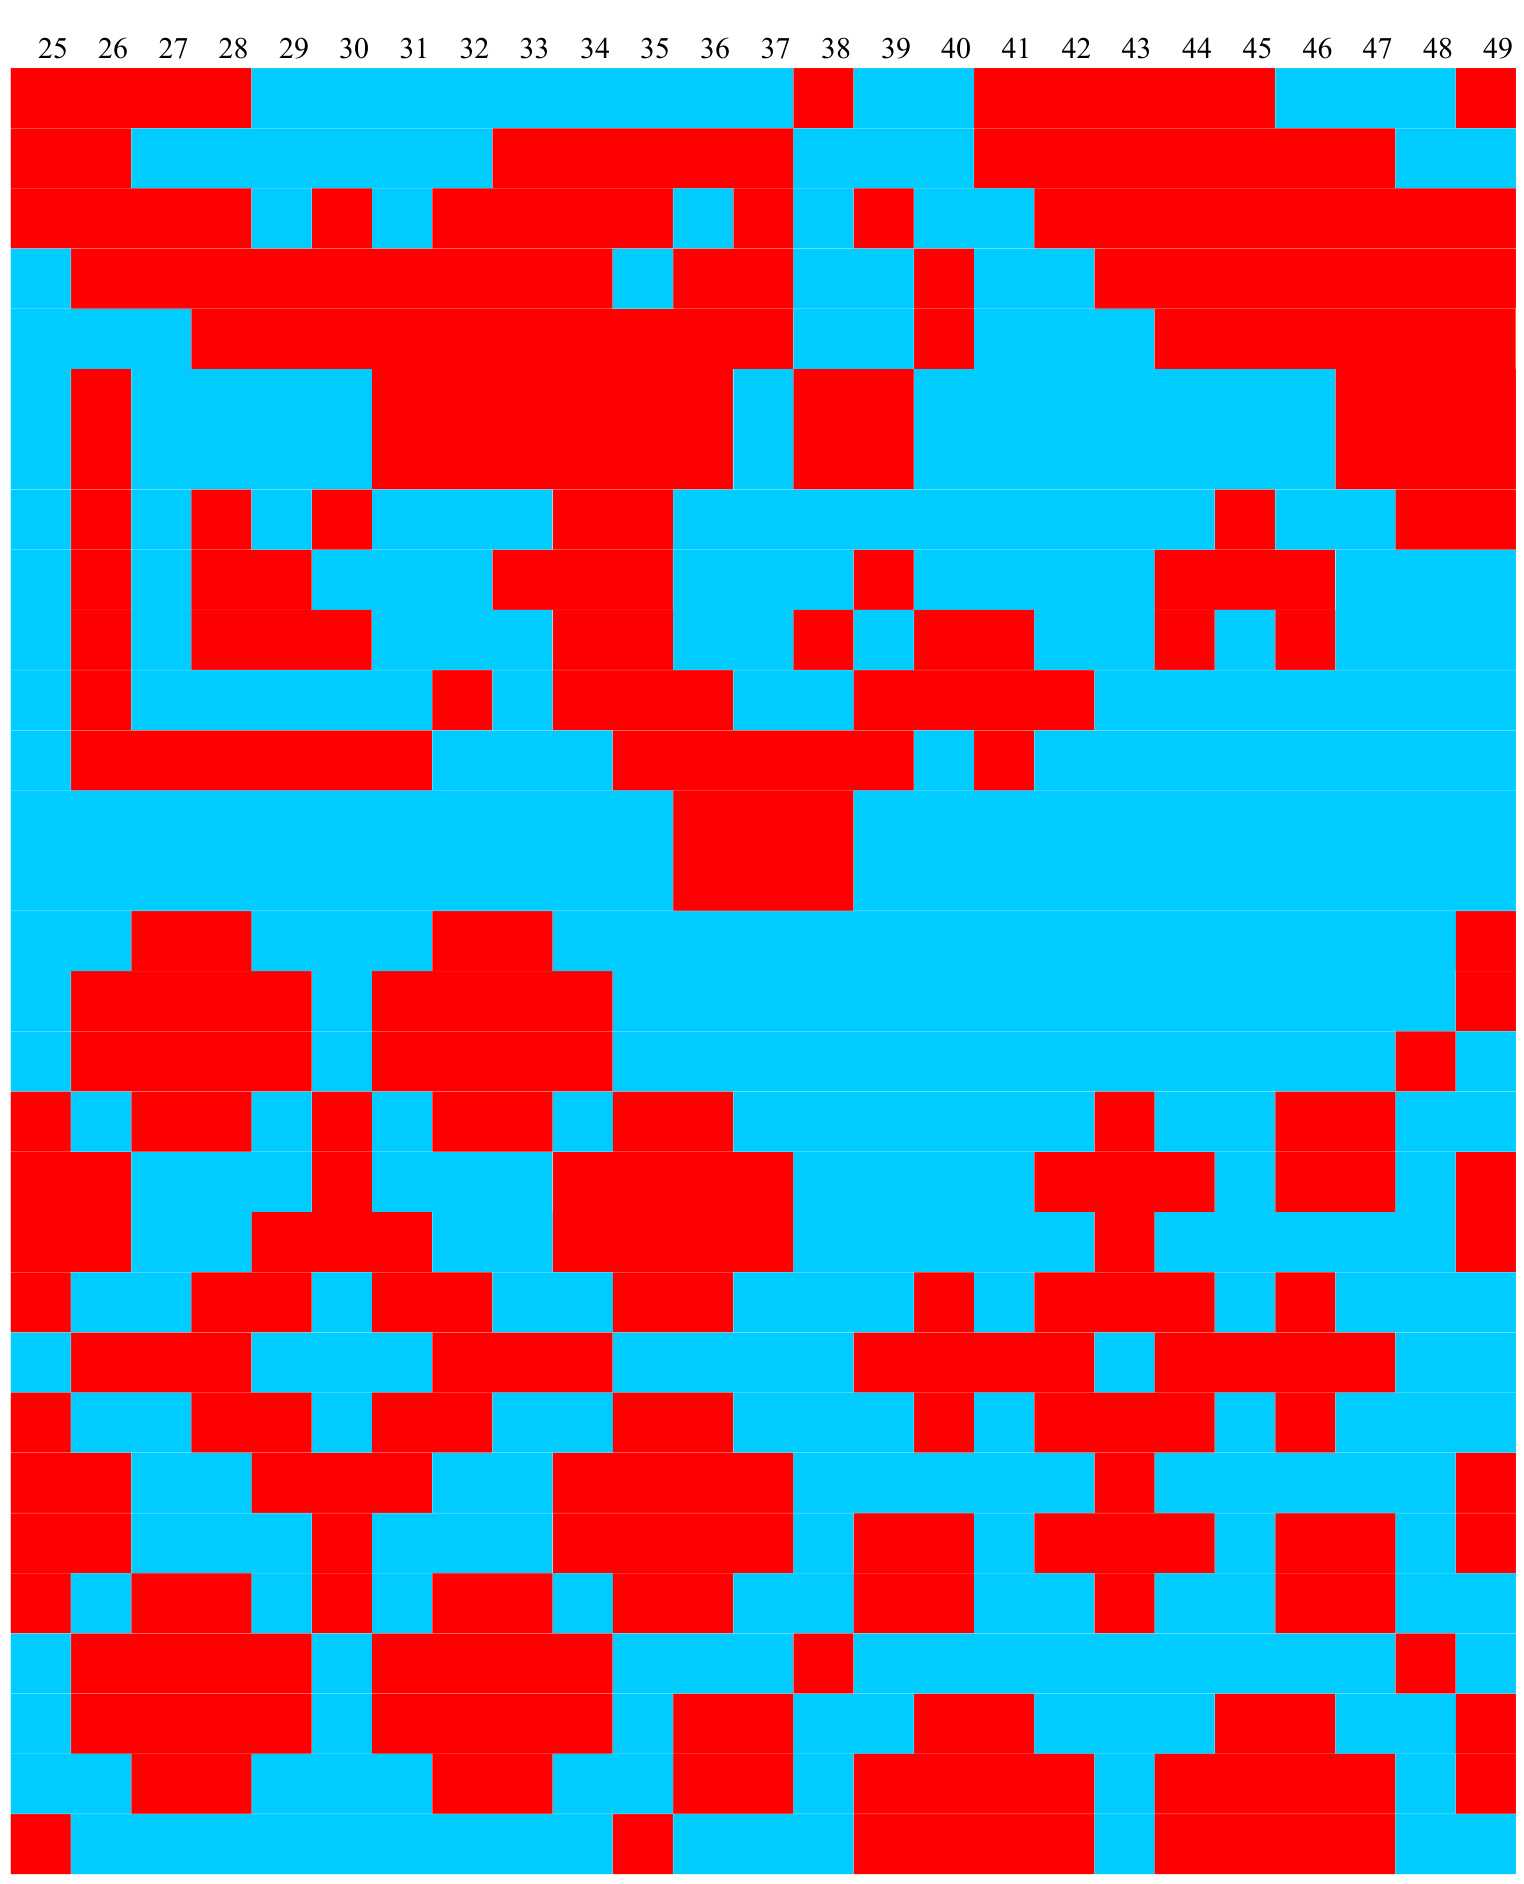
Back Chart—3B
Back Chart—3C
Back Chart—3D
Back Chart—3E
Back Chart—3F
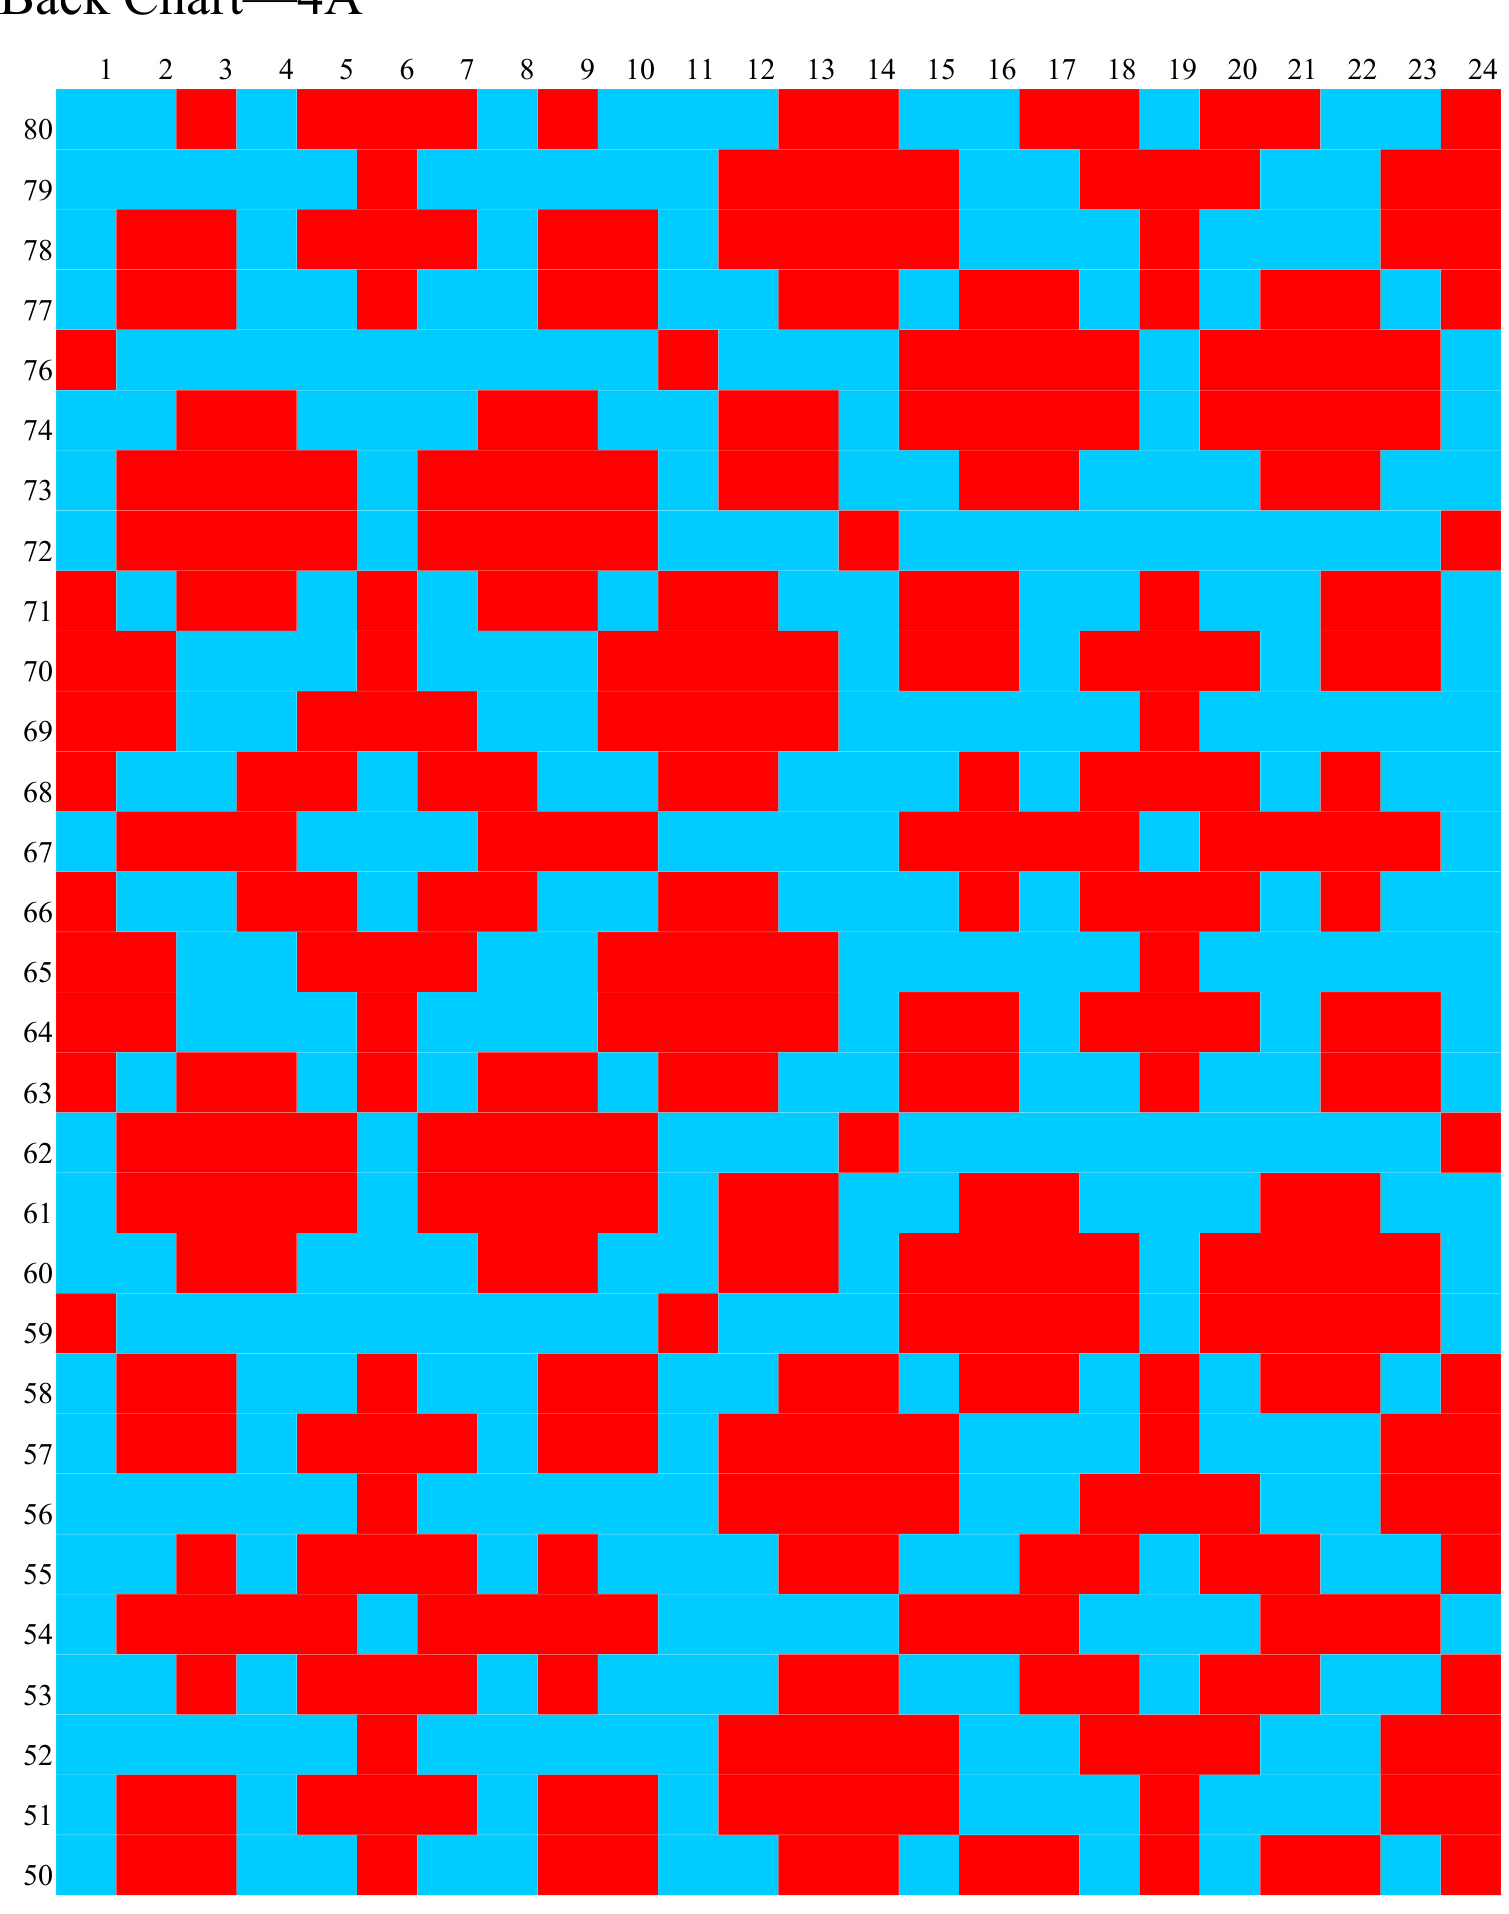
Back Chart—4A

Back Chart4B
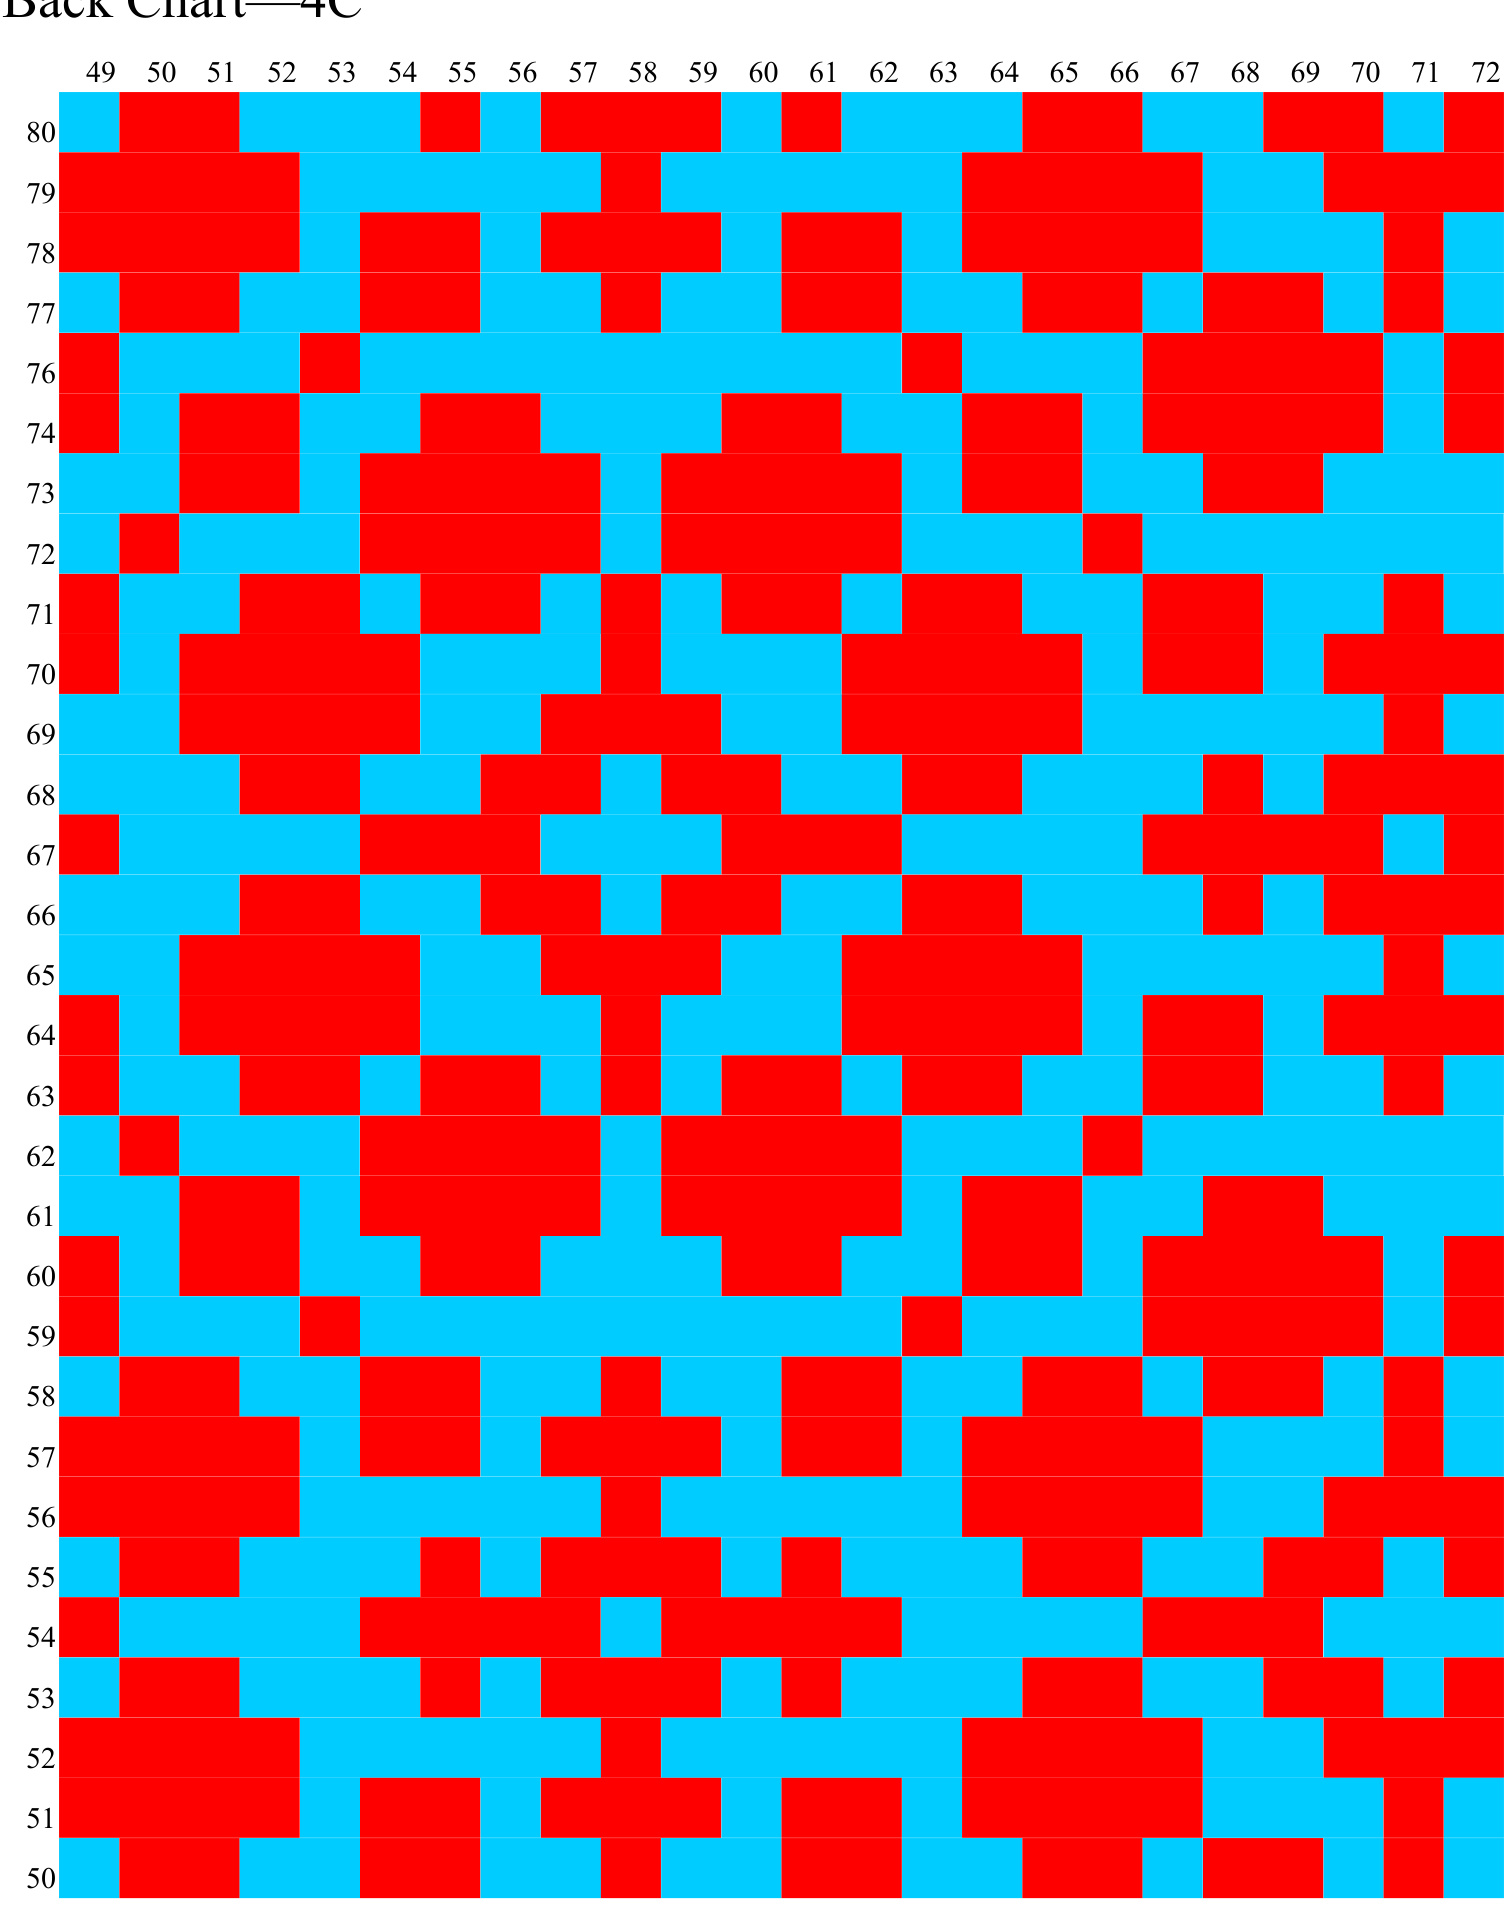
Back Chart—4C
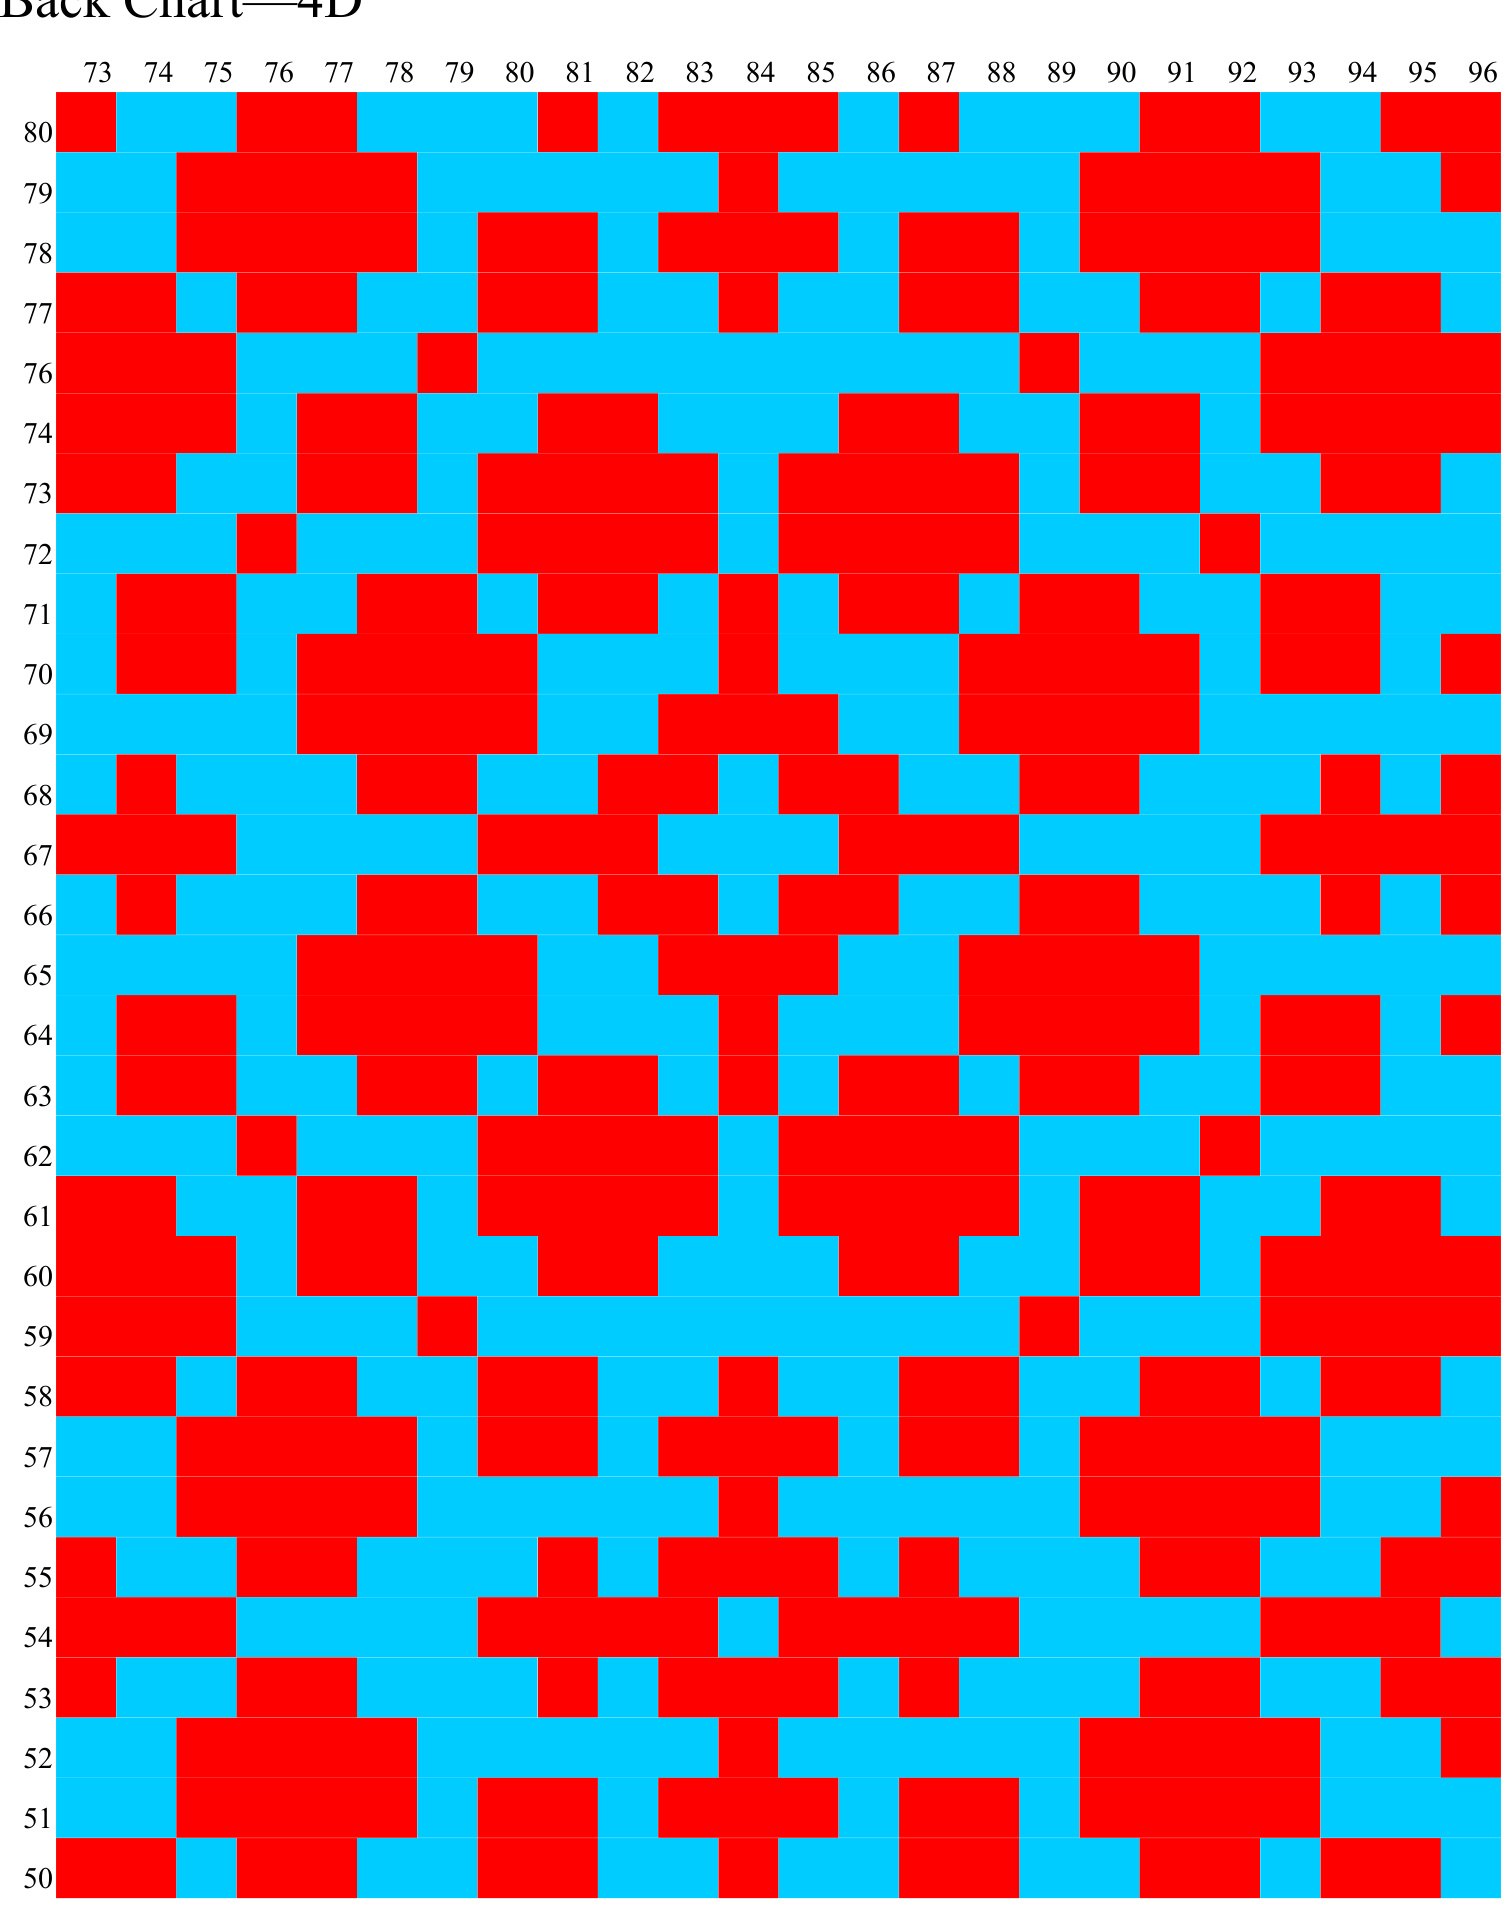
Back Chart—4D
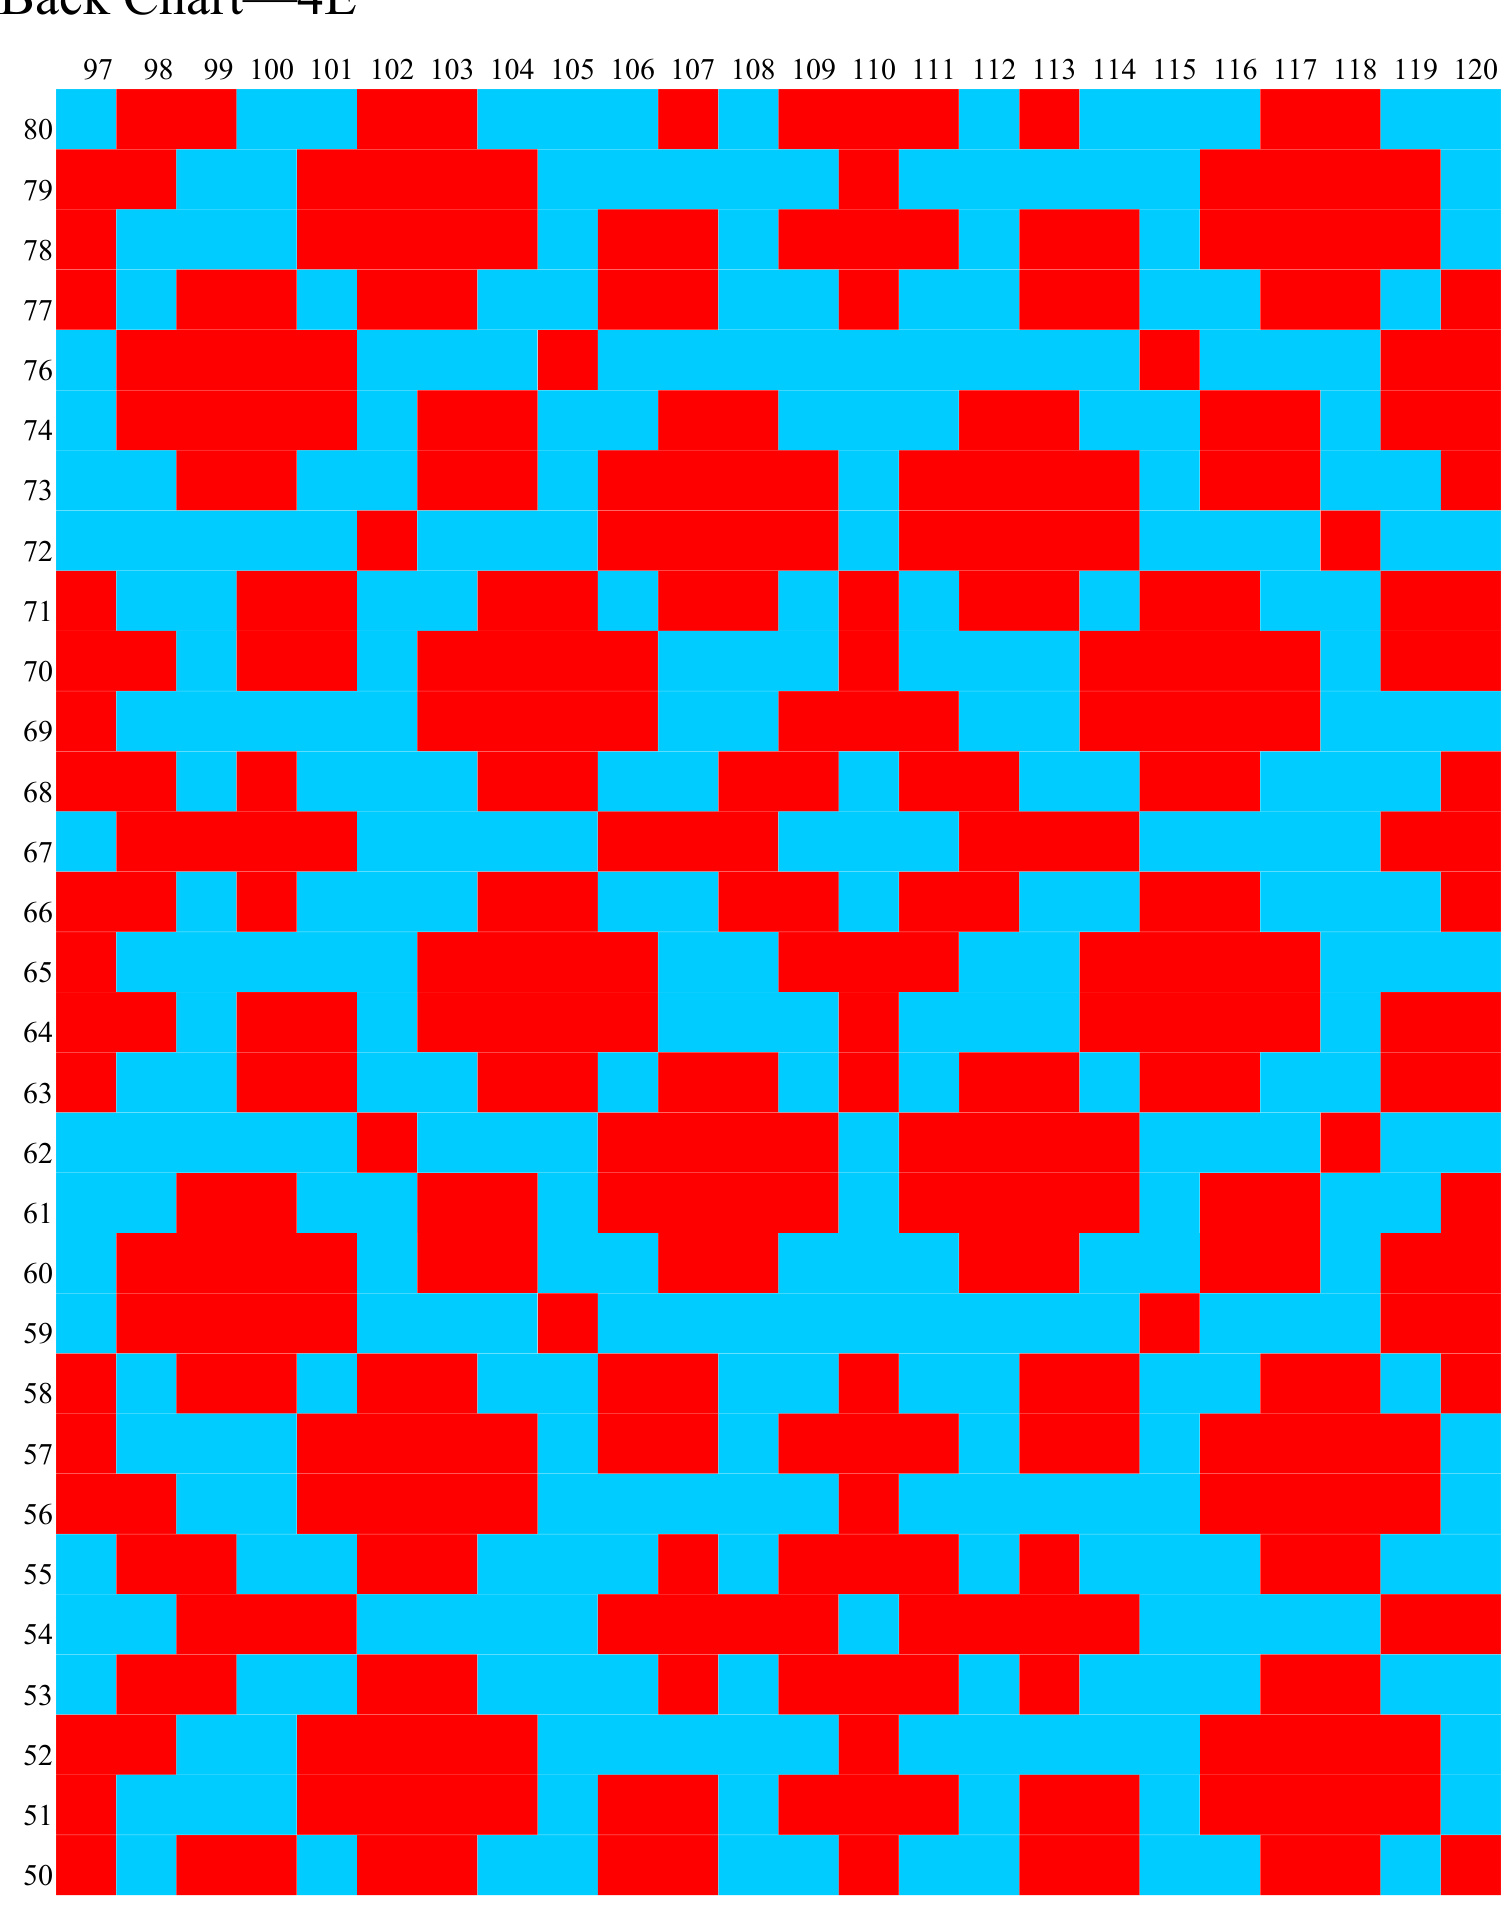
Back Chart4E
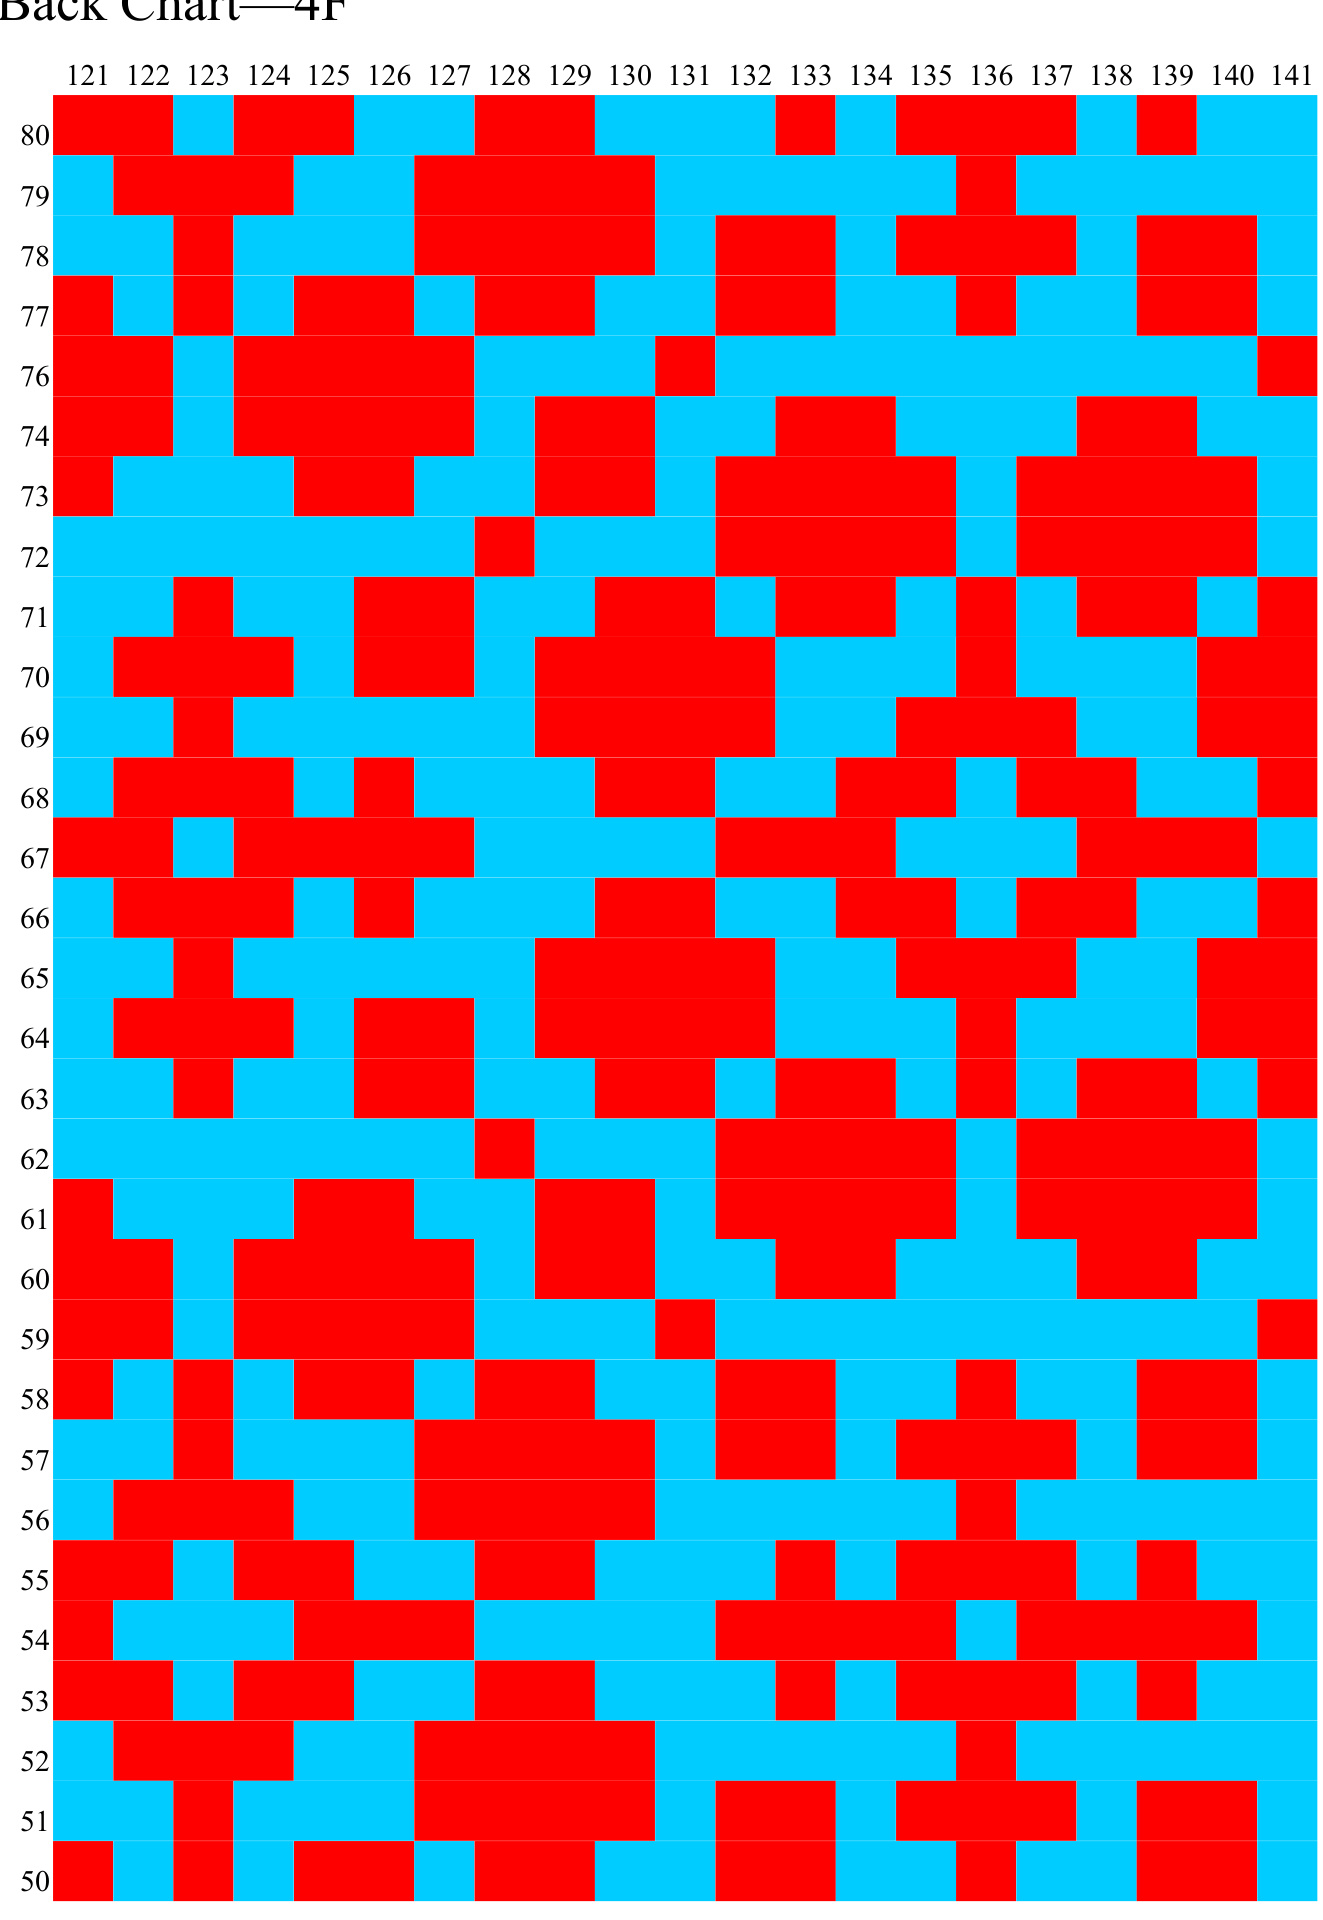
Back Chart4F
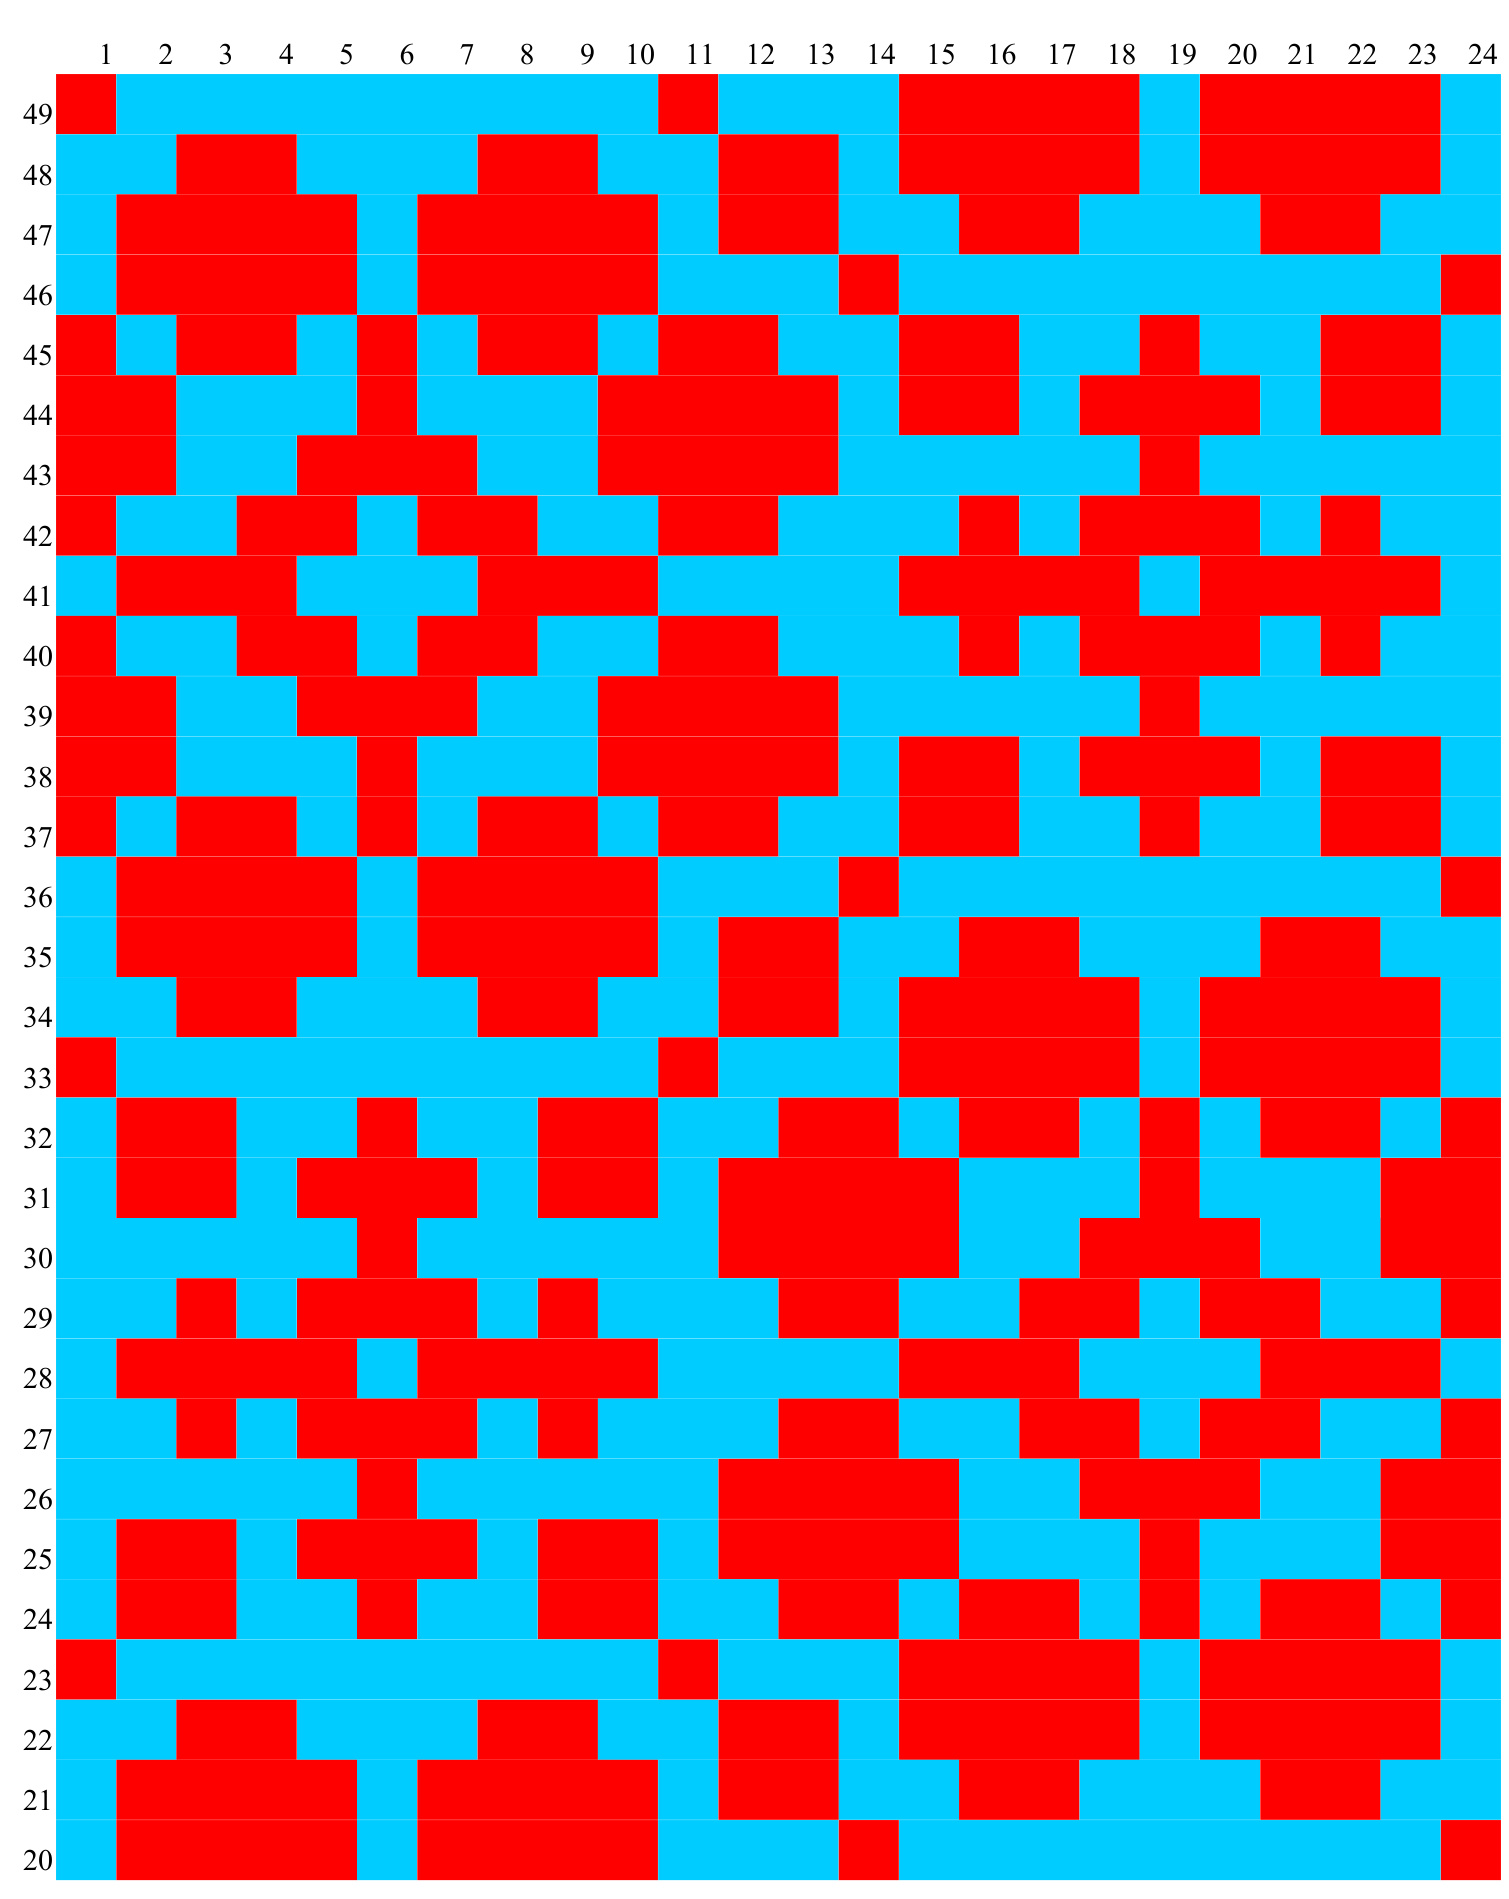
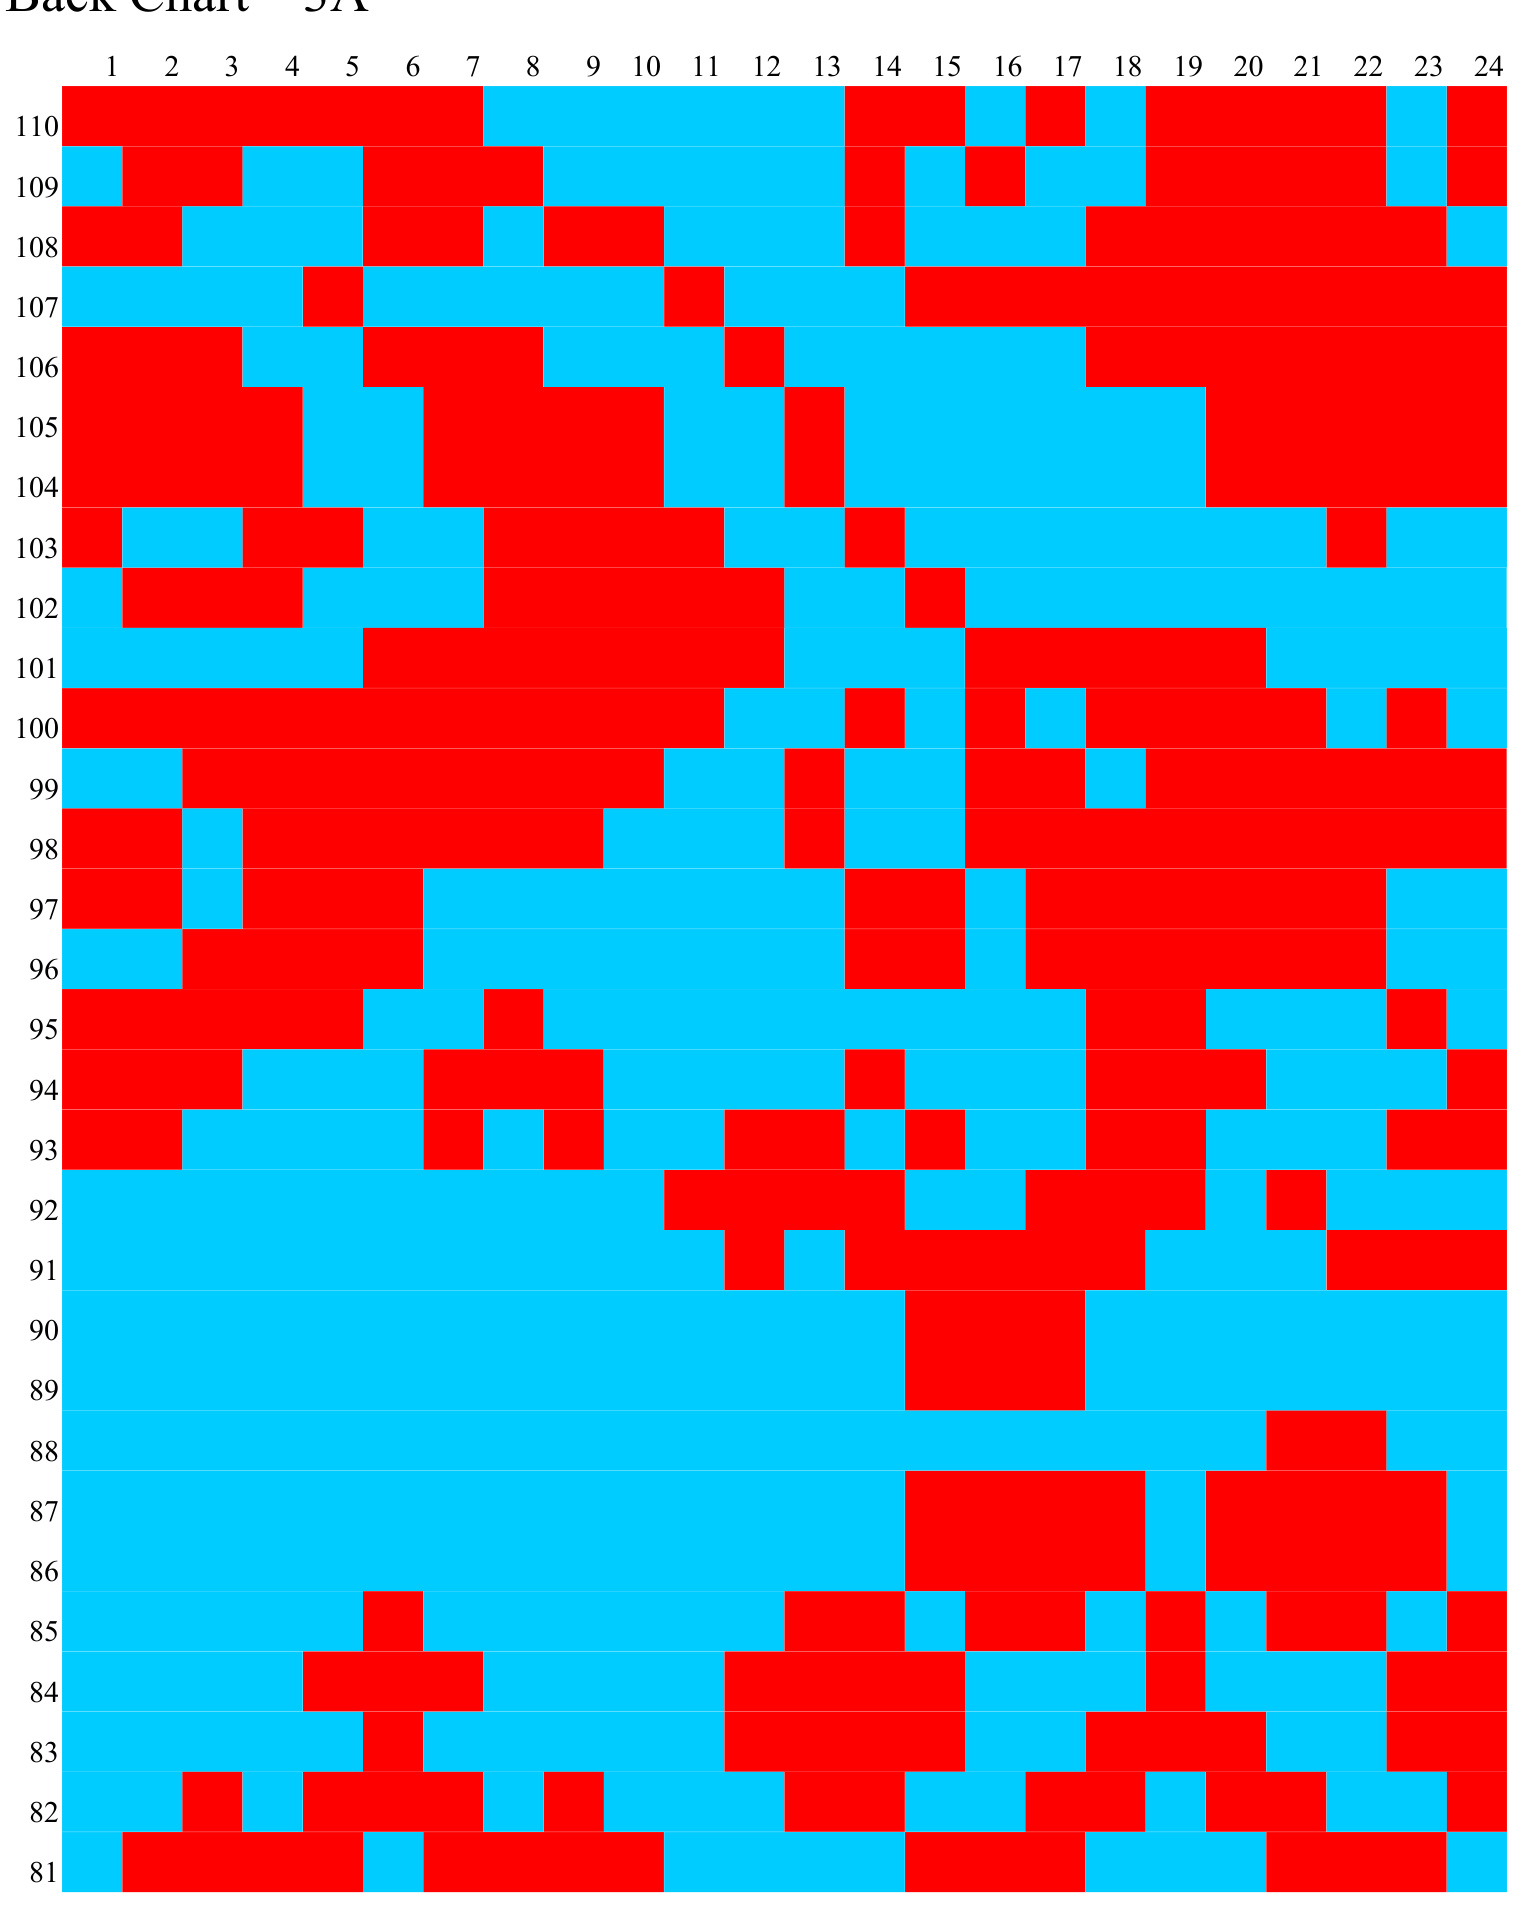
Back Chart—5A
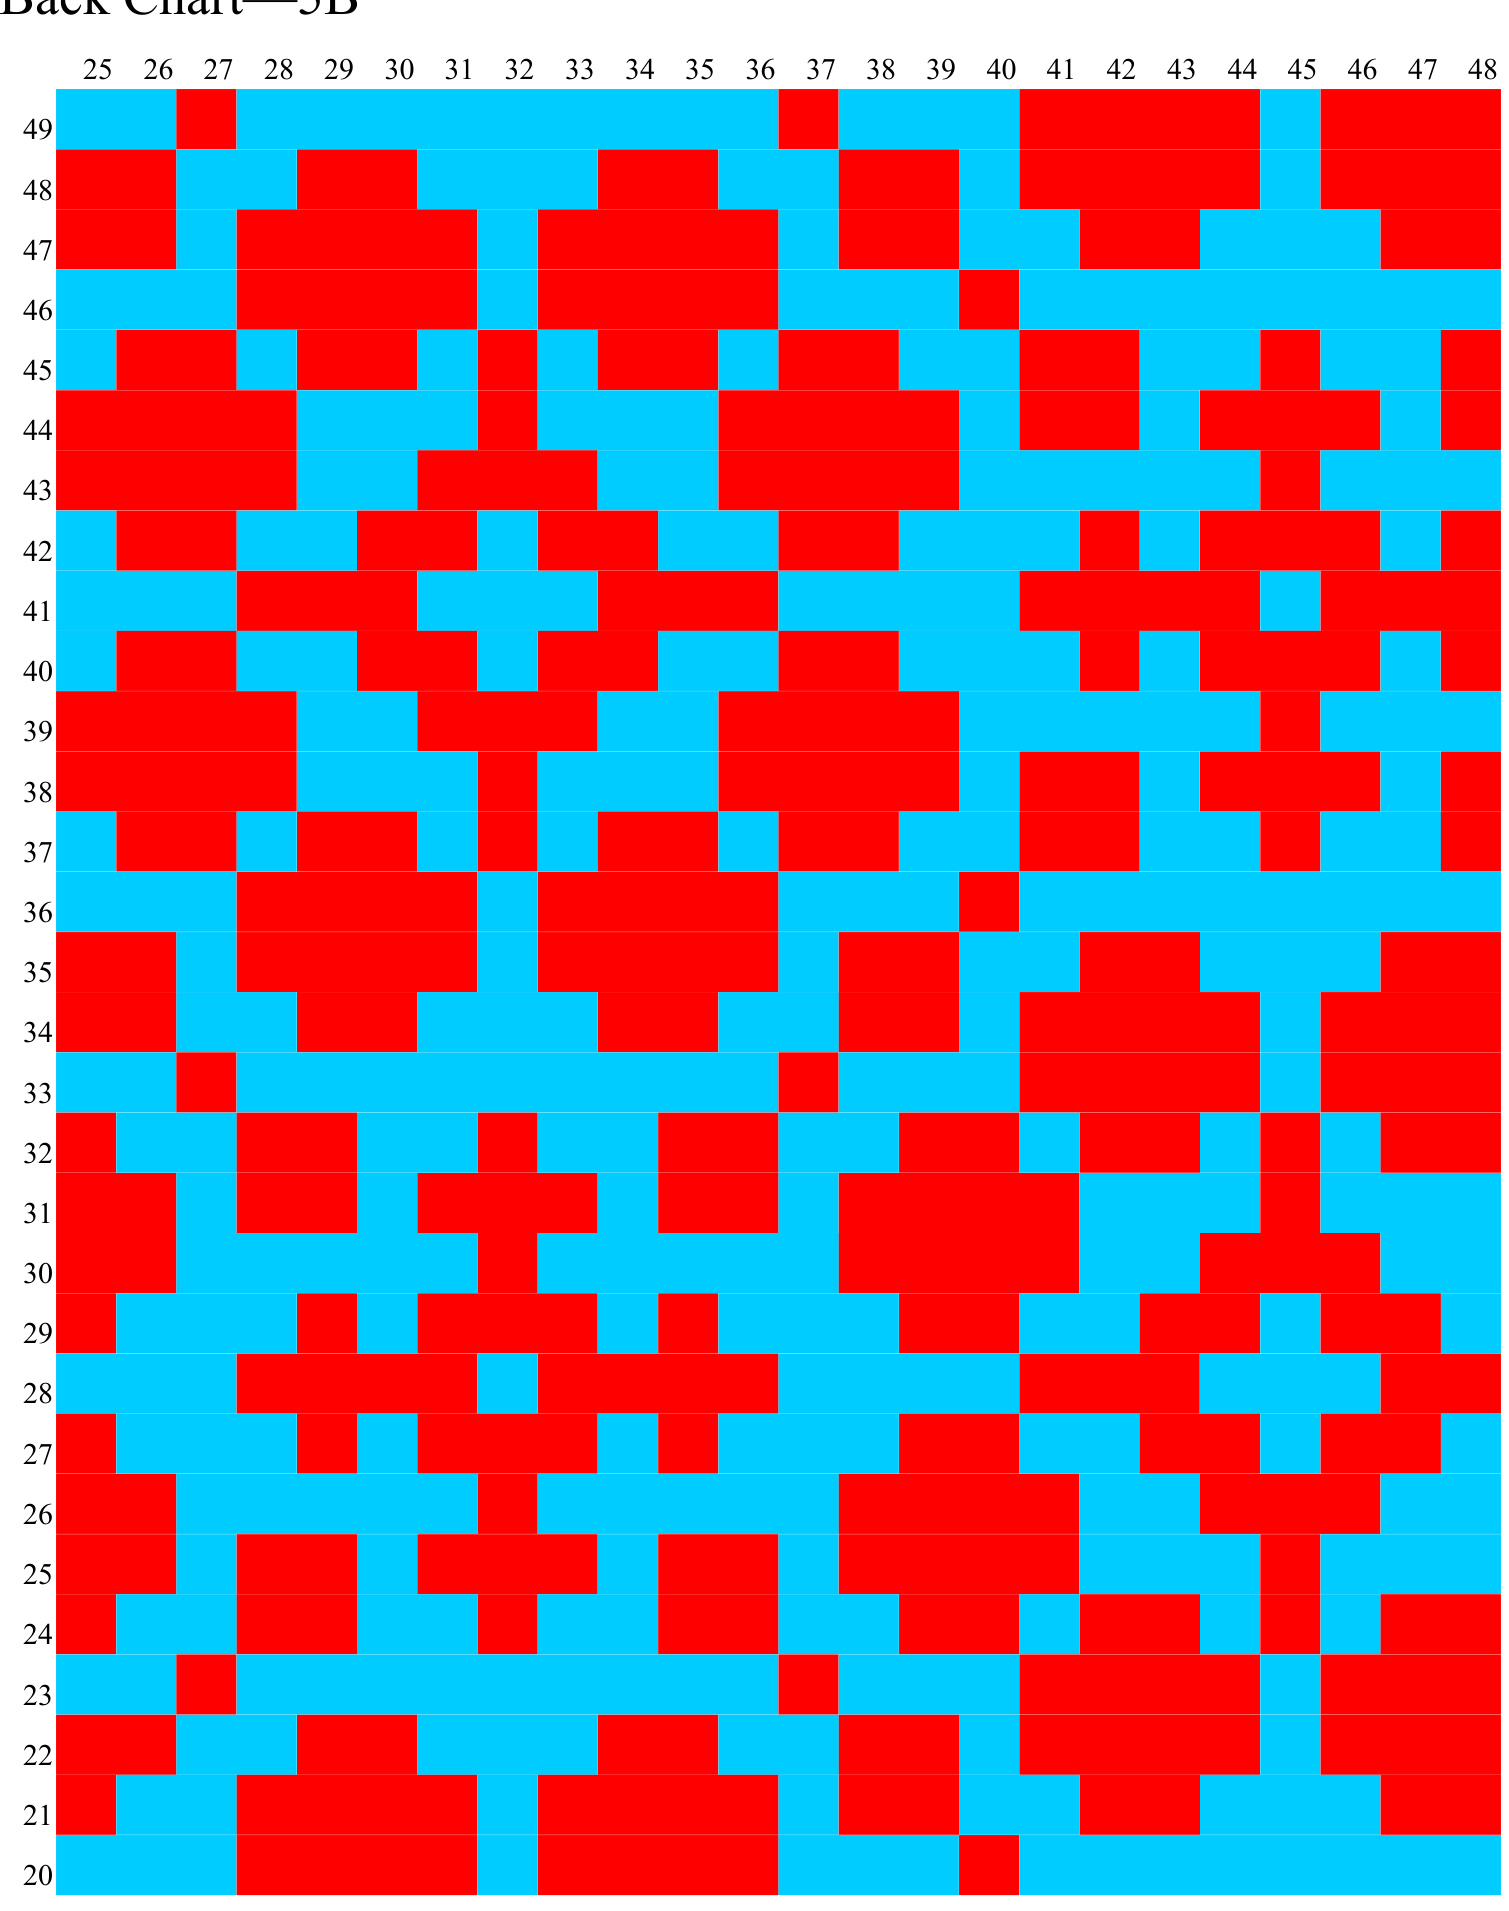
Back Chart—5B
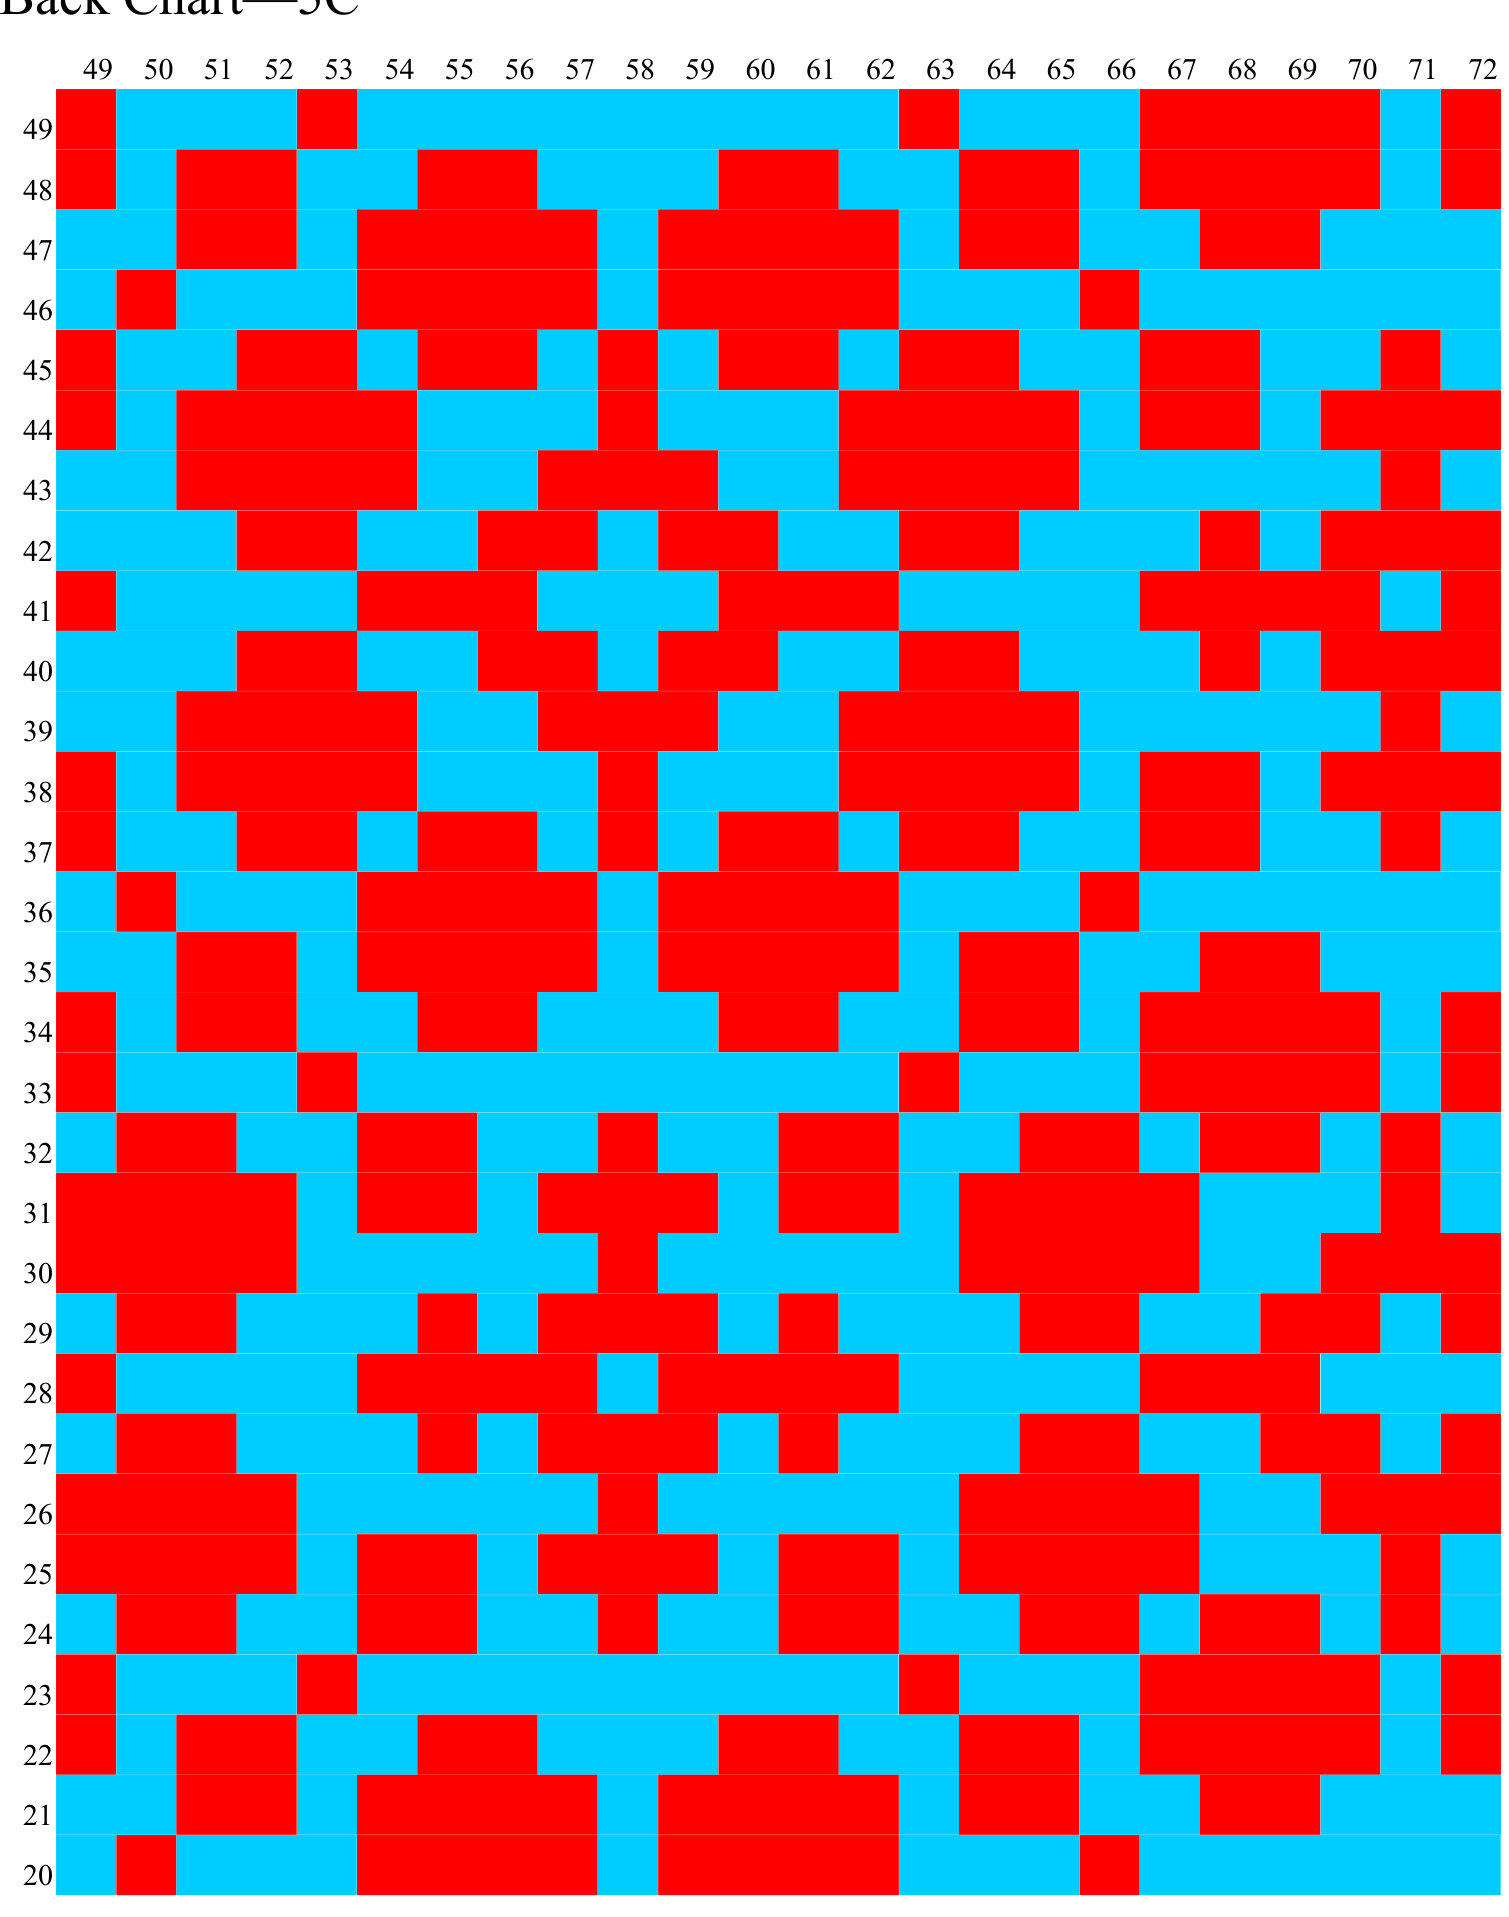
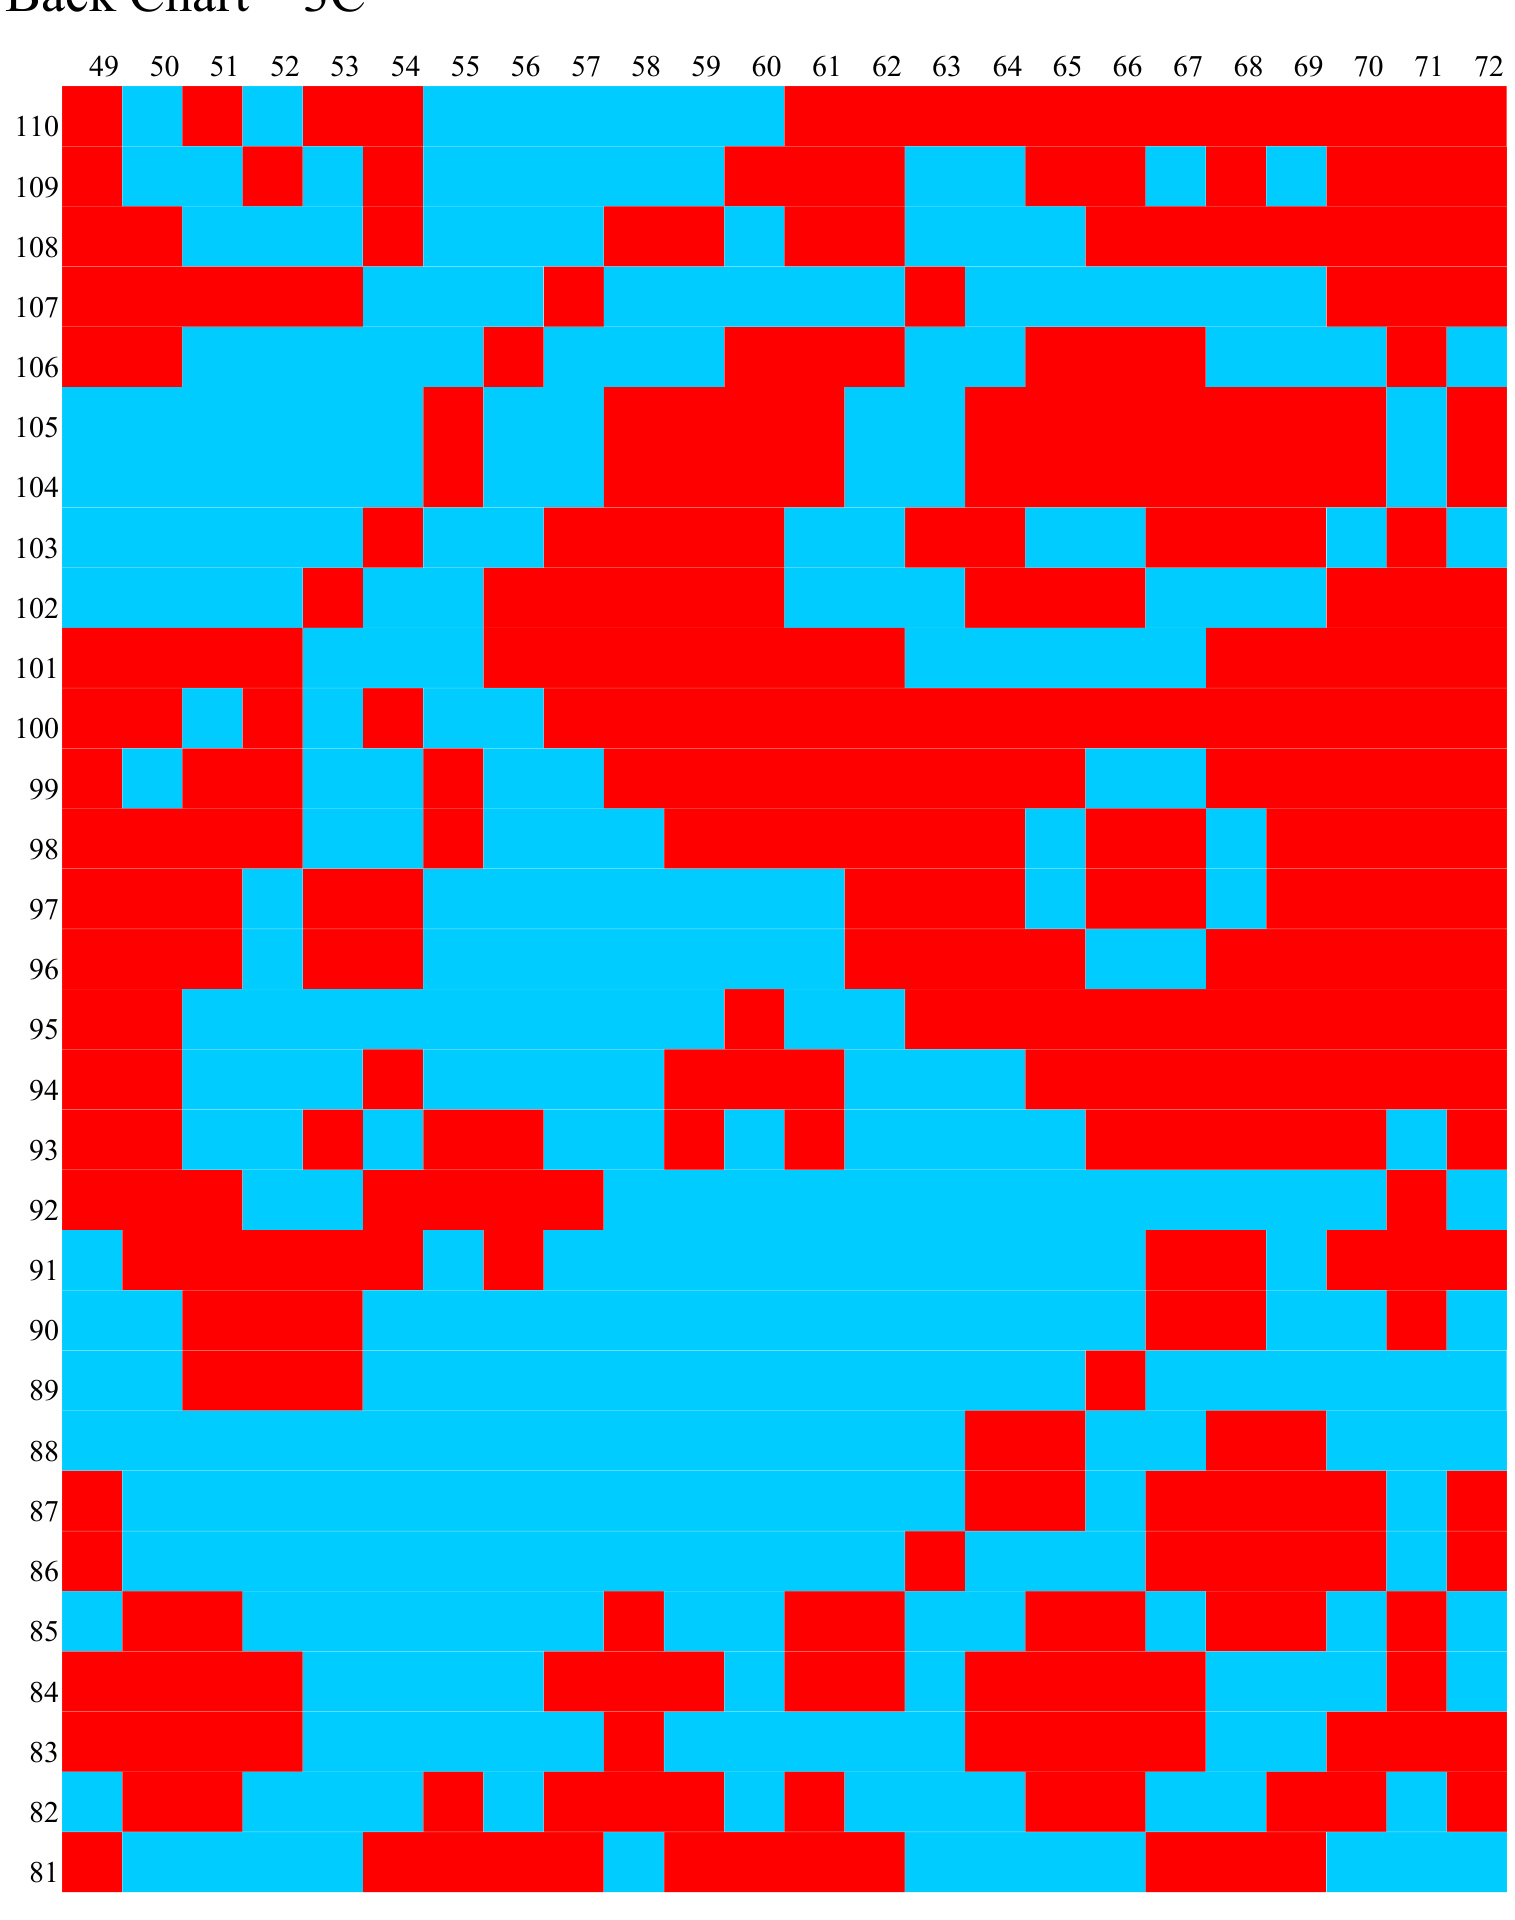
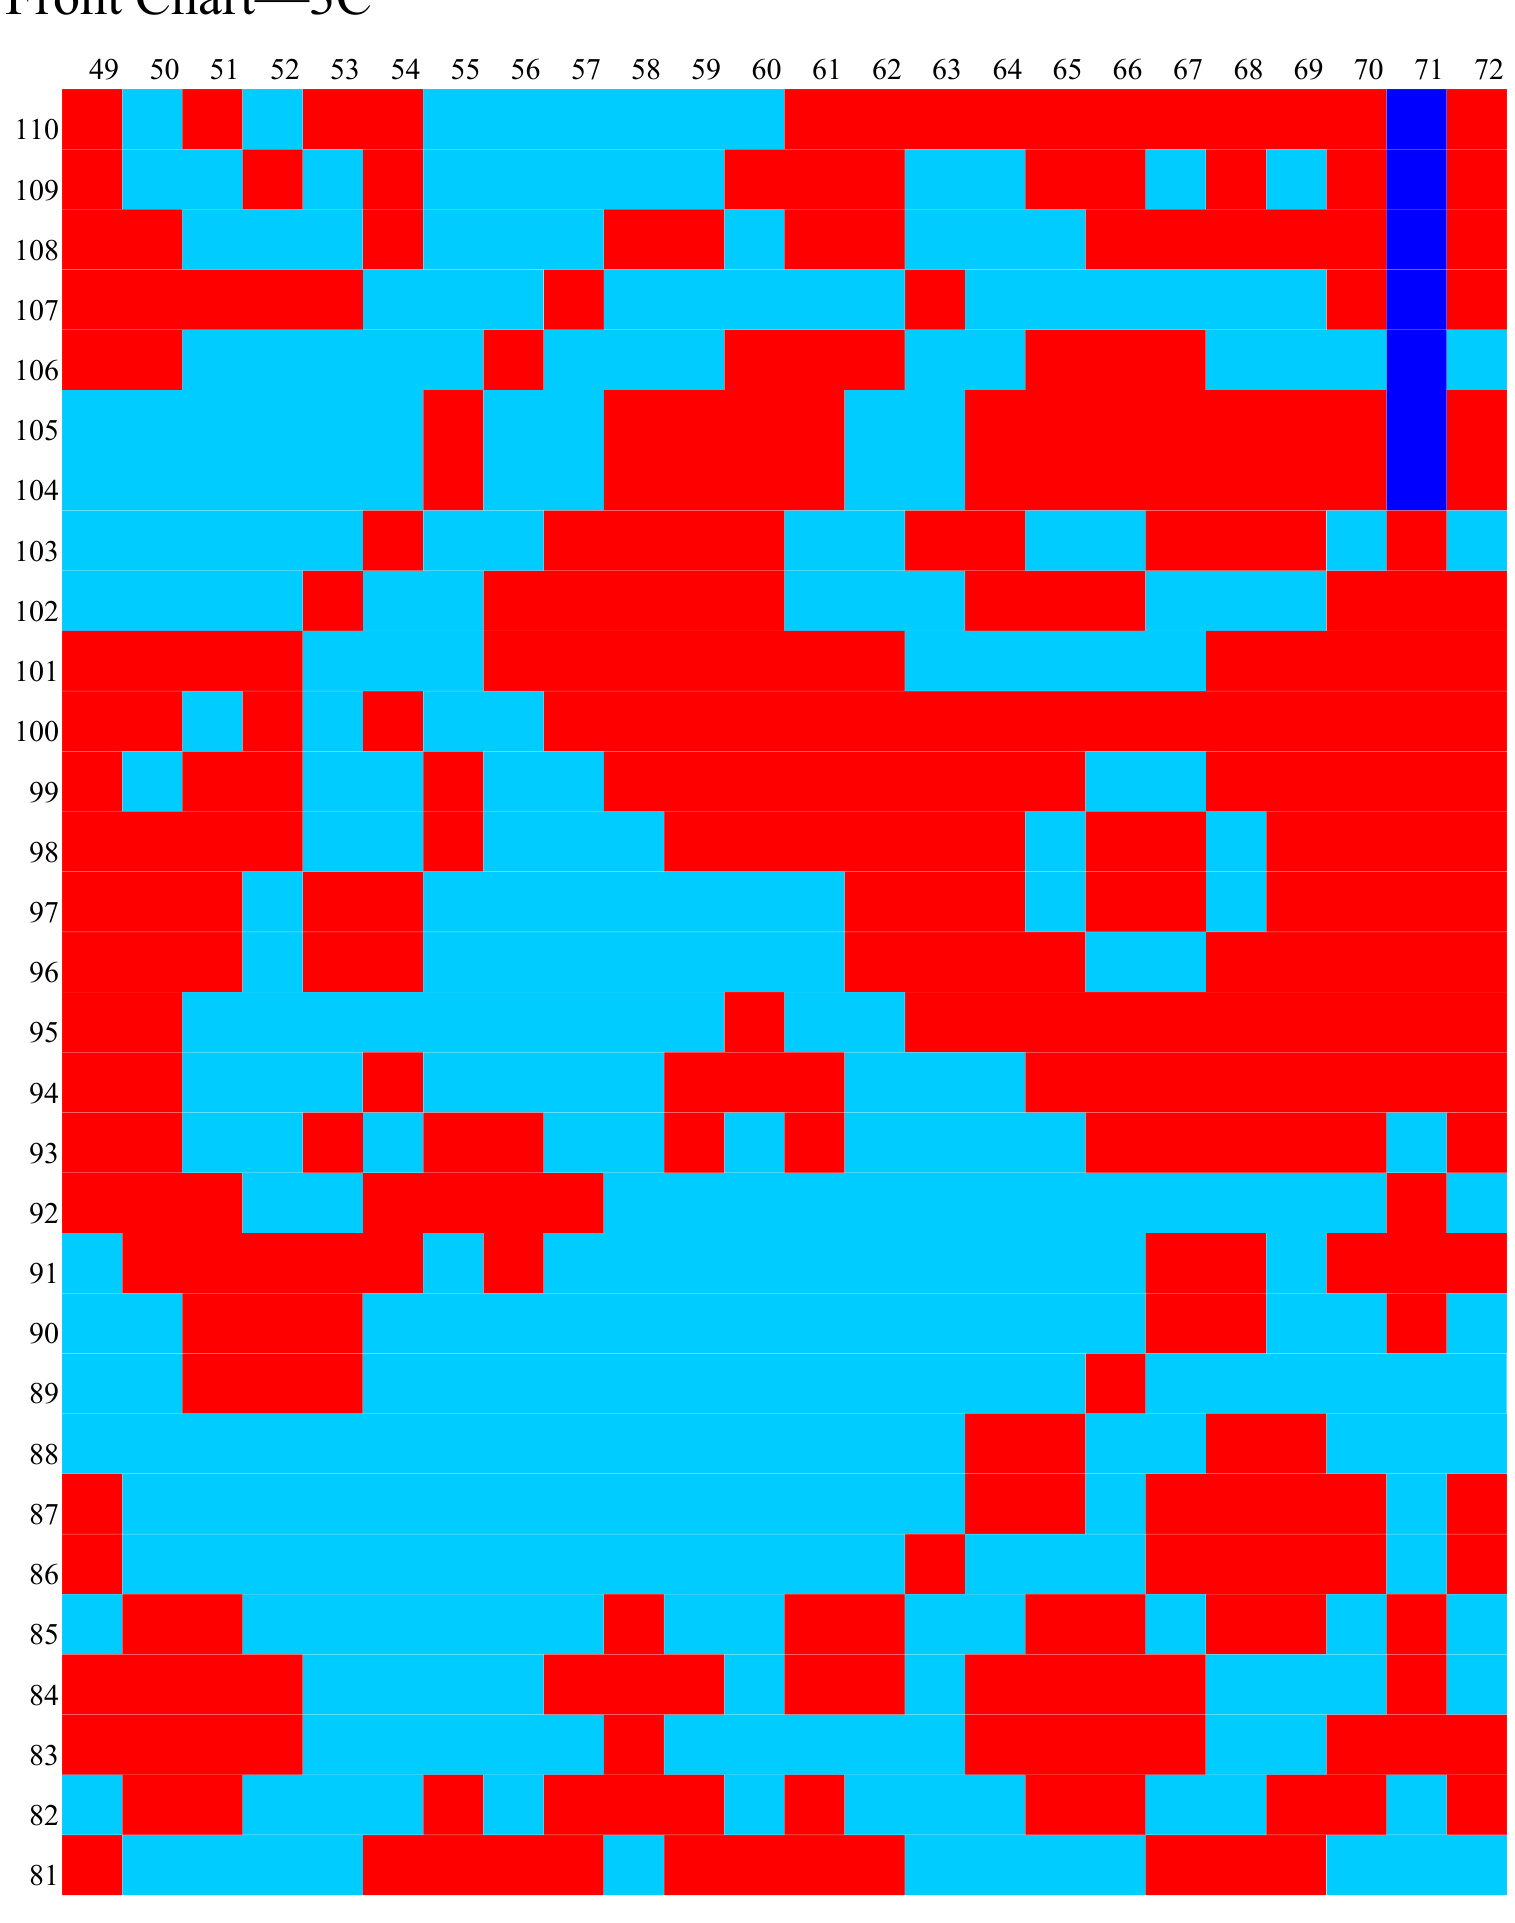
Back Chart—5C
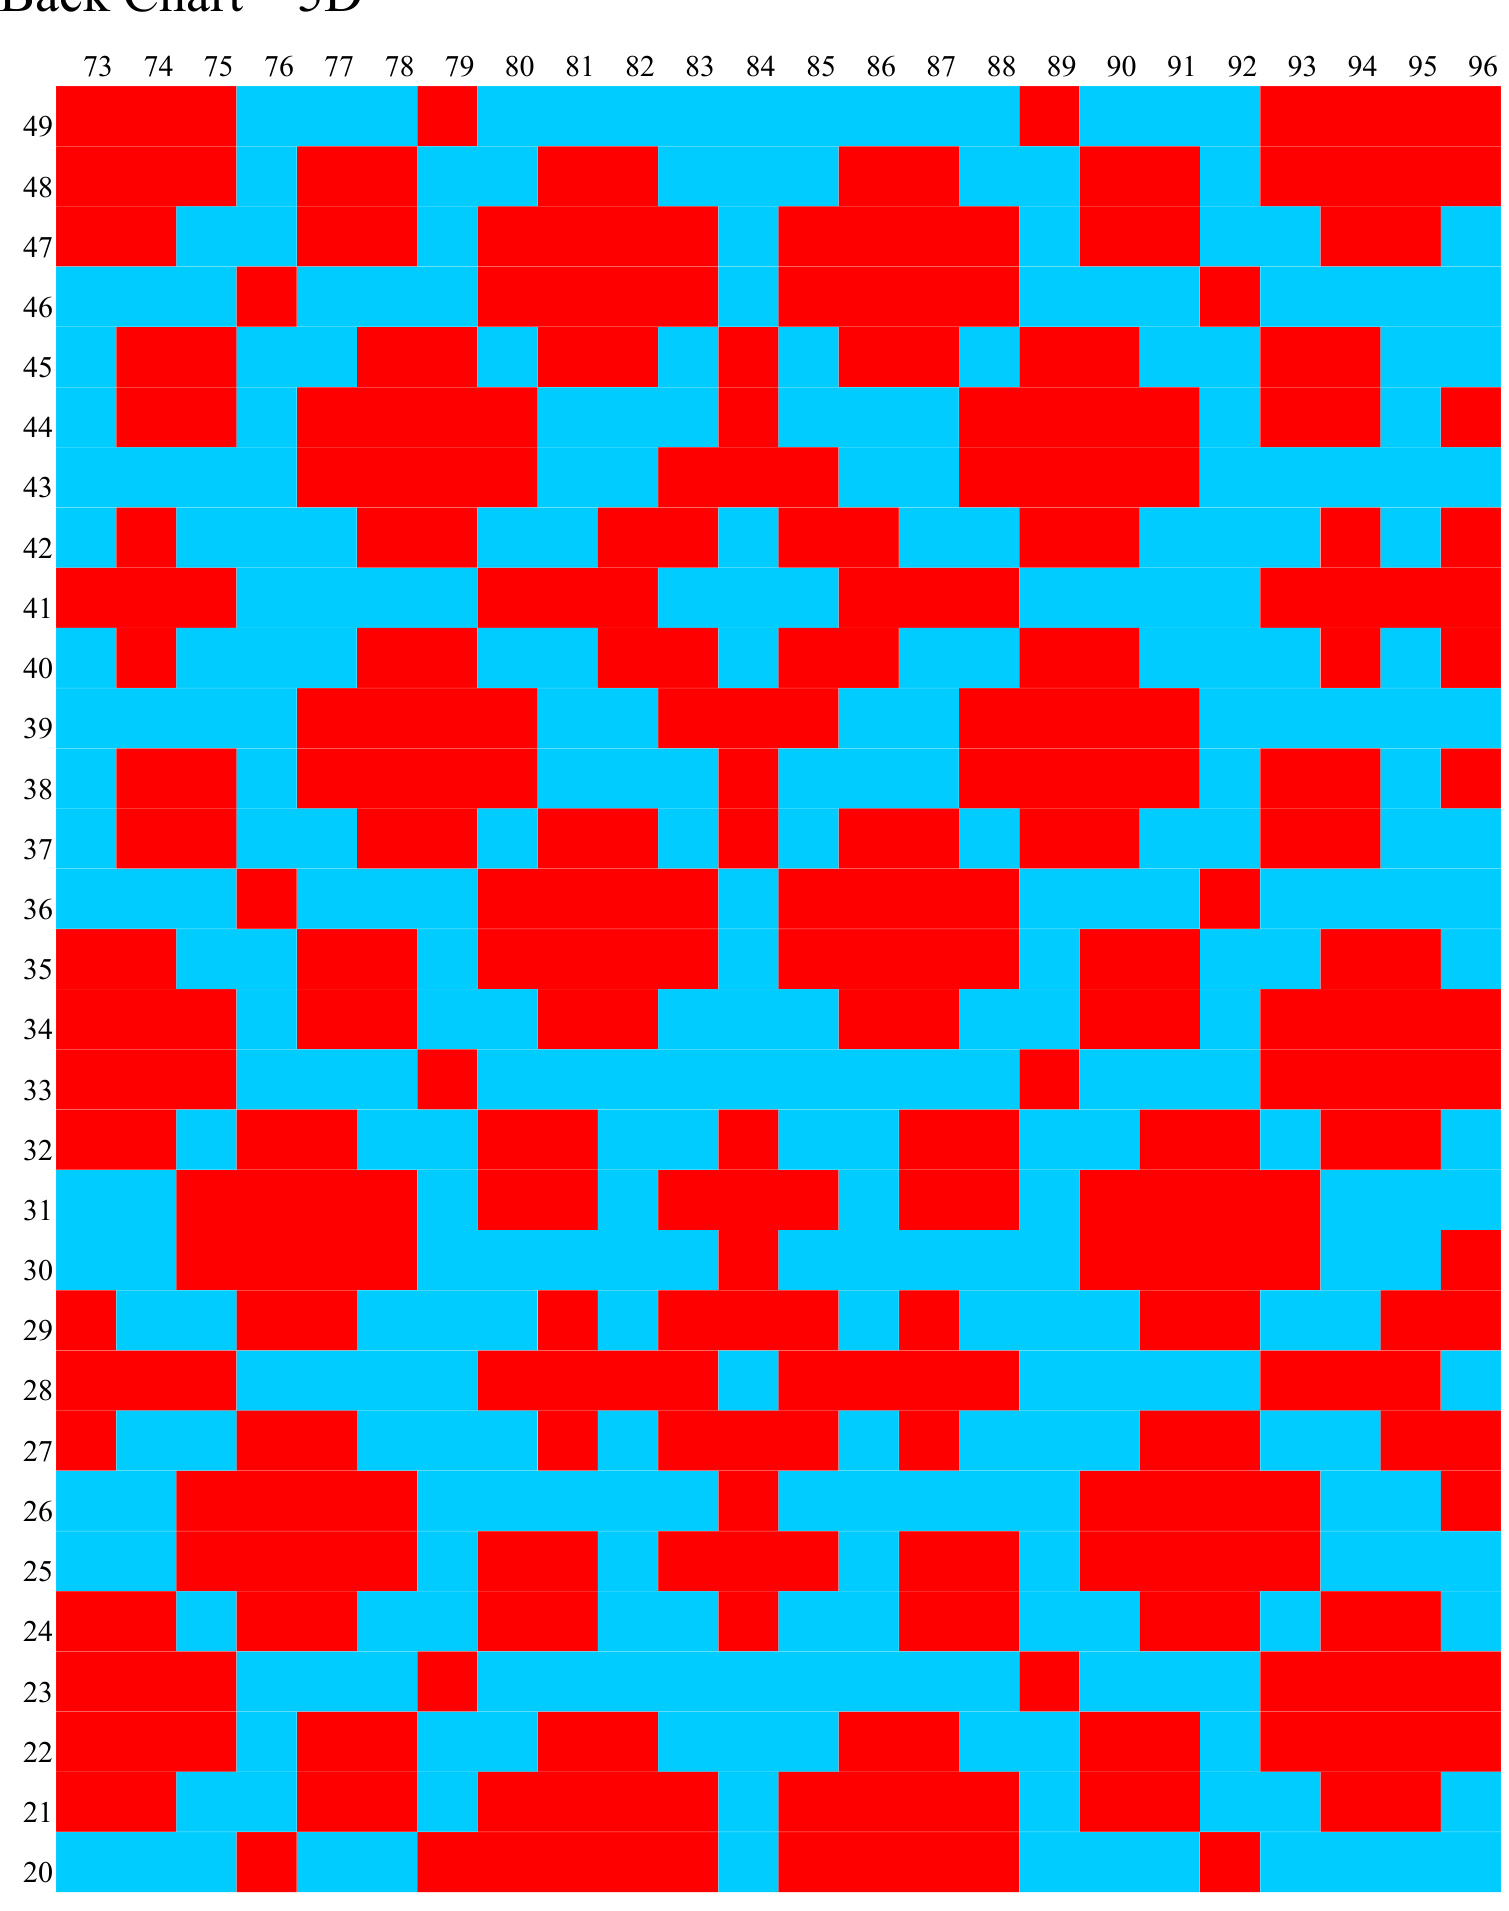
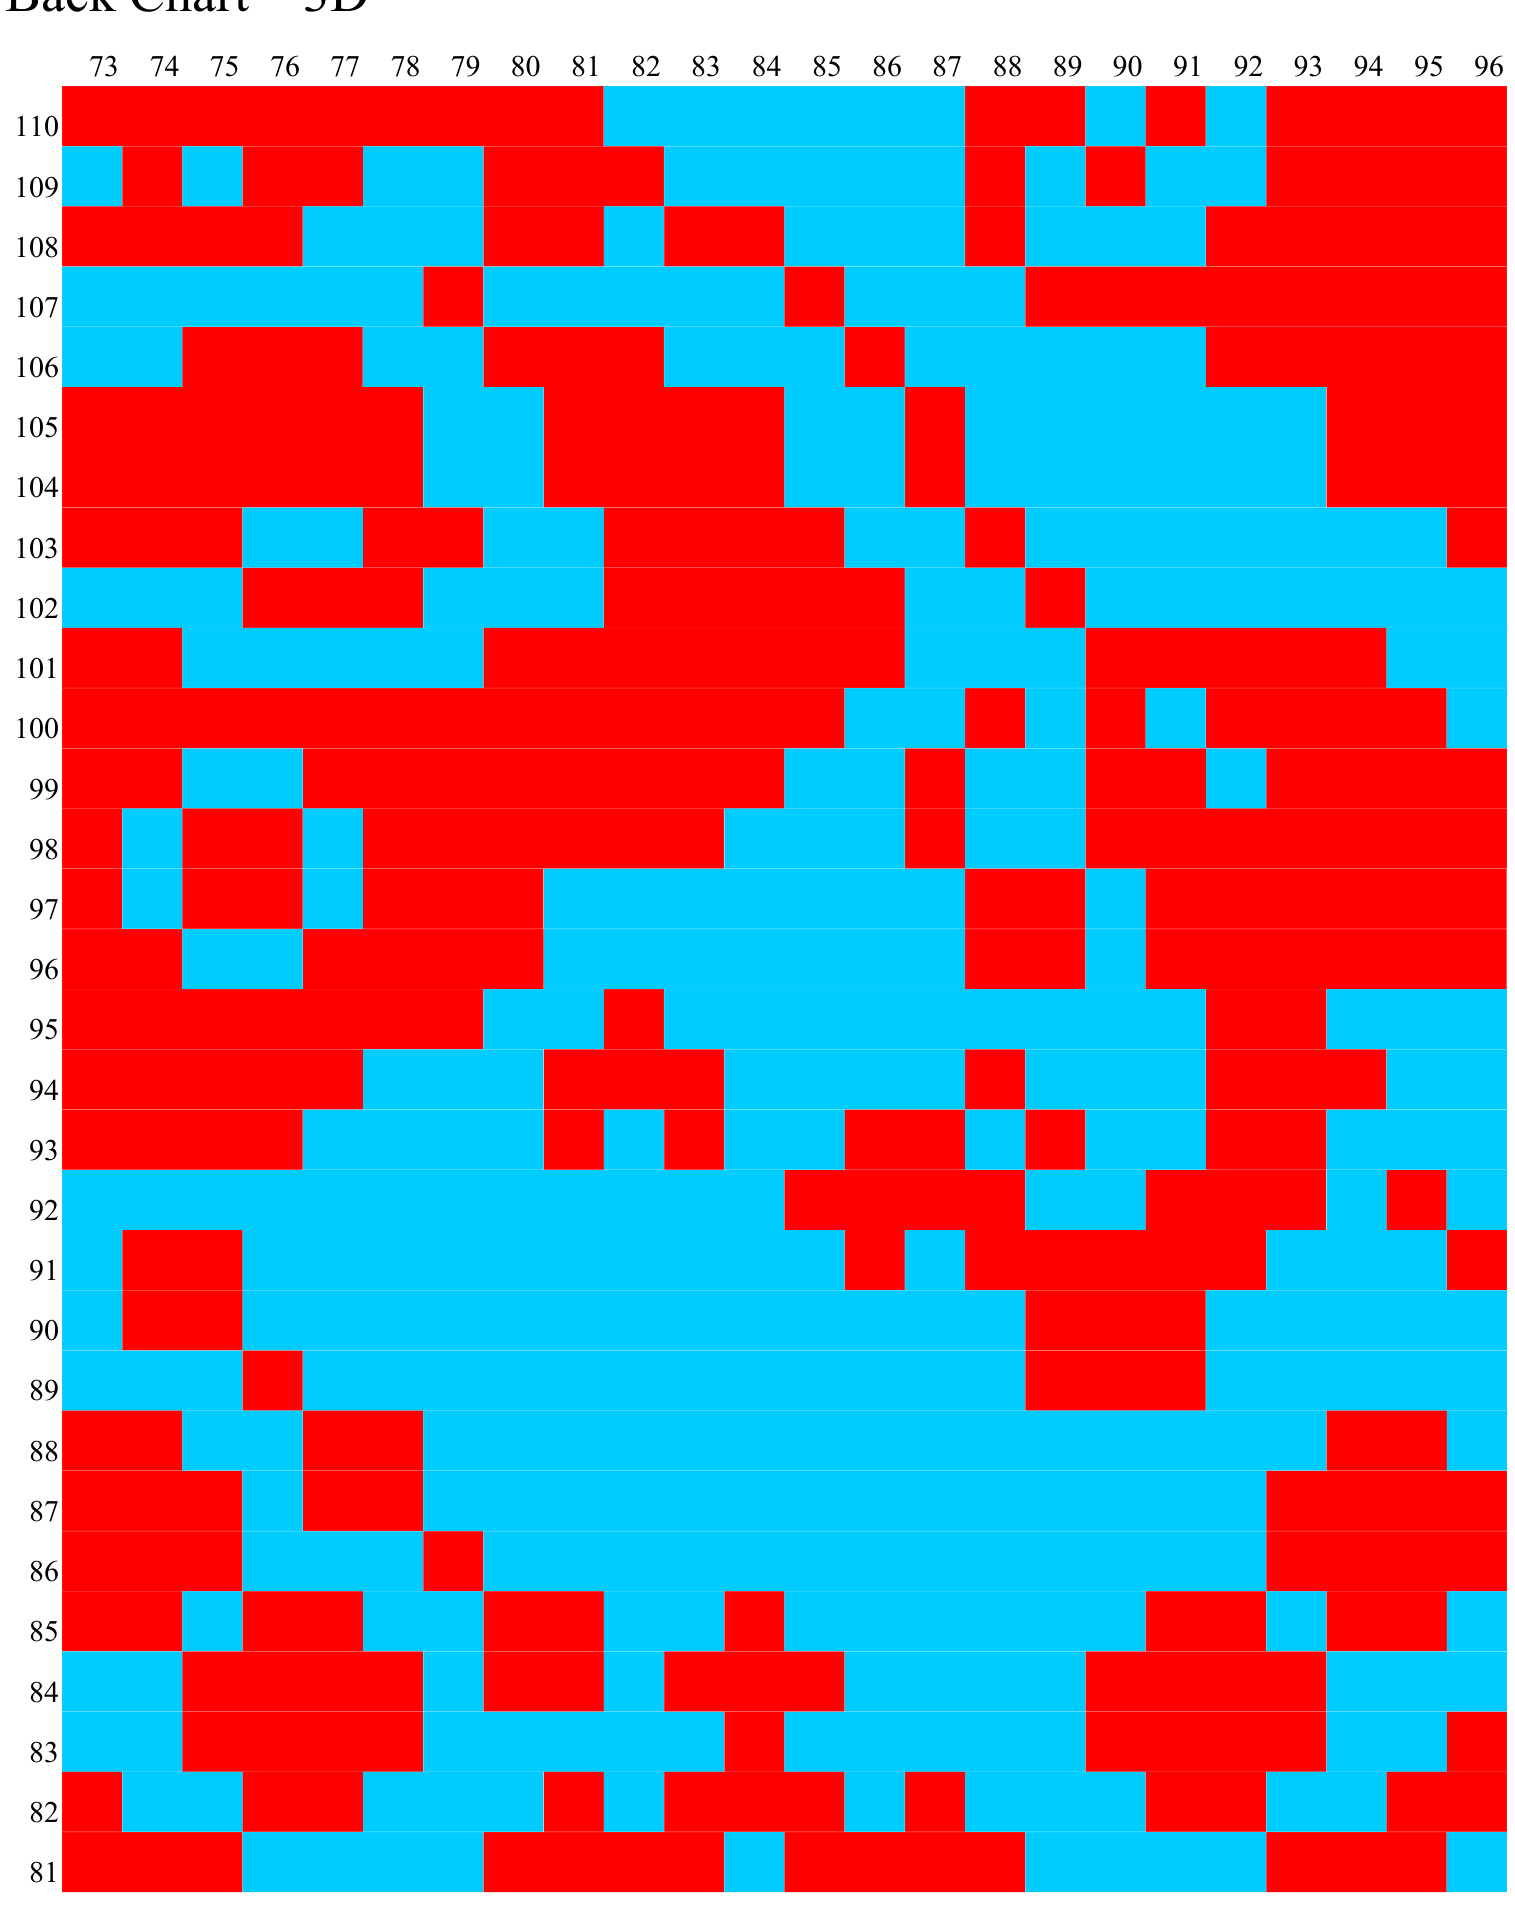
Back Chart—5D
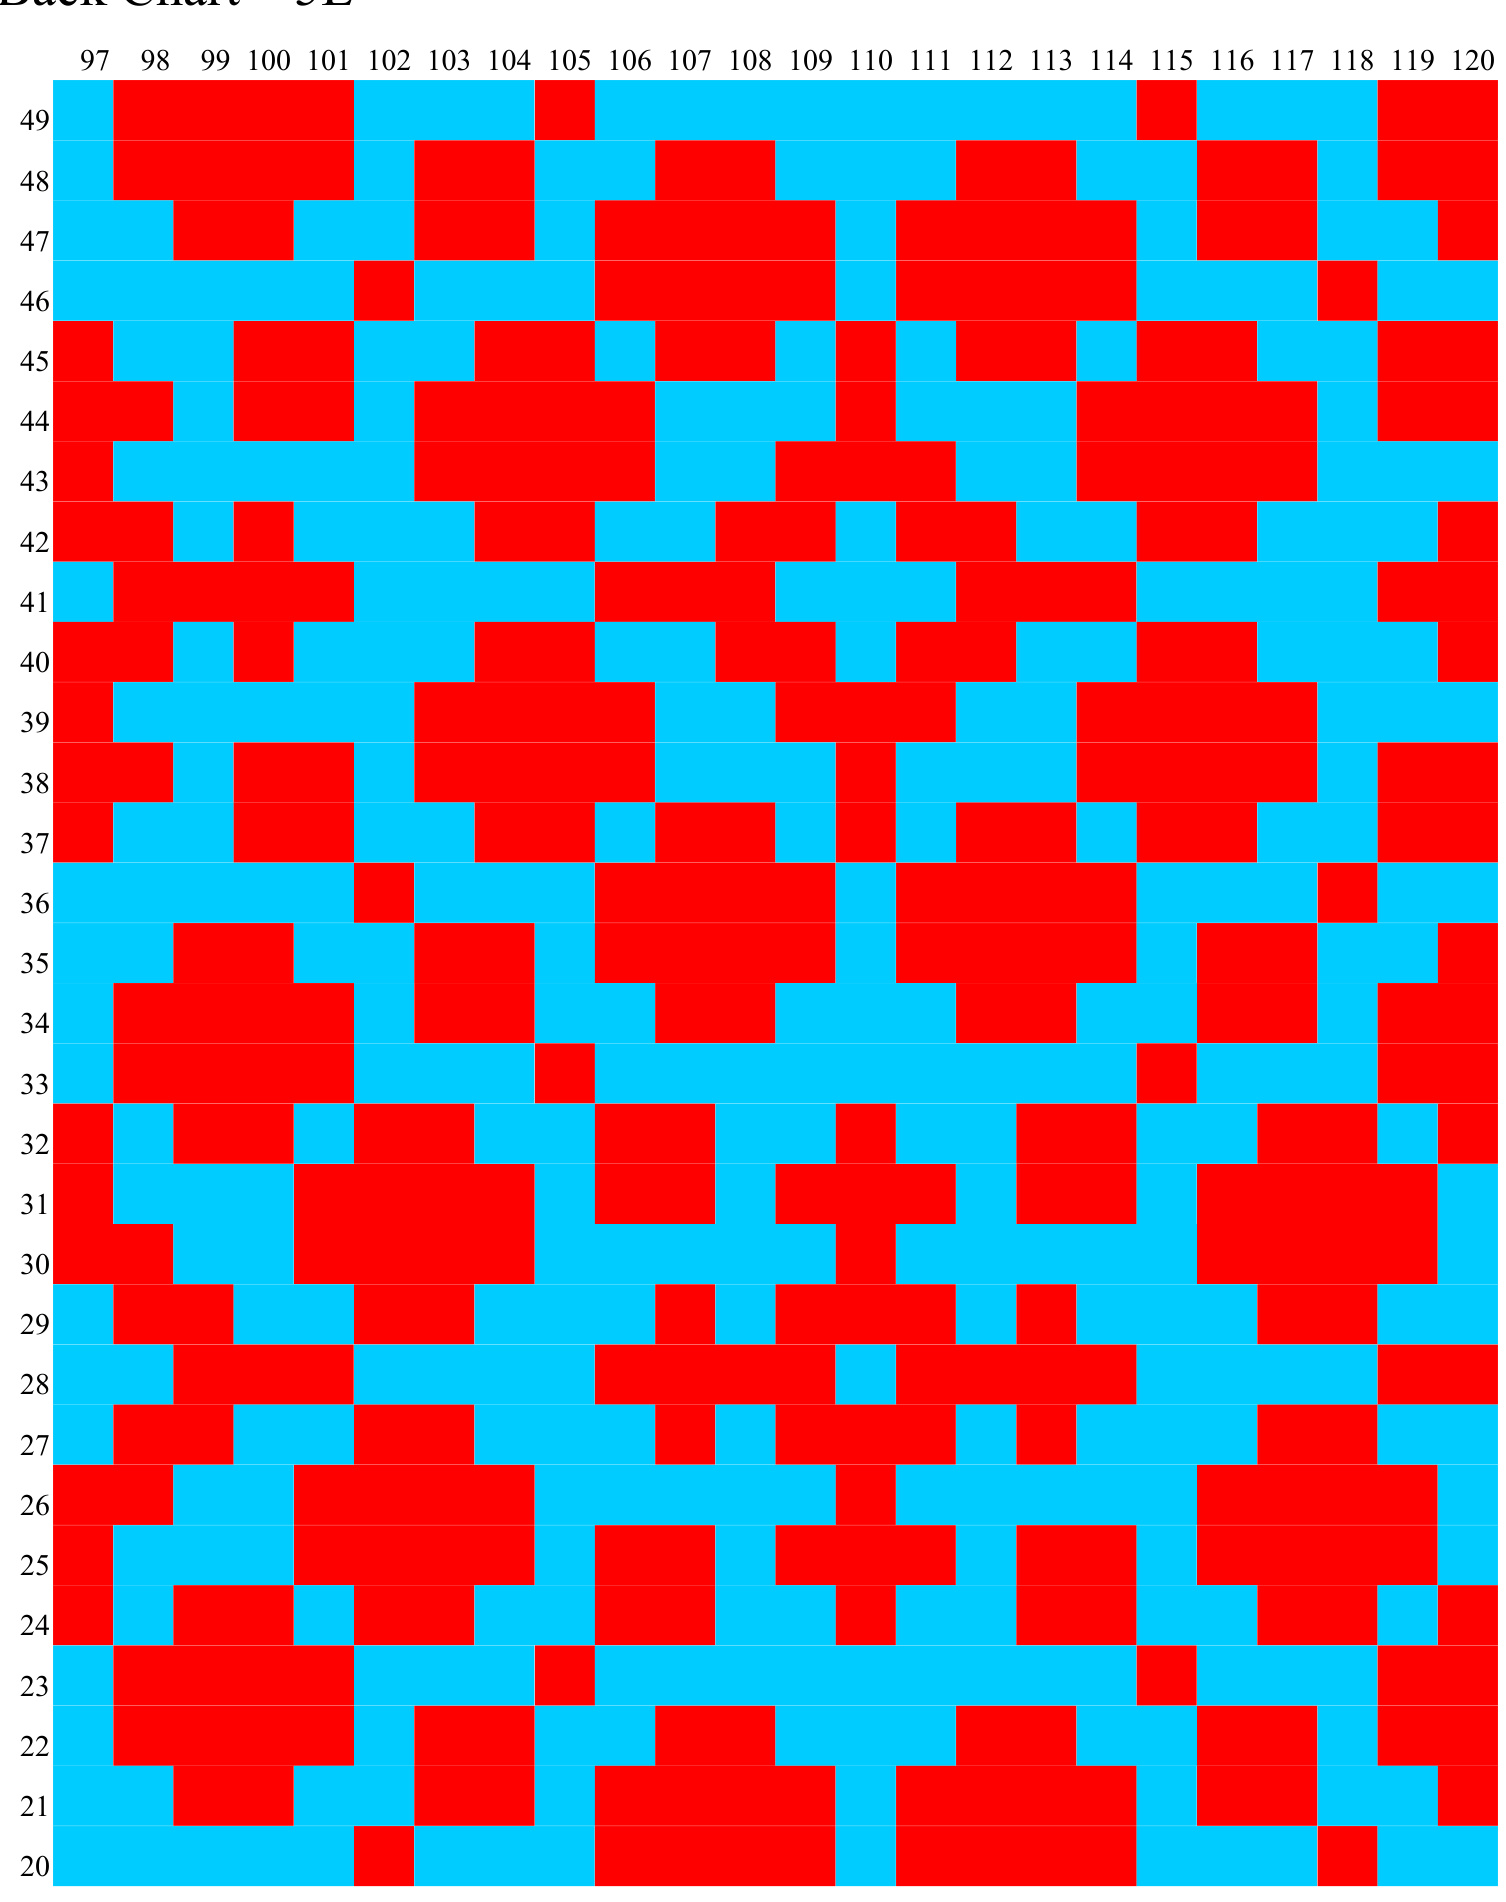
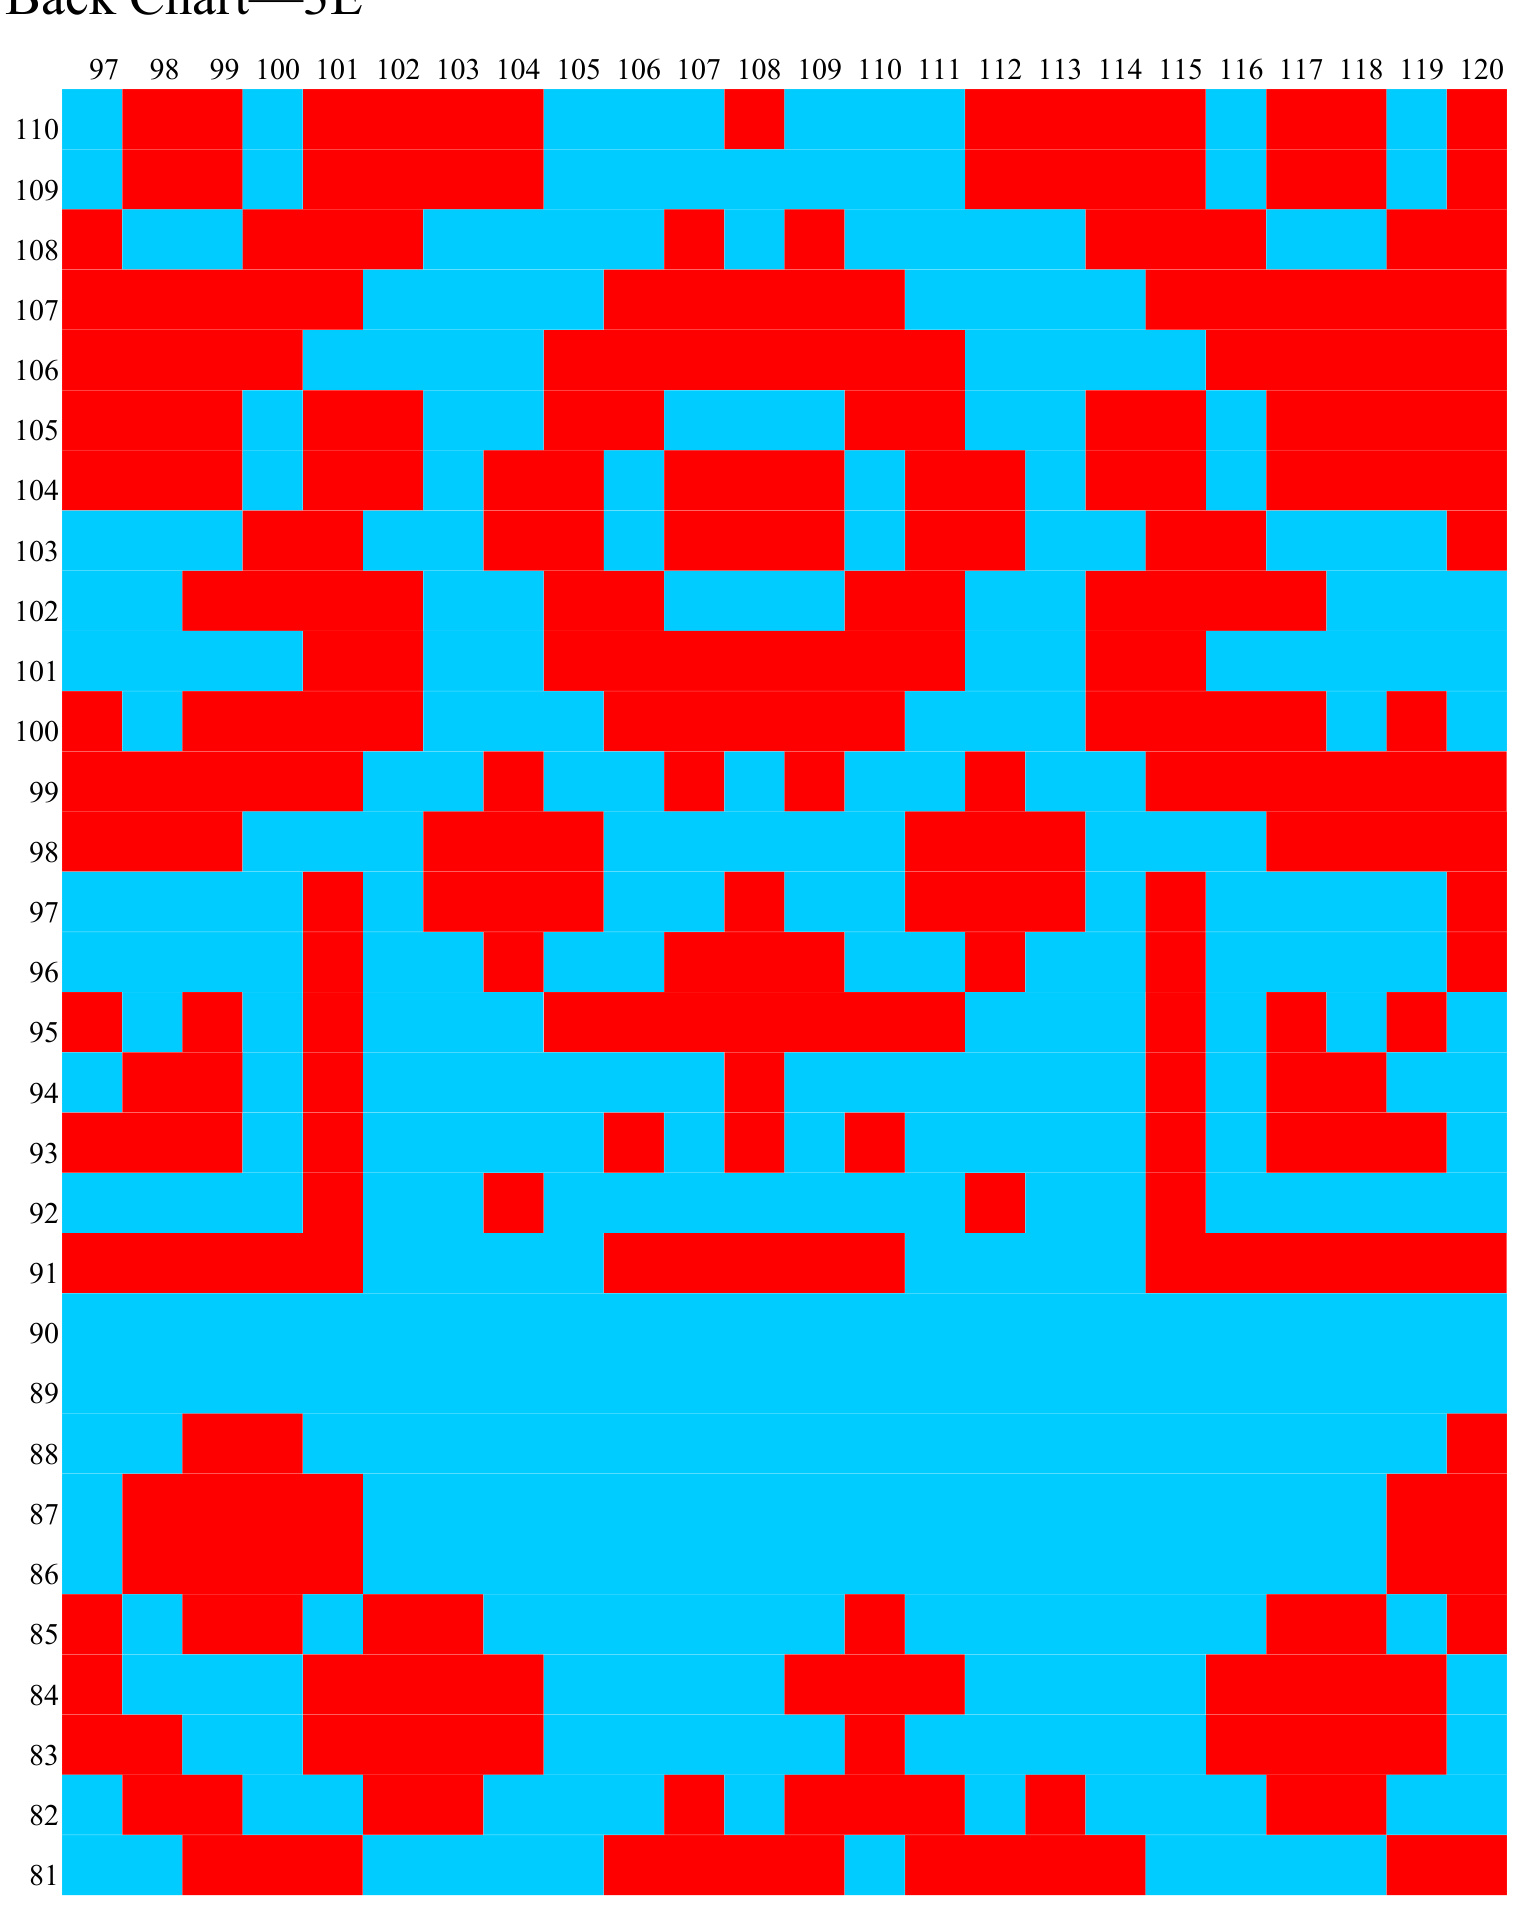
Back Chart—5E
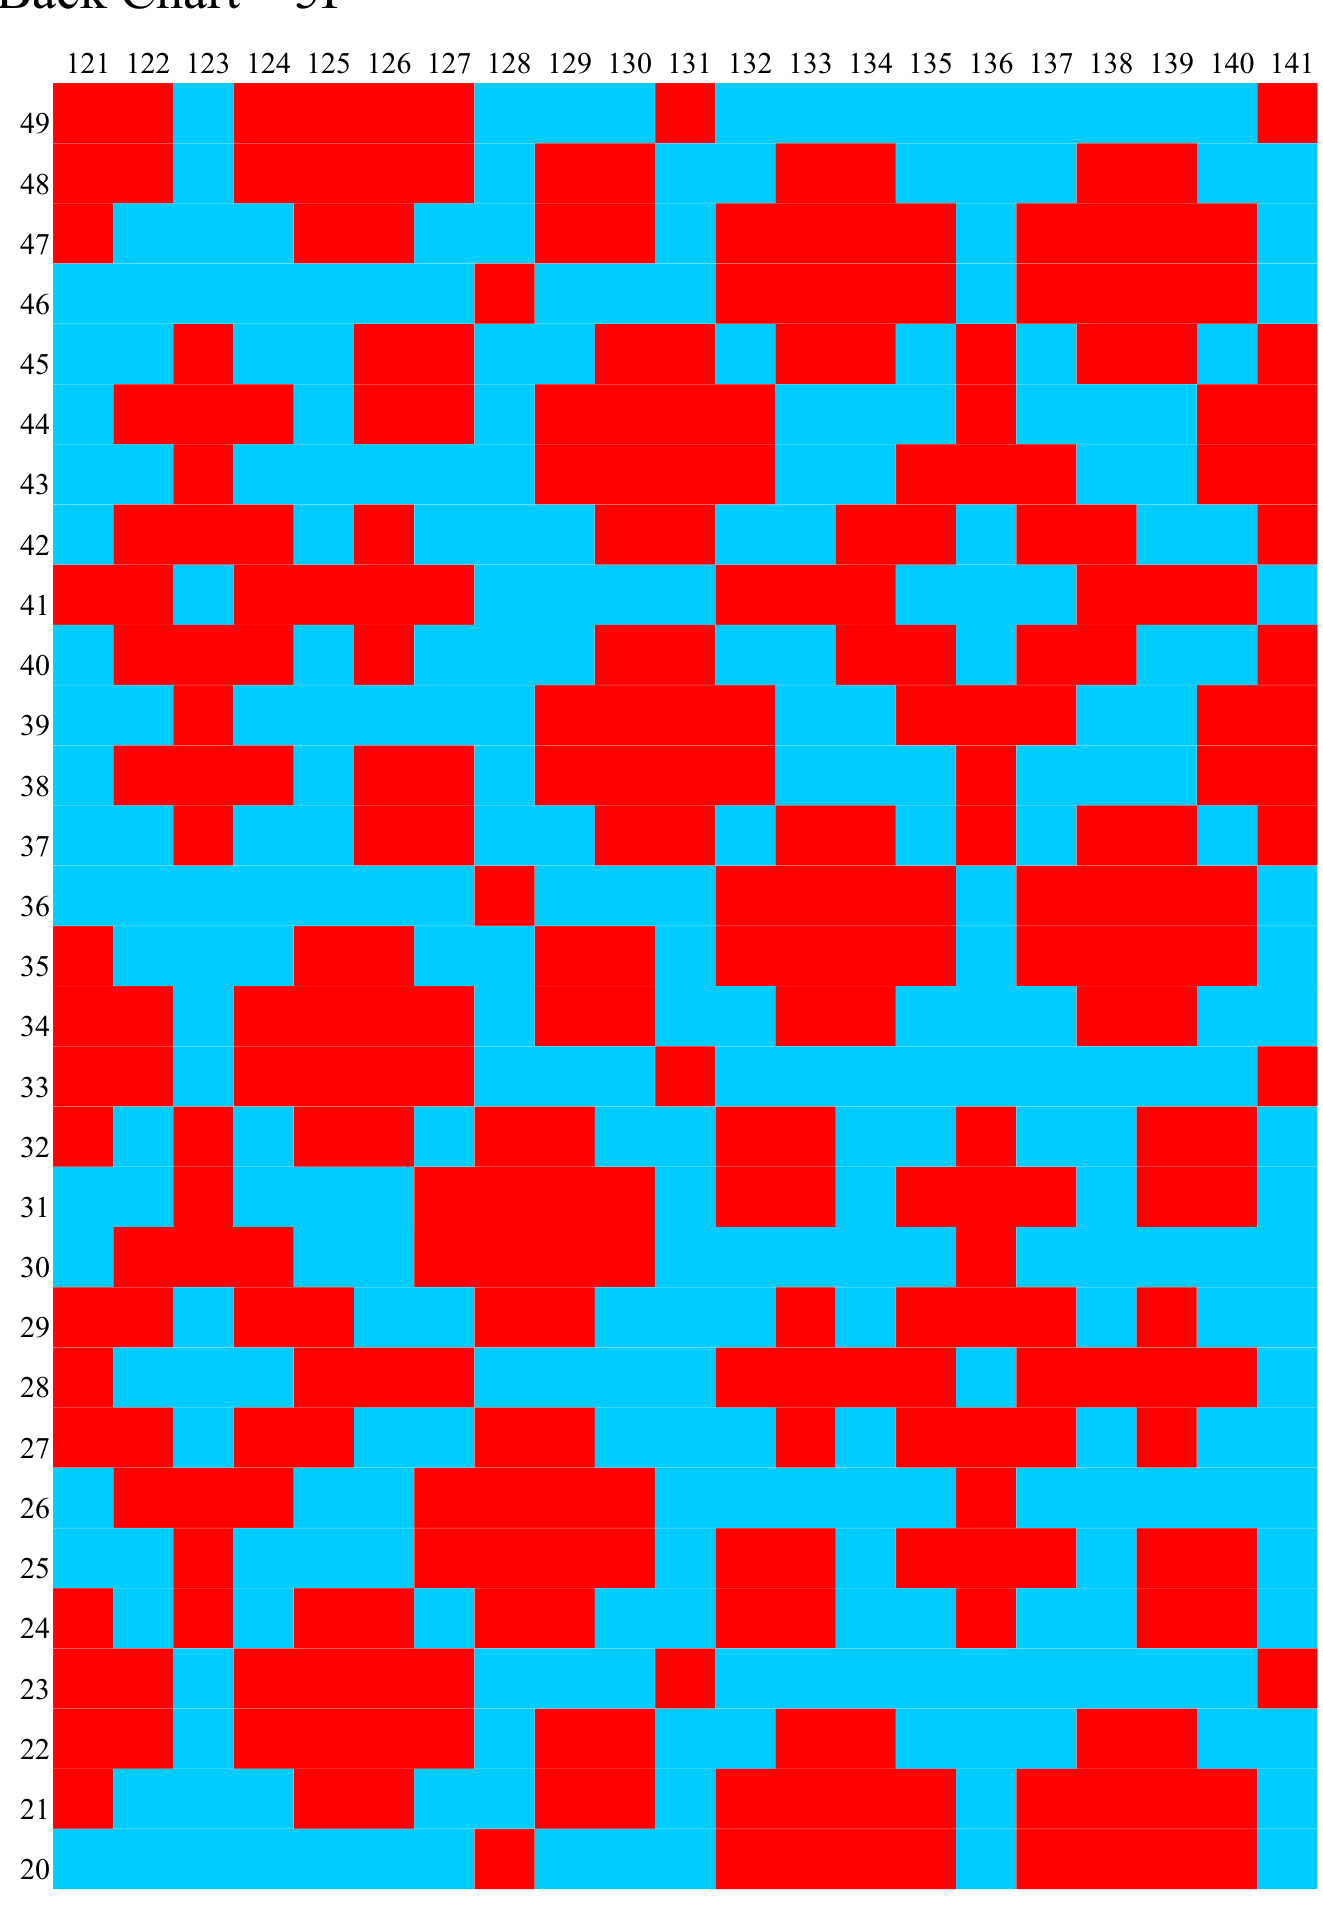
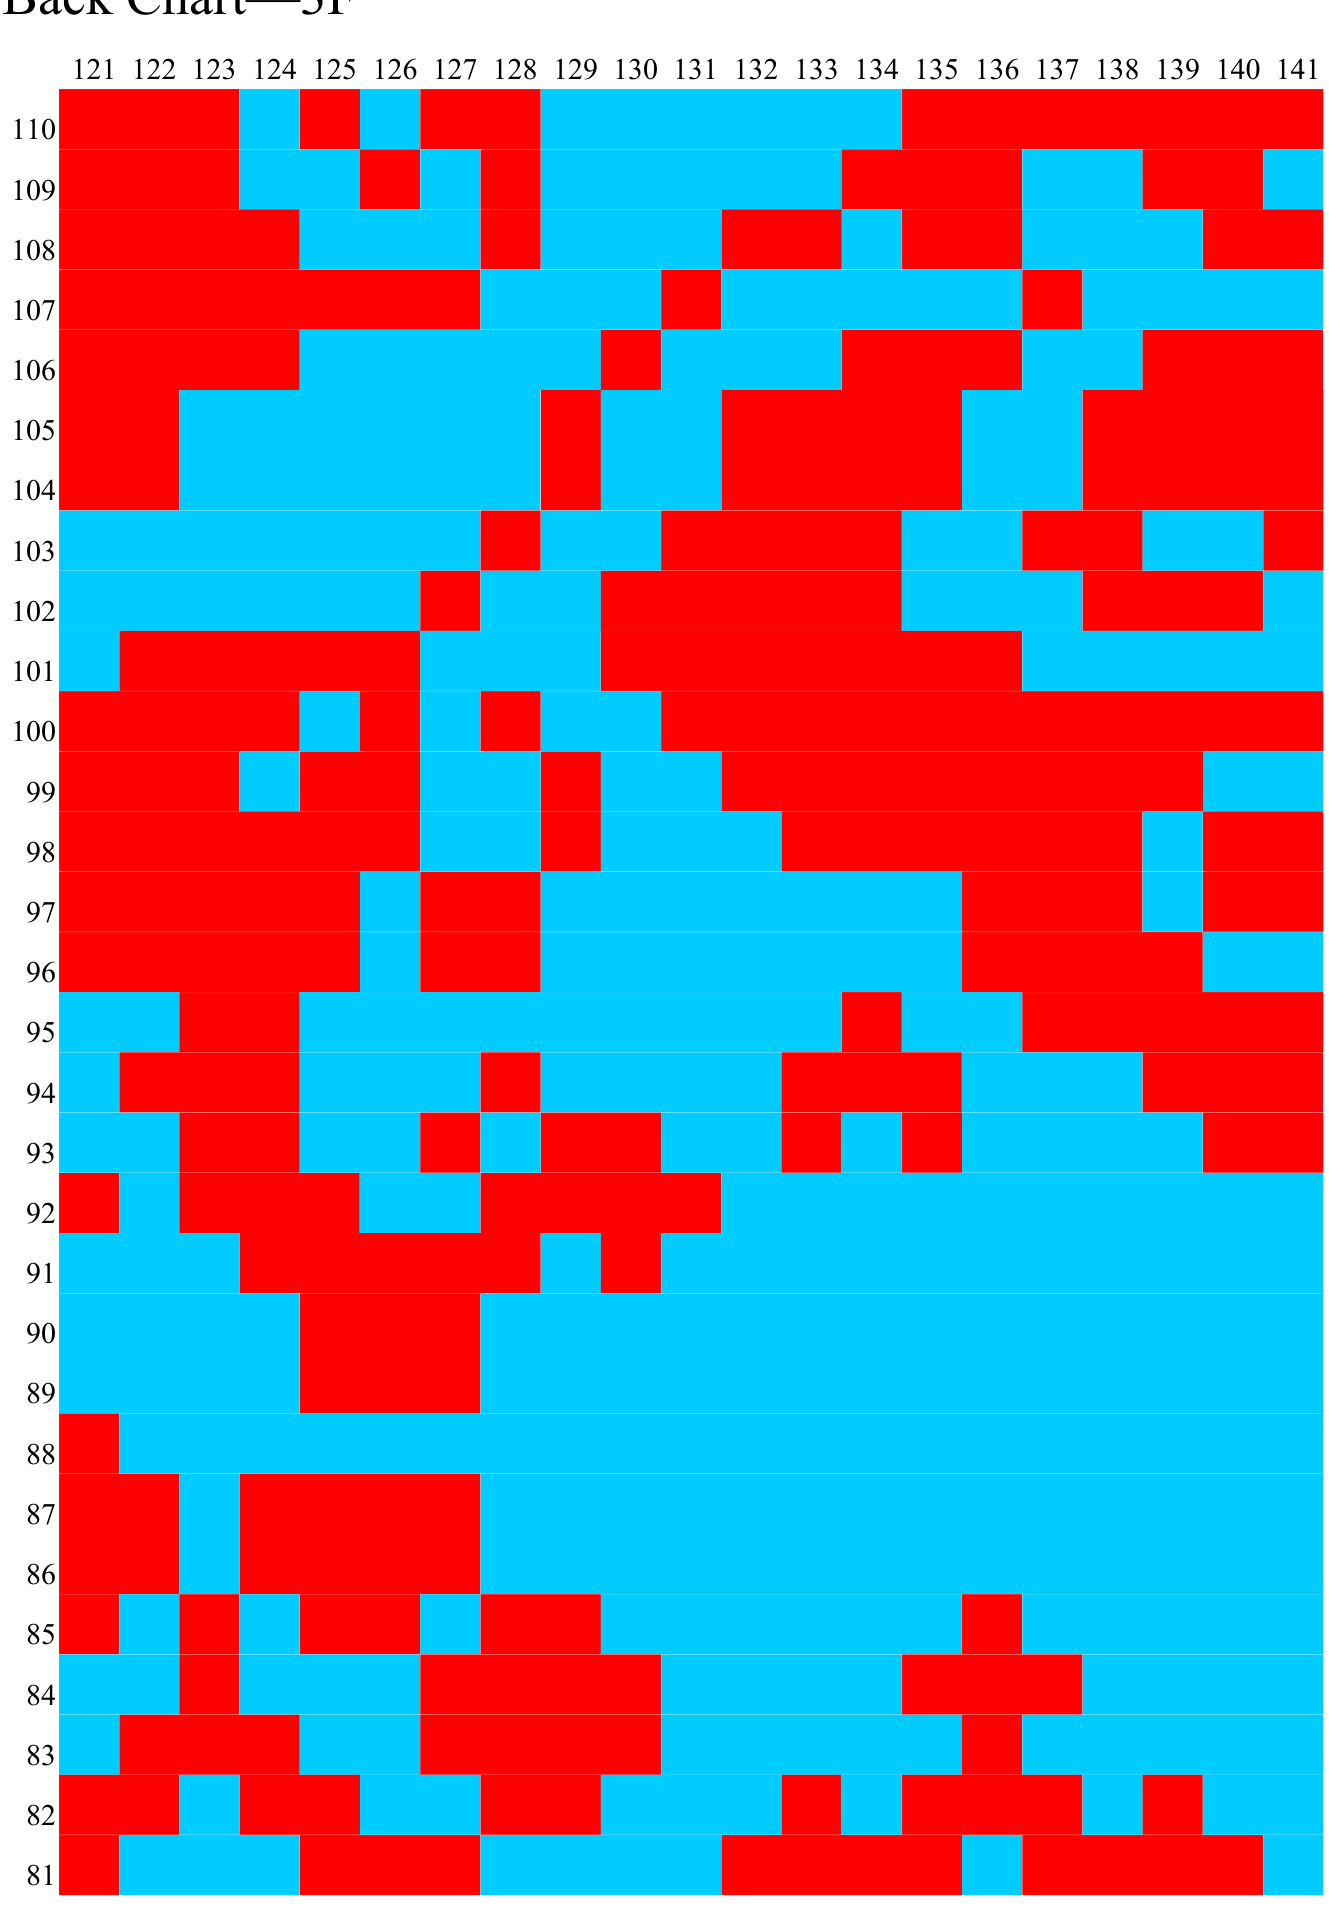
Back Chart—5F
Back Chart6A
Back Chart-6B Front and back charts are identical except for 1B, 1C, 1D, 2C, and 3C. Arrange charts as follows: A BCD etc 1 2 3 etc
Back Chart—6C
Back Chart—6D
Back Chart—6E
Back Chart6F
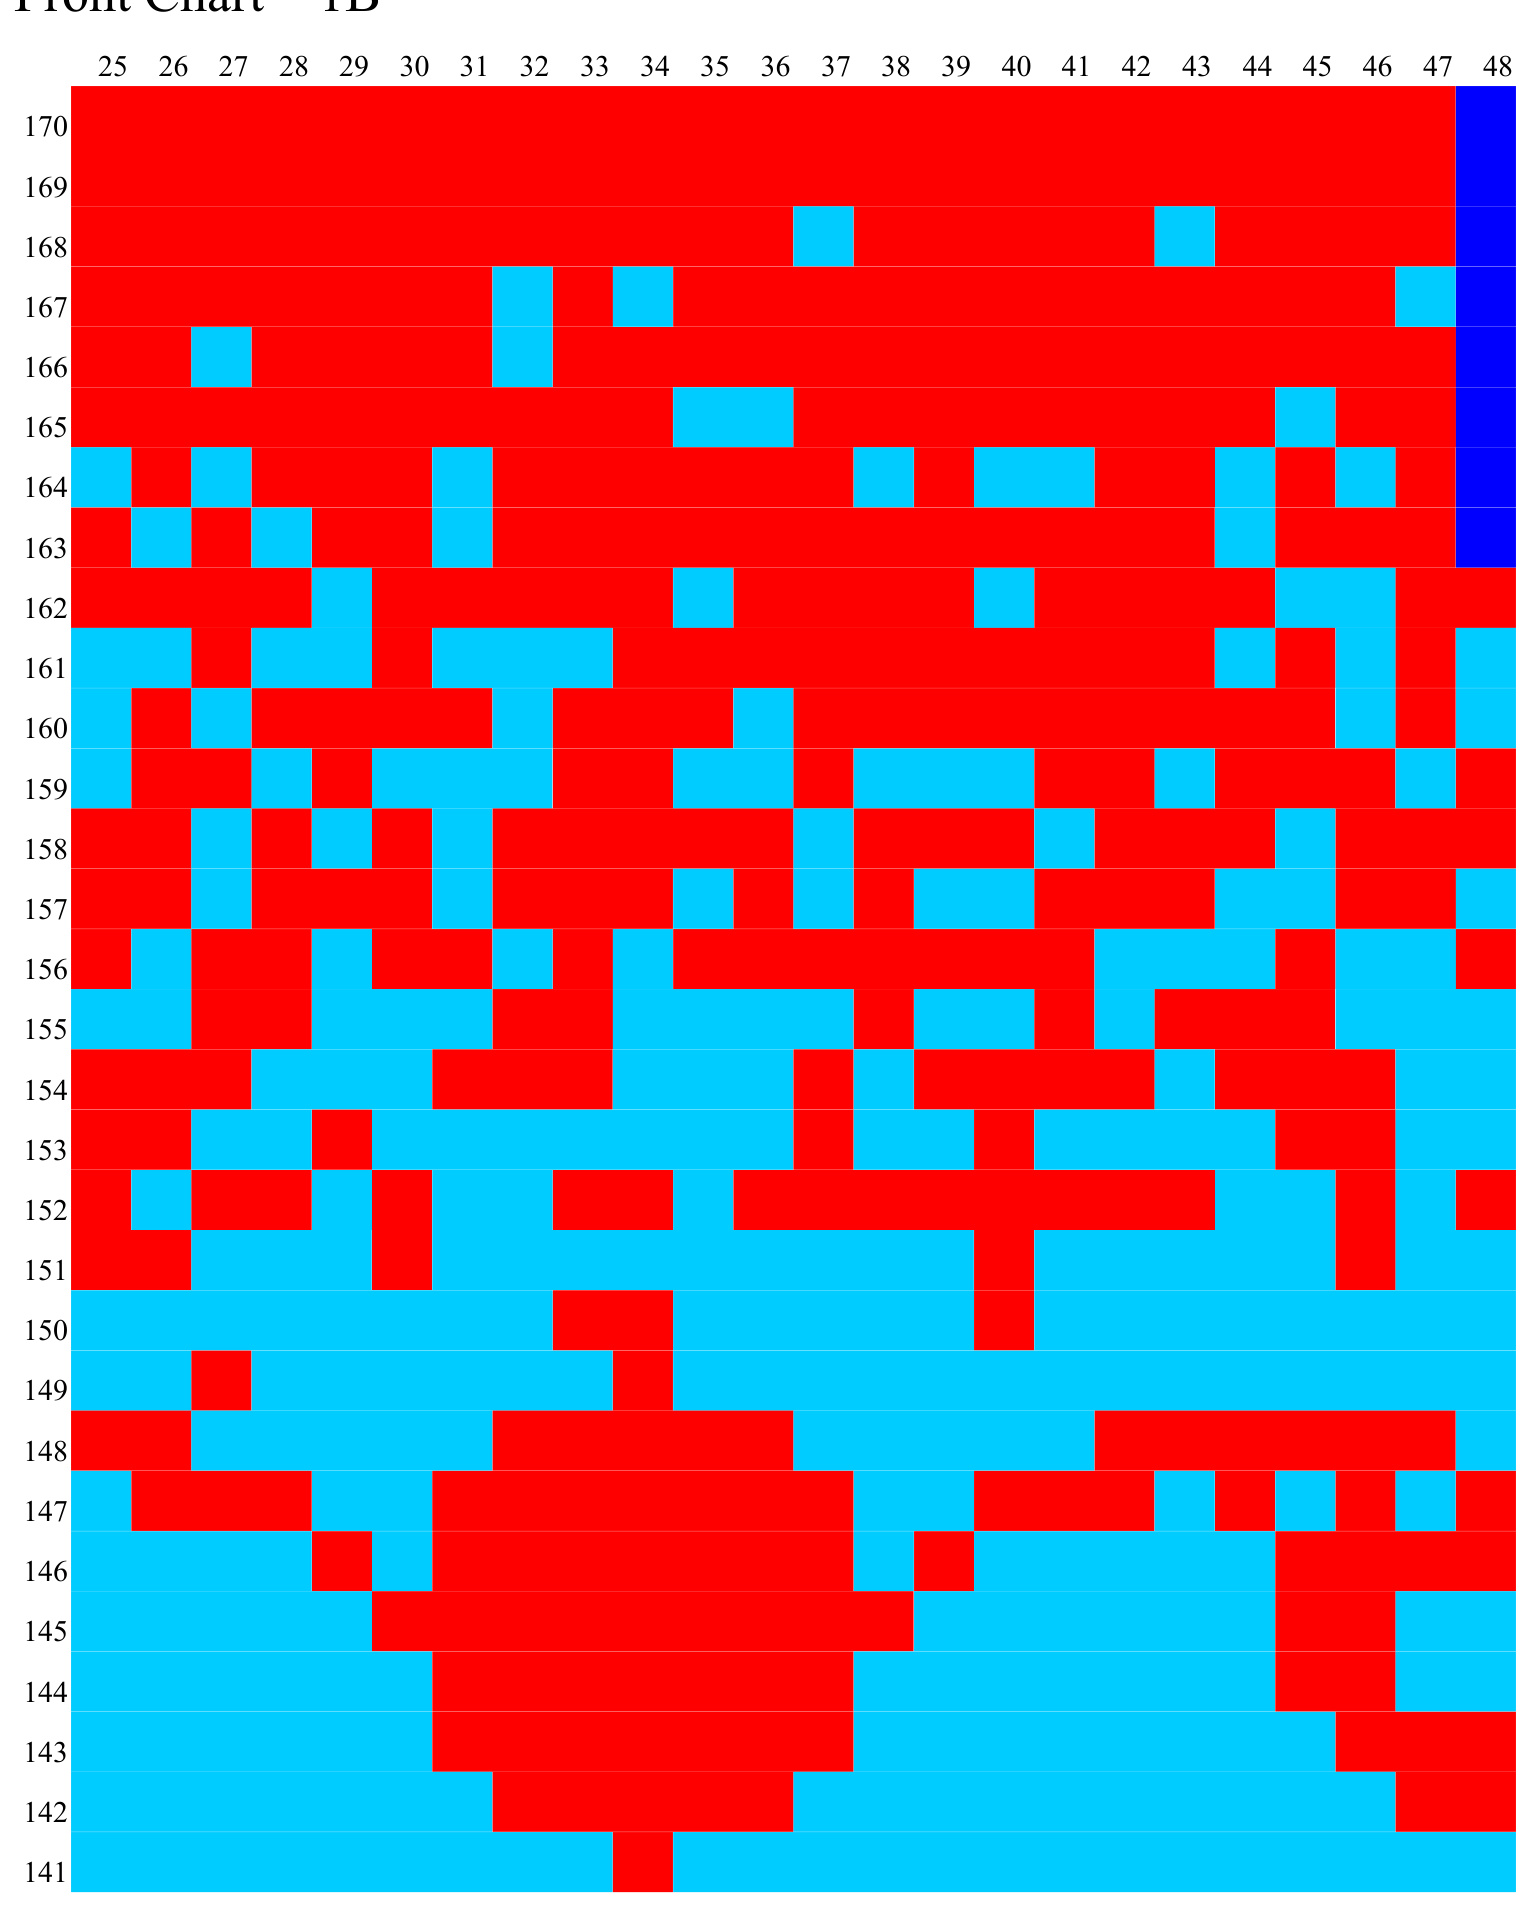
Front Chart——1B
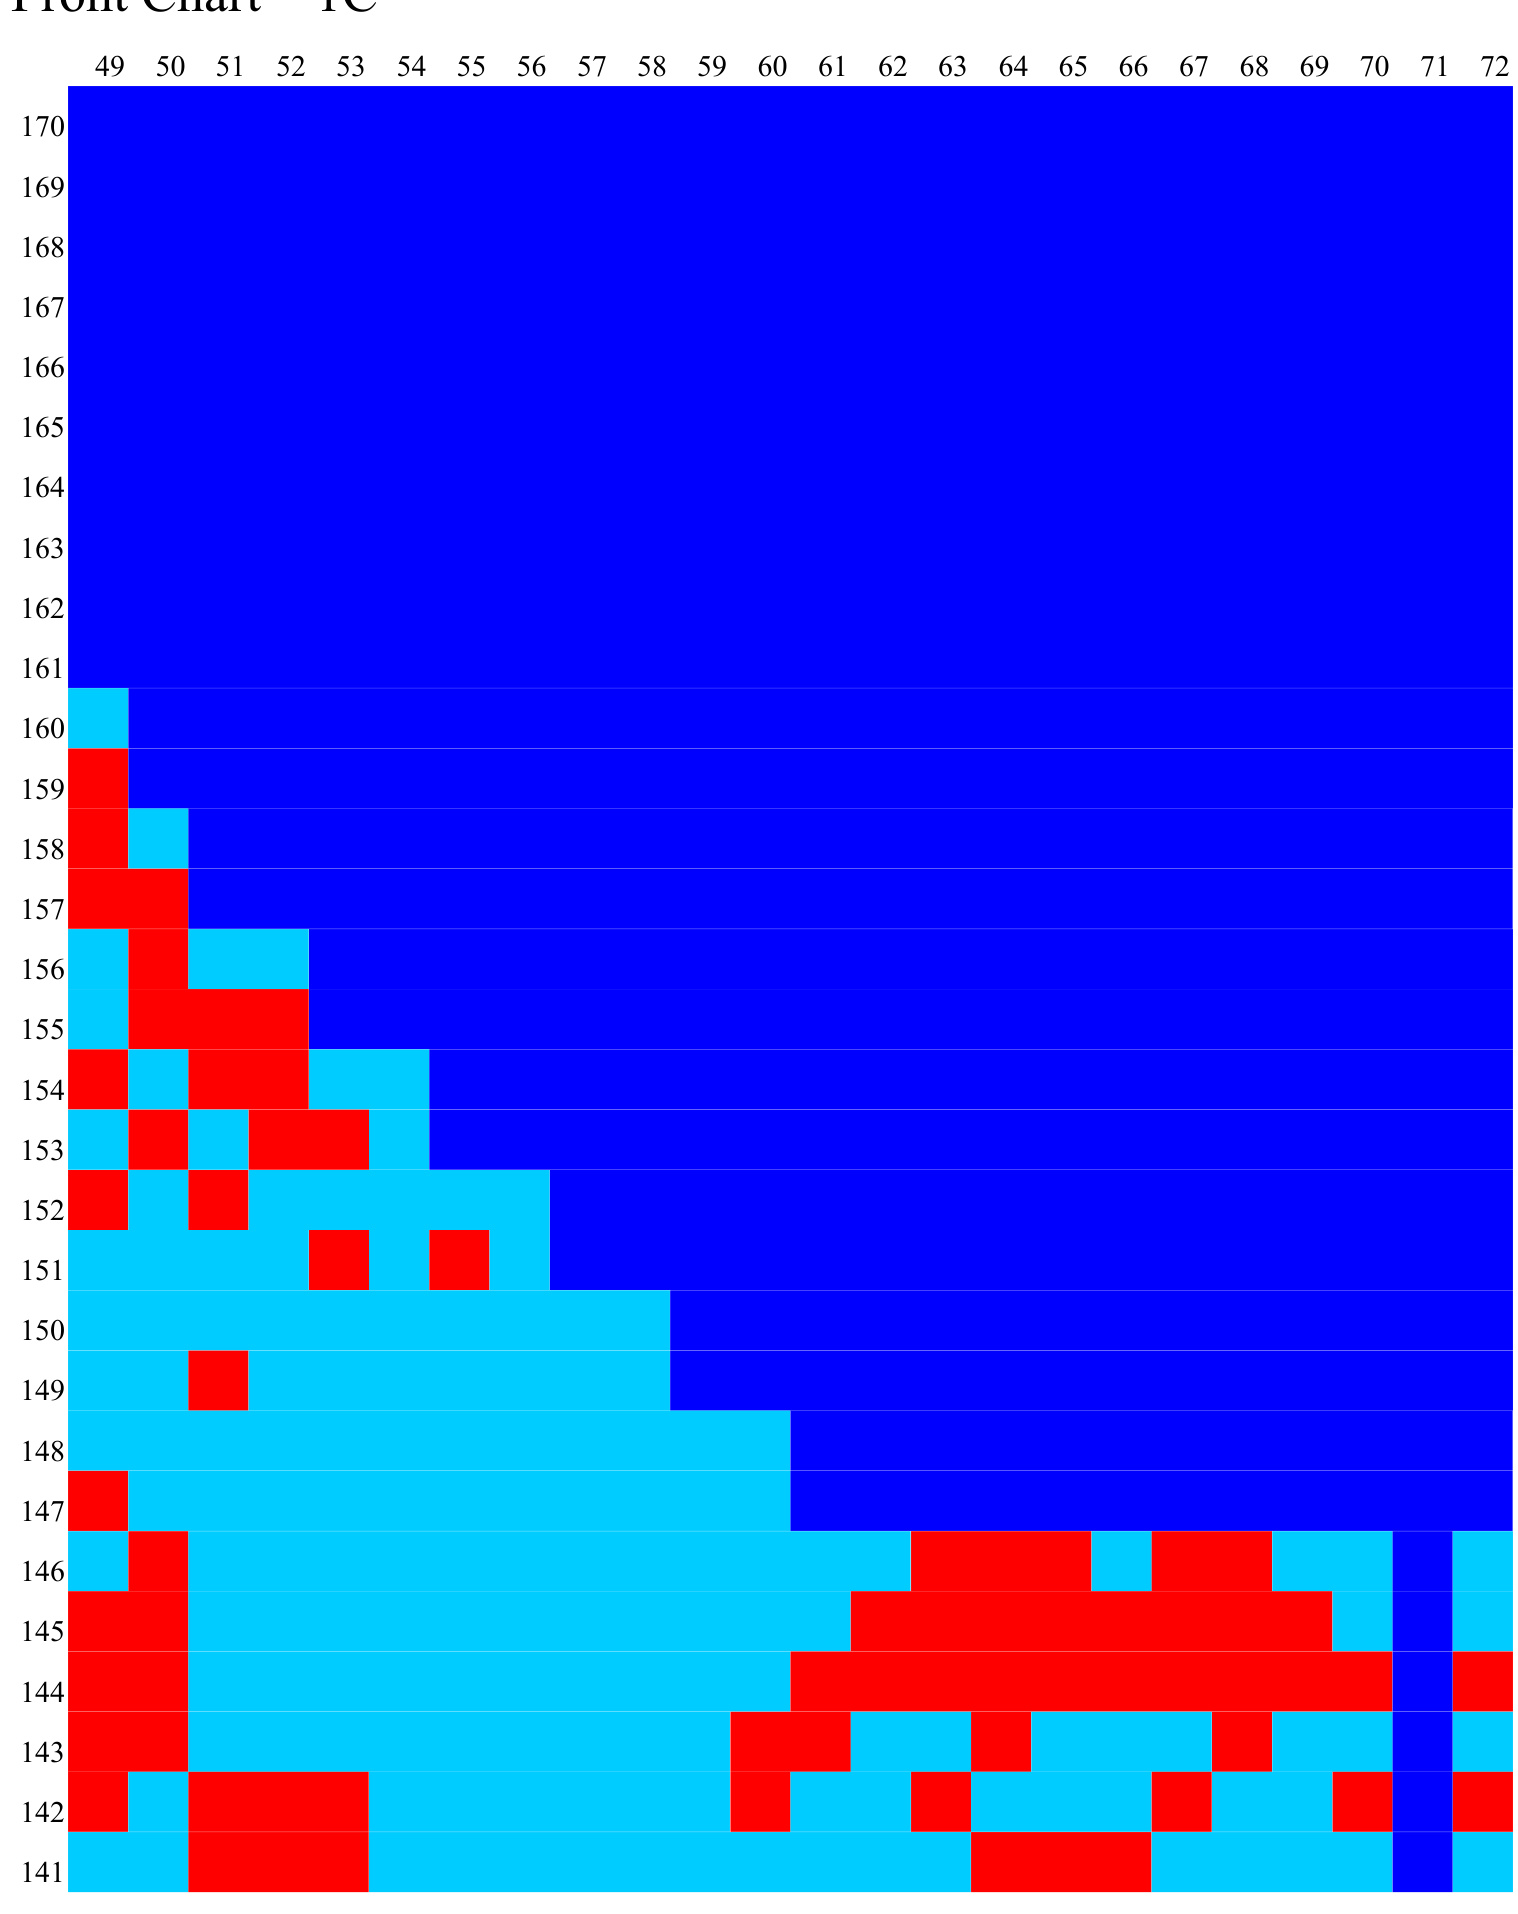
Front Chart—1C
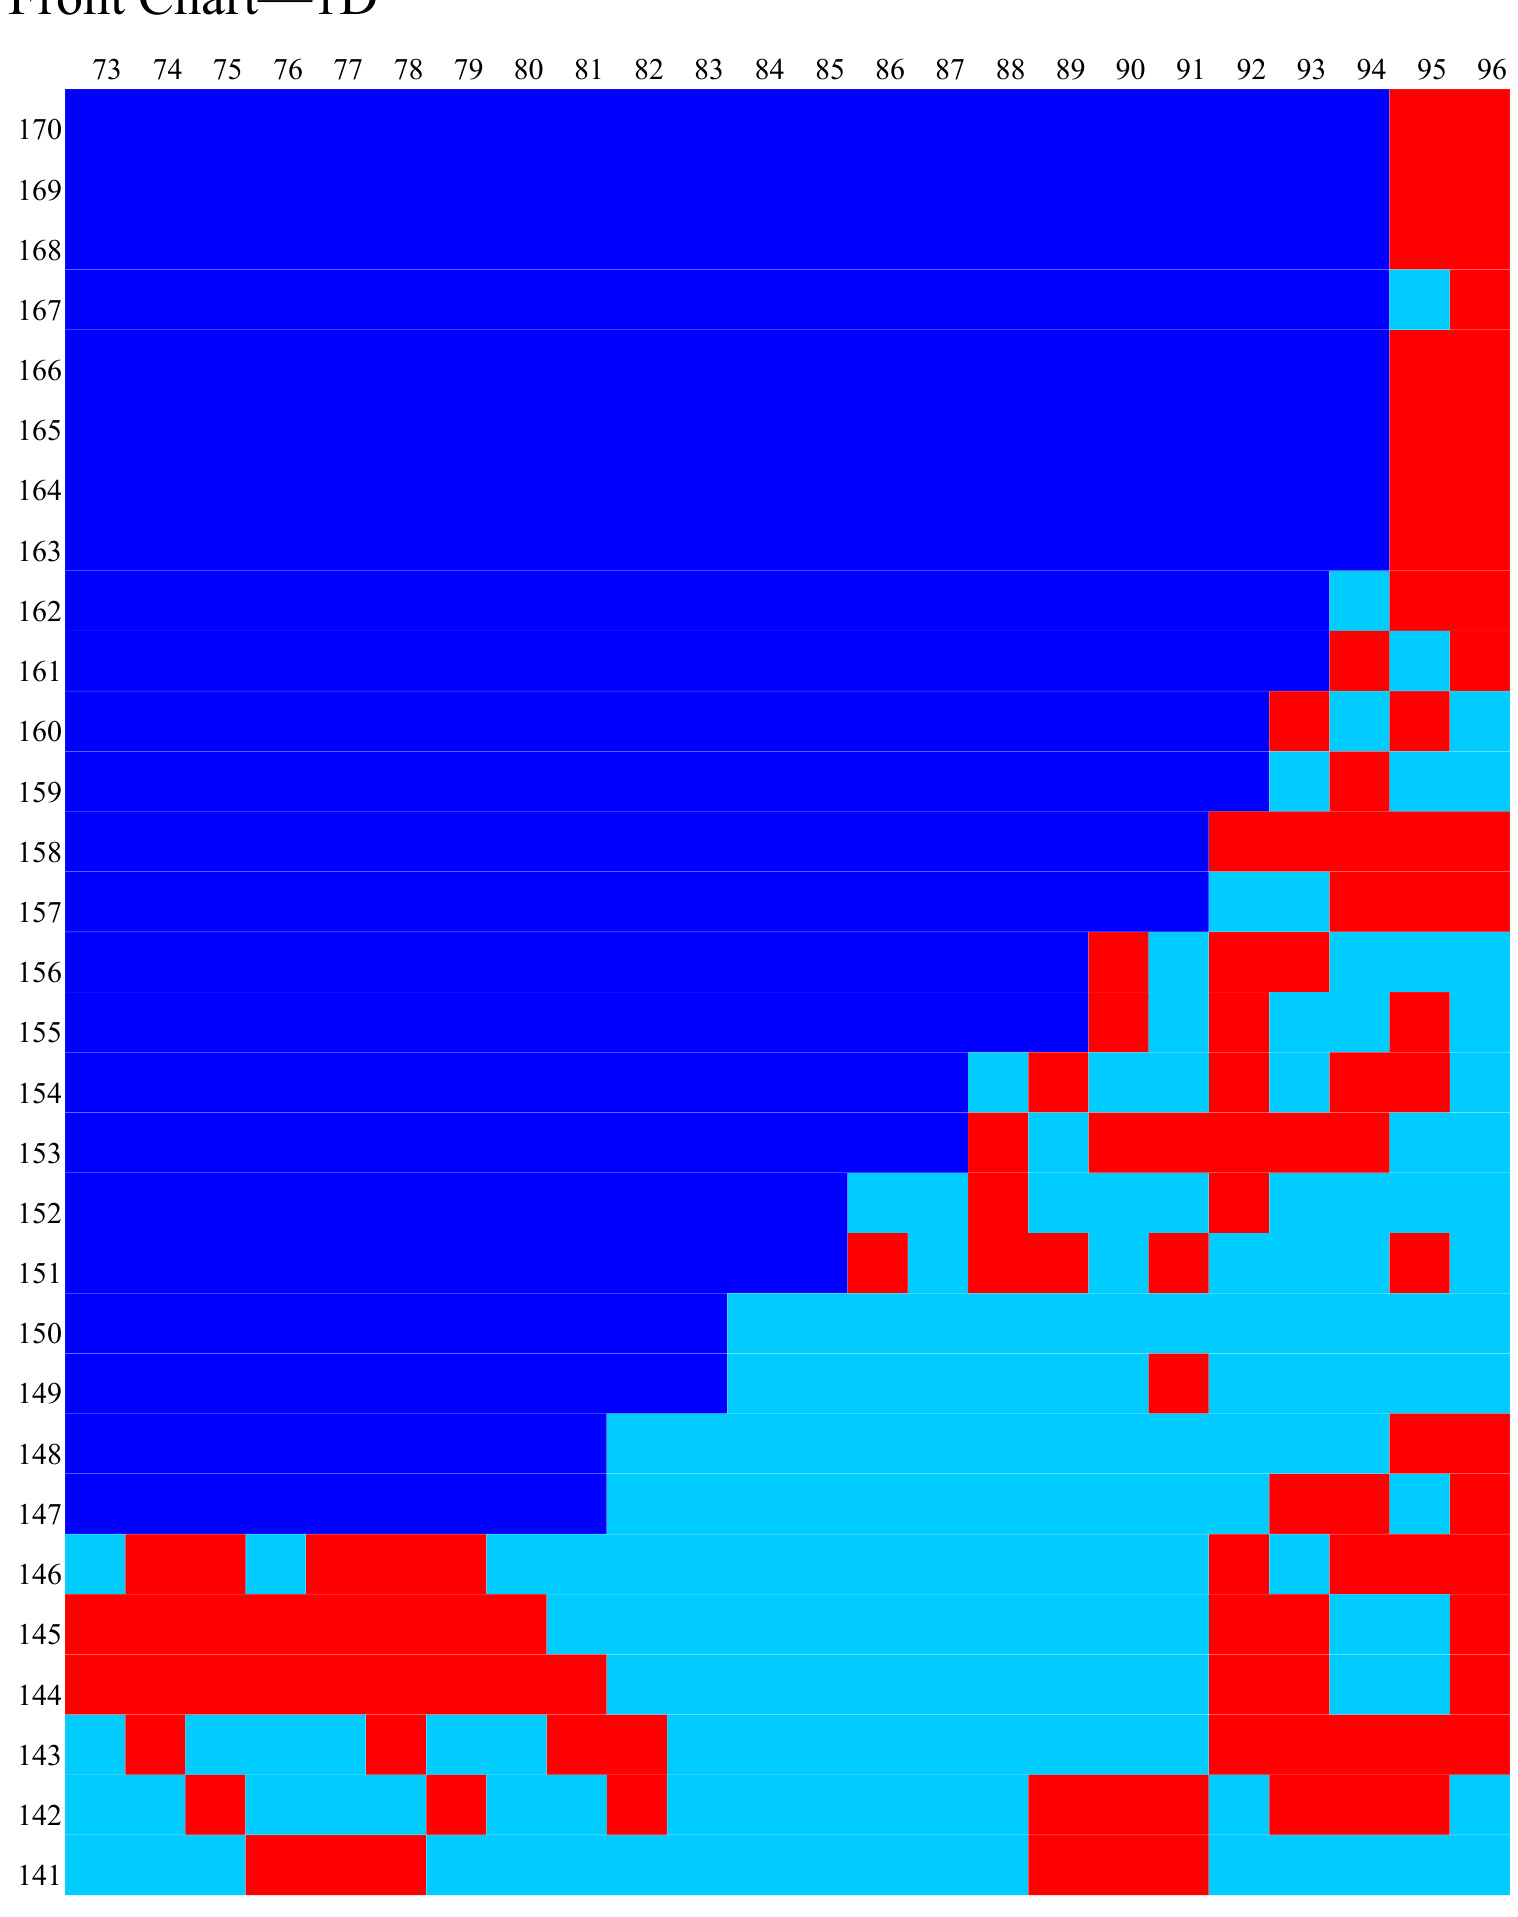
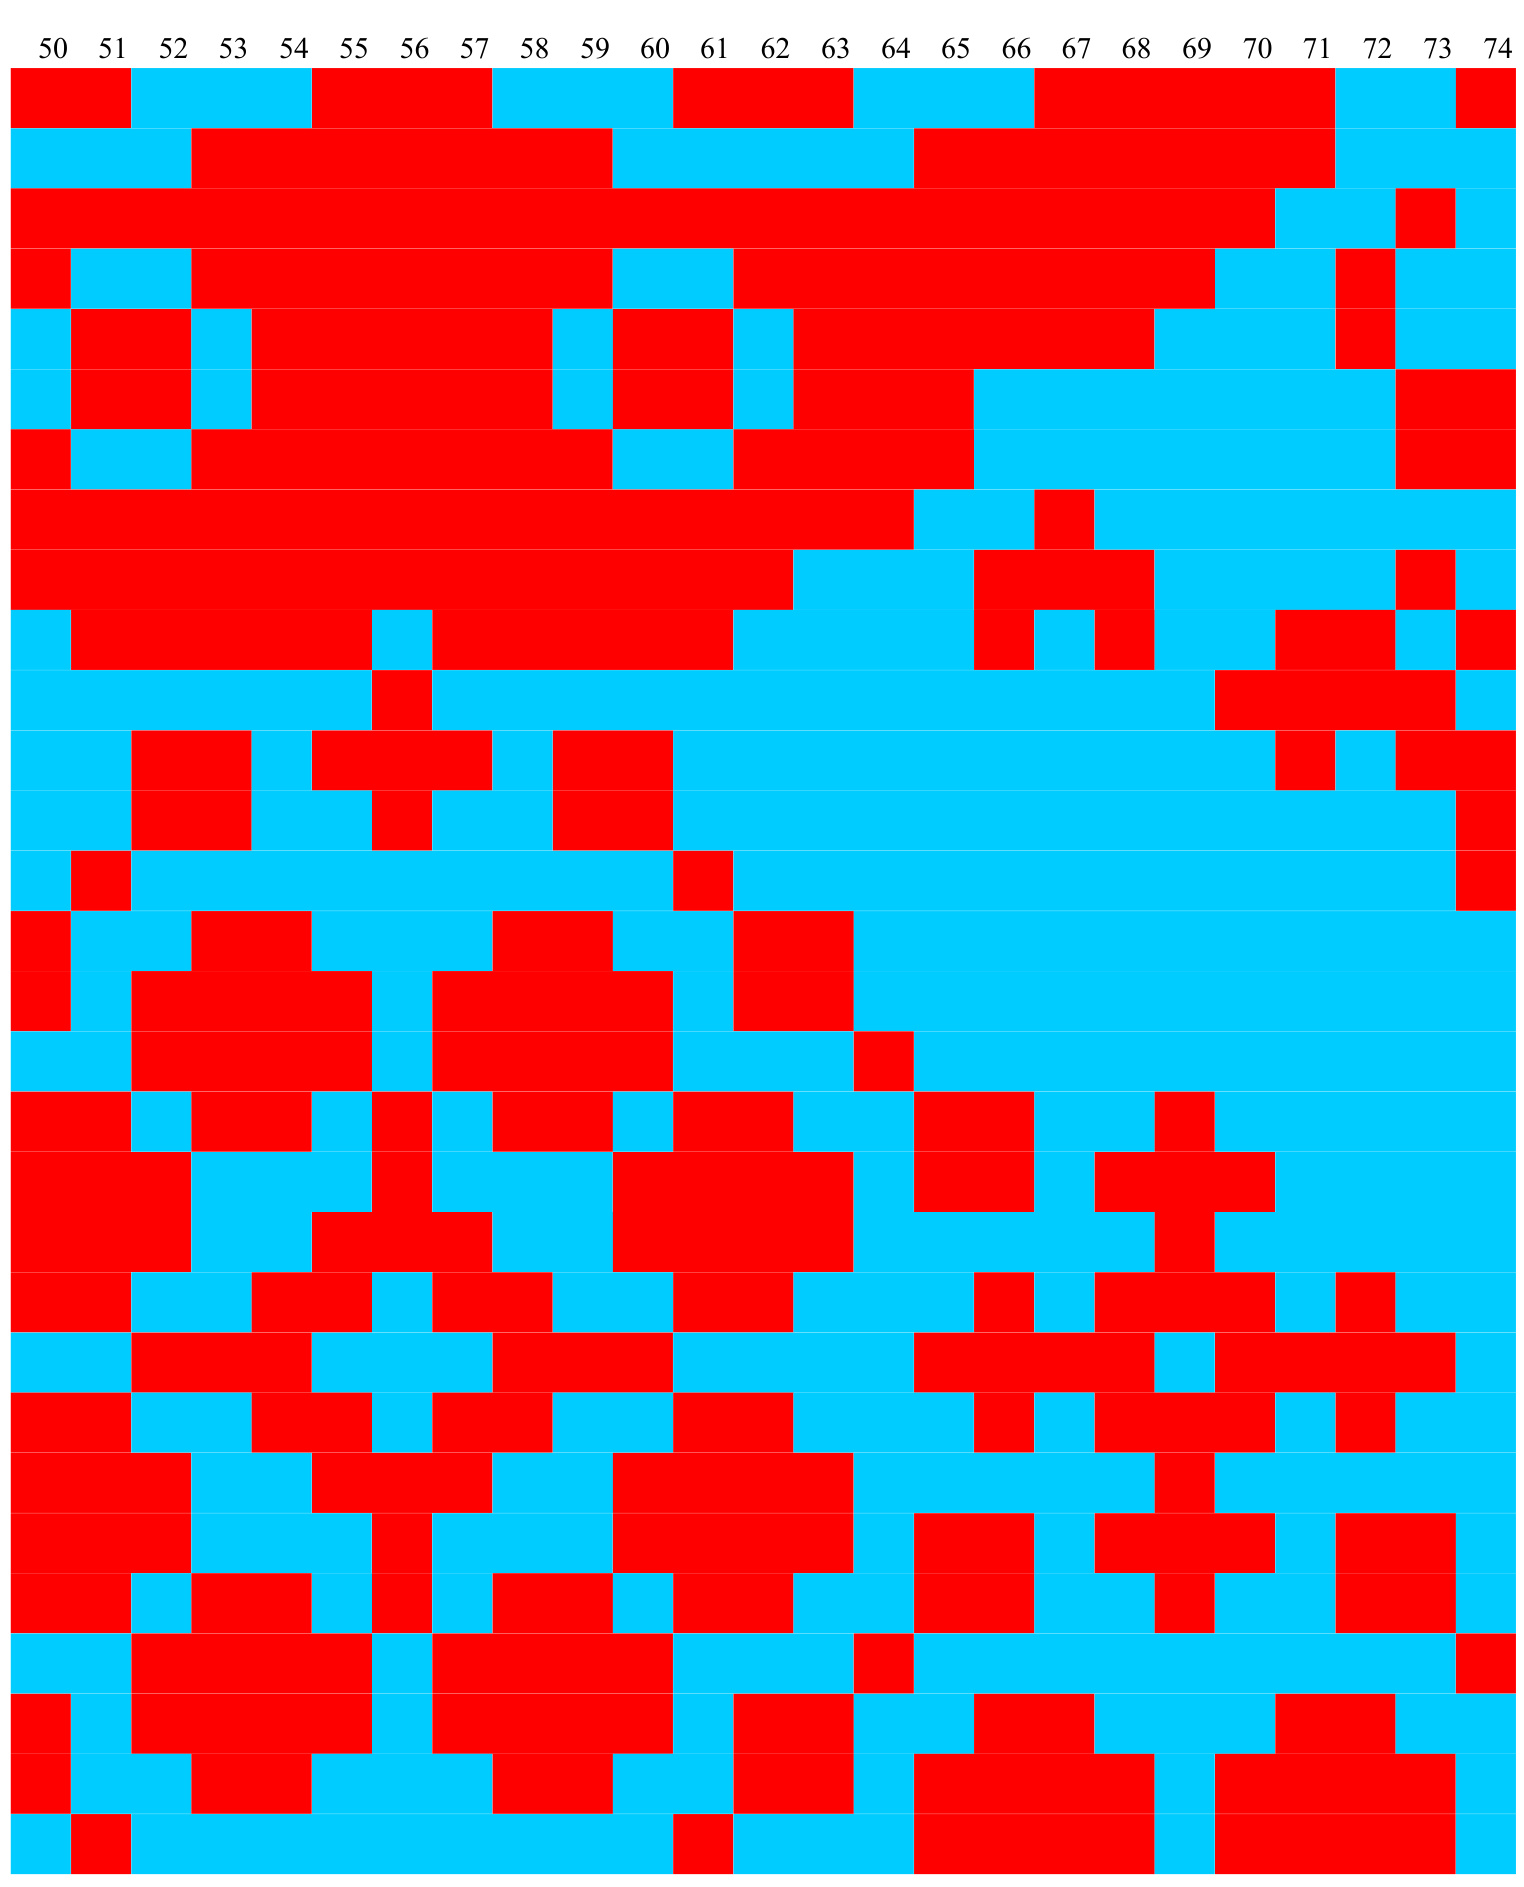
Front Chart——1D
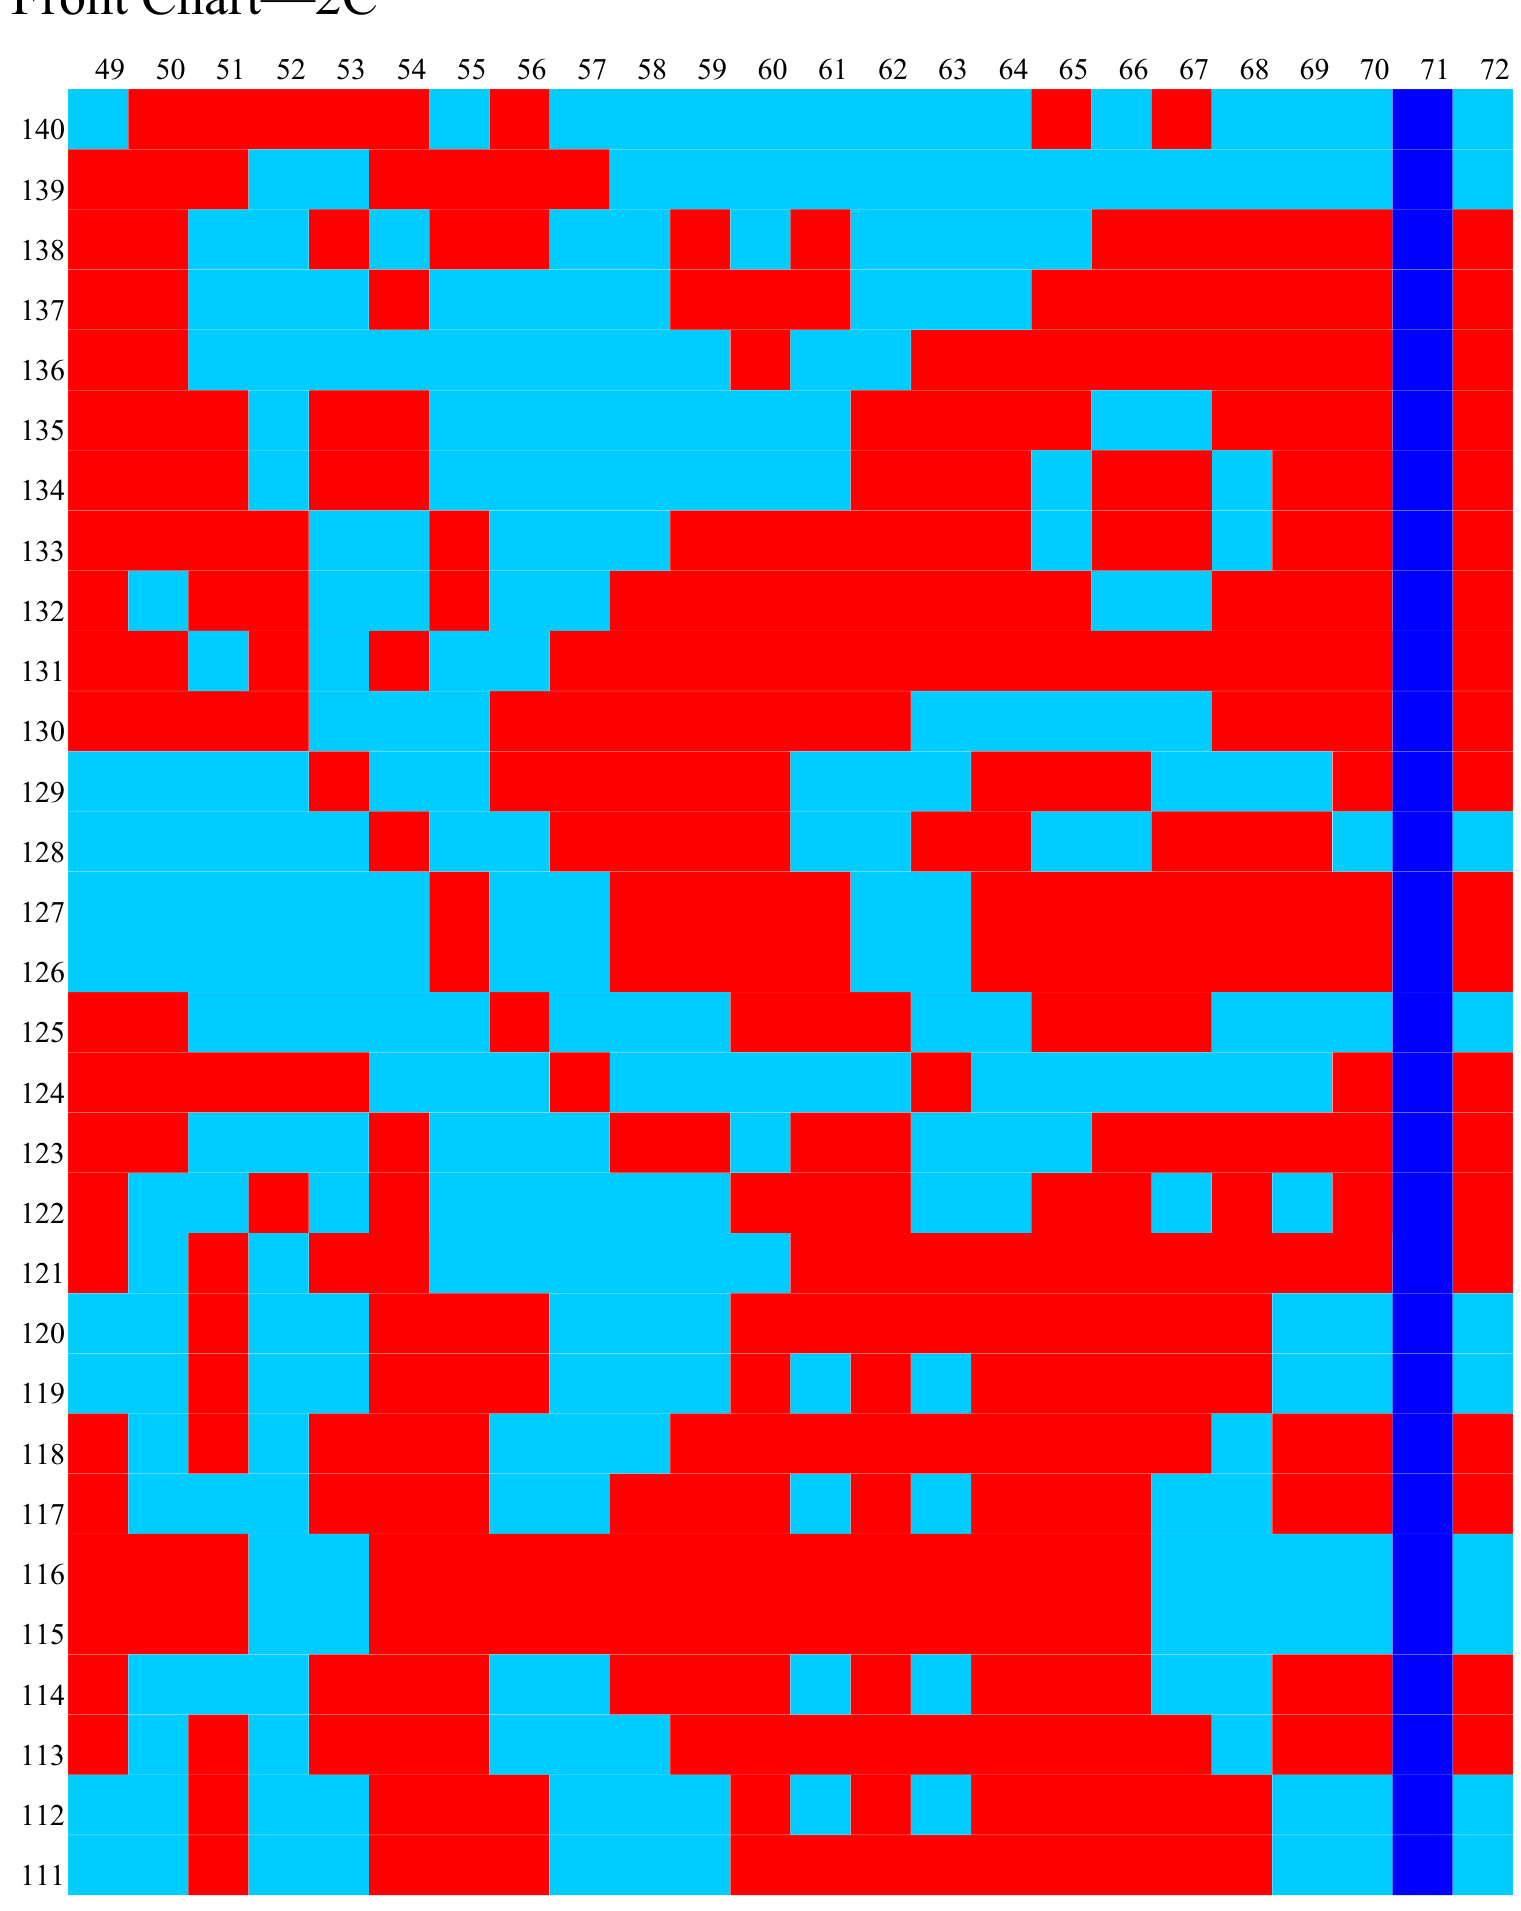
Front Chart—2C
Front Chart—3C
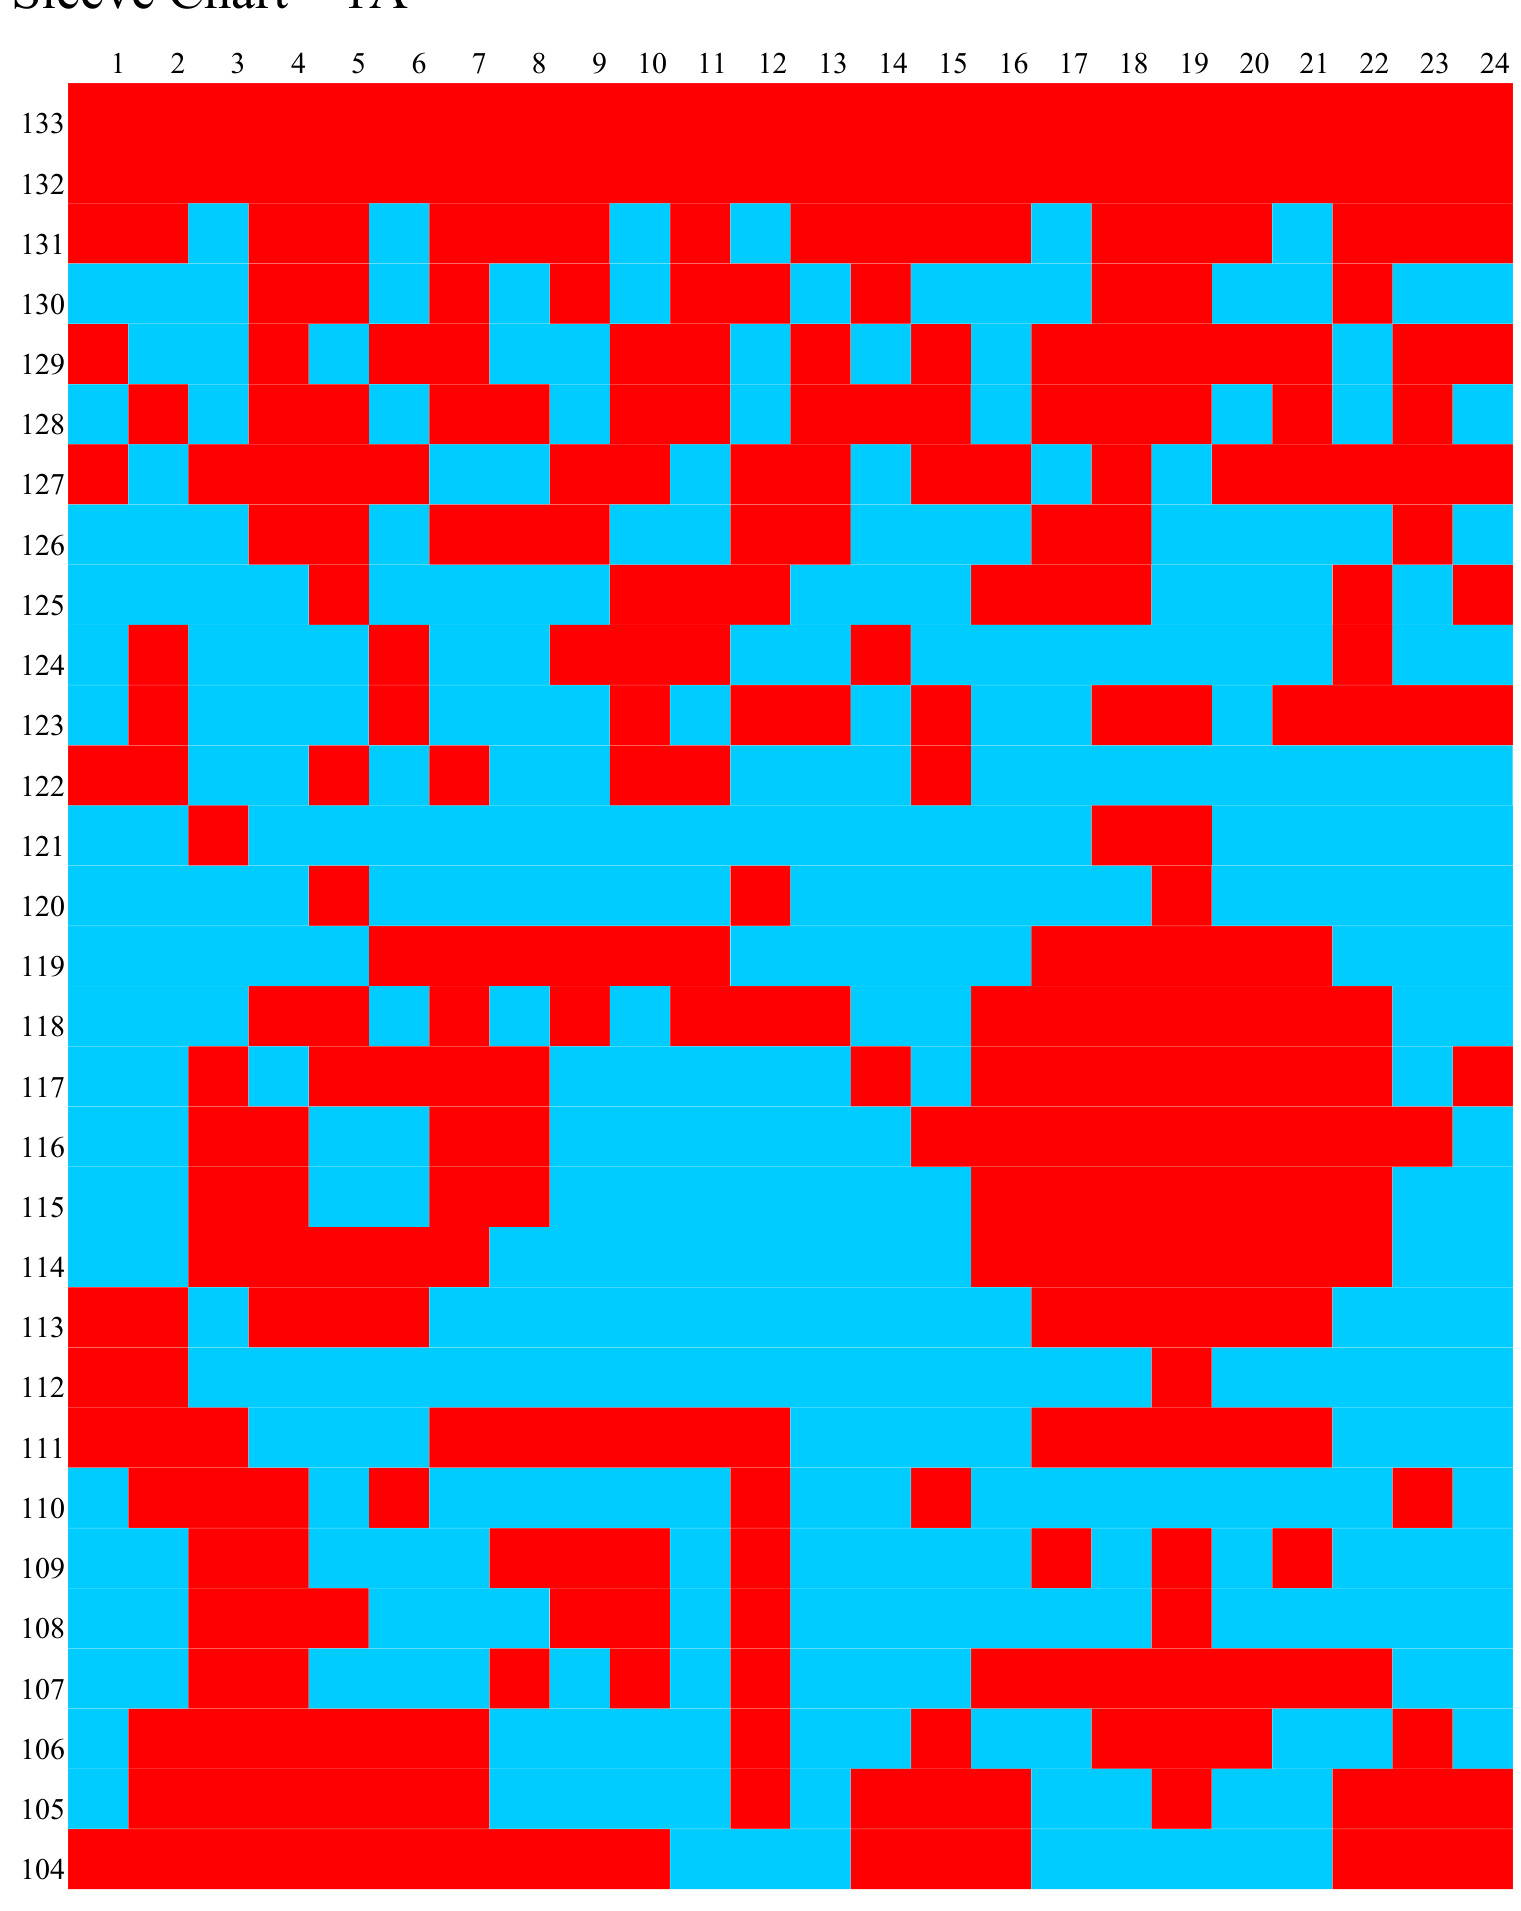
Sleeve Chart—1A
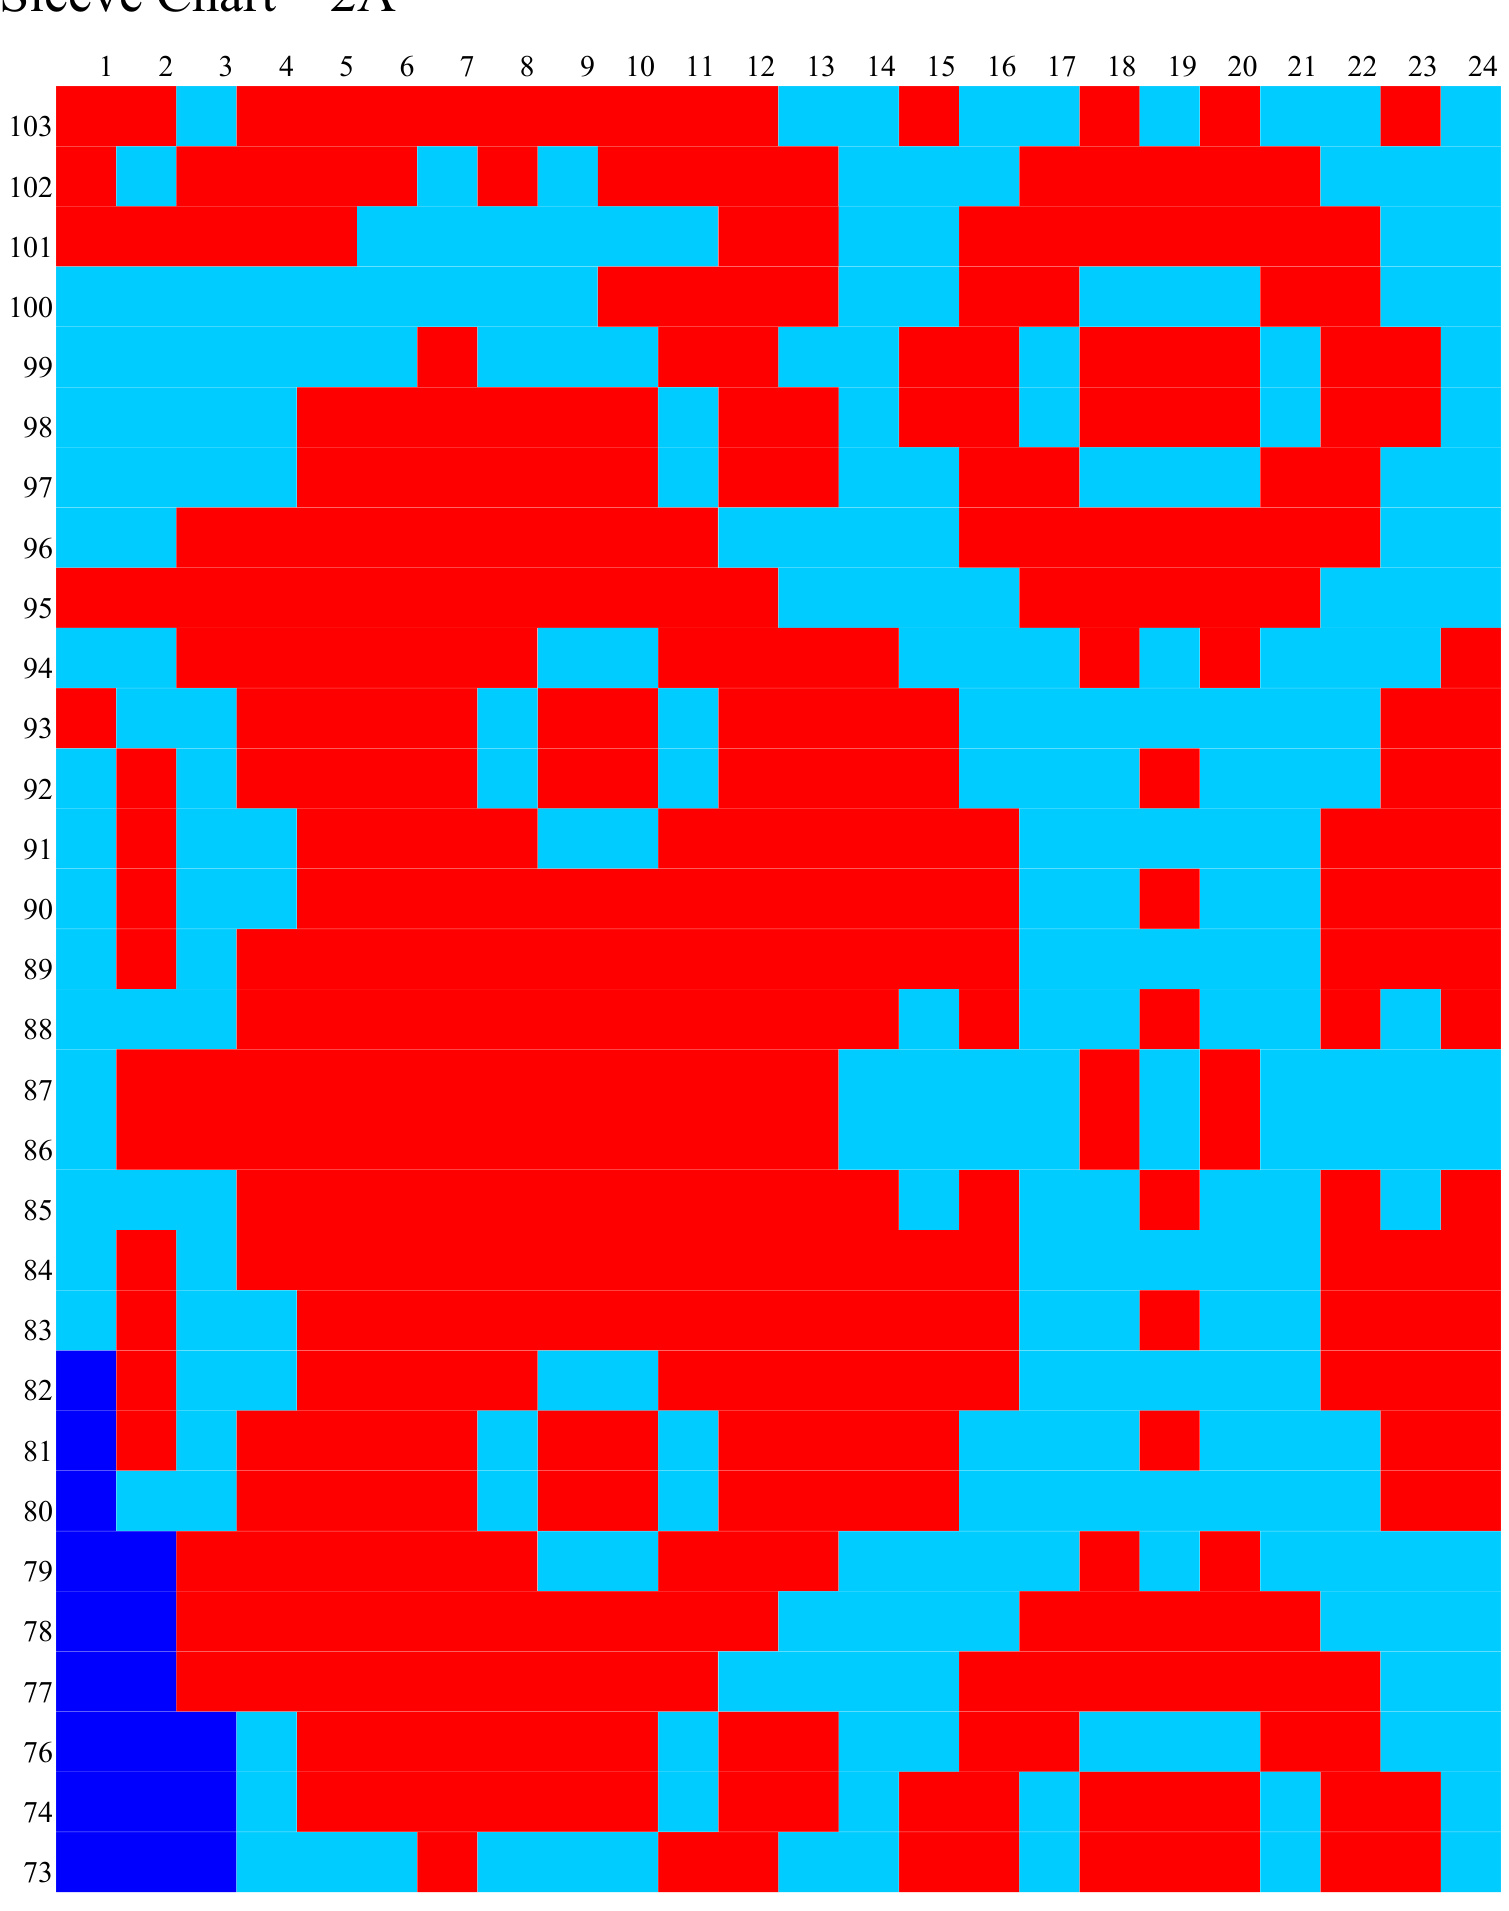
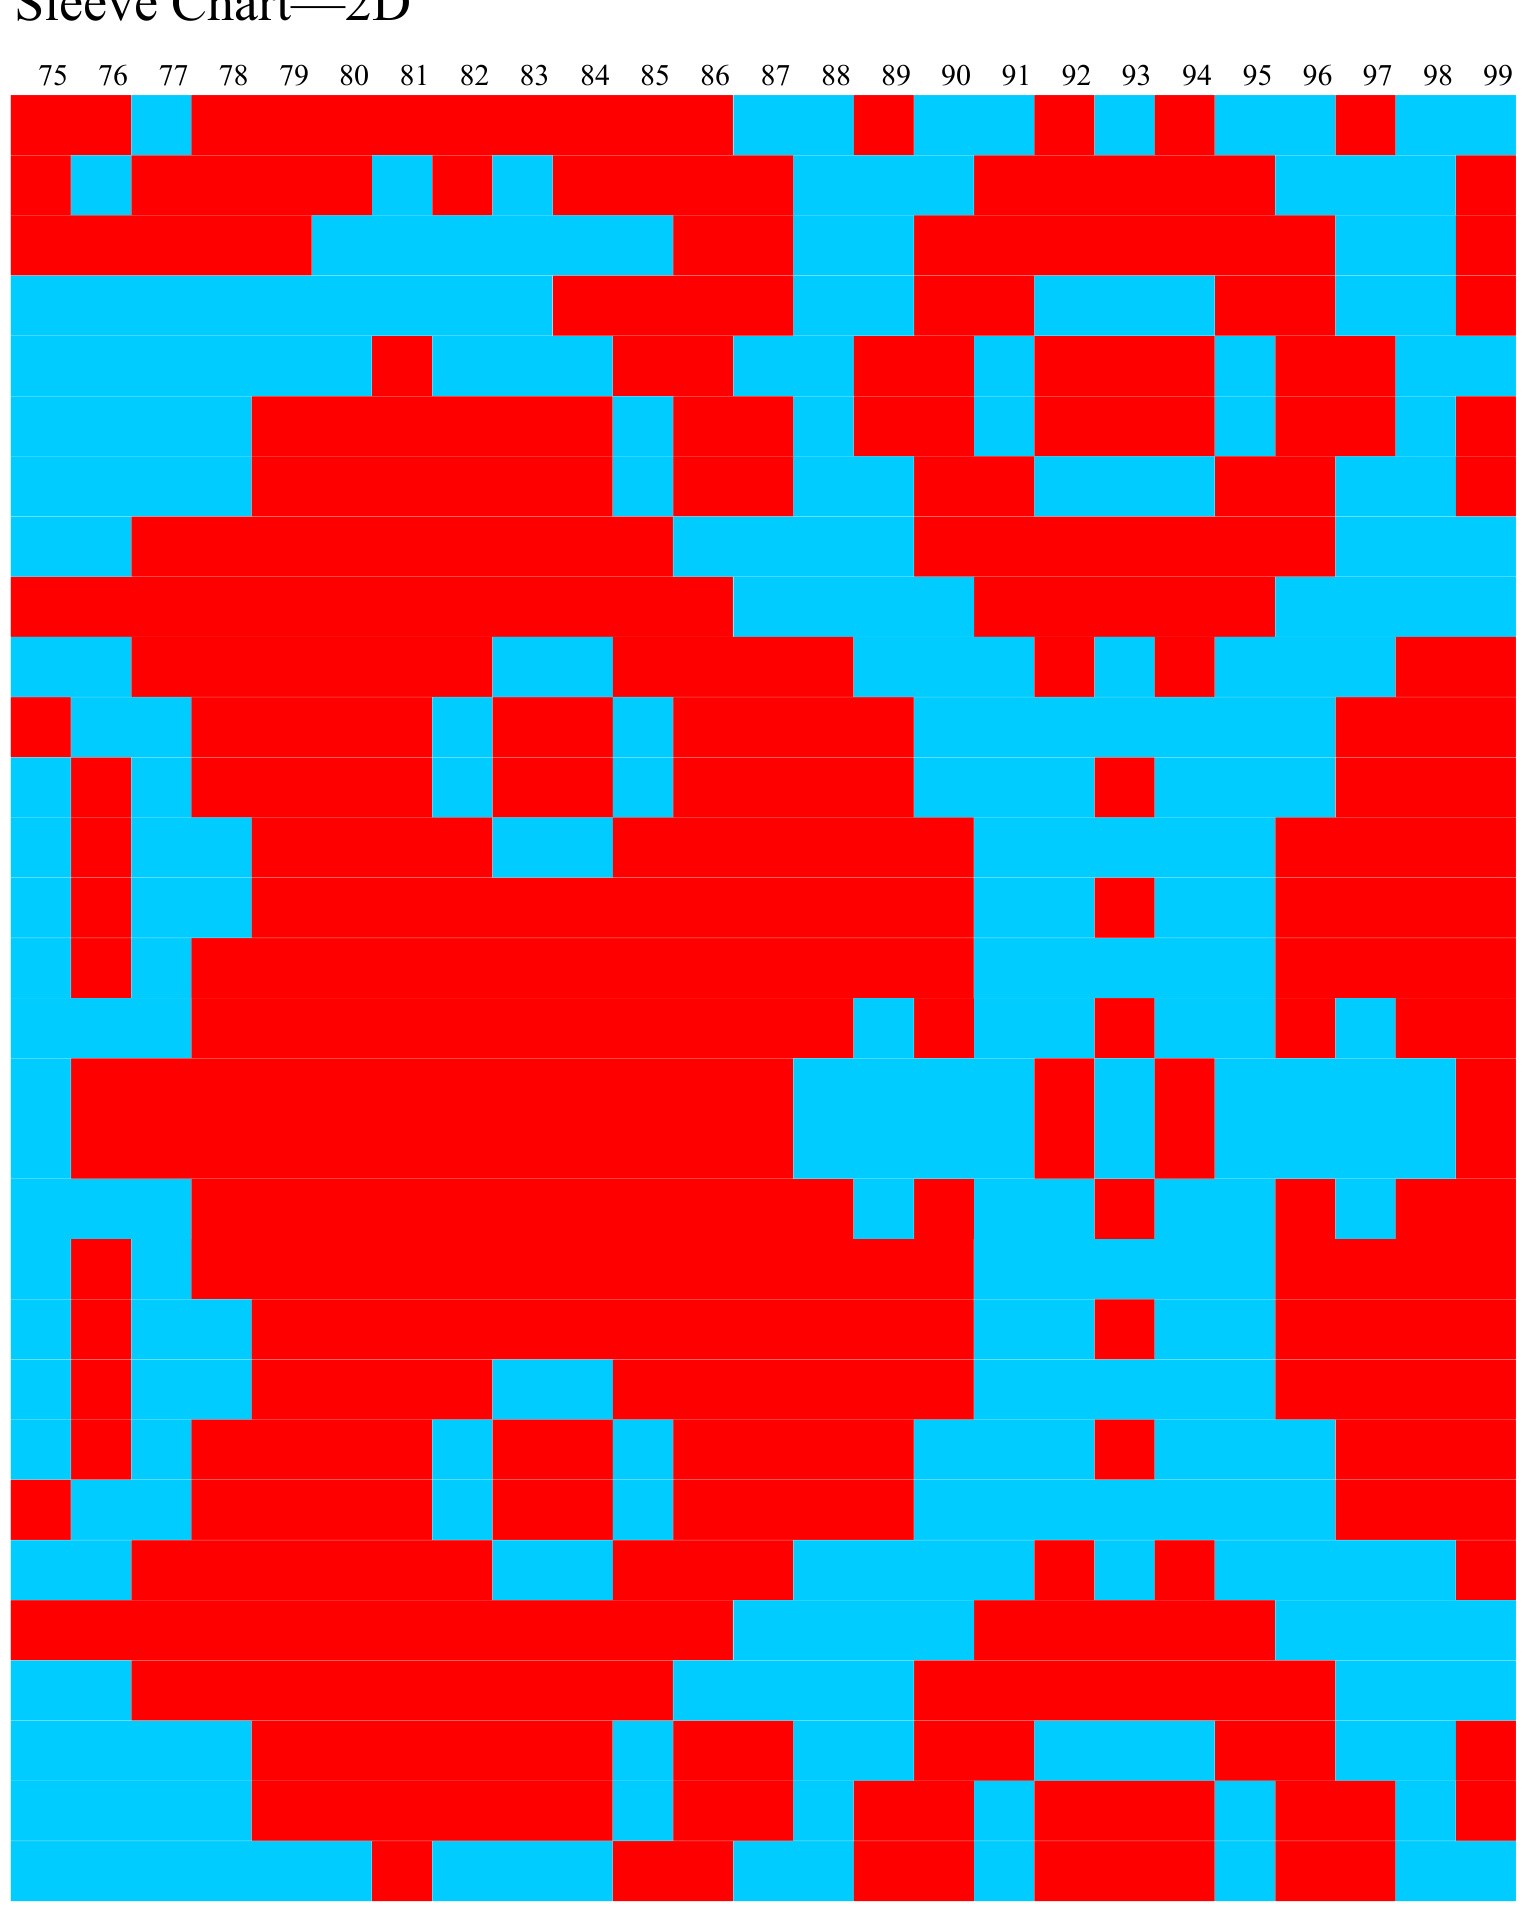
Sleeve Chart—2A
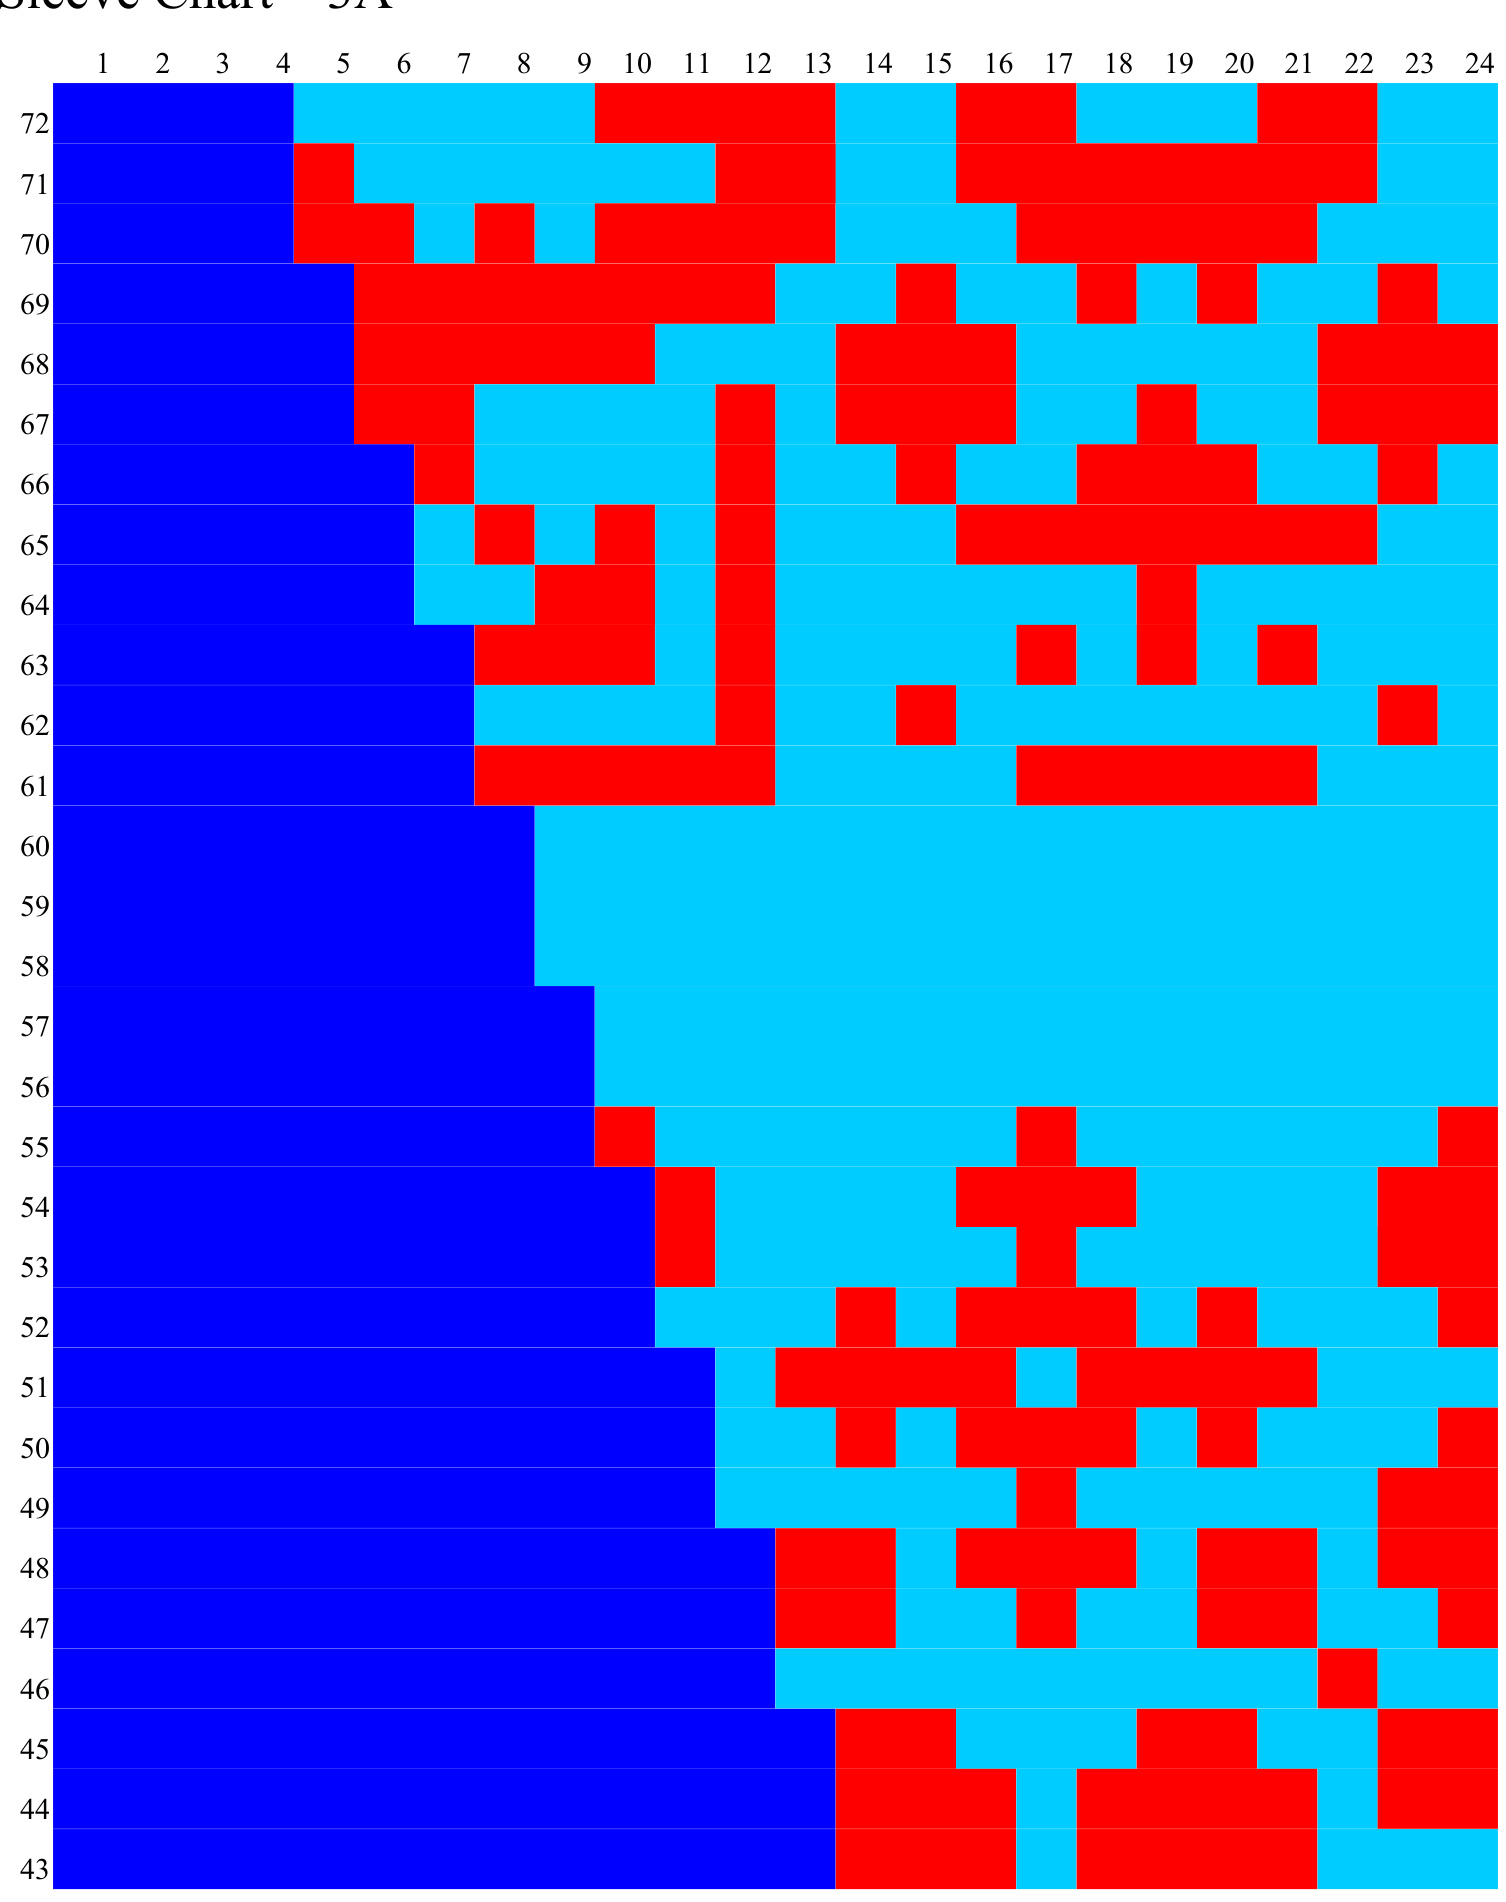
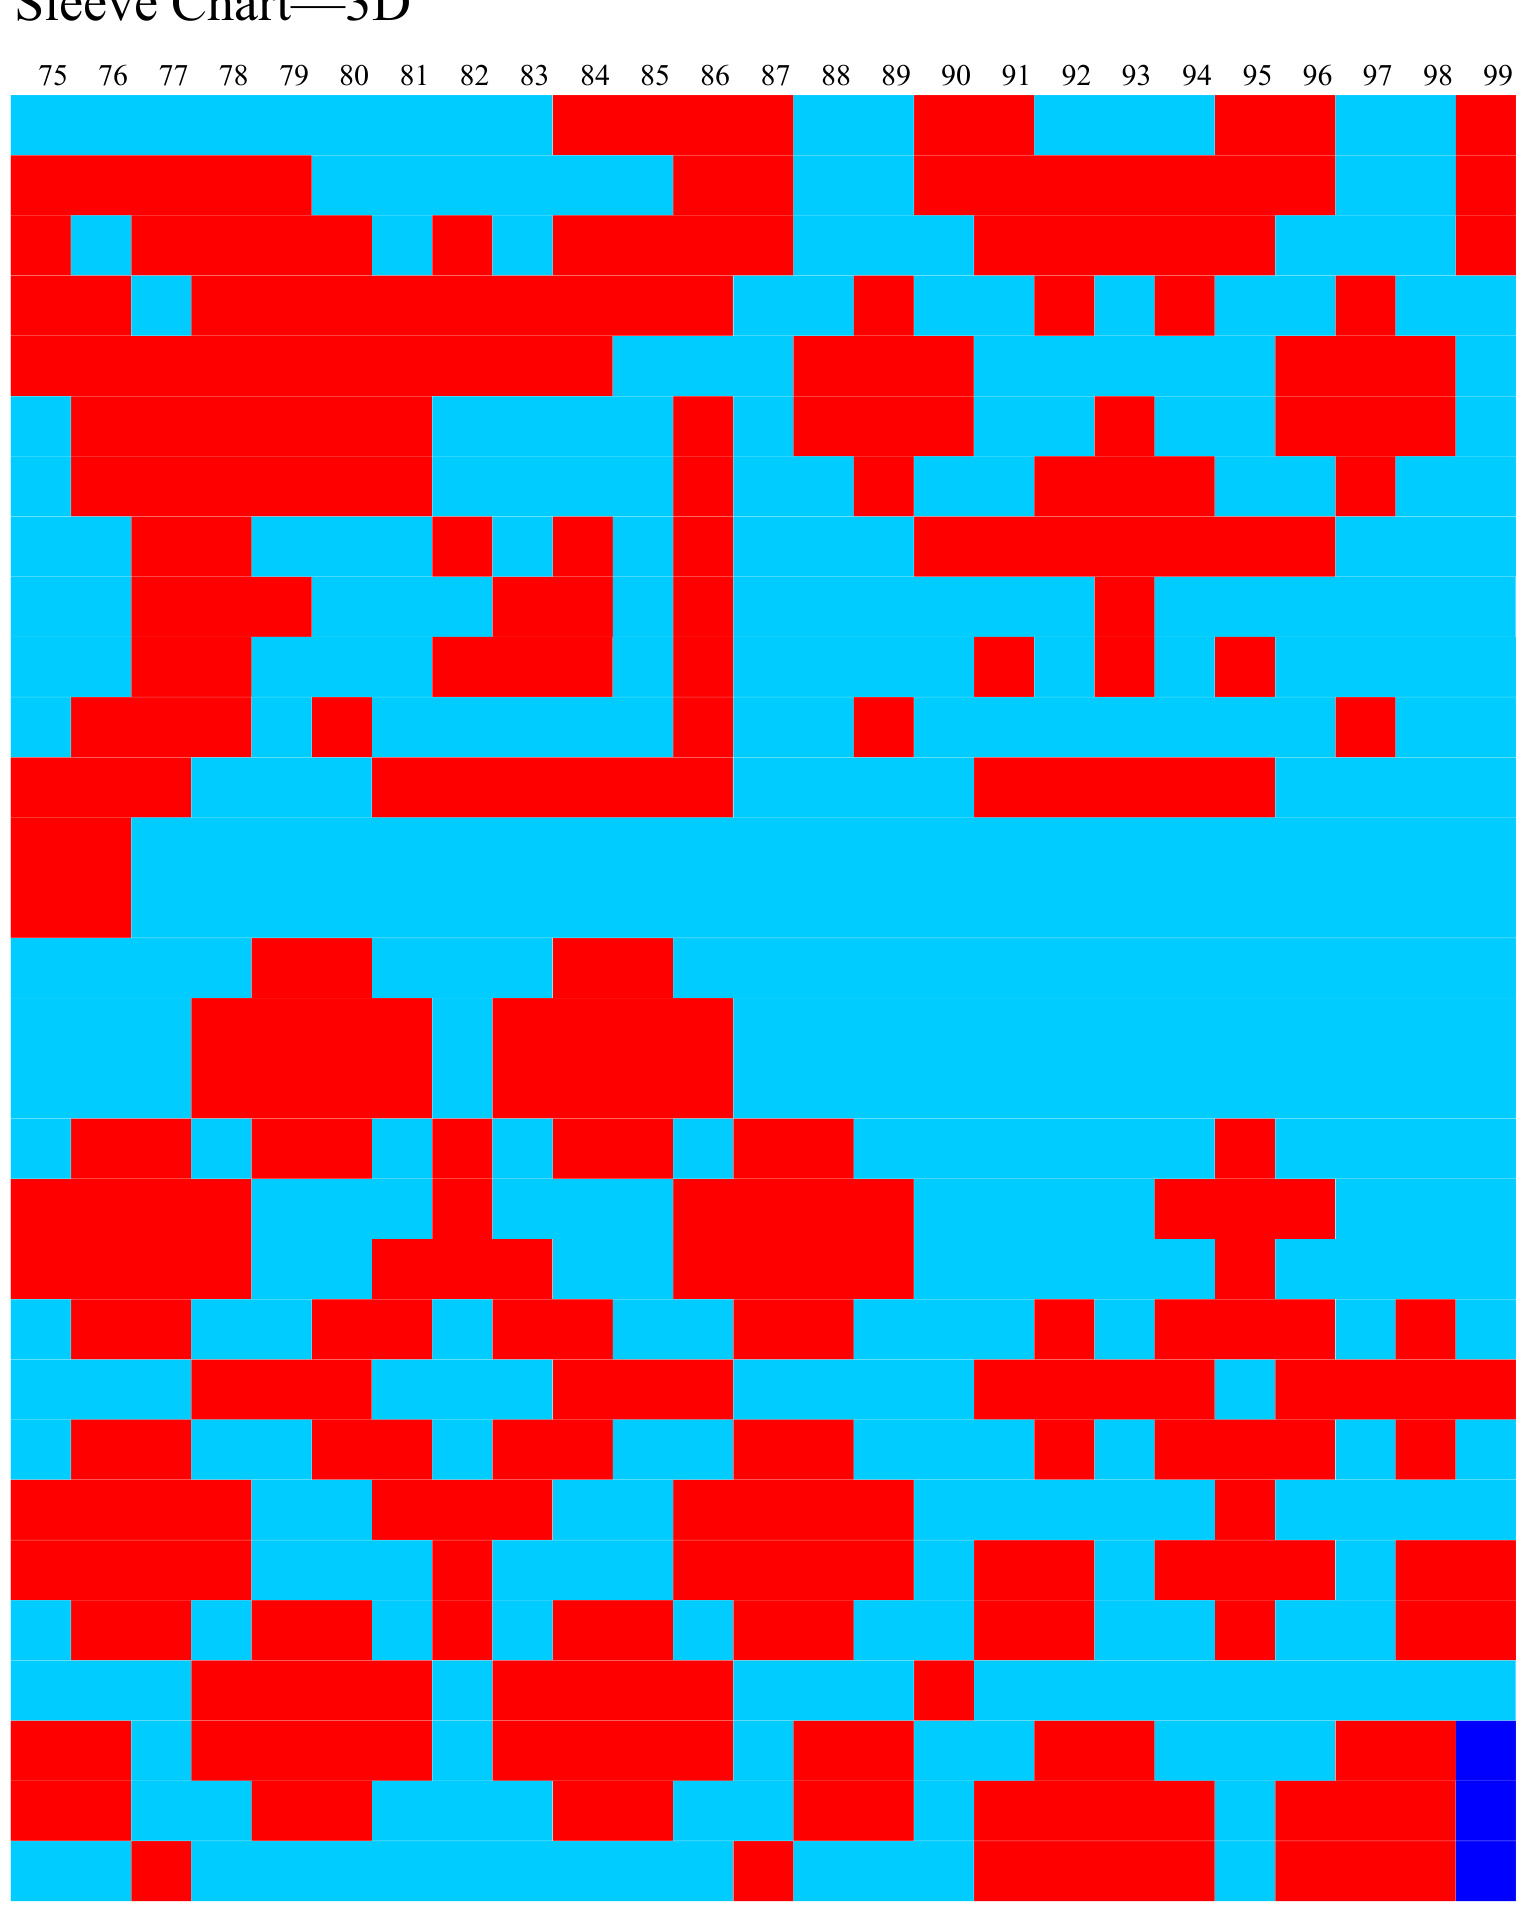
Sleeve Chart——3A
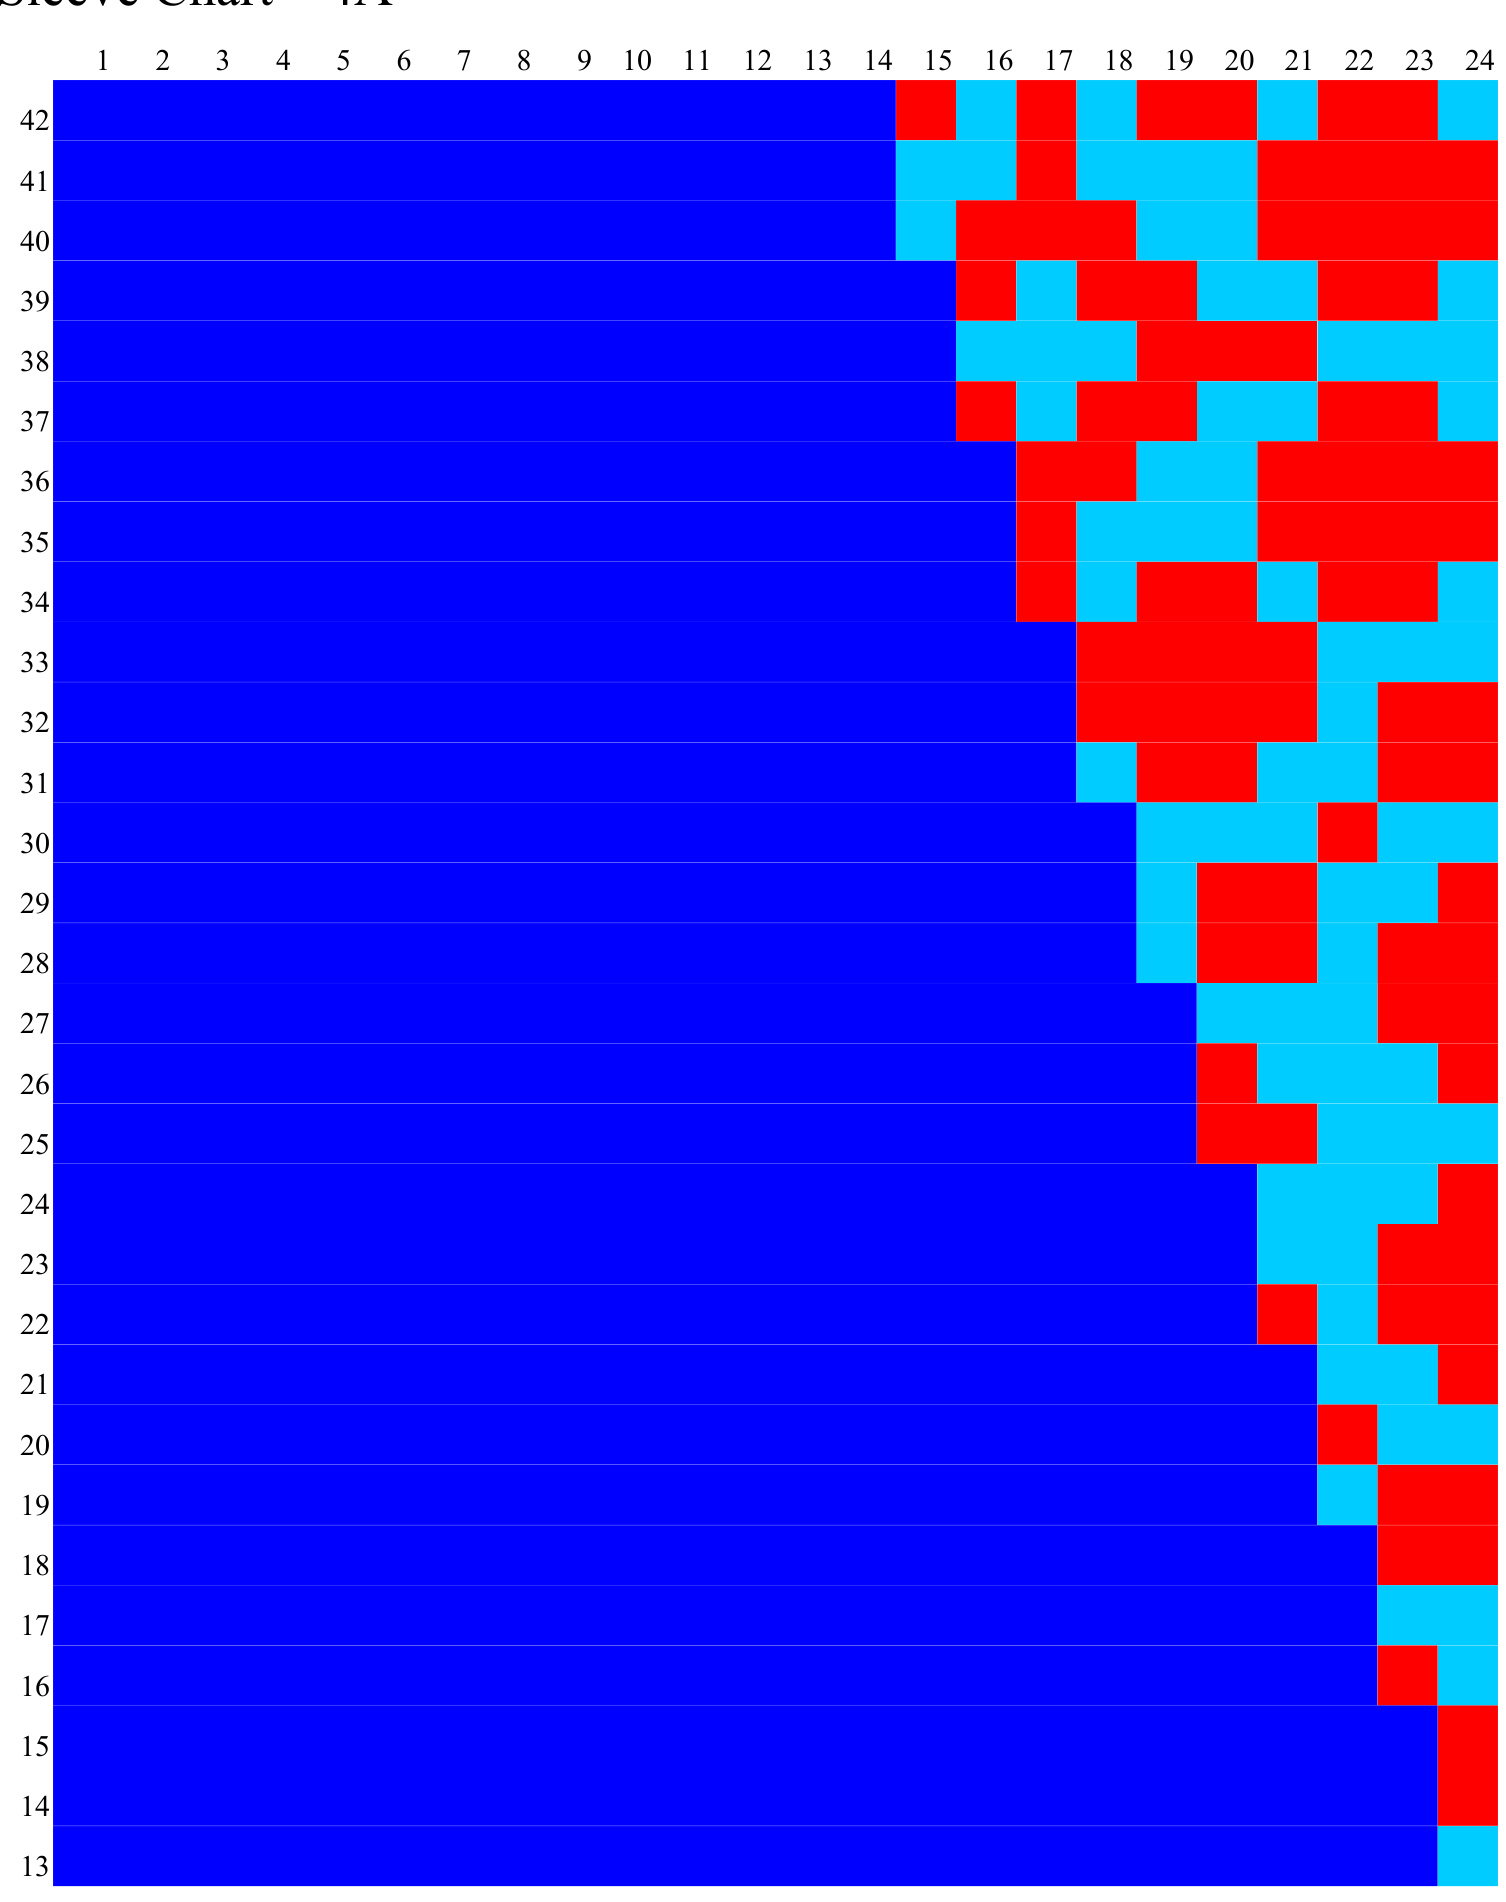
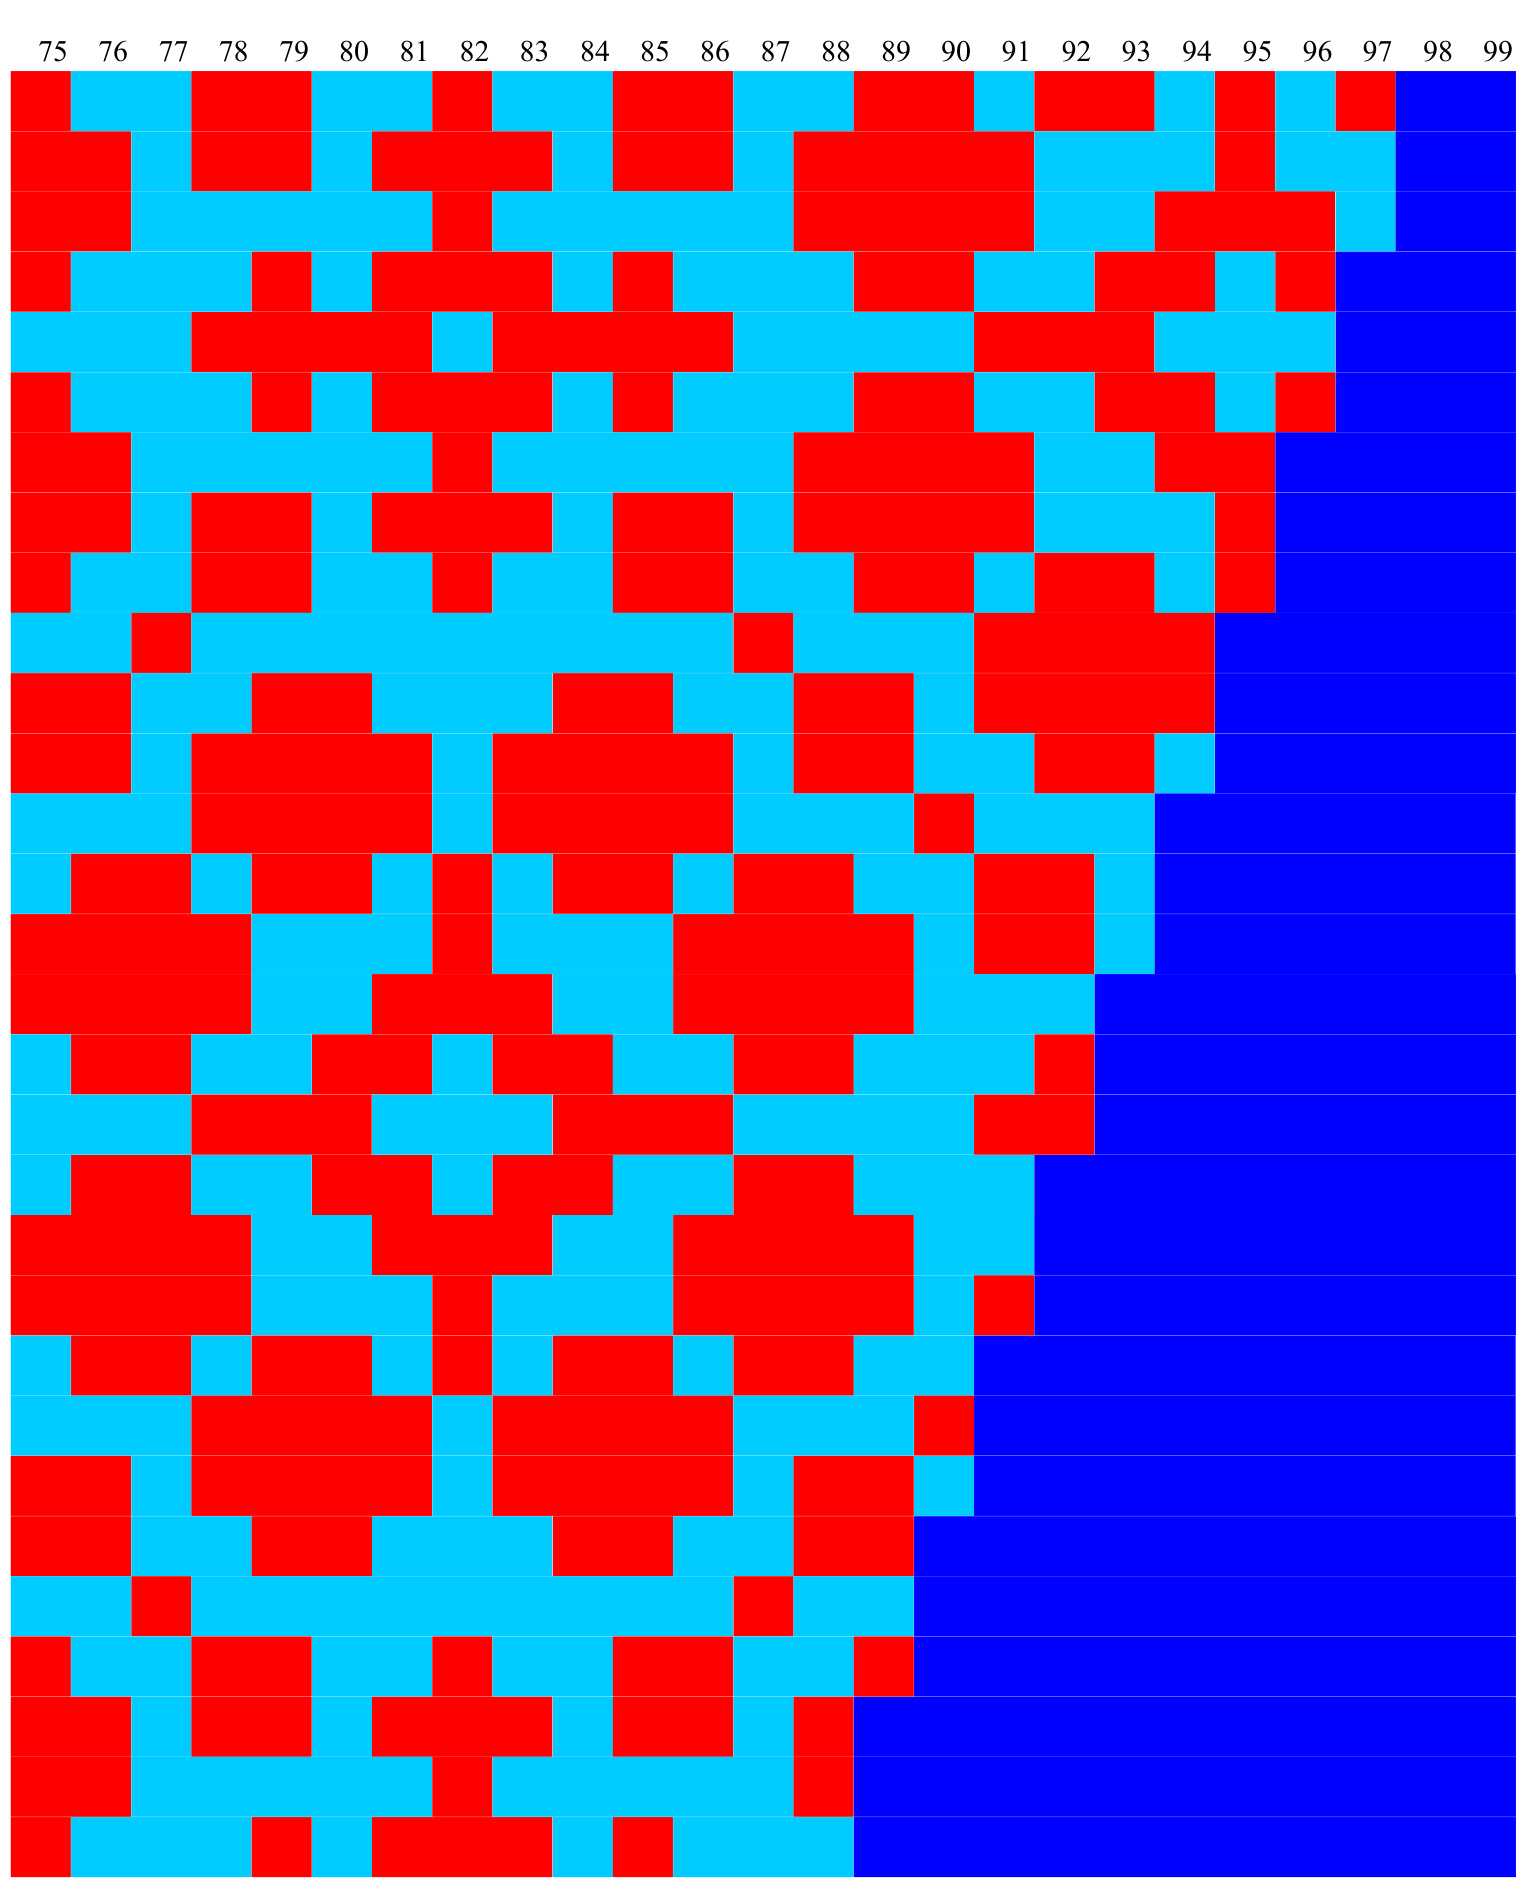
Sleeve Chart—4A
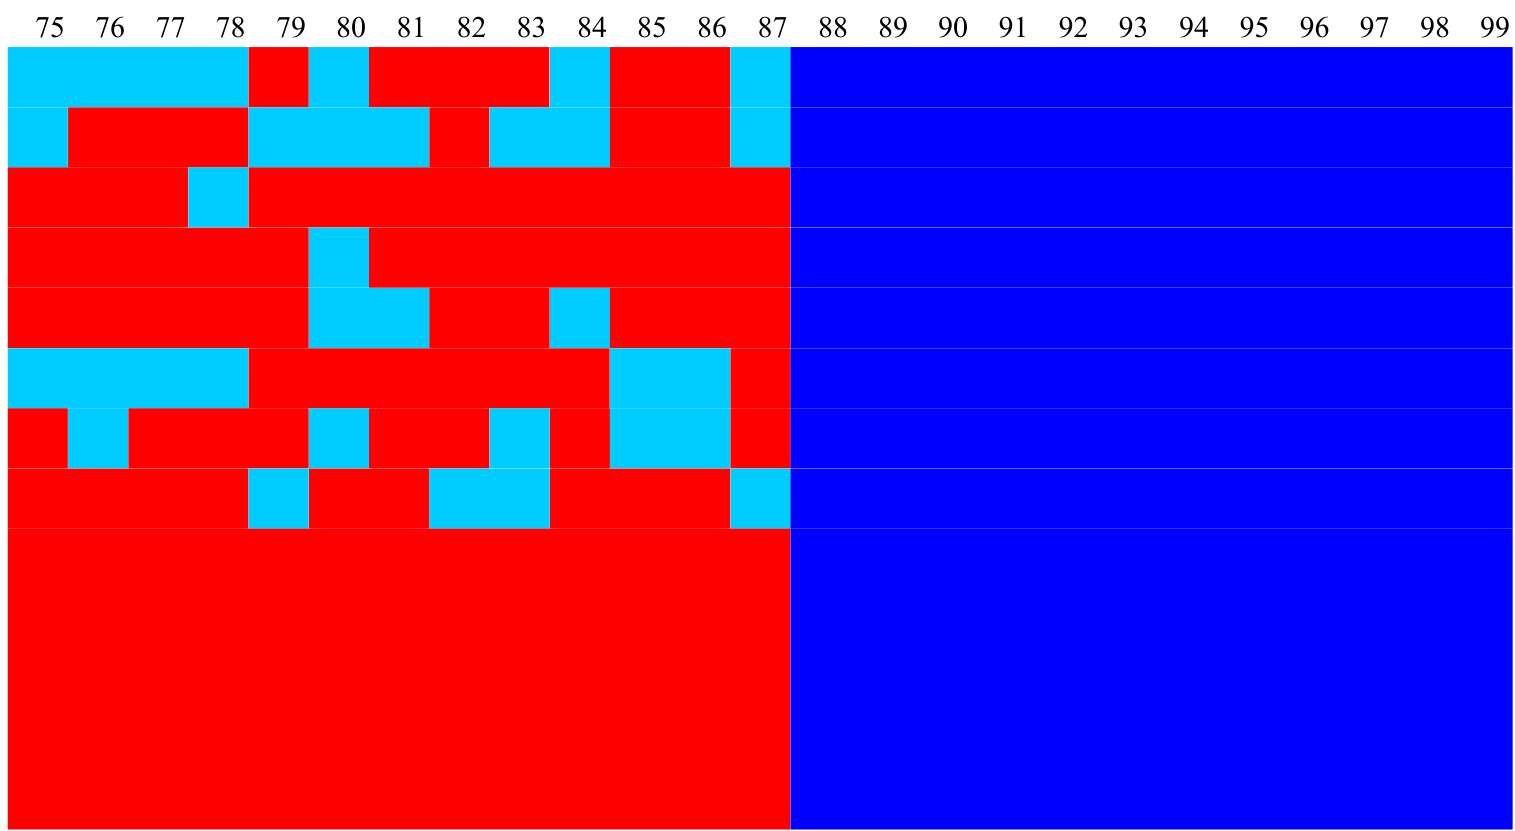
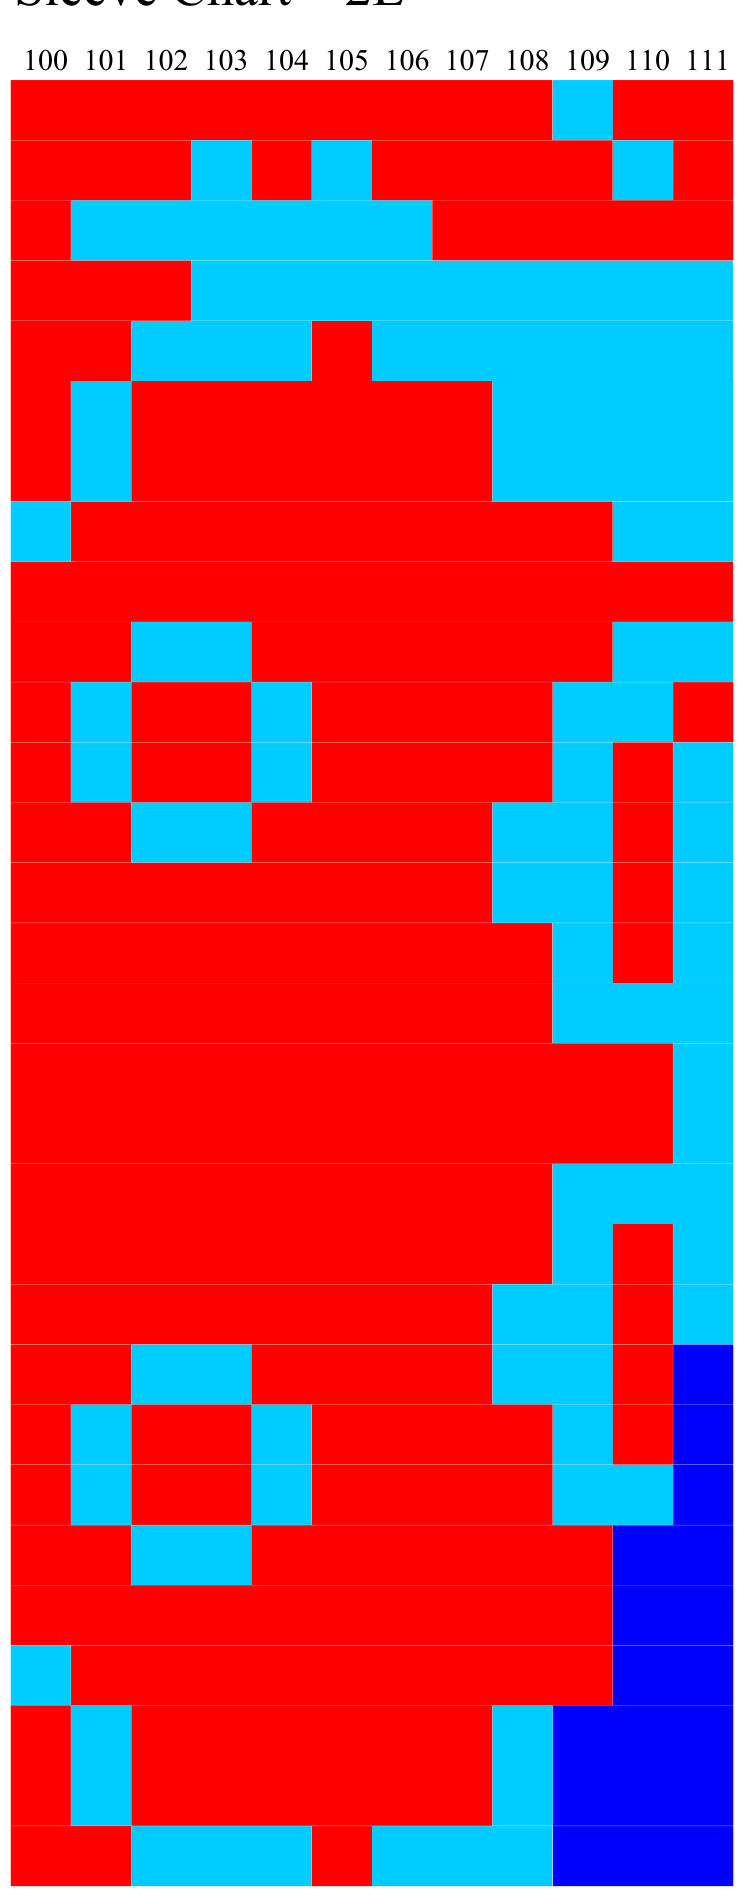
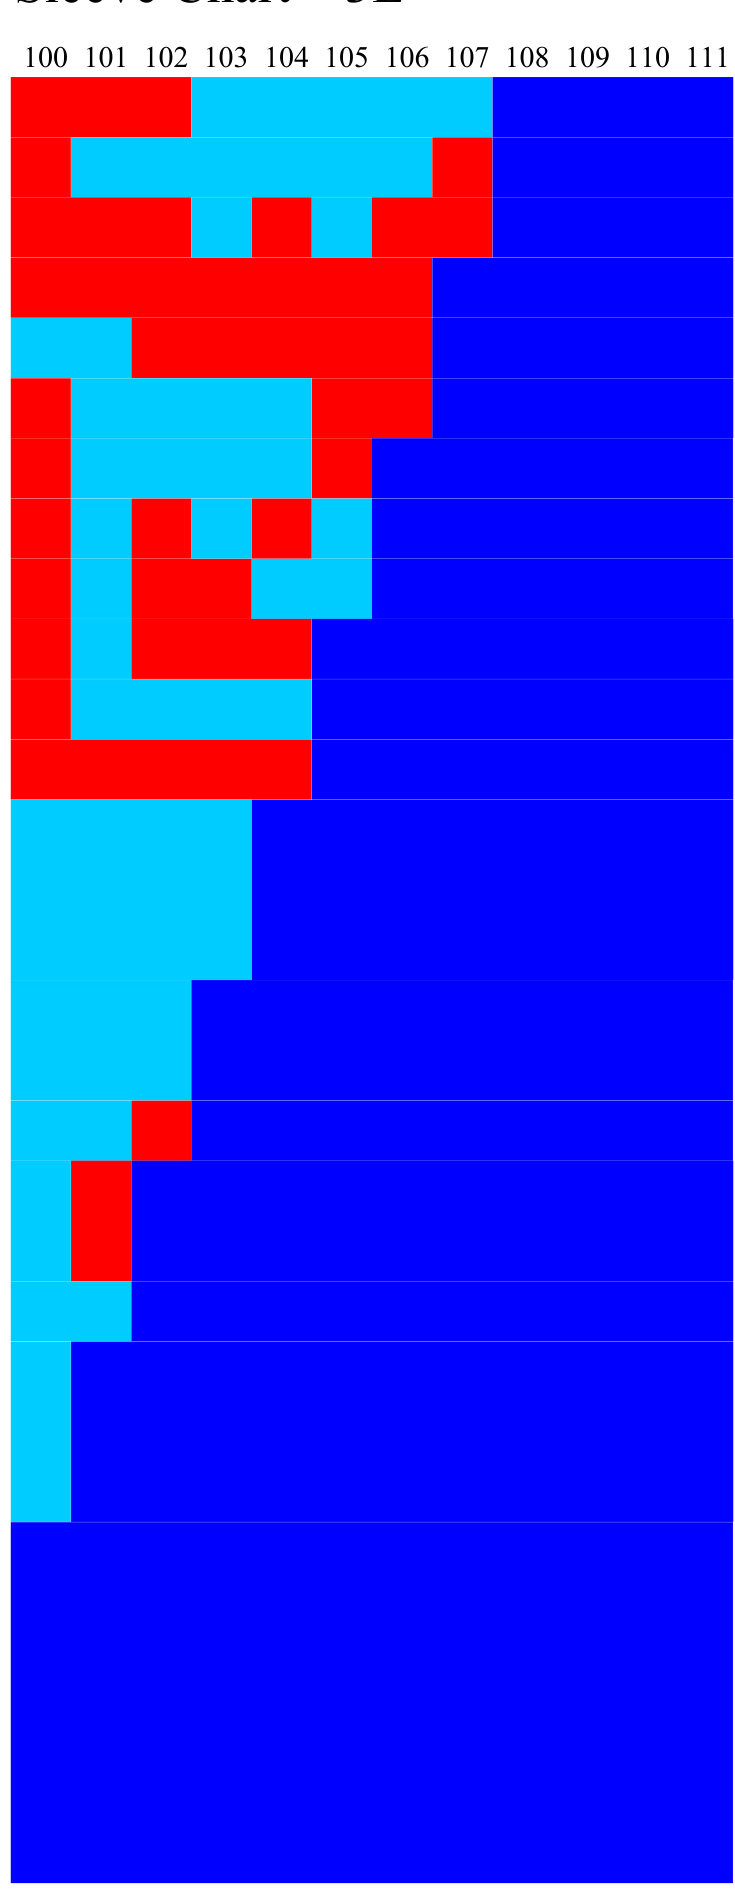
Sleeve Chart—5A

Sleeve Chart——1B
Sleeve Chart——2B
Sleeve Chart——3B
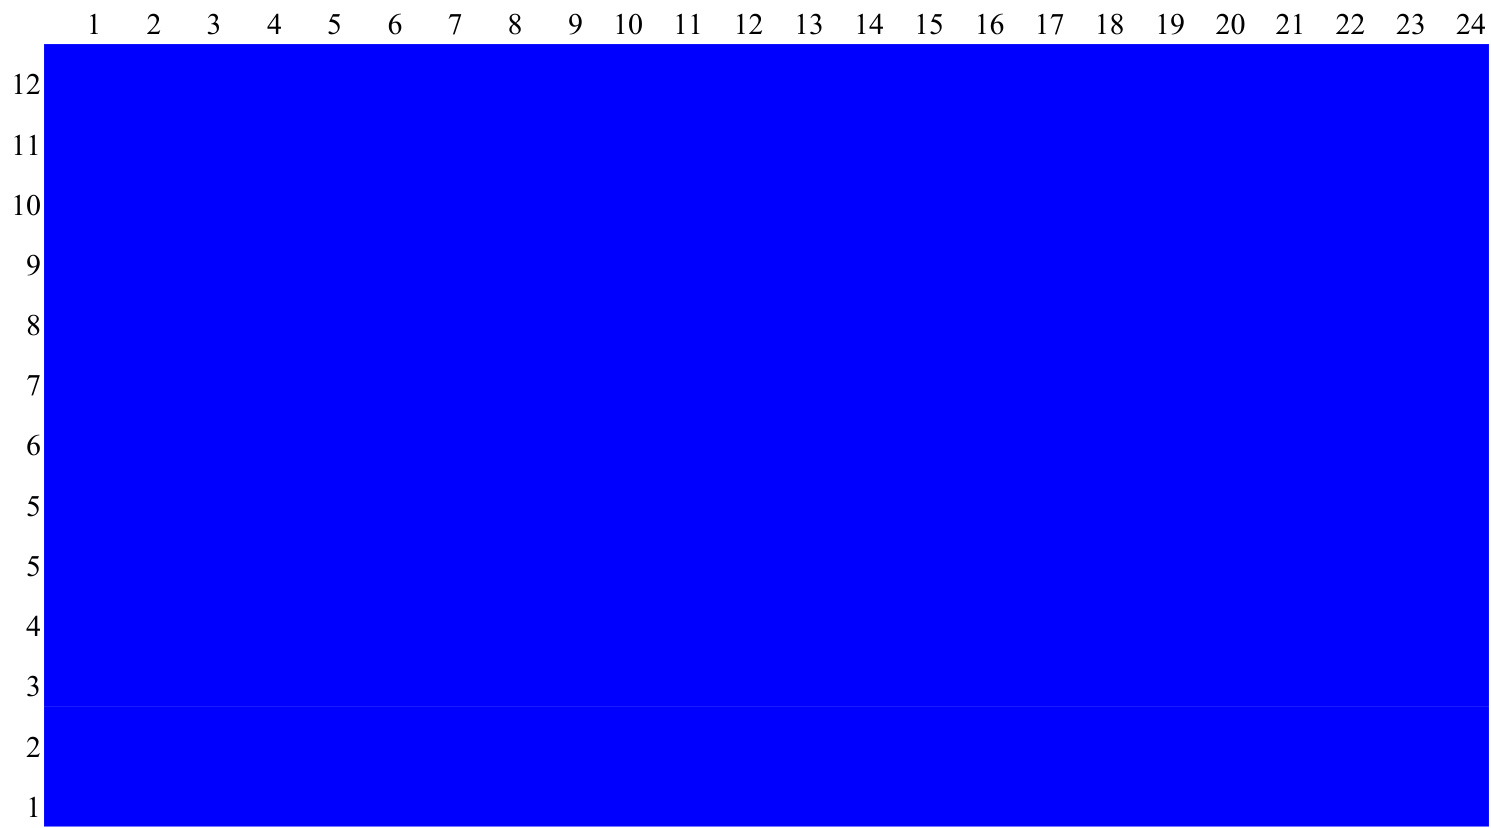
Sleeve Chart—4B
Sleeve Chart—5B
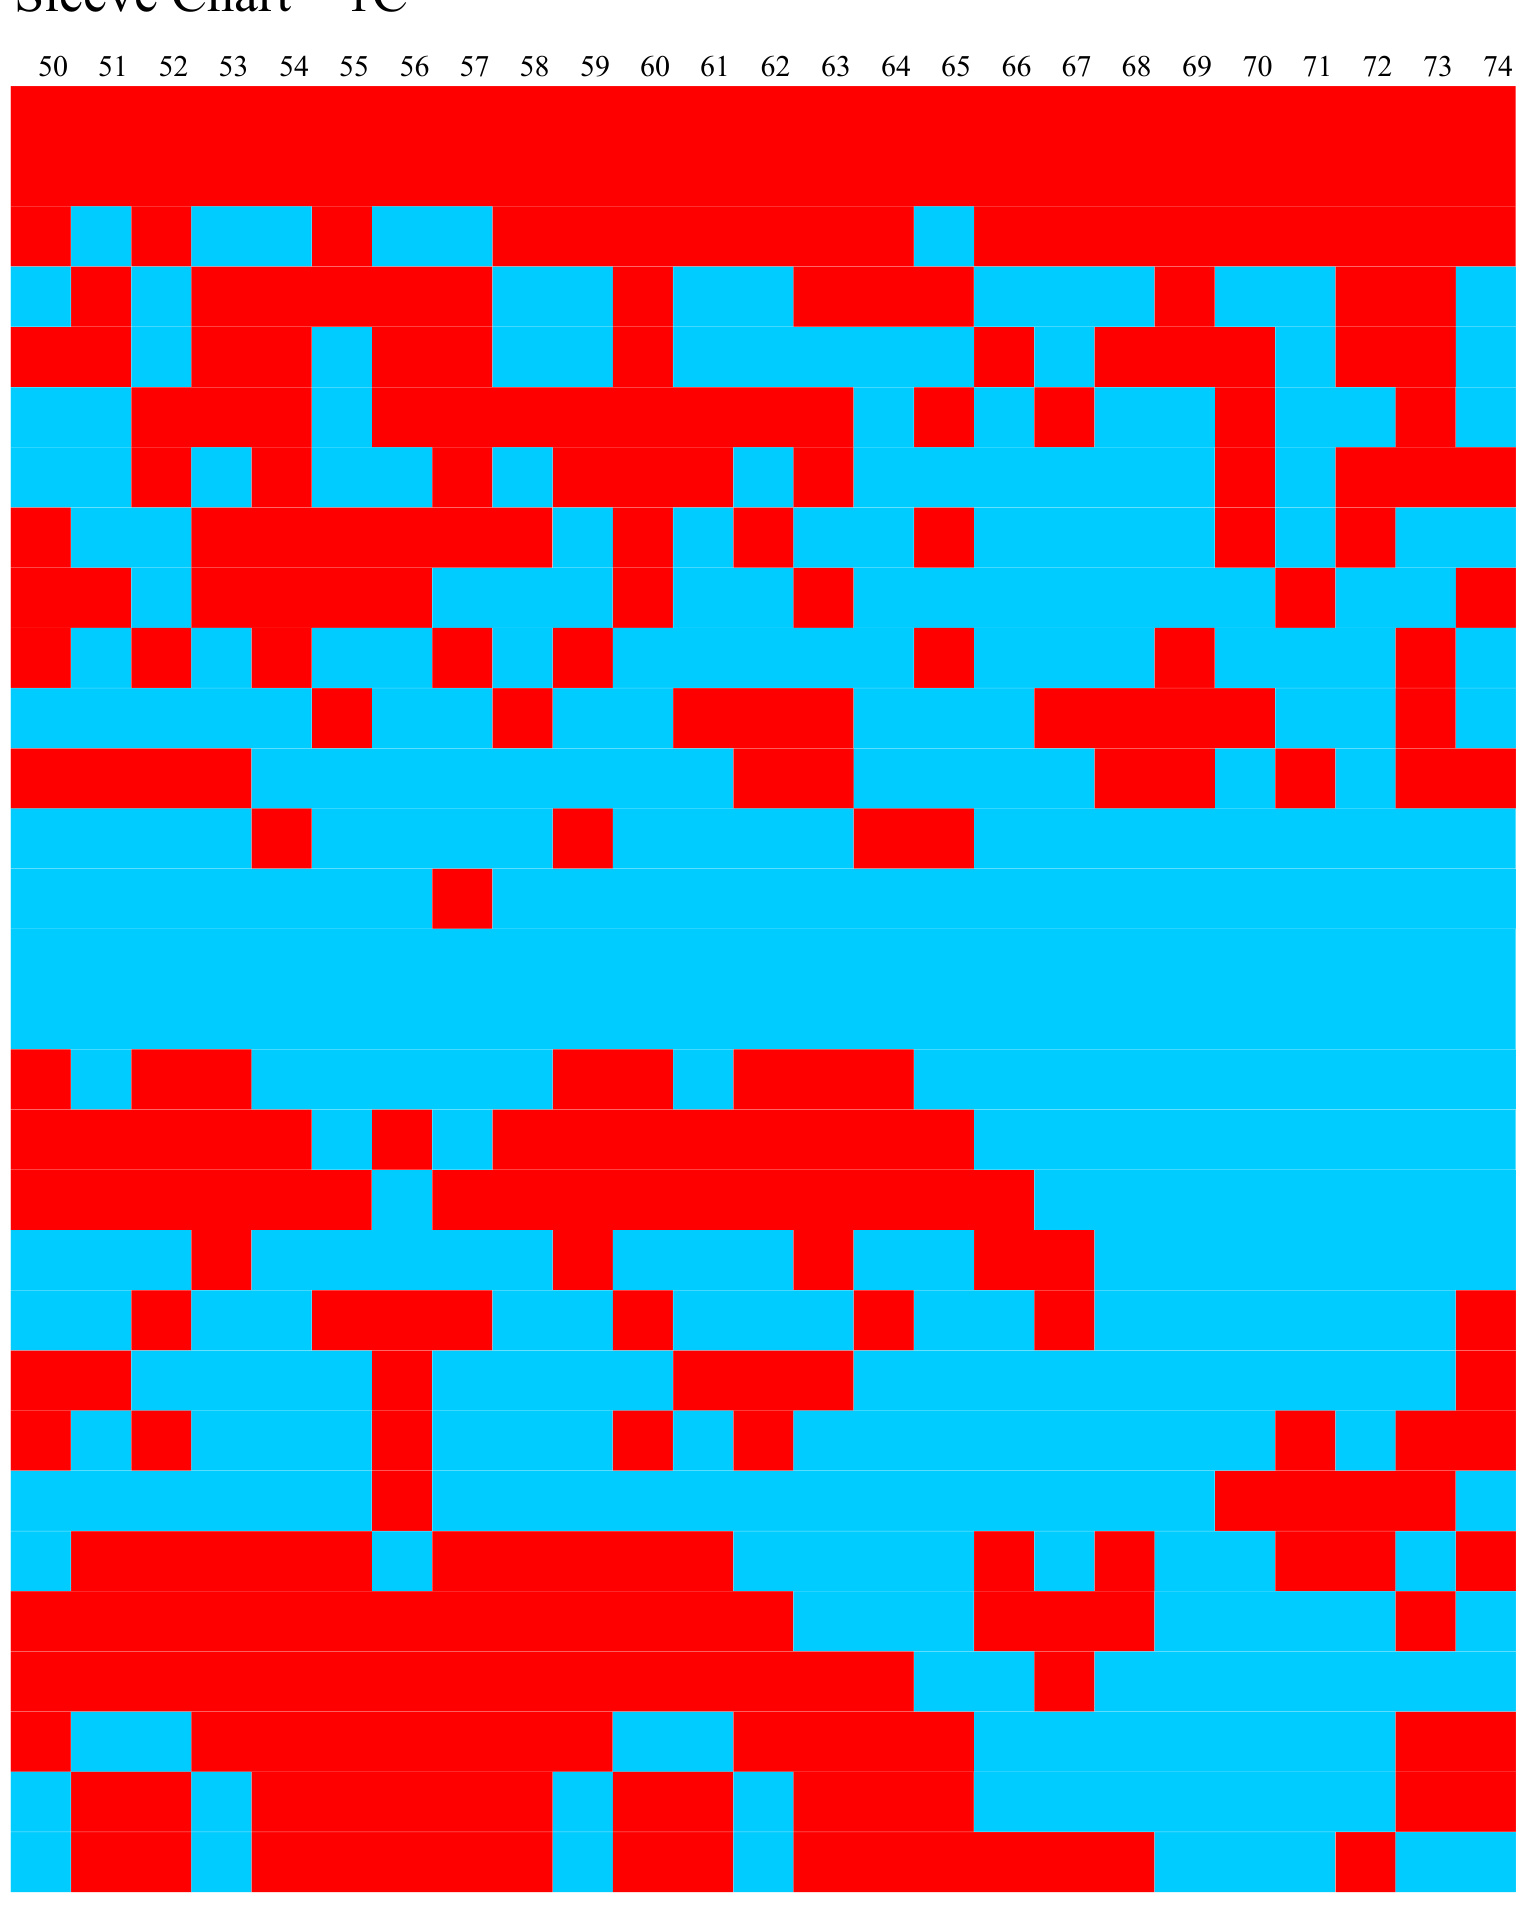
Sleeve Chart—1C
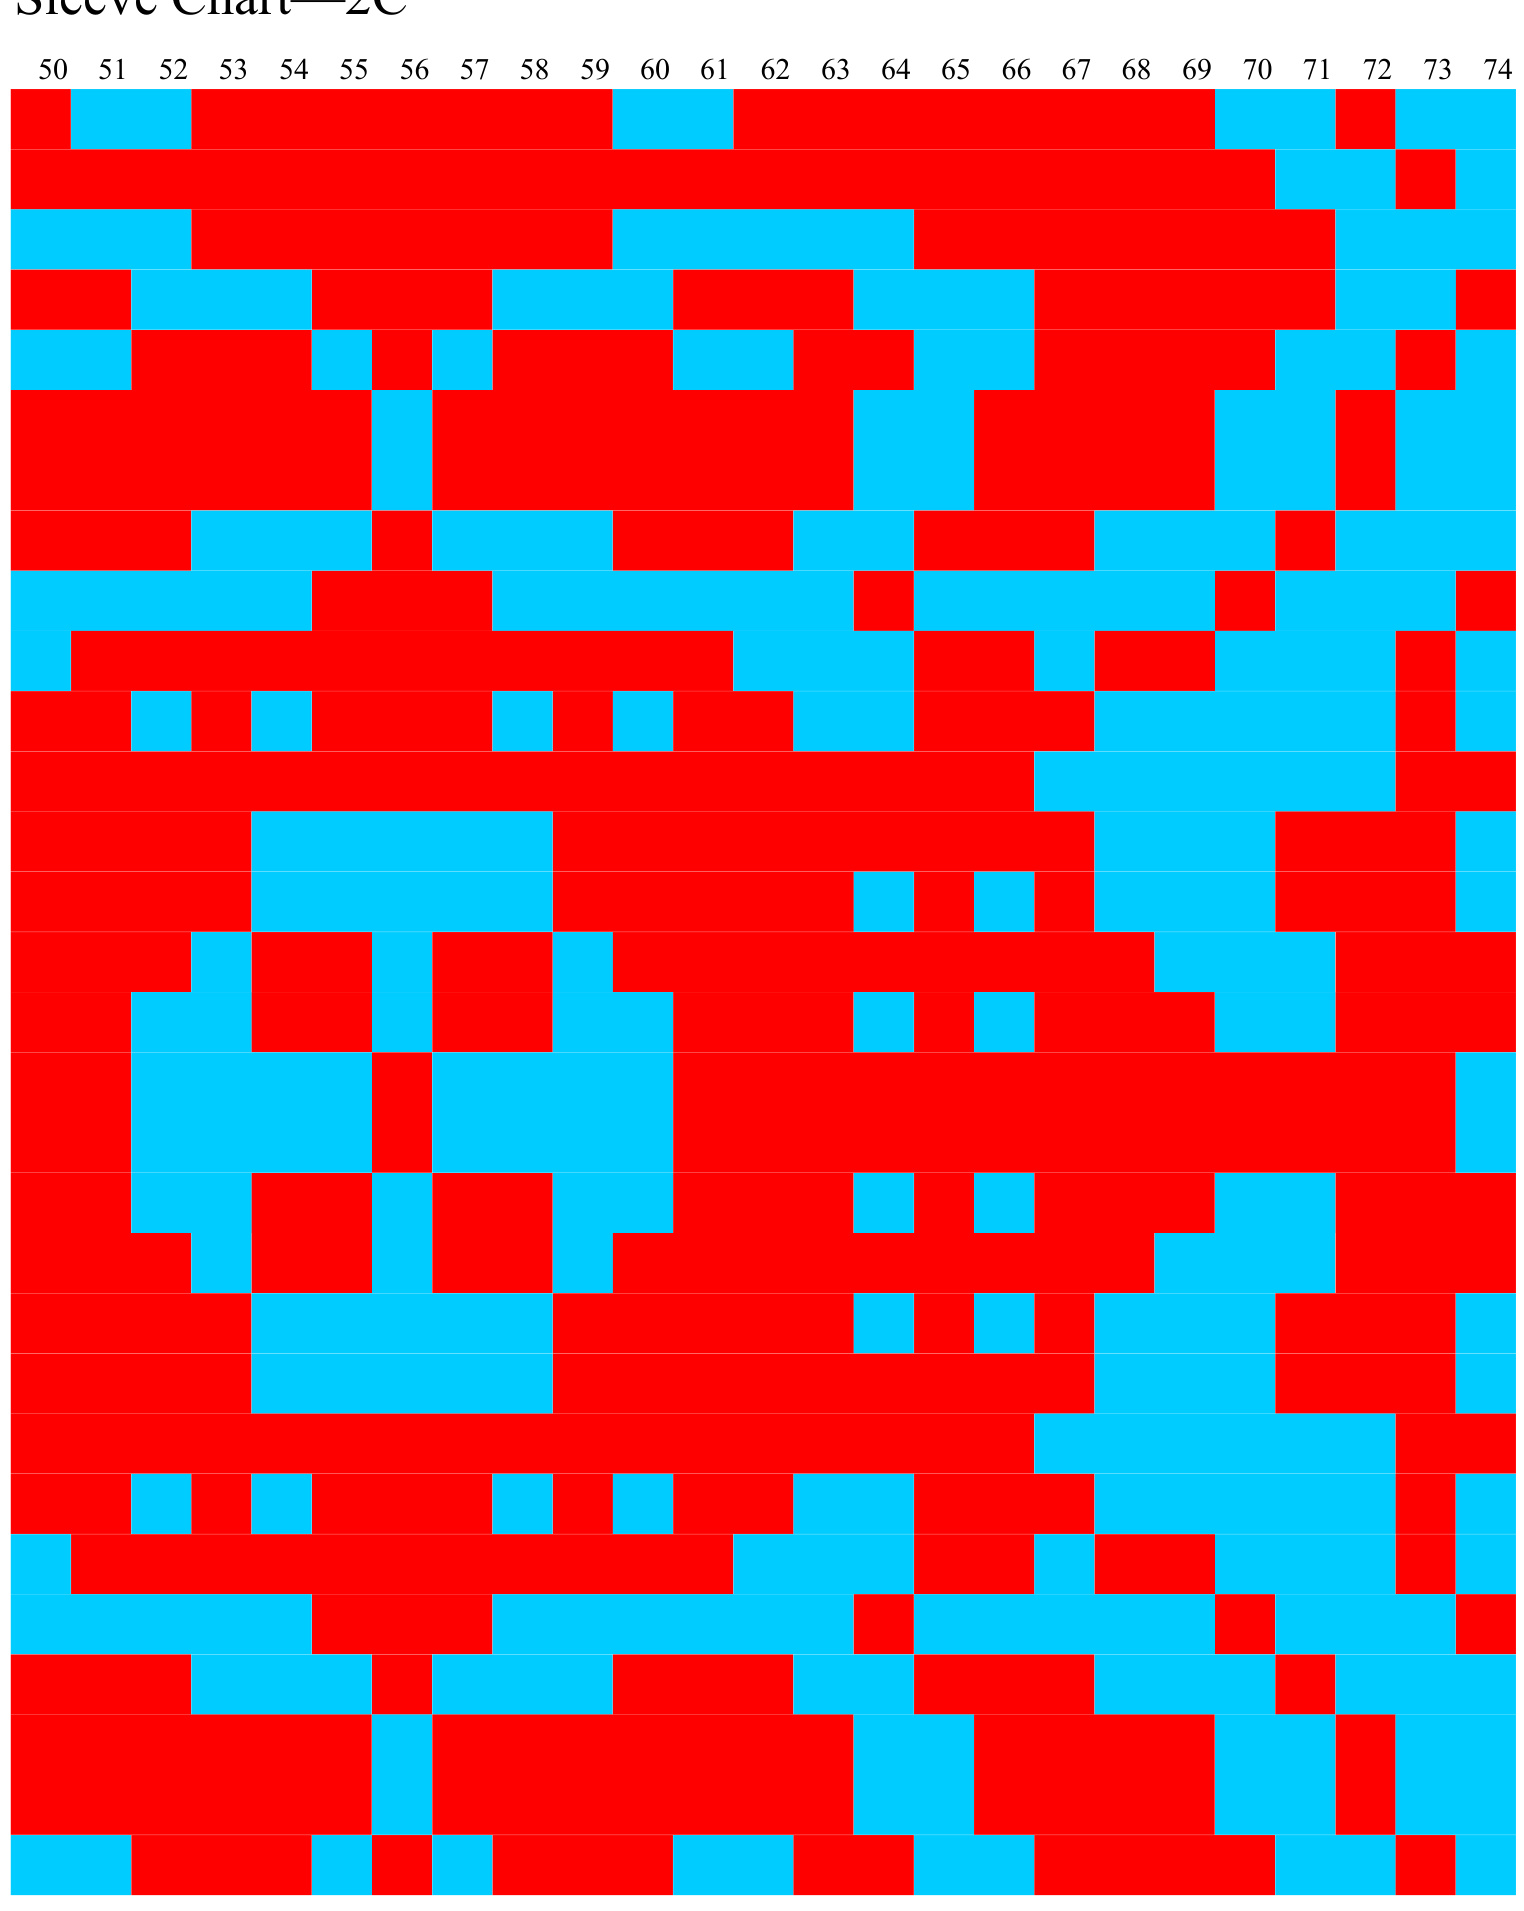
Sleeve Chart——2C
Sleeve Chart——3C
Sleeve Chart—4C
Sleeve Chart—5C
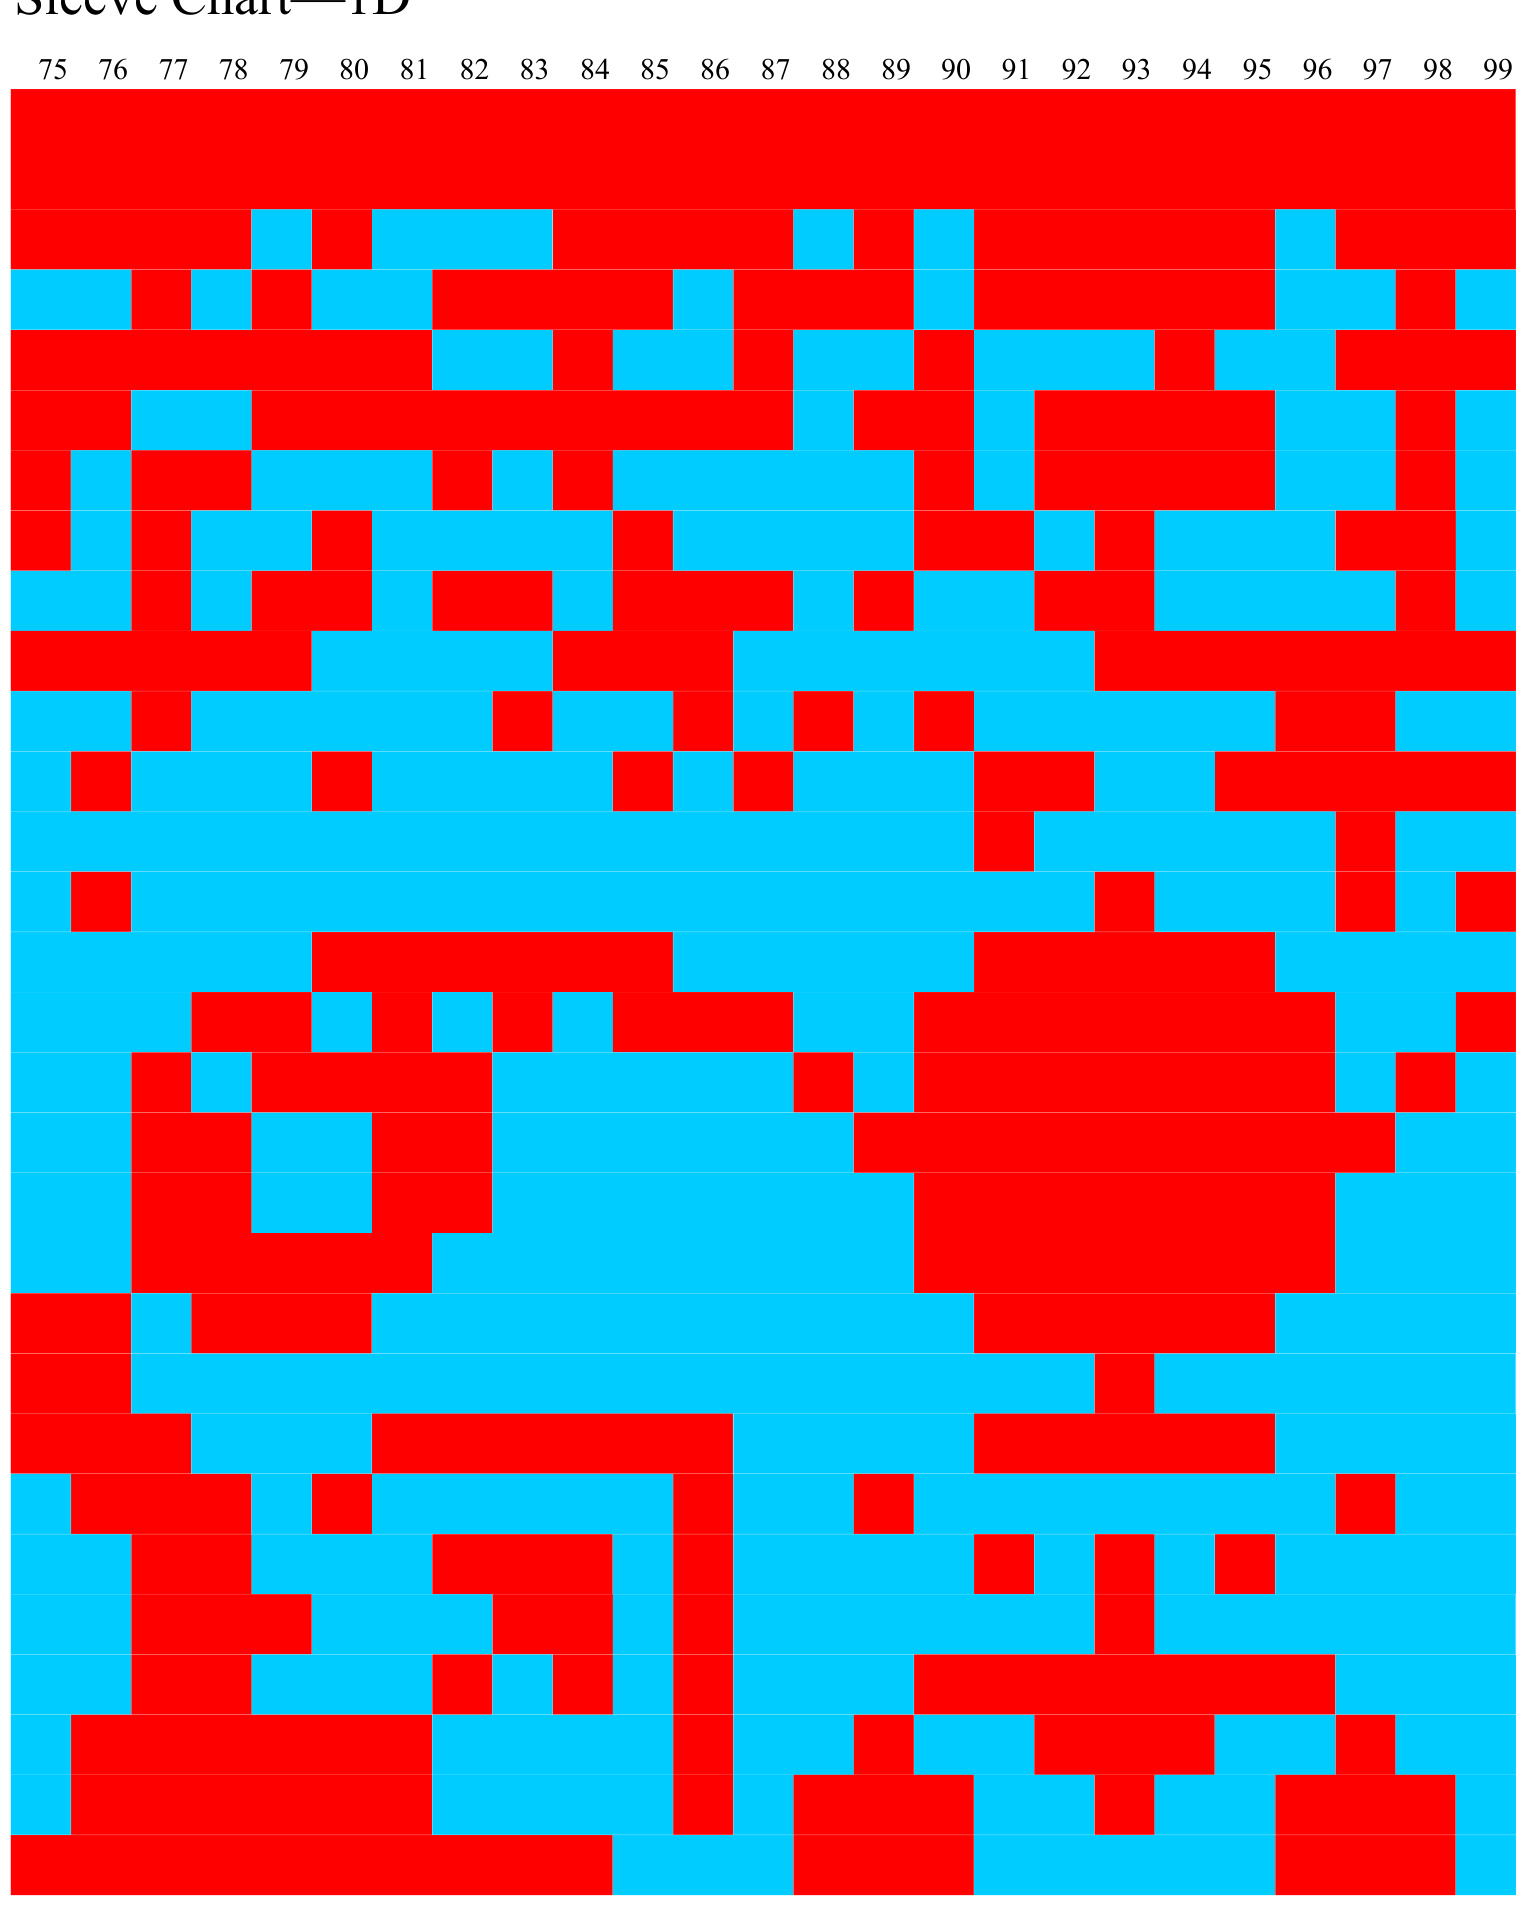
Sleeve Chart——1D
Sleeve Chart—2D
Sleeve Chart——3D
Sleeve Chart—4D
Sleeve Chart—5D
Sleeve Chart——1E

Sleeve Chart——2E
Sleeve Chart——3E
Sleeve Chart—4E
Sleeve Chart—5E
100 101 102 103 104 105 106 107 108 109 110111