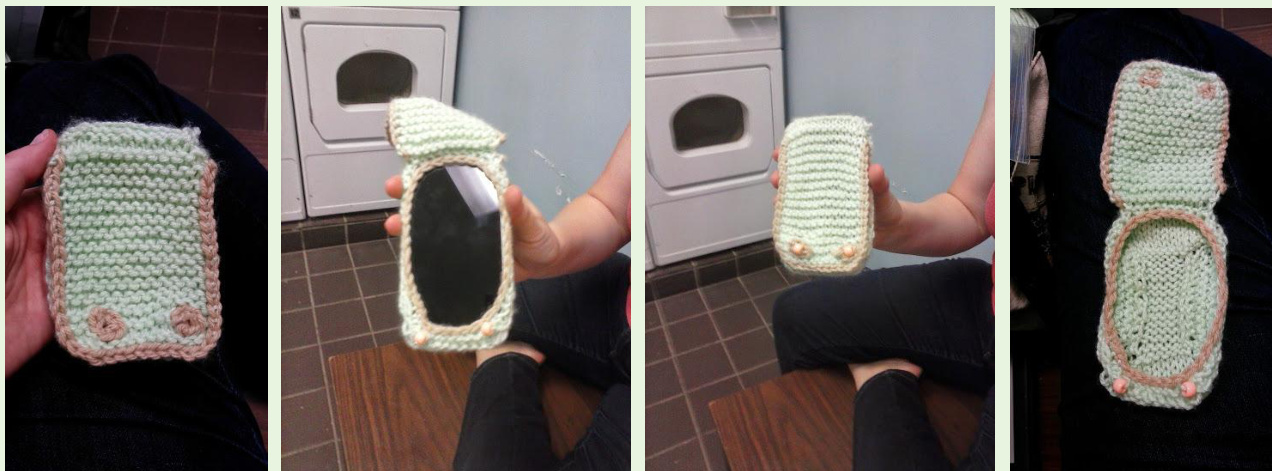
Minty Cream Cell Phone/Tablet Plate with Cover
What you will need:
Abbreviations:
Set of 5 Size 9 (5.5mm) Double Pointed Needles, or size of your choice. Size 5 Crochet Hook Yarn A: I love this yarn Menthe Color Yarn B: Caron Yarn in Cream Color Sts: Stitches K: Knit P: Purl YO: Yarn Over K2tog: Knit 2 together P2tog: Purl 2 together KFB: Knit front and Back Increase SC: Single Crochet DPN: Double Pointed Needle DPN (L): Double Pointed Needle on Left DPN (R): Double Pointed Needle on Right DPN (T): Double Pointed Needle on Top DPN (B): Double Pointed Needle on Bottom 2 beads or buttons (optional)
Instructions:
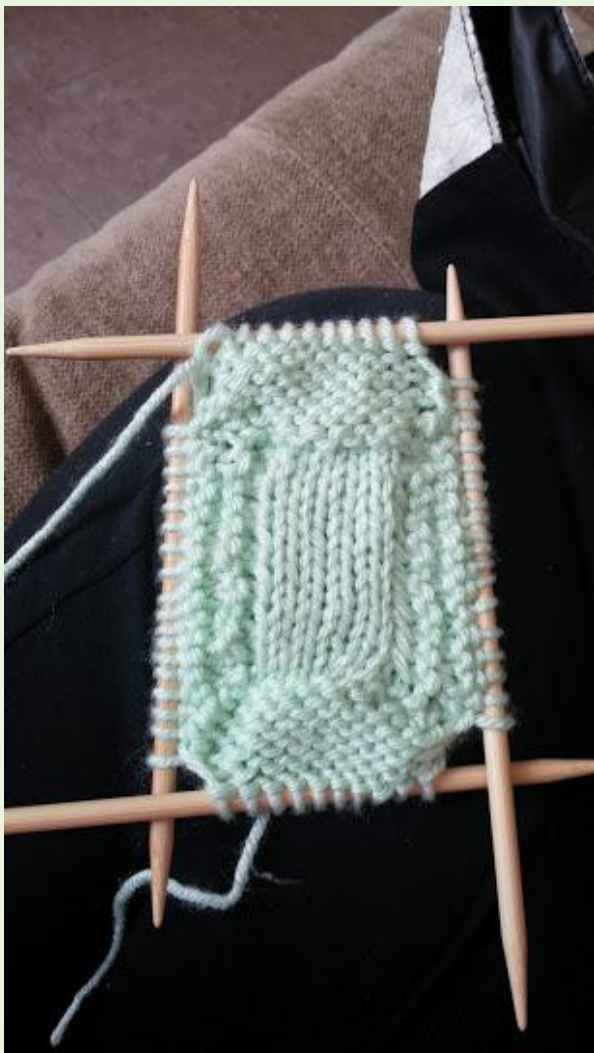
Begin by using yarn A and Yarn B for the provisional cast on method (my preferred method of provisional cast on is shown in this video here: https://www.youtube.com/watch?v=VkX5PR9GRK8) For my LG G2 I cast on 6 sts of Yarn A. Row A: K Row B: P Repeat Rows A and B until your work is the same shape as your cell phone or tablet. Secure one of your DPNs on the cast on stitches. Pick up stitches on the left and right sides of your work. (My favorite tutorial for how to pick up stitches is here: https://www.youtube.com/watch?v=f6PKAwja6Dc) Your work should be surrounded on 4 sides by DPNs. Begin working in the round. For the left and right sides I used garter stitch, and for the top and bottoms I used wrong side stockinette stitch. Knitting in the round: Row C: DPN (L): K until last stitch, KFB. DPN (B): P until last stitch, KFB DPN (R): K until last stitch, KFB DPN (T): P until last stitch, KFB Row D: P until last stitch, then KFB on all 4 DPNs. Repeat rows C and D until your work is approximately 0.5 cm on each side wider/taller than your cell phone or tablet. I've provided a picture below of what my work looked like.
To cast off, instead of using the traditional cast off which can be too tight, I used a more elastic cast off method. Begin on DPN (L) and P2tog. Slip the stitch on the right needle back onto the left needle, and repeat until you only have one stitch left on DPN (L). Transfer the stitch from DPN (L) onto DPN (B) and continue until you have only one stitch left on DPN (T). Place your phone or tablet on top of your finished yarn. Attach Yarn B. Begin to SC 2 stitches, skip a stitch, SC2, skip, and repeat until the phone or tablet is secure in the case. Weave in ends.
To add a garter stitch front flap to protect phone (optional)
Attach Yarn A. Pick up stitches from above the top or left (depending on which direction you want front flap to go). RowE:P Row F: K2, KF&B, K to last 3 sts, KF&B, K2. Row G: P Row H: K ows G and H until you reach where you'd like to add the button holes on a purl ro?
Row I: KI, YO, K2tog, K to last 4, K2tog, YO, Kl RowJ: P Row K: K Row L: Cast off
Single crochet the button holes, and around the edges of the phone. Weave in the ends. Add buttons or beads to secure the top of the phone flap. You're finished!!! It looks like a hippopotamus doesn't it?
Please be respectful. DO NOT replicate this tutorial into your own or sell your own version of the product without my permission. If you have any questions about the tutorial feel free to email me at redheadxmOment@aim.com or message me on my ravelry account!


