Drip Drip Drop Socks
Clue #3..... drip!
I hope your socks are turning out well! So far, you should have two legs, with tangled up cable motifs running around the outside like stairsteps (or very fancy raindrops- see what I did there?). But before they can drop into the stream that'll be the feet of these socks, you've got heel flaps and turns to work! Skill Level: Intermediate. This involves some serious cable work, and a slightly complicated pattern. Materials: Approx. 400 yds (365m) of sock yarn. I used a skein of Dream in Color's Everlast 8-ply Sock yarn, and it's gorgeous. Colorway: Shy If knitters would prefer to do colorwork cabling, I'm estimating 250-300 yds of Main color &100-150 yds of Contrast color. Needles: US1 or 2.25mm sock needles. Note that the pattern will eventually be written with DPNs in mind, but Magic Loop users can easily adapt the pattern with stitch markers. Sizing: Small (Large) sock creates a circumference of 8(9) inches or 20(22.5) cm. However, because a lot of the leg is ribbing, the circumference of this sock is really forgiving. Leg length and foot are adjustable to fit. Gauge: 8 stitches & 12 rows/rounds to the inch or 2.5cm in stockinett:
Abbreviations:
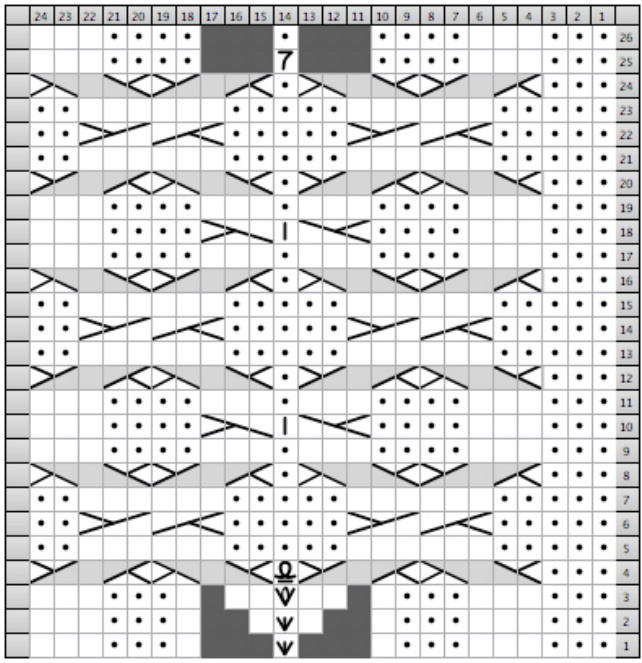
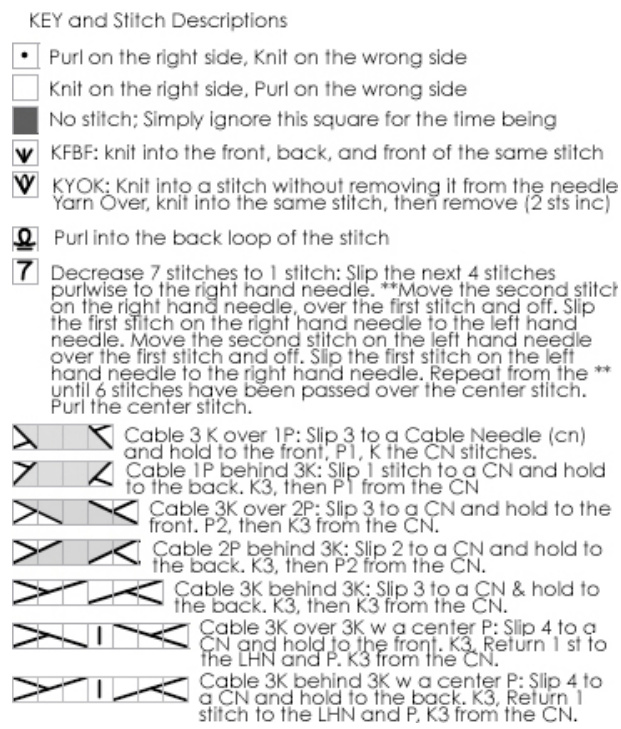
K= knit on the right side, purl on the wrong side P=purl on the right side, knit on the wrong side S= slip one stitch purlwise SSK= slip, slip, knit K2tog= knit two stitches together as one P2tog= pur two stitches together as one P3tog= purl three stitches together as one 3x3 rib= a pattern of ribbing that features 3 knit stitches then 3 purl stitches PM= place a marker (you'll need at least 3) SM= slip the marker \*Cable descriptions and chart symbols are defined in the chart key. (Optional) For Colorwork: At this point, the colorwork will change just a bit. For the HEEL FLAP, you'll continue to work all the purls in the main color and all the knits in the contrast color, but you'll be working back and forth over the heel flap. But for the HEEL TURN, work the entire thing in the main color.
LEFT HEEL FLAP
Set-up: knit the knit stitches and purl the purl stitches for 33(35) stitches. The heel flap will be worked over the next 39(41) stitches, reserving the remaining 33(37) stitches for the top of the foot. when working the heel flap, remember to work back and forth over the chart as for flat knitting and use the "wrong side" instructions for chart symbols! Left Small Heel Flap Row 1 (right side): S1, P2, work the nex line of the chart, then [K3,P3] twice. Turn work. Left Small Heel Flap Row 2 (wrong side): S1, K2, P3, K3, P3, work the next line of the chart (working backward!), then K3. Turn work. Left Large Heel Flap Row 1 (right side): S1, work the next line of the chart, then [K3,P3] twice, K3, P1. Turn work. Left Large Heel Flap Row 2 (wrong side): S1, [P3,K3] twice, P3, work the next line of the chart, then K1 Both Sizes: Alternate working Rows 1 & 2 until the chart stitches have all been worked. Then, continue the heel flap by knitting the knit stitches and purling the purl stitches (remembering to slip the first stitch of each row, of course!) until the heel flap measures 2.5 inches or 6.5cm, or reaches desired measurement. A longer heel flap results in a stretchier ankle. Finish after working a right side row.
RIGHT HEEL FLAP
Large size ONLY Set-up: Move the beginning of the round by removing the marker for the beginning of the round, purling 2 stitches, and replacing the marker.
Both Sizes
The heel flap will be worked over the next 39(41) stitches, reserving the remaining 33(37) stitches for the top of the foot. When working the heel flap, remember to work back and forth over the chart as for flat knitting and use the "wrong side" instructions for chart symbols! Right Small Heel Flap Row 1 (right side): S1, P2, K3, P3, K3, work the next line of the chart, P3. Turn work. Right Small Heel Flap Row 2 (wrong side): S1, K2, work the next line of the chart, [P3,K3] twice. Turn work. Right Large Heel Flap Row 1 (right side): S1, [K3,P3] twice, K3, work the next line of the chart, P1. Turn work. Right Large Heel Flap Row 2 (wrong side): S1, work the next line of the chart, [P3,K3] twice, P3, K1. Turn work. Both Sizes: Alternate working Rows I & 2 until the chart stitches have all been worked. Then, continue the heel flap by knitting the knit stitches and purling the purl stitches (remembering to slip the first stitch of each row, of course!) until the heel flap measures 2.5 inches or 6.5cm, or reaches desired measurement. A longer heel flap results in a stretchier ankle. Finish after working a right side row.
HEEL TURN
The heel turn is worked using short rows to change the direction of the knitting. Row 1 (wrong side): S1, P18(18) P3tog, P1, turn work Row 2 (right side): S1, K7(5), SSK, K1, turn work Row 3: S1, P8(6), P2tog, P1, turn work. Row 4: S1, K9(7), SSK, K1, turn work. Row 5: S1, P10(8), P2tog, P1, turn work. Row 6: S1, K11(9), SSK, K1, turn work. Row 7: S1, P12(10), P2tog, P1, turn work. Row 8: S1, K13(11), SSK, K1, turn work. Row 9: S1, P14(12), P2tog, P1, turn work. Row 10: S1, K15(13), SSK, K1, turn work. Row 11: S1, P16(14), P2tog, P1, turn work. Row 12: S1, K17(15), SSK, K1 SMALL size, stop here. LARGE size: turn work. Row 13: S1, P16, P2tog, P1, turn work. Row 14: S1, K17, SSK, K1. Total stitches 20.
Charts and other important things.. Left Leg Chart
Right Leg Chart