Naive Socks (This Must Be The Socks)
By SpillyJane http://spillyjane.blogspot.com
Size: Women's medium socks (approximately size 7-9, $8^{\circ}$ in circumference) are shown. If larger or smaller socks are desired, increase or decrease needle size and yarn weight accordingly. Gauge: 8 stitches $\l=1$ inch in pattern as shown. Yarn: 440 yards of fingering-weight sock yarn as shown. Needles: One set of five (5) double pointed needles in US 2( $\mathrm{\left(2.75\,mm\right)}$ or sizenecessaryto obtain gauge. Only four (4) needles will be used for the better part of this pattern, but the fifth needle will make a handy cable needle should you require it. The fifth needle will also be used when working the toe of the sock. Notions: A stitch marker to mark beginning of round (not required, but could be helpful,) a sewing needle to weave in ends, and a cable needle (an extra dpn works well.) Socks can also be worked without a cable needle if desired.
Stitch Guide:
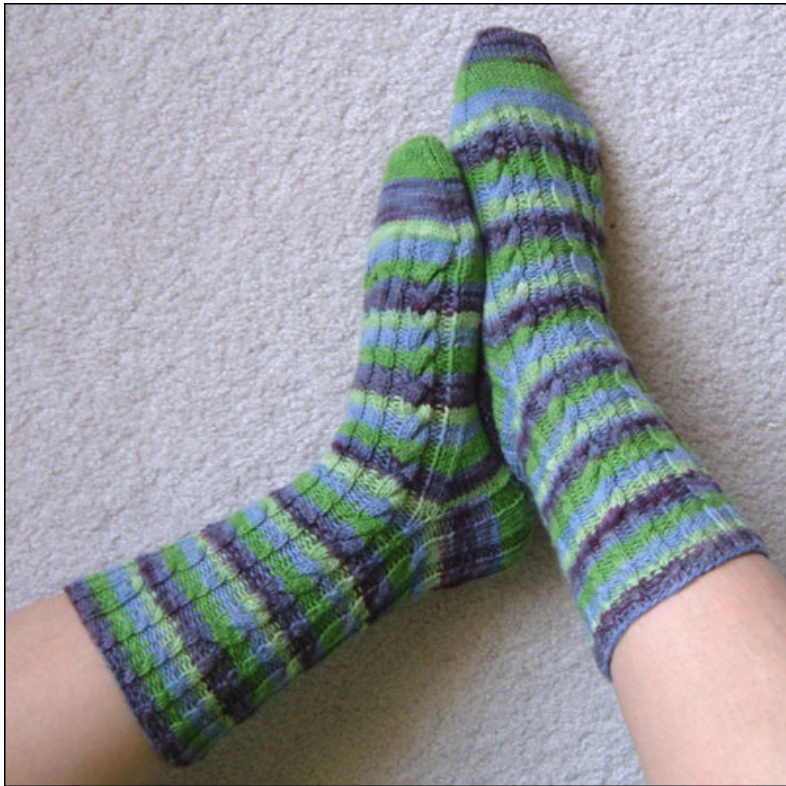
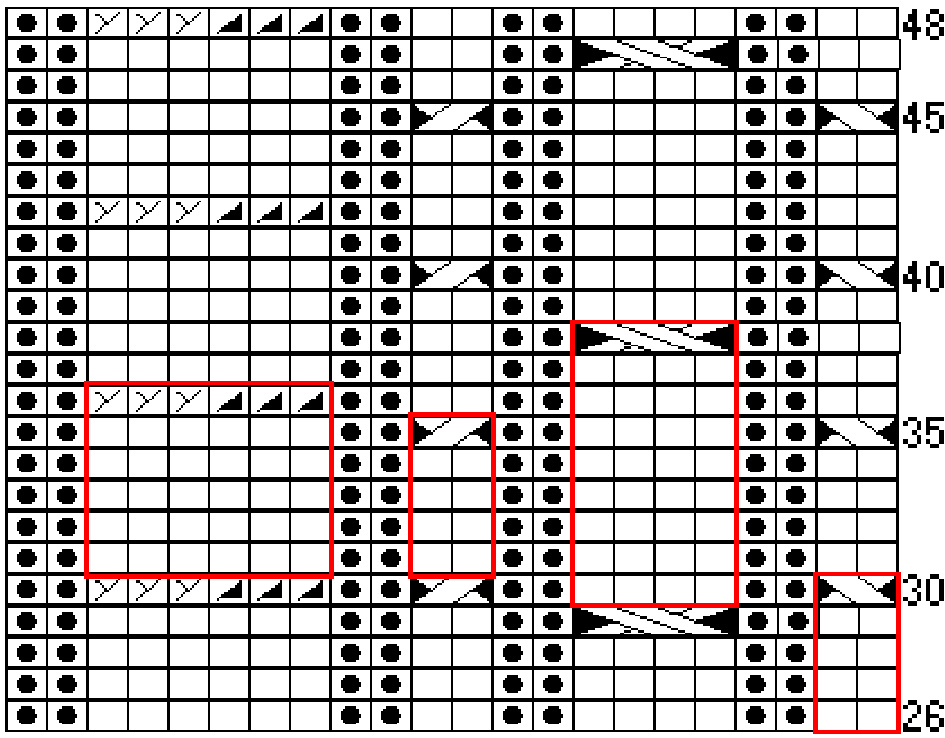
1/1 LC - Slip 1 stitch to cable needle, hold in front, knit 1 from left needle, knit 1 from cable needle. $\mathbf{1}/\mathbf{1}$ LC completed. 1/1 RC - Slip1 stitch to cable needle, hold in back, knit 1 from left needle, knit 1 from cable needle. $\mathbf{1}/\mathbf{1}$ RC completed. 2/2 LC - Slip 2 stitches to cable needle, hold in front, knit 2 from left needle, knit 2 from cable needle. 2/2 LC completed. $3/3\mathrm{~RC}-\mathrm{Slip}\,3$ stitches to cable needle, hold in back, knit 3 from left needle, knit 2 from cable needle. $3/3$ RC completed The Pattern: Cast on 66 stitches using the Long Tail Cast On, or any other stretchy cast on. Distribute stitches evenly across three (3) needles - 22 stitches on each. The needles will now be known as Needles 1, 2 and 3 respectively. Prepare to join in the round, being careful not to twist. \*\*Note: Theinstructionsgivenbelowwillrpeatd acrosalltree 3) ed.Whn t stitches on Needle 3 have all been worked the Round is completed. Refer to Chart A for a visual representation of Rounds 1-25, and Chart B for Rounds 26-48.
Cuff:
Rounds 1-4: k2, p2, k2, p2, k1, p2, k1, p2, k2, p2, k2, p2. Round 5: 1/1 LC, p2, $\mathbf{1}/\mathbf{1}$ LC p2,k1, p2,k, p2, 1/1 RC,p2, 1/1 RC, p2. Repeat rounds 1-5 twice more.
Leg:
Please Note: The initial ribbing is now completed. The following instructions will prepare the work for the first larger cable (the $_{2/2}$ LC over 4 stitches.) Round 16: k2, p2, k2, p2, k4, p2, k2, p2, k2, p2. Rounds 17-19: Repeat round 16. Round 20: 1/1 LC, p2, 1/1 LC, p2, 2/2 LC, p2, 1/1 RC, p2, 1/1 RC, p2. Rounds 21-24: k2, p2, k2, p2, k4, p2, k2, p2, k2, p2. Round 25: 1/1 LC, p2, 1/1 LC, p2, k4, p2, 1/1 RC, p2, 1/1 RC, p2. \*\*Note: Before starting Round 26 slip 4 stitches from Needle 2 to Needle 1, and slip 4 stitches from Needle 3 to Needle 2. Now, knit 2 AND purl 2 from Needle 1 to Needle 3. If using a marker to mark beginning of round, please move it back to the first stitch on Needle 1. Please refer to Chart B for a visual representation of the new arrangement of stitches, if needed. Rounds 26-28: k2, p2. k4, p2, k2, p2, k6, p2. Round 29: k2, p2, 2/2 LC, p2, k2, p2, k6, p2. Round 30: 1/1 LC, p2, k4, p2, 1/1 RC, p2, 3/3 RC, p2. All pattern elments,written and graphic, copyright JaneDupuis, 2. Pattern is for not-forprofit e only. Please do not reproduce, redistribute, or sell the pattern or finished object. Rounds 31-34: k2, p2. k4, p2, k2, p2, k6, p2. Round 35: 1/1 LC, p2, k4, p2, 1/1 RC, p2, k6, p2. Round 36: k2, p2, k4, p2, k2, p2, 3/3 RC, p2. Continue in this manner until leg is $8^{\circ}$ long (or desired length.) Complete the current round and prepare to begin setting up for the heel flap. \*\*Note: All the cables that will continue down the rest of the sock have now been established. Continue to knit in pattern (purling the p's and knitting the k's, and turning the cables on their designated rows) for the rest of the sock. The charts for the basic cables are outlined in red on Chart B should they be required for future reference. Heel: The heel flap is worked on Needle 3 across 33 stitches - 32 stitches from the leg PLUS 1 stitch that will be picked up when working the heel flap. The large 6 stitch cable will run down the back of the leg. Cables will not be twisted on the heel flap. Instructions follow below. Heel Flap: Stitches will now be shifted once more to set up for the heel flap. Slip 1 stitch from Needle 3 to Needle 2. Now, knit 2, purl 2, knit 4, purl 2 and knit 1 from Needle 1 onto Needle 3 (32 sts)The heel flap will be worked acrossthese stitches on Needle 3. The remaining 34 stitches on Needles 1 and 2 will be set aside and worked later. The yarn should now be at the end of Needle 3. Turn the knitting and prepare to work back across the “wrong side” of Needle 3 in the following manner: sl1, k2, p4, k2, p2, k2, p6, k2, p2, k2, p4, k2, p1. The next row wilfeature a picked-up stitch between the two “strands” of the large 6 stitch cable running down back of the leg. Turn the knitting again to knit back across the “right side" of the work as follows: sl1, p2, k4, p2, k2, p2, k3, make 1 stitch by picking up from the row of stitches directly below the current row of stitches and purl it tbl, k3 p2, k2, p2, k4, p2, k1 (33 sts.) Turn the knitting to the “right side”" and work as follows: Row 1: sl1, p2, k4, p2, k2, p2, k3, p1, k3 p2, k2, p2, k4, p2, k1. Turn the knitting to the “wrong side" and work as follows: Row 2: sl1, k2, p4, k2, p2, k2, p3, k1, p3, k2, p2, k2, p4, k2, p1. Repeat these two rows, forming a chain of slipped stitches on either side of the heel lap until it measures approximately 2”" square (with about 16-18 slipped stitches on either side) or desired length. Be sure to finish with a “wrong side" row. Turn Heel: Turn heel as follows: Begin on the “right side" of the heel flap. Row 1: Slip the first stitch, then k5, yo, k2tog, k5, k2tog, k1, p1 (the midpoint stitch), k1, k2tog, k5, k2tog, turn work. Row 2: This is a “wrong side" row. Yo, purl back to the midpoint stitch, knit the midpoint stitch, purl 10 sts past the midpoint stitch, turn work. Row3: This is a “right side” row. Yo, k2tog, k5, k2tog, k1, p1, k2tog, k5, k2tog, turn work. Repeat Rows 2 and 3 until you have 18 stitches left on the needle. Row 4: This is a “wrong side" row. Slip the first stitch, then purl until the midpoint stitch. Knit this stitch and then pur until the last 2 stitches. Purl these 2 stitches together (17 sts.) Prepare to pick up stitches for gusset. Gusset: With the “right side” facing, knit across the first 7 of the remaining heel flap stitches. Knit this stitch together with the next stitch (k2tog.) 16 heel flap stitches remain. This needle will now be known as Needle 1. Place all 34 of the the instep stitches on the same needle. This will be known as Needle 2. Still using Needle 1, pick up stitches formed by the slip stitch chain on the right hand side of the heel flap (the exact number of stitches may vary, depending on how long the heel flap was worked. 16-18 stitches seem to be the average number of picked-up stitches.) Be sure to pick up the chain stitches so they sit on the outside of the sock.This will give the illusion that the small 2 stitch cables on the sides of the sock have split and are running down the ankle to the sole of the foot. Knit these picked-up stitches through the back of the loop to tighten them. At the end of Needle 1 make a stitch or two if necessary to tighten the join between the new stitches and the instep stitches on Needle 2. Knit across the instep stitches on Needle 2, continuing with the pattern already established. Refer to Chart C if basic stitch placement information is required.
\*\*Note: Chart C is for reference only - it should NOT be followed in the same manner as the other charts offered with this pattern. It is included to show how the cables are placed on the instep and as a reminder of the basic cables themselves. Please take care to note the point at which the cables were left off on the current sock being worked and carry on accordingly.
After working Needle 2, make a stitch or two if necessary to tighten the join between the instep stitches and the new stitches on Needle 3. Using a new needle that will now be designated Needle 3, pick up stitches formed by the slip stitch chain on the left hand side of the heel flap. Try to pick up the same number of stitches as was picked up on Needle 1. On this first row, knit these new stitches through the back of the loop to tighten them. Now, knit 8 stitches from Needle 1 onto Needle 3. Prepare to begin the gusset decreases. To decrease for the gusset proceed as follows: Round 1: Needle 1 - knit to the last 3 stitches, k2tog, k1. Needle 2 - work across instep in established pattern. Needle 3 - k1, ssk, knit all other stitches. Round 2: Needle 1 - knit all stitches. Needle 2 - work across instep in established pattern. Needle 3 - knit all stitches. Repeat these two Rounds as many times as necessary until the number of stitches is back down to 66 - 16 stitches on Needle 1, 34 stitches on Needle 2 and 16 stitches on Needle 3. Foot: Continue working in established pattern (referring to Chart C if necessary as a reference ONLY - see above Note,) until piece is approximately $\mathbf{2}^{\mathfrak{s}}$ less than the desired length of sock. The pattern can be stopped at any point, depending on length of foot. The rest of the toe will be knit in plain Stockinette stitch. Prepare to begin to set up for the toe decreases. Toe: Set up for toe by knitting across all stitches on Needle 1. On Needle 2 stop working, k2tog, knit all stitches to last 2 stitches, ssk. Knit across allstitches on Needle 3 (64 sts.) Take up the fifth dpn (which may have been serving as a cable needle) and starting at the beginning of Needle 1, divide stitches among all four needles so that there are 16 stitches on each - the fifth needle is now in use will now be known as Needle 4. Decrease for the toe in the following manner: Round 1: Needle 1 - knit all stitches to the last 3 stitches, k2tog, k1. Needle 2 - k1, slip 1 knitwise, k1, psso, knit across all stitches. Needle 3 - knit all stitches to the last 3 stitches, k2tog, k1. Needle 4 - k1, slip 1 knitwise, k1, psso, knit across all stitches. Round 2: Needles 1-4 - knit across all stitches. Repeat these two rounds until there are 5 stitches remaining on each needle (20 sts.) Knit across the stitches on Needle 1 with Needle 4 and slip the stitches from Needle 3 to Needle 2. Graft stitches together using Kitchener stitch. Finishing: Weave in ends. Block lightly if desired.
Naive Sock Charts
Chart A - Rounds 1-25 of the cuff/leg:
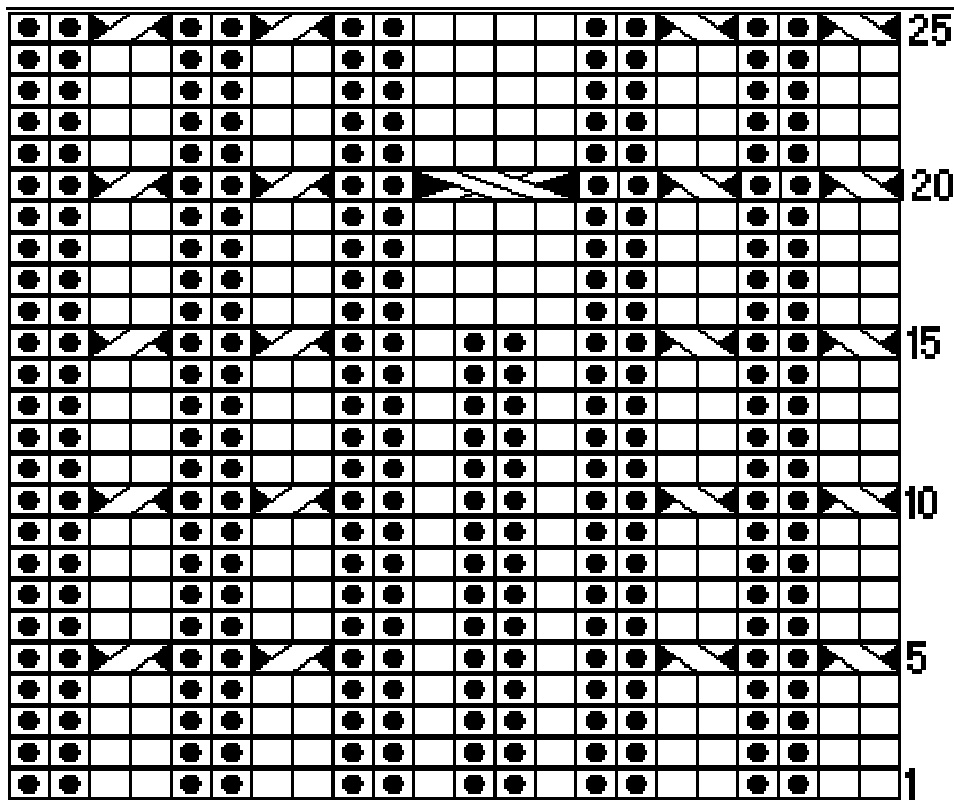
All pattern elements, written and graphic, copyright Jane Dupuis, 2oo7. Pattern is for not-for-profit use only. Please do not reproduce, redistribute, or sell the pattern or finished object.
knit purl 11RC 11LC 212LC yYN4033 Rc

Iknit purl 11RC 11LC 212LC YyYN40 33 Rc Acknowledgements: Thanks so much to everyone who volunteered to test knit this sock pattern long before it was actually released, and to those of you who helped me tweak the language and technique to prepare it for public consumption. In particular I'd like to thank Sarah Lou, Michelle and Adriana for their patience and correspondence during the initial process. Your assistance is greatly appreciated!


