and because every girl needs a change of clothes and accessories
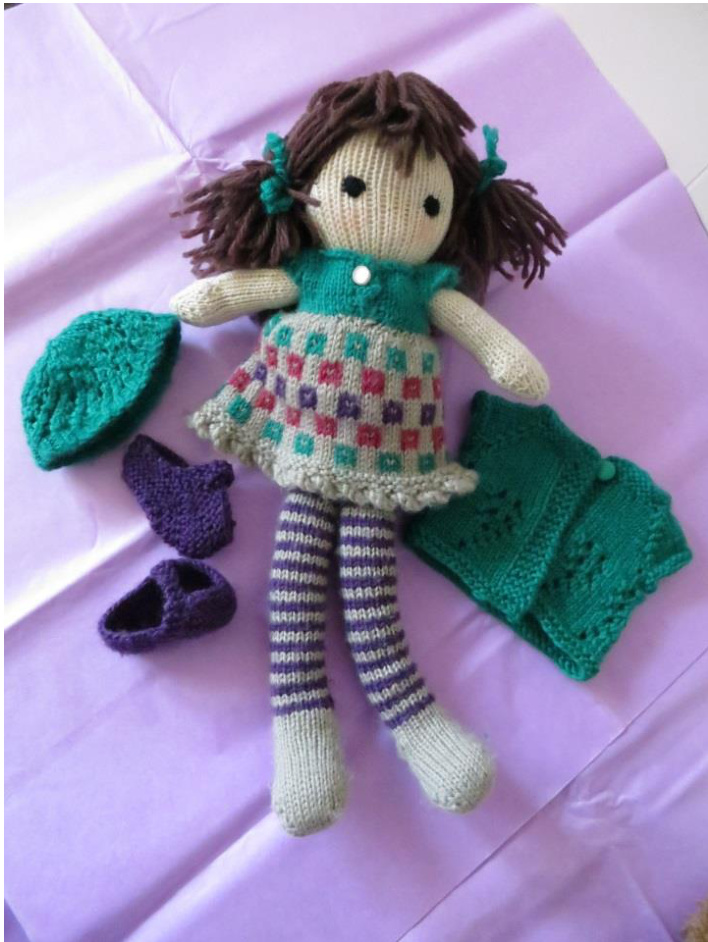
Lacy Day Accessories pattern
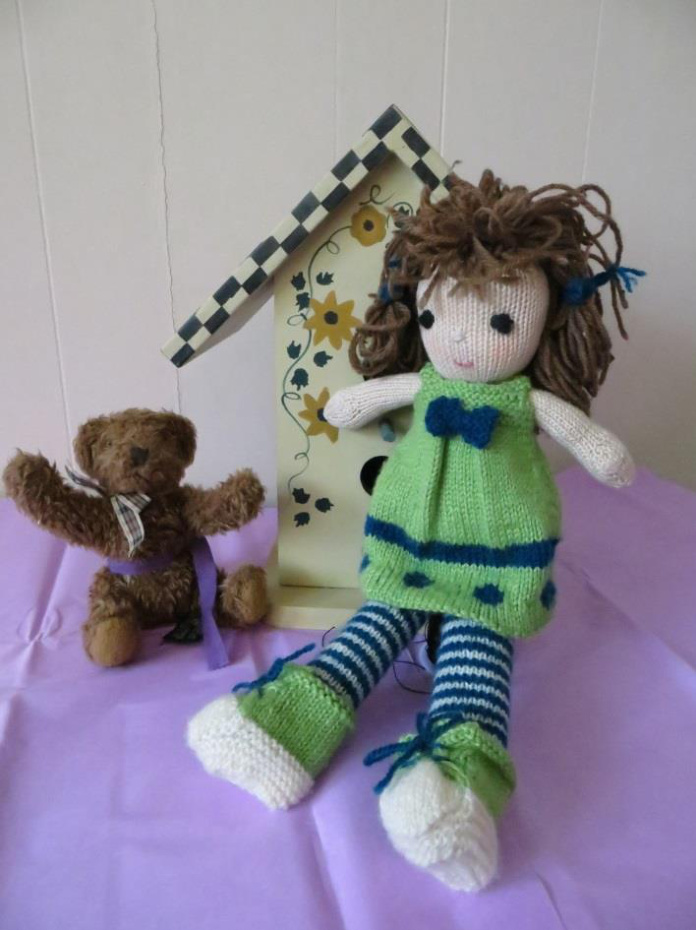
Playground Day Accessories pattern
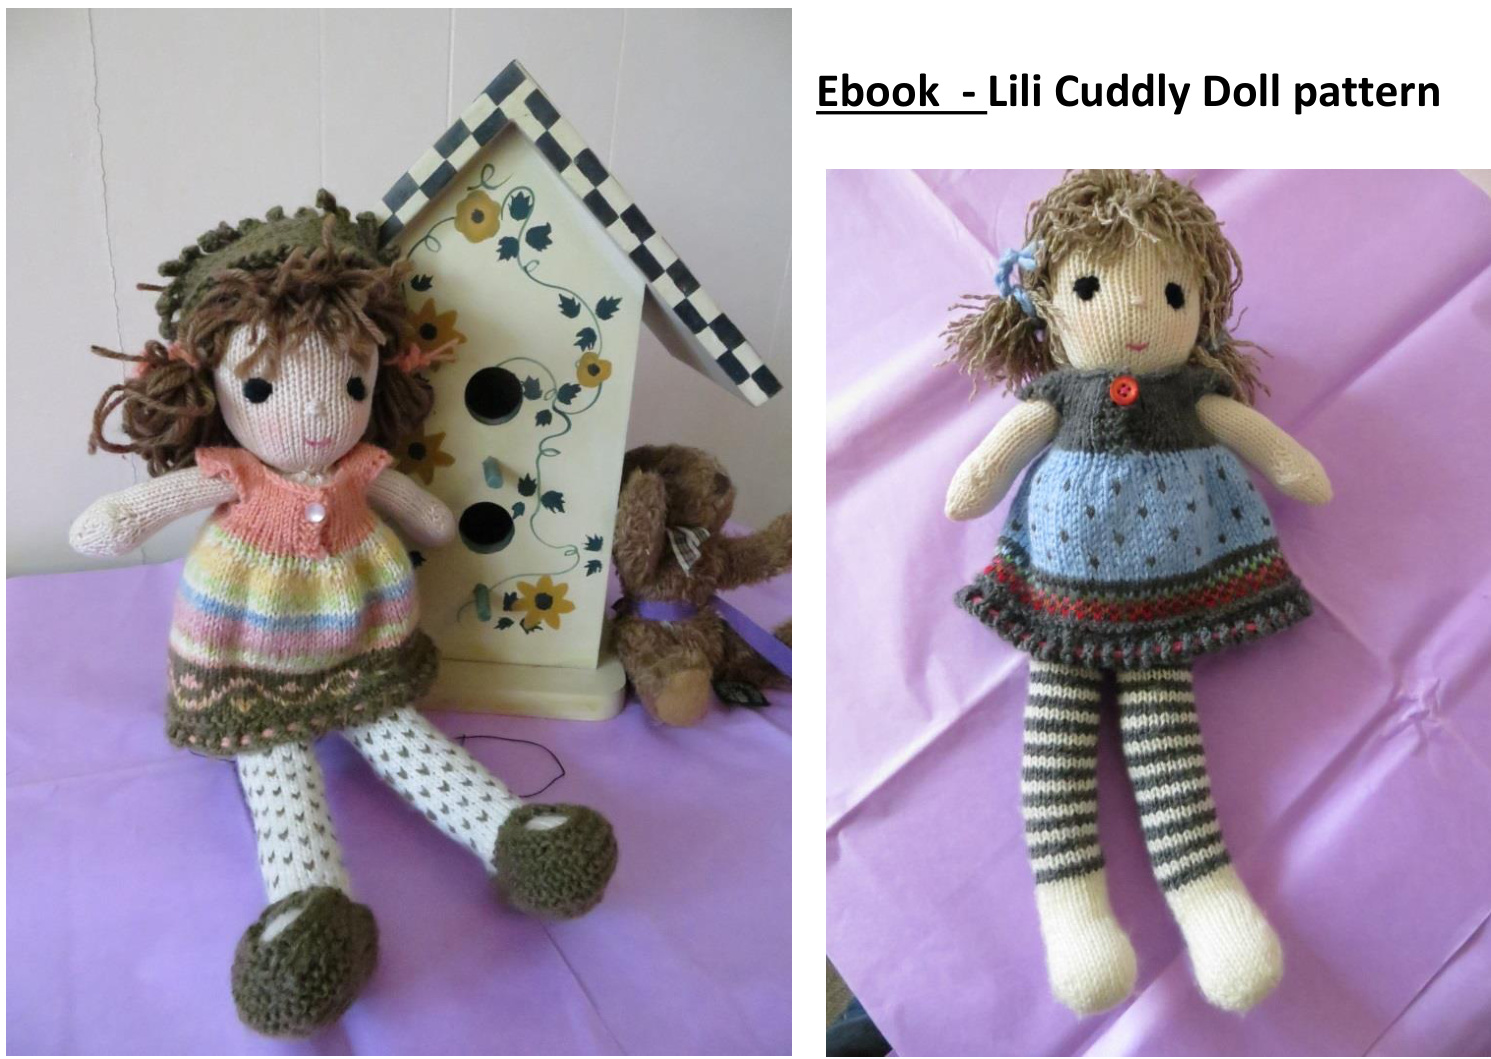
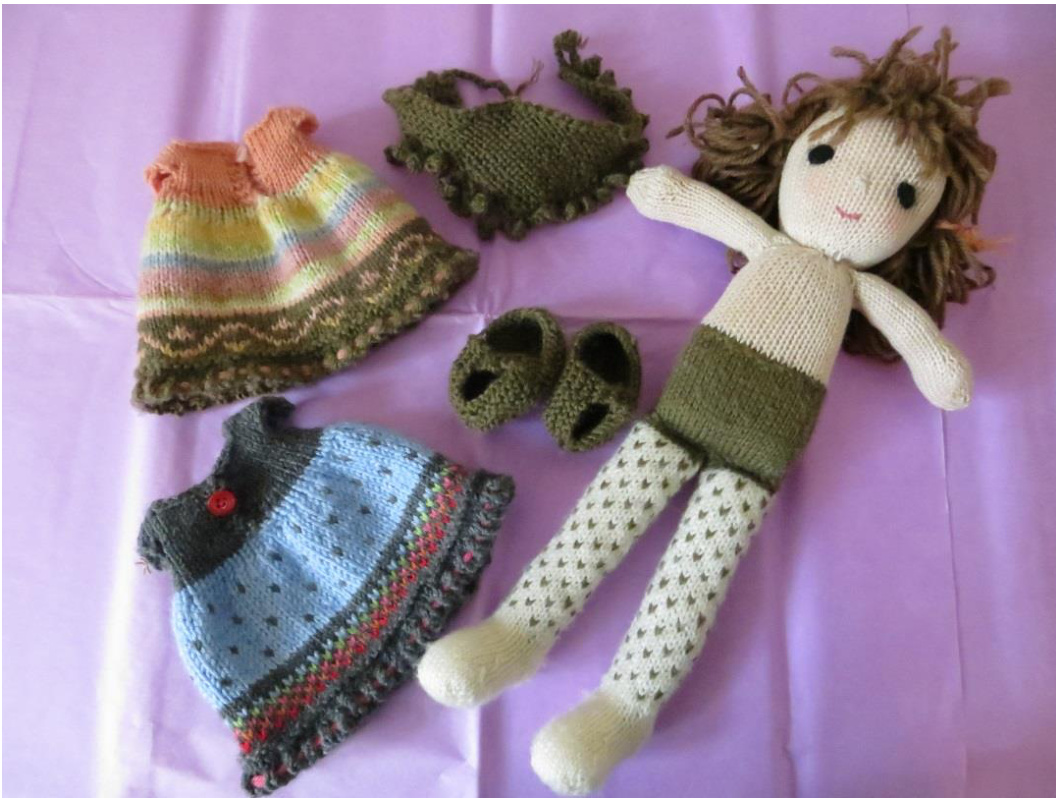
Lili Cuddly Doll
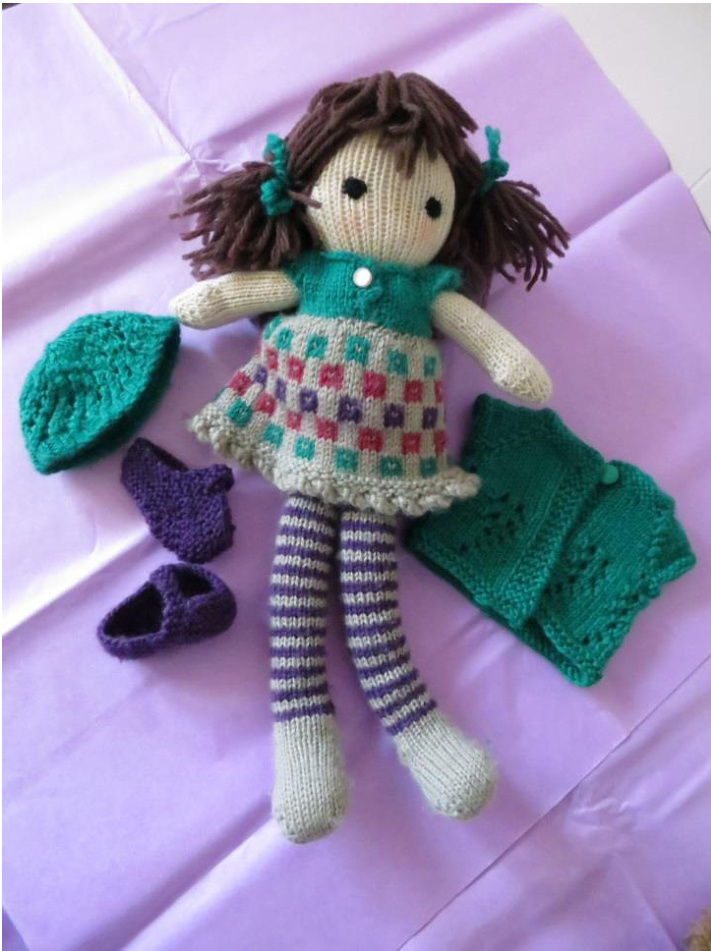
By Louise Lamarche This lovelydoll measures 34cm and isknit in the round in one piece with the arms joined along as you knit. Stuffing is added as you go so that once you close off the neck and sew a few stitches to close the underarm seam you are practically done. Requires handstitching to secure the join between legs and body and attach the head to the body. The hair is also sewed on. A bit of embroidery for the eyes, nose and mouth. A photo tutorial is included. Skills required are knitting in the round with the magic loop method or 5 DPNs, short-rows (though complete instructions are provided in pattern) and a knowledge of a toe-up sock technique. There are links to video tutorial to assistyou. The pattern also includes a dress with two different stitch patterns, ballerina shoes and a headscarf/shawl. All accessoriesareremovable.
Material:
Light DK or Sport yarn for legs - kaki and cream (dotted legs) grey & cream (striped legs) Rowan Siena 4 ply or 4 ply cotton for head, upper body and arms - cream or skin color 2.75mm circular needle, 80 cm long or 5 DPNs Markers Tapestry needle Toy filling 7mmbutton Do not worry if the skin color is too light, once you have finished the doll before making up the face and hair, you can dip all cotton pieces in a bowl of infused tea or strong coffe - a few seconds wil suffice. Let dry before finishing.
LEGSANDBODY
You will start at the toe preferably using one of the methods for making the toe-up socks. I prefer the closed toe caston, but most people prefer Judy's magic cast-on - see video links. If you choose to do a regular cast on, you may sew up the toe later on. Closed toe cast-on: http://vimeo.com/4551095 Judy's magic cast-on: http://www.youtube.com/watch?v=gkyd3nq3Yn8 With 2.75mm, cast on 14 sts. Join in the round using the magic loop method with 7 sts on each needle point. R 1: knit R2: \*K 1, M1, K5, M1, K1 \* repeat = 18 sts R3: knit R4: increase after first stitch and before last stitch as rows 2 = 22 sts R5: knit R6: increase after first stitch and before last stitch as rows 2 = 26 sts R7-9: knit these three rounds R10: \*K1, K2T, K7, K2T, K1\* repeat on other needle = 22 sts R11-13: knit these three rounds R14: K1, K2T, K5, K2T, K1, K11 = 9sts on top and 11 sts on sole R 15-18: knit these four rounds R19: knit 9 sts on top needle and start working the heel
SHORT ROW HEEL
Knit back and forth on 2nd needle only (11sts)
R1: K10, turn work R2: slip 1 purwise, insert marker, P8 - turn work R3: slip 1 knitwise, insert marker, knit to marker, remove marker, turn work R4: slip 1 purwise, pm, purl to next marker, rm, turn work R5: slip 1 knitwise, pm, knit to next marker, rm, turn work R6: slip 1 purwise, pm, purl to next marker, rm, turn work R7: slip 1 knitwise, pm, knit to next marker, rm, knit next 2 sts tog thru back loop, M1 - turn R8: slip 1 purlwise, pm, purl to next marker, rm, purl 2 sts tog., M1 - turn R9: slip 1 knitwise, pm, knit to next marker, rm, knit next 2 sts tog thru back loop, M1 - turn R10: slip 1 purlwise, pm, purl to next marker, rm, purl 2 sts tog., M1 - turn R11: slip 1 knitwise, knit to next marker, rm, knit next 2 sts tog thru back loop, M1 R12: Joining to the top, knit the 9 sts on the first needle on heel needle, M1, K2T thru back loop - knit to end. Heel is done. Resume knitting in the round with magic loop method. Knit2rows Increase row: K 1, M1, K7, M1, K1, K to end = 22sts (11 on both needles) R 1: \*K3 MC, K1 CC\* R2: knit MC R3: K1 MC, \*K1 CC, K 3 MC\* repeat to last sts K2 MC R4: knit MC Fill the foot with toy filling fiber = about 9 cm in circonference Knit rows 1-4: 9 times = 36 rows - or leg measures 13cm from bottom of heel. Knit 1 cm CC - put stitches on hold and cut thread
Knit second leg - do not cut thread
Fill legs with fiber leaving 1cm on top unfilled. = about 8.5 cm in circonference
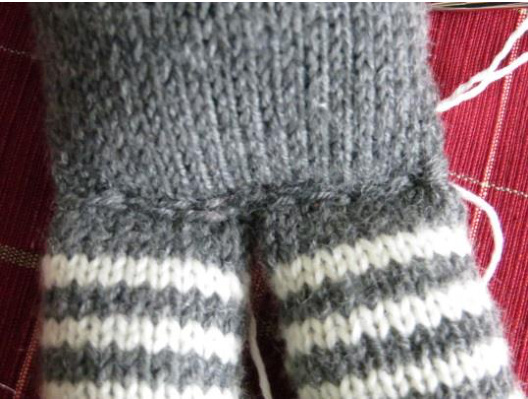
Joining legs tobody
Making sure that both legs are facing towards the front: Knit the 11 sts on front of second leg, puling tightly knit the 11 sts on front of first leg . With the magic loop, knit the 11 sts on the back of the first leg, pulling tightly knit the 11 sts on the back of the second leg. = 44 sts Knit until work measures 5 cm from join. Purl one decrease row: \*P3, P2T\*(8 times), P4= 36 sts. Cut thread and put on stitch holder. Make sure legs are stuffed upto 1 cm from body join. With CC yarn, thread a tapestry needle and back stitch the join of the legs with the body. This will secure the legs and make sure that they bend.
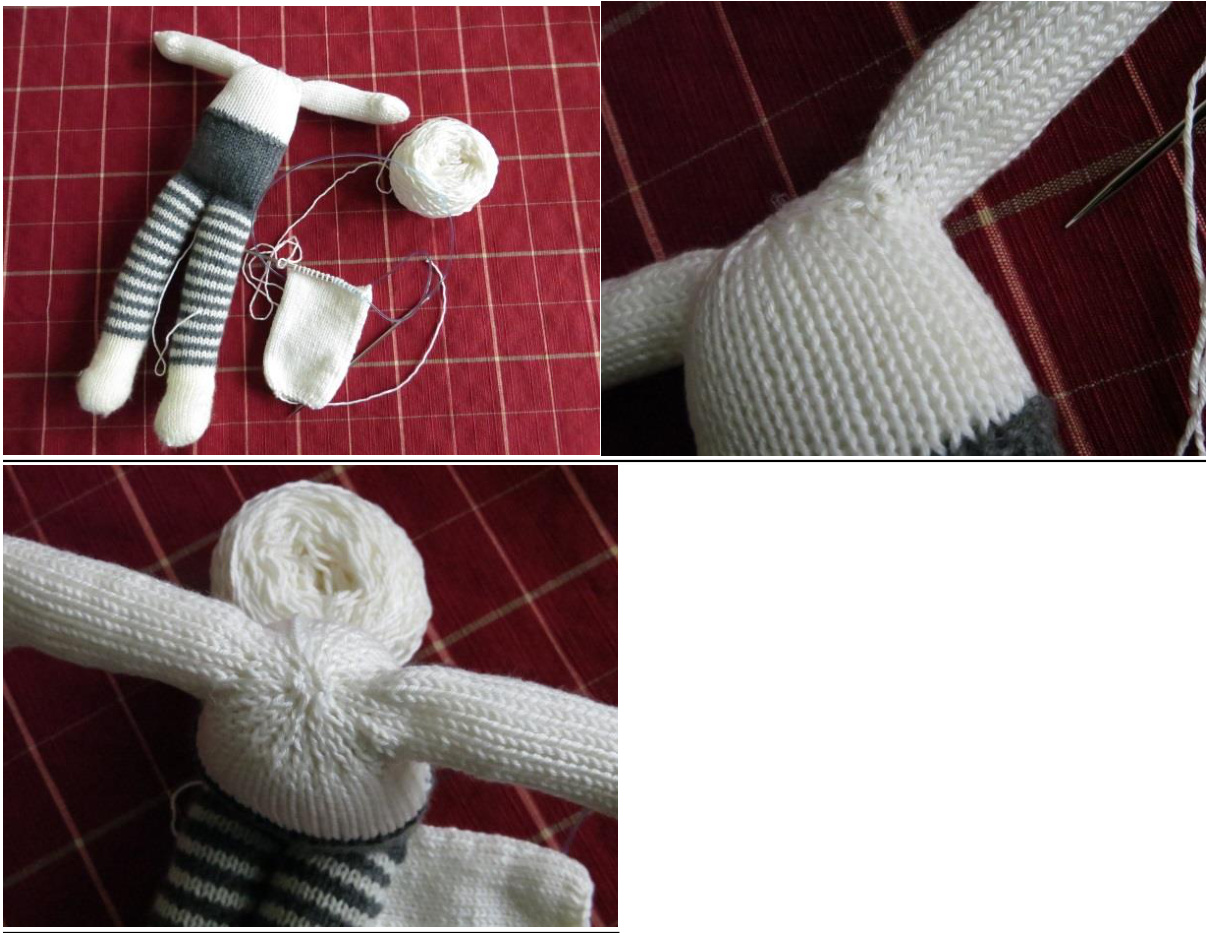
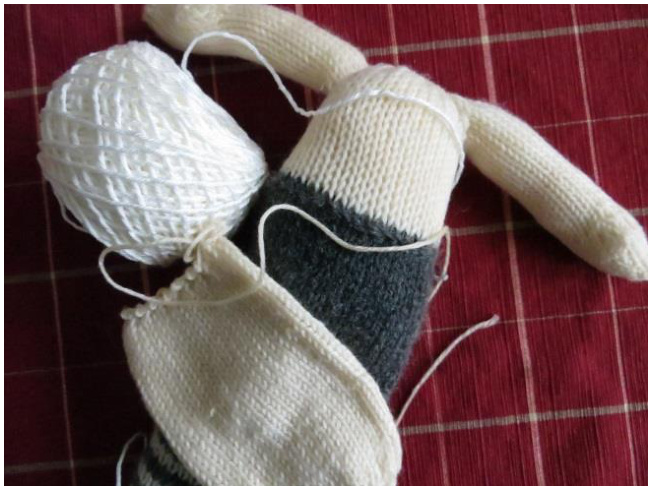
Arms With same method as the toes, Cast on 8 sts. R1-2: knit R3: \*K 1, M1, K2, M1, K1 \* repeat = 12 sts R4-5: knit R6: \*K 1, M1, K4, M1, K1 \* repeat = 16 sts R7-8: knit R9: K1, M1, K1, M1, K12, M1, K1, M1, K1 = 20 sts R10: knit R11: K1, M1, K18, M1, K1 = 22 sts R 12: knit R 13: Slip 1 knitwise, K2T, pass slipped stitch over, K16, K3T = 18 sts R 14: knit E15: K2T, K14, K2T = 16 sts Knit until vou reach 8 cm. w for left arm: K2, bind off 4 sts, knit to end leaving a 20 cm tail for underarm sear Last row for right arm: K10, bindoff 4 sts, knit to end leaving a 20 cm tail for underarm seam. ;tuff the arm, shaping the hand, leaving 1 cm unstuffed. About 6.5cm circonferenci
Top of Body:
With the legs facing forward, join the cotton yarn and knit in the round = 36 sts. At 8 cm from leg join, K16, bind off 4, K14 (including stitch on needle from the bind off), bind off 4 finishing the bind off at the beginning of the next row = 28 sts (14 each side).
Joining the arms to body:
R 1: K14 body front (including stitch on needle from the bind off), K12 from right arm starting with the 1st after the bind off (make sure thumb is towards the front), K14 body back, K12 left arm starting with the 1t after the bind off = 52 sts Distribute evenly on each needle making a loop in the middle of each shoulder to prevent pulling at arm join. R 2: Place marker and join in the round - knit to end R3: K13, K2T, K10, K2T, K12, K2R, K10, remove marker, K2T. Place marker = 48 sts R 4: K2T all around = 24 sts R 5: K R 6: K Stuff the body to desired thickness (my doll has a circonference of about 16.5 cm) and make sure the arms are stuffed up to 1cm of body opening. R 7: K2T all around = 12 sts. Before closing off, stuff top portion quite fully to hold the head. Cut thread and insert through the remaining stitches, pull to close the opening and secure with thread. Sew the underarm seam.
Head
With 2.75mm circular needle and body yarn, CO 18 sts. Join and knit one round. On row 2: K F/B of every stitch = 36 sts. At 9 cm: K2Tog all around = 18 sts. Knit one row. Cut thread and insert through the remaining stitches. DO NOT PULL THREAD
Note: if the color you have chosen for the skin is too pale, now is the time to dye it. Soak a tea sachet in a bowl of warm water, let it infuse a few seconds. Immerse the unfilled head and the filled top of the body PLUS 8O CM OF YARN TO SEW UP HEAD AND NOSE and soak 30 sec. Rinse. If the color is not dark enough, soak the tea bag again and repeat. For a warmer skin tone, try soaking in coffee. This photo shows the color of the yarn I used and the color of the body after dipping in tea. Fill the head (circonference about 7.5 inches). Pull the thread to close the opening and secure. Choose your nicer side for the face. Sew the head to the body. Pass your needle in the 3rd row of the head and about4 or 5th row on the body so that it does not wobble; it will still move.
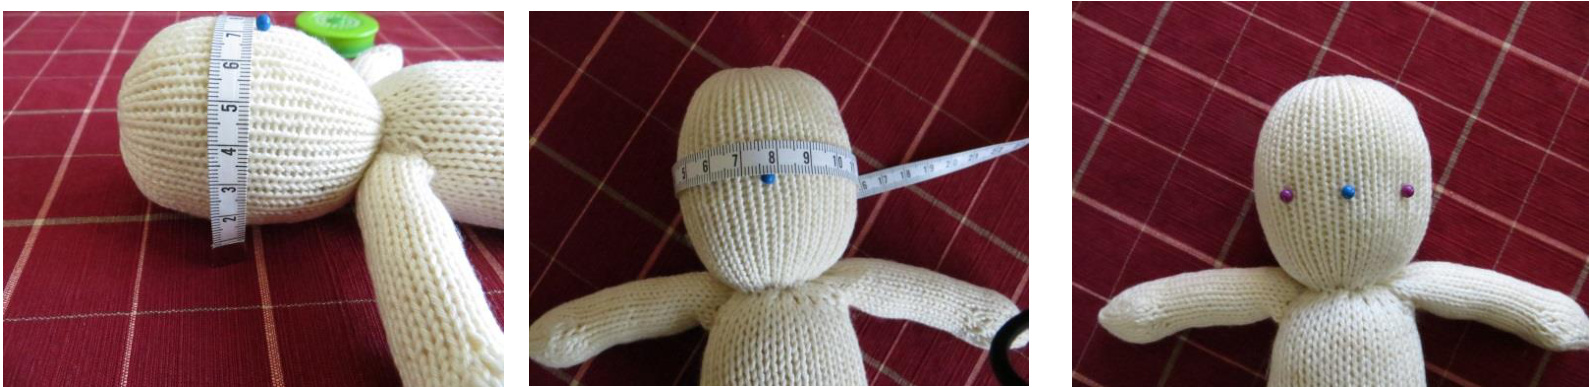
Face Lay doll flat on its back on a hard surface. Lay a measuring tape from side to side and put a pin in the middle of the face. Measure from top of head to neck and reposition the pin so that it is in the center of the head (should be about 4 cm from neck). Place a pin at a distance of about 2cm each side of middle pin for the eyes. Once you have embroidered the eyes, the distance between the eyes should be about 3 cm.
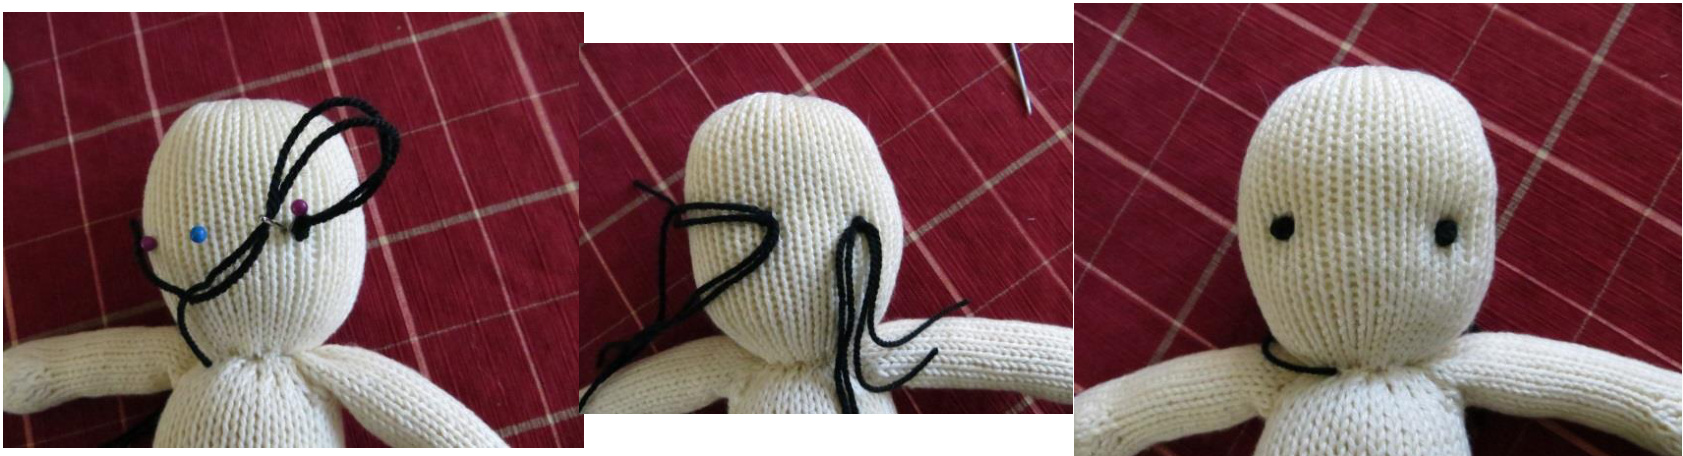
To make the eye socket, cut two black threads of 4ply or one thread DK about 30 cm long. Make two or three knots, one on top of the other in the middle. Thread one end in a long needle and push it on the right side of the pin all the way to the back of the head - thread the other end of the yarn and push it on the left side of the pin all the way to the back of the head. Pull slightly and tie ends together in the back of the head. Do the same for the other eye. If you are pleased with the eye socket, just tighten the back ends. Do not cut yet.
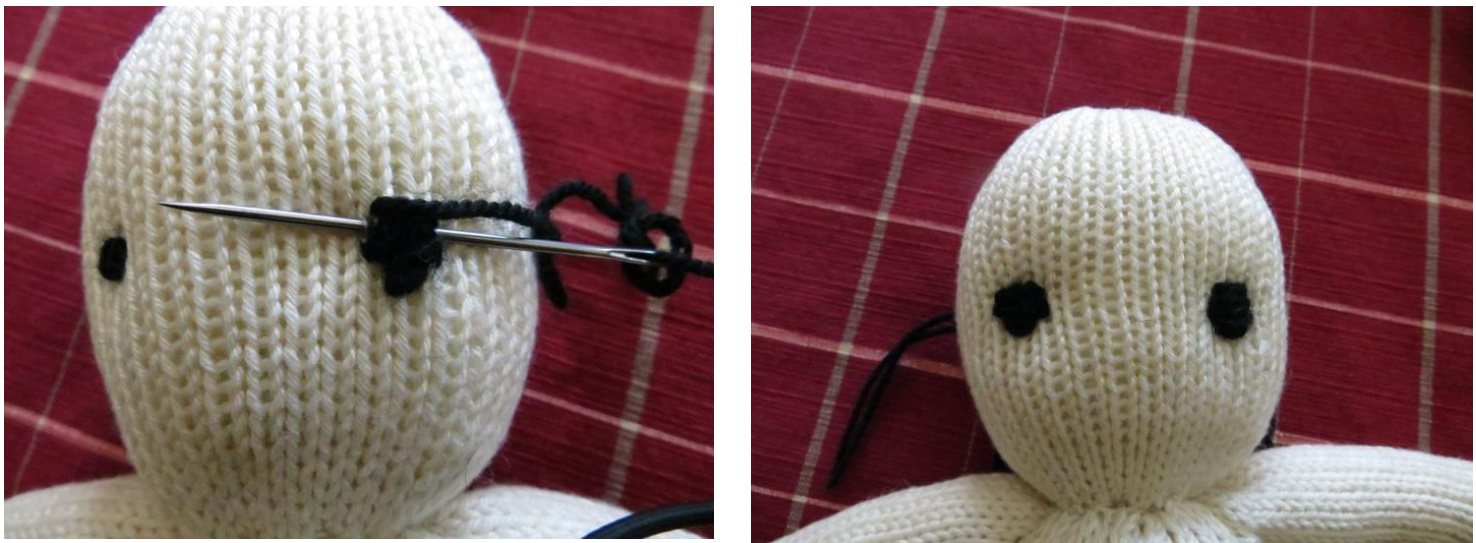
To embroider the eyes, use one thread of black fingering yarn and do some back stitches over the eyes to make a sort of lid - the doll's eye measures 1 cm wide by 1 cm high. Back stitch from top to bottom reducing the width of the stitches. Lose that thread by inserting needle through the head exiting at the back. Attach to the other threads. Cut to 2.5 cm.
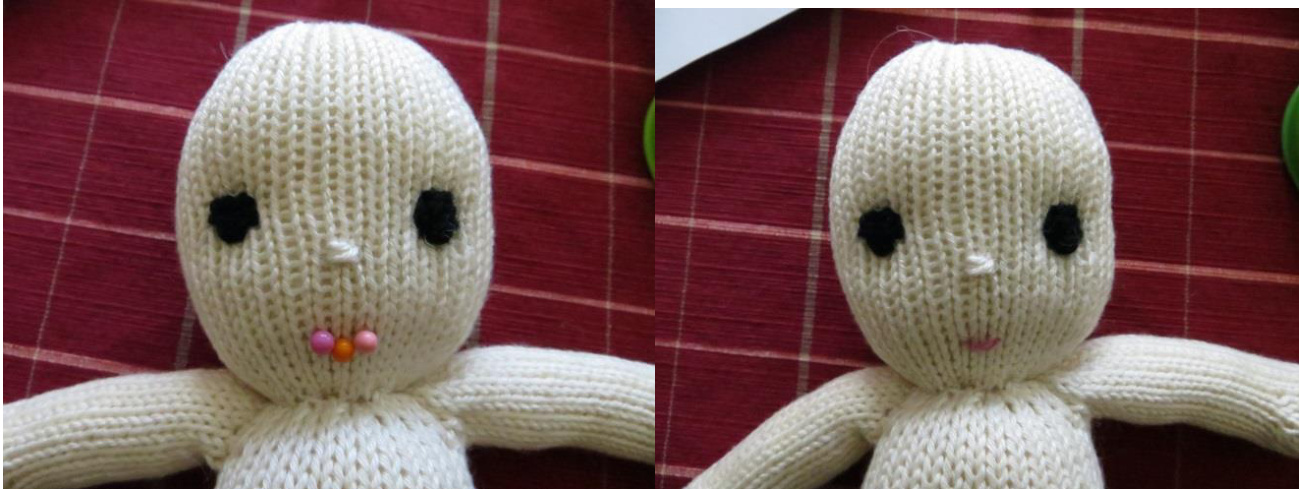
If you wish a nose and mouth: nose starts at the same level as the bottom of the eyes and is about .5cm wide and .5cm high. Back stitches with one thread of the face yarn for the nose and pink or red for mouth. Bottom of the mouth is located at 2 cm below the top of the nose - sides slightly up - total width is 1 cm. Blush the cheeks with the side of a coloringpencil.
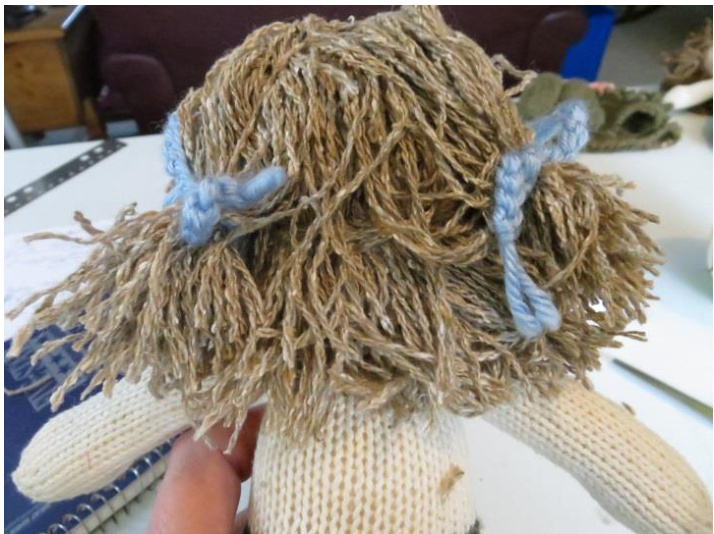
Hair
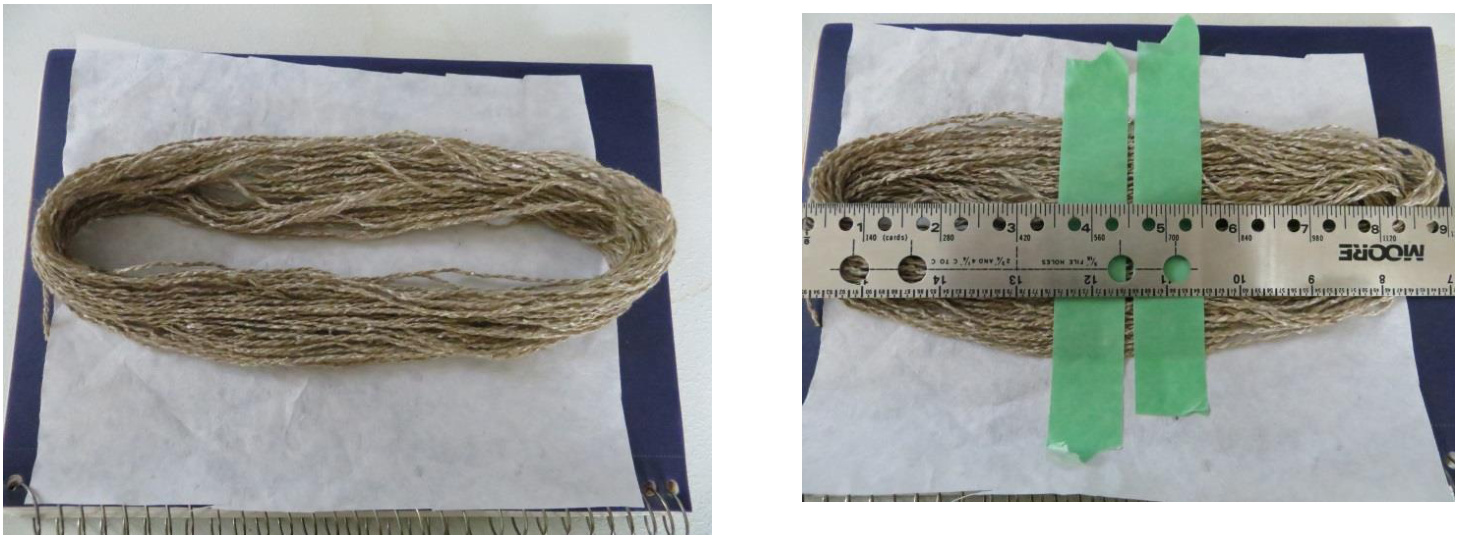
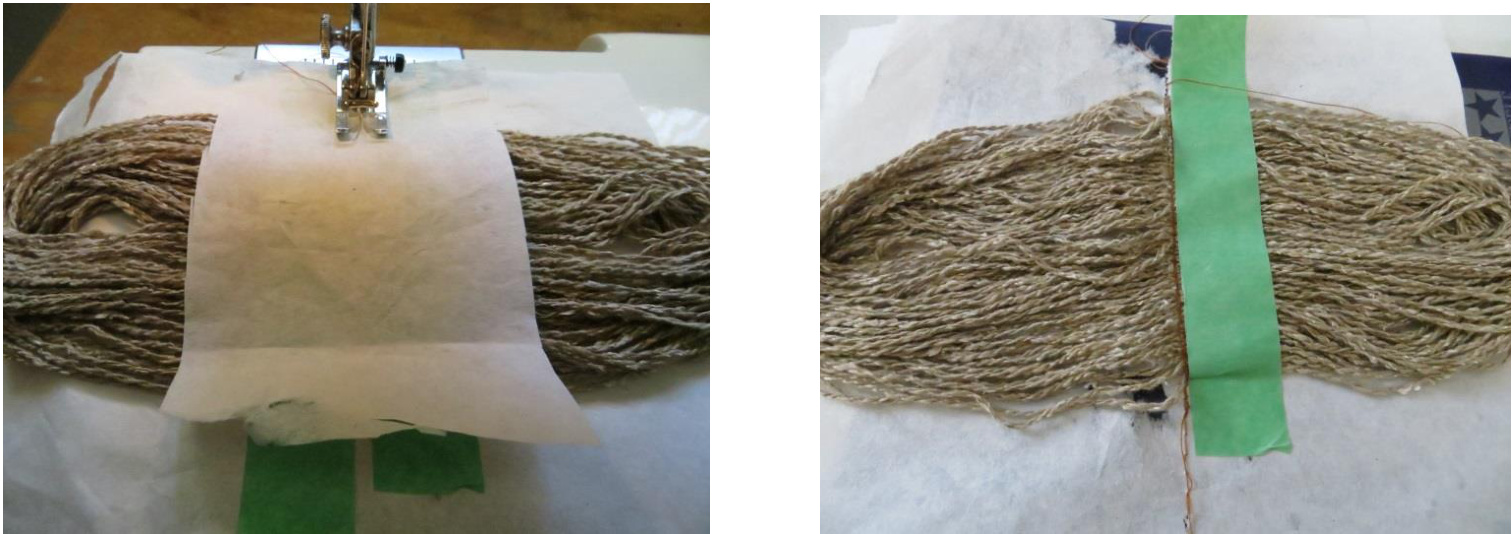
Crafty Sheep has a great tutorial on how to make the doll hair and fix it to the head. This is the method I have used. http://starrysheep.com/crafty/?p=103 The yarn gauge makes a big difference -I have used 4 ply yarn - if you use DK or worsted divide the wraps by 2. I did 45 wraps of 4ply yarn around a book that measured 24 cm. Gently remove from the book and lay the wrapped yarn on a tissue paper. Separate the wraps so that they measure about 20 cm wide (the wrap side) and 12 cm high in the middle. If you see some space between the wraps, add some more yarn. Find the middle and place a masking tape on each side of middle from top to bottom; this will hold the hair in place.
If you are sewing this on your sewing machine, put a tissue paper over this and sew along the middle between both tapes. Remove paper and tape. If you are sewing this by hand, gently remove the wraps from the tissue paper but keep the tape on.
1. Pin the hair on the head just above the forehead. Sew with back stitches, all the way down the middle from front to back (rounds strands on sides of head) - (if you have not used a sewing machine, make small stitches to capture all strands) - go over a second time.
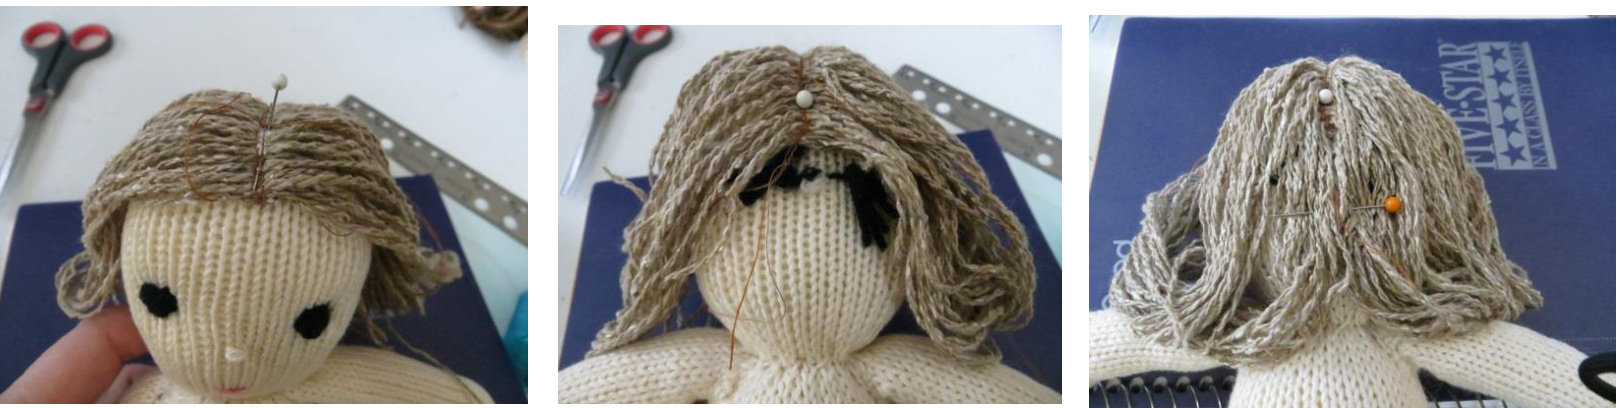
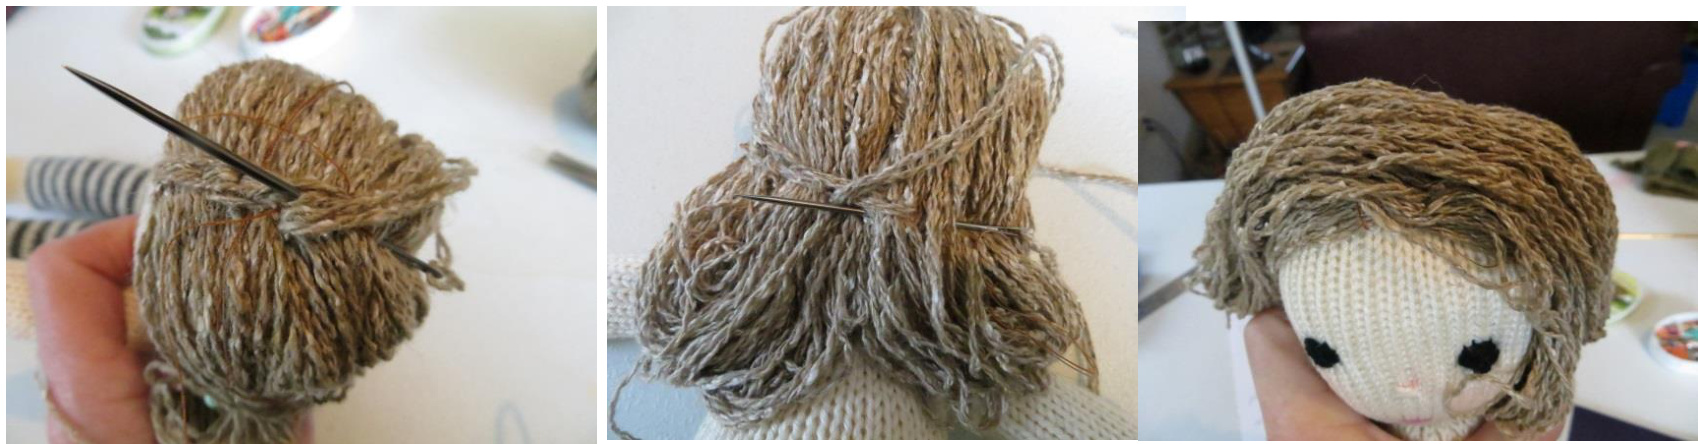
2. Arrange the hair neatly. You may cut the wraps or keep them. You need to sew the hair around the head at eye level on the side and slightly lower in the back to hide the black threads. You need to sew all the wraps so that there is no white spot showing; bring strands from the side to cover the middle back. Pin into place, trying to shape the hair in a nice curve along the sides of the forehead. nother layer of 45 wraps and proceed as above with a seam on top of the head onl
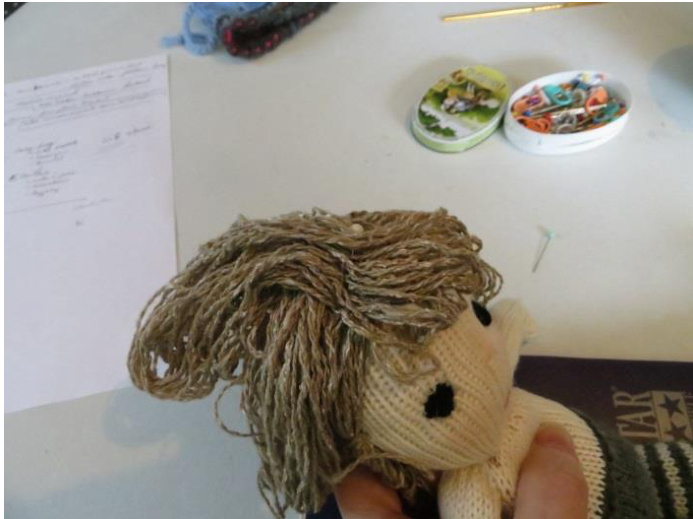
Abbreviations: co cast on M1 lift strand between the two stiches from front to back and knit thru back loop or purl thru front loop PM place marker RM remove marker YO yarn over BO bind off K knit P purl ST(s) stitch(es) K2T knit 2 sts together KF/B knit in front and back of stitch PF/B purl in front and back of stitch 3. Bangs: about 12 to 20 wraps around a book that measured 15 cm. Proceed as above, but do not tape in the middle, move to have 1/3 of the measurement on one side and 2/3 on the other side.Place this on the head from front to back - making the 1/3 match the beginning of the hair piece that you have already sewn into place (small round strands in front to form the bangs and the longer strands towards the back to hire the first hairpiece seam). Cut to shape.
Please contact me if you have any questions: lamarche.b@videotron.ca Copyright Louise Lamarche 2014. All rights reserved.
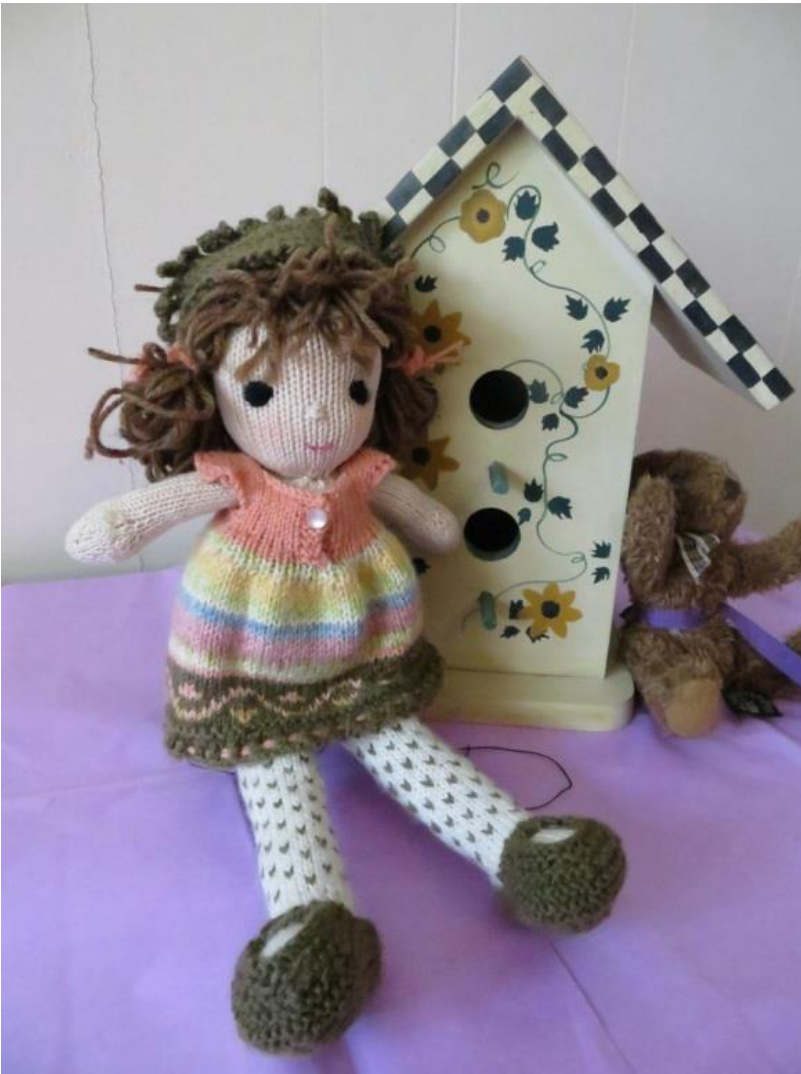
SWIRL DRESS OR JEWEL DRESS
Material:
Light DK or Sport yarn - kaki for swirl dress / grey - red - orange - pink - green and blue for jewel dress Multicolor sock yarn, doubled to meet gauge for swirl dress Peach light DK or Sport yarn for swirl dress 3.00 and 3.25mm circular needles 7mm button
Skirt
With 3.25mm circular needle and kaki, C0 162 sts and join in the round. R1: \*K2T, YO\* all around R2: K R3: \*K2T\* all around R4: K = 81 sts Change to 3mm circular needle. R5: P , increasing 3 sts evenly spread out = 84 sts R6: K
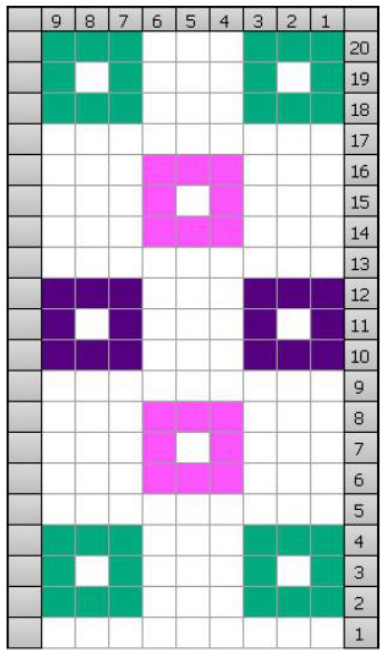
YOUR CHOICE - SWIRL PATTERN (KAKI) OR JEWEL PATTERN (GREY)
oin multicolor yarn (or red yarn for jewel dress) and knit the 5 rows of chosen char -13: K in kaki or grey but do not cut the multicolor yarn or blue yarn for jewel dre:
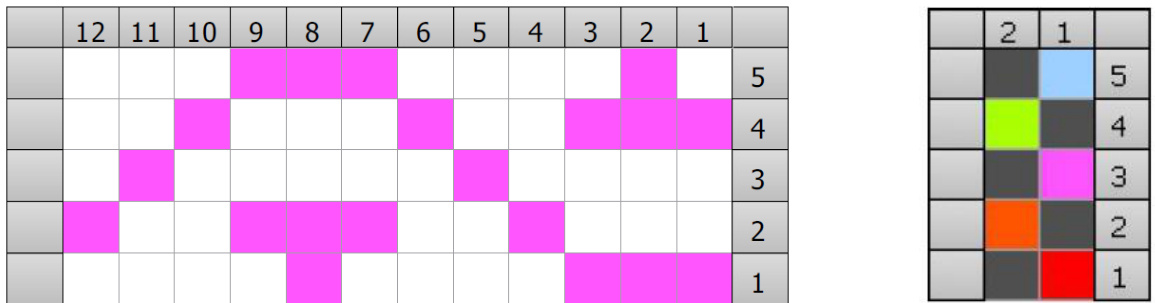
Cut kaki thread (DO NOT CUT GREY FOR JEWEL DRESS) and continue with multicolor yarn OR BLUE YARN. FOR JEWEL DRESSREPEATTHISPATTERN
At 8.5cm: \*K2T\* all around = 42 sts. Knit one row. Distribute 20 sts for back and 22 sts for front. You will now knit back and forth starting from the right side. R1: K3 (garter stitch border), K9 right front, K20 back, K 10 left front, C0 3 (garter stitch border) R2: K3, purl to last 3 sts, K3 R3: K R 4: K3, purl to last 3 sts, K3 R5: K R6: K3, purl to last 3 sts, K3 R7: K3, K7, cast off 4 for underarm, K16 (includes st on needle), cast off 4, knit to end = 10 sts right front, 16 sts back and 11 sts left front Continue each side separately. Left side: 11 sts - starting on the wrong side R1: K3, P8 R2: K11 R3: K3, P7, YO, P1 = 12 sts R4: K1, YO, K11 = 13 sts R5: K3, P9, YO, P1 = 14 sts R6: K1, YO, K13 = 15 sts R7: BO 8 sts, Purl to last stich, YO, P1 = 8 sts R8: K1, YO, K7 = 9 sts R9: Purl R10 Knit Cut thread and put on hold
Back: 16 sts - starting on the wrong side - join yarn
R1: P16 R2: K16 R3: P1, YO, P14, YO, P1 = 18 sts R4: K1, YO, K16, YO, K1 = 20 sts R5: P1, YO, P18, YO, P1 = 22 sts R6: K1, YO, K20, YO, K1 = 24 sts R7: P1, YO, P6, BO 10, Purl to last stich, YO, P1 = 8 sts on each shoulder - continue separately Right shoulder R8: K1, YO, K7 = 9 sts R9: Purl R10: Knit . Cut yarn and put on hold
Left shoulder (join yarn to front of work)
R8: K7, YO, K1 = 9 sts R9: Purl R10: Knit . Cut yarn leaving a 30 cm tail for 3-needle bindoff. Put on hold.
Right side: 10 sts - starting on the wrong side - join yarn
R1: P7, K3 R2: K10 R3: P1, YO, P6, K3 = 11 sts R4: buttonhole: K1, YO, K2T, K7, YO, K1 = 12 sts R5: P1, YO, P8, K3 = 13 stS R6: K12, YO, K1 = 14 sts R7: P1, YO, P10, K3 = 15 sts R8: BO 7, K6 (plus 7th st on needle), YO, K1 = 9 sts R9: Purl R10 Knit. DO NOT CUT THREAD and leave on needle.
Assembling the shoulders
Do a three needle bind off. You may wish to view this video to assist you. http://www.youtube.com/watch?v=wpJUrcX52DU Slip the right back shoulder stitches on a needle (same size or smaller than the one you are using). Turn your right side shoulder so that the back of the work is facing you, your working thread should be coming from the right. Take the right back shoulder needle and turn it so that the right side of work is facing the right right side of work of the right front. With both needles touching, insert working needle in first stitch of front needle and in the first stitch of the back needle, knit the two together and remove. You have one stitch on the right needle. Repeat with both second stitches, two stitches on the right needle, pass the first stitch on the right needle over this new stitch. One cast off. Repeat to end. Do the same on the other shoulder.
Finishing
Lose your threads. Block. If you want to tame the frill, pass a ribbon or a double stranded yarn in the eyelet and pull to even out the frill. Sew a small button. Weave a ribbon or double folded yarn in the eyelets at the bottom of the dress
BALLERINA SHOES
Material:
Kaki light DK or Sport yarn 3mm circular needle You willstart on the underfoot preferably using one of the methods for making the toe-up socks. I prefer the closed toe cast-on, but most people prefer Judy's magic cast-on - see video links. If you choose to do a regular cast on, you may sew up the sole later on. Closed toe cast-on: http://vimeo.com/4551095 Judy's magic cast-on: http://www.youtube.com/watch?v=gkyd3nq3Yn8 Starting underfoot, with the 3mm needle, cast on a total of 14 sts. Continue knitting using the magic loop method with 7 sts on each needle point. Note: if you are knitting the shoes in a 21 sts DK or heavier, see comments beside each row. R1: P R2: K F/B of every stitch = 28 sts R3: P R4: K R5: P11, PF/B in next 6 sts, P11 = 34 sts R6 -8- 10: K (in heavy DK omit rows 6 and 8) R7 - 9- 11: P (in heavy Dk omit rows 7 and 9) R12: K11, KF/B in next 12 sts, K11 = 46 sts R13: P R14: K R15: P38, bind off 8 R16: bind off 11 (the last 3 sts form the strap) K to end = 27 sts From here, you will knit back and forth. R17: K(in heavy DK omit row 17) R18: K4, K2T twice, K8, K2T twice, K7 = 23 sts (in heavy DK: K7, K2T twice K8, K2T twice, K4) R19: K (in heavy DK omit row 19) R20: K8, K2T twice, K11 = 21 sts R21: K9, K2T three times, K6 = 18 sts R22: K (in heavy DK bind off here: bind off 15 sts, K3 - skip row 23) R23: K3, bind off the rest of the stitches. You will need to reattach the yarn. Strap: K8 rows on the 3 stitches. Bind off and sew to other side. CO 3 sts (leave a 38 cm tail for crocheting a tie) R1: K R2: K3, cast on4 sts with your thumb, KF/B 5times in first stitch,turn work, K5, pass 2nd over 15, pass 3"d over 1st, pass 4th over 1"t, pass 5th over 1st -turn = 7 sts on needle. Cast off 4 needles. K 3 R3: K R4: K R5: K R6: K3, cast on 4 sts with your thumb, KF/B 5 times in first stitch, turn work, K5, pass 2nd over 1, pass 3rd over 1st, pass 4th over 1", pass 5th over 1st -turn = 7 sts on needle. Cast off 4 needles. K3 Repeat rows 3 - 6 -another times = 24 bobbles. On last bobble row - cast off 6 sts, leaving 1 st. 'ick up 50 sts along the bobble strip = 51 sts. Place a marker each side of middle st. The rest is done in short rows: knit to second marker. \*Remove marker, slip st purlwise, turn work, bring yarn to back, place marker, slip st purwise, knit to marker\* Repeat until all stitches have been knitted. Cast off loosely, leaving a 38 cm tail. Using crochet hook, chain about 30 sts (or desired length for making a bow tie). Or cast on about 30 sts and cast off on next row.
Hair ties
Cut about 1 meter of yarn, fold in half and crochet chain the desired length to wrap around the hair. You can also cast on about 40 sts and cast off on next row.
Abbreviations:
co cast on M1 lift strand between the two stiches from front to back and knit through back loop PM placemarker RM removemarker YO yarn over BO bind off K knit P purl ST(s) stitch(es) K2T knit 2 sts together KF/B knit in front and back of stitch PF/B purl in front and back of stitch Please contact me if you have any questions: lamarche.b@videotron.ca Copyright Louise Lamarche 2014. All rights reserved.
LACY DAY
By Louise Lamarche
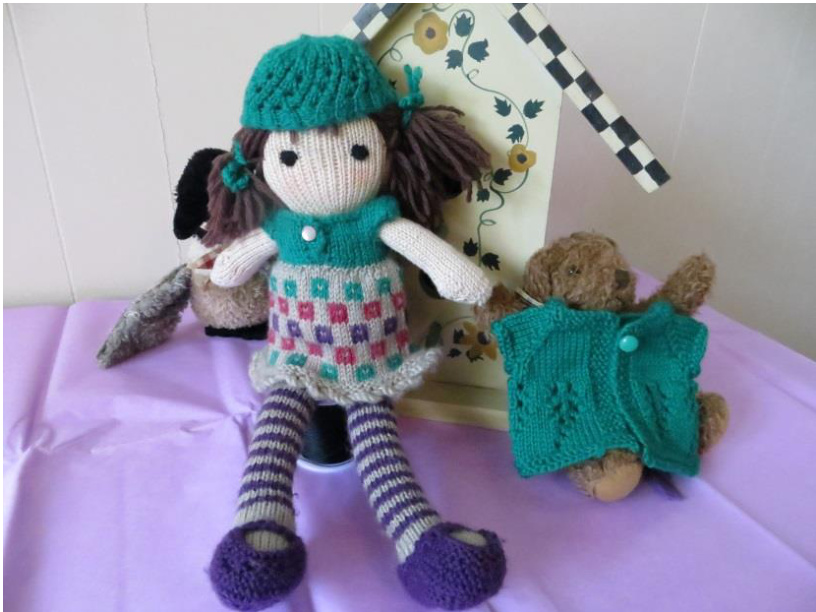
Knitted accessories for the LILI CUDDLY DOLL. The pattern includes a new dress design, a lacy cardigan, a lacy hat and ballerina shoes.
Material:
DK or Sport yarn - beige, green, pink, mauve 3.00 circular needles 7mm buttons
Dress
With 3 mm circular needle and beige, CO 160 sts and join in the round. R1: \*K3, bind off 3\* all around = 78 sts R2: P R3: K R4: P
Knit chart rows 1 to 20. Continue in beige. R 21-22:K R23: \*K2T\* all around = 39 sts R24: K. Distibute 20 sts for back and 19 sts for front. Cut beige and join green in middle front (1oth stitch). You will now knit back and forth. R1: cast on 3 with thumb. K3 (garter stitch border), K10 right front, K20 back, K9left front, CO 3 (garter stitch border) = 13 sts right front and 12 left front. R2: K3, purl to last 3 sts, K3 R3: K R 4: K3, purl to last 3 sts, K3 R5: K R6: K3, purl to last 3 sts, K3 R7: K3, K8, cast off 4 for underarm, K15 (16 sts on needle for back), cast off 4, knit to end = 11 sts right front and 10 sts left front. Continue each side separately. Left side: 10 sts - starting on the wrong side R1: K3, P7 R2: K10 R3: K3, P6, YO, P1 = 11 sts R4: K1, YO, K10 = 12 sts R5: K3, P8, YO, P1 = 13 sts R6: K1, YO, K12 = 14 sts R7: BO 8 sts, Purl to last stich, YO, P1 = 8 sts R8: K1, YO, K7 = 9 sts R9: Purl R10 Knit and put on hold
Back: 16 sts - starting on the wrong side
R1: P16 R2: K16 R3: P1, YO, P14, YO, P1 = 18 sts R4: K1, YO, K16, YO, K1 = 20 stS R5: P1, YO, P18, YO, P1 = 22 sts R6: K1, YO, K20, YO, K1 = 24 sts R7: P1, YO, BO 8 sts, Purl to last stich, YO, P1 = 8 sts R8: K1, YO, K7 = 9 sts R9: Purl R10: Knit and put on hold
Right side: 11 sts - starting on the wrong side
R1: P8, K3 R2: K11 R3: P1, YO, P7, K3 = 12 sts R4: buttonhole: K1, YO, K2T, K8, YO, K1 = 13 sts R5: P1, YO, P9, K3 = 14 sts R6: K12, YO, K1 = 15 sts R7: P1, YO, P11, K3 = 16 sts R8: BO 8, K7, YO, K1 = 9 sts R9: Purl R10 Knit and leave on needle
Assembling the shoulders
Do a three needle bind off. You may wish to view this video to assist you. http://www.youtube.com/watch?v=wpJUrcX52DU Slip the right back shoulder stitches on a needle (same size or smaller than the one you are using). Turn your right side shoulder so that the back of the work is facing you, your working thread should be coming from the right. Take the right back shoulder needle and turn it so that the right side of work is facing the right right side of work of the right front. With both needles touching, insert working needle in first stitch of front needle and in the first stitch of the back needle, knit the two together and remove. You have one stitch on the right needle. Repeat with both second stitches, two stitches on the right needle, pass the first stitch on the right needle over this new stitch. One cast off. Repeat to end. Do the same on the other shoulder.
Finishing
Lose your threads. Block. Sew a small button.
BALLERINA SHOES
Material: Kaki light DK or Sport yarn 3mm circular needle Starting underfoot, with the 3mm needle, cast on a total of 14 sts. I prefer the closed toe cast-on, but please choose whatever method you favor to cast on. Continue knitting using the magic loop method with 7 sts on each needle point. Closed toe cast-on: http://vimeo.com/4551095 Judy's magic cast-on: http://www.youtube.com/watch?v=gkyd3nq3Yn8
Note: if you are knitting the shoes in a 21 gauge DK or heavier, see comments beside each row.
R1: P R2: K F/B of every stitch = 28 sts R3: P R4: K R5: P11, PF/B in next 6 sts, P11 = 34 sts R6 -8- 10: K (in heavy DK omit rows 6 and 8) R7 - 9-11: P (in heavy Dk omit rows 7 and 9) R12: K11, KF/B in next 12 sts, K11 = 46 sts R13: P R14: K R15: P38, bind off 8 R16: bind off 11 (the last 3 sts form the strap) K to end = 27 sts From here, you will knit back and forth. R17: K(in heavy DK omit row 17) R18: K4, K2T twice, K8, K2T twice, K7 = 23 sts (in heavy DK: K7, K2T twice K8, K2T twice, K4) R19: K (in heavy DK omit row 19) R20: K8, K2T twice, K11 = 21 sts R21: K9, K2T three times, K6 = 18 sts R22: K (in heavy DK bind off here: bind off 15 sts, K3 - skip row 23) R23: K3, bind off the rest of the stitches. You will need to reattach the yarn. Strap: K8 rows on the 3 stitches. Bind off and sew to other side.
Lacy Hat
Cast on 48 sts. Join in the round. Knit 6 rows in ribs: \*K1, P1\* Knit one row increasing row: \*K12, M1\* = 52 sts
Lace pattern:
R1: \*YO, K2T\* all around R2: K R3: \*YO, K2T, K2\* all around R4: K Do lace pattern 4 times = 16 rows Decreasing rows: R1: \*K2T\* all around = 26 sts R2: K R3: \*K2T\* all around = 13 sts R4: K R5: \*K2T\* all around = 7 sts R6: K R7: \*K2T\* all around = 4 sts Pass yarn through and pull tight.
Lacy Cardigan
This cardigan is knit top-down. CO 46 sts R1: K4 (border), P6 (right front), pm, P5 (sleeve), pm, P16 (back), pm, P5 (sleeve), pm, P6 (left front), K4 (border) R2: K4, P to last 4, K4 R3 K4, P to last 4, K4 R4: K4, P to last 4, K1, YO, K2T, K1 (buttonhole) R5: K increasing one stitch before and after each marker (either K F/B or M1) R6: K4, P to last 4, K4 Repeat rows 5 and 6 another 4 times = 86 sts - 15 sts each front - 15 sts each sleeve - 26 sts back
Separating body and sleeves
K15 front, put 15 sts on stitch holder, CO4, K26, put 15 sts on stitch holder, C04, K15 = 64 sts R1: K4, P to last 4 sts, K4 R2:K R3: K4, P to last 4 sts, K4
Lace Pattern
Row 1 : K4, (k3, yo, k3tog, yo, k2) 7 times, K5 Row 2 : K4, P to last 4, K4 Row 3 : K4, (k1, ssk, yo, k3, yo, k2tog) 7 times, K5 Row 4 : K4, P to last 4, K4 Row 5 : K4, (k2, ssk, yo, k1, yo, k2tog, k1) 7 times, K5 Row 6 : K4, P to last 4, K4 Row 7 : K4, (k1, ssk, yo, k3, yo, k2tog) 7 times, K5 Row8 : K4, P to last 4, K4 Row 9 : K4, (k2, ssk, yo, k1, yo, k2tog, k1) 7 times, K5 Row 10: K4, P to last 4, K4 Row 11: K4 (k4, yo, k2tog, k2) 7 times, K5 Row 12: K4, P to last 4, K4 Row 13: K4, (k3, yo, k2tog, k3) 7 times, K5 Row 14: K4, P to last 4, K4 Row 15: K4, (k2, yo, k2tog, k4) 7 times, K5 Row 16: K4, P to last 4, K4 Row 17: K Row 18: P Row 19: P Row 20: P Bind off purlwise
Sleeves
Attach yarn. Pick up and knit 4 sts underarm = 19 sts Knit 2 rows Purl 1 row Bind off knitwise
Abbreviations:
co cast on M1 lift strand between the two stiches from front to back and knit through back loop PM place marker RM remove marker YO yarn over BO bind off K knit P purl ST(s) stitch(es) K2T knit 2 sts together SSK k2t thru back loop KF/B knit in front and back of stitch PF/B purl in front and back of stitch
Please contact me if you have any questions: lamarche.b@videotron.ca
Copyright Louise Lamarche 2014. All rights reserved.
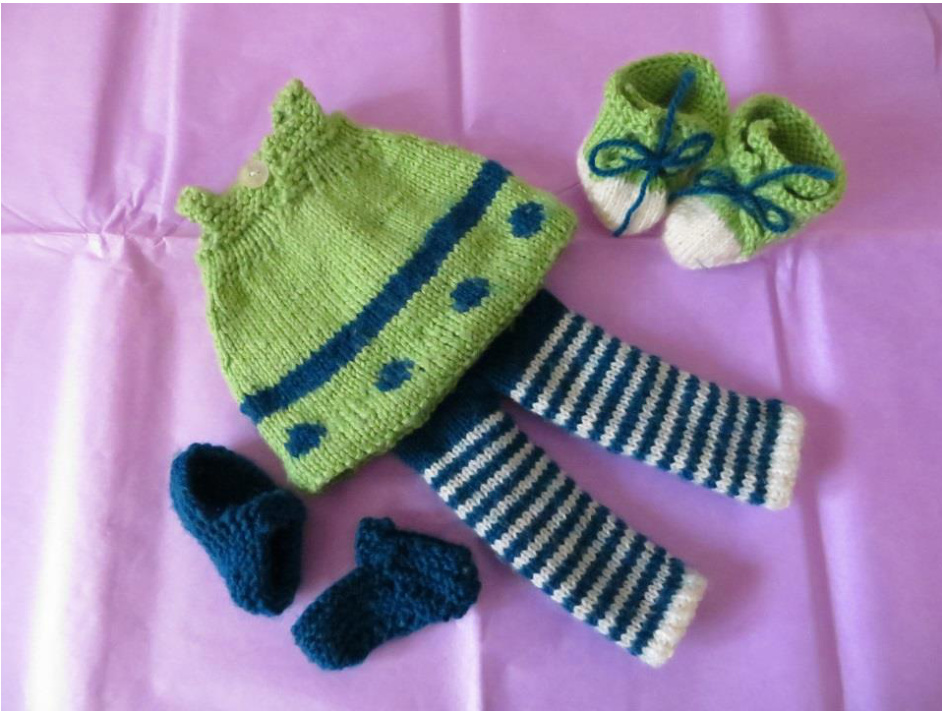
PLAYGROUND DAY
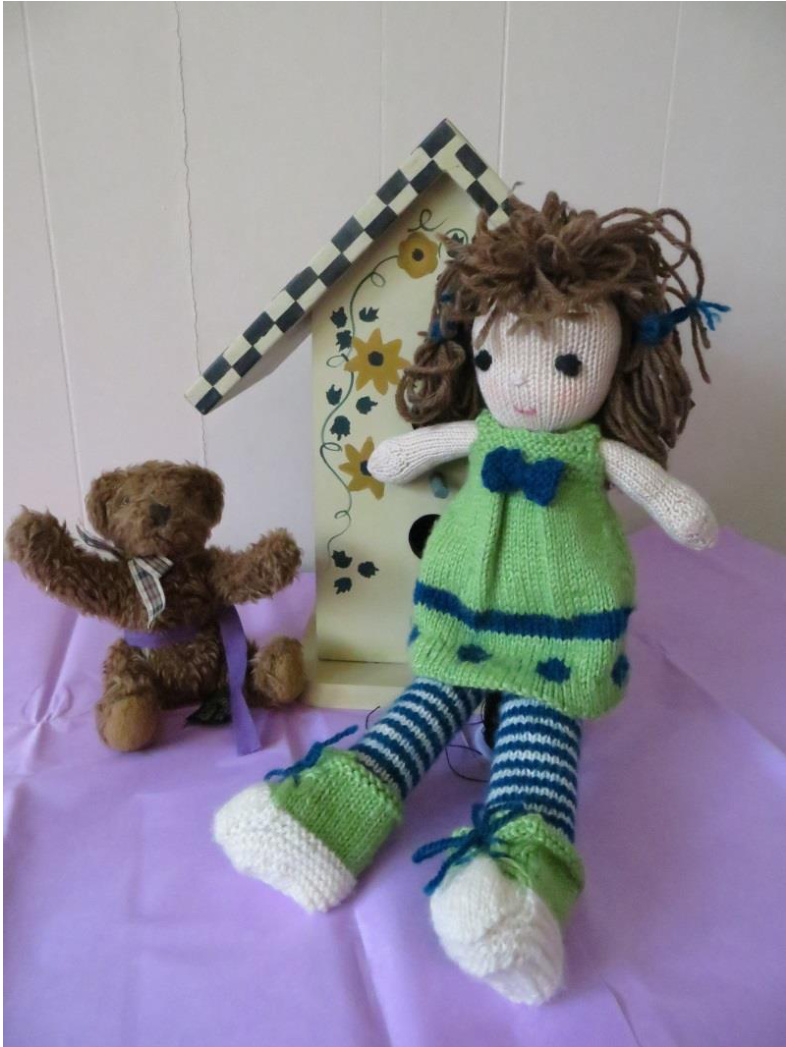
By Louise Lamarche Knitted accessories for theLILI CUDDLY DOLL.The pattern includes a new dress design, leggings and basketshoes.
Material:
DK or Sport yarn pistachio, teal and cream 3mm circular needles 7 mm button
Dress
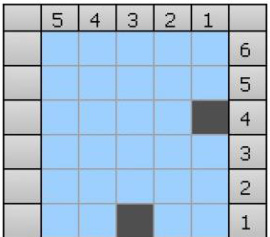
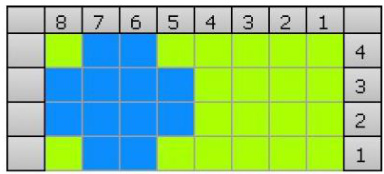
With 3mm circular needle and pistachio, CO 80 sts and join in the round. R1-4: K R5: P R6-9:K R10-13: K rows 1-4 of charft repeating these 8 sts all around R14-17: cut teal yarn and K in pistachio R18-21: join teal and K (move pistachio yarn up from row to row Continue in pistachio only.
At 5cm: decrease row: \*K1, K2T, K34, K2T, K1\* repeat = 76 sts Repeat decrease row every 4 rows two more times = 68 sts (34 sts on front and 34 sts on back) At 9 cm: K1, K2T, K28, K2T, K1, K2T (8 times), K2, K2T (8 times) = 32 sts on front and 18 sts on back Next row: K32, K10 turn work and knit back and forth. R1: K3 (border stitch) P to last, CO 3 with thumb R2: K to end R3: K3, P to last 3sts, K3 R4: K11 (back left side), K12, MIDDLE FOLD: slip 4 sts on aux. needle to back of work, K the 1st of aux. needle with next st on main needle, K 2nd aux. with 2nd main, repeat with 3rd and 4th - slip 4 sts on aux. needle in front of work, K next stich on main needle with 1st st on aux., knit next stitch on main with 2nd on aux, repeat with 3'd and 4th = 24 sts on front. Knit to end. R5: K to end (garter stitch to end of work) R6: K9, bind off 4, k19 (=20 with stitch on needle) bind off 4, K8 = 9 sts back left - 20 front - 8 sts back right Continue each side separately.
Right back (8 sts)
R1: K1, YO, K2T (buttonhole), K5 R2-4: K8 R5: bind off 5, K3 R6-11: K3 - cut thread leave on stitch holder
Front: (20 sts) starting on wrong side
R1-3: Knit R4: Sl1, K2T pass slipped stitch over, K to last 3, K3T = 16 sts R5-8: K R9: K3, bind off 10 sts, K3 Continue each shoulder separately. R10-13 K3 put on hold.
Left back: (9 sts) starting on wrong side
R1-5: K R6: BO 6, K3 R7-12: K3, put on hold
Assembling the shoulders
Do a three needle bind off. You may wish to view this video to assist you. http://www.youtube.com/watch?v=wpJUrcX52DU Slip the right front shoulder stitches on a needle (same size or smaller than the one you are using). Turn your left back shoulder so that the wrong side of the work is facing you. Take the right front shoulder needle and turn it so that the right side of work is facing the right right side of work of the left back. With both needles touching, insert working needle in first stitch of front needle and in the first stitch of the back needle, knit the two together and remove. You have one stitch on the right needle. Repeat with both second stitches, two stitches on the right needle, pass the first stitch on the right needle over this new stitch. One cast off. Repeat to end.Do the same on the other shoulder.
Finishing
Lose your threads. Block. Sew a small button.
Bow-tie
CO 5 sts. Knit 13 rows. Bind off. Wrap a string around the middle and make a knot in the back of the bow. Tie to front ofdress.
BASKET SHOES
Material:
Kaki light DK or Sport yarn 3mm circular needle You will start on the underfoot preferably using one of the methods for making the toe-up socks. I prefer the closed toe cast-on, but most people prefer Judy's magic cast-on - see video links. If you choose to do a regular cast on, you may sew up the sole later on. Closed toe cast-on: http://vimeo.com/4551095 Judy's magic cast-on: http://www.youtube.com/watch?v=gkyd3nq3Yn8 Starting underfoot, with the 3mm needle, cast on a total of 14 sts. Continue knitting using the magic loop method with 7 sts on each needle point. R1: P R2: K F/B of every stitch = 28 sts R3: P R4: K R5: P11, PF/B in next 6 sts, P11 = 34 sts R6-8-10:K R7-9-11:P R12: K11, KF/B in next 12 sts, K11 = 46 sts R13: P25, with yarn in front, sl1,turn R14: bring yarn to front, sl1, P4, bring yarn to back, sl1, turn R15: YTB, sl1, K5, YTF, sl1 turn R16: YTF, sl1, P6, YTB, sl1 turn R17: YTB, sl1, K7, YTF, sl1 turn R18: YTF, sl1, P8, YTB, sl1 turn R19: YTB, sl1, K9, YTF, sl1 turn R20: YTF, sl1, P10, YTB, sl1 turn R21: YTB, sl1, K11, YTF, sl1 turn R22: YTF, sl1, P12, YTB, sl1 turn R23: YTB, sl1, K13, YTF, sl1 turn R24: YTF, sl1, P14, YTB, sl1 turn R25: YTB, sl1, K15, YTF, sl1 turn R26: YTF, sl1, change to contrast yarn and P16 Knit and Purl a total of 8 rows on these 16 sts Next row: K2T, K12, K2T Next row: K14 Next row: Purl Bind off knitwise
Basket sides and back:
Cut off main color and join contrast color in same place. R1: K30 R2: P R3: K R4: P R5: K2, YO, K2t, K22, K2T, YO, K2 R6 : P R7 : K R8 : P R9: K2, YO, K2t, K22, K2T, YO, K2 R10: P R11: K R12: P R13: P Bind off knitwise As you lose you yarn tails, do 2 or 3 backstitches to secure flap to each side at front opening. Insert yarn or ribbon through eyelets.
Tights
DK or Sport yarn cream (CC) and teal (MC) 3mm circular needles
First leg:
CO 26 sts with CC R1-2: K1P1 ribs all around R3: K R4-5: Join MC and K with MC R6-7: K with CC Repeat rows 4 to 7 ten (10) more times. K 7 rows with MC - put on hold
Second leg: Following pattern for first leg
Joining legs in the round
Knit 12 sts from second leg - join the first leg by knitting together the last stitch of second leg and the first stitch of the first leg - Knit 24 - knit together the last stitch of the first leg with the first stitch of the second leg. Knit 12 sts = 48 sts. Knit until you reach 2 cm from crotch. Then change to K1P1 until you reach 6 cm from crotch. Bind off in ribs. Sew the join between the legs with a few stitches to close off. Auuieviduiuiis co cast on M1 lift strand between the two stiches from front to back and knit through back loop PM place marker RM remove marker YO yarn over BO bind off K knit P purl ST(s) stitch(es) K2T knit 2 sts together SSK k2t thru back loop KF/B knit in front and back of stitch PF/B purl in front and back of stitch YTF bring yarn to the front of work YTB bring yarn to back of work Please contact me if you have any questions: lamarche.b@videotron.ca Copyright Louise Lamarche 2014. All rights reserved.


