Crocheted T-shirt Bag
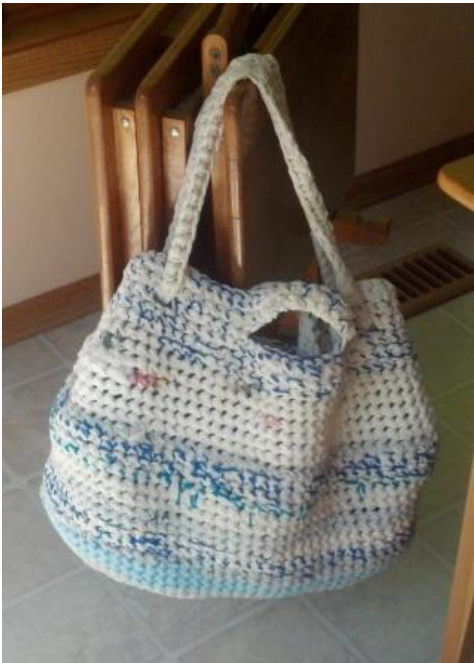
Large Market Bag 1

Medium Tote 2
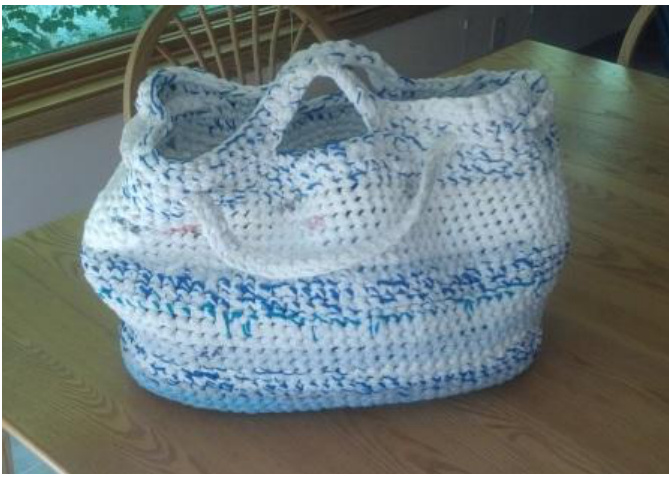
Large Market Bag 2
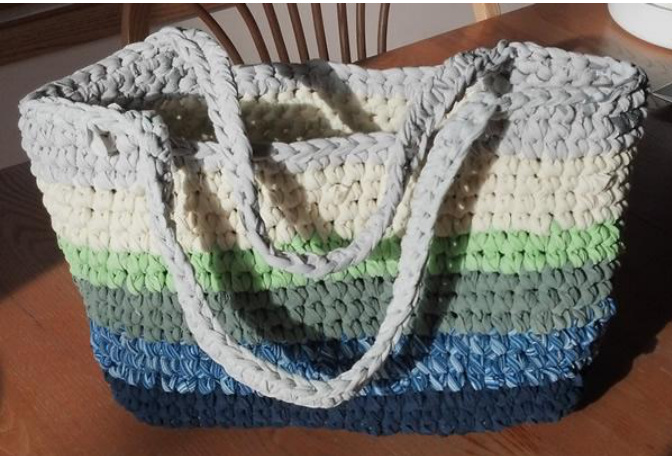
Medium Tote 1
There are many reasons for this bag.
1. It puts old shirts to good use. 2. For the author of this pattern it meets that need to feel like I am not wasting anything. 3. The resulting projects are useful. 4. It is easy to do in front of the TV, on a long car ride, or while visiting with someone who is also knitting or crocheting. 5. Most of all it empowers you to build with fabric and expand outside your box. There are no rules. We will talk about shape, what you want, how to think about getting there, what matters and what does not.
Crocheted T-shirt Bag
Materials:
Old shirts - one for a hot pad, many for a Large Market Bag. I used 7.5 shirts for the Medium Tote and around 25 for the Large Market Bag. Scissors. Some parts may be easier with a rolling cutter if you have one. Crochet hook size large. I used an N on my projects. I prefer metal as sometimes I work tight and I tend to break the plastic ones. Paper and pencil if you like to make notes about what you have done. This is a good habit to get into. It allows you to go back years to remember what you did. Following the instructions beginning on page 6, make some T-shirt yarn. Make a lot in advance, or cut shirts as you go. You get to choose. The yarn you make will be fairly fat. Small bags don't work very well with fat yarn, so your project will probably be more successful if it is flat (like a hot pad or seat cushion) or medium to large (like the pictured totebags). You must decide what shape you want to make. Round and rectangular are easy. You can also be creative. lade a Granny Square you know that each row must add stitches in order to lie flat. Round requires adding many stitches added frequently Rectangular requires adding stitches at the corners
BAG BOTTOM
Round
Loosely chain as many stitches as it takes to be able to "reach around" to the beginning. Probably around 4 stitches. As soon as you can reach around, begin making two or three single crochet stitches in each chain stitch. Continue making one, two or three single crochet stitches in each stitch around until you reach the desired size. ·You will notice the circle begin to "cup" if you need to increase more stitches, or "ruffle" if you need fewer increase stitches. Continue increasing in the circle, making 1, 2 or 3 stitches as needed to keep the circle flat. · Crochet round and round until the circle is the desired size of the hot pad, bottom of your bag, seat cushion for your chair, or any other creative thing you can think of.
Crocheted T-shirt Bag
BAG BOTTOM
Rectangle
· Next round: Single crochet in each stitch, making three single crochets in each corner stitch. O Mark the second stitch in each 3-stitch corner. O The marked stitches are the corner stitches. Continue rounds in this manner, making three single crochets in each corner stitch O Mark the second stitch in each 3-stitch corner ONOTE: Marking the corners is sort of annoying so, if you are experienced enough to see the corners as you get to them, you can skip marking the corners. OANOTHER NOTE: You don't even need to be experienced, you may just not care if the corners are exactly correct. Just increase when you get close to where you think the corner is. That is what I do. · Crochet round and round, continuing the corner increases, until the rectangle is the desired size of the hot pad, bottom of your bag, seat cushion for your chair, or any other creative thing you can think of. 0 The Medium Tote Bag is around 6 rounds and the Large Market Bag is around 10 rounds. OIf this is a hot pad or other flat project, you are probably done. Pull the last couple of inches of yarn through the last loop and pull snug. O Use a crochet hook to wrap the end of the yarn around the outside loop of the next few stitches. If necessary, snip off the end.
BAG SIDES
Round and Rectangle
Continue working in rounds, ELIMINATING ALL INCREASES. Work in rounds until the bag is almost as tall as you would like.
Crocheted T-shirt Bag
NOTES FOR SHAPING: O After three or four rounds without increasing you will see the bag begin to take shape. O GAUGE: the gauge on this work is HUGE. Adding a few stitches here and there WILL make a difference to the size of the bag. Adding many stitches will make a big difference. O STRAIGHT UP: If you want the bag to go up straight, do not make more than one single crochet in each stitch. OA LITTLE WIDER AT THE TOP: If you want the bag to be a little wider at the top than at the bottom, increase a stitch or two on each side every few rows. OSHAPING THE RECTANGLE: Increasing one stitch in each corner every fourth or fifth row will make sides and ends flare towards the top. OSHAPING THE ROUND BAG: Mark the beginning of the row. It is arbitrary, just pick a point and make it the beginning. Add a stitch at approximately "three o'clock", "six o'clock", “nine o'clock" and "twelve o'clock" every fourth or fifth row. Or stagger the additions, adding "three o'clock" in a row, "nine o'clock" a few rows later, "six o'clock" a few rows after that. 0 CHECK OUT THE SHAPE: When you lay your work down on its side to see how it looks, the shape may be exactly what you hoped for. OIT DOES NOT HAVE HARD SIDES: When you stand your work up on its end, it is not going to stand up like a well shaped purse, box or can. It is going to slump down around whatever the contents are. OFUNCTION OR DESIGN: If the shape you want is for appearance, more power to you, but if it is for a function you need to plan for the fact that it is not going to stand up. OIF YOU WANT A BOx: If you want your creation to stand up you will need to give it structure. Crochet around a rope or some other inner core material. Or work very tight. Or put a hard lining in it.
BAG TOP
Round and Rectangle
· SIMPLE HANDLE: locate the corners of the rectangle, or find 3, 6, 9 and 12 o'clock on the round bag. O Single crochet in each stitch to the beginning of the handle. OChain the desired length of the handle. OSingle crochet around to the beginning of the next handle. Chain the desired length of the second handle. O Single crochet a few stitches at the end of the handle to attach it to the bag.
Crocheted T-shirt Bag
O Single crochet in each stitch one more round, or until you run out of yarn. O Pull the last couple of inches of yarn through the last loop and pull snug. OUse a crochet hook to wrap the end of the yarn around the outside loop of the next few stitches. If necessary, snip off the end.
OEXAMPLE:
■SMALL HANDLE ON RECTANGLE BAG: ■Each side is approximately 30 stitches ■\*Beginning at the corner single crochet the first 8 stitches ■Chain 14 stitches ■Single crochet in the 23'd stitch, and in the remaining 7 stitches of the side.\* ■Continue single crochet around the short end, then repeat between the \*s to finish the row. ■Single crochet in each stitch one more round, or until you run out of yarn. ■Pull the last couple of inches of yarn through the last loop and pull snug. Use a crochet hook to wrap the end of the yarn around the outside loop of the next few stitches. If necessary, snip off the end. ■Each side is approximately 30 stitches \* Beginning at the corner single crochet the first 8 stitches ■Chain 25, or 30, or 35, or however long you want the handle ■Single crochet in the 23'd stitch, and in the remaining 7 stitches of the side.\* Continue single crochet around the short end, then repeat between the \*s to finish the row. ■Single crochet in each stitch one more round, or until you run out of yarn. ■Pull the last couple of inches of yarn through the last loop and pull snug. Use a crochet hook to wrap the end of the yarn around the outside loop of the next few stitches. If necessary, snip off the end.
HANDLE ON A ROUND BAG:
■Each side is approximately 14 stitches ■\*Beginning at the 3 o'clock single crochet two stitches ■Chain 10 stitches or however long you want the handle ■Single crochet in the 13th and 14th stitches up to 6 o'clock. ■Single crochet between 6 o'clock and 9 o'clock.\* Repeat between the \*s to finish the row between 9 o'clock and 3 o'clock. Single crochet in each stitch one more round, or until you run out of yarn. ■Pull the last couple of inches of yarn through the last loop and pull snug. Use a crochet hook to wrap the end of the yarn around the outside loop of the next few stitches. If necessary, snip off the end.
T-shirt Yarn
Make T-shirt yarn:
Cut off Shirt Bottom.
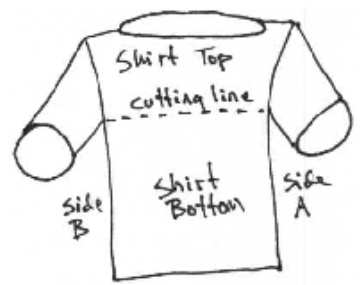
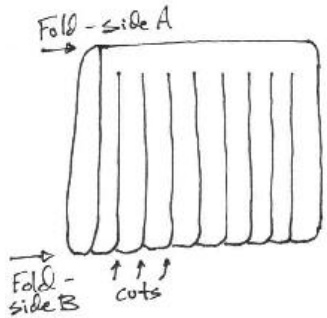
Flatten Shirt Bottom and, with scissors or rolling cutter, cut strips from Fold - Side B to within 1" - 2" of Fold - Side A. Be careful not to cut through the Fold -Side A.

Put your non-dominant arm through shirt bottom at Fold - Side A. Slide Shirt Bottom forward so the Fold - Side A is completely exposed, maybe a couple of inches off your arm. With scissors cut diagonally through one strip as follows:
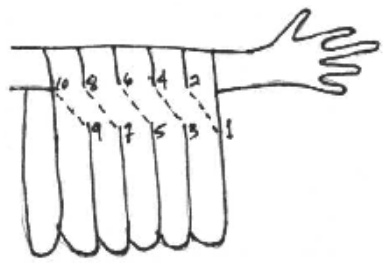
Starting at 1 make a diagonal cut to 2 and let the strip fall down. Repeat cutting from 3 to 4, 5 to 6, etc. until all the strips are cut and you have one continuous long strip of T-shirt yarn. Do NoT worry that it is inconsistent in width or that there is a funny shape at the locations of what was the Fold -Side A.
T-shirt Yarn
If you don't want to waste, and you are not in a hurry, you can use the Shirt Top as follows: Cut off the neck band, the sleeves, and the top shoulder seams.
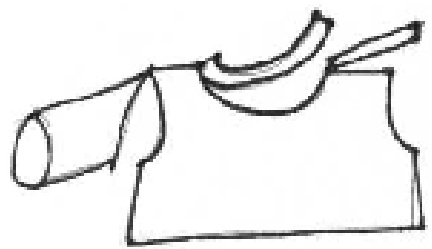
You will have two pieces that look like this:

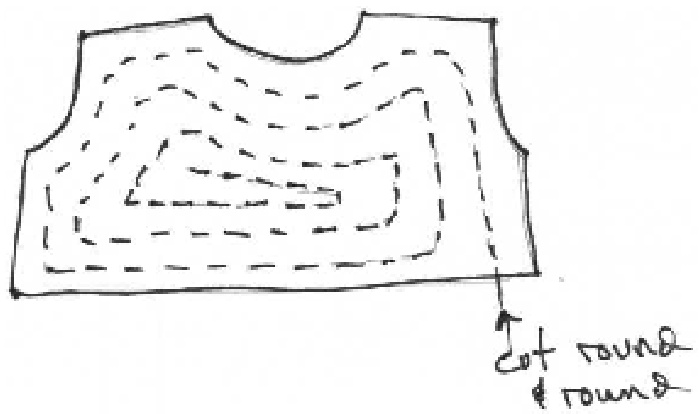
With scissors (or rolling cutter if you are VERY good) cut a strip of similar width to that of your just made yarn round and round from the outside, following the contours of the piece. The sticky-outy corners don't matter, but if they bother you use the scissors to round them off as you go by. Cut until you have used up the entire Shirt Top. You have now made a very uneven length of T-shirt yarn. The bumpy parts disappear when you crochet the yarn, so don't worry about how it looks.


