Paddy, the Ponda Bear
Affer the Success ofOatmeal the Teddy Bear, I received several requests for q ponda bear. Paddy, the Ponda Bear is now availble in pbF formot for you. Enjoy!pJ
Supplies:
I skein of worsted weight in Black ?1 skein of worsted weight in White ?Size E/ 4 (3.5mm) crochet hook or any size to obtain correct gouge ?Gquge is not critical in this project ?I set of I2 mm sofety plastic eyes or I pr of block buttons. ?I skein Embroidery thread in Black. for nose or I skein (using q Small embroidery thread in Block for outlining Nose and eyes cut out of black felt Optional: black embroidery thread to make a pair of eyes if not using Safety eyes. ?Polyester fiberfill ?1 Stitch marker ?I weaving needle ?I embroidery needle ?I black felt for eyes ond nose ?Fabric Tac glue ?Ribbon for decoroting Skil level: Easy and fun to make. This pattern step-by-step has instructions, even for on adventurous beginner. Need to know the basic stitches, Seen in Abbrevigtions section.
Notes:
After moking Numerous dolls, I found that crochet hook E/4 (3.5 mm) mokes the tightest stitches. However, the basic rule is to work stitches tightly so stuffing does not Show. With the type of doll to make, called omigurumi you will work in the round but do not join. I use a stitch marker to indicate the beginning of the next row qs the work progresses. You may use the adjustoble ring method to sStart your rounds.
I still use ch 2, 6 sc in the second ch to start my beginning rounds. There is no right or wrong, mostly, preference.
Abbrevigtions:
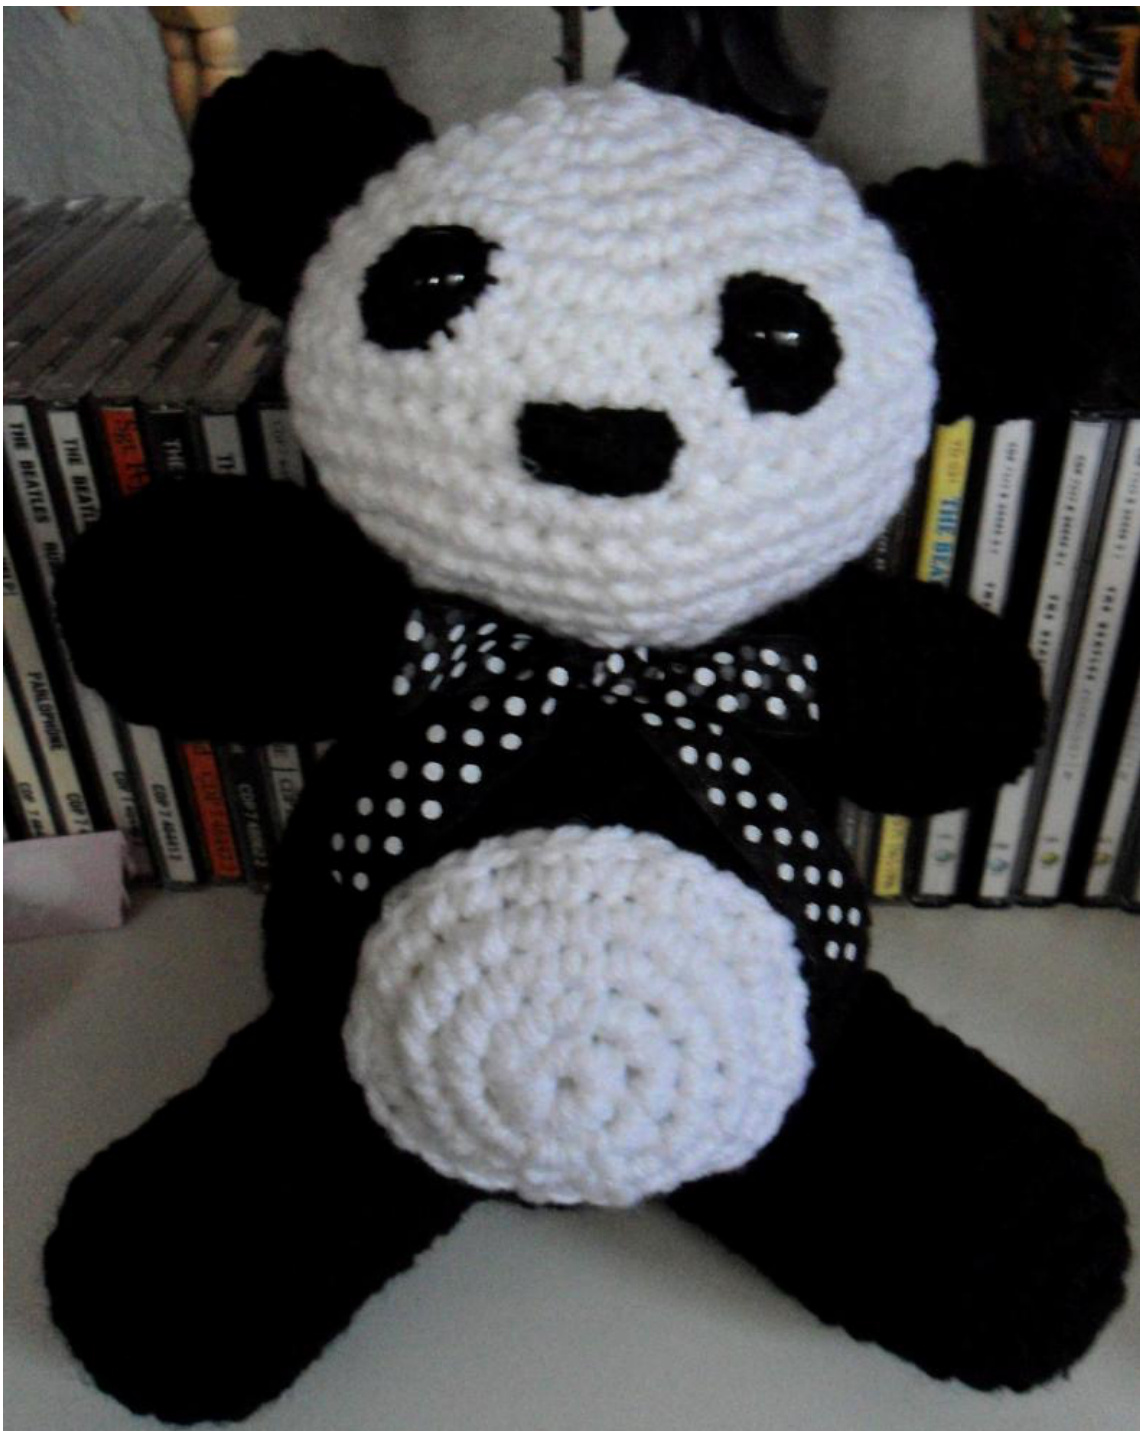
ch: chain stitch ?Sl st: slip stitch 巴inc: 2 single crochet stitches in 1 ScCSc: single crochet 巴dec: decrease or in this pattern, 2 Sctog is acceptable 巴[] : work directions inside brackets as mony times as indicated. ?St(s): stitches Head: Make I in worsted weight in white. 1) Ch 2. 6 sc in the 2nd ch st. (6) 2) Place morker (pM). 2 Sc in the next 6 sc. (12) 3) PM. [2 sc in the next Sc, 1 Sc in the next 1 sc] 6 times. (18) 4) PM. [2 sc in the next sc, 1 Sc in the next 2 sc] 6 times. (24) 5) PM. [2 sc in the next Sc, 1 sc in the next 3 sc] 6 times. (30) 6) PM. [2 sc in the next sc, 1 Sc in the next 4 sc] 6 times. (36) 7) PM. [2 sc in the next sc, 1 sc in the next 5 sc] 6 times. (42) 8) PM. Sc in the next Sc around. (42) 9) PM. Sc in the next Sc around. (42) 10) PM. Sc in the next Sc around. (42) I)PM. Sc in the next Sc around. (42) 12) PM. Sc in the next Sc around. (42) 13) PM. [Dec or (2sctog), sc in the next 4 sc] 6 times. (36) I4) PM. [Dec or (2sctog), sc in the next 3 sc] 6 times. (30) 15]) PM. [Dec or (2sctog), sc in the next 2 Sc] 6 times. (24) 16) PM. [bec or (2sctog), sc in the next 1 sc] 6 times. (18) 米Placement of the eyes (using safety eyes, buttons, or even em. is ot this point becquse it is extremely hard to do after you clos of the head. I usualy place at row 7 at 6 Sts apart. See photo gd Stuffing Starts here if you like but I usually wait until I am cl closing the 9op. 17]) PM. [Dec or (2sctog] 6 times. (12) 18) Stuff with polyester fiberfill. 19) Fsten off and leave a long tail for weaving. Nose: Embroider nose with either black embroidery skein or with worsted weight yarn. Follow this shape for the eyes with black felt ond place the Safety eye/button qs Noted in the drawing.
EgrS: Make 2 with worsted weight in black. 1) Ch 2, 6 sc in the 2nd ch. (6) 2) PM. [2 sc in the next sc] 6 times. (12) 3) PM. Sc in the next Sc around. (12) 4) PM. Sc in the next Sc around. (12) 5) PM. Sc in the next Sc around. (12) 6) Fosten off ond leave a long toil for weaving.

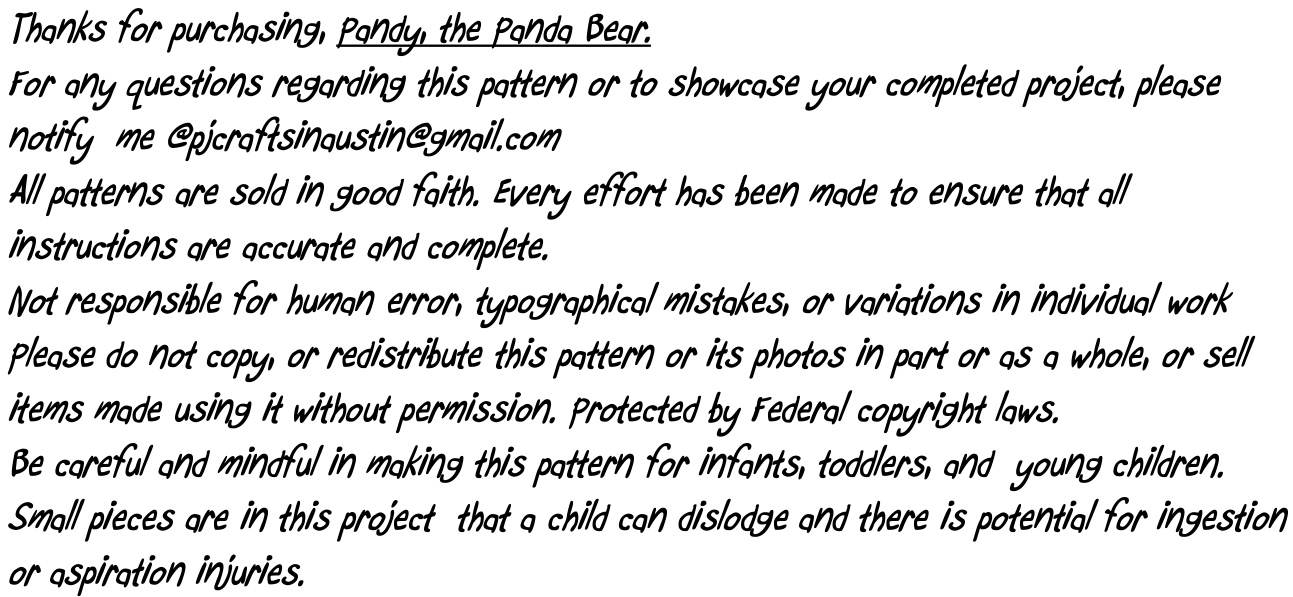
Feet and legs Make 4 totol for upper ond lower extremities. Use worsted weight in black. 1) Ch 2. 6 sc in the 2nd ch st. (6) 2) PM. 2 sc in the next 6 sc. (12) 3) PM. [2 sc in the next Sc, 1 Sc in the next 1 sc] 6 times. (18) 4) PM. Sc in the next Sc around. (18) 5) PM. Sc in the next Sc around. (18) 6) pPM. Sc in the next Sc around. (18) 7) pM. Sc in the next Sc around. (18) 8) PM. Sc in the next Sc around. (18) 9) PM. Sc in the next Sc around. (18) 10) PM. Sc in the next Sc around. (18) I) PM. Sc in the next Sc around. (18) 12) PM. Sc in the next Sc around. (18) 13) PM. Sc in the next Sc around. (18) 14) Fasten off ond leave a toil for sewing. 15) Stuff carefully. Body: Make I. 1) Ch 2. 6 sc in the 2nd ch st. (6) 2) Place marker (pM). 2 Sc in the next 6 sc. (12) 3) PM. [2 sc in the next Sc, 1 sc in the next 1 sc] 6 times. (18) 4) PM. [2 sc in the next Sc, 1 sc in the next 2 sc] 6 times. (24) 5) PM. [2 sc in the next sc, 1 sc in the next 3 sc] 6 times. (30) 6) PM. [2 sc in the next Sc, 1 sc in the next 4 sc] 6 times. (36) 7) PM. [2 sc in the next Sc, 1 Sc in the next 5 sc] 6 times. (42) 8) PM. [2 sc in the next sc, 1 sc in the next 6 sc] 6 times. (48) 9) PM. Sc in the next Sc around. (48) 10) PM. Sc in the next Sc around. (48) I1) PM. Sc in the next Sc around. (48) 12) PM. Sc in the Next Sc around. (48) 13) PM. [Dec or (2sctog), 1 sc in the next 6 sc] 6 times. (42) 14) PM. Sc in the Next Sc around. (42) 15) PM. [Dec or (2sctog), 1 sc in the Next 5 sc] 6 times. (36) 16) PM. Sc in the Next Sc around. (36) 17]) PM. [Dec or (2sctog), 1 sc in the next 4 sc] 6 times. (30) 18) PM. Sc in the next Sc around. (30) 19) PM. [Dec or (2sctog), 1 sc in the next 3 sc] 6 times. (24) 20) PM. Sc in the next Sc around. (24) 21) PM. [Dec or (2sctog), 1 sc in the next 2 sc] 6 times. (18) 22) PM. [Dec or (2sctog), 1 sc in the next 1 sc] 6 times. (12) 23) Fasten off and leave a toil for sewing. 米Stort stuffing body with polyester fiberfill at this time. Tummy: Make I in worsted weight in white. 1 Ch 2. 8 sc in the 2nd ch st. (8) 2) pPlace morker (pM). 2 Sc in the next 8 sc. (16) 3) PM. [2 sc in the next Sc, 1 sc in the next 1 sc] 8 times. (24) 4) PM. [2 sc in the next sc, 1 sc in the next 2 sc] 8 times. (32) 5) PM. [2 sc in the next Sc, 1 Sc in the Next 3 sc] 8 times. (40) 6) Fasten off and leave a toil for sewing. Assembly gnd Embellishment Connect the ears to the head. Moke the nose with felt ond embroider the nose. XMoke the two eyes with felt ond add the Sofety eyes or buttons ond then to foce. Add the arms and legs to the body. Add the head to the body XAdd the white tummy to the front of the body. I used Fabric-Tac to adhere but you can stitch on, too. XYou may olso embroider the buttons on with colorful embroidery thread or worsted weight yarn. \* Add ribon and make q bow to the neck.
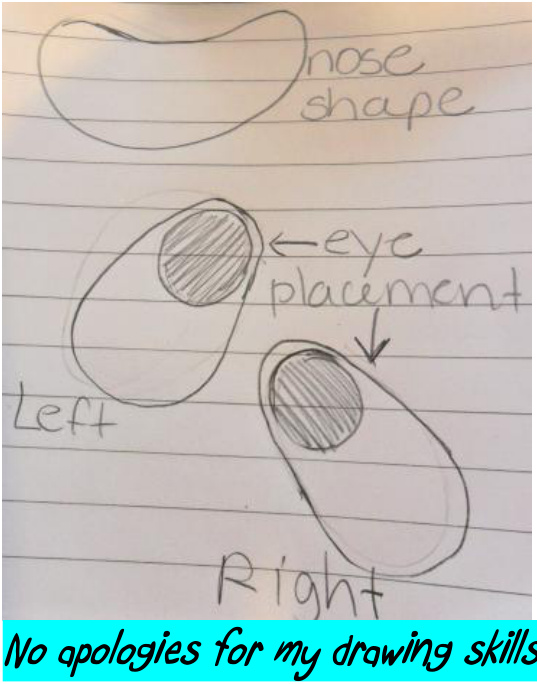
AsSembled ponda before ribbon added.