Sea Leaves
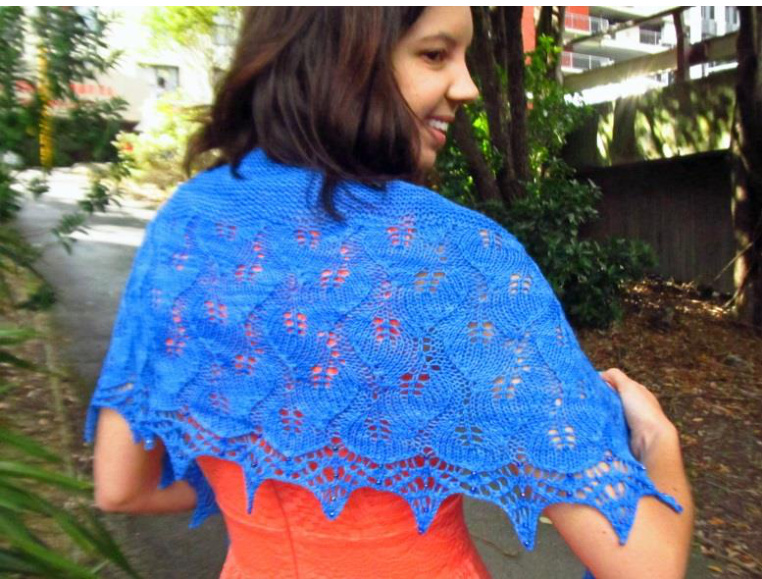
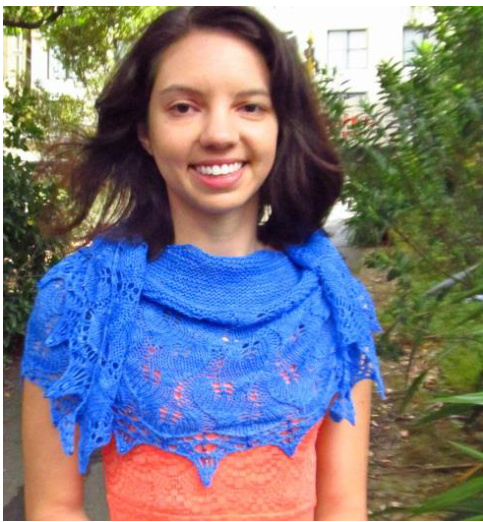
This crescent shaped shawlette can be knitted in sock weight (fingering) yarn or in lace weight. You can amend the pattern easily to include a garter stitch or stocking stitch top to your shawl, or you can go directly into lace from the start. The wavy shapes of the leaves made me think of the sea.
Materials
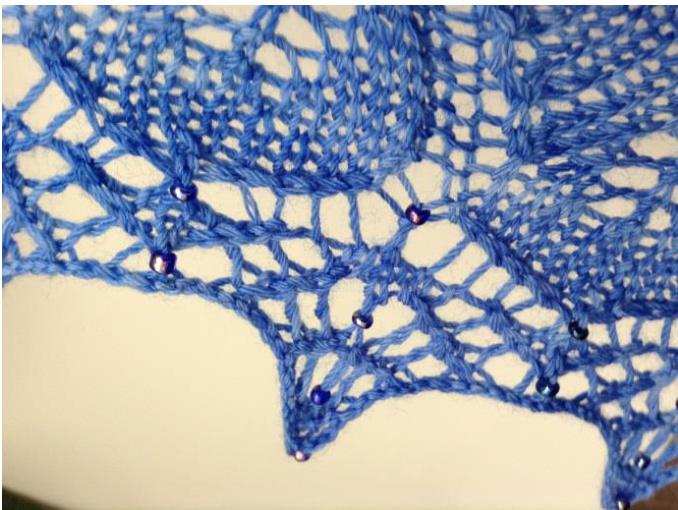
1 skein of Vintage Purls Sock 100g 384 metres (420 yards) Sample used 94 grams 361 metres (394 yards) 1 skein of Vintage Purls Lace 100g ;2 size 6/0 seed beads or 5/0 triangle seed beads. (6 more beads per extra pattern repea1 Gauge - 18 sts and 36 rows over 4 inches of garter stitch blocked. Exact gauge is not important but be aware if your gauge is a lot looser you may run out of yarn. I had 6 grams left so there is a little leeway. eedles - Size 6 (4 mm) needles were used for both the lace weight and sock weight yarns Finished Size - 182 cm (72") long x45 cm (18") deep at centre back.
Abbreviations
cdd - centred double decrease - slip two stitches knitwise, knit 1 and psso incr3 - makes three stitches from one - knit, YO, knit into one stitch k - knit k1 tbl - knit 1 through the back loop of the stitch k2tog - knit two stitches together k3tog - knit 3 stitches together p-purl p1 tbl - purl 1 through the back loop of the stitch sk2p - slip 1 stitch knitwise, knit two together and pass slipped stitch over. 1 I Pa g e @Sue Schreuder 2013 This version Jan 2014 ssk - slip slip, knit slipped stitches together through back loop yo-yarnover Place a bead and then knit the required stitch where it is highlighted in green Knit the required stitch and then place a bead on the stitch where it is highlighted in red.
Instructions
Sock weight version: GarterTabStart Garter Stitch Top Lace Body (Chart A) x 2 (or x 3 if you skip garter top) Lace Border Bind Off Block. Lace weight version: Garter Tab Start Lace Body (ChartA) x 4 Lace Border (ChartB) Bind Off Block
Garter Tab Start
Stephen West has great tutorial on gartertab here: http://westknits.com/index.php/2011/07/garter-tab-cast-on/ - Cast on 2 stitches Knit four rows k2, yo, turn your work 90 degrees Pick up purl bumps down the side as k1, yo, k1, yo turn Pick up and knit 2 from cast on edge (9 stitches) k2, inc3, K1, Yo, k1, yo, K1, yo, inc3, K2 (16 stitches) k2, yo, k12, yo, K2 (18 stitches)
Garter or stocking stitch top
If you prefer, you can use stocking stitch for the top instead of garter stitch. Replace the knit to last 2 stitches on row 2 with purl to achieve this. Row 1 (right side) k1 tbl, k1, incr3, knit to last three stitches incr3, k1, k1 tbl Row 2: (wrong side) k1 tbl, k1, yo, knit to last 2 stitches yo, k1, k1 tbl 2 I Pa g e @Sue Schreuder 2013 This version Jan 2014 Repeat rows 1 and 2 until you have 138 stitches. Or 3 stitches +(multiple of 12)+ 3 stitches if you want a larger garter stitch body. (Not suitable to increase if you have only 1 skein of sock yarn).
Lace Body (equivalent to Chart A)
/ou are using stitch markers, these may be placed at the [] positions on the instructions. Row1: k1 tbl, k1, incr3, [p1, k2, yo, k1, yo, k4, k3tog, p1] repeat to last 3 stitches incr3, k1, k1 tbl Row 2: k1 tbl, k1, yo, p2, k1,[k1, p10, k1] repeat to last 5 stitches, k1, p2, yo, k1, k1 tbl Row 3: k1 tbl, k1, incr3, k2, p1[p1, k3, yo, kl, yo, k3, k3tog, p1] repeat to last 6 stitches p1, k2, incr3, k1, k1 tbl Row 4: k1 tbl, k1, yo, p5, k1,[k1, p10, k1] repeat to last 8 stitches, k1, p5, yo, k1, k1 tbl Row 5: k1 tbl, k1, incr3, k1, yo, k2, k2tog, p1, [p1, k4, yo, k1, yo, k2, k3tog, p1] repeat to last 9 stitches p1, k3, yo, k2tog, incr3, k1, k1 tbl Row 6: k1 tbl, k1, yo, p8, k1,[k1, p10, k1] repeat to last 11 stitches, k1, p8, yo, k1, k1 tbl Row 7: k1 tbl, k1, incr3, k8, p1, [p1, ssk, k8, yo, p1] repeat to last 12 stitches p1, k8, incr3, k1, k1 tbl Row 8: k1 tbl, k1, yo,[k1, p1 tbl, p9, k1] repeat to the last 2 stitches, yo, k1, k1 tbl Row 9: k1 tbl, k1, incr3,[p1, ssk, k8, yo, p1]repeat to the last 3 stitches, incr3, k1, k1 tbl Row 10: k1 tbl, k1, yo, p2, k1,[k1, p1 tbl, p9, k1] repeat to the last 5 stitches, k1, p2, yo, k1, k1 tbl Row 11: k1 tbl, k1, incr3, k2, p1, [p1, ssk, k8, yo, p1] repeat to the last 6 stitches, p1, k2, incr3, k1, k1 tbl Row 12: k1 tbl, k1, yo, p5, k1,[ k1, p1 tbl, p9, k1] repeat to the last 8 stitches, k1, p5, yo, k1, k1 tbl Row 13: k1 tbl, k1, incr3, ssk, k1, yo, k2, p1,[p1, sk2p, k4, yo, k1, yo, k2, p1] repeat to the last 9 stitches, p1, k5, incr3, k1, k1 tbl Row 14: k1 tbl, k1, yo, p8, k1, [k1, p10, k1] repeat to the last 11 stitches, k1, p8, yo, k1, k1 tbl Row 15: k1 tbl, k1, incr3, sk2p, k1, yo, k1, yo, k3, p1, [p1, sk2p, k3, yo, k1, yo, k3, p1] repeat to the last 12 stitches, p1, sk2p, k3, yo, k1, yo, k1, incr3, k1, k1 tbl Row 16: k1 tbl, k1, yo, [k1, p10, k1] repeat to the last 2 stitches, yo, k1, k1 tbl Row 17: k1 tbl, k1, incr3, [p1, sk2p, k2, yo, k1, yo, k4, p1] repeat the last 3 stitches, incr3, k1, k1 tbl Row 18: k1 tbl, k1, yo, p2, k1, [k1, p10, k1] repeat to the last 5 stitches, k1, p2, yo, k1, k1 tbl Row 19: k1 tbl, k1, incr3, k2, p1, [p1, yo, k8, k2tog, p1] repeat to the last 6 stitches, p1, k2, incr3, k1, k1 tbl Row 20: k1 tbl, k1, yo, p5, k1, [k1, p9, p1 tbl, k1] repeat to the last 8 stitches, k1, p5, yo, k1, k1 tbl Row 21: k1tbl, k1, incr3, k5, p1, [p1, yo, k8, k2tog, p1] repeat to the last 9 stitches p1, k5, incr3, k1, k1 tbl Row 22: k1 tbl, k1, yo, p8, k1, [k1, p9, p1 tbl, k1] repeat to the last 11 stitches , k1, p8, yo, k1, k1 tbl Row 23: k1 tbl, k1, incr3, k8, p1, [p1, yo, k8, k2tog, p1] repeat to the last 12 stitches, p1, k8, incr3, k1, k1 tbl Row 24: k1 tbl, k1, yo, [k1, p9, p1 tbl, k1] repeat to the last 2 stitches, yo, k1, k1 tbl
Lace Border (equivalent to Chart B)
k1 tbl, k1, incr3, [p1, k2, yo, k1, yo, k4, k3tog, p1] repeat to last 3 stitches incr3, k1, k1 tbl 3 I Pa g e @Sue Schreuder 2013 This version Jan 2014 Row 2: k1 tbl, k1, yo, p2, k1,[k1, p10, k1] repeat to last 5 stitches, k1, p2, yo, k1, k1 tbl Row 3: k1 tbl, k1, incr3, k2, p1, [p1, k3, yo, k1, yo, k3, k3tog, p1] repeat to last 6 stitches p1, k2, incr3, k1, k1 tbl Row 4: k1 tbl, k1, yo, p5, k1, [k1, p10, k1] repeat to last 8 stitches, k1, p5, yo, k1, k1 tbl Row 5: k1 tbl, k1, incr3, k1, yo, k2, k2tog, p1, [p1, k4, yo, k1, yo, k2, k3tog, p1] repeat to last 9 stitches, p1, k3, yo, k2tog, incr3, k1, k1 tbl Row 10: k1 tbl, k1, yo, p3, [p1, yo, p2tog, k5, p2tog tbl, yo, p2] repeat to the last 5 stitches, p3, yo, k1, k1 tbl Row 11: k1 tbl, k1, incr3, k3, [k3, yo, ssk, k3, k2tog, yo, k2] repeat to the last 6 stitches, k3, incr3, k1, k1 tbl Row 12: k1 tbl, k1, yo, p6, [p3, yo, p2tog, k1, p2tog tbl, yo, p4] repeat to the last 8 stitches, p5, yo, k1, k1 tbl Row 13: k1 tbl, k1, incr3, (k2 tog yo) x 3,[inc3, yo, ssk, yo, ssk, yo, cdd, yo, k2tog, yo k2tog, yo] repeat to the last 9 stitches, p1, k5, incr3, k1, k1 tbl Row 14: k1 tbl, k1, yo, p9, [ p14] repeat to the last 11 stitches, p9, yo, k1, k1 tbl Row 15: k1 tbl, k1, incr3, k1, (yo, k2tog) x4, [yo, inc3, (yo, ssk) x3, k1, (k2tog, yo) x2, k2tog repeat to the last 12 stitches, (yo, ssk) x 4, k1, incr3, k1, k1 tbl Row 16: k1 tbl, k1, yo, [p16] repeat to the last 14 stitches, p12, yo, k1, k1 tbl Row 17: k1 tbl, k1, (yo, k2tog) x 6, yo [k2tog, yo, k1, (yo, sk) x3, yo, cdd, (yo, k2tog) x 2, yo] repeat the last 15 stitches, (ssk, yo) x 6, ssk, k1, k1 tbl
Bind Off
Bind off on the wrong side of the work. A stretchy bind off is recommended e.g. Jeny's Surprisingly Stretchy Bind off (A video is available here http://www.youtube.com/watch?v=53Mtbkyf5CQ. Or you could use a crochet bind off with a chain between each stitch. This video shows the basic crochet bind off http://www.youtube.com/watch?v=efRaicXpT 8 This is the bind off I used.
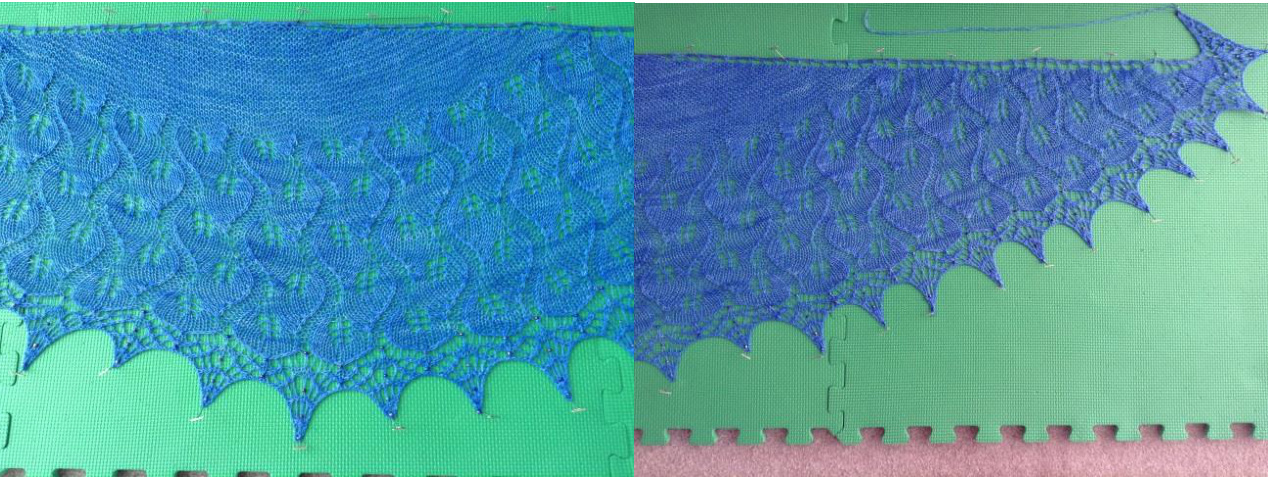
Blocking
Place your completed shawl into a basin of warm water with Soak or Eucalan for 20 mins. Squeeze out water without wringing and place in a towel and roll up. I stand on this to get most of the water out. If you have blocking wires put these along the straight edge of the shawl leaving the very ends free and pin these out in a straight line. Pin out the longer beaded ends to suit so that the lace is stretched out. Weave in ends when dry.
Thanks
Thanks to Boo Knits whose basic shawl shape I shamelessly purloined. She writes great patterns - check her out on Ravelry. http://www.ravelry.com/designers/boo-knits . Thanks also to my lovely model Rachel for agreeing to have photos taken.
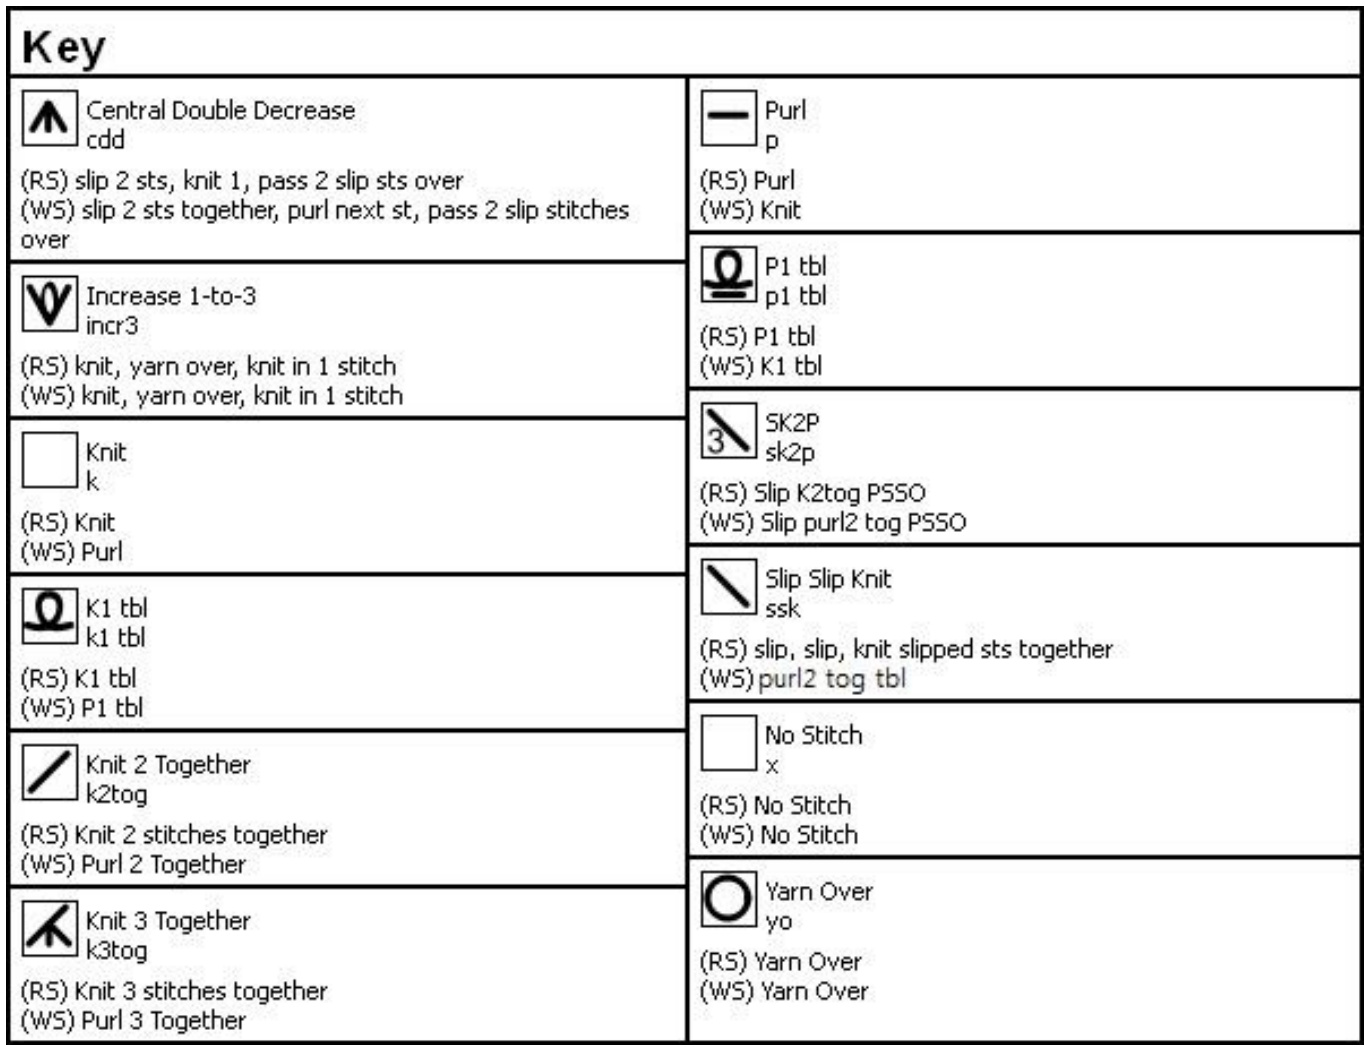
Chart A - Lace Body
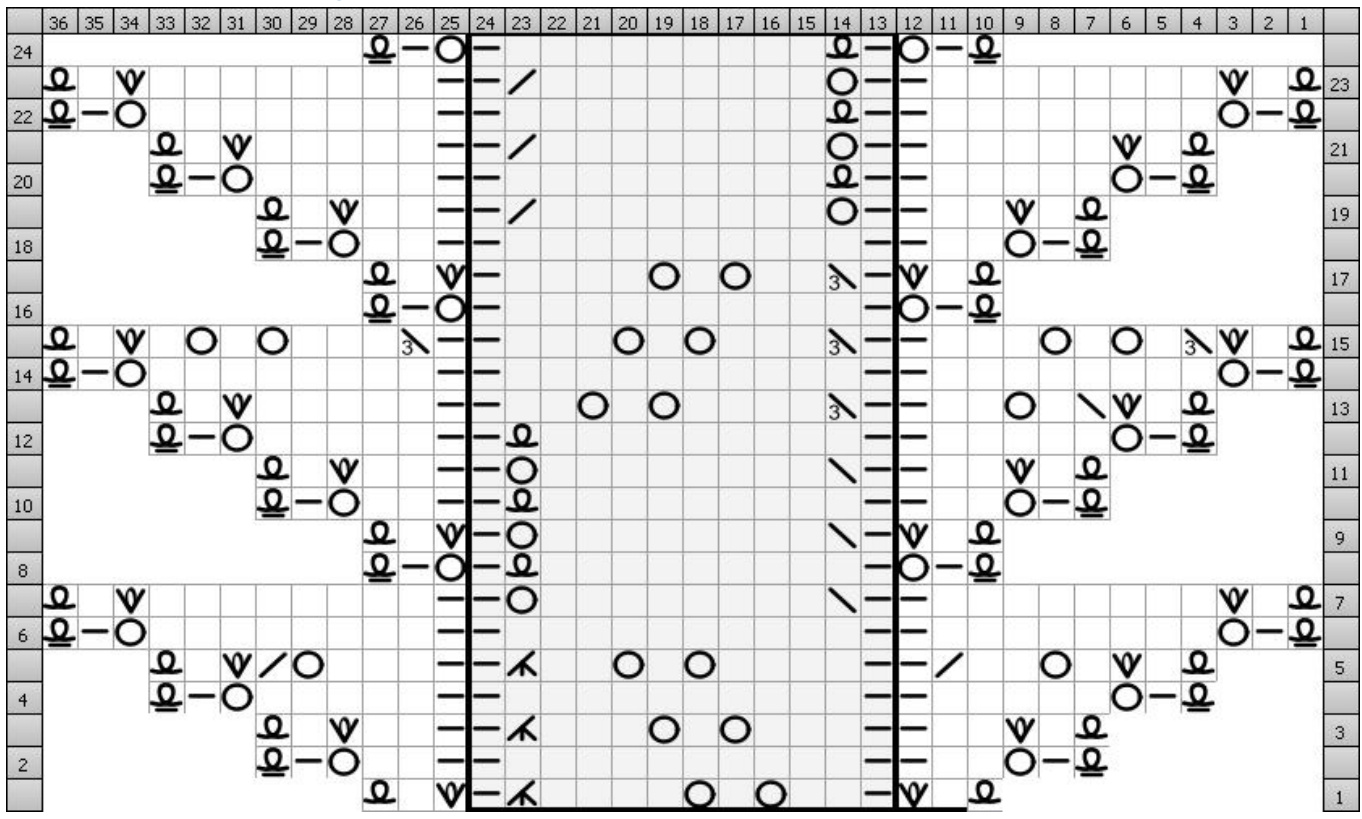
Chart B - Border
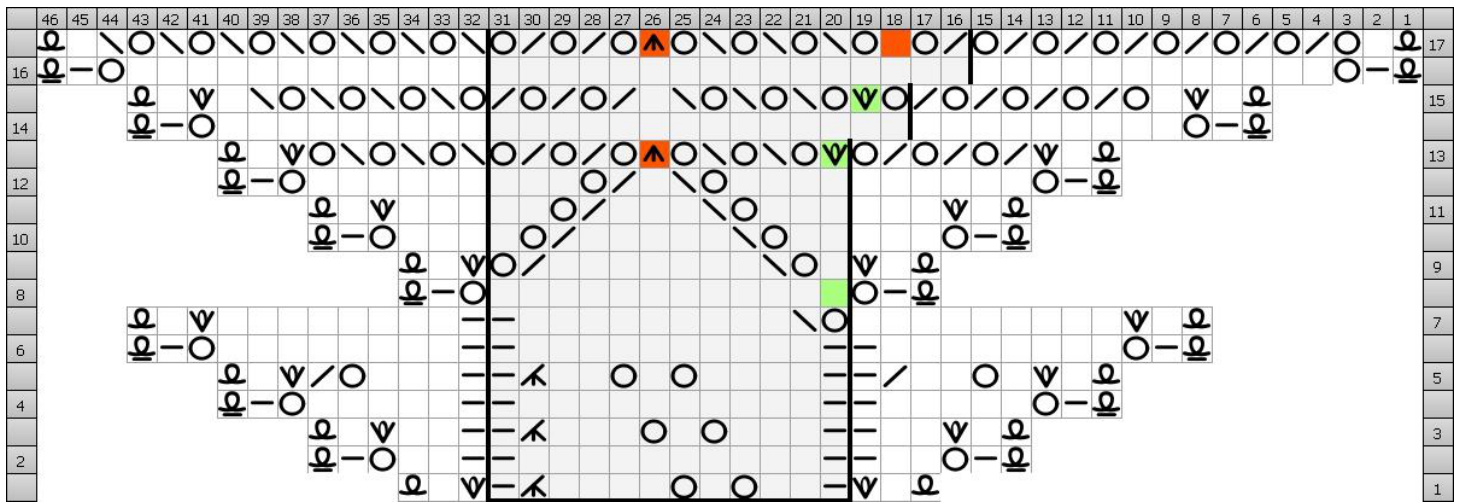
Note: The pale grey shaded centre section shows the pattern repeat on the charts. The dark black lines show where stitch markers may be placed. A green stitch should be beaded prior to knitting the required stitch. A red stitch should be beaded after knitting the required stitch.


