With Blue Bells and Cockle Shells Shawlette
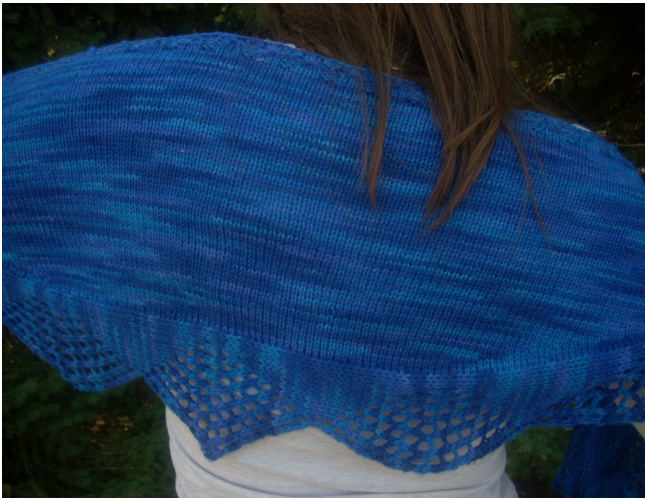
By Pam Chamberlain This shawlette gets its name from the names of the two patterns that are used: the Cockle Shells lace edging and the Blue Bell ribbing. This shawlette is knit in one piece starting with the Cockle Shells lace edging and then the body of the shawlette is picked up and worked into the narrow curved shape using short rows. It is then finished with a simple Blue Bell ribbing to prevent the edge from rolling. The combination of lace and simple stockinette stitches, and the unique construction of this shawlette makes this a fun project that uses less than 440 yards of sock yarn. Lace patterns are written, not charted.
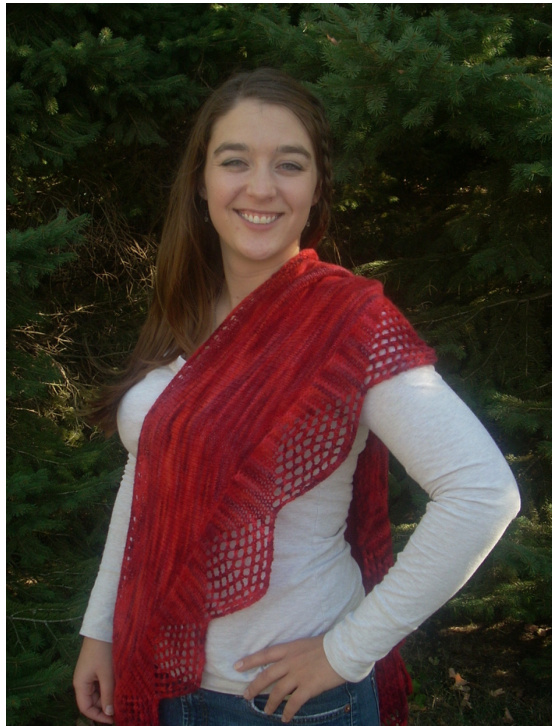
Difficulty: Intermediate Size: One size fits most Finished measurements: Width at Widest Point: 14 inches Length: 58 inches Gently Blocked
Yarn: 440 yards of blockable fingering/sock weight yarn. The sample shawls were made using: 1 skeins - Knit Picks Stroll Tonal Sock Yarn in Deep Waters, 75% Superwash Merino, 25% Nylon, 440 yds/100 grams Or: 2 skeins - Knit Picks Imagination in Ruby Slippers, 50% Merino Wool, 25% Superfine Alpaca, 25% Nylon, 219 yards/50 grams
Needles:
US size 6/4 mm - 24/29 inch circular needles US Size 9/5.5 mm - 24/29 inch circular needles Crochet hook size J/10/6 mm Or size needed to obtain gauge
Notions:
Lace blocking wires and pins
Gauge:
22 sts/30 rows over 4" (10 cm) in St st (gently blocked) using smaller needles To save time, take time to check gauge. While gauge is not important as the fit is not crucial, changes in gauge will result in size differences and the amount of yarn needed to complete the project.
Techniques:
Bind off in pattern: To stay in your pattern while binding off, knit the stitches you should knit and purl the stitches you should purl before binding them off. Work two stitches, one at a time. \*Insert the tip of the LH needle into the first stitch on the RH needle, lift and pull this stitch over the second stitch and off the needle. Work one stitch.\* Repeat from \* to \* until one stitch remains on the RH needle. Cut yarn and gently pull it through the last remaining stitch. Weave in the remaining yarn end on the wrong side. Crochet or Chain cast on: Using your main yarn and a crochet hook two sizes larger than your knitting needle, make a slipknot on the crochet hook in your right hand. Hold the needle and yarn in your left hand with the yarn under the needle. Wrap the yarn around the needle from back to front and using the crochet hook, pull the yarn through the slipknot. \*Bring the yarn to the back under the needle and wrap the yarn around the needle from the back to the front and using the crochet hook, pull the yarn through the loop on the hook.\* Repeat from \* to \* until you have cast on the desired number of stitches minus one. Then bring the yarn to the back and slip the loop from the crochet hook to the needle. Designer Note: I like to use the crochet cast on as it exactly matches the knit bind off. Using a crochet hook two sizes larger than your knitting needle allows for stretching when blocking. k2tog - knit two together: Insert the RH needle from left to right (knitwise) into the front loops of the next two stitches on the LH needle. Knit these two stitches together. Knit bind off: Knit two stitches, one at a time. \*Insert the tip of the LH needle into the first stitch on the RH needle, lift and pull this stitch over the second stitch and off the needle. Knit one stitch.\* Repeat from \* to \* until one stitch remains on the RH needle. Cut yarn and gently pull it through the last remaining stitch. Weave in the remaining yarn end on the wrong side. PU and knit - Pick up and knit: Along the edge, insert the tip of the RH needle under both loops of the edge stitch from front to back, then wrap the yarn around the tip of the needle and pull the yarn through. sk2p - sl1, k2tog, psso: Slip one stitch knitwise to the RH needle. Insert the RH needle from left to right (knitwise) into the front loops of the next two stitches on the LH needle and knit them together (k2tog). With the tip of the LH needle, lift and pull the slipped stitch over the k2tog stitch and off the needle. ssk - slip, slip, knit: Slip the next two stitches on the LH needle knitwise to the RH needle one at a time. Insert the LH needle through the front loop of both slipped stitches from left to right. Knit these two stitches together. ssp - slip, slip, purl: With yarn in front, slip the next two stitches on the LH needle knitwise to the RH needle one at a time. Return these two slipped stitches to the LH needle in the same order, keeping them twisted. Insert the RH needle into these two stitches through the back loops from left to right. Purl these two stitches together.
Directions:
With larger needles, CO 12 sts loosely. Purl 1 row. Designer Note: I like to use the crochet cast on because it has the clean finished look of a crocheted chain and it exactly matches the knit bind off.
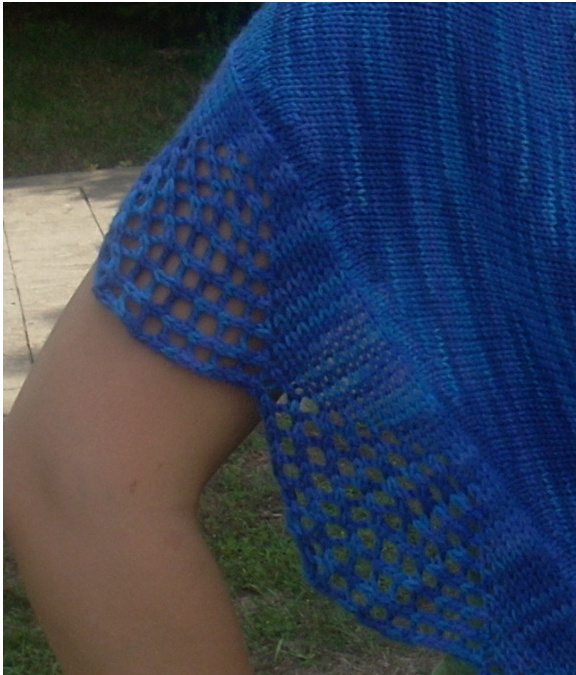
Cockle Shells Lace Edging (12 sts and 32 rows) Stitch count varies by row. Row 1 (RS): P1, k1, yo, k10. 13 sts. Row 2 and all WS rows: Purl. Row 3: P1, k1, yo, k2tog, yo, k9. 14 sts. Row 5: P1, k1, (yo, k2tog) 2x, yo, k8. 15 sts. Row 7: P1, k1, (yo, k2tog) 3x, yo, k7. 16 sts. Row 9: P1, k1, (yo, k2tog) 4x, yo, k6. 17 sts. Row 11: P1, k1, (yo, k2tog) 5x,yo, k5. 18 sts. Row 13: P1, k1, (yo, k2tog) 6x, yo, k4. 19 sts. Row 15: P1, k1, (yo, k2tog) 7x, yo, k3. 20 sts. Row 17: P1, (ssk, yo) 7x, ssk, k3. 19 sts. Row 19: P1, (ssk, yo) 6x, ssk, k4. 18 sts. Row 21: P1, (ssk, yo) 5x, ssk, k5. 17 sts. Row 23: P1, (ssk, yo) 4x, ssk, k6. 16 sts. Row 25: P1, (ssk, yo) 3x, ssk, k7. 15 sts. Row 27: P1, (ssk, yo) 2x, ssk, k8. 14 sts. Row 29: P1, ssk, yo, ssk, k9. 13 sts. Row 31: P1, ssk, k10. 12 sts. Reneat Rows 1-3? for pattern.... Repeat Rows 1-32 for pattern. Designer Note: I like to make a copy of the pattern and tape it to an index card. I also use a sticky arrow or sticky tape to mark the row I'm working on. Work 9 total repeats of the pattern. End after completing Row 32 (a purl row). BO all the sts, but do NOT break the yarn. Transfer the loop to the smaller needle and with RS facing you, PU and knit one stitch for every row of the edging and 1 st on the CO row. 292 sts.
Short Rows:
Note: The turning point refers to point at which the previous short row was turned. This is the last st worked in the previous row. There is a gap between the last st worked and the unworked st. Row 1 (WS): Purl. Row 2 (RS): K180. Turn. 112 unworked sts on LH side. Row 3: P68. Turn. 112 unworked sts on RH side. Row 4: K67, k2tog, k3. Turn. Row 5: P70, ssp, p3. Turn. Row 6: K to 1 st before last turning point, k2tog, k3. Turn. Row 7: P to 1 st before last turning point, ssp, p3. Turn. Repeat Rows 6 and 7 until all sts are used. On last WS row: P across to 1 st before last turning point, ssp, p1, p2tog. Turn. 235 sts. Designer Note: On each row, 4 additional stitches will be worked. Next work Blue Bell Ribbing. Blue Bell Ribbing: (multiples of 5 sts and 6 rows) Row 1 (RS): \*P1, k3, p1 rep from \* to end. Row 2 (WS): \*K1, p3, k1 rep from \* to end. Row 3: Same as Row 1. Row 4: Same as Row 2. Row 5: \*p1, yo, sk2p, yo, p1, rep from \* to end. Row 6: Same as Row 2. Bind off loosely in Row 1 rib pattern. Weave in ends. Wet block, stretching to open up the lace.

Pam learned to knit (backwards) at her Grandmother's knees as a small child. Pam is a TKGA Certified Master Knitter. Her first love is texture, especially lace. She loves to knit shawls, but hasn't learned how to wear them yet! For pattern support contact: PamChamberlainknits@gmail.com PamChamberlain on Ravelry @ Copyright 2015, Pam Chamberlain Knits. All rights Reserved.


