Felia Socks Michaela Orth
Right and left socks are identical. Make two for a pair. Abbreviations are listed on page 5 as well as the key for the charts.
1 Cuff
Cast on 62 [66, 70] stitches Being careful not to twist, join for working in the round and mark beginning of round (= right in the middle of needles 4 and 1). Distribute the stitches as follows: Needles 1 and 4 (= later sole stitches): each 16 [17, 18] stitches, needles 2 and 3 (= later top of foot): each 15 [16, 17] stitches. Chart A shows the pattern for the needles 2 and 3 and includes all sizes. Therefore please omit the yellow and the turquoise column for size S and please omit the turquoise column for size M. Size L please use all columns.
Size S:
Needle 1: k1, \*p2, k2\* repeat from \* to \* 2 more times, p2, k1 Needle 2 + 3: appropriate round of chart A Needle 4: k1, p2, \*k2, p2\* repeat from \* to \* 2 more times, k1 Sizes: S [M, L] to fit a leg and foot circumference of appr. 7 [8, 9]" Yarn: fingering weight sock yarn Needles: US Size 1.5 / 2.5mm or size needed to obtain gauge Notions: Tapestry needle Gauge: 32 stitches and 48 rows = 4" x 4"(10 cm x 10 cm) in stockinette Size M: Needle 1: p1, \*k2, p2\* repeat from \* to \* 3 more times Needle 2 + 3: appropriate round of chart A Needle: \*p2, k2\* repeat from \* to \* 3 more times, p1 Size L Needle: k1, \*p2, k2\* repeat from \* to \* 3 more times, p1 Needle 2 + 3: appropriate round of chart A Needle 4: p1, \*k2, p2\* repeat from \* to \* 3 more times, k1 2 Leg The needles 1 and 4 continue in the k2/p2 rib, knit chart B for needles 2 and 3. Knit the chart for a total of 3 to 4 times. Therefore please omit the yellow and the turquoise column for size S and please omit the turquoise column for size M. Size L please use all columns. 3 Heel Flap Divide for heel flap by placing the top of the foot stitches (= needles 2 + 3) on hold. The heel flap will be worked back and forth over remaining 32 [34, 36] stitches (needles 1 and 4). Row 1: With right side facing, (slip 1 purlwise with yarn in back, k1) 16 [17, 18] times, turn. Row 2: With wrong side facing, slip 1 purlwise with yarn in front, p31 [33, 35], turn. Repeat last 2 rows until heel flap measures approximately 2.25 inches, ending ready to work a right side row. 4 Heel Continue working back and forth. Use short rows to turn heel as follows: Row 1: With right side facing, slip 1 purlwise with yarn in back, k18 [18, 20], ssk, k1, turn. Row 2: With wrong side facing, slip 1 purlwise with yarn in front, p7 [5, 7], p2tog, p1, turn. Row 3: With right side facing, slip 1 purlwise with yarn in back, knit to one stitch before gap caused by turn on previous row, ssk (using one stitch from each side of the gap), k1, turn. Row 4: With wrong side facing, slip 1 purlwise with yarn in front, pur to one stitch before gap caused by turn on previous row, p2tog (using one stitch from each side of gap), p1, turn. Repeat last 2 rows until all heel stitches have been worked, ending ready to work a right side row. 20 [20, 22] heel stitches.
5 Foot
Resume working in the round as follws: Slip 1 purlwise with yarn in back, k10 [10, 11]. Mark beginning of round. Knit remaining heel stitches, pick up and knit into all slipped stitches along the edge of the heel flap, make 1 knitwise, mark right side of foot, work round 1 of chart B, mark left side of foot, make 1 knitwise, pick up and knit all slipped stitch along edge of heel flap, knit to end of round. Right and left side markers divide foot into top of foot section and sole. Decrease 2 sole stitches every other round as follows: Round 1: Knit to 2 stitches before right side of foot, k2tog, work chart B, ssk, knit to end of round. 2 sole stitches decreased. Round 2: Knit to right side of foot, work chart B, knit to end of round. Repeat last 2 rounds until 62 [66, 70] stitches remain - 32 [34, 36] stitches for the sole and 30 [32, 34] stitches for the top of the foot. Continue working even, without decreasing sole stitches, knit chart B for a total of 2 times for the top of the foot, then continue with chart C once. The rest of the foot is plain stockinette. Knit until foot measures approximately 2 inches (5 cm) less than desired length from back of heel turn.
6 Toe
Knit to right side of foot. This is the new beginning of round. Set up round: Knit all top of the foot stitches, k1, ssk, knit to 3 stitches before end of the round, k2tog, k1. 60 [64, 68] stitches remain, each 30 [32, 34] stitches for the top of the foot and for the sole. Round 1: Knit to end of round. Round 2: K1, ssk, knit to 3 stitches before left side of foot, k2tog, k2 (one stitch before and one stitch after left side of foot marker), ssk, knit to 3 stitches before right side of foot, k2tog, k1. 4 stitches decreased. 2 rounds until foot measures desired length, ending after a decrease rounc ot stitches to sole stitches using Kitchener stitch. Weave in ends and block. Chart - Cuff
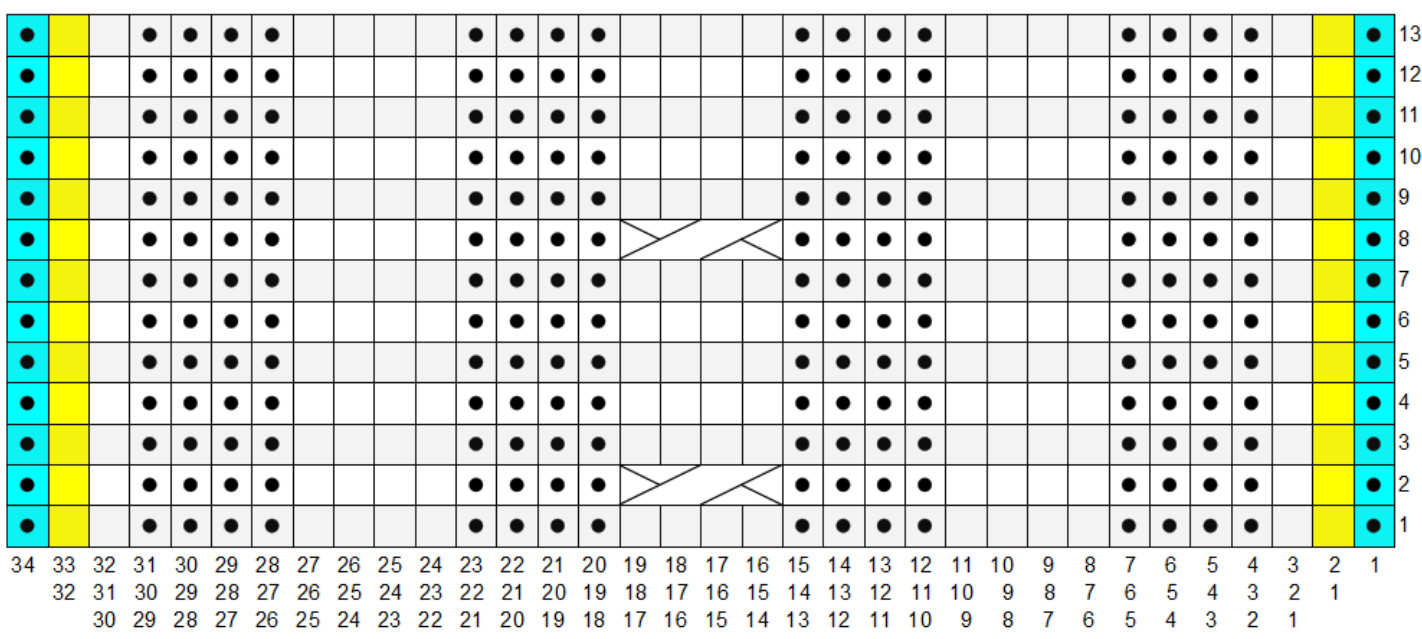
Chart B - Leg
Needle 3
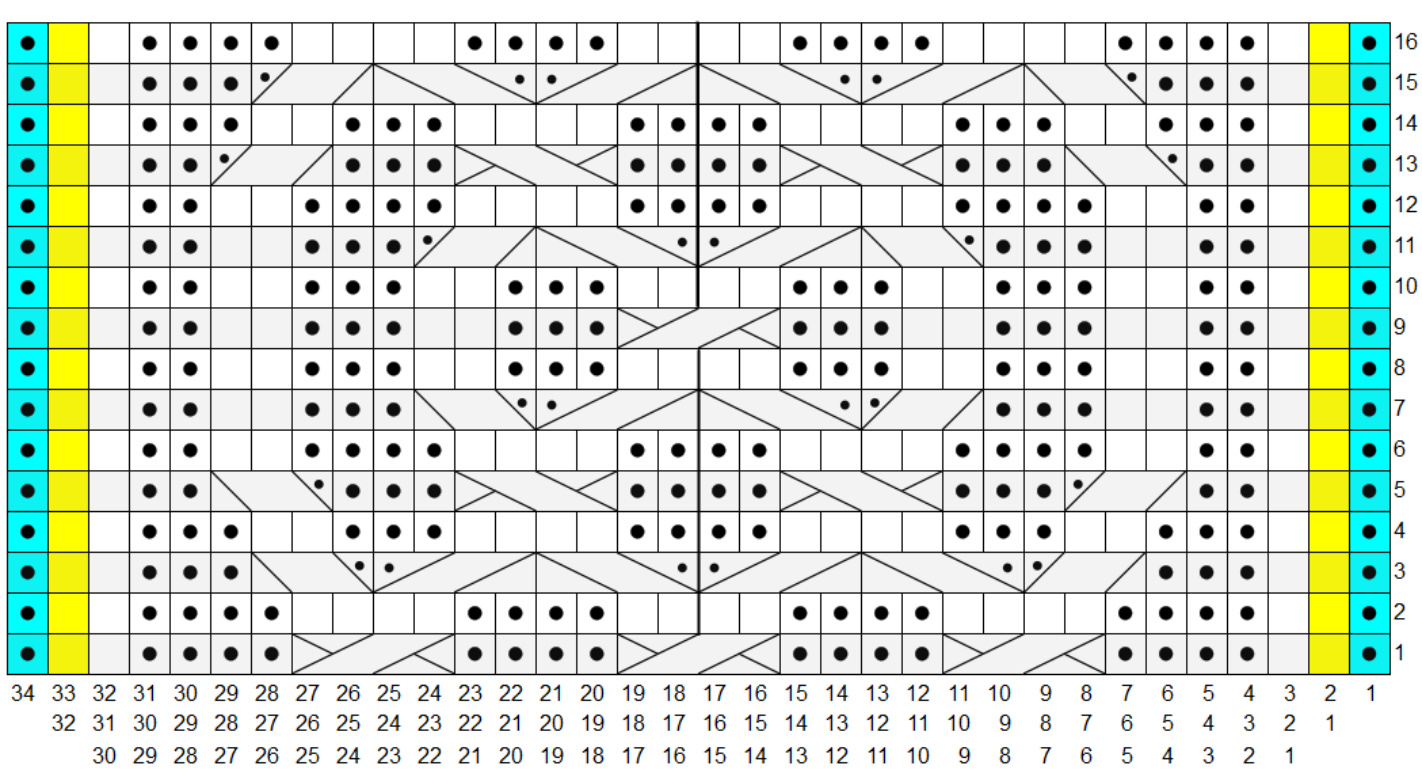
Chart C - Foot

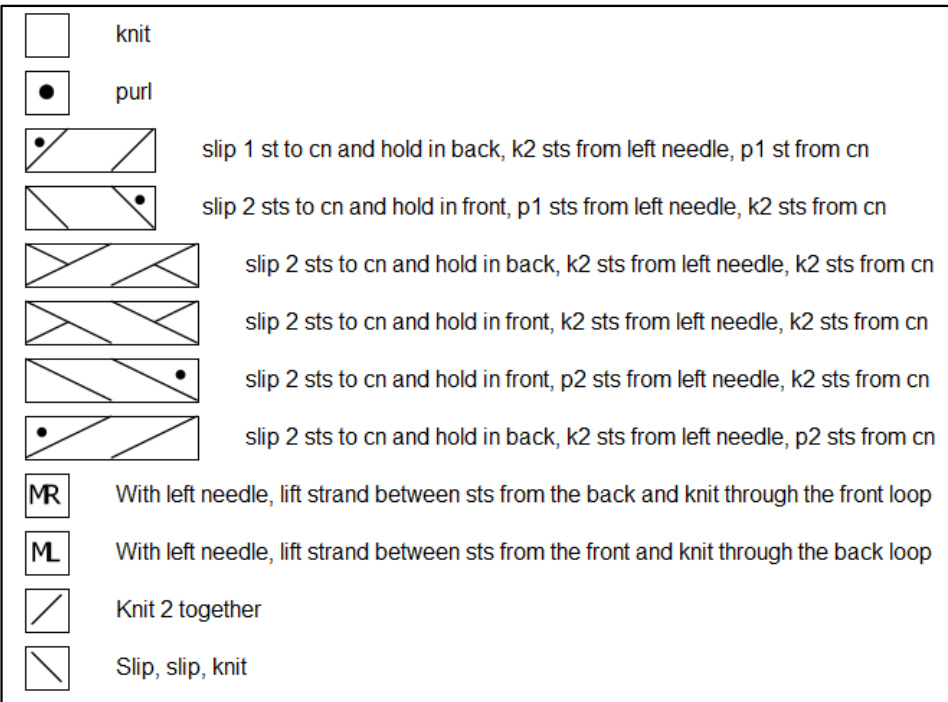
Hbbreviations: cn cable needle k knit k2tog knit 2 together p purl p2tog purl 2 together ssk slip 2 knitwise individually, insert left needle through slipped stitches and knit 2 together through back loop from this position st stitch sts stitches


