BROWN TWEED DRESS
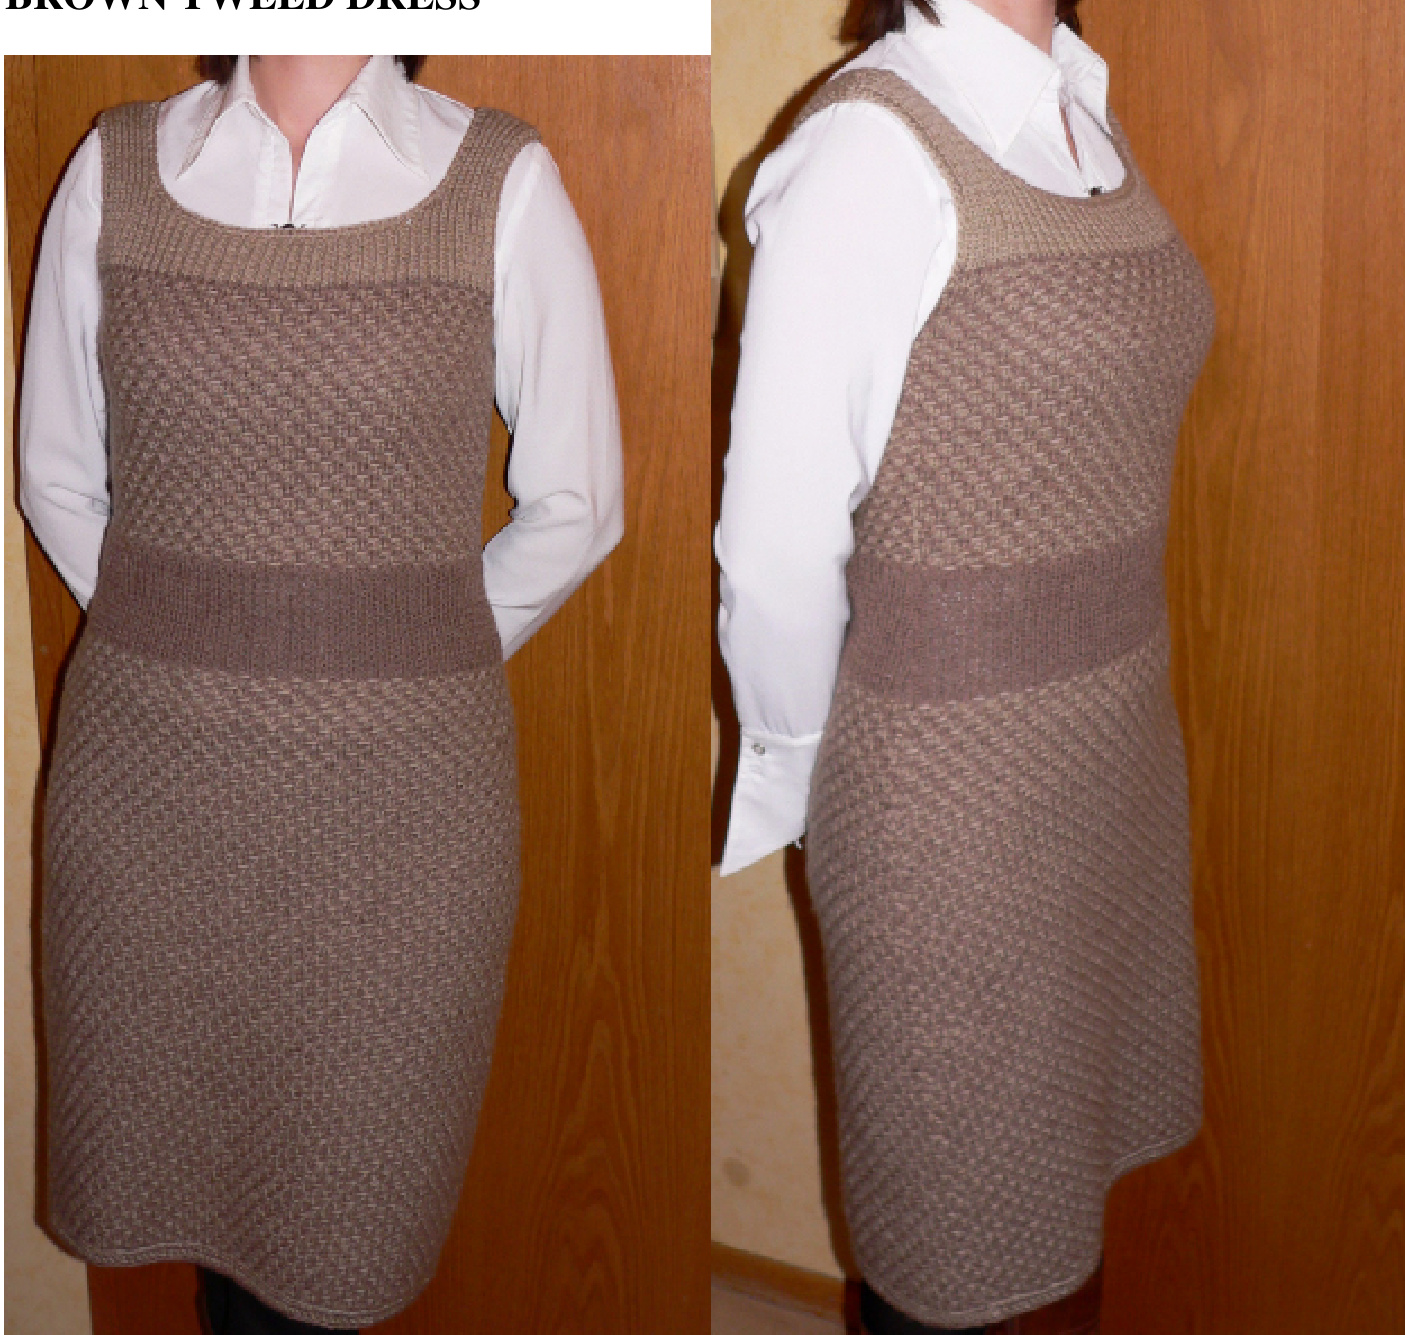
Difficulty: Advanced Beginner/Intermediate (for change in size) Needle:US 7/ $4{,}5\;\mathrm{mm}$ circular needles Hook:US size E $/\,3{,}5\mathrm{mm}$ Yarn: Schewe Nebraska, 2 skeins ( $250\mathrm{g}$ per skein/8,82 ounces) of different (contrasting) colors, but in the same color range (two different shades of brown, blue, green... as desired). Size of the FO: 40/42 German sizes, but it can easily be adapted to fit other sizes. Gauge: Rib: 20 stitches and 32 rows: $10\mathrm{~x~}10\mathrm{~cm}\,/\,4\mathrm{~x~}4$ inches Pattern: 20 stitches and 38/40 rows: $10\mathrm{\,x\,}10\mathrm{\,cm}/4\mathrm{\,x\,}4$ inches Caution: skipped stitches in the pattern make the fabric tighter, but the rows are thus less tall. Be sure to check the gauge before start working. This pattern does not include other sizes beside the one mentioned above, and any change in the gauge will automatically cause a change in the FO size. Also, for a different size, you will have to adapt the pattern yourself - which should not be too difficult if you are not a beginner.
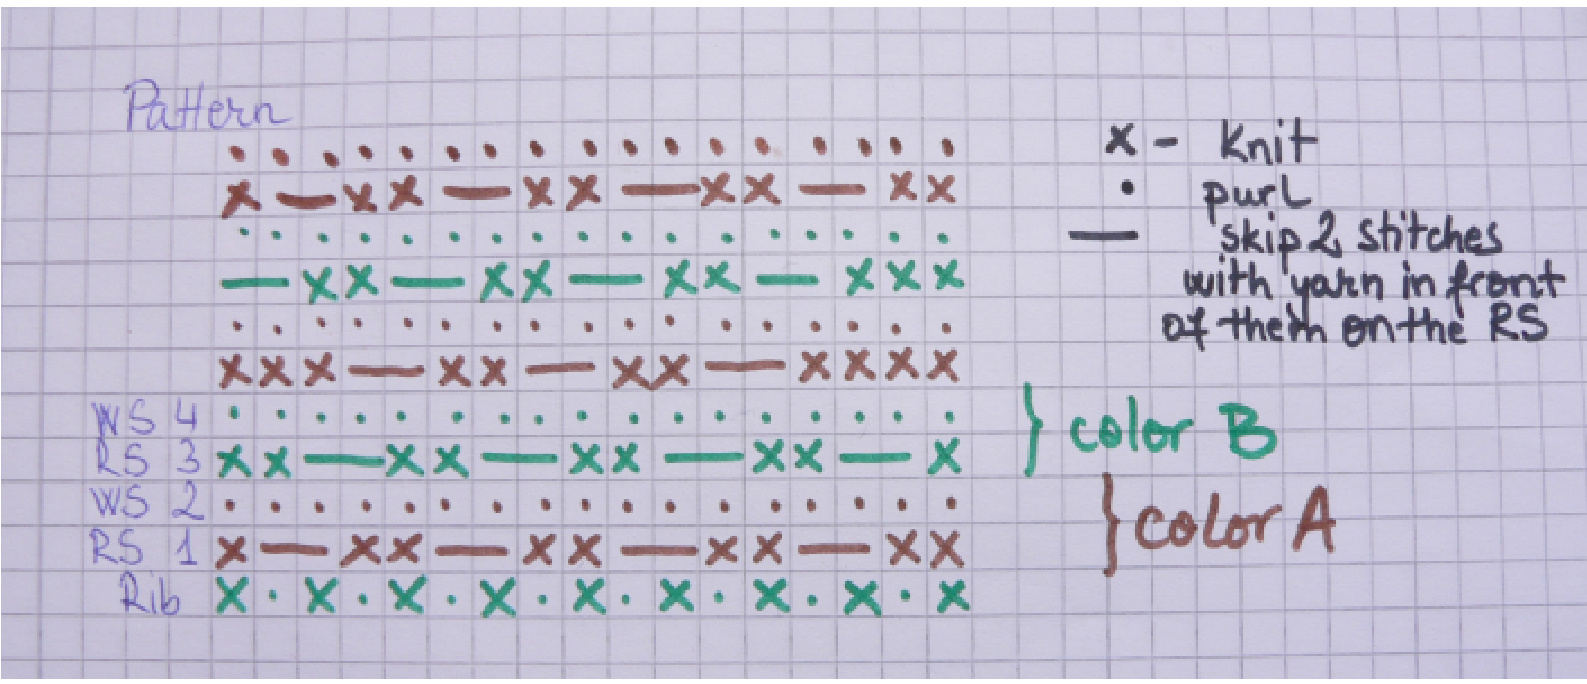
Pattern:

Change to color A, repeat rows 1-2, shifting RS1 every time with minus k1 (not a decrease!!) Change to color B, repeat rows 3-4, shifting RS3 every time with minus k1 (not a decrease!!!)
Dress - top
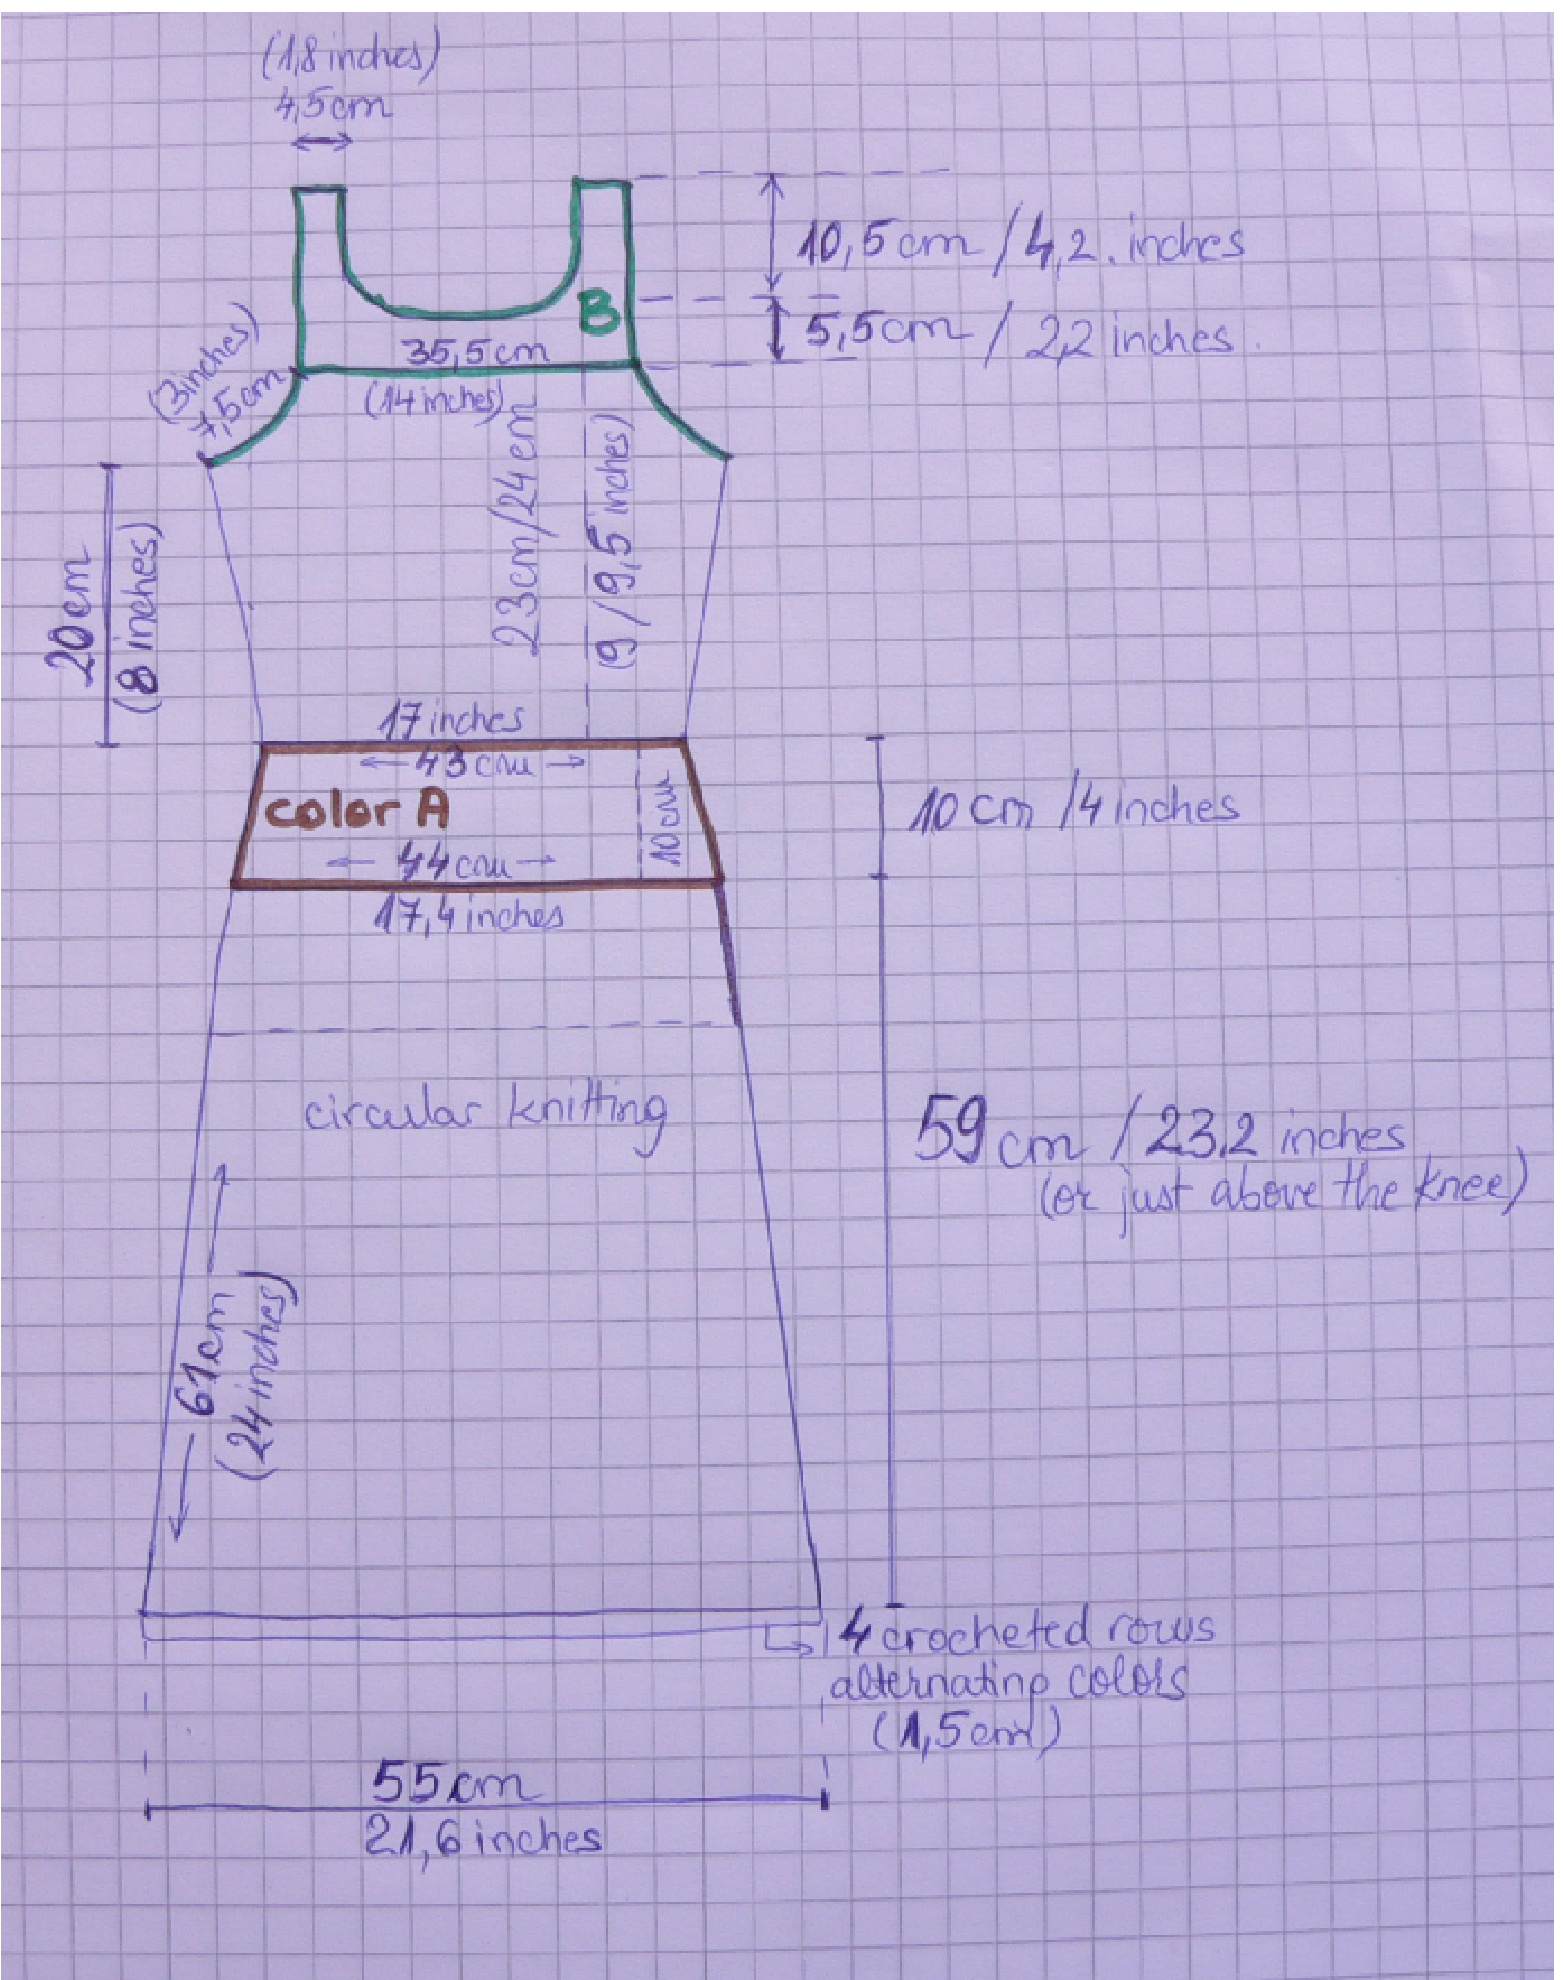
Starting with the waistband, this dress is knitted in 2 pieces - front and back, joined together by sewing on the sides. Knitting the top it in the round on circular needles is not a good idea - tried it. It stretches too much, and at the same time it will look too tight on the body when wore. After knitting the top, the stitches at the bottom of the waistband are picked on the needles, and skirt is worked from top down, starting in one piece for the first $10{-}15\;\mathrm{cm}$ (as desired), then knitted in the round, for the desired length. Knitting in the round means that all the rows previously purled are now also knitted.
Front waistband:
With color A (the darkest of the two colors) cast on for front waistband 92 stitches on circular needles Work from bottom up 29 rows: kl, pl, as for a rib. Row 30: decrease 2 stitches at each end of the row - 90 stitches Row 31 (RS row): with color B, begin the pattern (follow the chart for the next 12 rows). Row 32: purl all the stitches with color B Row 33 (RS row): change to color A as chart indicates. Caution: do not cut the yarn each 2 rows for changing colors, just switch the color at the beginning of the indicated row and work on The edges of the piece wil thus result a bit uneven, but when sewed together they look perfect. Row 43: increase 1 stitch at each end of the row - 92 stitches. Continue with the pattern. Row 65: increase 1 stitch at each end of the row - 94 stitches. Continue with the pattern. Row 85: increase 1 stitch at each end of the row - 96 stitches. Continue with the pattern. Row 105: begin underarm decreasing: 3,2,1 stitches each following row. Row 111: finished underarm decreasing, you now have 84 stitches remaining. Continue with the patterm for 8 more rows.
Upper rib - front:
Row 119 (RS): with color B, begin front upper rib (k1, p1). Work 16 rows, decreasing 1 stitch at each end of the row after the $8^{\mathrm{th}}$ row (middle of the rib) - 82 stitches.
Strap:
Row 135: begin straps. Work k1, p1 the first 18 stitches of the row, fasten off 46 stitches, work k1, p1 the last 18 stitches. Top neck cut done. Each strap is worked as follows: Row 1 of strap: kl, p1 Row 2: decrease 2 sitches at the beginning of the row, above the fastened offrow. 16 stitches remaining. K1, pl till the end of the row Row: 3 -as row 1 Row 4: decrease I stitch at the beginning of the row - 15 stitches remaining. K1, pl tillend of row. Next 20-22 rows (till the strap reaches shoulder or the desired length): k1, p1. Fasten off. The straps will be sewed together with the correspondent back strap on the shoulder.
Back waistband:
With color A (the darker one) cast on 90 stitches on circular needles. Work from bottom up 29 rows (k1, pl for rib), decreasing 2 stitches every $7^{\mathrm{th}}$ row - decrease 4 times 2 stitches, resulting 82 stitches in the $28^{\mathrm{th}}$ row. Row 30: decrease 2 more stitches at each end of the row - 80 stitches. Row 31: begin patern with color B, work as front, increasing 2 stitches per row 6 times tillrow 103 - 92 stitches, where underarm decreasing begins. Row 103: underarm decreasing 2, 1, 1 - at the beginning of row 109, 84 stitches remaining. Work 10 more rows till upper rib following the pattern.
Upper rib - back:
Row 119 (RS): with color B, begin back upper rib, working identical with front upper rib til straps are finished. Follow the description for front upper rib and straps. Sewing: When these two distinct parts (front and back) are finished, sew them together, leaving one side of the waistband free (will be sewed later, after finishing the skirt). This will result in a sort of vest. Caution: back is actually 2 rows shorter than the front in the underarm section, but when sewed together, they must match in length. This will prevent the back from hanging. 4 rows shorter would be even better, but it will result in serious trouble in the sewing process. Crocheted rib: After sewing, with color B (the same as the color of upper rib), crochet 1 row of sc around the neck cut and both arm cuts of upper rib. This will prevent stretching and will add to the width of the straps.
Skirt:
After sewing front and back, and leaving one side of the waistband free (usually on the left side of the work, as for inserting a zipper), pick up $90\substack{+90}=180$ stitches, working a purled WS row with color A first (the same as for the waistband). This will be considered row 0. Caution: due to the zipper space, the round work would only begin after $10\,\mathrm{cm}$ (or as desired) of nonround knitting, so we are still talking about WS purled rows and RS pattern rows, as chart indicates. Row 1 (RS row): with color B, begin pattern as chart indicates. Work 29 rows more, increasing 1 time over 4 rows (as explained below) when work measures $5\;\mathrm{{cm}}$ (2.,5 inches) from waistband. That means: - one normal increase - 1 stitch at the beginning and at the end of the row, knitted row, 1 stitch increase at each end - for the left side, where zipper would fit in. - one increase over 4 rows in the middle of the row, which would correspond to the other hip. Row 31: begin circular knitting - all WS rows are now knitted. Row 33: increase again: 2 stitches at each side, resulting in a total of4 stitches increased per row, and 8 stitches after 4 rows (see instructions and chart below). The pattern calls for increasing on the sides (over the hips), and that can be a bit tricky. Increasing in the pattern: calls for inserting a block of (K2, sk2 with yarn in front), a total of 4 stitches. Can be done in 4 rows or in 6 rows - over hips in 4 rows, and later in 6 rows. Increase from 180 to 228 stitches, a total of 12 increases of 4 stitches each (48 stitches), distributed 6 on every side of the skirt. Between 5 and $32\;\mathrm{cm}\,/\,2{,}5$ to 12 inches, allincreases are made.
Chart of increases over 4 rows:
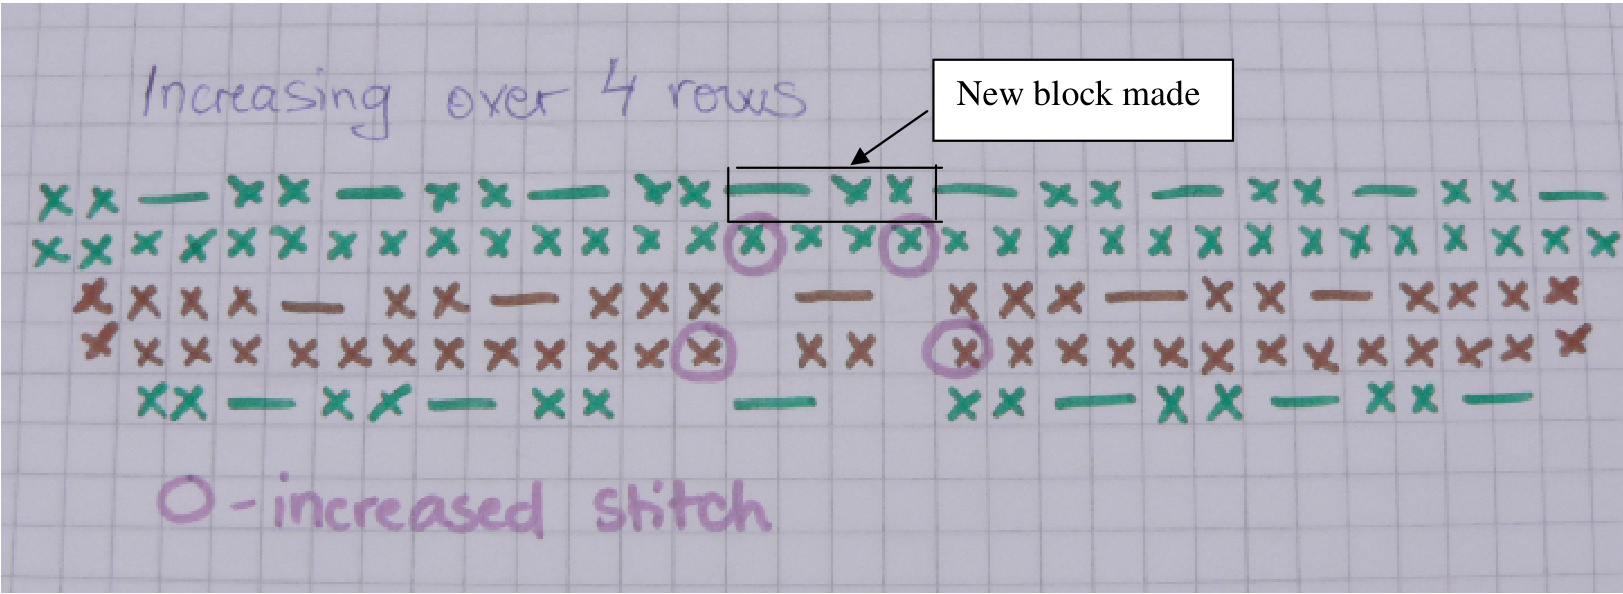
Pattern-unrelated comment: For the moment, please be creative about the increasing over 6 rows, it's not so complicated to figure out J. I will ad that later on - hopefully. Caution: place a marker at the beginning of each row, in order to know where to change colors. The line where the colors changes will unfortunately be a little visible on the RS, but it looks better than a sewing line (see picture above). For that reason, it is not a good idea to place the spot where the color will be changed in the middle of the back, it is far more obvious there, and, due to increases, the line can result a bit crooked, defect which is less noticeable on the side! Skirt should have 220 rows, not counting row 0. Fasten off with color A. Crochet 3 rows of sc, alternating colors B-A-B and decreasing at least 10 times, thus preventing the edge of the skirt from rolling upwards. The chart says 4 rows, but that is a mistake. The space on the left side (as for a zipper), can now be sewed, or you can very wellintroduce a zipper, if you feel it would help. The original design has no zipper. Also, some sort of lining would further prevent the skirt to stretch too much at the back, but again, the original design has no such thing. Weave all the ends, and there is your dress! For problems with the pattern, corrections, questions, please feel free to contact me at any time. $\copyright2008$ Ioana-Cristina Petrus This design cannot be sold or published without my permission. The tems made using that particuar design cannot be sold without my permission.


