EUCLID
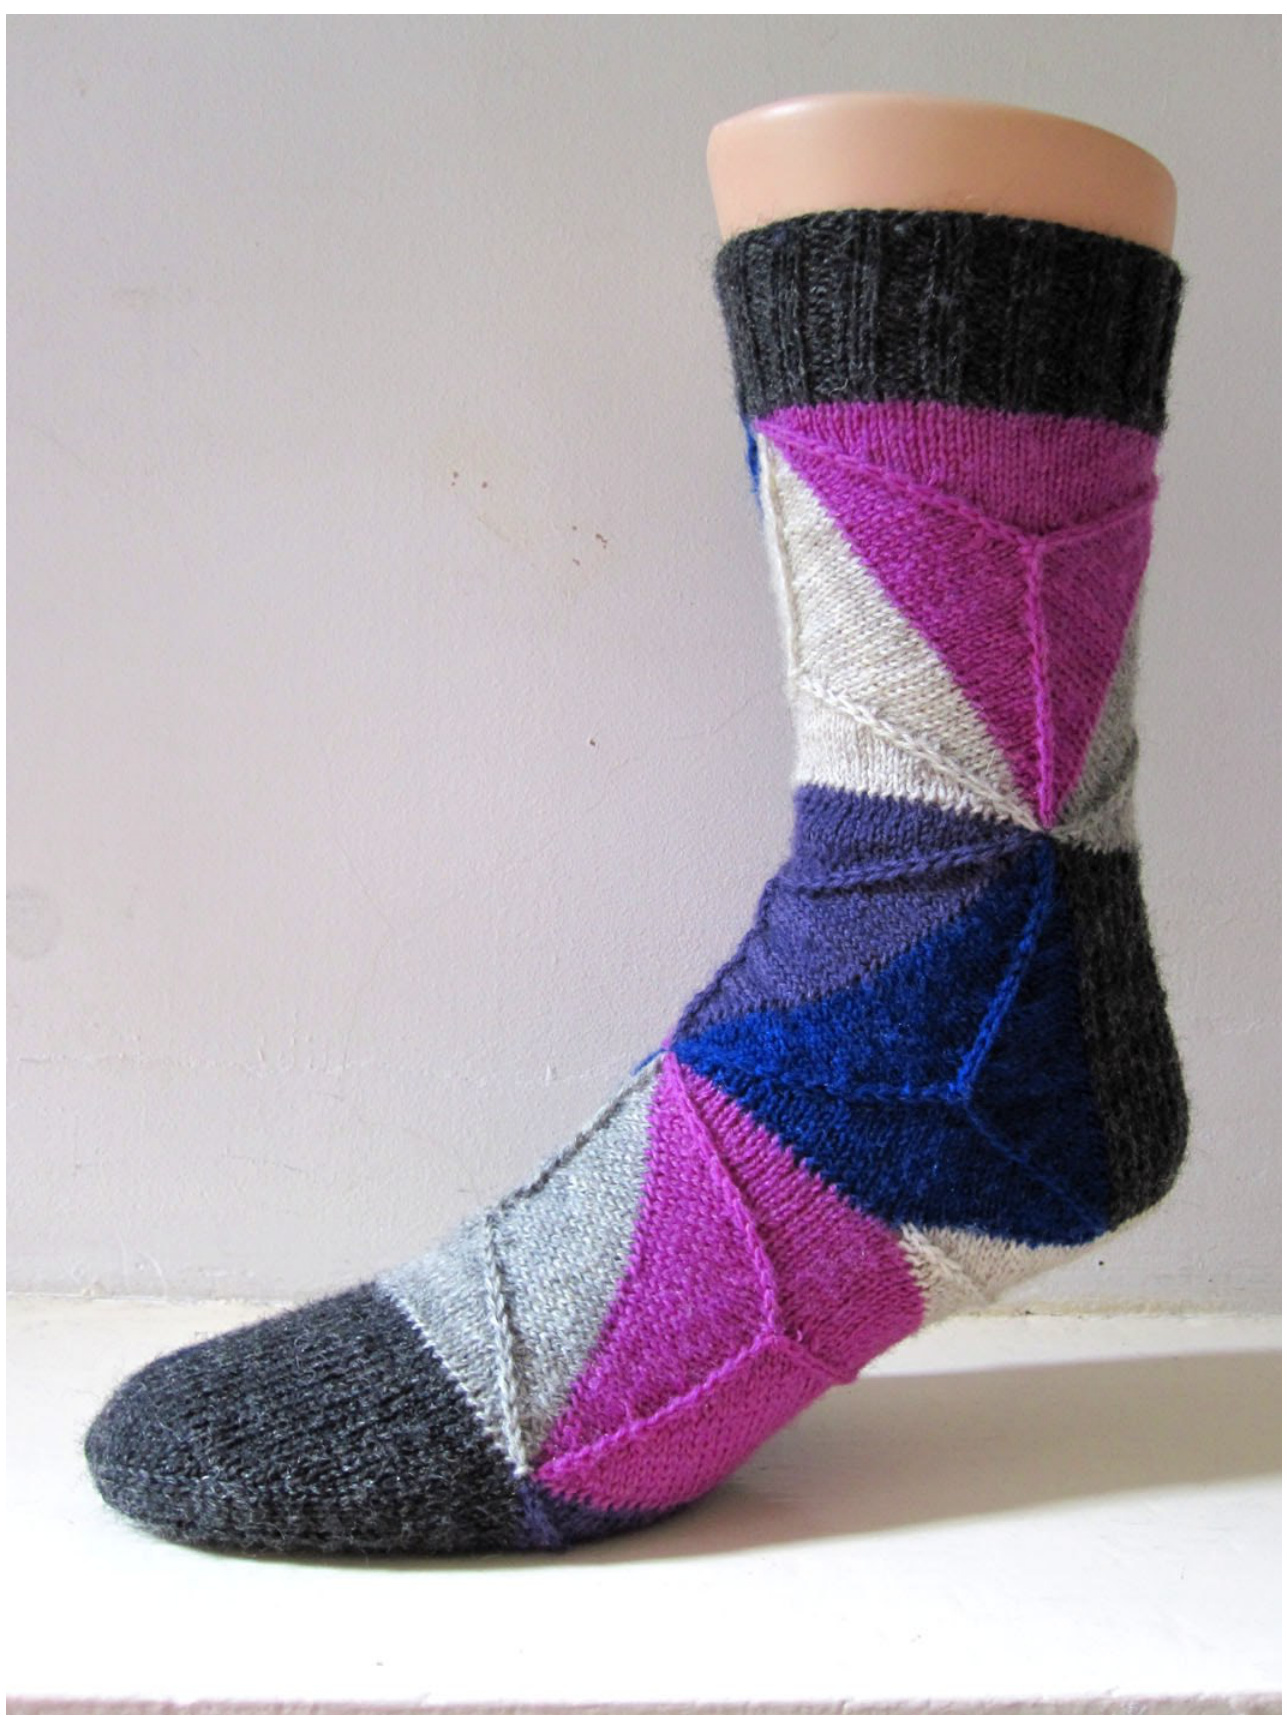
COPYRIGHT ? GENERAL HOGBUFFER 2013 Named after Euclid of Alexandria, also referred to as 'the father of geometry', because this sock is predominantly constructed of equilateral triangles. Please make sure you have read the whole of the instructions before starting to make sure you have understood what you will be doing, and to make you aware of all the options. IMPORTANT: This sock was designed for the 2013 Tour De Sock contest, and if you are working the socks as part of this contest you will have to follow the relevant rules for size and not modify the design. If you are working these outside the contest, you are obviously welcome to knit them any way you prefer, and that is why I have included suggestions for modifications at the end.
Size:
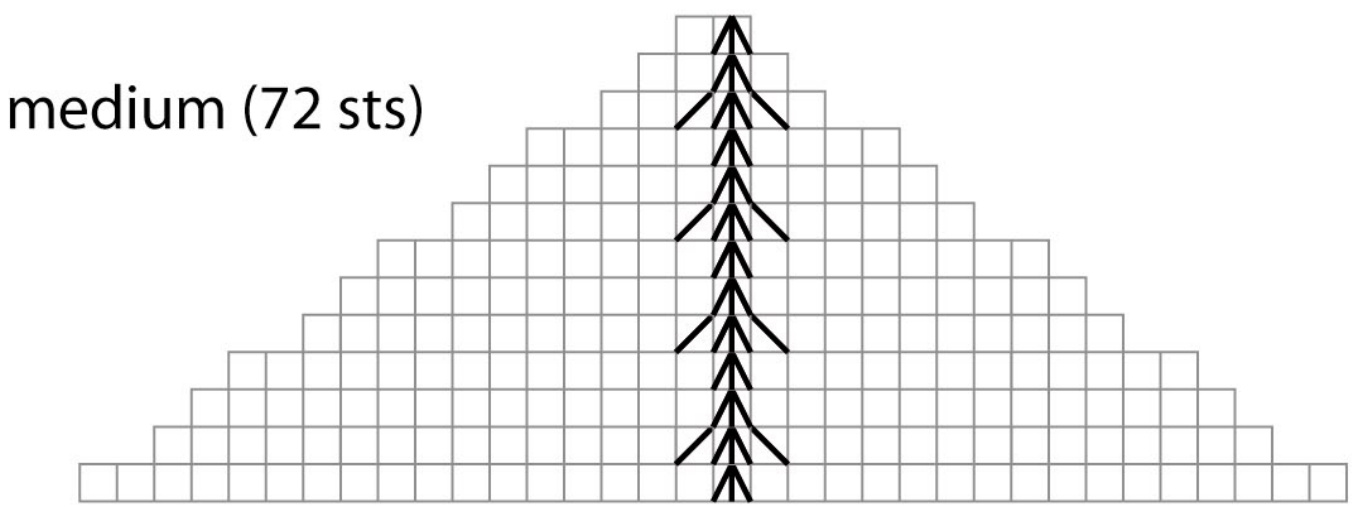
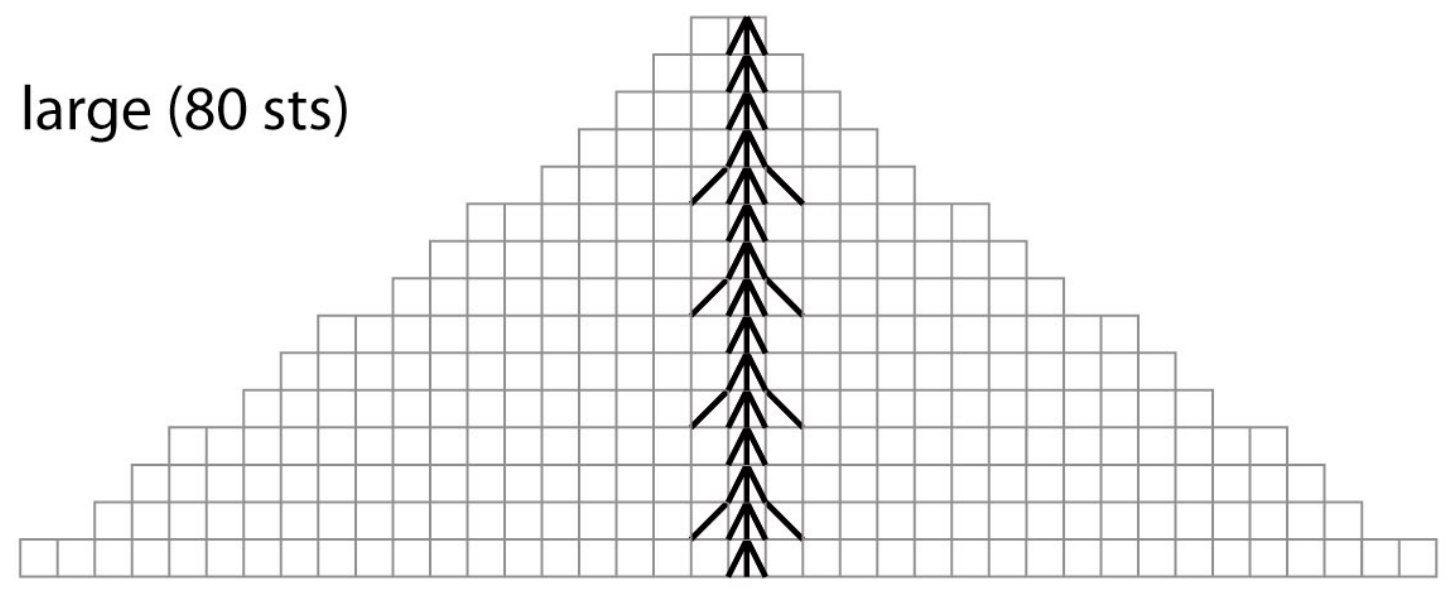
All the triangles you will be working will be the same size; one side of the triangle will be half the circumference of your sock, and as long as it is an even number, the sides of your triangle can be any size you like, therefore making this a very versatile pattern where size is concerned. When picking the right size for you keep in mind that most parts of the sock will have the fabric at odd angles, this will result in a reduced stretch. I found it best to work my sock with 72 sts (as I would for a stranded sock) even though I would wear a 64 sts plain stocking stitch sock. I will give numbers for a 64/72/80 st sock, but anything beyond and in between should not be hard to work out if needed.
Material:
Sock wool in 4 ply / fingering weight in either a self-striping colourway, or a yarn with a long gradient colour change like Zauberball or Noro. Alternatively, this would also make a good project to use up leftovers, in that case, use as many different yarns as you like, but make sure that adjacent triangles are made from different colours.
Needle size:
2.5 mm or size needed to get the right dimensions. You will need 4 DPNs to work the triangles, although this can be done on circulars if you absolutely prefer. Equally, the cuff and toe can be worked on DPNs, although I would normally recommend circulars for these. Use what you are most comfortable with and what works best for you.
Further requirements:
Tapestryneedle Stitch markers (although you could do it without if they irritate you) Waste yarn in a good contrast (if you want to use the provisional cast on method)
Cuff:
Using your favourite cast-on method and the colour of your choosing, cast on 64/72/80 sts and close to a round, taking care not to twist the cast-on. Work either K1, P1 or K2, P2 rib for as many rounds as you would like your cuff to be. Please note that, as the triangles will form tiers, the length of the leg can only be customised to a small degree. One tier of triangles should be fine for most people, while 2 tiers are probably a bit on the long side for most, so the length of the cuff is the only way to fine-tune the length. If you want to be sure what you are getting, I would recommend you knit a test triangle; the measurement from base to tip is the height of your tier.
Leg:
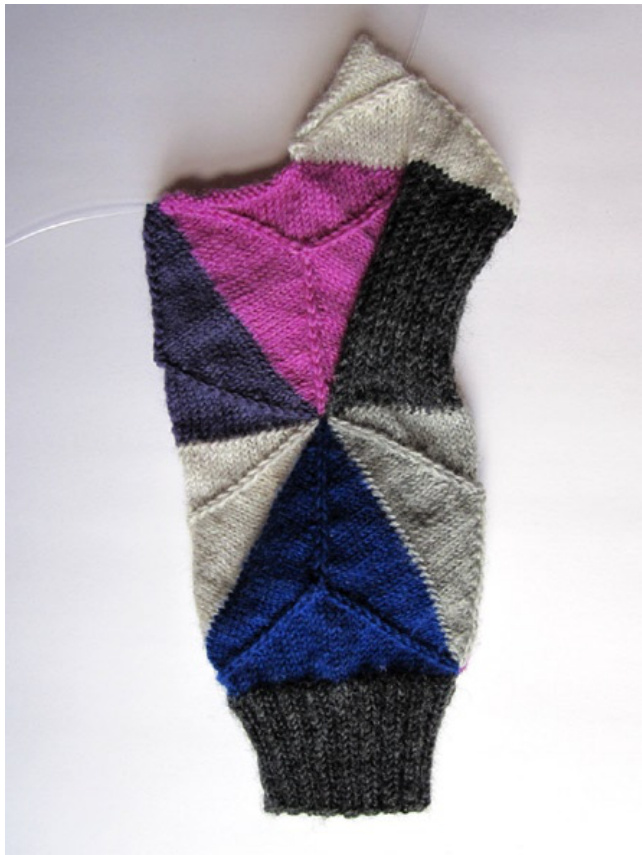
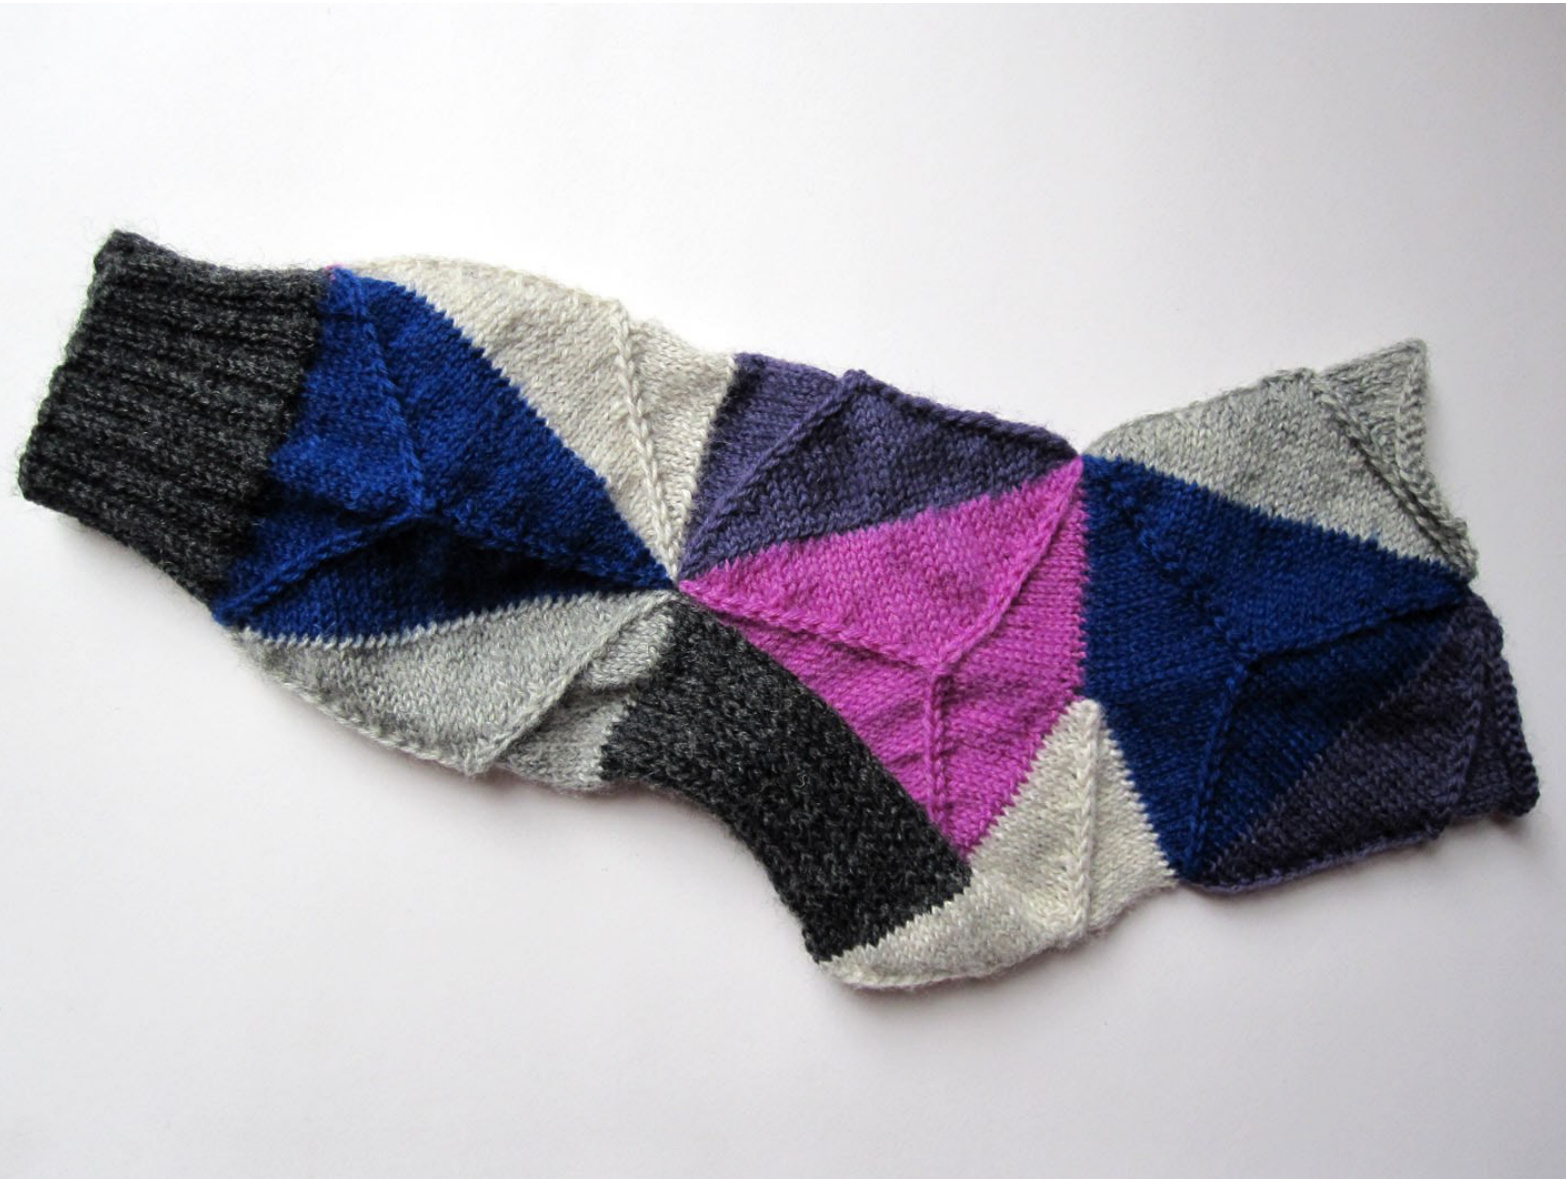
Basically, almost all of this sock is constructed by knitting triangles from the outside in, joining each new one to one or two existing ones. You will get the sts to work your triangles by picking up sts from existing triangles and by casting on new ones. The choice you will have to make is which method you would like for this. I have used the backwards loop cast on for my sample socks, and I found the sts were easy enough to pick up later. The effect is not perfectly invisible, so if you prefer you can cast on your sts with waste yarn, knit them in your working yarn and then pick up the loops later as you would with any provisional cast on. Please note that you will need to follow the special instructions for the heel flap if you use this method. ALL triangles throughout the sock will be knitted in exactly the same way, the only thing that differs slightly is how the sts for the first round are obtained. I have provided charts for the main three sizes, these show a third of the triangle and are therefore to be repeated on each needle.The first triangle will have one side attached to the cuff and the tip pointing downwards. The decreases will go from the three corners and meet in the centre. K16/18/20 onto the first DPN, K16/18/20 onto second DPN and cast on 16/18/20 more sts onto this needle. Cast on 32/36/40 sts onto the third needle. Cast on 16/18/20 sts onto the fourth needle. It may feel counter intuitive to have the corners of the triangle in the centre of your needles, but I found that the decreases come out a lot cleaner if they are not at the ends of the needles. It also eradicates the need to shift sts around for the centred double decreases, but feel free to re-arrange your needles as you please. \*\*K 80/90/100, (starting by knitting the sts from Needle 1 onto Needle 4), this should take you to the end of one of your needles, ready to start the chart. (If you are now wondering why we didn't start the triangle at the beginning of a needle in the first place: you will need to have the yarn tails at the corners of your triangles to help you neaten these areas later.) Follow the chart for your chosen size, ending up with 6 sts, 2 on each needle. Break the yarn with a 6 inch / 15 cm tail, thread it into a tapestry needle and sew through the sts twice in a round, then pull together tight to close the hole. Sew tail in on the back side. For the second triangle, start at the tip of the first triangle, pick up and knit 16/18/20 sts onto your first needle, pick up and knit another 16/18/20 sts onto your second needle and cast on the remaining sts as for the first triangle. Work triangle as before from \*\*. For the third triangle, start at the free tip and pick up and knit 16/18/20 sts onto the first needle, pick up and knit 16/18/20 sts onto the second needle, K16/18/20 cuff sts still with the second needle, K16/18/20 cuff sts with the third needle, cast on 16/18/20 sts onto the third needle and finally cast on 16/18/20 sts onto the fourth needle. Work triangle as before from \*\*. The fourth triangle will complete the tier; start at the free tip of the third triangle and pick up and knit 16/18/20 sts onto the first needle, pick up and knit 16/18/20 sts onto the second needle, pick up and knit 16/18/20 sts from the first triangle onto the second needle, pick up and knit 16/18/20 sts onto the third needle, cast on 16/18/20 sts onto the third needle and finally cast on 16/18/20 sts onto the fourth needle. Work triangle as before from \*\*. If you would like to work a fairly tall sock, work a second tier exactly as the first, only this time you will be picking up and knitting sts from the second and fourth triangle of the first tier instead of knitting cuff sts.
Heel tier:
Work the first triangle attached to the leg as above, and work a second triangle attached to it. Now, instead of working the next triangle as previously described, work it instead on the other side of the first triangle. Effectively, you are working triangles 1,2 and 4 of the tier. You will end up with one triangle attached to the body of your sock and two triangles attached to it either side. Using 3 DPNs in total, pick up sts as follows (you are only picking these up, NOT knitting them as Well: On the empty side of the left triangle, pick up 21/24/27 sts evenly (that's 2 out of 3 sts picked up) ontoyour firstDPN. From the yet unused side of the triangle from the last tier, Pick up all 32/36/40 sts onto your second DPN. On the empty side of the right triangle, pick up another 21/24/27 sts evenly onto your third DPN. Attach your yarn to the right end of Needle 2, ready to work a RS row. With Needle1, K all sts on Needle2 to the last st, SSK this st with the first st on Needle3. Turn (and discard the free needle, you will work normal rows on two needles now.) Row2: sl1, P30/34/38, P2tog, turn Row3: [sl1, K1] 15/17/19 times, sl1, SSK Repeat these two rows until you have used up all the side sts, you should end ready to work a RS row after a total of 42/48/54 rows. This will sound like a lot for a heel flap, but please remember that you are not working a plain sock, and the extra length is needed to balance with the sides of the triangles. NOTE: If you are casting on with waste yarn, you have no choice but to pick up all sts from the side triangles. To still end up with the same number of rows, work the first row as before, followed by: Row2: sl1, P30/34/38, P2tog, turn Row3: [sl1, K1] 15/17/19 times, sl1, SSSK (you will use up 2 sts from the side triangle), turn Row4: sl1, P30/34/38, P3tog, turn (again, you will use up 2 side sts) Row5: [sl1, K1] 15/17/19 times, sl1, SSK Repeat these last 4 rows, and you should have used up all sts from the sides after roughly the same number of rows as if you followed the other method. For the heel turn, you will work a triangle that has one corner in the centre of the heel flap, so this is the only time where the yarn does not start in the middle of the first needle, in fact there is no need to cut and join the yarn at all if you work this triangle in the same yarn as the heel flap. However, If you are working the sock in lots of leftovers and you want to use different colours for the flap and the bottom of the heel, just cut your heel flap yarn after the last WS row and start with the triangle colour. With Needle 1, K32/36/40 heel sts. With Needle 2, pick up and knit the first 16/18/20 sts of the triangle that's attached to the heel flap. Cast on 16/18/20 sts. With Needle 3, cast on 16/18/20 sts. Pick up and knit the last 16/18/20 sts of the triangle that's attached to the other side of the heel flap. Work a triangle as before, except that you start knitting a fullround before starting the first row of the chart.
Foot:
Measure the tier of triangles from the leg to determine how to work the foot. If the length of the work so far from the centre of the heel plus the height of a tier of triangles is less than your required foot length minus 2.5 inches / 6cm, then work another tier of triangles round the foot the same way as for the leg, then work plain as described below. If your size does not allow for another tier of triangles work the rest of the foot plain as follows: Starting at the centre of the sole triangle, pick up and knit 64/72/80 sts from the sides of the previous triangles. I reverted to working on circulars for this part, but feel free to stick with DPNs and distribute the sts to be most convenient for you. K 1 round. In the next round, evenly decrease to 56/64/72 sts. Work in plain knit until you have 2.5 inches / 6 cm less than your desired foot length.
Toe:
To place your markers for the toe decreases (if you prefer to use them), work first round as fol lows: K 11/13/15, K2tog, K1, place marker, K1, SSK, K 11/13/15. Repeat on Needle2 Round2: K Round3: K Round4: K Round5: [K to 3 sts before marker, K2 tog, K1, sl marker, K1, SSK, K to end] on each needle Round6: K Round7: K Round8: as Round 5 Round9: K Round10: K Round11: as Round5 Round12: K Round13: as Round5 Round14: K Round15: as Round5 Round16: K Round17: as Round5 Keep working Round 5 until you have a total of 16 sts. With a DPN, K 4 sts from needle1. Move the remaining 4 sts from needle1 and the first 4 sts from needle2 onto a second DPN. Move the last 4 sts from needle2 onto the first DPN. Cut yarn, leaving about 10 inches / 25 cms and graft the toe closed. Sew in all remaining yarn ends, you should have at least one end at each point where the triangle points meet, sew this through the end pints to draw the holes closed. Start from the top to workasecondsock.
Further options:
If you prefer or need a flatter, shorter toe feel free to substitute it, it may give you the extra bit of length to work another tier of triangles. If you know you need a smaller circumference on the foot than on the leg only pick up and cast on the sts for the next smaller size and work the smaller triangles accordingly after the heel turn. Although the construction is different, in terms of separate elements you are essentially working a Strong heel, even though you have a classic slip stitch heel flap. Because of the construction, you will end up with ridges formed by the decreases, some of which will be on the sole. If this will not work for you because your feet are very. sensitive, you may want to work a short row heel turn and a plain foot, but the design will be somewhat compromised.
Glossary:
St, sts stitch, stitches Kknit Ppurl SI slip K2tog knit 2 stitches together SSK slip, slip, knit. Slip 2 stitches separately as if to knit, insert left needle into these two stitches from the right and knit onto right needle. SSSK slip, slip, slip, knit. Slip 3 stitches separately as if to knit, insert left needle into these three stitches from the right and knit onto right needle. P2togpurl 2 stitches together P3tog purl 3 stitches together CCD centred double decrease. Slip 2 stitches together as if to knit, knit next stitch and pull slipped stitches over this stitch. WS, RS Wrong Side, Right Side small (64 sts)
Glossary of symbols used:
knit knit 2 together Ncentred double decrease
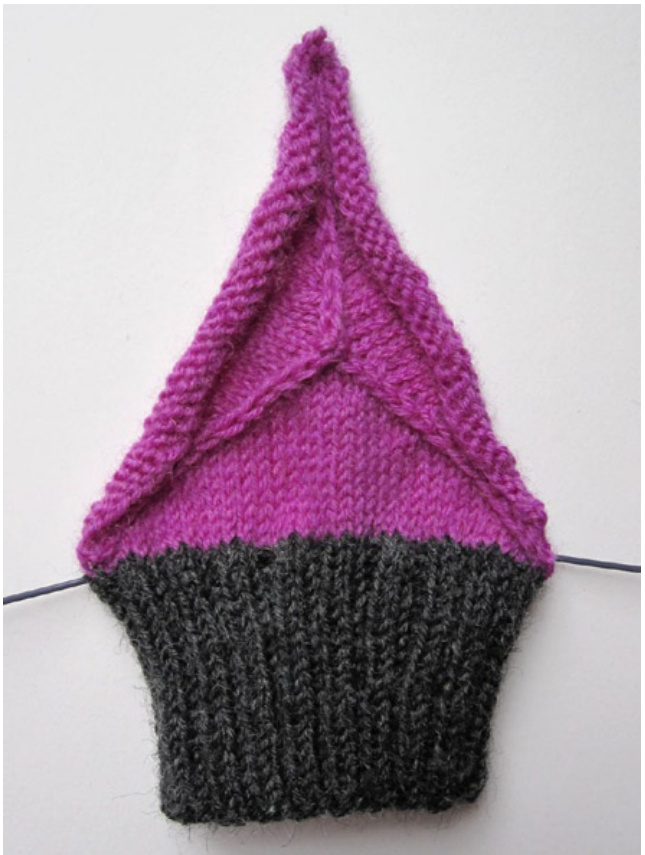
First triangle attached to cuff
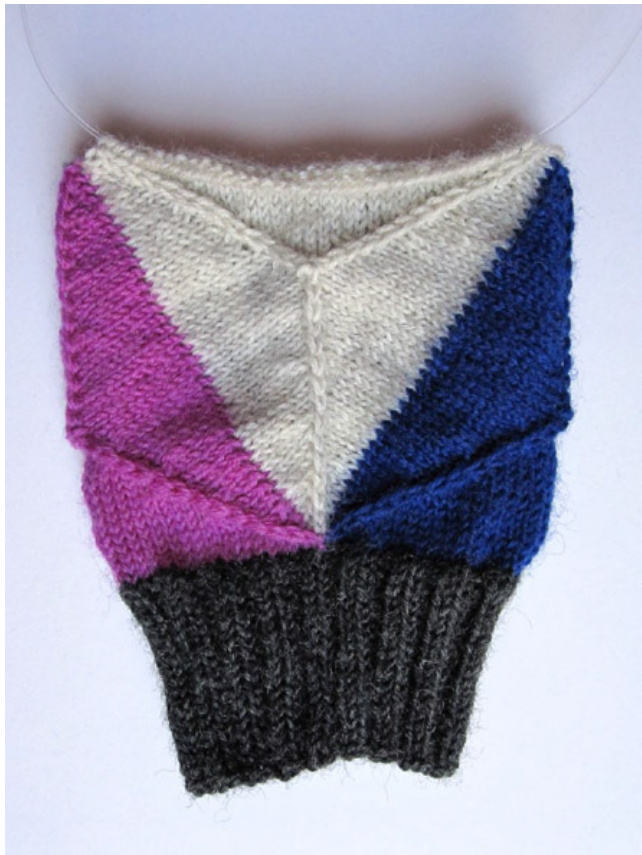
First tier finished
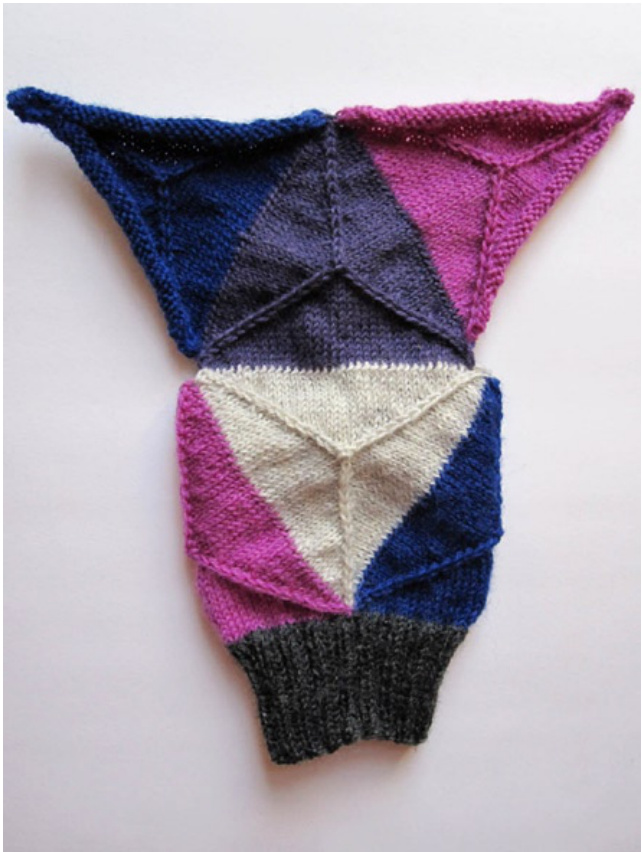
The three triangles for the heel tier

Ready to start the heel flap
Heel flap finished
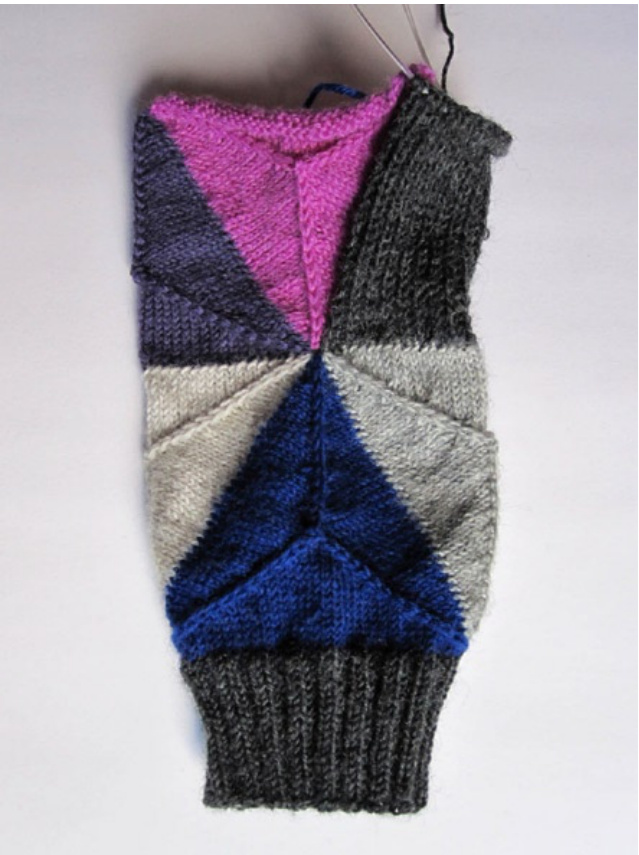
Heel triangle attached
Foot tier attached, ready to work toe