Foldable Desktop Christmas Tree #2
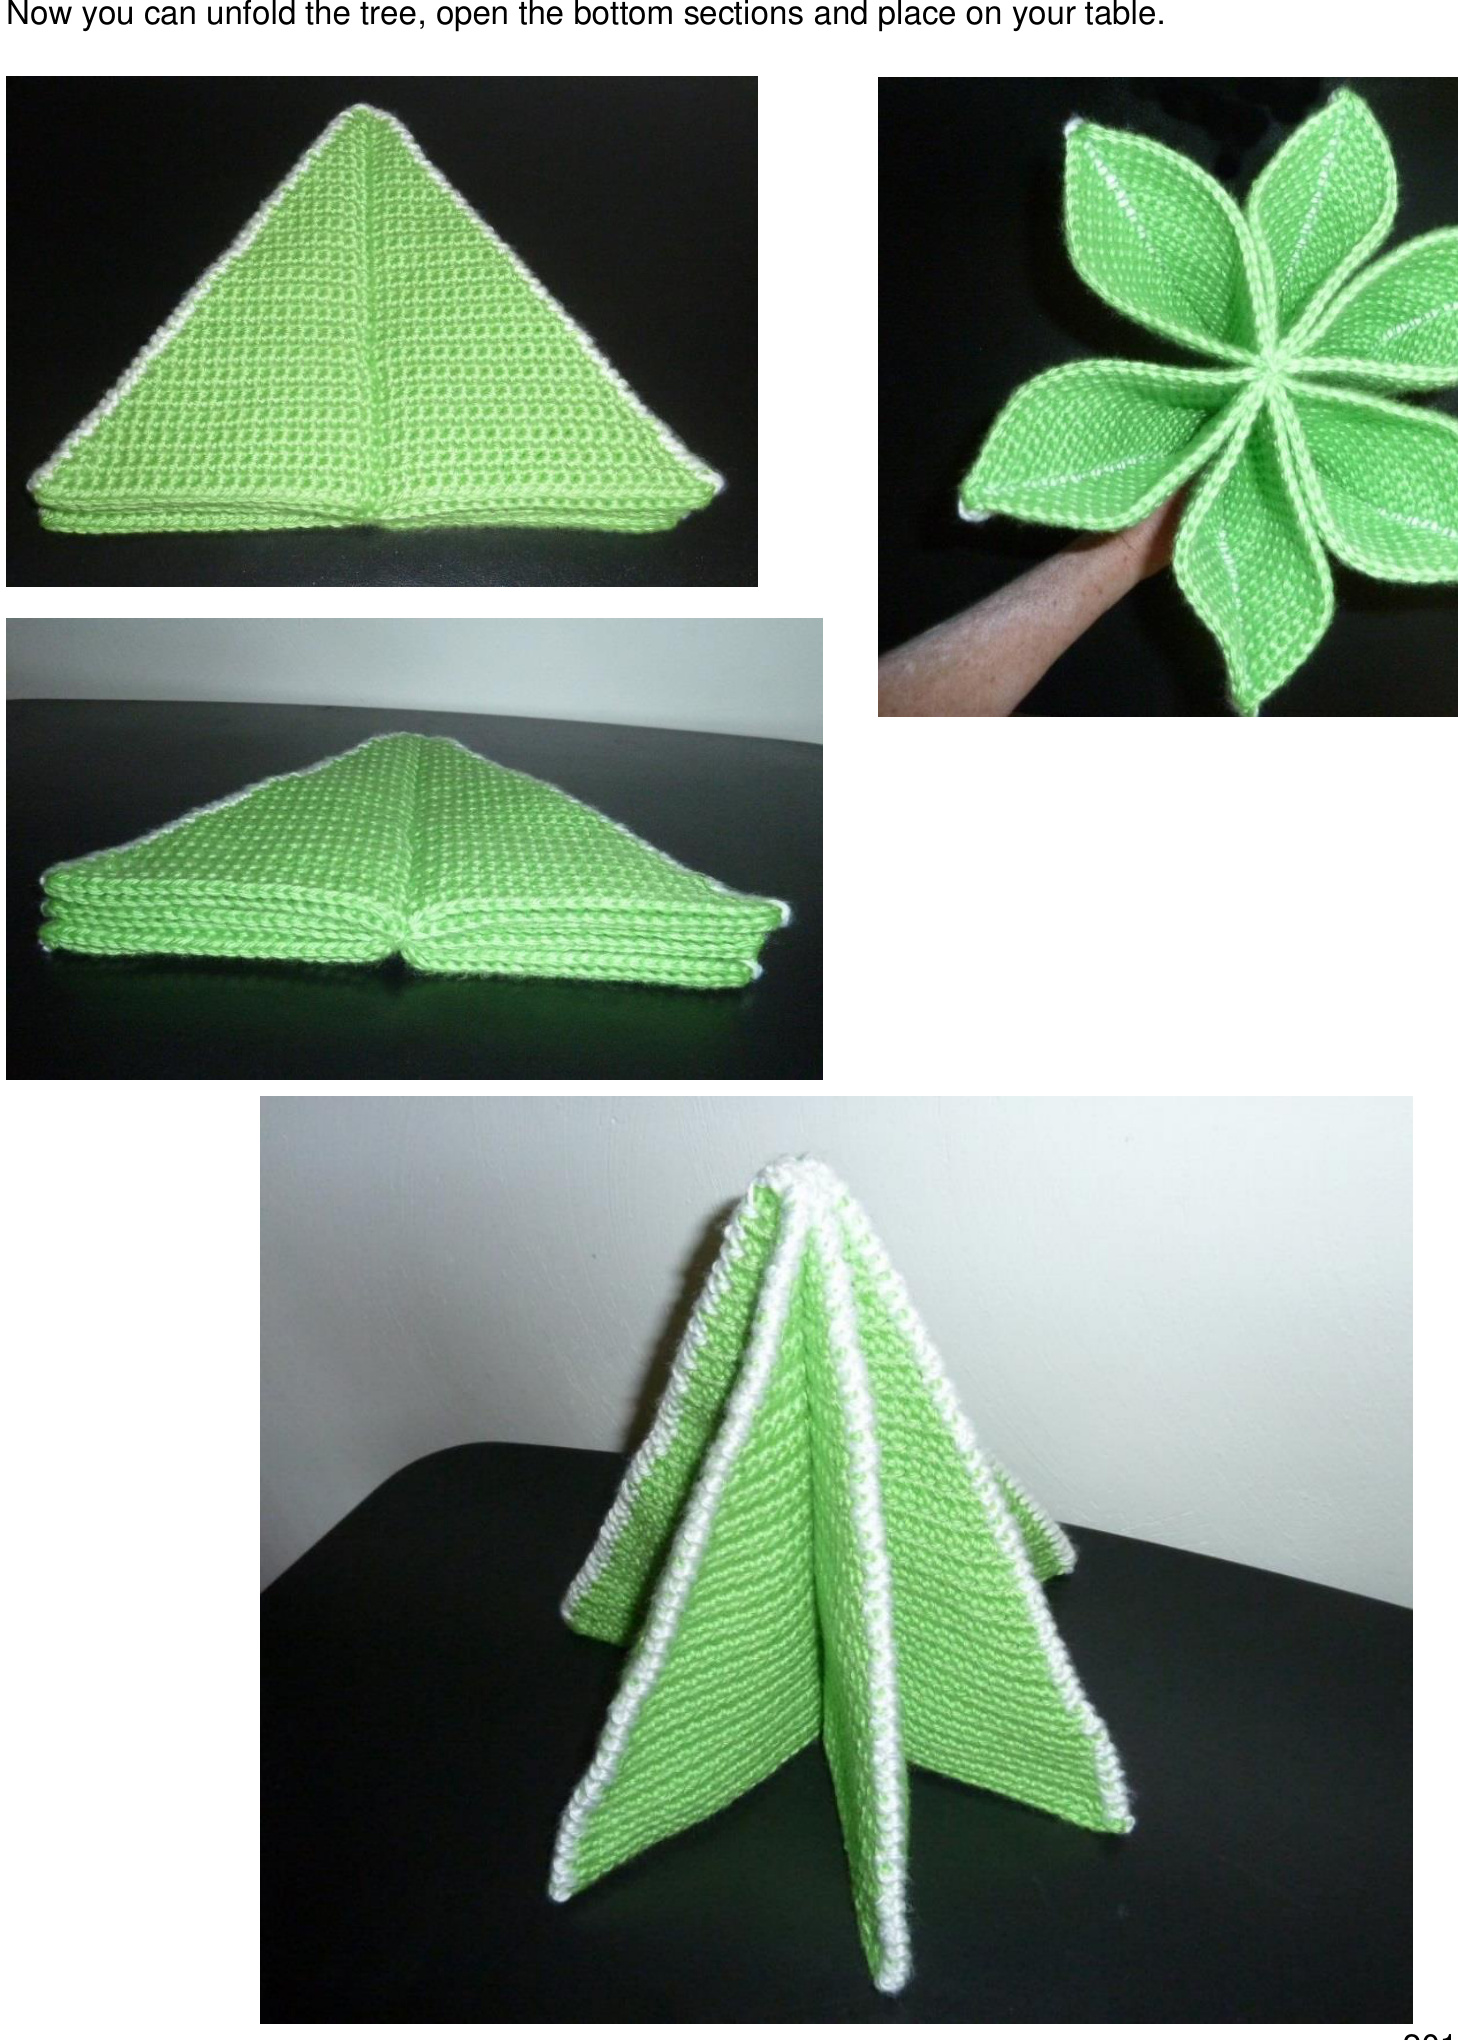
Yes, it is another folding tree. This one is a bit taller. But it still folds down flat. And stores easily after the holidays. It is a very easy and versatile pattern. It is essentially just crocheting triangles, and stitching them together. It is a nice size tofit on a small table. And it is child-safe. Hopeyour Holidays areTheBest!
Materials:
Worsted Weight Yarn (l used Caron Simply Soft) \* \~ 320 yds for a 43 row 3-segment-folding tree \* \~ 21 yds for edging (l used green for the tree, white for the edging) (Use any Colors you wish) 4.00 mm / F-G hook Yarn needle Scissor or Snips Gauge is not crucial. 5 sts and 6 rows = 1 inch (2.5cm) Size: For a 43 row 3-segment-folding tree: Height = \~ 8" (20.3cm) Width at the bottom of the tree = \~ 10" (25.4cm) Depth when folded flat = about 1" (2.5cm)
US Terminology
Abbreviations:
Ch(s) = Chain(s) FO=FastenOff Inc = Increase with 2 single crochets into one stitch Sc = Single Crochet Ss = Slip Stitch St(s) = Stitch(es)
Decorated it with your imagination. Some ideas:
Attach dollar bills to it as a special gift Adorn with colored paper clips for an office theme Affix withstar stickersfor a classroom Pin small folded Origami cranes on it Use it as an Advent tree Drape it with jewelry or earrings Clip on a chain-garland Use tiny plastic doll clothespins Or tape bows and little ornaments Add a small Tree-Top Star or Angel.... whatever. Or maybe a Silly Gnome on top. Pattern Notes: Pattern is adaptable for different sizes. A smaller tree can be made by making less rows. A taller tree can be made by continuing beyond row 43, with more odd and even rows. If it is a lot taller, it might be good to lightly stuff it (to help support it so it can stand erect). A simple flat or fluffed Tree-ornament can be created from using just one complete segment. Add a bit of stuffing, crochet completely around, and add a small chain-loop at the top for hanging. You can sew on or use fabric glue to attach bows or crocheted flat-circle-ornaments. You could also attach with small bent paperclips, safety pins or plastic doll clothespins. A simple white or red or gold chain-stitch might make a nice garland. And a tiny angel or star for the top would look good. An unadorned tree is really pretty, too. Onelastnote: The main difference from the first foldable tree, is that the bottom is left open and no stuffing is needed. Tree:(Make6) Note: One complete segment is made from 2 sides: a front and a back. Six sides (for 3 complete segments) will be needed for the foldable tree. Row 1: Ch 2, 3 Sc in the 2nd ch from the hook. Turn. (3) Row 2: Ch 1, Sc across. Turn. lote: Repeat Row 2 for all even-numbered Rows. Mark Row 1 as the right side with a stitch-marker, thread or safety pin: It helps keep track of even and odd rows. Row 3: Ch 1, Inc, Sc, Inc. Turn. (5) ODD Rows 5, 7, 9, 11, 13, 15, 17, 19, 21, 23, 25, 27, 29, 31, 33, 35, 37, 39, 41, and 43: Ch 1, Inc, Sc across, Inc. Turn. (Total sts for each row: 7,9, 11, 13, 15, 17, 19, 21, 23, 25, 27,29, 31, 33, 35, 37,39, 41, 43 and 45) FOafter row 43.
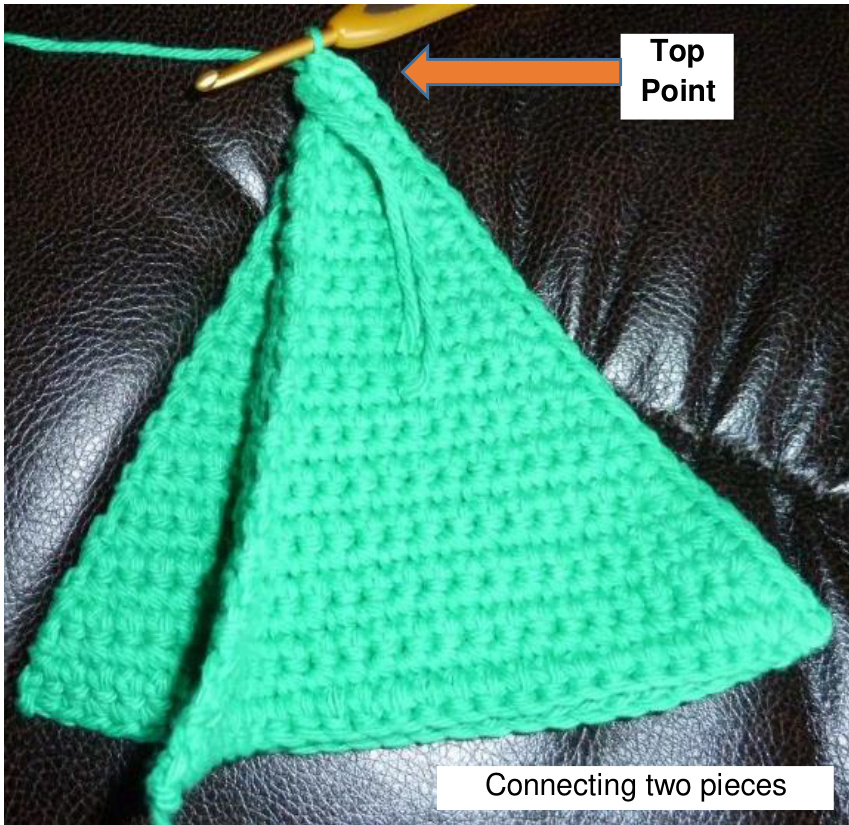
To complete one segment:
Hold two pieces together with wrong sides facing and top-points together. Join yarn in the bottom Right Corner with a ss through both pieces. Continue to Sc (through both pieces) to the top. 3 Sc in in the top point, and then sc down to the next corner. Ss in the corner st and FO. The bottom section of the triangle will be left open. (One Segment Complete) Note: You can Reverse-SC around, if you join in the Left Corner. And you will only need 2 sc's in the top point.
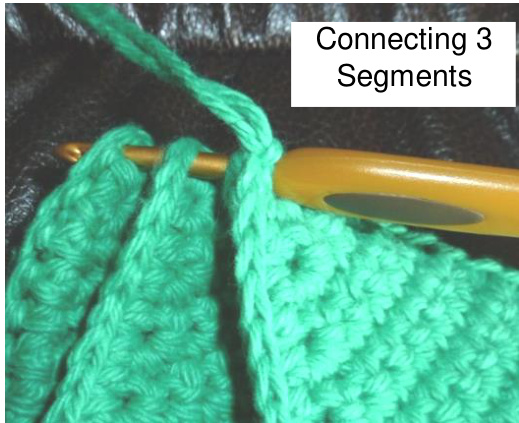
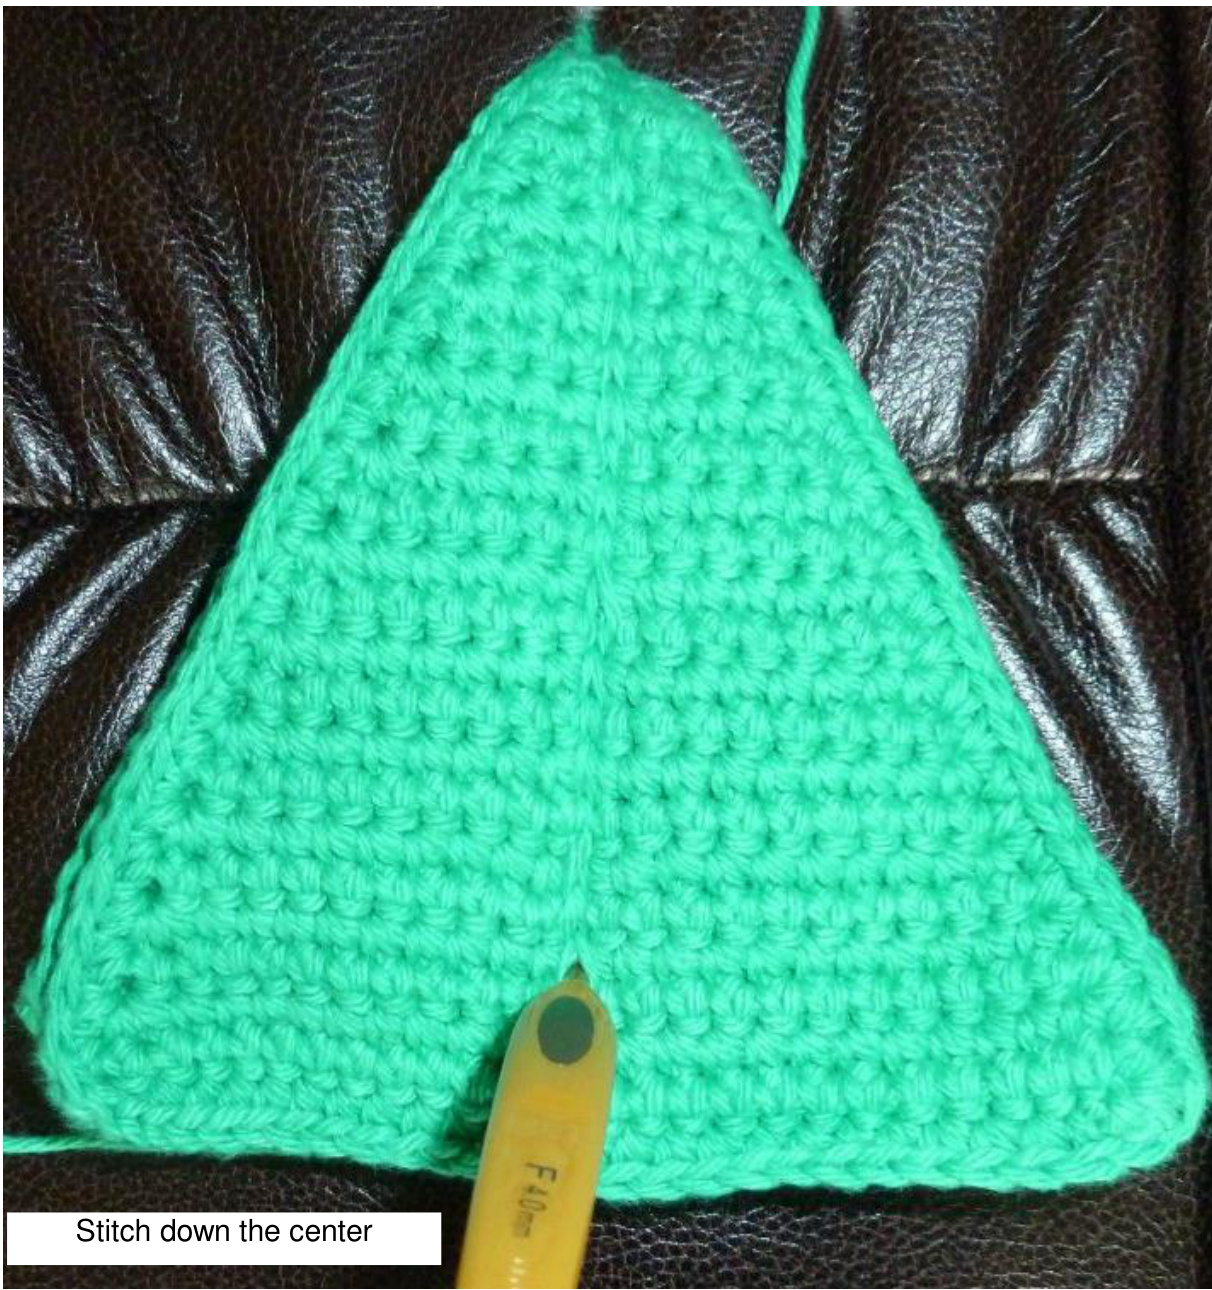
Assembly: Hold 3 complete segments together, with the right sides of the outer two segments facing out. With yarn underneath: hook through the top center-sc-point of all 3 tree segments and pull up a loo Surface-crochet (ss) through each row, straight down the center. Keep the 3 segments aligned, and the stitches snug. If you pin the 3 sections together, it may help to keep it lined up. I periodically checked the middle and back, to keep even. OR If you find that it is too difficult to surface crochet through 6 layers: Sew with a back stitch from the top point, straight down the center. Keep the 3 segments aligned. Secure and weave in the ends.