Size: (0-1 months) 3 months (6 months) 12 months (18 months)
Hilma Baby Bonnet
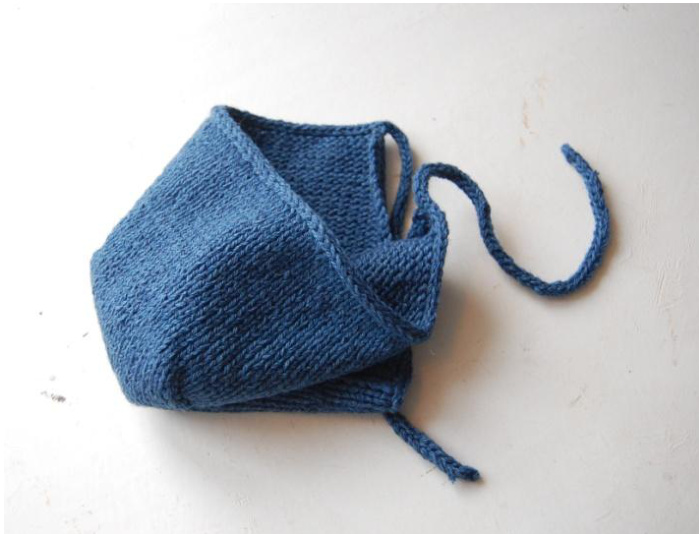
by Gralina Frie This little bonnet is knitted back and forth in one piece. You need to pick up stitches along the bottom edge to make the I-cord bind off, but that's all there is to it. The principles for knitting all three versions of the bonnet are the same, it's your choice of yarn and how you choose to finish it that makes it unique.
Materials:
80-100m of Worsted weight yarn OR the double amount of fingering weight yarn doubled OR 3 times the amount of Lace weight yarn 3 strands held together. Scrap yarn for a provisional CO if you knit the version with I-cord front. Needles: US 6 - 4.0mm circular needles or size needed to obtain gauge. Tapestry needle. 2 stitch markers. If you're knitting the version with seed stitch border, I recommend you to knit the border with a Us 4 - 3.5mm needle. Gauge: 20 sts and 27 rows to 10 cm/ 4" with US 6 - 4.0mm needles over Stockinette sts.
Abbreviations:
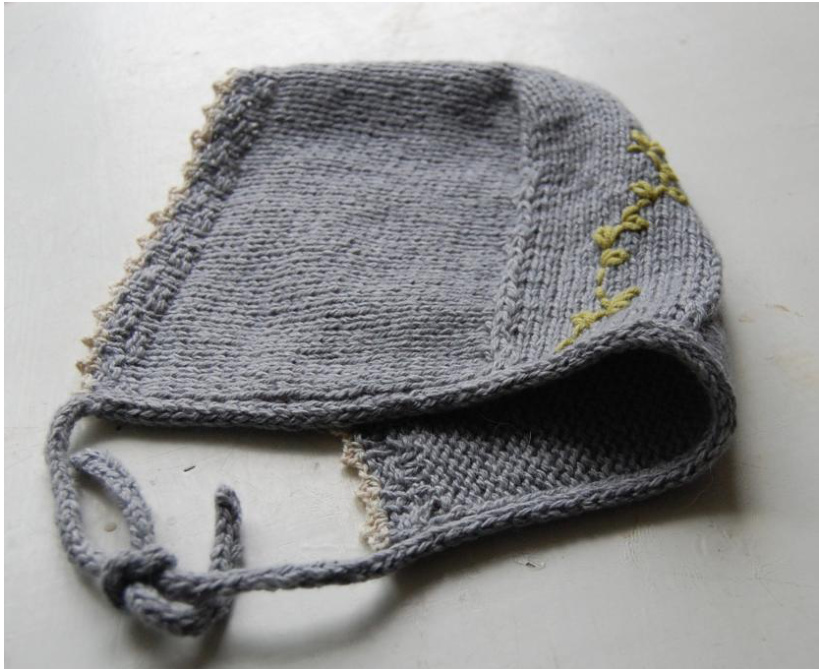
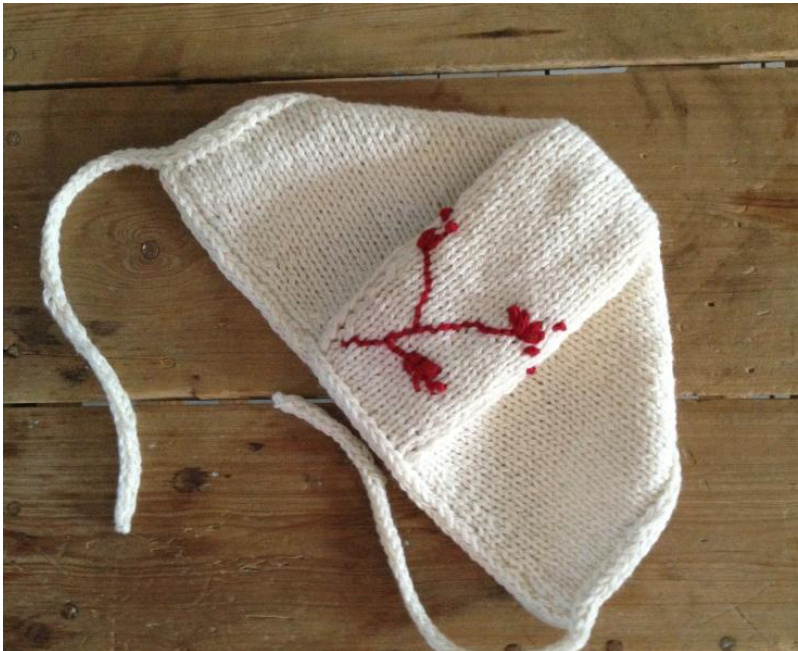
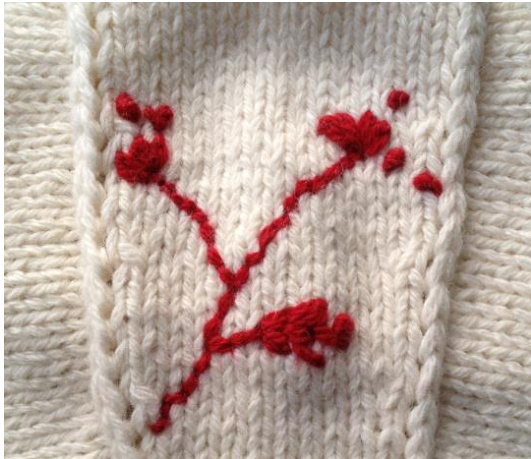
k=knit; p=purl; st(s)=stitch(es); St st=stockinette stitch=knit 1 row, purl 1 row (only needed for gauge swatch); skpo=slip 1 st knitwise, knit 1, slip slipped st over; skpo special=slip 1 st knitwise, k2tog, slip slipped st over; k2(3)tog=knit 2(3) together; p2(3)tog=purl 2(3) together PM=place marker; RS=right side; WS=wrong side Grey bonnet - size 12 months, version A with double seed stitch and crochet picot edging. Blue bonnet - size 12 months, version B with french knots in white lace weight mohair. Whitebonnet-size3months,versionBwith embroidery inred. Please read entire pattern before casting on!
Pattern and photos are ? Gralina Frie. This patterns is for personal and non-profit use only. Please contact me if you'd like to sell items made from this pattern.
BONNET
The bonnet is knitted back and forth in rows. Before you begin, you need to decide what kind of brim you'd prefer: A) Double seed stitch (or 2x2 ribbing): Using working yarn and US 4 - 3.5mm needles, C0 (58) 68 (72) 74 (76) sts and work 4 rows of double seed st (or 2x2 ribbing), beginning with k2,p2. Change to US 6 - 4.0mm needles and St sts and increase (2) 2 (2) 2 (2)sts evenly =(60) 70 (74) 76 (78)sts. Work6rowseven. B)I-cord: Using scrap yarn and US 6 - 4.0mm needles, C0 (60) 70 (74) 76 (78) sts. Work in St sts for 6 rows.
Decrease row (all):
\*k1, skpo, kto 3 sts before end, k2tog, k1 = 2 sts decreased. Work 7 rows even. Repeat decrease row\* repeat from \* twice = 3 decrease rows: (54) 64 (68) 70 (72) sts. Work even until piecemeasures A) (9) 10 (11) 12 (13) cm/(3.5) 4 (4.5) 4.75 (5)" B) (8) 9 (10) 11 (12) cm/(3.25) 3.5 (4) 4.5 (4.75)" from CO edge, ending with a RS row. Size O-1 months:this will be right after the last decrease row. You will now be working back and forth on the (16) 18 (20) 20 (20) center stitches in St st. As you work ahead, you will be consuming the side stitches, and at the same time work decreases for the neck. As you work along, you'll notice that you can remove the markers, as it will be clear to you where each row ends. Begin like this though: Row 1: k (34) 40 (43) 44 (45), PM, skpo. Turn. (Keep turning at the end of each row) Row 2: Slip 1, sl m, p(14) 16 (18) 18 (18), PM, p2tog. \*Row 3: Slip 1, sl m, kto marker, sl m, skpo Row 4: Slip 1, sl m, p to marker, sl m, p2tog Row 5: Slip 1, sl m, k to marker, sl m, skpo special Row 6: Slip 1, sl m, p to marker, sl m, p3tog Row 7: Slip 1, sl m, k to marker, sl m, skpo Row 8: Slip 1, sl m, p to marker, sl m, p2tog\* Simultaneously decrease the center stitches when heel/saddle measures 3-4 cm/1.2-1.6" (smaller sizes=low number), ending with a WS row. \*Slip 1, k1, skpo, knit until 4 sts before m, k2tog, k1. Work (7) 7(9) 9 (9) rows even\* repeat Repeat between Row 3 - Row 8 until all side sts are consumed. Last row will be a WS row.
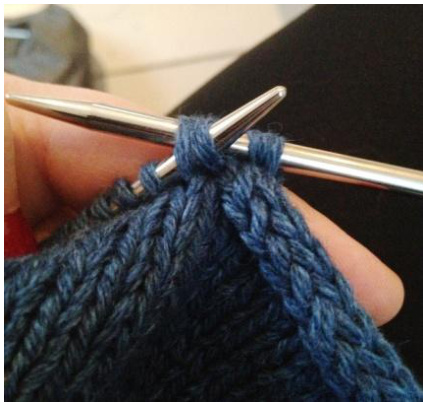
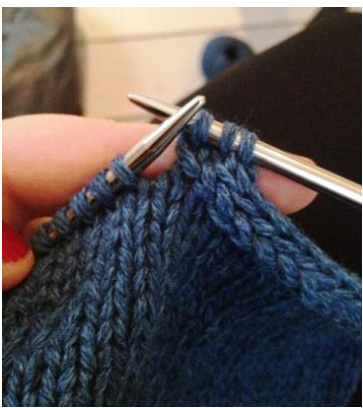
I-cord bind off:
Pick up and purl 18 (20) 20 (20) sts along the right side - ie pick up 3 out of 4 rows. Break yarn. Slide sts to other side of the needles. With RS facing and working yarn, pick up and knit 18 (20) 20 (20) sts along the right side. Break yarn. All neck sts should nowbeonthesameneedle. A. With smaller needles and working yarn, CO 3 sts and work a 25cm/10" long I-cord. Slip these 3 sts onto the circular needle with the neck sts from right, RS facing. Work an I-cord bind offlike this \*k2, k2tog through back loop, slip 3 sts back to the left hand needle\* repeat between \*-\* until 1 sts is left from the front = 3 sts. Change to smaller needles and work a 25cm/10" long I-cord. Break yarn. B. Work an I-cord bind off like this \*k2, k2tog through back loop, slip 3 sts back to the left hand needle\* repeat between \*-\* until 1 sts is left from the front = 3 sts. Break yarn.
Pattern and photos are Gralina Frie. This patterns is for personal and non-profit use only. Please contact me if you'd like to sell items made from this pattern.
Finishing
I-cord front edging (Version B):
With US 6 - 4.0mm needles and working yarn, C0 3 sts and work a 25cm/10" long I-cord. Carefully unravel the scrap yarn and slip sts onto the circular needle from left. Work an I-cord BO like this: \*[k2, k2tog through back loop, slip 3 sts back to the left hand needle]repeat 7 times, k2, k3tog through back loop, slip 3 sts back to the left hand needle, repeat from \* until all stitches are consumed. Work a 25cm/10" long I-cord.
Crochet picot edging (Version A):
With a 2.5mm crochet hook and a contrasting colored yarn (preferably lace weight) and RS facing, join yarn at right edge: \*Chain 2, skip 1 loop (from the CO edging) and work a picot [sc 1, chain 2, sc 1] into the same loop\* repeat between \*-\* to end.End witha sl st.
Embroidery "Twig" (optional):
With a contrasting colored yarn and a tapestry needle, work a combination of back stitches and chain stitches across the fabric. Don't bother counting stitches or anything - just picture roughly where you'd want to go and go there with back stitches. When you're there, work 3 chain stitches spread out like a little flower. Add one or two French knots outside the flower. Weave in the ending. Add one or two shorter twigs with flowers.
Weave in the ends. Block if necessary. Good luck! nicofrie@bjarenet.com Pattern and photos are @ Gralina Frie. This patterns is for personal and non-profit use only. Please contact me if you'd like to sell items made from this pattern.


