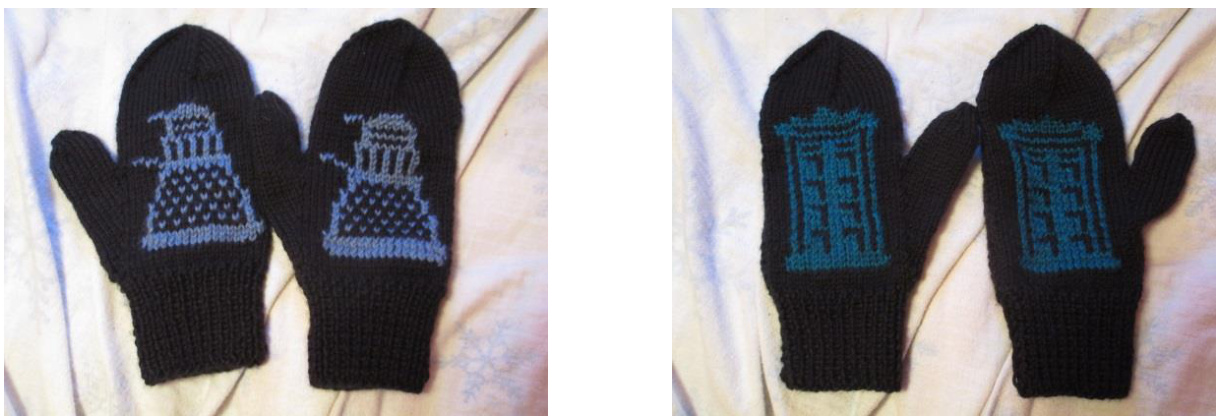
The Daleks Have the TARDIS Mittens for Men
Designed by Amanda Brown
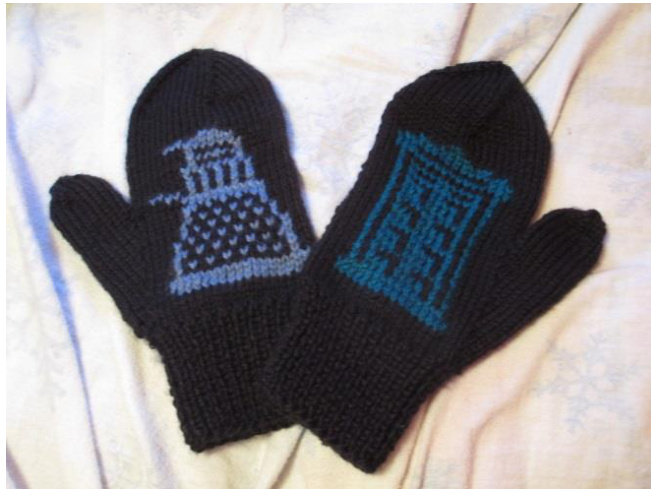
Both mittens are the same, with a Dalek on one side and a TARDIS on the other, so you can "EXTERMINATE!" the cold this winter. Who knows? Maybe the Doctor will approve and show up.
Materials:
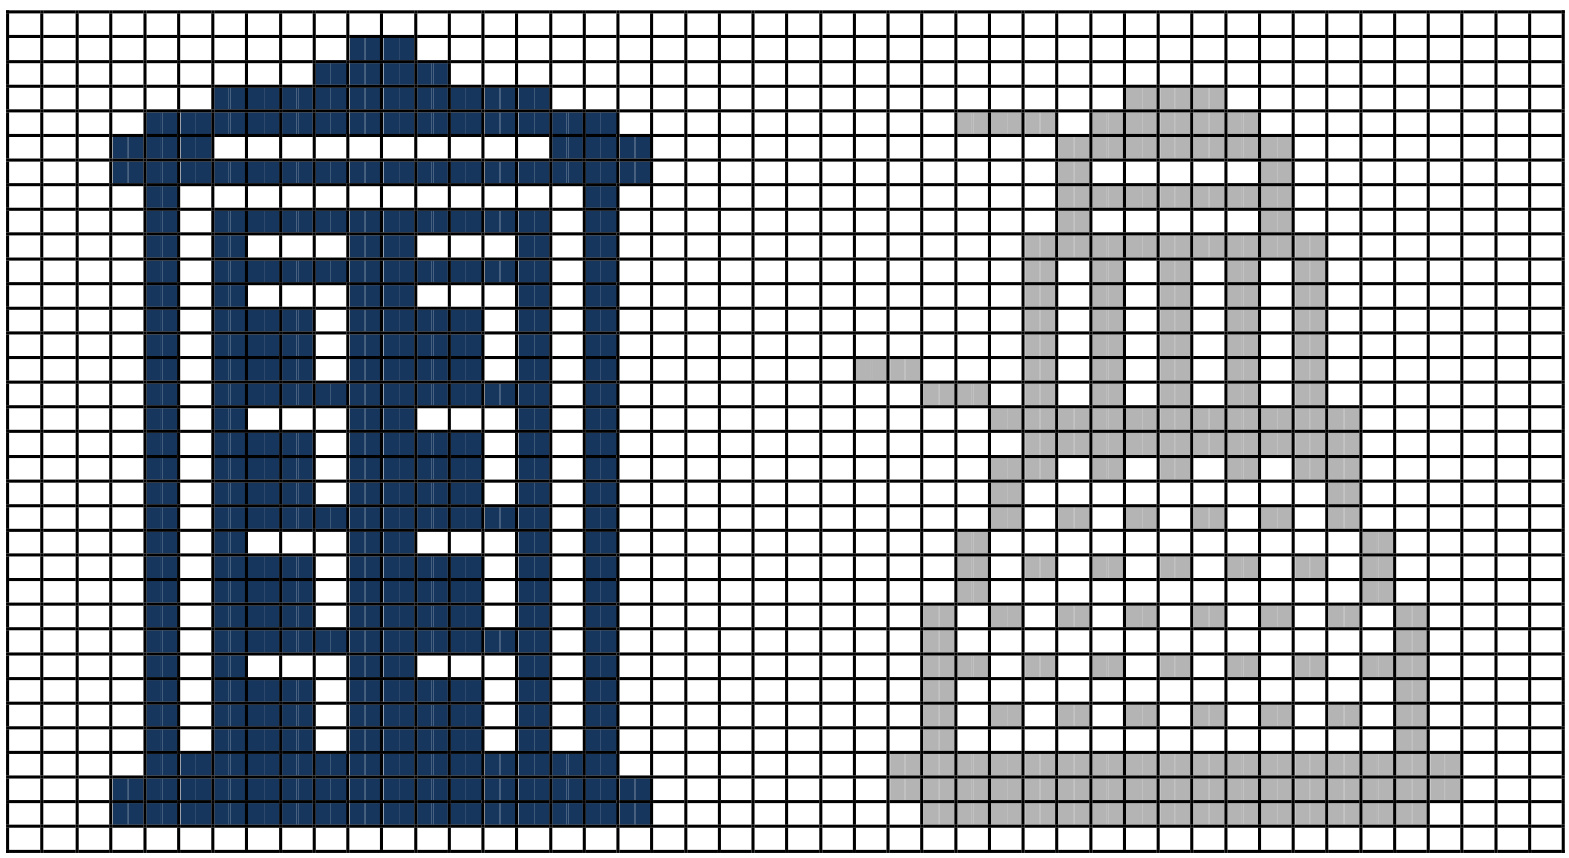
Less than I skein each of: Caron Simply Soft Eco (4 Medium Worsted weight, 80% acrylic 20% polyester) in Black (0034) and Denim Wash (0025) Caron Simply Soft (4 Medium Worsted weight, 100% acrylic) in Pagoda (0014) Size US 7 straight needles Set of 5 size US 7 double-pointed needles Waste Yarn Yarn Needle 2 Stitch markers (optional) ge: Approximately 5 stitches and 6 rows to I inch. Exact gauge not necessar Finished Size: Men's large, fits a 9" hand circumference (To make a smallr size, use a finer gauge yarn and smaller needles. I hope to have a women's size written up soon!) Abbreviations: k: knit number of stitches indicated p: purl number of stitches indicated S: slip number of stitches indicated (as if to purl, unless otherwise noted) ml: make I stitch pm: place stitch marker sm: slip stitch marker k2tog: knit two stitches together yo: yarn over Directions: Cuff Using black yarn and straight needles, cast on 46 stitches Work in kl pl ribbing for 3 inches, slipping the first stitch of every row Mitten Body Knit one row, increasing I stitch two stitches before the end of the row. This knit side is now the "right side." Next row (wrong side): sl, k22, pm, ml, pl, ml, pm, k23 Increase round: DO NOT WORK THIS ROUND UNTIL INDICATED IN THE PATTERN Wrong side: sl, p to first marker, sm, ml, purl to second marker, ml, sm, p to end of row Continue working in Stockinette stitch (knits on right side, purls on wrong side), slipping the first stitch of each row. Work the increase round every third row. Begin working the Dalek and TARDIS color chart on the 6"h row after the cuff, keeping in mind that the thumb gusset stitches (the stitches between the markers) will occur between the Dalek and TARDIS, and they are not shown on the chart. Continue in this manner until there are I7 stitches between the stitch markers. On the next row, transfer the stitches between the markers to waste yarn using a yarn needle threaded with the waste yarn. Remove the markers, YO once to bridge the gap, and continue working the chart until it is completed. Then continue to work in Stockinette stitch with black yarn only until the mitten body (Stockinette portion alone, not including the cuff) measures 6 % inches, ending with a wrong-side row. Dalek and TARDIS Color Chart Work from bottom to top, right to left on right-side rows and left to right on wrong-side rows
Shaping the top ot the mitten: Next row (right-side): knit allstitches onto 4 double-pointed size US 7 needles as follows: Needle I: 12 stitches, Needle 2: Il stitches, Needles 3&4: I2 stitches. Join into a round and knit one round. 2"d round: Knit to last two stitches on Needle I, k2tog. Knit allstitches on Needle 2. Knit to last two stitches on Needle 3, k2tog. Knit to last two stitches on Needle 4, ktog. 3rd round: knit all stitches 4"h round: All needles: knit to last two stitches on needle, kK2tog. Repeat rounds 3 and 4 until 24 stitches remain. Then work round 4 until 8 stitches remain. Break yarn, leaving a 6-inch tail. Thread the yarn needle with the tail and drawn tail through the remaining 8 stitches. Pull tight and weave in end. Thumb: Using black yarn and double-pointed needles, pick up stitches on waste yarn plus I stitch previous cast on to bridge the gap over the thumb (18 stitches total). Distribute the stitches evenly onto 3 double-pointed needles. Knit around until the thumb measures 2" from where you picked up the stitches. Then work as follows: Round I: On all needles: k2tog, k to end of needle Round 2: knit all stitches Repeat around I until 6 stitches remain. Break the yarn, leaving a 6-inch tail Thread the needle with the tail and draw the tail through the remaining 6 stitches as with the top of the mitten. Pull tight and weave in end.
Fishing
Turn the mitten inside-out and weave in all loose ends. Sew up the side of the mitten either with the tail left from casting on or with a separate piece of yarn. I recommend pinning the side before you sew to make sure the edges line up. Make two mittens and enjoy. Happy Exterminating!