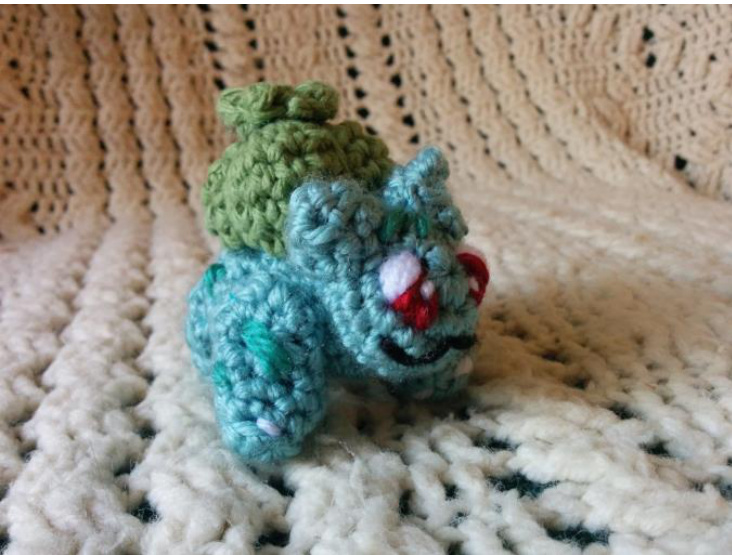
Mini Bulbcscur Plushie/Keychcin
Pattern by Kate Graff, GrafficDesigns. Bulbasaur is @ to the Pokemon franchise, owned by Nintendo. This pattern is not to be sold or meant to infringe on these rights.
Make sure to check out the full sized version too!
http://www.ravelry.com/patterns/library/bulbasaur-7
You will need:
3.5mm Ehook Worsted weight light blue, green, and small amounts of white, red, and green-blue yarn. (l used Red Heart Soft Seafoam and DeepSea, Lilys Sugar'n Cream green ) Tapestry needle PolyFill stuffing Needle & thread Optional: straight pins (for holding parts in place while sewing and for using to mark ou the embellishment embroidery templates) Optional: keychain parts (I disassembled a lanyard I got on sale) rtant in this pattern, as long as the stuffing isn't showing through. This pattern is made out of separate body parts that will be sewn together as you go. The major detail work (face, spots, toes claws) are made by embroidery techniques, for tips and tricks on embroidery, check out this youtube video: https://www.youtube.com/watch?v=dgLGEXUSQA
Terms:
-SC : single crochet -SCDEC: single crochet decrease (I like to use the invisible technique: https://www.youtube.com/watch?v=GPnlY YNC1oU) -HDc: half-double crochet -SLP: slip stitch -BLO: Back Loop Only -FL: Front Loop
Bulb:
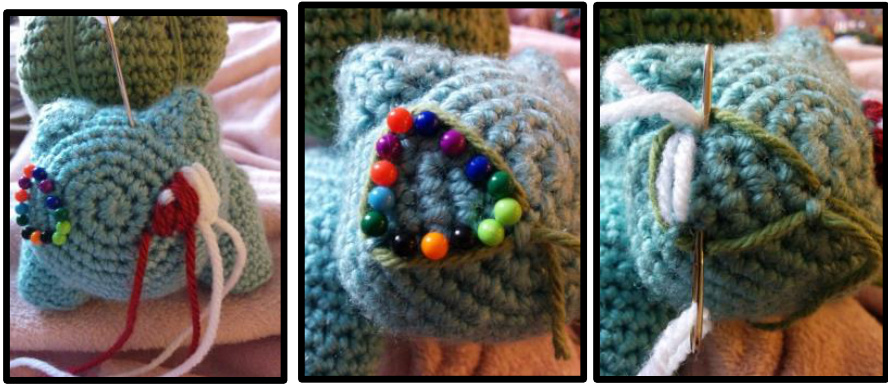
1. Magic ring, chain one, 6 sc in middle. Slp to close ring. 2. \*2sc\* around (12) 3. \*sc, 2sc\* around (18) 4-6.\*sc\* around (18) 7-8. \*sc, sc, scdec\* around (10). Stuff inside. 9. In BLO, \*scdec\* around. (5) Finish off. 10. Insert hook through exposed FL created in round 9, and SC around. (5) 17.\*slp, 2hdc\* around, and finish off. To create the leaf lines, using tapestry needle and the green yarn, attach to bottom of bulb nd stretch yarn up and through the bulb tor leaf and continue down the other side. Make tight and continue for the other two egments.
Body:
1. Magic ring, chain one, 10sc in middle. Slp to close ring 2. \*2sc\* around (20) 3. \*sc, 2sc\* around (30) 4. \*sc\* around (30) 5. \*sc\* around (30) 6. \*sc, scdec\* around (20) 7. \*scdec\* around (10) stuff the inside and finish off. There will be an opening to this segment. When you attach to the bulb, place the bulb bottom point inside the opening and sew together.
Head:
1. Magic ring, chain one, 7sc in middle. Slp to close ring 2. \*2sc\* around (14) 3. \*sc, 2sc\* around (21) 4. \*sc\* around (21) 5. \*sc, sc, sc, scdec\* around (17) 6. \*sc, scdec\* around (12) stuff the inside, Finish off. Attach to the body by sewing the opening (neck) to the body Ears: (makes a shallow cone) 1. Chain 9 and slp through the first loop (creating a circle) 2. \*sc \* (9) 3. In BLO, \*scdec\* around until there are no more stitches to decrease. Finish off. Turn inside out and stuff (just a smidgeon, it falls out easily). Attach by sewing to the head.
Legs: (make 4)
1. Magic ring, chain one, 8 hdc in middle. Slp to close 2. In BLO, \*sc\* around 3-4. \*sc\* around 5. .Sc in next 4 stitches, chain one and turn. 6. sc 4, chain 1 and turn 7. Slp 1, sc 2, chain 1 and turn 8. Slp 1, sc 1, slp around entire circumference (evens up the stitching around). Stuff the inside, finish off. have .5 (1, 1, 1, 1.5, 1.5, 2, 2) inches from bottom of garment. ;teps 5-8 will be the upper thigh areas) Finishing touches: Using tapestry needle and appropriate yarn colors, embroider the eyes, mouth and spots.