Slanted Skirt
by Tanja Osswald
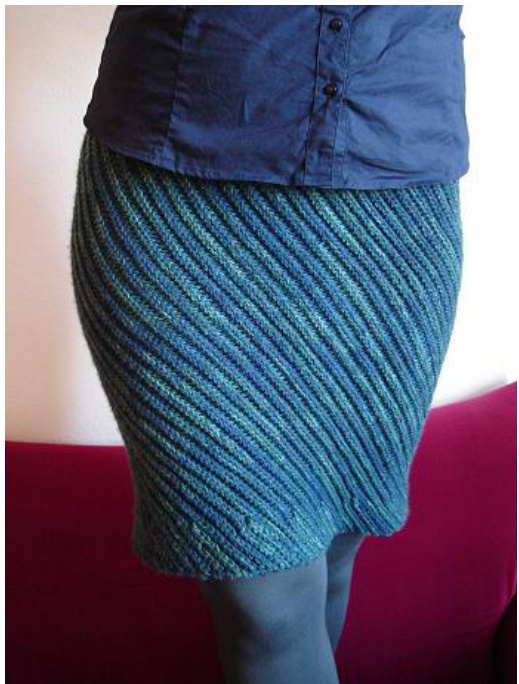
The pattern for this skirt evolved in 2009 from my mittens and baby socks without heels - if slanted crochet can make up for a heel, it should be able to accomodate for the curves a skirt covers. Voila, a pencil skirt without having to do the hip shaping. This skirt is worked in rows, from side to side. The diagonal ribs ensure a good fit.
step 1: Choose a yarn
Basically, you can make this skirt from any yarn you like. Do keep in mind that is it for a skirt, though - you are going to sit on it - it will get more wear and tear than a sweater or a cardigan. My three favorite skirts are made from a rayon/ cotton/ linen blend, from regular sock yarn and from sock yarn that is based on cotton. The sock yarns are worked with three resp. two strands held together. Choose the yarn matching the occasions you want the skirt to wear to: something light for summer to be worn without tights? The choose a yarn that feels good on your legs. Something to fizz up cold winter days? Choose a yarn that keeps you warm.
step 2: Choose a stitch
This skirt's construction works with any stitch that stretches vertically- you could even knit it if you have to. Some suggestions that create a nice ribbing: · blo sc: single crochet into the back loop only · dc worked into the back loop and the horizontal bar beneath.
step 3: Make a swatch
You are decided on the yarn you want to use and the stitch you want to work in? Now, grab you collection of hooks and start swatching. What you want to achieve is a stretchy fabric that is not see-through (if all else fails, you can sew in an underskirt, of course) and that is the right tickness. If your yarn is too fimsy, take two or more strands together. For sc and dc sts, you can stay close to the hook size suggested with the yarn for your first swatch. For slip stitches, be prepared to use a way larger hook - your personal tension has enormous influence on the hook size. Keep in mind: The people who put the information on your yarn won't wear your skirt. Feel free to temper with the hook size until you have a fabric you like. To actually make the swatch, follow the instructions in step 6, just with fewer sts (around 30 might be good). You can switch hooks during one swatch but be careful to take your measurements from the part that is worked with the hook you want to use in the end.
step 4: Take a measure
You need two measurements: 1. The length your skirt is supposed to have, starting from where you want the skirt to sit on your waist or on your hips down to wherever you want it to end. With all the stretchiness involved this might not be the exact length you end up with but you can adjust by wearing the skirt a bit higher or lower. To decide on a length, try on some skirts you already own and check which length makes your legs look best (if you have a skirt in the perfect length, you can measure out that, too). For me, that is slightly above the knees. For a skirt that is considerably longer than that, you have to plan in a slit or increases. Check the variations for that. 2. The second measurement is the widest circumfence the skirt shall cover. If you are not sure where the widest point of your hips and tights is, take a non-stretchy string, tie it into a loop and try to put it up to your waist. Easy? Make the loop smaller. Not possible? Widen the loop. Just possible? Measure the length.
step 5: Do the math
Take you swatch and stretch it, as you want the finished skirt to be stretched on you. Put it in front of you such that the slant goes from lower left to top right, the ends of rows being at top and bottom. Place three pins as follows: two pins ten centimeters apart, parallel to the bottom edge. Place one more ten cm up from the right pin (see photo). Count the rows between the first two pins (along the red line in the photo). This gives you the number or rows your skirt will need. Count the stitches from the third pin down to the height of the first two (along the yellow line in the photo). This gives you the number of stitches to start with.
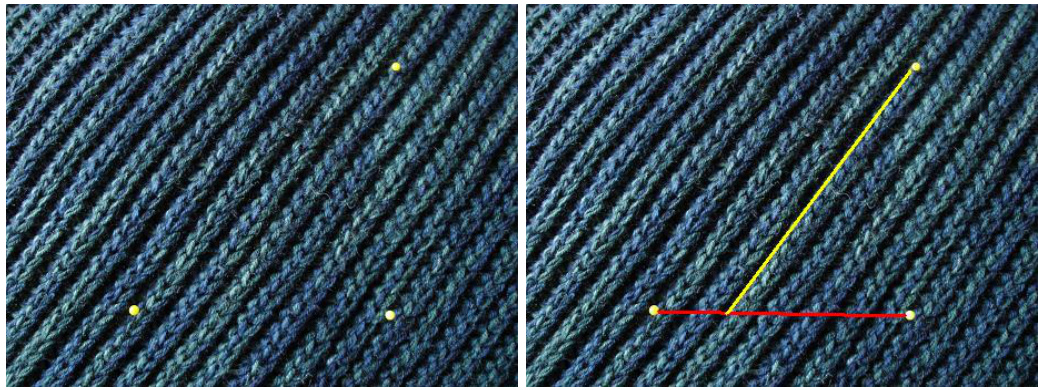
Figure 1: counting stitches on the swatch Use these to calculate your skirt according to your measurements from step 4. An example: Say, your skirt shall be 1m in circumfence and 60cm in length. Your row count was 16 rows to 10cm and your stitch count was 24sts to get 10cm of height. Thus, your skirt will have 10 x 16rows = 160rows and 6 x 24sts= 144sts. Note that all these calculations can still be tweaked, later. But the more careful you are with swatching and measuring, the less tweaking you will need later.
step 6: Crochet away
Make the number of chains you decided on in step 5, plus one. In the example, that would be 145 chains. Work the following in your favorite stretchy rib stitch; I'll just write 'st' here. A note about turning chains: When in doubt, make a turning chain more than you think you need. You are working a parallelogram, so the sides are not going up straight and you need some extra give to span the diagonal. Otherwise, you might end up with a nice stretchy fabric that has a very tight upper and lower end. So, turning rows with slip stitches: Make one chain. Turning rows with sc: make two chains. Turning rows with hdc: make three chains. etc. This extra chain is nice to work into for increases, too. 1. row: st all 2. row: work 2sts tog., st to end, st 1 into the turning chain of the previous row. epeat rows 1 and 2 to the number of rows you calculated in step 5, end with a row 1
step 6a: try and tweak
When the edge is long enough to go around your hips, start trying on now and then. That is, provisionally close the skirt by joining the beginning chain to the current row (e.g. by putting in a tie every couple of cm) and put it on. Perfect fit? Go to step 6b. Too tight? Add some more rows. Too short? Add some more rows; the less stretching, the longer the skirt.
step 6b: closing
You have made a parallelogram now (see sketch below). It is closed by joining the beginning chain of chains to the last row you made (that is the side labeled with "A"” to the one labeled with "B" in the sketch). Decide which side is the outside and close the seam on the inside. Which method you use - sewing, slip stitching - is dependent on the st you use and how you like your seam. To avoid a jog, work 2sts into one at both ends, switching the two and the one part, so you keep in line with the parallelogram (if you are unsure which side to hold in - try a version and see whether it looks good or pronounces the jog).
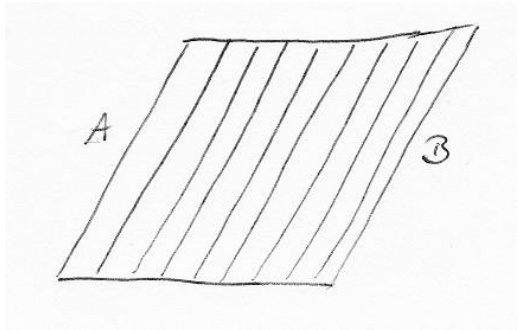
Figure 2: parallelogramm
step 6c: finishing
Break yarn and sew in ends. Make a chain of chains and thread that through the top of the skirt as a closure. Wearhappily.
Variations
ruffe 1: short rows
One way to create a ruffe is to use short rows. In the green skirt, I made the ruffe ten sts high and placed one short row after every six rows (three ribs). That is: After row 2, work ten sts, turn with at turning chain, dec 1, work to end, 1st into the turning chain. Turn, st all the row, for the 11th st, insert the hook into the turning chain and first st that was not worked in the short row. If you use a higher st that sc, adjust the end of the first short row to avoid a bump For a more pronounced ruffe, work all hem sts in a different st that is not stretchy, e.g. F and iB for slip stitches, fo sc for sc. The hem will be less stretchy and with the extra rows ruffe more.
ruffe 2: add slant
The second way to create a rufle is to repeat the construction idea of the skirt: by slanting the rows, each row becomes shorter and gives more circumfence. In practice, the pattern will look something like this: 1. row: increase 1, st 10, work 2sts tog., st to end (one increase, one decrease) 2. row: work 2sts tog., st to 11 sts from end, work 2sts tog., st to end, st 2 into the turning chain of the previous row. (two decreases, two increases) You can add fare by increasing the number of increases and decreases per row.
longer skirt 1: faring out
Calculate the circumfence of the skirt as explained in step 5 to just above the knees and for the rest of the skirt length, work a long ruffle with enough increases to let you walk comfortably.
longer skirt 2: work a slit
You can add a slit, too. With the stretchiness of the pattern, the slit will be open permanently. Don't add a ruffed hem for this version. How to do the slit: Decide on where the slit is going to start (make a drawing where you can add in the numbers). As soon as you have passed the end of the slit, place a marker and continue crocheting the same hem edge as before. Each time you reach the marker, decrease one, both on even and odd rows. You will end up with no sts. Rejoin yarn and continue at the other side of the slit, increasing each row. Note: I have not test-crocheted this version, it might turn out awful. Don't plan in a large slit; there will be too much distortion.
straight part at top
If you want to have a smaller waist, you can work the top rows straight. You just have to make a tiny adjustment to the second row in step 6: Work five sts, work 2sts tog., st to end, st 1 into the turning chain of the previous row.
straight all the way
In case you don't like slants, you can work the skirt all straight. In the pattern, that means you work a regular rectangle, no increases or decreases. Be sure to measure carefully for this version; it hugs your curves less so you have to be more exact in starting out right.
more slant
Increase and decrease in every row (all the increases on the one side, all the decreases on the other side). This is a good option if you use a tall st, like dc.
less slant
Work less shaping rows, not every second, but every nth row. Again, be careful to not mix increases and decreases. Copyright by Tanja Osswald. Please do not distribute this pattern and do not sell anything you made from it.


