Galaxy Clusters Doily by Susan Palmer
Crocheted and photographed by Frosty
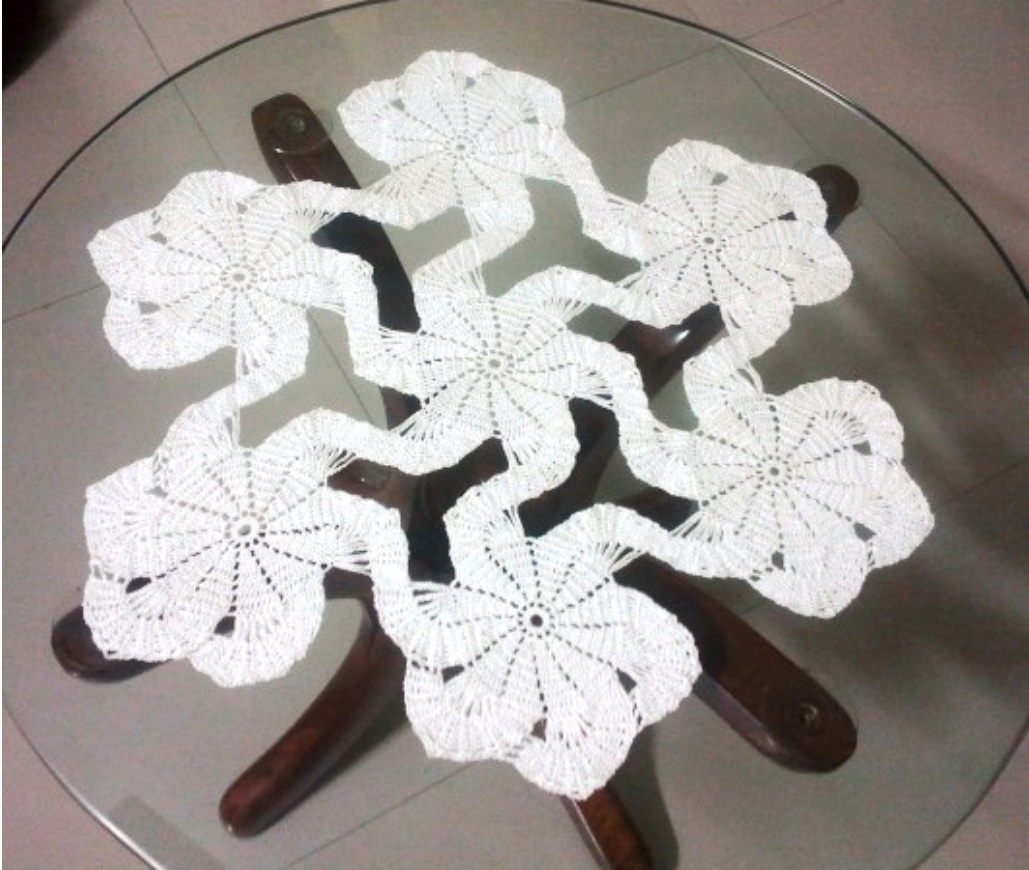
This crochet doily was inspired by a machine embroidery pattern published by Advanced Embroidery Designs (advanced-embroidery-designs.com). I consulted with them before posting my design to make sure it doesn't infringe on any copyright. They assured me that their copyright only covered the pattern for the machine embroidery design, not to patterns in other types of needlework. My thanks to Advanced Embroidery Designs for the inspriation, and to Frosty, one of my test crocheters for the featured photo. Thanks to all the wonderful ladies, all 64 or them, too numerous to list, who tested the pattern. This pattern would never have seen the light of day if it weren't for their hard work. This pattern is offered for free. You may copy it, give copies away, use copies in workshops, sell objects crocheted from the pattern, just not sell the pattern. It is my gift to the crochet world and not intended for profit by me or anyone else. My copyright is for the pattern for the two motifs which may be joined in a variety of ways. One is shown in the featured photo with a central motif surrounded by 6 additional motifs. Additional combinations are show in photos at the end of the pattern. Susan P. Palmer, Albuquerque, NM Note: all directions are given in American/Canadian crochet terms. British/Australian crochet terms double crochet treble crochet double treble slip stitch chain Sc = single crochet dc = double crochet trbl = treble crochet sl st = slip stitch ch = chain
Description of Construction:
Each motif is made separately then joined together. The first 8 rows of the center wheel are crocheted in the round. On round 9, you will begin working back and forth. The center motif has 6 spiral arms with unattached end rows. The surrounding motifs have 3 spiral arms with unattached end rows and 3 spiral arms that are attached to adjacent spiral arms. materials: size 10 crochet thread, approx 1000 - 1200 yds US size 7 steel hook (4.5mm)
Center Motif
center wheel
ch 9, join in ring with a slip stitch rl: ch 2 (counts as 1 sc), 23 sc around ring, join last sc to 2d chain with sl st. (24 sc in ring including the ch 2) r2: ch 4 (counts as 1 dc and ch 2). Dc in next sc. \*Ch 2, sk 1 sc, dc in next dc. Repeat from \* 10 more times. Ch 2, join to 2"d ch of ch 4 with a sl st. (12 ch 2 spaces spearated by dc's) r3: sl st into ch 2 sp. Ch 2, 2 dc in same ch 2 sp. \*Ch 2, 3 dc in next ch 2 sp. Repeat from \* around. End with ch 2, join to 2"d ch at beg of rnd with a sl st. (3 dcs in each ch 2 sp separated by ch 2) R4: ch 2 (counts as 1 dc), dc in the next 3 dc's. \* Ch 2. dc in the 2"d ch of next ch 2, dc in next 3 dc. Repeat from \* around ending with ch 2, sl st in 2"d ch at the beginning of the rnd. (You should have 4 dc's over each 3dc group separated by ch 2) r5: continue established pattern with a dc in the 2nd chain and a dc in each of the dc's in the dc group with a ch 2 between. You will have groups of 5dc's separated by ch2. r6: repeat r4 except you will have groups of 6 dc's separated by ch 2. r7: repeat r4 except you will have groups of 7 dc's separated by ch 2. r8: repeat r4 except you will have groups of 8 dc's separated by ch 2.
Spiral arms
From this point on, you will be working back and forth in rows over two adjacent groups of 8 de's instead of in the round. Rb (right bridge): sc in sc, hdc in hdc, dc in each of the next 4 dc's. Trbl in next trbl and top of ch 4. Ch 4, turn. left bridge): Trbl in trbl, Dc in each of the next 4 dc's, hdc in hdc, sc in s You should now be at the beginning dc of an 8dc group. r9: ch 3 (counts as dc), dc in next 7 dc's. Ch 3, sl st into the first and second dc of the next 8dc group of the center wheel, ch 4. Turn. R10: sc in 1st dc, hdc in next dc, dc in each of the next 4 dc's. Trbl in next dc and top of ch 4. Ch 4, turn. (the turning chain serves as a trbl) R11: Lb, Ch 5, sl st in next dc of the center wheel 8-dc group, ch 6. Turn. R12:Rb R13: Lb, Ch 7, sl st in next dc of the center wheel 8-dc group, ch 8. Turn. R14: Rb R15: Lb, Ch 8, sl st in next dc of the center wheel 8-dc group, ch 9. Turn. r16: Rb r17: Lb, Ch 9, sl st in next dc of the center wheel 8-dc group, ch 9. Turn r18: Rb c in each of the next 7 sts, Ch 9, sl st in next dc of the center wheel, ch 10. Tui r20: dc in each of the next 8 dc's. Fasten offleaving a long tail for grafting. The first 8-dc group has a spiral arm with chains that attach it to the top of an adjacent 8-dc group. (See Fig. 1) Attach thread to the beginning of the third 8dc group (arrow #2 in Fig. 1). Repeat rows 9-20 to create the next spiral arm. Create the remaining 4 sprial arms attaching thread at arrows 3, 4, 5, and 6 shown in Fig. 1 to begin each.
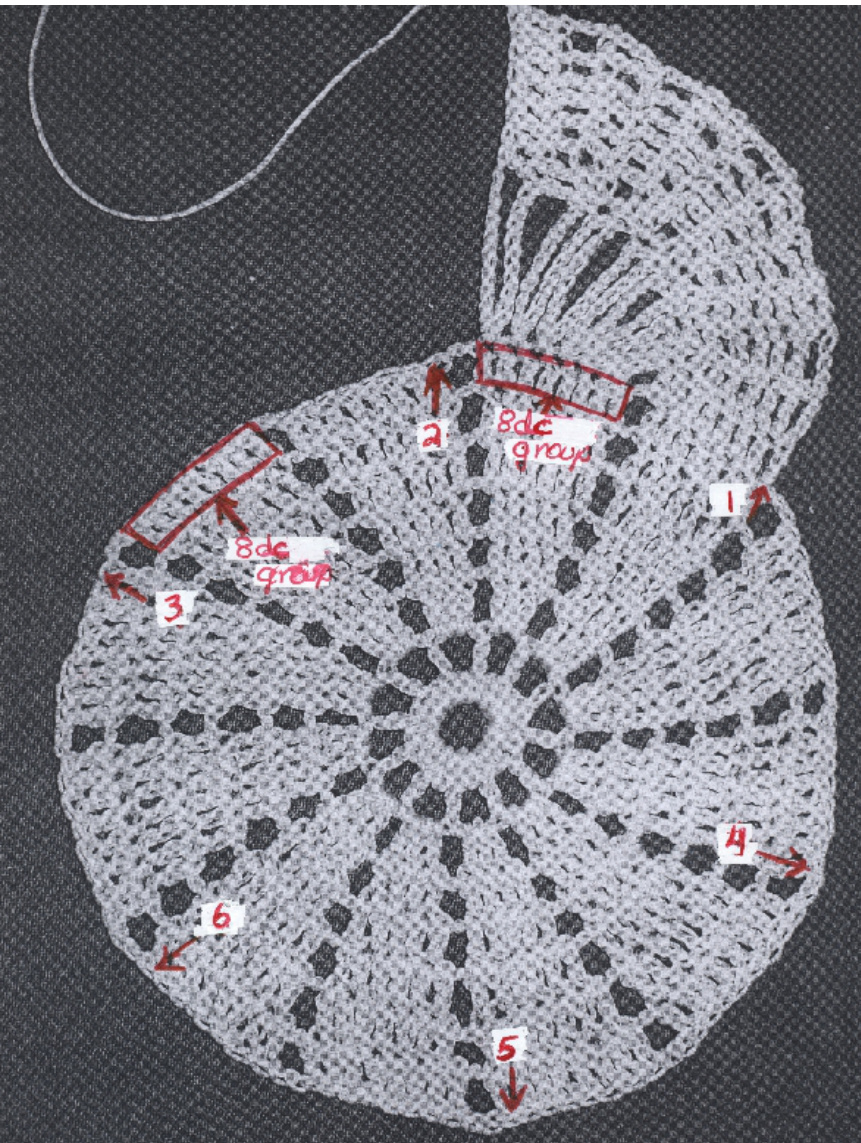
Fig. 1
Outer Motifs make 6
Follow directions for a center wheel making 3 adjacent spiral arms on the center wheel as before starting at arrows #1, 2, and 3 in fig. 1. For the remaining 3 spiral arms (attaching thread and starting at arrows 4 for the first, then 5, then 6), work the following rows: r9: ch 3 (counts as 1 dc), dc in next 7 dc's. Ch 3, sl st into the first and second dc's of the next 8dc group of the center wheel, ch 4. Turn. R10: sc in 1st dc, hdc in next dc, dc in each of the next 4 dc's. Trbl in next dc and top of ch 3. Ch 4, turn. (the turning chain serves as a trbl) R11: Lb, Ch 5, sl st in the third dc of 8dc group, ch 6. Turn. R12:Rb R13: Lb, Ch 7, sl st in next fourth dc of the 8 dc group, ch 8. Turn. R14: Rb. R15: Lb, Ch 8, sl st in next dc of the 8 dc group, ch 9. Turn r16: Rb r17: Lb, Ch 9, sl st in next dc of the 8 dc group, ch 9. Turn r18: Rb r19: Lb, Ch 9, sl st in next dc of the 8 dc group , ch 8. Turn. r20: Rb r21: Lb, Ch 7, sl st in next dc of the 8 dc group , ch 6. Turn. r22: Rb You will now start joining the spiral arm you just finished (from now on refered to as arm A) to the adjacent spiral arm, from now on referred to as arm B by working back and forth between the arms. 1. On A, dc in the next 7 dc's, ch 2, sl st into the top of the last stitch on row 10 of B. Slip stitch up the edge of the row to the top of row 11. Ch 3, turn. 2. slip stitch in 3rd dc on the last row of A. Slip st over the next 2 dc, ch 3, turn. 3. Slip stitch into the top of the stitch at the end of row 12 om B. Sl st up the side of the row to the top of row 13. ch 3, turn 4. and slip st into top chain at the end of the last row on A. Fasten off and weave in thread ends
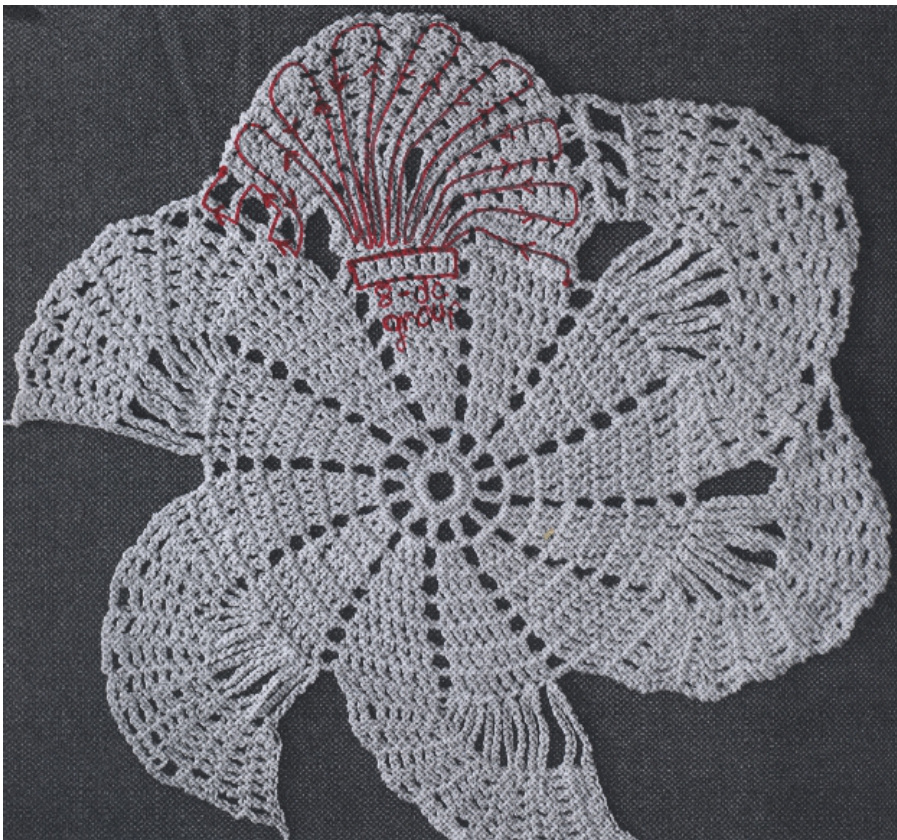
Fig. 3: a crude diagram showing the direction the rows of the attached arms are worked. Repeat instructions for attached spiral arms 2 more times (start at arrows 5, and 6 in Fig. 1) to finish the motif. Make 5 more outer spiral motifs. When all motifs have been completed, join by whip stitching the spiral arms together using the long tails using the photo as an orientation guide. Weave in ends.
With Open Arms! - Modified Doily
Modifed vs. original version of the spiral arms.
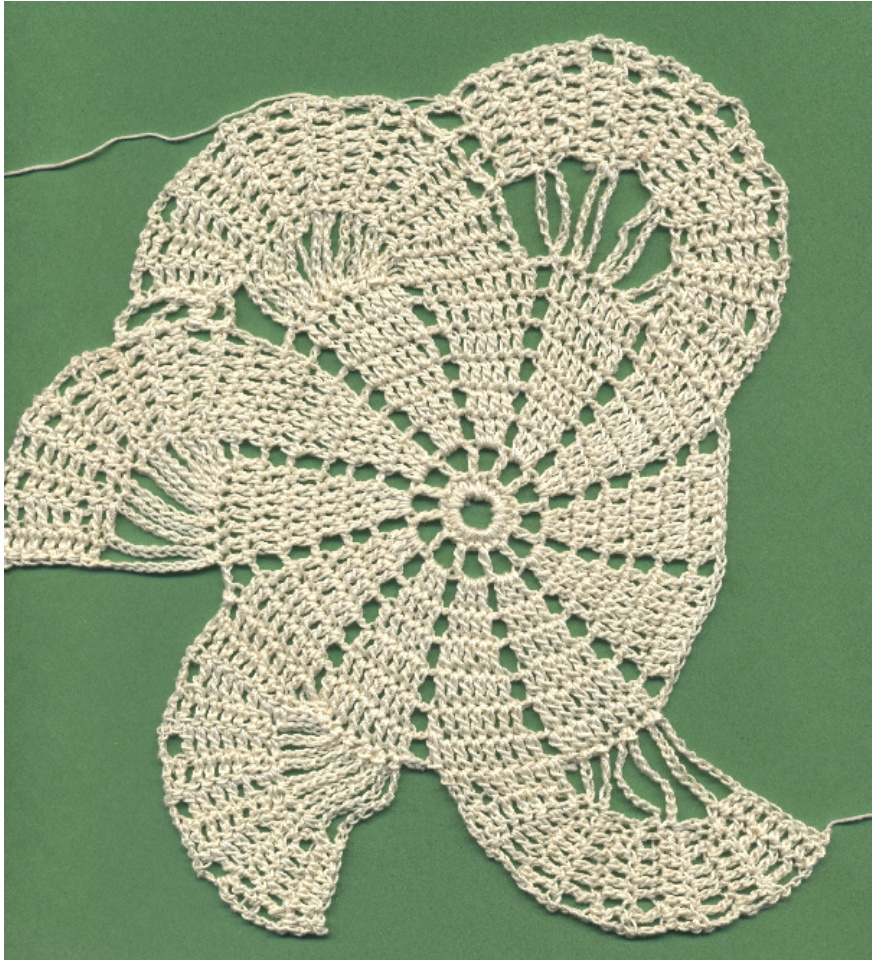
This motif shows a comparison of the modified spiral arms (attached and unattached on the right half of the motif) with the original spiral arms shown on the left half. The modified spiral arms spread out a bit more from the center wheel but because there are fewer chains, the spiral arm lhas a more open rather tha solid look. The instructions for making the center wheel are the same as for the original Spiral Arm doily. Please refer to those directions which cover rounds 1 - 8. abbreviations: BL1: trbl in 2nd trbl, dc in each of next 4 dc's, hdc in hdc, sc in sc. Ch2 BL2: trbl in 2"d trbl, dc in each of next 4 dc's, hdc in hdc, sc in 2nd ch of ch 2. Ch2 : hdc in hdc, dc in each of next 4 dc's, trbl in trbl and top of ch 4. Ch 4, turn.
Unattached Spiral Arms (make 3)
R9: ch 3 (counts as 1 dc), dc in next 7 dc's. Ch 2, turn. dc, dc in each of the next 4 dc's. Trbl in next dc and top of ch 3. Ch 4, turn. (tl turning chain serves as a trbl) R11: BL2, ch 4, sc in first dc of 8 dc group. S1 st to 3rd dc, ch 5 turn. R12: Rb R13: BL1 R14: Rb R15: BL2, ch 7, sl st in next 2 dc's of 8 dc group, ch 9, turn r16: Rb r17: BL1 r18: Rb2, ch 9, sl st in 4" and 5th dc's of 8 dc group. Ch 9, turn r19: BL2, ch 9 sl st in 6t"h and 7th dc's of 8 dc group, ch 9. r20: dc in sc, hdc in next 4 dc's, trbl, and 4t ch of ch 4 r 21: BL1. Ch 8, sl st in last dc of adjacent dc group. Ch 7, turn. of the 8 stitches across the spiral arm. Fasten off leaving a long tail for graftin
Attached Spiral Arms (make 3)
Start first spiral arm at point 4 in fig. 1. Start next 2 attached spiral arms at points 5, and 6. repeat rows 9 - 19 above. r20:Rb r21: BL1. R22:Rb2 r23: BL2, ch 8, sl st in 8th dc of 8 dc group, ch 7, turn. r 24:Rb r25: dc in trbl, each of the 4 dc's, hdc, and sc R26: sl st in top of ch 4 of row 10 of adjacent spiral arm r27: sl st up the side of row 10 to the top of the row. Ch 2, turn r28: sl st in 3rd dc at the top of the spiral arm. Sl st to 5th dc. Ch 2, turn. R 29: sl st in top of row 12 of adjacent spiral arm. Sl st up the side of row 13 to the top of the row. Ch 2, turn. Sl st into last dc of the spiral arm. Fasten off.
Design possibilities for Spiral Motifs
Table Runner - For this version, you would need 2 motifs that have 6 open arms for the 2 center pieces, 6 motifs that have 3 attached and 3 unattached arms (3 motifs for each end) , and 2 motifs that have 4 unattached and 2 attached arms for the sides. Bedspread - start with a center motif that has 6 unattached arms. Surround it with 6 motifs that also have all arms unattached. Keep working out in successive rounds (or rows). The outer most round or row will be motifs that have 3 attached and 3 unattached arms. Simplest of all - single motif doily with either all attached or all unattached spiral arms.


