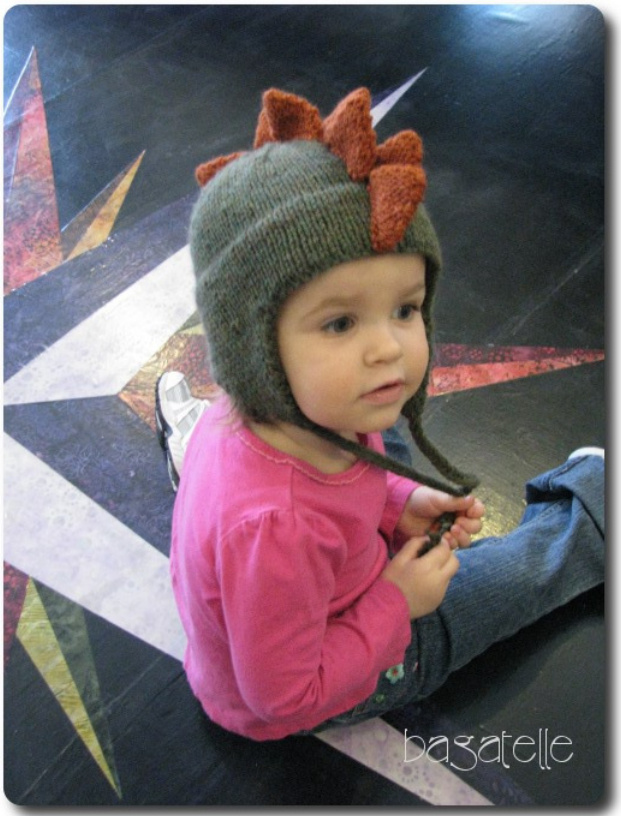
Dino Cap
This cap is based on Paula Roberts' original design for Eastport Alpaca. Used with permission from Louet North America.
Available Sizes - Newborn/2 years/3 years Yarn Requirements Plymouth Encore Worsted: Green #1466 % skein Pumpkin #456 % skein Needlesand Materials US 7 16" circular and double pointed needles US 6 16" circular Stitch markers Tapestry needle Sewing needle and thread (color does not matter) Gauge: 18 sts & 24 rows = 4 inches in stockinette stitch on largest needle.
Abbreviations
K: knit. P: purl. K2tog: knit 2 together. CO: cast on. BO: bind off.
Approximate Finished Size
Circumference (in inches) 14 17.75 19 Please read over all instructions before beginning to knit. The short-rows do not use wraps to fill in the spaces as they are pretty well concealed once the piece is folded.
Instructions
With size 6 needle cast-on 64/80/88 sts. Place round marker and join, being careful not to twist.
Lining and Earflaps
e earflaps are worked in short rows, with the remaining sts left on the needl Work approximately 2/2.5/2.75" (or desired depth to cover ears) in stockinette st. Begin working the first earflap as follows: P6/7/8, K15/19/21, turn. Next Row: P 15/19/21, turn. Next Row: K 14/18/20, turn. Continue working short rows, working 1 less stitch on each row, until 2/4/4 knit stitches remain. Next Row: P 2/4/4, turn. Next Row: K 3/5/5, turn. Continue in rows working 1 more stitch at the end of each row, ending last row with K 15/19/21. First earflap is complete. Continuing 0n, P 22/27/30, K15/19/21, turn. Work second earflap the same as first earflap on 15/19/21 sts just worked. Continuing on, P 6/8/8 to the end of rnd. Change to Us 7 circular needle and work in stockinette until the same depth as lining.
Joining the lining
Carefully pick up 64/80/88 stitches from the original cast on with the smaller needle. Join to main body of the hat by knitting one stitch off of each of the left needles as you would for a 3 needle bind off. Continue knitting in stockinette until the hat measures 4.5/5/5.5" from folded edge.
Shape Crown
Note: Change to double pointed needles when there are no longer enough stitches to work on circular needle. Decrease Round: K8/9, K2tog Straight round: K Continue decreasing every other round until 8 st remain. Pull tail through remaining stitches to secure and weave in all ends. Spikes - Make 11/12: CO 9/11/11 st. P 9/11/11, turn K 8/10/10, turn P 7/9/9, turn Continue until last row is P 1. Turn work. K 2, turn. P 3, turn. Continue until all of the sts have been worked (end P 9/11/11.) Bind off leaving last st on the right needle. Before pulling the tail through the last st on the needle, pick up (but do not work) 1 loop in the CO area. BO this new st and pull tail through. This gives a more finished look to the CO area. If using a long tail CO, it will look nearly seamless.Weave in the shorter ofthe two tails. Using the other tail attach the spikes to the hat at a slight angle to each other using a whip stitch. Pick up just the top leg of the st on the hat and very litle of the stitching will show on thewrong side.
Braids
To make each braid, measure 12 lengths of the MC that are 24" each. Using a tapestry needle with a very large eye, thread them over the center 2 stitches of the earflap. Braid each until approximately 2" remain. Using sewing thread and needle, stitch the yarn so that it is secure. Hold one end of the CC length-wise along the braid and wind around it to secure. When approximately %" has been covered (and all of the sewing stitches), thread the working end into the large tapestry needle and tuck the working end down through the portion of the braid that was just wrapped, securing it. Trim the CC yarn ends so they are flush against the wrap. Trim the end of the braid so the tassel is tidy.


