SPILLYJANEKNITS
Piggy Mittens
BY SPILLYJANE HTTP://SPILLYJANE.BLOGSPOT.COM
THE MITTENS
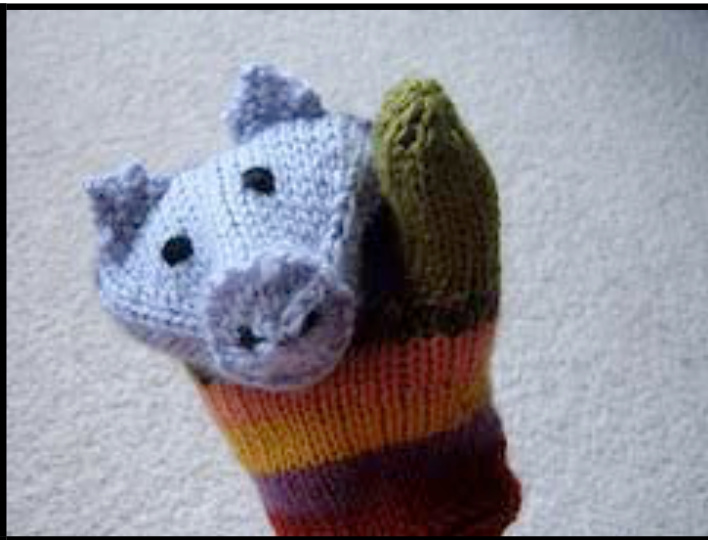
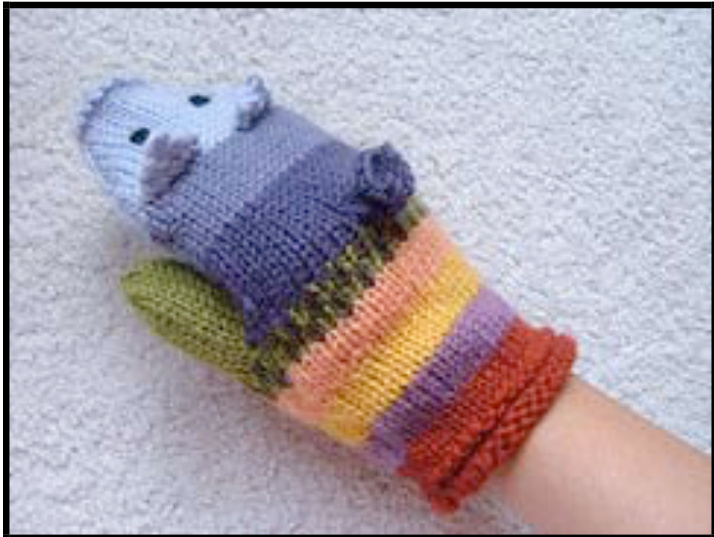
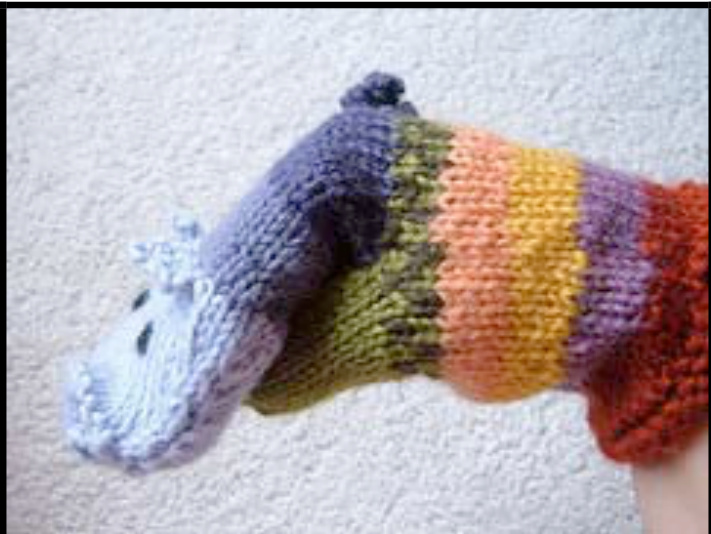
Whimsical multi-colour mittens with pig snouts, ears and curlicue tails. This is the perfect stash-busting project for you or your little one! Use as many (or as few) colours as you wish to create your own whimsical piggies.
SIZE
Hand circumference of 5.5", 6", 6.5", 7", 7.5", 8" - 2-4 years (Child's Small.) 4-6 years (Child's Medium.) 6-8 years (Child's Large.) 8 years+ (Women's Small.) Women's Medium, Women's Large, respectively. GAUGE 6 stitches and 7 rows = 1 inch (2.5 cm) in pattern
YARN
Odds and ends of worsted or DK weight yarn; it's up to you. Use as many or as few colours (or patterns) as you like. While there are no hard and fast rules for how much yarn you'll need, plan on using 200 yards worth for the largest mittens (Women's large.) Two 8" scraps of contrasting waste yarn for thumb placement (any of the other colours used in the mittens workswell.)
NEEDLES
One set of five (5) double pointed needles in US 5 (3.75 mm) or size necessary to obtain gauge.
NOTIONS
Stitch markers to mark beginning of round and/or designate palm from back of hand (not required, but could be helpful.) and a sewing needle to weave in ends.
THE PATTERN
PIGGY EARS (MAKE 4.ALL SIZES) Use 2 of the 5 dpns as regular straight needles to work the ears. Using dpns and colour of choice, CO 7 sts leaving a 12" tail. This tail will later be used to attach the ear to the back of the mitten. Prepare to knit flat as follows: Row 1 (Right Side): Knit 7. Row 2 (Wrong Side): Ssk, knit 3. k2tog. Row 3 (RS): Ssk, knit 1, k2tog. Row 4 (WS): Slip 1, kl, pass slipped st over, kl. Row 5 (RS): K2tog. Break yarn and draw end through last st to finish. Weave in this end ONLY. The tail left from the CO will be used to sew the ear to the rest of the piggy. PIGGY TAILS (MAKE 2,ALL SIZES) Use 3 of the 5 dpns as regular straight needles to work the tails. Using 2 dpns held together and colour of choice, CO 6 sts leaving a 12" tail. This tail will later be used to attach the tail to the back of the mitten. Carefully slip one of the 2 dpns out from the cast on row and prepare to knit flat as follows: Row 1 (Right Side): In each of the 6 sts on the needles. knit 1 in front, knit 1 in back, knit 1 in front. You will have a total of 18 sts once all 6 sts have been worked. Row 2 (Wrong Side): Bind off all sts purl-wise. Break yarn and draw through the last st to finish. Weave in this end ONLY. The tail left from the CO will be used to sew the tail to the rest of the piggy.
CUFF
With colour of choice, CO 33 (36,39, 42,45, 48) sts and divide evenly (or as evenly as possible) on 4 dpns. Join, being careful not to twist. Work the cuff in the following manner (cuff is the same for all sizes of mitten): Rounds l-6: Knit all sts. Round 7: Purl all sts. >NOTE: As the mitten is worked the first 6 knit rows will curl up to meet to Row 7 (the purled row.) When the mitten is complete, the curling edge may be sewn to the purled row if desired. This. however, is not necessary since theedgewill staytightly curled regardless.
PALM
Round 8 (and all other Rounds before the thumb): Knit all sts, alternating colours and adding simple colourwork patterns as desired (a 2x2 check pattern is a nice way to break up otherwise plain stripes.) Continue working mitten in Stockinette st until it measures 2.5" (3", 3.5", 4", 4.5", 5") from the bottom edge of the mitten. The thumb will be placed on the next row. >NOTE: As the right and left mittens are not identical in their thumb placement please take care to knit ONE of EACH and not two the same. It has happened! The thumb stitches will be knit onto waste yarn and will be picked up and worked later once the rest of the mitten iscomplete. > For the Right hand mitten: Determine which side of the mitten is going to be the palm. This needle will now be known as Needle 1. Knit the first stitch on Needle 1. Using an 8" scrap of contrasting waste yarn knit the next 6 (6. 7. 8. 8. 9) sts. Slip these stitches back onto the left hand needle and continue to knit in pattern. >For the Left hand mitten: Determine whcih side of the mitten will be the palm. The first Needle holding the palm stitches will be known as Needle 1. Knit across all stithcs on Needle 1. The next Needle holding palm stitches will be known as Needle 2. Make note of how many sts were knit onto waste yarn for the right thumb and knit until there are that many sts plus one stitch on Needle 2. Using an 8" scrap of contrasting waste yarn, knit the next 6 (6. 7. 8. 8. 9) sts. Slip these stitches back onto the left hand needle and continue to knit in patern. Continue knitting until mitten reaches the tip of the recipient's little finger (or desired length.) knitting to the end of the round. Proceed to finger decreases.
FINGER/SNOUT DECREASES:
Child's Small mitten decrease: Ensure that the stitches are placed as evenly as possible on the needles. Stitches should be placed as follows: > Needle 1: 9 sts. These are the first half of the palm stitches and the beginning of the round. > Needle 2: 8 sts. These are the second half of the palm stitches. > Needle 3: 8 sts. These are the first half of the backof-hand stitches. > Needle 4: 8 sts. These are the second half of the back-of-hand stitches. Decrease as follows: Round 1: (Needles 1 and 2) K2tog. knit 13, k2tog. (Needles 3 and 4) k2tog. knit 12, k2tog. (29 sts.) Round 2: Knit across all sts. Round 3: (Needles 1 and 2) k2tog. knit ll, k2tog. (Needles 3 and 4) k2tog. knit 10. k2tog. (25 sts.) Round 4: Knit across all sts. Round 5: (Needles 1 and 2) k2tog. knit 9. k2tog. (Needles 3 and 4) k2tog. knit 8. k2tog. (21 sts.) Round 6: Knit across all sts. Round 7: (Needles 1 and 2) k2tog. knit 7, k2tog. (Needles 3 and 4) k2tog. knit 6, k2tog. (17 sts.) Round 8: K2tog, knit across all sts. (16 sts.) Round 9: Purl all sts. This is the round that forms the ridge of the piggy's snout. Now prepare to work the snout. Continue decreasing in the following manner: Round 10: Knit 14, k2tog. (15 sts.) Round 1ll: Knit across all sts. Round 12: Knit 13. k2tog. (14 sts.) Round 13: Knit across all sts. Round 14: K2tog across all sts. (7 sts.) Break yarn and draw tail through these final stitches to finish. Using sewing needle draw tail inside mitten to be woven in later.Proceed to work thumb. Child'sMediummittendecrease:Ensure that the stitches are placed as evenly as possible on the needles. Stitches should be placed as follows: > Needle 1: 9 sts. These are the first half of the palm stitches and the beginning of the round. >Needle 2: 9 sts. These are the second half of the palm stitches Needle 3: 9 sts. These are the first half of the backof-hand stitches. > Needle 4: 9 sts. These are the second half of the back-of-hand stitches. Decrease as follows: Round 1: (Needles 1 and 2) K2tog. knit 14, k2tog. (Needles 3 and 4) k2tog. knit 14, k2tog. (32 sts.) Round 2: Knit across all sts. Round 3: (Needles 1 and 2) k2tog. knit 12, k2tog. (Needles 3 and 4) k2tog. knit 12, k2tog. (28 sts.) Round 4: Knit across all sts. Round 5: (Needles 1 and 2) k2tog. knit 10. k2tog. (Needles 3 and 4) k2tog. knit 10. k2tog. (24 sts.) Round 6: Knit across all sts. Round 7: (Needles 1 and 2) k2tog. knit 8. k2tog. (Needles 3 and 4) k2tog. knit 8. k2tog. (20 sts.) Round 8: K2tog. knit 6, k2tog. knit across rest of sts. (18 sts.) Round 9: Purl all sts. This is the round that forms the ridge of the piggy's snout. Now prepare to work the snout. Continue decreasing in the following manner: Round 10: Knit 16. k2tog. (17 sts.) Round 1l: Knit across all sts.
Round 12: Knit 15, k2tog. (16 sts.) Round 13: Knit across all sts. Round 14: Knit 1, k2tog across all other sts. (8 sts.) Break yarn and draw tail through these final stitches to finish. Using sewing needle draw tail inside mitten to be woven inlater.Proceed to work thumb. Child's Large mitten decrease: Ensure that the stitches are placed as evenly as possible on the needles. Sttiches should be placed as follows: > Needle 1: 10 sts. These are the first half of the palm stitches and the beginning of the round. > Needle 2: 10 sts. These are the second half of the palm stitches >Needle 3: 10 sts. These are the first half of the backof-hand stitches. > Needle 4: 9 sts. These are the second half of the back-of-hand stitches. Decrease as follows: Round 1: (Needles 1 and 2) K2tog. knit 16. k2tog. (Needles 3 and 4) k2tog. knit 15. k2tog. (35 sts.) Round 2: Knit across all sts. Round 3: (Needles 1 and 2) k2tog. knit 14, k2tog. (Needles 3 and 4) k2tog. knit 13. k2tog. (31 sts.) Round 4: Knit across all sts. Round 5: (Needles 1 and 2) k2tog. knit 12, k2tog. (Needles 3 and 4) k2tog. knitll, k2tog. (27 sts.) Round 6: Knit across all sts. Round 7: (Needles 1 and 2) k2tog. knit 10. k2tog. (Needles 3 and 4) k2tog. knit 9. k2tog. (23 sts.) Round 8: Knit across all sts. Round 9: (Needles 1 and 2) k2tog. knit 8, k2tog. (Needles 3 and 4) k2tog. knit 7, k2tog. (19 sts.) Round 10: Purl all sts. This is the round that forms the ridge of the piggy's snout. Now prepare to work the snout. Continue decreasing in the following manner: Round 1l: Knit 17. k2tog. (18 sts.) Round 12: Knit across all sts. Round 13: Knit 16. k2tog. (17 sts.) Round 14: Knit across all sts. Round 15: Knit 1, k2tog across all other sts. (9 sts.) Break yarn and draw tail through these final stitches to finish. Using sewing needle draw tail inside miften to be woven in later. Proceed to work thumb. Women's Small mitten decrease: Ensure that the stitches are placed as evenly as possible on the needles. Sttiches should be placed as follows: > Needle 1: 1l sts. These are the first half of the palm stitches and the beginning of the round. Needle 2: 10 sts. These are the second half of the palm stitches > Needle 3: 1l sts. These are the first half of the backof-hand stitches. >Needle 4: 10 sts. These are the second half of the back-of-hand stitches. Decrease as follows: Round 1: (Needles 1 and 2) K2tog. knit 17. k2tog. (Needles 3 and 4) k2tog. knit 17, k2tog. (38 sts.) Round 2: Knit across all sts. Round 3: (Needles 1 and 2) k2tog. knit 15. k2tog. (Needles 3 and 4) k2tog. knit 15. k2tog. (34 sts.) Round 4: Knit across all sts. Round 5: (Needles 1 and 2) k2tog. knit 13, k2tog. (Needles 3 and 4) k2tog. knitl13. k2tog. (30 sts.) Round 6: Knit across all sts. Round 7: (Needles 1 and 2) k2tog. knit 11, k2tog. (Needles 3 and 4) k2tog. knit 11, k2tog. (26 sts.) Round 8: Knit across all sts. Round 9: (Needles 1 and 2) k2tog. knit 9. k2tog. (Needles 3 and 4) k2tog. knit 9, k2tog. (22 sts.) Round 10: K2tog. knit across all sts. (21 sts.) Round 1l: Purl all sts. This is the round that forms the ridge of the piggy's snout. Now prepare to work the snout. Continue decreasing in the following manner: Round 12: Knit 19. k2tog. (20 sts.) Round 13: Knit across all sts. Round 14: Knit 18. k2tog. (19 sts.) Round 15: Knit across all sts. Round 16: Knit 1, k2tog across all other sts. (10 sts.) Break yarn and draw tail through these final stitches to finish. Using sewing needle draw tail inside miften to be woven inlater.Proceed towork thumb. Women's Medium mitten decrease:Ensure that the stitches are placed as evenly as possible on the needles. Sttiches should be placed as follows: > Needle 1: 12 sts. These are the first half of the palm stitches and the beginning of the round. > Needle 2: 1l sts. These are the second half of the palm stitches > Needle 3: 1l sts. These are the first half of the backof-hand stitches. > Needle 4: ll sts. These are the second half of the back-of-hand stitches. Decrease as follows: Round 1: (Needles 1 and 2) K2tog. knit 19, k2tog. (Needles 3 and 4) k2tog. knit 18, k2tog. (41 sts.) Round 2: Knit across all sts. Round 3: (Needles 1 and 2) k2tog. knit 17. k2tog. (Needles 3 and 4) k2tog. knit 16, k2tog. (37 sts.) Round 4: Knit across all sts. Round 5: (Needles 1 and 2) k2tog. knit 15. k2tog. (Needles 3 and 4) k2tog. knit 14, k2tog. (33 sts.) Round 6: Knit across all sts. Round 7: (Needles 1 and 2) k2tog. knit 13. k2tog. (Needles 3 and 4) k2tog. knit 12. k2tog. (29 sts.) Round 8: Knit across all sts. Round 9: (Needles 1 and 2) k2tog. knit ll, k2tog. (Needles 3 and 4) k2tog. knit 10. k2tog. (25 sts.) Round 10: (Needles 1 and 2) k2tog. knit 9. k2tog. (Needles 3 and 4) k2tog. knit 10. (22 sts.) Round 1l: Purl all sts. This is the round that forms the ridge of the piggy's snout.
Now prepare to work the snout. Continue decreasing in the following manner: Round 12: Knit 20. k2tog. (21 sts.) Round 13: Knit across all sts. Round 14: Knit 19, k2tog. (20 sts.) Round 15: Knit across all sts. Round 16: K2tog across all sts. (10 sts.) Break yarn and draw tail through these final stitches to finish. Using sewing needle draw tail inside miften to be woven in later. Proceed to work thumb. Women's Large mitten decrease: Ensure that the stitches are placed as evenly as possible on the needles. Stitches should be placed as follows: > Needle 1: 12 sts. These are the first half of the palm stitches and the beginning of the round. > Needle 2: 12 sts. These are the second half of the palm stitches >Needle 3: 12 sts. These are the first half of the backof-hand stitches. > Needle 4: 12 sts. These are the second half of the back-of-hand stitches. Decrease as follows: Round 1: (Needles 1 and 2) K2tog. knit 20, k2tog. (Needles 3 and 4) k2tog. knit 20, k2tog. (44 sts.) Round 2: Knit across all sts. Round 3: (Needles 1 and 2) k2tog. knit 18, k2tog. (Needles 3 and 4) k2tog. knit 18. k2tog. (40 sts.) Round 4: Knit across all sts. Round 5: (Needles 1 and 2) k2tog. knit 16, k2tog. (Needles 3 and 4) k2tog. knit 16, k2tog. (36 sts.) Round 6: Knit across all sts. Round 7: (Needles 1I and 2) k2tog. knit 14, k2tog. (Needles 3 and 4) k2tog. knit 14, k2tog. (32 sts.) Round 8: Knit across all sts. Round 9: (Needles 1 and 2) k2tog. knit 12, k2tog. (Needles 3 and 4) k2tog. knit 12. k2tog. (28 sts.) Round 10: Knit across all sts. Round 11: (Needles 1 and 2) k2tog. knit 10. k2tog. (Needles 3 and 4) k2tog. knit 10. k2tog. (24 sts.) Round 12: Purl all sts. This is the round that forms the ridge of the piggy's snout. Now prepare to work the snout. Continue decreasing in the following manner: Round 13: Knit 22, k2tog. (23 sts.) Round 14: Knit across all sts. Round 15: Knit 21, k2tog. (22 sts.) Round 16: Knit across all sts. Round 17: K2tog across all sts. (1l sts.) Break yarn and draw tail through these final stitches to finish. Using sewing needle draw tail inside mitten to be woven in later.Proceed to work thumb.
THUMB
Using yarn colour of choice, pick up 6 (6. 7. 8. 8. 9) sts both above and below the stitches held on the waste yarn for a total of 12 (12, 14. 16, 16. 18) sts discarding the waste yarn when finished. Divide the stitches as evenly as possible on 4 needles. You may also wish to pick up 2 stitches at either side of the thumbhole to make the join tighter, close up any holes and to allow for greater freedom of thumb movement. Prepare to knit the first thumb round, starting from the outer lower corner and working across the front of the thumb. This will be Needle 1. The following needles will be Needle 2, Needle 3. and Needle 4, respectively. Eliminate the 4 stitches picked up to allow for greater thumb movement in the following manner: Needle I: k2tog, knit across. >Needle 2: Knit across, k2tog. Needle 3: k2tog, knit across. >Needle 4: Knit across, k2tog. Continue knitting in Stockinette st until thumb reaches the tip of the recipient's thumb (or desired length.) knitting to the end of Needle 4. Begin thumb decreases. Thumb Decreases: Decrease for the thumb in the following manner: Round 1: K2tog across all thumb sts. Round 2: Knit across all sts. Repeat these two rows until 4 (4, 5. 6, 6, 7) sts remain. Break yarn and draw tail through these final stitches to finish. Using sewing needle draw tail inside mitten to be woveninlater.
FINISHING
Sew ears and tail on back of mitten using tails left from CO edges, referring to pictures for placement if required. Embroider eyes and nostrils on the back of mitten using French knots and/or satin stitch. Weave in other ends to finish. Block lightly if desired.


