CRAFT
SMORGASBORD BY TRACY ST. JOHN
Use a smorgasbord of crafts to create a cozy and useful up-cycled blanket. Felting, embroidery, knitting and crochet are all mixed up and served buffet-style; use as much knitting or as much crocheting as you like to make your piece unique and fabulous. Bon apppetit! Knit and/or crochet... ...and felting and embroidery DIFFICULTY INTERMEDIATE
MATERIALS
Yarn: Worsted weight, any fiber desired. Approximately 800 yds MC, desired number of CCs totaling approximately 400 yds. Amounts needed depend on desired size of blanket; these were the amounts used in the sample blanket. Needles and Hook: US size 8 (5 mm), 16" circular and DPNs; US H (5 mm) crochet hook. Notions and Other Materials: Polar fleece, jersey knit, or wool sweaters or other knitted items which will felt when machine-washed; embroidery needle; tapestry needle; scissors; pencil or chalk; cutting mat and rotary cutter (optional); straight edge. 8 wool sweaters were used in the sample.

MEASUREMENTS
Sample shown is approximately 44" wide and 60" long
GAUGE
Approx 20 sts and 28 rows = 4" in St st in the round Approx 16 dc and 6 rows = 4" Gauge is not terribly critical for this project; one half stitch per inch in either direction will work. It is more important that you are happy with the appearance of your stitches.
NoTES
This pattern is intended as a tutorial rather than a very specific instructional pattern. Please keep this in mind when creating your own up-cycled item. While I am as detailed and specific as possible with my instructions, your own design might take quite a different path, and that is great! Please take the techniques in this tutorial and adapt them for your own purpose using the materials you have available, and don't be afraid to add your own twist to make your project unique.
INSTRUCTIONS
CREATING THE FABRIC
For my blanket, I started with eight sweaters I found at a thrift shop. They varied in composition and size, but were all 100% animal fiber which had not been treated to be machine-washable. As you shop for your own sweaters, look for garments which contain NO cotton, nylon, or any other vegetable or synthetic in the fiber contents, but only animal fibers such as wool, alpaca, angora, mohair, or cashmere. The care label in a suitable garment should read “hand-wash only” or “dry-clean only” If it says it is machine washable, it probably won't work for this purpose. You can also use fabric which has not been felted. Any fabric which will not unravel or fray will work, such as jersey knit or Polar fleece. To protect my washing machine, I placed each sweater in a pillowcase and tied it shut before putting it in the machine. If your sweaters are very different from each other in color and you are concerned about color transfer, sort by color and wash separately. If not, they can all go in together if there is enough room in the washer for the sweaters to agitate freely. Set your washer (top-loaders work best) to a hot wash/cold rinse cycle and add a little detergent. Check the progress of the felting process several times during the cycle. Each sweater may take a different amount of time to felt; some will be finished a few minutes into a cycle, others may take two or three complete trips through the washer to complete. The fabric can be considered thoroughly felted when you can no longer see the individual stitches of the original knitted fabric, and it has a smooth, uniform appearance. If desired, you may machine-dry the garments on low heat, or lay them out flat to dry.
CUTTING THE BLOCKS
When deciding how and where to make the cuts on your sweaters, look first at the seams. If possible, it is best if you can cut your squares in areas where there are no seams. Use the fronts and backs of the sweaters for your larger squares, and save the sleeves and shoulder areas for smaller squares. If you must use an area which contains a seam, make a small sample cut and gently tug on the seamed area to see if it will separate. If so, you may want to use sewing thread to reinforce the ends of the cuts over any seamed areas. For my blanket, I cut nine 12"” squares and twelve 6”’ squares (refer to schematic for layout). You may cut any size and quantity of squares you like, depending on the desired size and layout of your finished blanket. Set the squares aside.
CROCHETING CENTER SQUARES
I used traditional granny squares for the square centers of my blocks, but you can use any square motif you like. Here is a pattern for a simple granny square; you can make yours as many rounds as you want for whatever size square you prefer. Make as many as desired (I made 4 grannies for the sample). Rnd 1: With color of choice, ch 5, sl st in beg ch to form a ring. Ch 3 (counts as dc , here and throughout), 2 dc in ring, ch 2, \*3 dc in ring, ch 2; rep from \* 2 more times, sl st in top of beg ch-3 to join, end off. Rnd 2: Join new color in any ch-2 sp. Ch 3, 2 dc in same ch-2 sp, ch 2,3 dc in same ch-2 sp, ch 1, \*(3 dc, ch 2,3 dc) in next ch-2 sp, ch 1; rep from \* 2 more times, sl st in top of beg ch-3 to join, end off. Rnd 3: Join new color in any ch-2 sp. Ch 3, 2 dc in same ch-2 sp, ch 2,3 dc in same ch-2 sp, ch 1,3 dc in next ch-1 sp, ch 1, \*(3 dc, ch 2, 3 dc) in next ch-2 sp, ch 1, 3 dc in next ch-1 sp, ch 1; rep from \* 2 more times, sl st in top of beg ch-3 to join, end off. Rnd 4: Join new color in any ch-2 sp. Ch 3, 2 dc in same ch-2 sp,ch 2,3 dc in same ch-2 sp, (ch 1, 3 dc in next ch-1 sp) twice, ch 1, \*(3 dc, ch 2,3 dc) in next ch-2 sp, (ch 1, 3 dc in next ch-1 sp) twice, ch 1; rep from \* 2 more times, sl st in top of beg ch-3 to join, end off. Rnd 5: Join new color in any ch-2 sp. Ch 3, 2 dc in same ch-2 sp, ch 2, 3 dc in same ch-2 sp, (ch 1, 3 dc in next ch-1 sp) three times, ch 1, \*(3 dc, ch 2, 3 dc) in next ch-2 sp, (ch 1, 3 dc in next ch-1 sp) three times, ch 1; rep from \* 2 more times, sl st in top of beg ch-3 to join, end off. Rnd 6: Join new color in any ch-2 sp. Ch 1, work 2 sc in same ch-2 sp, \*work 1 sc in each dc and ch-1 sp to next ch-2 sp, work 3 sc in next ch-2 sp; rep from \* around to beg ch-2 sp, work one more sc in beg ch-2 sp, sl st in beg sc to join, end off, leaving a long tail for sewing. Note: You may make your granny square as large as you like by repeating Rnd 5, adding one more set of (ch 1, 3 dc in next ch-1 sp) on each side of the square for each additional rnd worked. Make your squares smaller by omitting rnds before finishing with Rnd 6. Weave in all ends except the long tail for sewing, block the squares and set them aside.
CUTTING THE CENTER OPENINGS
Return to your 12" blocks. For the sample blanket, I cut circle-shaped openings in 5 blocks and square-shaped openings in 4 blocks. You can cut as many of each as you like. You may either use a cutting mat and rotary cutter or sharp scissors to make your openings. I would recommend that you practice a bit on some scrap felt with the rotary cutter, especially when making circular cuts. TO CUT THE SQUARE OPENINGS: You can do this a couple of different ways. You can measure a granny square and then use a ruler to precisely measure in from the edges of your block to center the square. Use a pencil or chalk to mark the opening to be cut as you make your measurements. If you are not too concerned that your square is precisely centered, you can lay your granny on the block wherever you want it and simply trace around it,then cut out the opening. TO CUT THE CIRCLE OPENINGS: You have a couple of different options for this part and you can decide what works best for you. If you like, you can cast on 100 sts on your DPNs and completely knit and block one circle motif to use as a stencil for your circle openings. This makes for a very evenly knit circle inside your felted squares. Alternatively, you can make a circle template - approx. 7" in diameter - from a piece of cardboard or use a 7" paper plate as a stencil (that's what I did) for your circular openings. Center your stencil on the block, trace around it, and make your cut. You may want to measure with your ruler to make sure the circle is precisely centered before you cut if this is important to you.
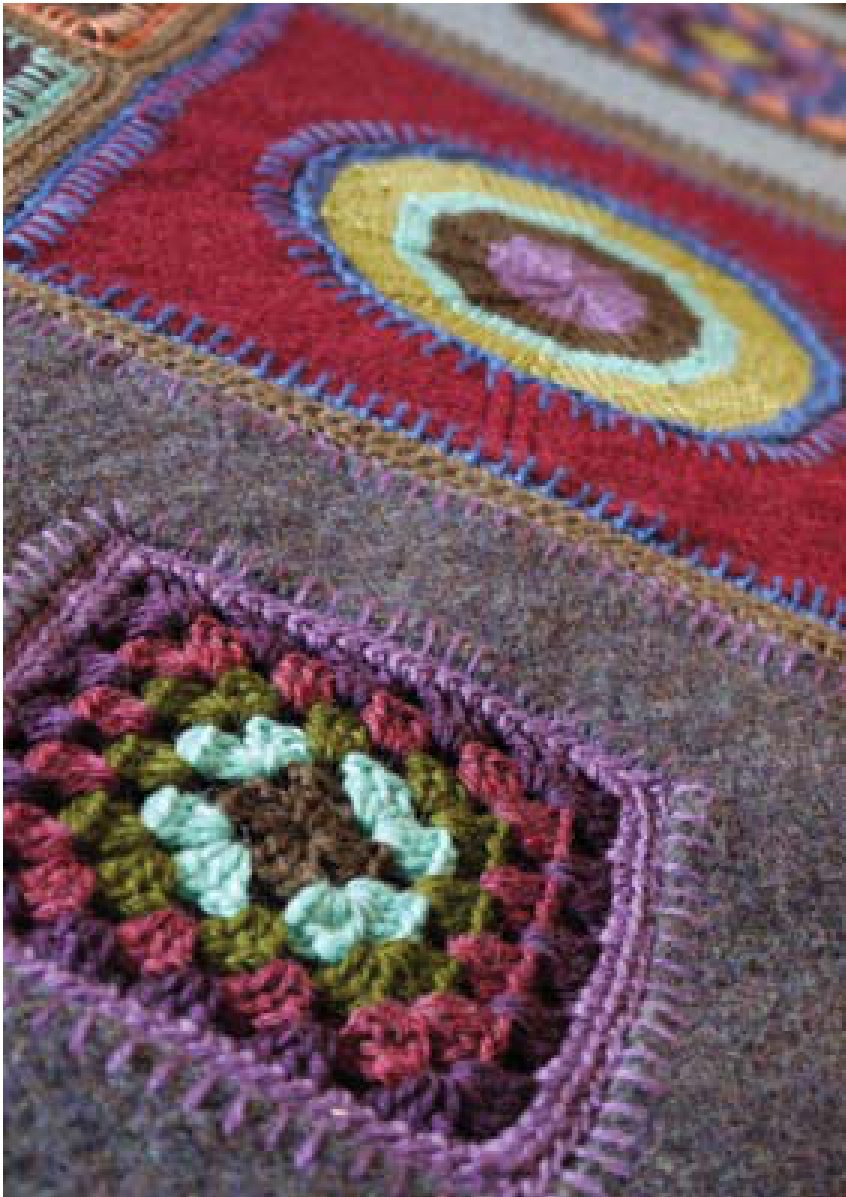
BLANKET STITCH
Now comes the fun part; laying out your blocks and planning your color scheme (if you are inclined to be a planner). Refer to the photos to see how I laid out the large and small blocks, the circles and squares. Begin with the large blocks. When determining what color to use for blanket stitching on my large blocks, I started with the square-cut openings. I laid my granny squares on the blocks according to what I felt was the best color coordination. The color that was used for the last round of the granny square is the color that I used to blanket stitch on its block. Once the colors for the squares had been determined, I moved to the circle-cut blocks. I chose the blanket stitch colors for those circles based on which colors had not already been selected for the square-cut openings. Finally, I chose colors to edge the small blocks with. Once I had made all of my color selections, I pinned a little snip of my planned color for each block to it, so that I would not forget. I am fortunate enough to have a workspace where I could leave my blanket in progress laid out. If you do not have a good space for this, it might be wise to label each square and indicate on the schematic which square goes where so that you will be able to re-create your design once all of your pieces are ready for assembly. Referring to the photo tutorial on the last page, work blanket stitch around all exposed edges of the blocks. If you are using felted wool or fleece, just work the blanket stitch in the raw edge of the fabric. If using jersey, turn the fabric under .25’' to make a hem, and encase the hem in the blanket stitching. For my blanket, I spaced my blanket stitches at about .25” apart. This spacing would be appropriate for picking up stitches using worsted or aran weight yarn; for bulkier yarn space them farther apart and for finer space them closer together.
EDGING THE BLOCKS
Using the same color that you stitched around each block with, work a round of sc around the outside edge only of large and small blocks. Insert your crochet hook in each blanket stitch as if it were a crochet stitch and work your sc as usual, working 2 sc in each blanket st on either side of the corners to turn the corners. Count the stitches along each side of the square. You will need to have the same number of stitches along each side of every square to make the assembly process easiest. End off CC and join MC to any st on the outer edge, and work a round of sc with MC, increasing or decreasing as necessary to obtain the same number of sts along each edge, and remembering to work the extra corner stitches. End off leaving a long tail for sewing. Note: On the sample blanket,there are 48 sts along each edge of each large block, and 23 sts along each edge of each small block.
INSERT THE GRANNY SQUARES
Use whip stitch to sew the granny squares into the center cut-outs.
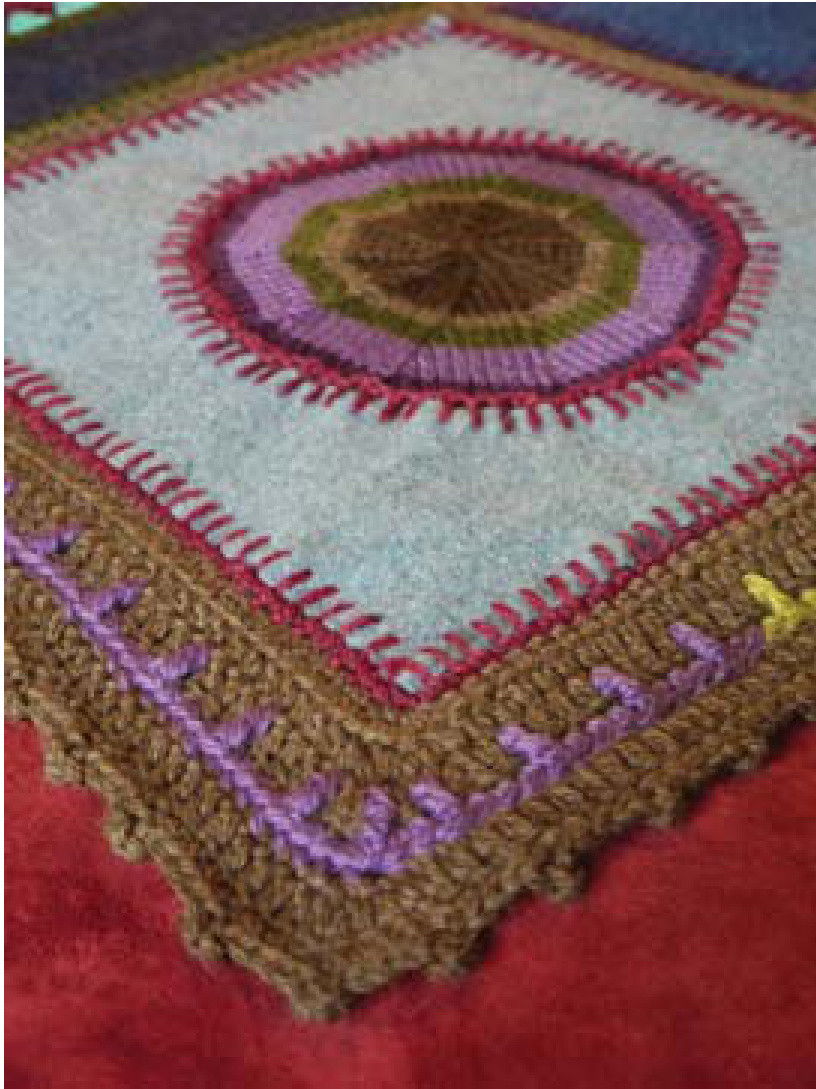
KNITTING THE CENTER CIRCLES
Note: You can change colors as you like to make varying size stripes in your circles. To work jogless"? stripes, you will need to work at least two rnds of any given color, working the first two rnds like this: Rnd 1: Knit all sts. Rnd 2: Insert tip of right needle into the st below the first st of Rnd 1 and lift it onto the left needle, knit it together with the first st to be worked for Rnd 2. Knit rem sts in round. With RS facing and using circular needles and the same CC that was used for blanket stitch, pick up and knit one st in each blanket st around the circle opening. Count your stitches and pm to mark beg of rnd. Work one round of purl sts, increasing or decreasing as necessary to obtain 100 sts. Example: If you worked your blanket sts spaced at about .25" apart, you should have about 80 sts picked up, so you will need to increase approximately 20 sts in the purl round. Rnds 2 - 4: Knit around. Rnd 5: \*K8, k2tog; rep from \* around. Rnds 6 - 7: Knit around. Rnd 8: \*K7, k2tog; rep from \* around. Rnds 9 - 10: Knit around. Rnd 11: \*K6, k2tog; rep from \* around. Rnds 12 - 13: Knit around. Rnd 14: \*K5, k2tog; rep from \* around. Rnd 15: Knit around. Rnd 16: \*K4, k2tog; rep from \* around. Rnd 17: knit around. Rnd 18: \*K3, k2tog; rep from \* around. Rnd 19: Knit around. Rnd 20: \*K2, k2tog; rep from \* around. Rnd 21: Knit around. Rnd 22: \*K1, k2tog; rep from \* around. Rnd 23: K2tog around. Cut yarn, leaving a 12: tail. Run yarn through rem sts and pull tight, tie a knot. Repeat for remaining circle blocks.
ASSEMBLE THE SQUARES
Hold squares RS together and use whipstitch to sew squares together in your desired layout.
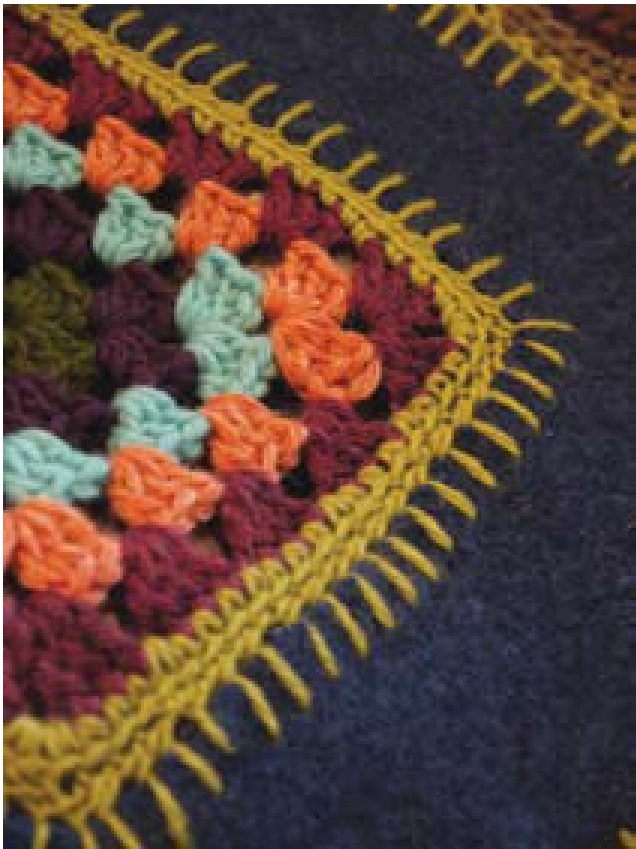
EDGING THE BLANKET
Join MC to any stitch on the edge of the blanket.
Rnd 1: Ch 1, then work a round of sc around the entire edge of the blanket, working 2 sc in each of the 2 corner sts of each corner to turn them. Sl st in beg sc to join, do not turn. Rnd 2: Ch 1 (does not count as st), then work an hdc in the blo of each sc around, again working extra corner sts. Sl st in beg hdc to join, do not turn. Rnd 3: (Note: when working this round, you should still remember to work your turning sts in the corners. If one of the skipped sts lands in a corner st, just work the extra corner sts in the st after the corner, maintaining the pattern.) Ch 3 (counts as dc), dc in next 2 hdc, ch 1, sk next hdc, \*dc in next 3 hdc, ch 1, sk next hdc; rep from \* around, sl st in top of beg ch-3 to join. Do not turn. Secure MC but do not end off; leave it attached to use on Rnd 5. Rnd 4: Join any CC to one of the first dcs of the groups of 3 dcs in Rnd 3. Ch 1, \*sc in next 3 dc,tr in skipped hdc from Rnd 2; rep from \* around, changing CC as desired. Sl st in beg sc to join, end off CC. Rnd 6: Ch 3 (counts as dc), dc in each sc around, working extra corner sts. Sl st in top of beg ch-3 to join. Rnd 7: Ch 1, then sc in each dc around, working a picot in every 4th st or as desired, sl st in beg sc, end off.
FINISHING
Weave in all ends, block blanket if desired.

original design by Tracy St. John
Tracy is super excited that she is not running out of ideas for things to do with yarn. Some ideas just happen to be better than others; ask her dogs. Check out some of her other notions here at Tangled, at interweave.com, or stop by and say hi to her on Ravelry, ID yarnarriffic. It is of the utmost importance to Tangled to provide accurate and well-written patterns. All Tangled patterns have been carefully edited for errors. If you think you may have found a mistake or need assistance with this design please contact Team Tangled at support@tangledness.com. yright 2011 by Tracy St. John and may not be distributed in any way. Photos by Brittany Tyl
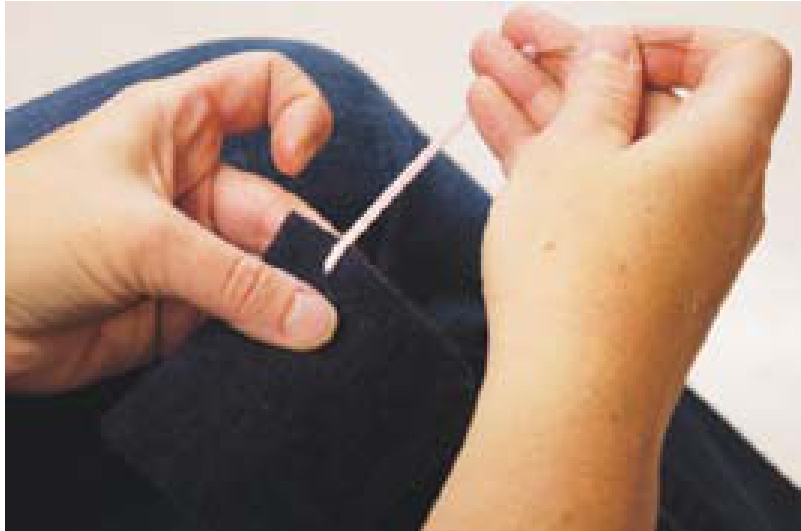
Step 1: insert threaded needle into fabric from back to front about .25" from edge
Step 2: pull though about 8” of yarn and hold with with one hand
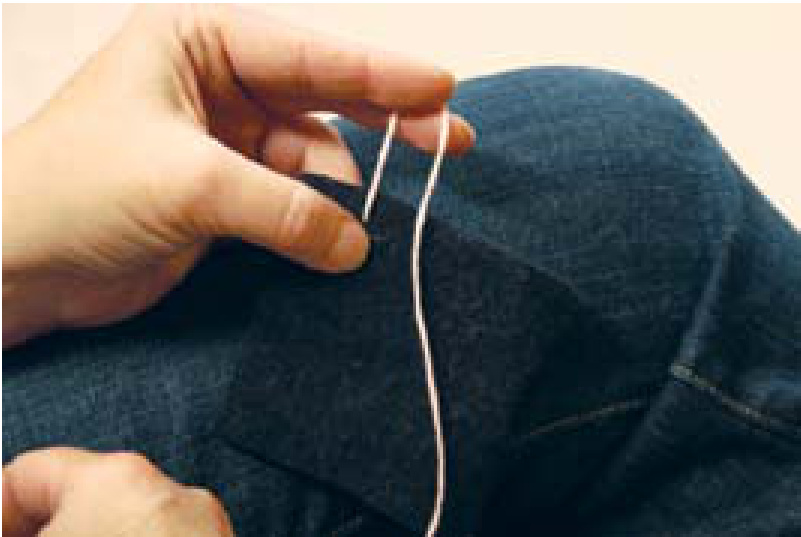
Step 3: insert needle into fabric from front to back about .25" (or desired spacing) to the right of the place where the needle was inserted in step 1
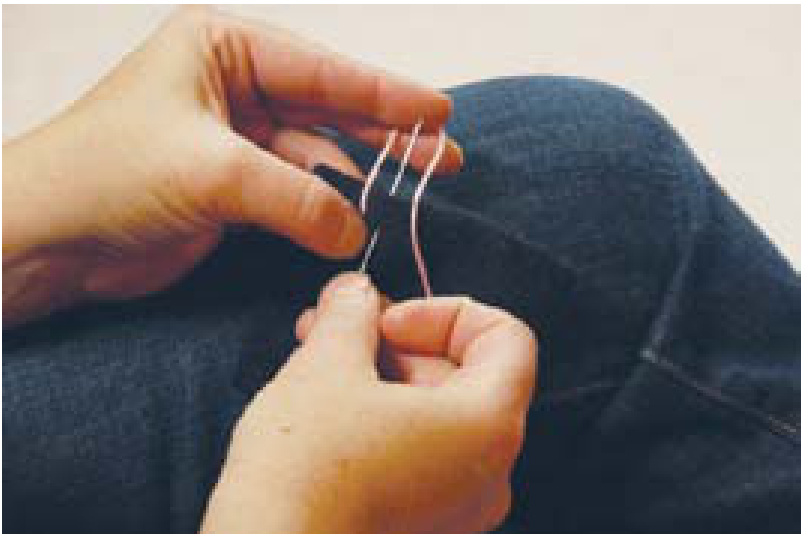
Step 4: bring needle through the yarn loop created between the two insertion points
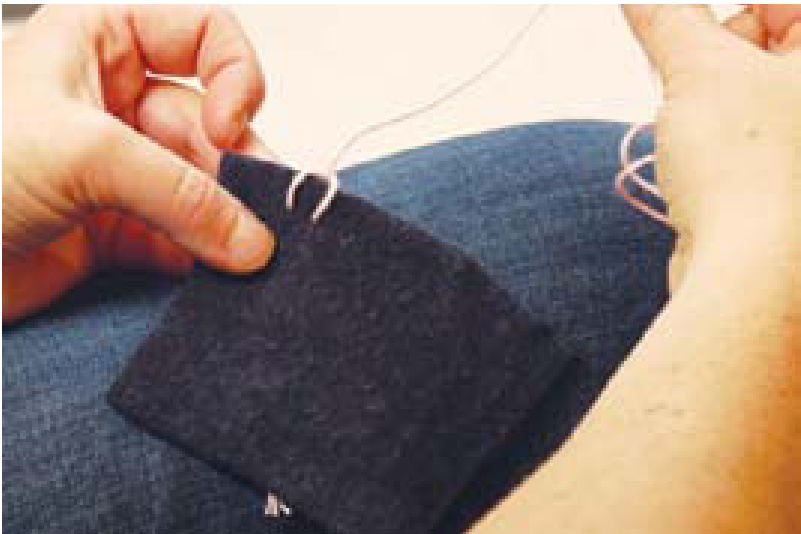
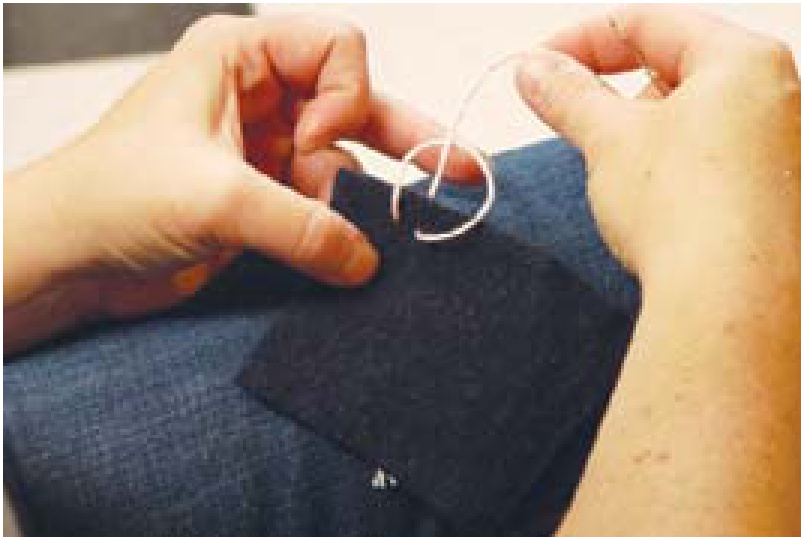
Step 5: pull yarn tightening loop along the edge of the felted fabric - 1 blanket stitch created
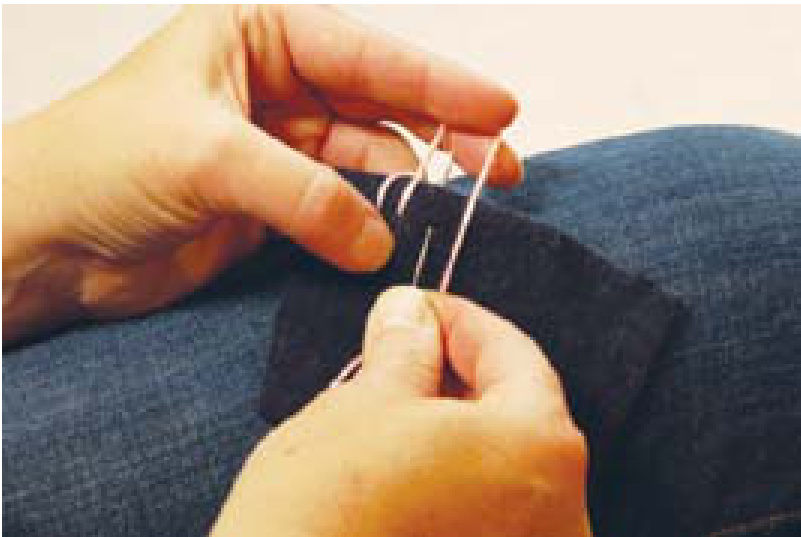
Repeat steps 1 - 5 for blanket stitch seam


