(LET-THE-YARN-DO-THE-WORK) LOG CABIN AFGHAN
The Log Cabin was my beloved mother-in-law's favourite quilt pattern, and she passed the fondness onto me—to such an extent that I have already published the pattern for one. But the previous version (in The Color Book) required buying I-don't-know-how-many colours of yarn and coordinating them . . . plus sewing in all those tails because each segment was a different colour. With this afghan, I used a yarn (Katia Azteca) whose colour movement does the work: the lights move beautifully, the darks move beautifully—never too much, but not so little as to be monochromatic. It meant fewer decisions and fewer tails with a beautiful result. You could certainly find another yarn that does this—or choose colours without as much contrast—-and since gauge does not matter the pattern will still work. The point is to let the yarn dothework! Materials Gauge Needles 16 stitches and 32 rows = 4" (10cm) in garter stitch But gauge does not matter: see note 1. two Us 9 / 5.5mm circular needles, 16, 20, or 24" (40 [50, 60]cm) long Seenote2. Katia Azteca (50% wool, 50% acrylic, each approximately 3%2 oz [100g] and 197 yd [189m]) in the following amounts and colours: Yarn 3 Sally Melville May be reproduced for personal use by original purchaser only. www.sallymelvilleknits.co. 150 yd (135m) or 1 ball red (#7837), 1160 yd (1045m) or 6 balls light (#7835), 1570 yd (1410m) or 8 balls dark (#7834). See notes 3-5. Small ball of yarn suitable for sewing: see note 7.
Size
In this yarn, and to this gauge, each square is just under 10" (25cm) square.
Abbreviations and terms
kknit L left R right RS right side WS wrong side pick up insert needle into a space or garter ridge bump (usually working from L to R) pick up and knit insert needle into a space, then knit it (usually working from R to L)
Note
1. Gauge does not matter. You'll just make however many squares you want until it's the right size. 2. I found this easy to work using two circular needles—-one for the light colour and one for the dark. You can use only one longer circular for everything, but it would be awkward. 3. Whatever other yarns or colours you use, it is traditional to use red in the center of a Log Cabin: this represents the hearth at the centre of the home. 4. This afghan is six squares by six squares. You could make it smaller or larger, but the yardage listed is for this size. (l am currently planning a 4 x 4 one.) 5. It took only one ball of red to do all the center squares for a six by six afghan. Then one ball of the light made 6 squares with some left over, and one ball of the dark made 5 squares with a tiny bit left over. But these amounts are dependent upon getting the same stitch and row gauge. 6. The way this pattern is laid out, you need an even number of squares in each direction. But there are other Log Cabin layouts that do not demand this: laying the squares diagonally would be one of those options. 7.This yarn is not suitable for sewing up: it will tear. 8. A wonderful thing about this pattern is that it does not need a final edging around the piece—a lot of work avoided! (But you could, of course, add one if you wanted more knitting.)

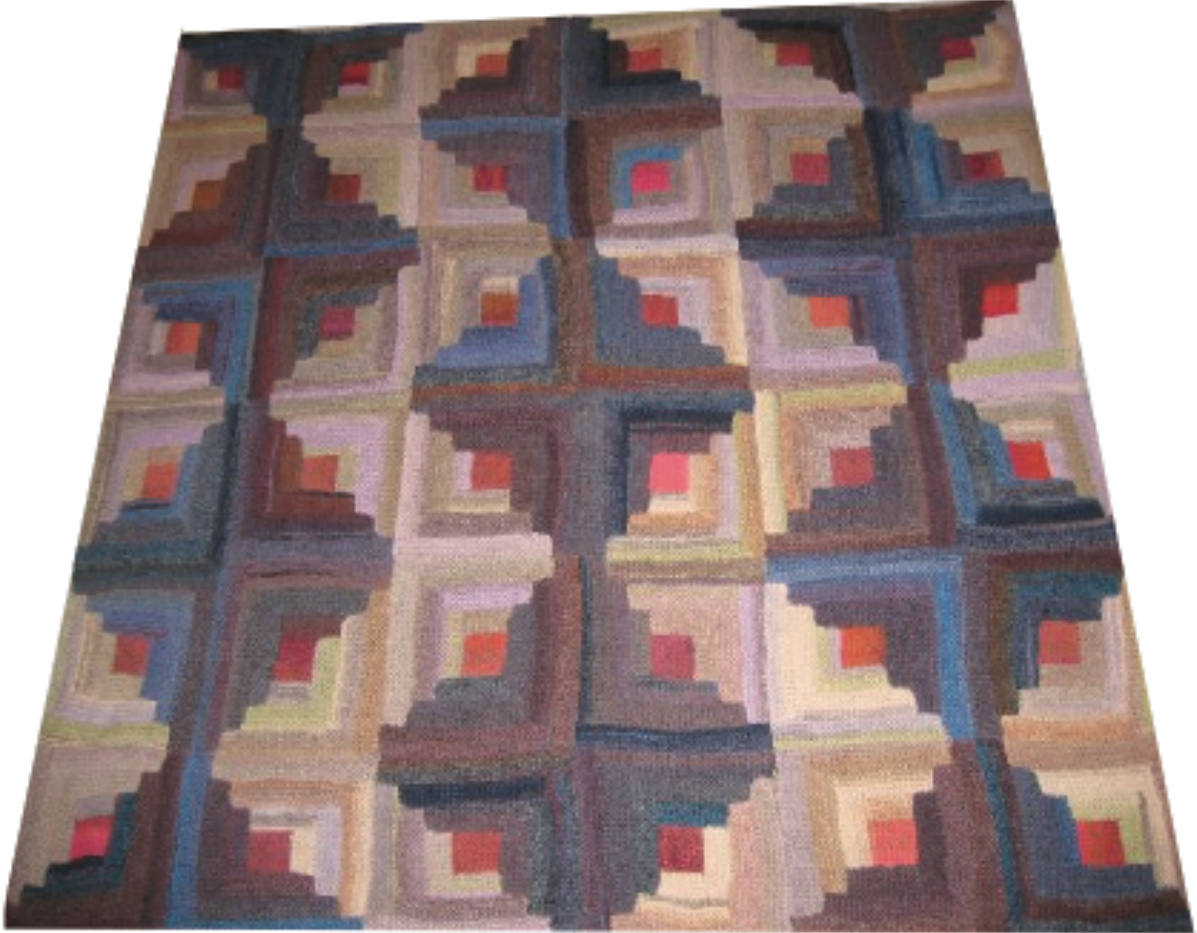
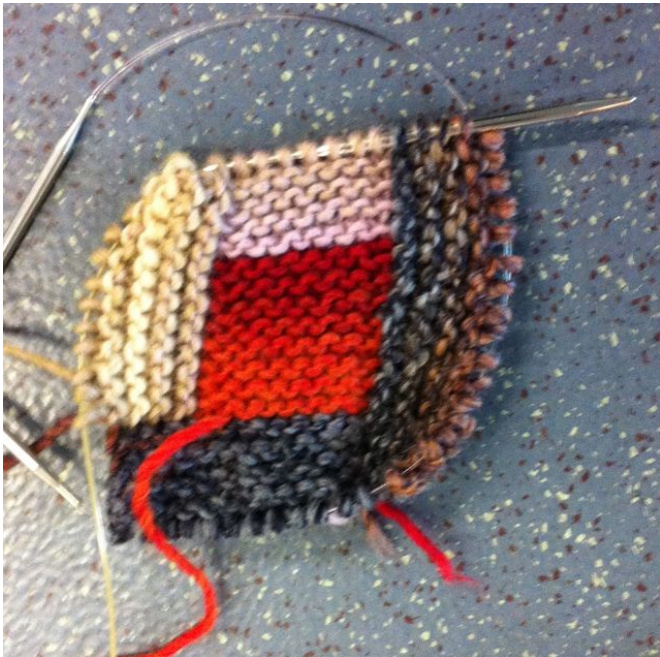
This photo shows four squares, each approximately 10" × 10" (25cm x 25cm). You can see here how the yarn colours move so beautifully! 3 Sally Melville May be reproduced for personal use by original purchaser only. www.sallymelvilleknits.co. Afghanpattern There is a drawing on page six that clarifies all that follows. BasicSquare Pieceone With red, long-tail cast on 8 stitches. K8 for 15 rows, ending with a WS row: cut yarn. Piecetwo With light, k8 for 9 rows, ending with a RS row: do not cut yarn.
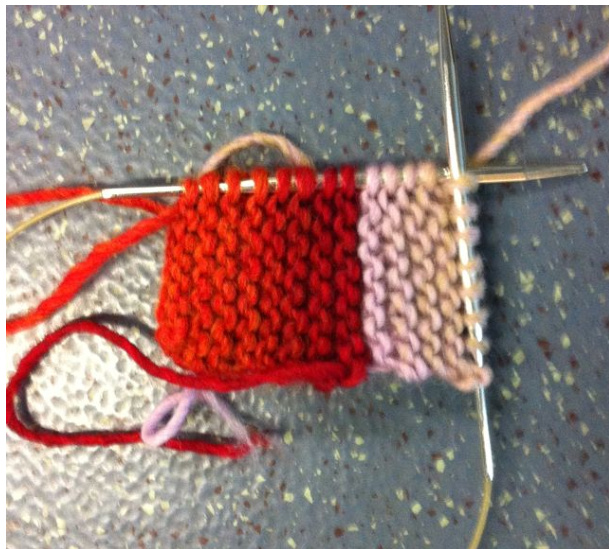
Piece four Turn work 90° to right. With second needle, pick up 4 stitches along edge of piece 3 (see photo to right): k4 with dark. With right needle, pick up and knit 8 stitches along cast-on edge of piece 1 (see photo below)—12 stitches. K12 for 8 more rows with dark, ending with a RS row: do not cut yarn. Piecethree Turn work 90° to right (clockwise). With left needle, pick up 8 from edge of piece 1 and 4 from edge of piece 2 (see photo to left)—12 stitches. K12 for 9 rows with light, ending with a RS row: cut yarn.

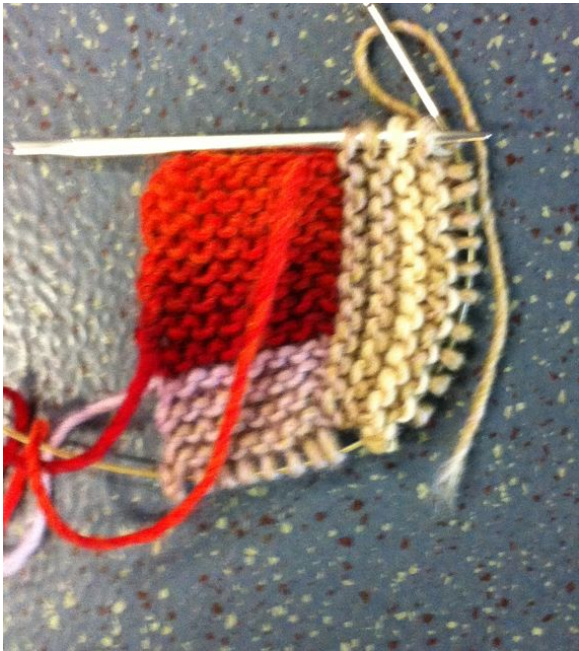
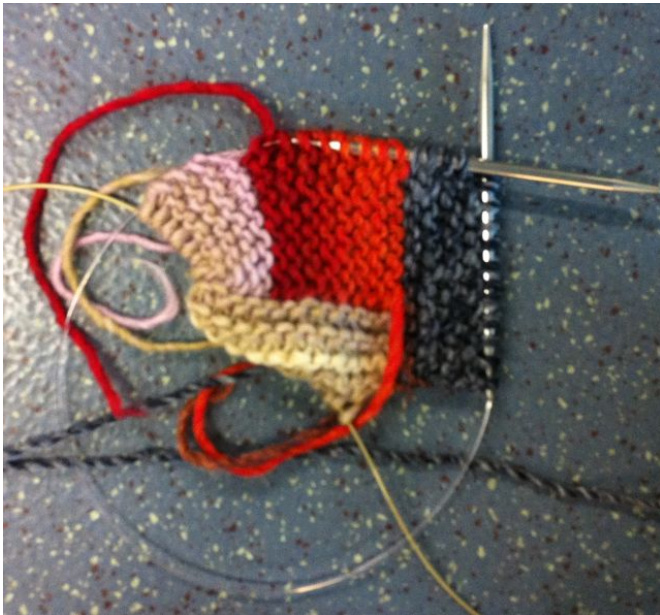
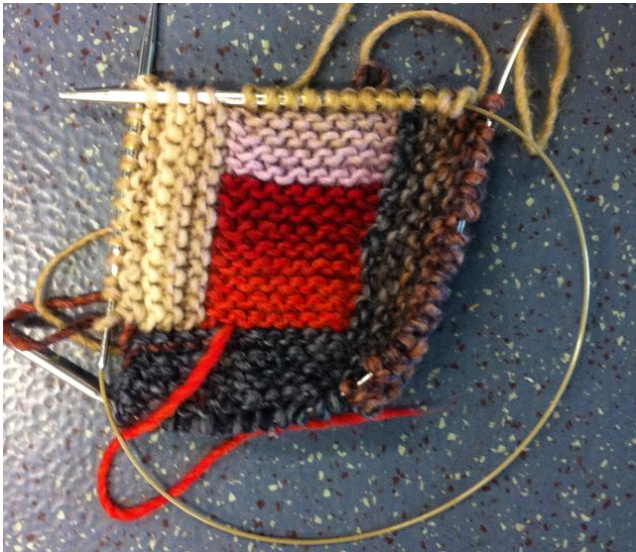
The next piece is shown in three parts. Working this waymadethingslessawkward.Infuture,I'll justtell you how many stitches and from where. You may executehoweveryouwish. Turn work 90° to right. With left needle and light colour, pick up then knit 4 from edge of piece 5, then k8 from piece 2—12 stitches (see photo to right). With same needle, pick up 4 stitches from edge of piece 3 (see photo below left), then slip left needle through these same 4 stitches (see photo below right): knit these 4 stitches-—16 stitches. K16 for 8 more rows with light, ending with a RS row: do not cut yarn. Piecefive Turn work 90° to right. With left needle and dark colour, pick up then knit 4 from edge of piece 2, k8 from edge of piece 1, pick up then knit 4 from edge of piece 4 (see photo to left). K16 for 8 more rows with dark, ending with a RS row: cut yarn. Pieceseven Turn work 90°to right. With left needle and light colour, pick up then knit 4 from edge of piece 4, k12 from piece 3, pick up then knit 4 from edge of piece 6—20 stitches. K20 for 8 more rows with light, ending after a RS row: cut yarn. Pieceeight Turn work 90° to right. With left needle and dark colour, pick up then knit 4 from edge of piece 5, k12 from piece 4, pick up then knit 4 from edge of piece 7—20 stitches. K20 for 8 more rows in dark, ending after a RS row: do not cut yarn. Turn work 90° to right. With left needle and dark colour, pick up then knit 4 from edge of piece 6, k16 from piece 5, pick up then knit 4 from edge of piece 80—24 stitches. K24 for 8 more rows in dark, ending after a RS row: cut yarn.
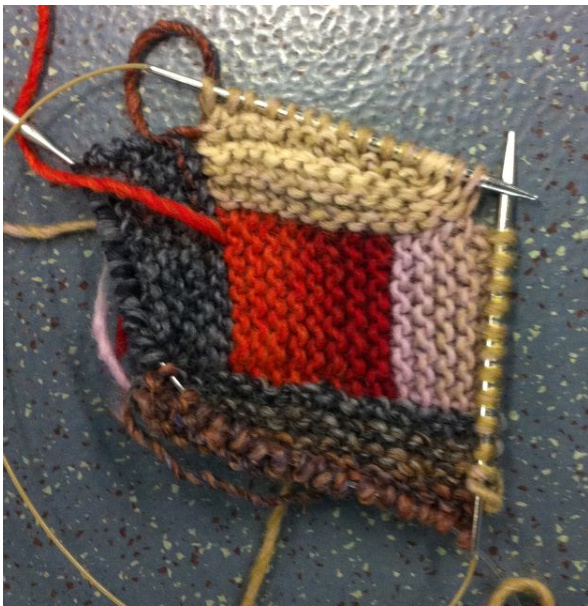
Piece ten Turn work 90° to right. With left needle and light colour, pick up then knit 4 from edge of piece 7, k16 from piece 6, pick up then knit 4 from edge of piece 9—-24 stitches. K24 for 7 more rows in light, ending after a WS row. Row 9 (RS) Bind off to one stitch on right needle: do not cut yarn. Turn work 90° to right. With left needle and light colour, pick up then knit 4 from edge of piece 8, k20 from piece 7, pick up then knit 4 from edge of piece 10—29 stitches. Rows 2, 4, 6, 8 (WS) K28, slip last stitch purl-wise and with yarn to front. Rows 3, 5, 7 (RS) K29 with light. Row 9 (RS) Bind off to one stitch on right needle: cut yarn. Piecetwelve Turn work 90° to right. With left needle and dark colour, pick up then knit 4 stitches from edge of piece 9, k20 from piece 8, pick up then knit 4 from edge of piece 11—29 stitches. Rows 2, 4, 6, 8 (WS) K28, slip last stitch purl-wise and with yarn to front. Rows 3, 5, 7 (RS) K29 with dark. Row 9 (RS) Bind off to one stitch on right needle: do not cut yarn. rieceulllteel Turn work 90° to right. With left needle and dark colour, pick up then knit 4 from edge of piece 10, k24 from piece 9, pick up then knit 4 from edge of piece 12—33 stitches. Rows 2, 4, 6, 8 (WS) Slip first stitch purl-wise and with yarn to front, k31, slip last stitch purl-wise and with yarn to front. Rows 3, 5, 7 (RS) K33 with dark. Row 9 (RS) Bind off, then cut yarn.
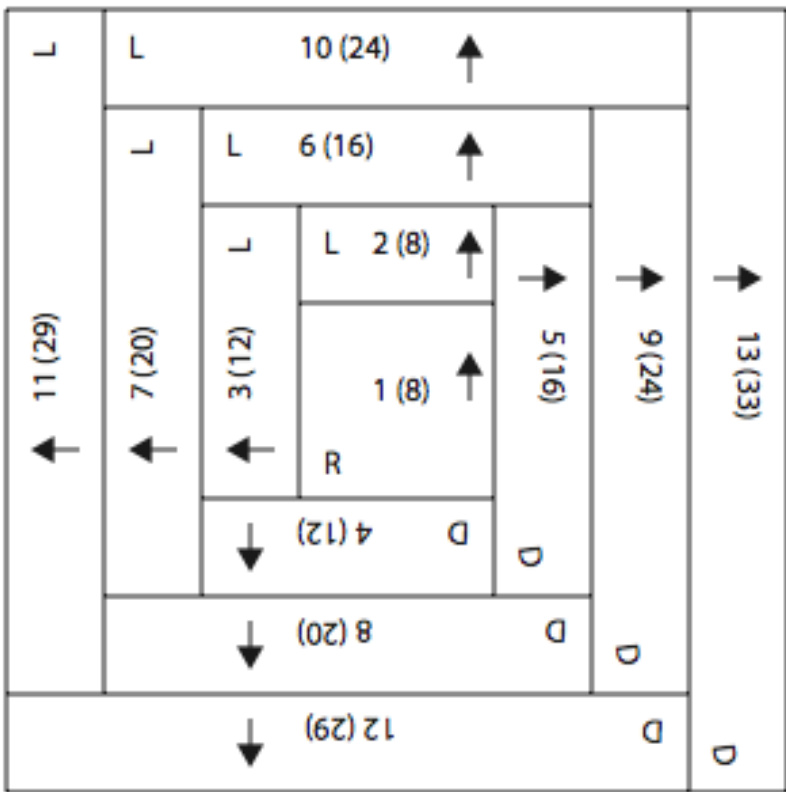
arrow indicates direction of working. first number = number of piece. second number = number of stitches in piece letterindicates colour: R =red, L = light, D = dark
Assembly
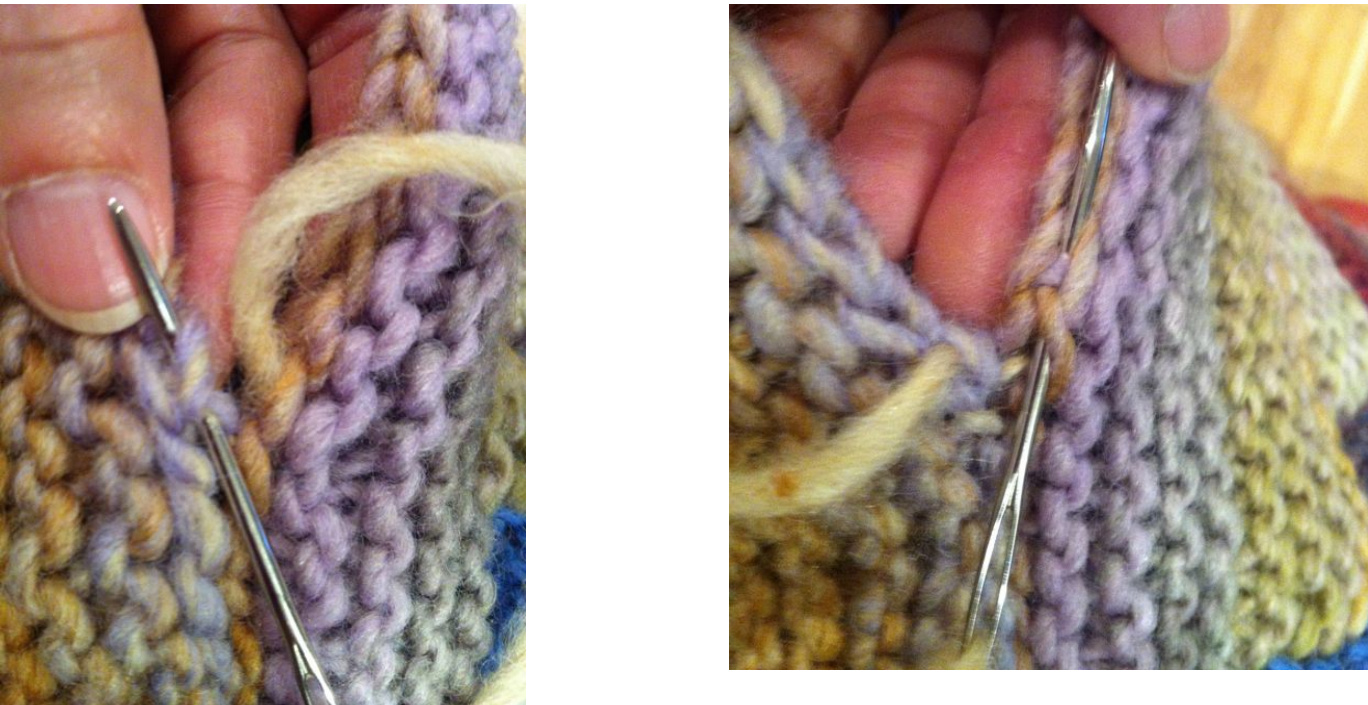
Lay pieces as shown in photo (on page one) or to whatever arrangement you wish. Sew together (with a yarn that will not tear but will wash the same as wool) by taking %2 of each edge slip stitch or bind off stitch into the seam allowance each time (see 2 photos below).
3 Sally Melville May be reproduced for personal use by original purchaser only. www.sallymelvilleknits.co.


