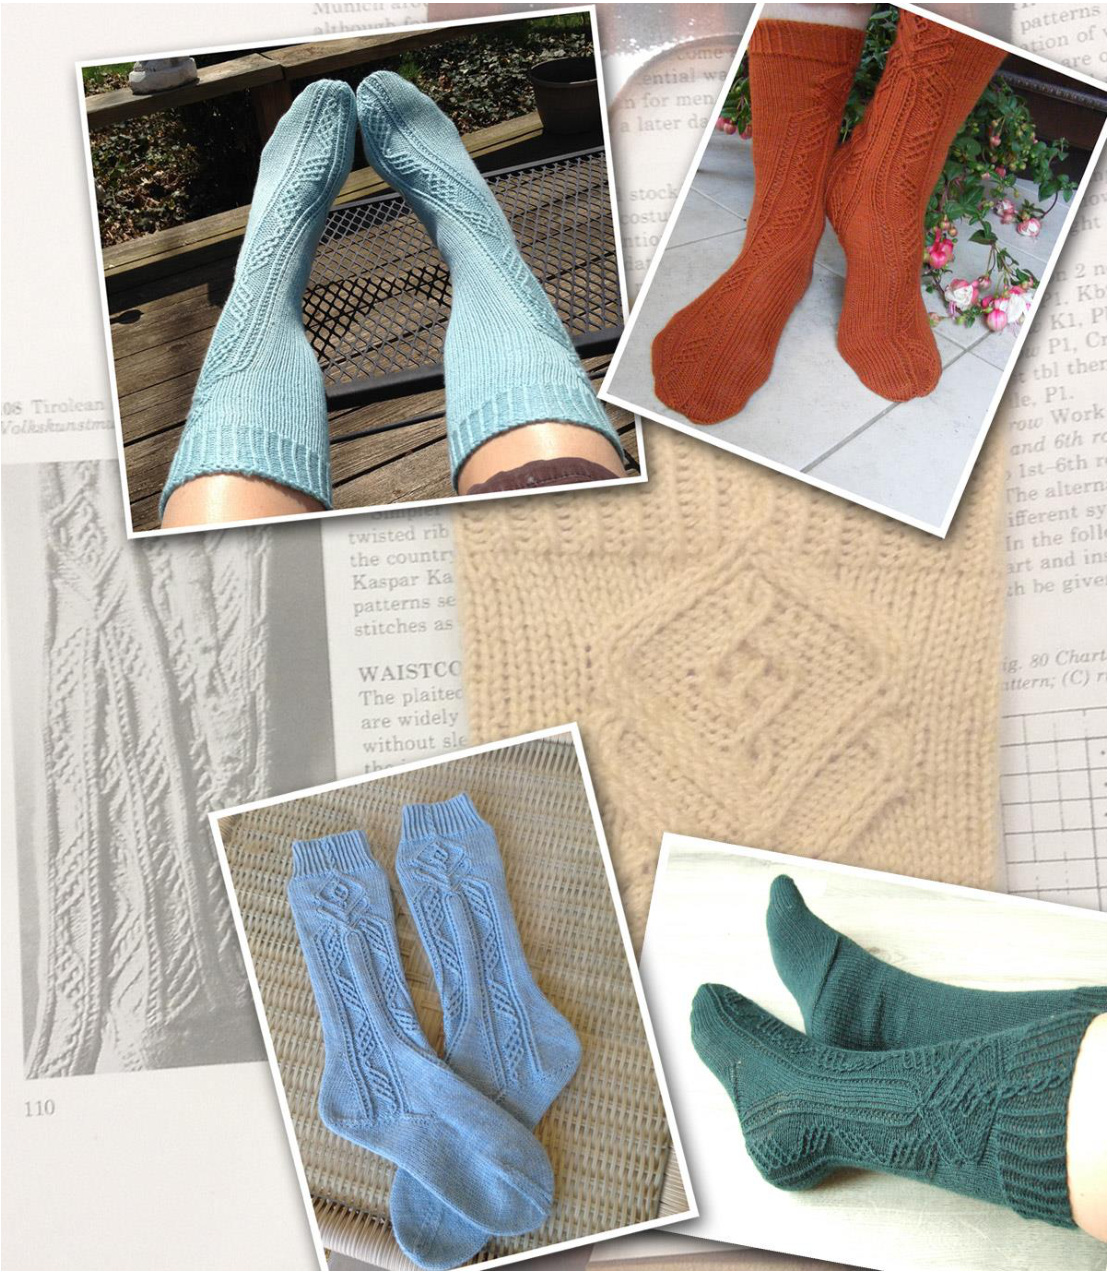
SOCK AROUND THE CLOCK
BY NATALIA VASILIEVA
9 Natalia Vasilieva, Larissa Kennedy, Gail Bryant, Judith Coats-Crowson, Madeleine Tiger
SKILL LEVEL: INTERMEDIATE
TECHNIQUES USED: MAGIC LOOP, TWISTED-STITCH KNITTING (WITH CABLING AND TRAVELING STITCHES), FOLLOWING CHARTS, ELASTIC CROCHETED CAST-ON, LIFTED INCREASES, MODIFIED SQUARE HEEL, CABLING WITHOUT CABLE NEEDLE (DESIRABLE).
FINISHED MEASUREMENTS
Sock length: 81/2" (22 cm) to fit foot length 9%/4" (24.5 cm). Sock circumference: 61/4" (16 cm) to fit foot circumference 81/2" (22 cm). Leg length: 101/2" (26.5 cm).
TOOLS AND MATERIALS
· Schachenmayr Regia Silk 4-ply (55% merino, 25% nylon, 20% silk; 218 yds (200 m) per 50 g): 2 skeins in #028 (peach) · Circular needles US 1%2 (2.5 mm) or size to get the gauge; at least 32" (80 cm) length ·Crochet hook 2.5 mm · 2 cable needles (optional)
GAUGE
Stockinette: 32 sts x 50 rows = 4" x 4" (10 x 10 cm)
CONSTRUCTION
These socks are worked in Magic Loop technique with the beginning of the round (BOR) at the back of leg and then at the middle of the sole. You may utilize any other technique of your choice preserving BOR position. Each sock starts with an Elastic Crocheted Cast-on. Cuff is worked in twistedstitch ribbing with a small cable at the outer side of leg which develops into a rich clock design inspired by traditional Bavarian stockings from Rae Compton's "The Complete Book of Traditional Knitting" (p.110). Arc-expansion increases are placed before and after the back clock arm and cause the front clock arm to bend over instep. This arm is incorporated with toe decreases.
SIZING NOTES
The easiest way to make these socks bigger or smaller is by regauging, but the clock design can also be applied to your basic stockinette socks by replacing 32 plain stitches of the leg with 38 stitches of the clocks, and 14 plain stitches of the foot with 16 stitches of the front clock arm. If you need bigger or smaller heel, start Arc-Expansion increases sooner or later and work more or less decreases in V-shaped part of Heel Turn. For example, if you add a pair of arc-expansion increases (i.e. start increases from Row 100), then add a pair of decreases to V-shaped part of Heel Turn as well so you'll have 30 middle stitches for square (Dutch) part of Heel Turn. Of course, you'll need the same number of stitches in the Instep as well (16 sts of front clock arm +14 sts of front gusset), thus the initial Instep/Heel distribution of stitches will change and affect the number of rows in square (Dutch) part of Heel Turn. If you need shorter leg, that's doable in the same way (i.e. by starting Arc Expansion increases sooner and ending them in appropriate place), but the toe patterning will likely be affected. For example, you may begin Arc-Expansion area from Row 82 thus eliminating 4th clock arm motif off the leg. Of course, all the remaining front clock arm motifs will be shifted 20 rows as well, so you may need to chart your own toe (see p.18 for Clock Arms Chart).
DIRECTIONS
RIGHT SOCK
CUFF
Using a crochet hook, cast on 64 sts with Elastic Crocheted method1 as follows (you may find a photo tutorial on this technique here: http://www.ravelry.com/projects/skeincharmer/elastic-crocheted-cast-on): Make a slip knot and place it on a hook, (\*) yarnover, wrap a yarn around the needle and pull through both loops on the hook, repeat from (\*) 63 more times. Slip the last stitch from the hook onto the needle (= 65 sts), join the work in the round being careful not to twist the stitches, slide the last stitch (which the working yarn is attached to) onto the other needle (=Needle 1) and pass it over the first casted-on stitch = 32 sts on each needle. Start to work twisted-ribbing cuff with the Right 1/1/1 Cable as follows: Rounds 1-2: (\*) p1, k1 tbl, repeat from (\*) across. Round 3: Needle 1: [p1, k1 tbl] x7 times, p1; Right 1/1/1 Cable (= slip knit loop to cable needle and hold to back, slip purl loop to cable needle and hold to back, k1 tbl, move first cable needle to front, p1 from back cable needle, k1 tbl from front cable needle); [p1, k1 tbl] x7 times. Needle 2: (\*) p1, k1 tbl, repeat from (\*) across. Round 4 (as Round 1): (\*) p1, k1 tbl, repeat from (\*) across. Repeat these 4 rounds to desired height of cuff, ending with Round 2. Sample socks have 18 rounds in the cuff. Note: you may also follow Right Cuff Chart at the bottom of p.8.
LEG
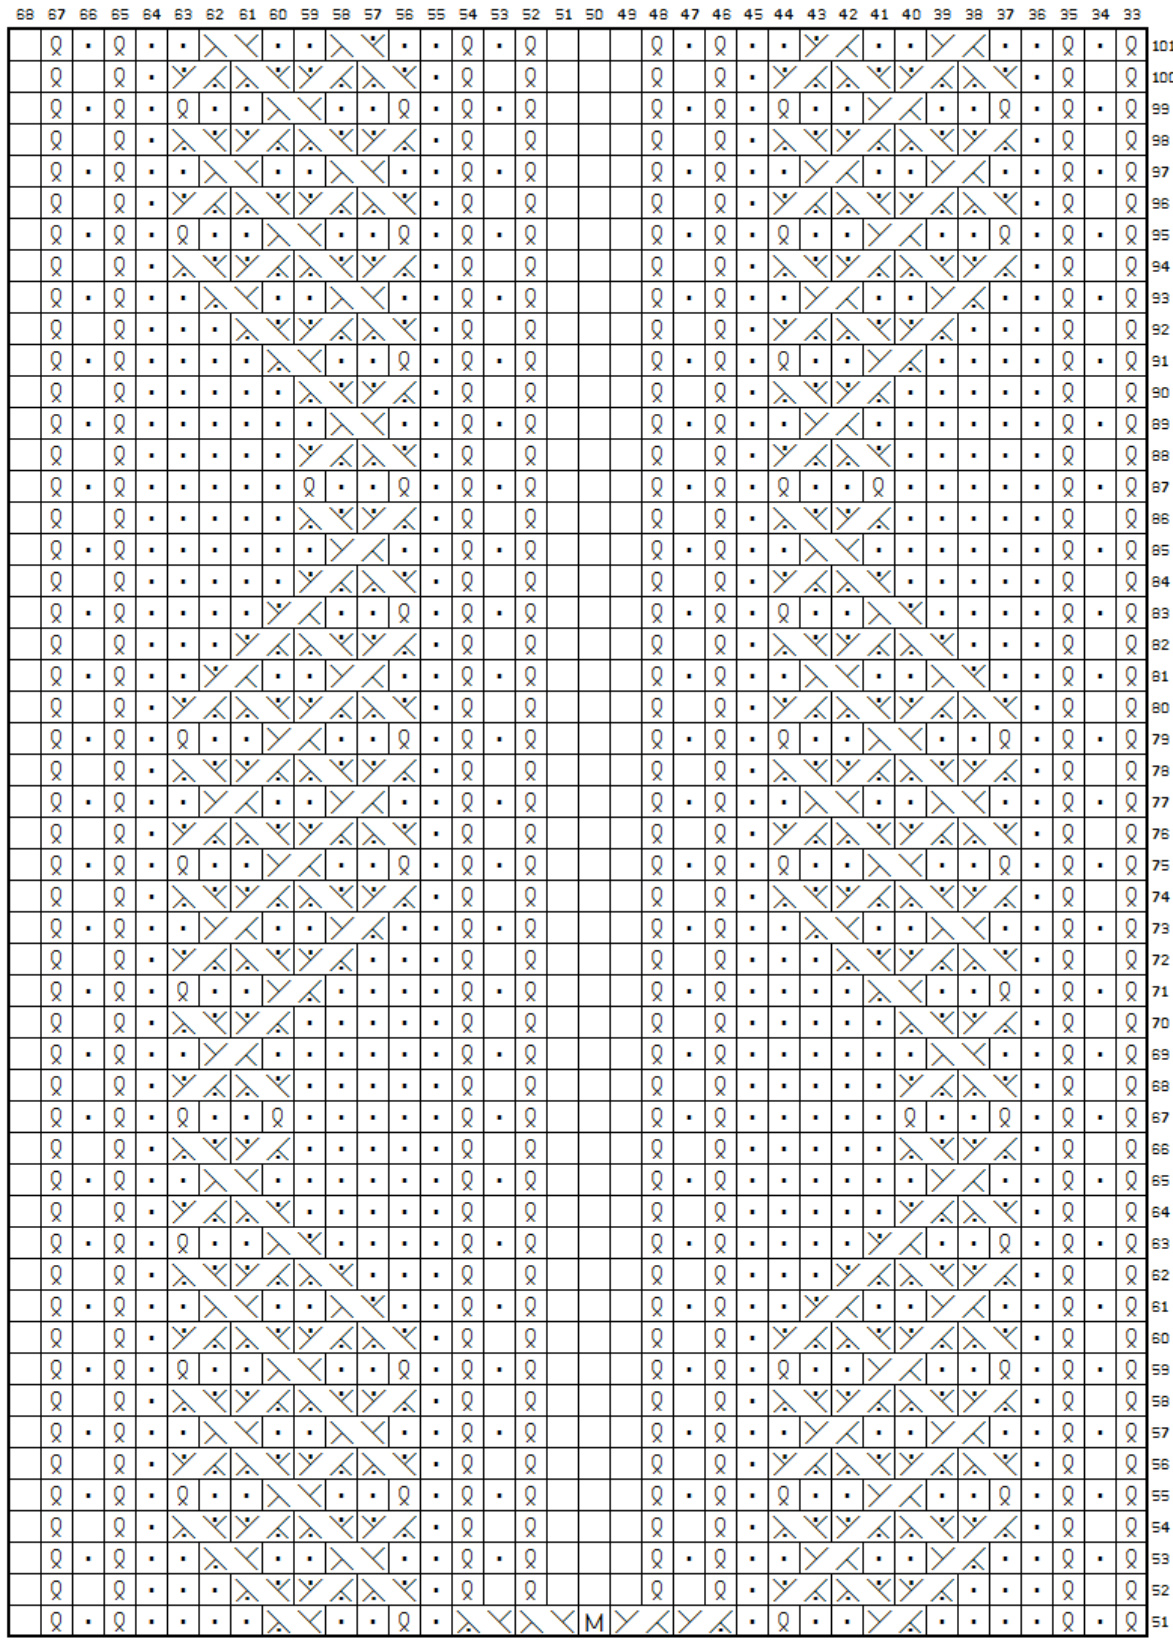
Proceed to Right Leg Charts, aligning it with the Right 1/1/1 Cable of the cuff and working the rest of stitches in Stockinette through Rows 19-101 = 36 sts on Needle 1, 32 sts on Needle 2. You now have a clock design on the outer of the leg: diamond clock motif below the cuff with two clock arms emerging from it. The clock arm closer to beginning of the round is further referred to as "back clock arm", and the clock arm closer to the middle of the round - as "front clock arm".
ARC-EXPANSION AREA
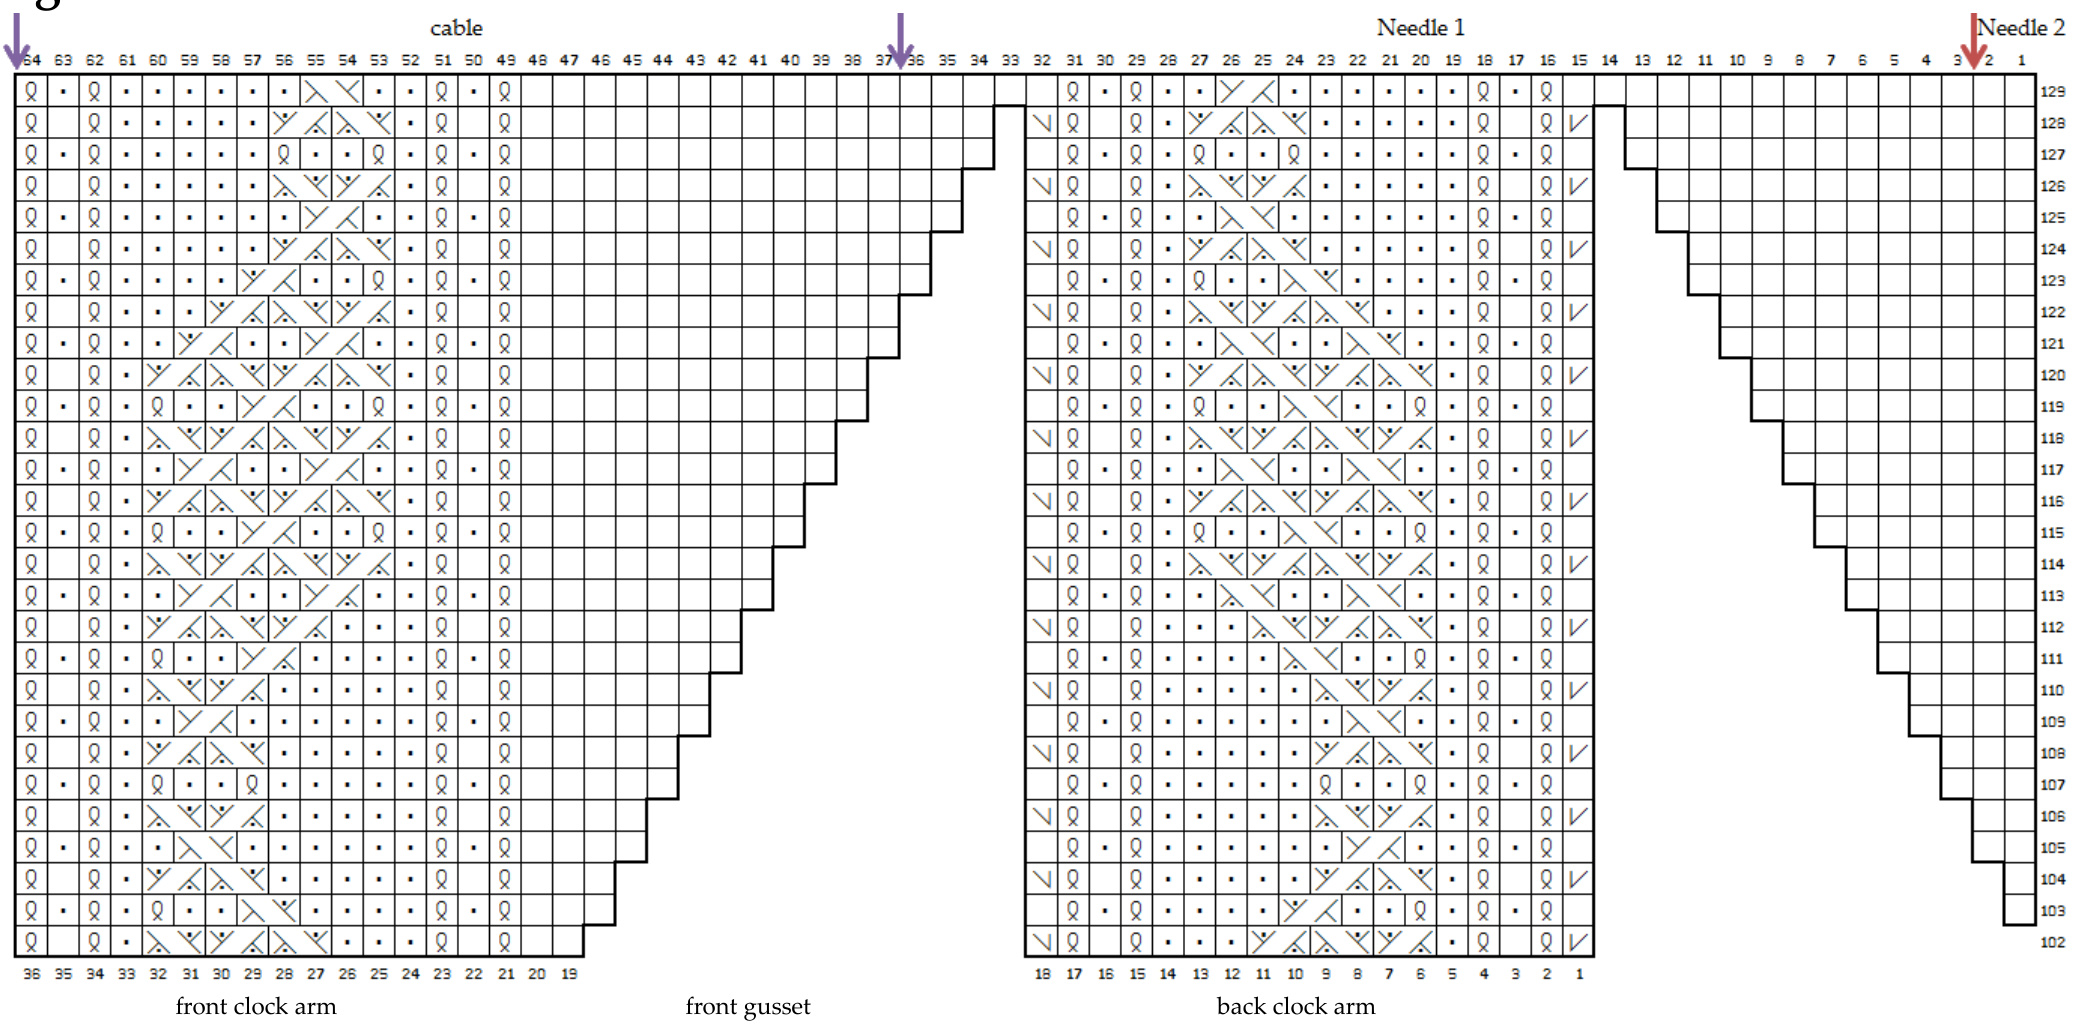
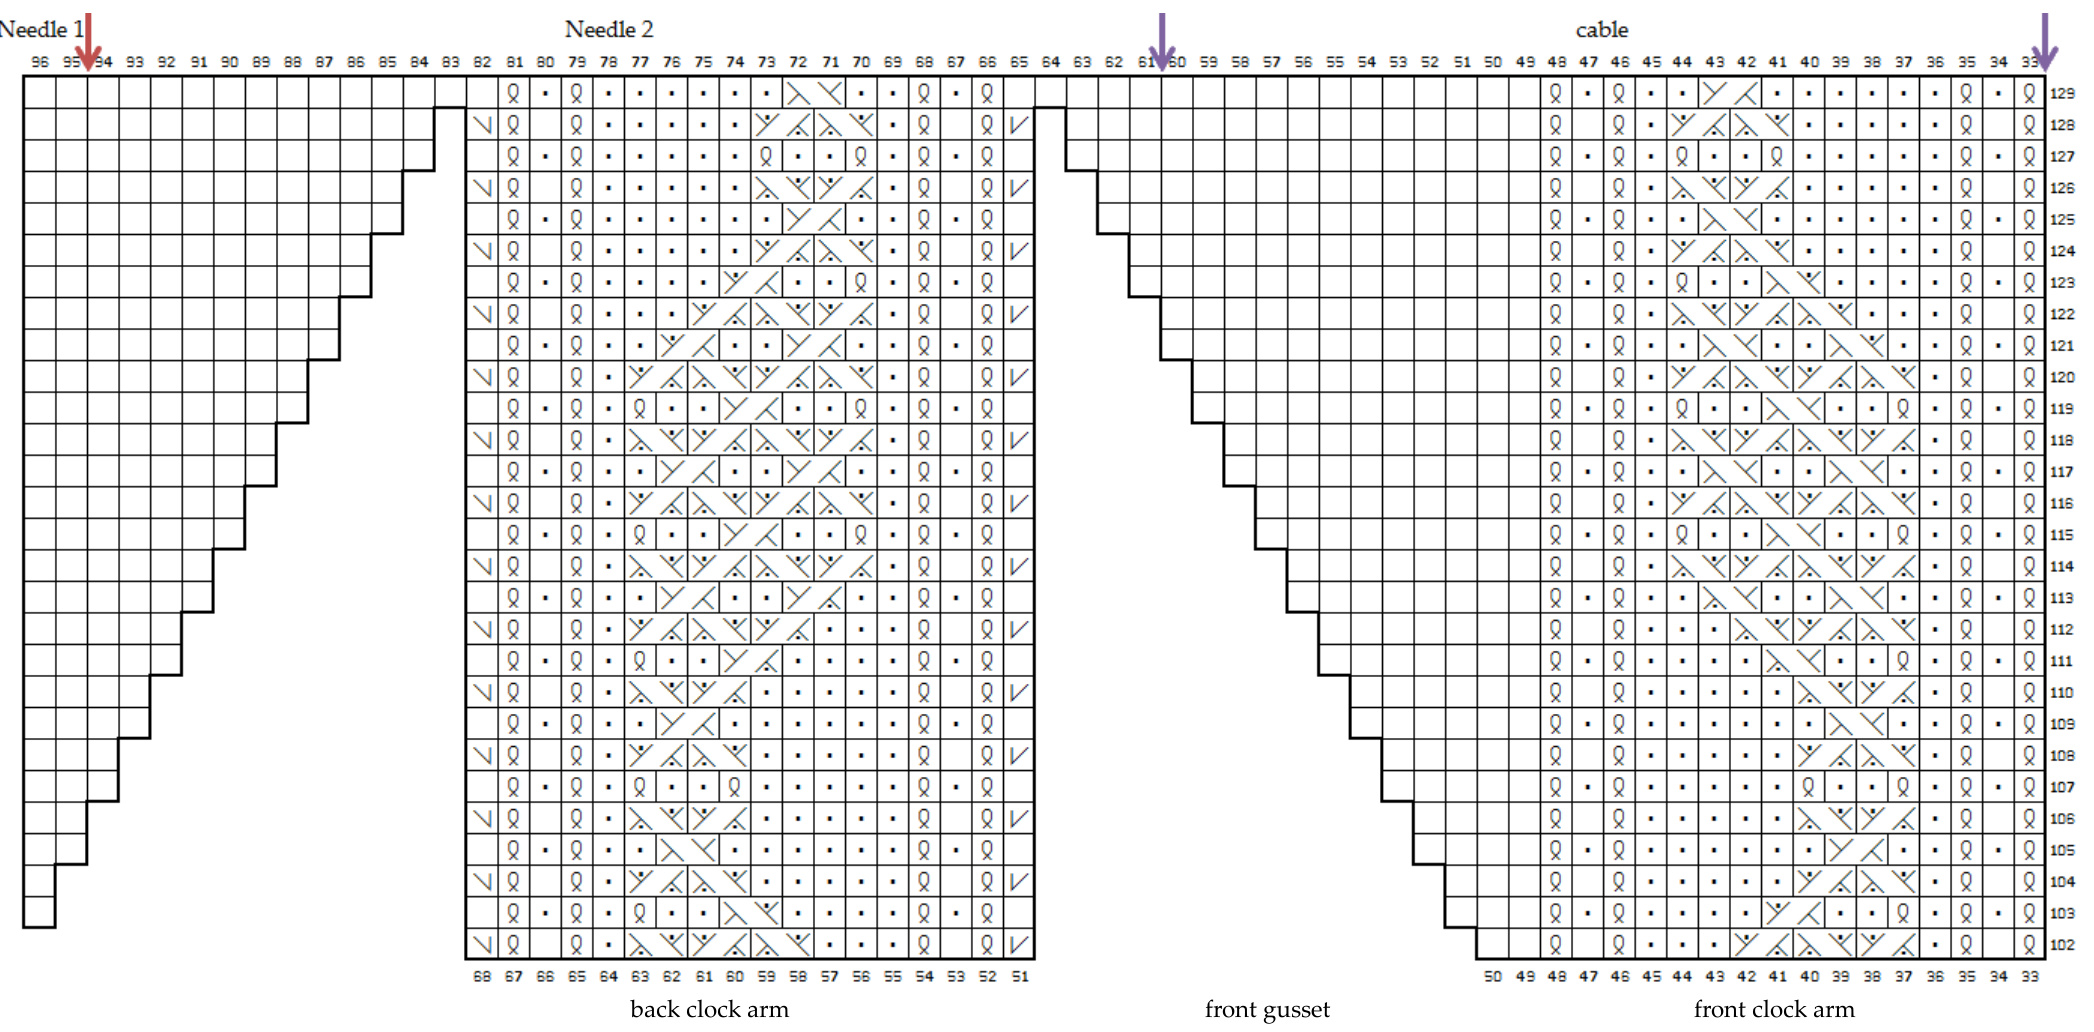
ses for integrated gussets start from Row 102 of Right Arc Chart Round 1: Needle 1: Knit to 1 stitch before back clock arm, lift the right leg of the stitch one row below the rightmost stitch on the left needle and knit it (=Rightleaning Lifted Increase, RLinc), then kl; work next row of back clock arm in pattern as established; k1, lift the left leg of the stitch two rows below the leftmost stitch on the right needle and knit it (=Left-leaning Lifted Increase, LLinc); work next row of front clock arm in pattern as established = 2 sts increased. Needle 2: Knit all stitches. Round 2: Needle 1: Work next row of Right Arc Chart bearing in mind there is 1 additional stitch before back clock arm and another one between both arms. Needle 2: Knit all stitches. Repeat these 2 rounds till the end of Row 129 of Right Arc Chart = 36+28 sts on Needle 1, 32 sts on Needle 2.
HEEL TURN
Rearrange stitches so 28 sts for Instep (16 sts of front clock arm +12 sts of front gusset) are on hold on a cable (purple arrows at the top of Right Arc Chart), 34 sts are on Needle 1, and 34 sts are on Needle 2. Beginning of the round is between needle tips (red arrow at the top of Right Arc Chart). You may need to knit or unravel couple of stitches to reach that point. Note: Feel free to adjust the position of clocks in the way most pleasing for you but please bear in mind this may change the toe patterning. The key is to divide Heel Turn stitches (Needle 1+Needle 2) in two halves after putting Instep stitches on hold. Start as for V-shaped heel turn as follows: Row 1 (RS): kl, ssk, k1, turn. Row 2 (WS): slip 1, p3, p2tog, p1, turn. Row 3: slip 1, knit to 1 stitch before gap, ssk, k1, turn. Row 4: slip 1, purl to 1 stitch before gap, p2tog, p1, turn. Repeat last 2 rows 10 times more, expanding stockinette zone between gaps by 1 stitch at the end of each row = 8+28+8 sts. Continue as for square (Dutch) heel turn as follows: Next row (RS): slip 1, knit to 1 stitch before gap, ssk, turn. Next row (WS): slip 1, purl to 1 stitch before gap, p2tog, turn. Repeat these 2 rows 6 times more, ending with WS row = 1+28+1 sts.
FOOT
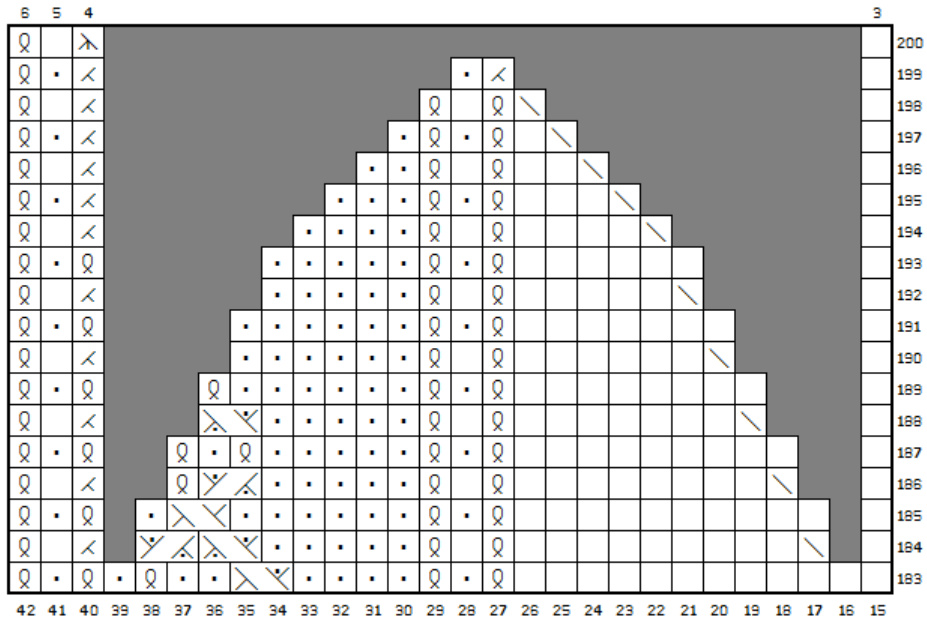
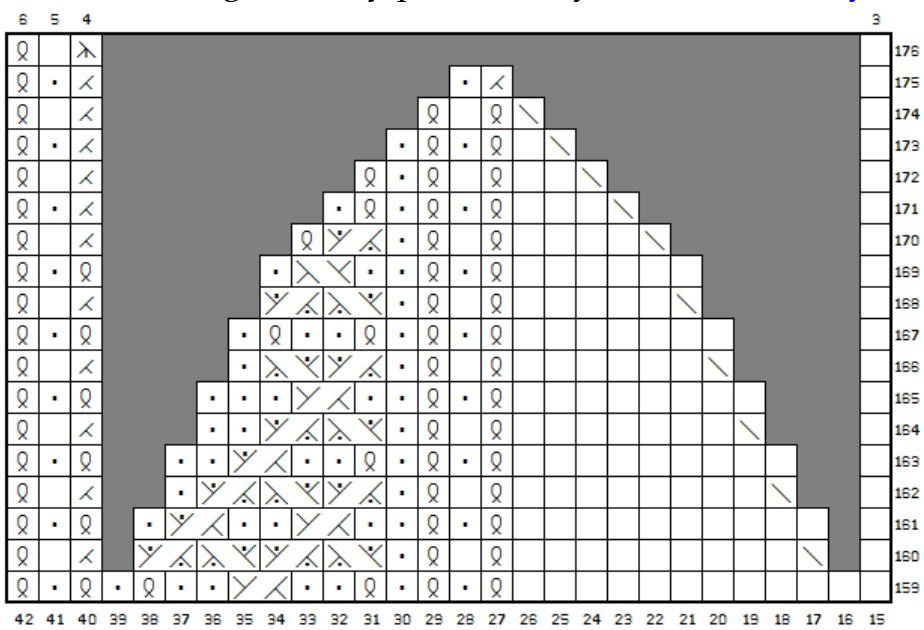
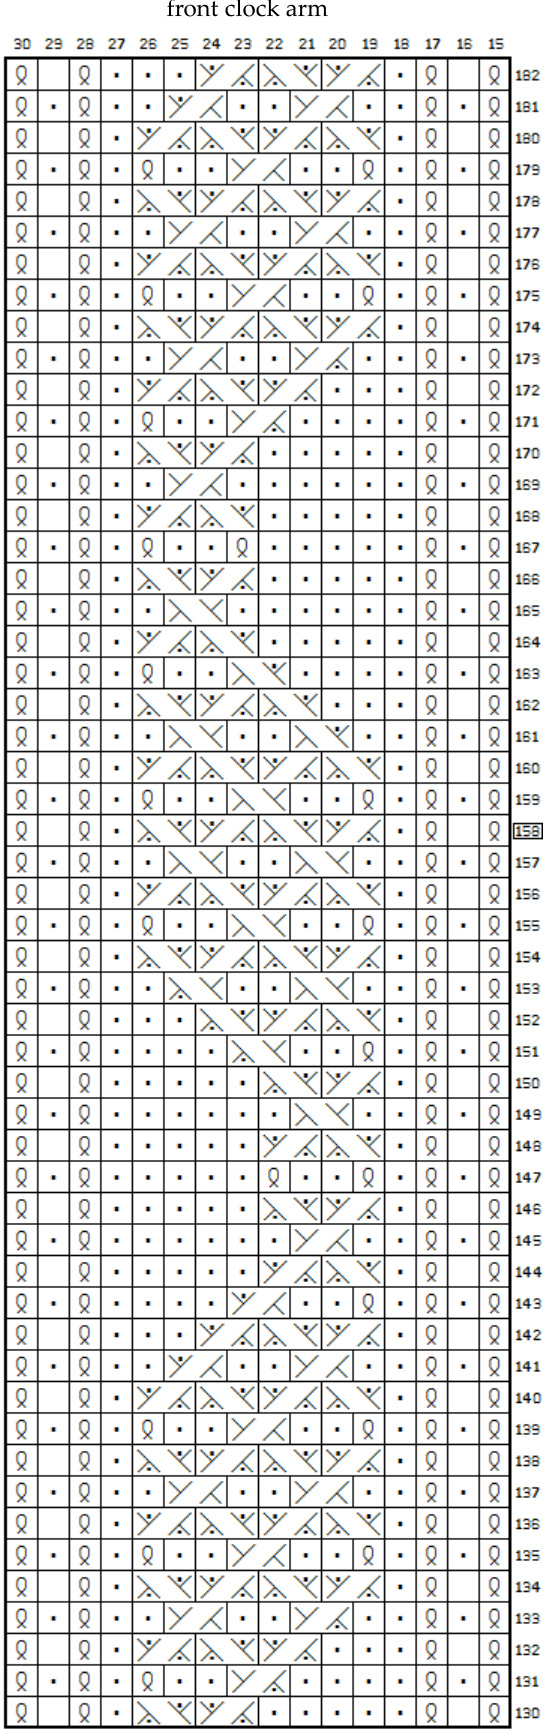
Resume working in the round: Sole: slip 1, knit to 1 stitch before gap, ssk. Instep: knit to front clock arm, work next row of Right Foot Chart. Sole: k2tog, k13 - you're in the middle of the sole with beginning of the round between needle tips = 14+14 sts on Needle 1, 28 sts on Needle 2. Continue in this manner working 28 sole sts and 12 instep sts in stockinette, and 16 sts of front clock arm according to Right Foot Chart, for desired length of foot minus 2" (5 cm). Sample socks have 54 rounds in foot after heel turn with toe decreases started at Row 184 of Right Toe Chart. If you're extremely lucky and 30-rounds or 70-rounds foot is just enough length for you, you may then follow Alternative Right Toe Chart, starting toe decreases on Row 160 or Row 200 respectively. Please note Right Foot Chart stops on Row 182!
TOE
Note: Toe Charts are designed for particular length of foot, so if you need yours to be longer or shorter, the specific chart may be no longer applicable. Please adjust accordingly (you may find Clock Arms Chart of p.18). Decrease round: Sole: knit to last 3 sts, k2tog, k1; Instep: work next row of Right Toe Chart (Alternative Right Toe Chart). Sole: ssk, knit to the middle of the sole. Next round: Sole: knit. Instep: work next row of Right Toe Chart (Alternative Right Toe Chart). Sole: knit. Repeat these 2 rows 4 times more, then work only Decrease round 7 times more = 4+4 sts. Cut the yarn, pull the tail through remaining stitches and draw tight.
LEFT SOCK
Work as for Right Sock, but start the cuff from k1 tbl and place Left 1/1/1 Cable on Needle 2 (= slip knit loop to cable needle and hold to front, slip purl loop to cable needle and hold to back, k1 tbl, p1 from back cable needle, k1 tbl from front cable needle), then follow Left Cuff, Leg, Arc, Foot and Toe Charts, working Left Arc-Expansion Area as follows: Round 1: Needle 1: Knit all stitches. Needle 2: Work next row of front clock arm in pattern as established; knit to 1 stitch before back clock arm, RLinc, then k1; work next row of back clock arm in pattern as established; k1, LLinc = 2 sts increased. Round 2: Needle 1: Knit all stitches. Needle 2: Work next row of Left Arc Chart bearing in mind there is one additional stitch between both clock arms and another one after back clock arm. Repeat these 2 rounds till the end of Row 129 of Left Arc Chart = 32 sts on Needle 1, 36+28 sts on Needle 2. and replacing Decrease round for Left Toe with following: Sole: knit to last 2 sts, k2tog; Instep: work next row of Left Toe Chart (Alternative Left Toe Chart); Sole: k1, ssk, knit to the middle of the sole.
FINISHING
Weave in all ends. Block if desired.
Right Leg Chart 2
| X | 50 | ||||||||||||||||||||||||||||||||
| y | 49 | ||||||||||||||||||||||||||||||||
| y | 48 | ||||||||||||||||||||||||||||||||
| Y | 47 | ||||||||||||||||||||||||||||||||
| 46 | |||||||||||||||||||||||||||||||||
| y | 45 | ||||||||||||||||||||||||||||||||
| 44 | |||||||||||||||||||||||||||||||||
| M | 43 | ||||||||||||||||||||||||||||||||
| 353433 | 32 | 3130 | 29 | 28 | 27 | 2625 | 2423 | 22 | 21 | 20 | 19 | 18 | 17 | 16 | 15 | 14 | 13 12 | 11 | 10 | 9 | 8 | 7 | 6 | 5 | 3 | 2 | |||||||
Right Leg Chart 1
| 42 | |||||||||||||||||||||||||||||||||||||
| 41 | |||||||||||||||||||||||||||||||||||||
| 40 | |||||||||||||||||||||||||||||||||||||
| 39 | |||||||||||||||||||||||||||||||||||||
| 38 | |||||||||||||||||||||||||||||||||||||
| 37 | |||||||||||||||||||||||||||||||||||||
| 36 | |||||||||||||||||||||||||||||||||||||
| 35 | |||||||||||||||||||||||||||||||||||||
| 34 | |||||||||||||||||||||||||||||||||||||
| EE | |||||||||||||||||||||||||||||||||||||
| 32 31 0E 29 28 27 25 24 23 22 21 20 19 | |||||||||||||||||||||||||||||||||||||
| 3332313029282726252423222120 |
Cuff Chart
| X | 17 | |||||||||||||||||||||||||||||||||
| 16 | ||||||||||||||||||||||||||||||||||
| 5 | ||||||||||||||||||||||||||||||||||
| DX | 0 | 4 | ||||||||||||||||||||||||||||||||
| 0 | OX | 3 | ||||||||||||||||||||||||||||||||
| X | 12 | |||||||||||||||||||||||||||||||||
| D | X | DX | D | DX | ||||||||||||||||||||||||||||||
| OX | 0 | 10 | ||||||||||||||||||||||||||||||||
| X | X | 0 | X | |||||||||||||||||||||||||||||||
| X | ||||||||||||||||||||||||||||||||||
| X | D | D | D | |||||||||||||||||||||||||||||||
| DX | DX | DX DX | DX x0 | x 8 | cO | |||||||||||||||||||||||||||||
| DY D | X OX OX | X OX | X | D |
Please note this clock design starts on Needle 1!
| 101 | |||||||||||||||||||||||
| 100 99 | |||||||||||||||||||||||
| 98 | |||||||||||||||||||||||
| 97 | |||||||||||||||||||||||
| 96 | |||||||||||||||||||||||
| 95 94 | |||||||||||||||||||||||
| 93 | |||||||||||||||||||||||
| 1 | |||||||||||||||||||||||
| 90 | |||||||||||||||||||||||
| 88 | |||||||||||||||||||||||
| 87 | |||||||||||||||||||||||
| 86 | |||||||||||||||||||||||
| 85 | |||||||||||||||||||||||
| 84 | |||||||||||||||||||||||
| 83 82 81 80 79 76 S 3 70 89 68 67 66 65 64 62 61 BO 65 67 56 55 54 53 62 | |||||||||||||||||||||||
Right Arc Chart
Right Foot Chart
Right Toe Chart
| 4241403938 | 373635343332313029 | 2B | 27 | 181 180 179 178 177 176 175 174 173 172 171 170 169 168 167 166 165 164 163 162 161 160 159 158 157 156 155 154 153 | |||||||||
| 8 | 8 | 0 | x0 182 | ||||||||||
| 80 x0 | |||||||||||||
| x0 | x | ||||||||||||
| DX | X | 0 | |||||||||||
| 0 | |||||||||||||
| x8 0 | |||||||||||||
| X | x0 | Q | |||||||||||
| 8 | |||||||||||||
| X | 0 | ||||||||||||
| 8 | |||||||||||||
| x | |||||||||||||
| X | 0 | 80 | |||||||||||
| 0 | 0 | 80 | |||||||||||
| x 0 | |||||||||||||
| x x0 | |||||||||||||
| 0 | 0 0 | ||||||||||||
| 0 | |||||||||||||
| X | X | 0 | |||||||||||
| x | |||||||||||||
| 80 | |||||||||||||
| x0 | |||||||||||||
| 0 | |||||||||||||
| ox | |||||||||||||
| DX | DX | ||||||||||||
| X | X | 8 | 152 | ||||||||||
| X | 0 0 | 80 151 | |||||||||||
| x0 150 x0 149 | |||||||||||||
| 148 147 | |||||||||||||
| X | D 0 | Q 146 | |||||||||||
| OX | 80 144 | ||||||||||||
| X X X X OX OX X X | 0 | 0 D OX 0 OX 0 x0 0 0 x0 0 x0 0 | 145 0 143 142 141 140 80 139 x0 138 137 136 135 80 134 80 133 132 131 0 130 | ||||||||||
42414039383736353433323130292827
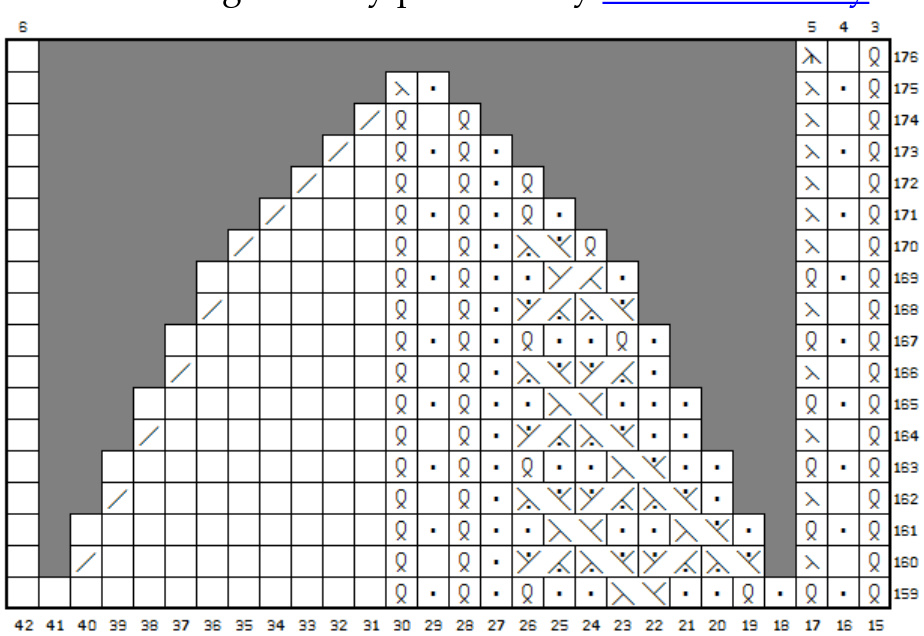
Alternative Right Toe Chart
graciously provided by Larissa Kennedy
Left Leg Chart 2
| 50 | ||||||||||||||||||||||||||||||||
| 49 | ||||||||||||||||||||||||||||||||
| 48 | ||||||||||||||||||||||||||||||||
| 0 | y | 47 | ||||||||||||||||||||||||||||||
| 46 | ||||||||||||||||||||||||||||||||
| 45 | ||||||||||||||||||||||||||||||||
| 44 | ||||||||||||||||||||||||||||||||
| 67 | M | 43 | ||||||||||||||||||||||||||||||
| 6665646362 | 616059 | 58 | 5756555453 | 52 | 88660176594860515 | 3736 | 353433 | |||||||||||||||||||||||||
Left Leg Chart 1
| B65 | ||||||||||||||||||||||||||||||||||||
| 42 | ||||||||||||||||||||||||||||||||||||
| 41 | ||||||||||||||||||||||||||||||||||||
| 40 | ||||||||||||||||||||||||||||||||||||
| 66 | ||||||||||||||||||||||||||||||||||||
| 86 | ||||||||||||||||||||||||||||||||||||
| 96 | ||||||||||||||||||||||||||||||||||||
| 35 | ||||||||||||||||||||||||||||||||||||
| 34 | ||||||||||||||||||||||||||||||||||||
| 66 | ||||||||||||||||||||||||||||||||||||
| 32 31 28 27 26 25 24 23 22 20 19 | ||||||||||||||||||||||||||||||||||||
| 656463626160595857565554535251504948474645444342414039383736353433 |
Left Cuff Chart
| 18 | ||||||||||||||||||||||||||||||||
| DX | ||||||||||||||||||||||||||||||||
| DX | ||||||||||||||||||||||||||||||||
| DX | DX | |||||||||||||||||||||||||||||||
| DX | X | |||||||||||||||||||||||||||||||
| DX | X | |||||||||||||||||||||||||||||||
| D | DX | |||||||||||||||||||||||||||||||
| DX | DX | |||||||||||||||||||||||||||||||
| DX | ||||||||||||||||||||||||||||||||
| X | DX | X | ||||||||||||||||||||||||||||||
| 0 | DX | x | ||||||||||||||||||||||||||||||
| DX | ||||||||||||||||||||||||||||||||
| DX DX | x0 | |||||||||||||||||||||||||||||||
6463626160595857565554535251504948474645444342414039383736353433 Please note this clock design starts on Needle 2!
Left Leg Chart 3
686766656463626160595857565554535251504948474645444342414039383736353433
Left Arc Chart
Left Foot Chart
30292827262524232221201918171615
Left Toe Chart

Alternative Left Toe Chart
Clock Arms Chart
| 5 | |||||||||||||||||||||||||||
| 39 38 | |||||||||||||||||||||||||||
| 85 | |||||||||||||||||||||||||||
| 84 | |||||||||||||||||||||||||||
| 83 | |||||||||||||||||||||||||||
| 20 6 |
In case of emergency use this chart to design your own toe decreases.
Key to Charts
口 k1 k1 tbl 口 p1 Right 1/1/1 Cable: slip knit loop to cable needlle and hold to back, slip purl loop to cable needle and hold to back too, k1 tbl, move first cable needle to front, p1 from back cable needle, k1 tb1 from front cable needle 三 Left 1/1/1 Cable: slip knit loop to cable needle and hold to front, slip purl loop to cable needle and hold to back, k1 tbl, p1 from back cable needle, k1 tbl from front cable needle Right 1/1/1 Cable Increase: slip knit loop to cable needle and hold to back, slip purl loop to cable needle and hold to back too, k1 tbl, move first cable needle to front, k1 tbl from back cable needle, lift the purl bump of the stitch two stitches below right needle onto left needle and knit it tbl, k1 tbl from front cable needle = 1 st increased Left 1/1/1 Cable Increase: slip knit loop to cable needle and hold to front, slip purl loop to cable needle and hold to back, k1 tbl, k1 tbl from back cable needle, lift the purl bump of the stitch two stitches below right needle onto left needle and knit it tb1, k1 tb1 from front cable needle = 1 st increased Z Right 1/1 Cable: slip 1st stitch to cable needle and hold to back, k1 tbl, k1 tbl from cable needle MN MN Left 1/1 Cable: slip 1st stitch to cable needle and hold to front, k1 tbl, k1 tbl from cable needle ZZ Right 1/1 Twist: slip 1st stitch to cable needle and hold to back, k1 tbl, p1 from cable needle MN MW Left 1/1 Twist: slip 1st stitch to cable needle and hold to front, p1, k1 tb1 from cable needle make 1 knit make 1 purl Right-leaning Lifted Increase (RLinc): lift the right leg of the stitch one row below the rightmost stitch on left needle and knit it, then k1 Left-leaning Lifted Increase (LLinc): k1, then lift the left leg of the stitch two rows below the leftmost stitch on right needle and knit it 囚 Right-leaning twisted decrease: slip 1st stitch to cable needle and hold to back, slip 2nd stitch purlwise, k1 tbl from cable needlle, psso Left-leaning twisted decrease: k2tog tb1 k2tog 口 ssk slip 1 purlwise, k2tog tbl, psso 口 no stitch cables shown in yellow are the only difference between Right and Left clock designs


