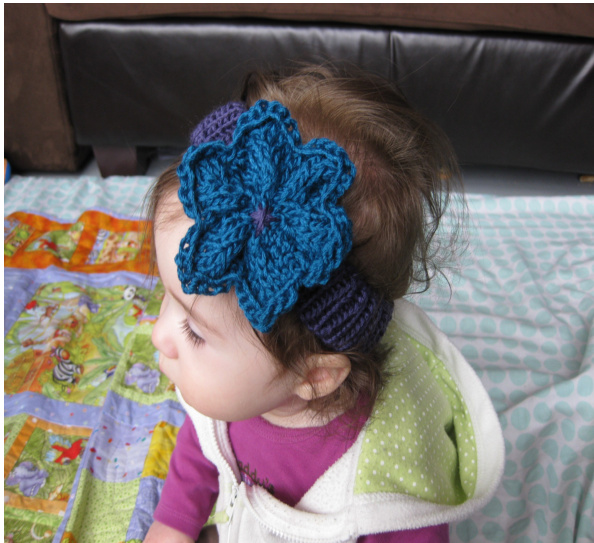
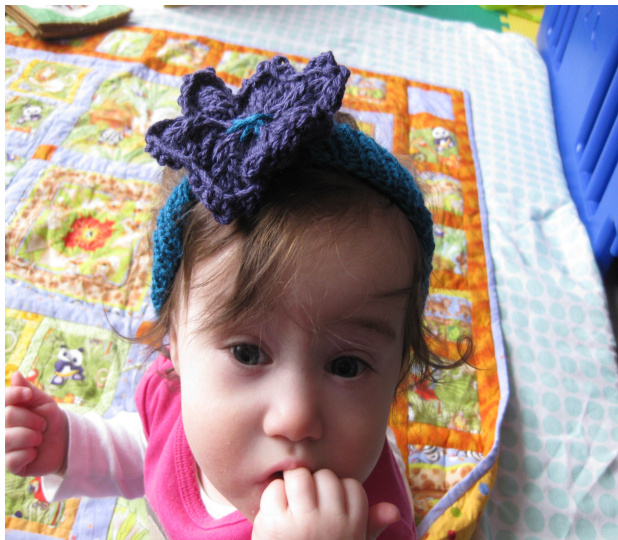
Beatrix Flower Headband by Kimberly Golynskiy
Yarn: Naturally Caron Country (Peacock and Deep Purple shown) - use two colors, one for the headband and the center of the flower (MC), and one for the flower (CC) - This is a great project for scrap yarn because it doesn't usemuch Gauge: I hate gauge. No gauge. Needles: one set 16 inch size 4 (3.5mm) OR 7 (4.5mm) circular needles, one set size 8 (5mm) straight needles, one tapestry needle Size: 3-6 months, 6-12 months Key: K2tog - knit the next two stitches together (1 stitch decrease) P2tog - purl the next two stitch together (1 stitch decrease) SSK - slip one stitch knitwise, then slip the next stitch knitwise, then insert left needle into the front loops of the slipped stitches and knit them together from this position (through the back loops) (1 stitch decrease) YO - yarn over (1 stitch increase)
Headband:
For size 3-6 months, cast on 70 stitches on 16 inch, size 4 (3.5mm) circular needles in MC For size 6-12 months, cast on 70 stitches on 16 inch, size 7 (4.5mm) circular needles in MC Place marker at the beginning and join in the round Knit 10 rows 1x1 rib (K1, P1 all) Bind off in rib. Leave a long tail to use to both secure the flower to the headband and use as the color for the center of the flower.
Flower:
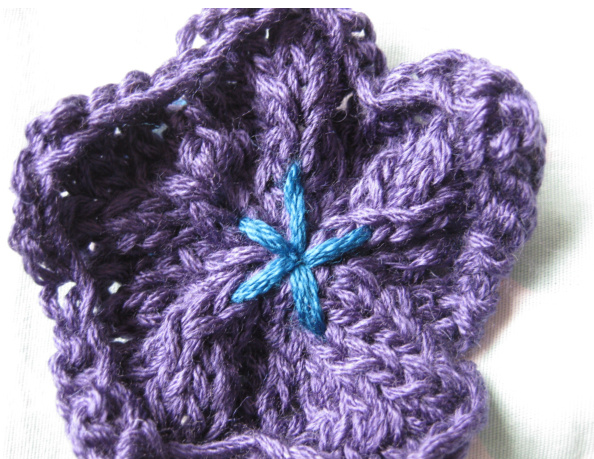
Cast on 46 stitches on size 8 (5mm) straight needles in CC Row 1: Purl all Row 2: K1, (YO, K2, SSK, K2tog, K2, YO, K1) repeat to end Row 3: Purl all Row 4: (K2, SSK, K2tog, K2, YO, K1, YO) repeat to last stitch, then K1 Row 5: Purl all Row 6: (K2, SSK, K2tog, K2, YO, K1, YO) repeat to last stitch, then K1 Row 7: Purl all Row 8: (K1, SSK, K2tog) repeat to last stitch, then K1 (28 sts) Row 9: P2tog all (14 sts) Row 10: K2tog all (7 sts) Cut a long tail (you need enough to attach it to the headband). Using a tapestry needle, thread yarn through the stitches on the needles, pull closed and using the tail, whipstitch the open sides together to close the flower.
Finishing:
Using a tapestry needle, pull the tails from the cast on/bind off area of the headband up through the middle of the flower. Make a decorative contrasting color by stitching outward from the middle in a star pattern (see photo for detail). Using the yarn tail of the flower, attach it to the headband. Weave in ends (they're easy to hide under the flower).
Note on sizing: If your headband comes out too large for the size you want, reduce the number of stitches by an even number. You can use any yarn for this project, but may need to tweak the number of stitches based on the thickness (thicker yarn = fewer stitches, thinner yarn = more stitches), but always in even numbers.


