OMORIKA
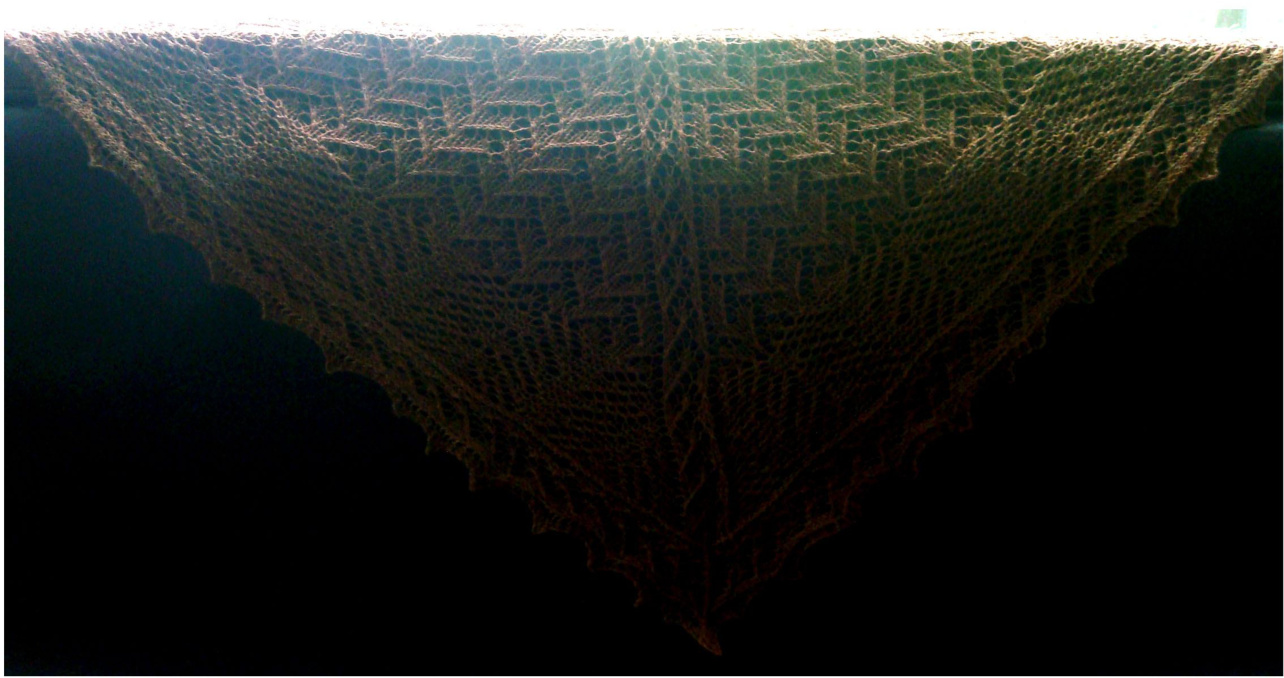
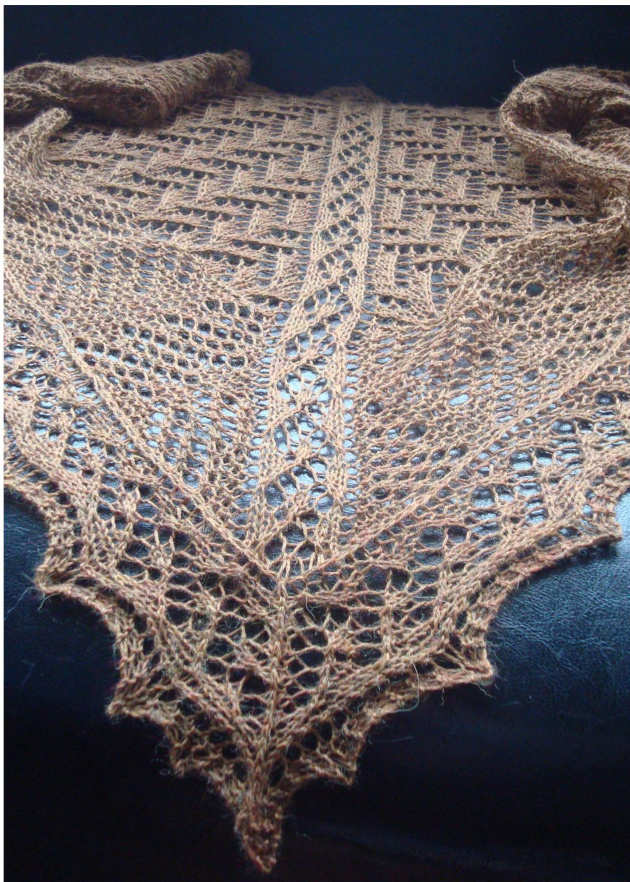
Omorika is a very transitional shawl for the period in my life that it was designed. The design reflects that, with an Escher-inspired design as the first element, and a rigid, asymmetrical garter stitch design on the bottom. A beautiful, twisting border and spine finish this shawl off, and give it the right touch of elegance while not overwhelming the geometry of the design. Coupled with a soft yarn, this shawl is the perfect pattern to toss over your shoulders for an evening out, or an afternoon in.

Materials:
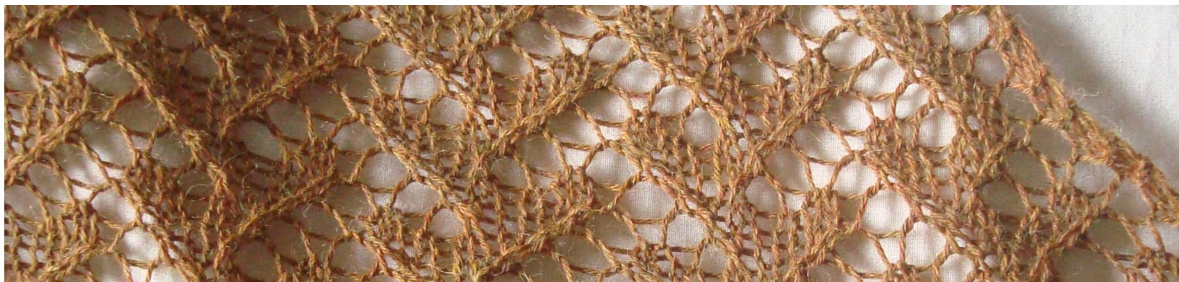
3.25 mm [3 US] circular knitting needles Approximately 400 yards fingering [sock] weight yarn TheshawlshownwasknitinBerroccoUltraAlpacaFine Stitchmarkers Darning needle Blocking pins
Gauge:
Not important.
Pattern Directions:
Casting On: 1. Using a provisional cast on of your choice, cast on four stitches. Knit back and forth for 26 rows, or until you have 13 bumps on each side of the fabric. Turn. 2. K3, PM, K1, pick up 3 stitches, YO, PM, pick up 7 stitches, PM, YO, pick up 3 stitches, K1 from provisional cast on edge, PM, K3 from provisional cast on edge. Turn. 3. K3, purl to last three, K3. [The first and last three of every row are always knit.] Chart A:


2
Centre Spine Chart:
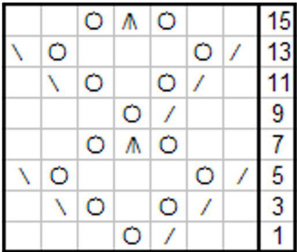
\*\*A note about rows in this section-the even rows are uncharted. This is because they are all worked asdirectedinthewritteninstructions,K3,purltolast3,K3. Main Body Set Up: 1. K3, Work row 1 of Chart A, work Row 1 of Centre Spine Chart, work Row 1 of Chart A, K3. Turn. 2. K3, purl to last three, K3. Continue in this fashion until all 16 rows have been completed. \*\*A note about the design. This design is NOT symmetrical. If you would like to make it symmetrical, please flip Chart A for the second section after knitting the spine [K2tog becomes SSK, etc.]. Chart B:
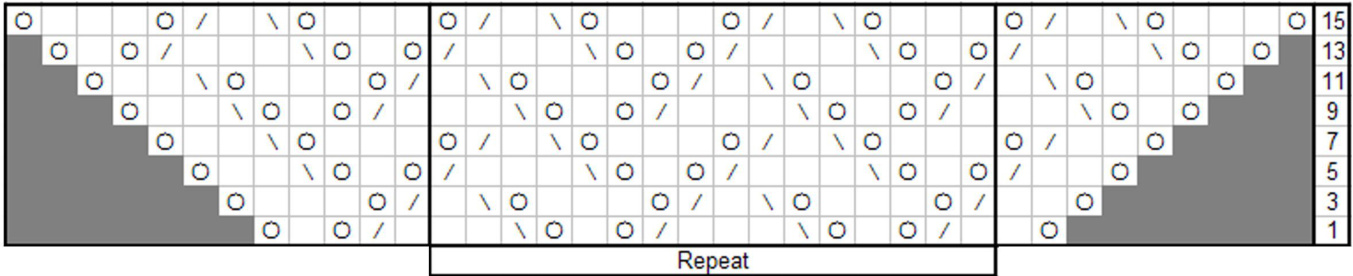
Main Body: 1. K3, work row 1 of Chart B, work row 1 of Centre Spine Chart, work Row 1 of Chart B, K3. Turn. 2. K3, purl to last three, K3. Repeat chart B in its entirety four times, ending on Row 15 16. [last four repeats] Knit across.

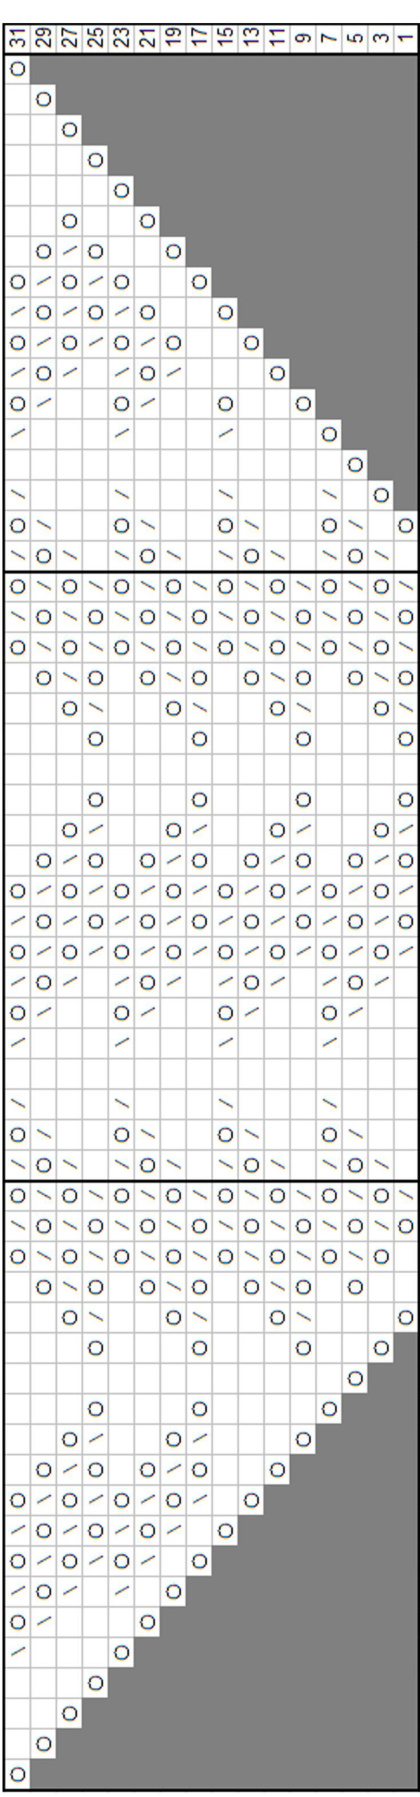
Chart C:
Body Section Two:
1. K3, work row 1 of chart C, work row 1 of Centre Spine Chart, work row 1 of chart C, K3. 2. K across. Continue working in this fashion until all 32rows of Chart C are completed DO NOT BREAK YARN. RightEdgingSetUp: 1. K3, YO, K1, turn. 2. S1 purlwise, P1, K3. Repeat rows 1 and 2 until you have added 9 stitches[13 stitches for edging to be worked back and forth].
Right Edging Chart:
| Q | 25 | ||||||||||||
| 0 | 23 | ||||||||||||
| ! | 21 | ||||||||||||
| ! | 19 | ||||||||||||
| ! | ! | 0 | 17 | ||||||||||
| ! | 15 | ||||||||||||
| ! | 0 | 13 | |||||||||||
| 0 | ! | 0 | 11 | ||||||||||
| 9 | |||||||||||||
| 6 | M | ! | 7 | ||||||||||
| ! | 5 | ||||||||||||
| 6 | 3 | ||||||||||||
| ! | ! | 1 |
1. Work Right Edinging Chart. Turn 2. S1 purlwise, P to last three, K3. Continue in pattern until you have knit all the right side stitches up to, but not including, the centre stitch of the Centre Spine Chart. Break yarn, leaving a long tail to weave in later. Left Edinging Setup: 1. Attach yarn to far left edge of shawl. K3, YO P1. Turn 2. S1 purlwise, K 4. Repeat rows 1 and 2 until you have added 9 stitches [13 stitches for edging to be worked back and forth]. Left Edging Chart:
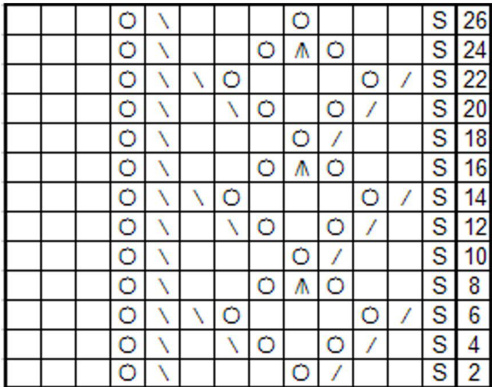
\* \*A note about this point in the shawl -if you've followed the directions exactly, you should be looking at the wrong side of the shawl. Therefore, this chart works a bit differently than the others. You will begin with a WS row, and work the charted rows [even] on the RS. 1. K3, P9, P2tog. 2. Work Row 2 of Left Edging Chart. Continue in this fashion, ending on an odd row, until you have knit all the right side stitches up to the centre stitch of Centre Spine Chart. Make sure that you have not knit the centre stitch of the Centre Spine Chart!! Break yarn, leaving a long tail to weave in later. ow here's where things get funny, and you will need to use your sense as a knitter 1. Attach yarn at right edge, RS facing you. Work Right Edging chart in pattern to last stitch, S2K1 PSSO, work Left Edging Chart in pattern. 2. K3, purl across, K3. Continue in this fashion until you have knit those centre three together enough times that all the pattern stitches are gone [only the centre stitch and the six edging stitches remain]. You may have to stop knitting in pattern sooner rather than later, and your edges may not match. Rest assured that as long as you are decreasing one stitch from either edge as you go, this part will turn outokay. 1. K2, S2K1PSSO, K2, turn. 2. K all. 3. K1, S2K1PSSO, K1, turn. 4. Bind off. Soak in warm water and block firmly. Allow to air dry. Weave in all ends. Wear. Enjoy. \* \* This chart has only been tested by myself. There may be errors. If you find any errata or anything you think may be errata, or if anything is unclear, please don't hesitate to contact me.

6


