Multi-Purpose Pointies
by Sunshine Stewart
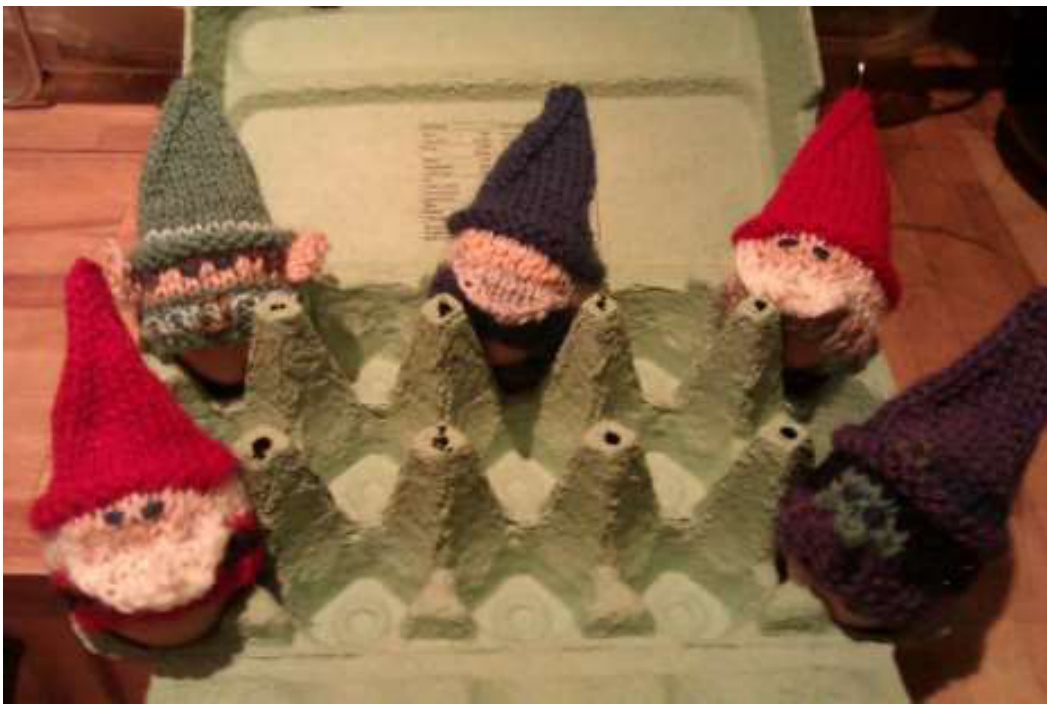
This is a core pattern which can be altered to make 5 different pointy headed characters (wizard, witch, Santa, elf and gnome). The characters can then be used for a range of purposes. Instructions are included for use as an egg cosy, catnip toy, lavender sachet, pocket warmer, ornament and game piece. This is a great way to use up yarn left over from other projects. All are worked flat from the bottom up and then seamed to finish.
Tools and Materials
Less than 10g DK yarn Two double pointed needles in size 6 US (4mm) Embroidery needle or crochet hook Depending on the end use, in addition to the needles and yarn, you may need: Catnip toy, lavender sachet, ornament and game piece Sewing thread Sewing needle Cotton stuffing A small circle of fabric (2 1/4inch across) Catnip toy Catnip Lavender sachet Lavender @2013 Sunshine Stewart http://www.ravelry.com/designers/sunshine-stewart https://www.etsy.com/shop/mymamaknits Game piece Dried beans Pocket warmer Rice or lentils 2 small buttons 2 small pieces of cotton fabric Note about usage: Copyright 2013 - Sunshine Stewart. The Multi-Purpose Pointies patterns and associated images, charts and instructions may not be republished, copied, manipulated or transmitted in any way without permission from the author, Sunshine Stewart. Finished goods made from these patterns are for personal use only and not for making items for profit by sale.
Pocket Warmer Flap:
CO 12 stiches in your coat colour P1, K1 rib for two rows P1, K1, yo, K2tog, (P1, K1) 2x, K2tog, yo, P1, K1 P1, K1 rib for 10 rows CO 9 stitches and K1, P1 rib across these and the original 12 stitches CO 9 stitches. You should now have 30 stitches. Continue as per the coat instructions below. Coat: For all CO 30 stitches in your coat colour Row 1: K1, P1 rib across entire row Row 2 - 5: Repeat Row 1. If your character needs a belt, switch to the belt colour for rows 3 and 4 andreturn to thecoat colour for row5. Row 6: still using the coat colour. Knit the entire row. Face: Santa, Gnome and Wizard Row 7: Change to your beard/hair colour and Purl the entire row Row 8: Knit 12 still using the hair colour, knit 6 in flesh colour, knit 12 in hair colour Row 9: Purl 12 in hair colour, purl 6 flesh, purl 12 hair colour Row 10: Knit entire row using the hair colour Elf Row 7: Change to your flesh colour and Purl the entire row Row 8: Knit 12 still using the hair colour, knit 6 in flesh colour, knit 12 in hair colour Row 9: Purl 12 in hair colour, purl 6 flesh, purl 12 hair colour Row 10: Knit entire row using the hair colour Row 7: Purl 12 stiches using your hair colour, Purl 6 in flesh colour, Purl 12 in hair colour @2013 Sunshine Stewart http://www.ravelry.com/designers/sunshine-stewart Row 8: Knit 12 still using the hair colour, knit 6 in flesh colour, knit 12 in hair colour Row 9: Purl 13 in hair colour, purl 4 flesh, purl 13 hair colour Row 10: Knit entire row using the hair colour Hat: For all Row 11: Change to your hat colour and Purl the entire row Row 12: Purl entire row Row 13: Knit entire row Row 14: K1, K2tog, knit to last three stitches, K2tog, K1 (28) Row 15: Purl entire row. If your hat has a band use that colour for this row. Row 16: K1, K2tog, knit to last three stitches, K2tog, K1 (26) Row 17: Purl entire row. Row 18: K1, K2tog, knit to last three stitches, K2tog, K1 (24) Row 19: Purl entire row. Row 20: (K6, K2tog) 3x (21) Row 21: Purl entire row. Row 22: (K5, K2tog) 3x (18) Row 23: Purl entire row. Row 24: (K4, K2tog) 3x (15) Row 25: Purl entire row. Row 26: (K3, K2tog) 3x (12) Row 27: Purl entire row. Row 28: (K2, K2tog) 3x (9) Row 29: Purl entire row. Row 30: (K1, K2tog) 3x (6) Row 31: Purl entire row. Row 32: (K2tog) 3x (3) For anything other than an ornament, pull through the yarn and tie off. I leave a long tail and use this to seam the back. For an ornament continue on as follows Row 33: Purl entire row. Row 34:K2tog,K1 Do not turn, but instead use your DP needles to work the remaining two stiches as an I-Cord until it measures 6 inches. Pull through the yarn and tie off. You will then fold this over and attach the cast off end to the hat tip to make the loop for hanging your ornament.
Embellishments
Add the features below to give your characters some personality Beard: Gnome, Santa, Wizard With the hat towards you, pick up 10 stiches from the bottom (nearest coat) all hair row, centering the picked up stiches under the flesh of the face. @2013 Sunshine Stewart http://www.ravelry.com/designers/sunshine-stewart Row 1: Knit across entire row Row 2: P2tog, P6, P2tog Row 3: K2tog, K4, SSk Row 4: Purl entire row Row 5: K2tog, K2, SSk Row 6: Purl entire row Row 7: K2tog, SSk Row 8: Purl entire row Pull yarn through and tie off. It will be pretty curly.. I tacked mine down near the middle of the beard while weaving in the ends so that only the tip curls up. Use an embroidery needle or crochet hook to add some eyes. I have done two simple stiches on either side of the centre stich of the top row of the face for all except the witch whose eyes are on the 2nd from the top row. Use an embroidery needle or crochet hook to add the buckles. I have done a simple square of stiches around the centre of the belt and hat band Ears: Elf Using the flesh colour CO 4 Row 1: Knit entire row Row 2: P2tog,P2 Row 3: K1, K2tog Cast Off with a long tail Make the second that same as the first. Use the long tail to sew the ear into place Witch (or any other you feel needs a nose!) Pick up two stiches from the centre of the face, under the eyes. With DP needles work as for an I-Cord for three rows. Pull through yarn and tie off Finishing off For all Seam up the back and weave in all ends. If you are making an egg cosy, get them eggs boiled up cuz you're done!
Ornament
Santa and his elf are perfect for the Christmas tree. Or maybe you prefer a witch to hang on your rear view mirror. If you forgot or missed the step for adding your hanging loop above, simple pick two stiches up from the top of the hat now and work your I-Cord. (You could also skip this step and use some ribbon for the loop.) Lightly stuff your character with cotton stuffing and close up the character by sewing your circle of fabric to the bottom.
Game Pieces
Wizard toss anyone? Or why not make teams of gnomes in different colour hats for a game of tic-tac-gnome or gnome checkers? Lightly stuff your character with cotton stuffing. Add a small handful of dried beans before closing up to give the figure a bit of stability and weight. Close up the character by sewing your circle of fabric to the bottom.
Lavender Sachet
Keep your undies smelling sweet with a lavender scented pointie. Lightly stuff your character with cotton stuffing and dried lavender. Close up the character by sewing your circle of fabric to the bottom.
Catnip toy
Let your cat enjoy an elf or two. Lightly stuff your character with cotton stuffing and dried catnip. I put my catnip in the middle of the stuffing to ensure it stays in while my cat practices alligator death rolls with the figure...Close up the character by sewing your circle of fabric to the bottom.
Pocket Warmer
Perfectly pocket sized these little pals are perfect for those chilly mornings. Sew the two small buttons on to the back of your figure's coat. Get a piece of paper and lay your pointie flat on it. Trace around it making a triangular shape about % inch bigger than the figure. Use this template to cut two pieces of cotton fabric. With right sides facing sew up the fabric leaving a small hole which you can then use to turn the shape right side out. Once you have turned it, fill with rice or lentils and sew up the hole. This insert can now be heated in the microwave and then buttoned into your pointie. \*Heating the insert should not take very long, and I recommend you start by heating it about 10 seconds at a time until you know how long it will take. You want it warm not burning! \*Only heat the insert - never heat the entire pointie and make sure the fabric you have used for the insert is cotton. Some yarns and fabrics will melt in the microwave!
Abbreviations
CO = cast on k = knit kfb = knit into the front and back of the stitch k2tog = knit 2 stitches together p = purl p2tog = purl 2 stitches together SSK = slip, slip, knit yo = yarn over @2013 Sunshine Stewart http://www.ravelry.com/designers/sunshine-stewart https://www.etsy.com/shop/mymamaknits


