Ruffle Tops
Materials
Yarn for top of hat: Ruffle yarn - Approximately 1 skein of Red Heart Sashay or Bernat Twist and Twirl (after trying many brands, these are the two which hold their shape the best.) Plus a matching worsted weight yarn. Yarn for bottom of hat, earflaps, braids: yarn in a variety of colors. See individual variations for specific colors. Crochet Hooks: G, H, J Miscellaneous: yarn needle, 2 small black buttons, sewing needle and thread Gauge: 4" = 10 hdc and 7 rounds with J hook Sizes: newborn to adult Note: Please look over ENTIRE pattern before beginning. Top part (increase rounds) are worked in continuous rounds. Do not join unless stated. Check information and material list under desired variation (i.e. lala, clown) BEFORE starting hat.
Working With Ruffle Yarns
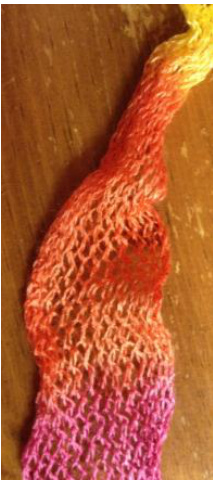
Working with these yarns is a different experience. I am going to share some of my experiences to better help you on this adventure. Photos below are a few tips. The actual pattern starts on page 3. First, take it slow. This is not a fast project. Once you accept this fact, the whole experience will be a happier one. This project works in alternating rounds, one round ww, then one round ruffle yarn. Scarves are created differently.All brands are not created equally! I LOVE the primary colors of Starbella, but found it limp and lifeless. Bernat Twist and Twirl was my favorite, but there isn't a large variety of colors. First, unroll several feet of yarn as shown in photo. The skein/yarn tends to get twisted. Take a break every once in a while and untwist yourself. Insert hook into next st. We will be working in single crochet.
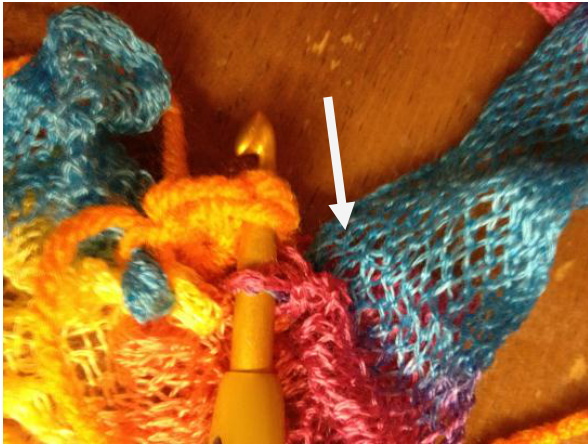
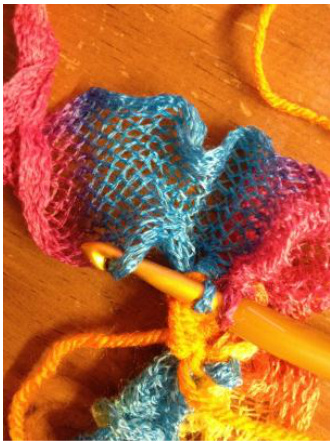
Stick hook through a space in yarn, close to hook and along one edge of ruffle yarn (see arrow in photo at left). Pull through stitch.
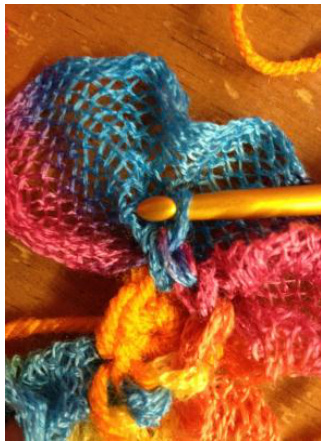
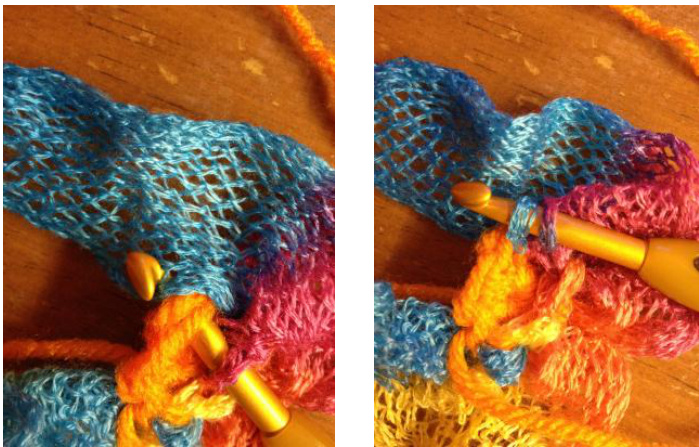
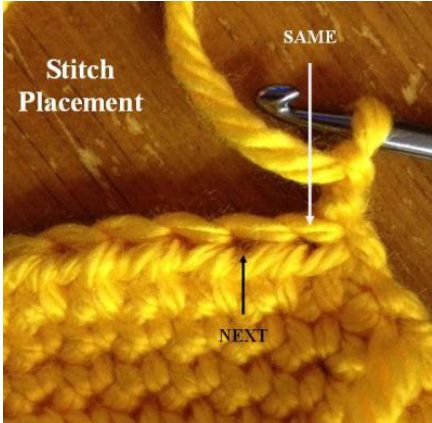
Insert hook into a space in yarn approximately 1-1.5" awav from first space.
Add one round of worsted weight in between rounds of ruffle yarn. First stitch complete. ade a GREAT how to video: http://www.youtube.com/watch?v=YJfoNf2AD9 Features for ALL sizes are after base hat section. Note: Begin each hat with a magic loop of 8 sts, equal to 8 sc. Hat is worked in rounds, alternating worsted weight yarn and ruffle yarn to begin with. At end of each round place current yarn in front of work (opposite of where it normally would go) and pick up other strand. Repeat each round. Don't let your ruffle rounds get too loose. Keep track of stitch counts on ww rounds to keep the hat coming together.
Directions for all sizes:
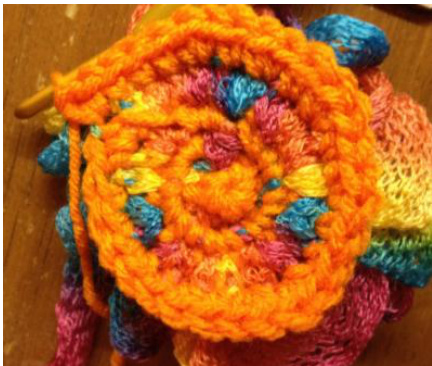
Work through increase round for desired size, then skip to "body". With J hook and WORSTED WEIGHT YARN, start with a magic circle of 8 sts (or preferred method for starting a circle of 8sts). Place marker to keep track of beginning of round. Drop ww yarn and pick up ruffle yarn. 1. (ruffle) Sc in each st to end of round (8sts). 2. (ww) 2sc in each stitch around (16sts). 3. (ruffle) Sc in each st to end of round. 4. (ww) \*sc, 2 sc in next st\*, repeat to end of round. (24sts) 5. (ruffle) Sc in each st to end of round. 6. (ww) \*sc 3, 2 sc in next st\*, repeat to end of round. (30sts) newborn 7. (ruffle) Sc in each st to end of round. 8. (ww) \*sc 4, 2 sc in next st\*, repeat to end of round. (36sts) 3-6 mths 9. (ruffle) Sc in each st to end of round. 10. (ww) \*sc 5, 2 sc in next st\*, repeat to end of round. (42sts) 6-12 mths 11. (ruffle) Sc in each st to end of round. 12. (ww) \*sc 6, 2 sc in next st\*, repeat to end of round. (48sts) 12-24 mths 13. (ruffle) Sc in each st to end of round. 14. (ww) \*sc 7, 2 sc in next st\*, repeat to end of round. (54sts) Child/preteen 15. (ruffle) Sc in each st to end of round. 16. (ww) \*sc 8, 2 sc in next st\*, repeat to end of round. (60sts) Teen/Adult
BODY:
Next 3 rounds (all sizes): With ruffle yarn, sc in each st to end of round. Change to ww. Sc in each st to end of round. Change to ruffle yarn. Sc in each st to end of round. Sl st in next st. Skip to instructions for desired variation (clown, lala, annie) to finish the hat.
\~VARIATIONS\~ Complete the above pattern first, following the colors listed below.
IMPORTANT NOTE: Before starting the bottom half of hat please be aware you need to attach the next yarn so the ruffles are towards the outside of your hat. Main part of hat is continued with a J hook. If you tend to crochet loosely, switch to an I hook at this point. If worsted weight yarn is preferred for bottom half of hat, please use an I hook AFTER ruffle rounds and do NoT work an extra decrease round. Features: All features are attached with a yarn needle and yarn tail or sewing needle and matching thread.
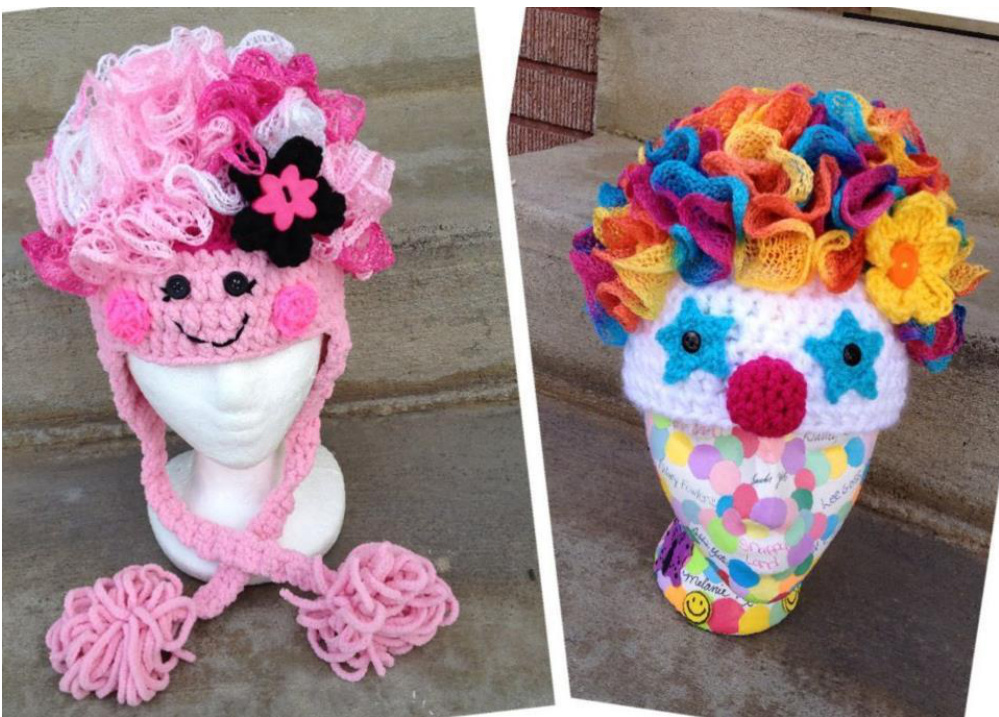
LALA
Yarns: Bulky weight yarn in pink, or worsted weight yarn (held 2 strands together); Worsted weight yarn in bright pink (cheeks) and black (stitching and flower). Sample was created using the following yarns: Red Heart Sashay Tutu, Red Heart Shocking Pink (top), Northland Comfy Fleece (bottom hat of hat, flaps and poms). Miscellaneous: 2 small buttons for eyes, sewing needle and thread, large button for flower center (optional). Start hat with a bright pink yarn, then alternate with ruffle yarn. After "body" section is complete, follow steps below. With ruffles facing you and top of hat pointing down, attach 2 strands of ww yarn (shocking pink). Ch 2, hdc in each st to end of round, sl st to join. For sizes child-adult only, work 2 more rounds of hdc. Switch to light pink, bulky weight yarn (or 2 strands ww). Ch 2, hdc in each st to end of round, with 6 decreases evenly spaced, sl st to join. \*Ch 2, hdc in each st to end of round, sl st to join\*. Repeat from \* to \*, adding additional rounds based on hat size: For newborn - 24 months: 2 more rounds. Sc in next st, sl st. Finish off OR continue to "EARFLAPS". For child: 3 more rounds. Sc in next st, sl st. Finish off OR continue to "EARFLAPS". For teen-adult: 4 -5 more rounds. Sc in next st, sl st. Finish off OR continue to "EARFLAPS Cheeks (make 2): With bright pink yarn and H hook, start with a magic circle of 10 HDC sts (or preferred method for starting a circle of 10 hdc sts) With black yarn or embroidery floss, stitch mouth and features. Add flower to hair. See instructions below.
CLOWN
Yarns: Bulky weight yarn in white, or worsted weight yarn (held 2 strands together); Worsted weight yarn in dark pink and blue, or colors to match "hair". Sample was created using the following yarns: Bernat Twist and Twirl Circus; Red Heart Pumpkin (top), Turqua (stars), Boysenberry (nose); Loops and Thread White (bottom half of hat). Miscellaneous: 2 small buttons for eyes, sewing needle and thread, small amount of stuffing for nose, large button for flower center (optional). Start hat with orange yarn (or color to match ruffles), then alternate with ruffle yarn. Afte "body" section is complete, follow steps below. With ruffles facing you and top of hat pointing down, attach bulky weight white yarn, or worsted weight white yarn (held two strands together). Ch 2, hdc in each st to end of round, with 6 decreases evenly spaced, sl st to join. \*Ch 2, hdc in each st to end of round, sl st to join\*. Repeat from \* to \*, adding additional rounds based on hat size: For newborn - 24 months: 4 more rounds. Sc in next st, sl st. Finish off OR continue to "EARFLAPS". For child: 7 more rounds. Sc in next st, sl st. Finish off OR continue to "EARFLAPS". For teen-adult: 8-9 more rounds. Sc in next st, sl st. Finish off OR continue to "EARFLAPS" Nose: With dark pink yarn and G hook, start with a magic circle of 6 sts (or preferred method for starting a circle of 6sts). 1. 2sc in each stitch around (12sts). Place marker and work in continuous rounds. 2. \*sc, 2sc in next stitch\*, repeat to end of round. 3. \*sc sc2tog\*, repeat to end of round. 4. Sc each stitch to end of round. Finish off, leaving a tail for attaching to hat. Slightly stuff nose then attach to face using a yarn needle and yarn tail. Stars (make 2): With G hook and blue yarn, start with a magic circle of 5 sts (or preferred method for starting a circle of 5sts).join and pull closed. 2sc in each stitch around (10sts). \*Sl st in next st, ch 4, sl in first ch from hook, sc, hdc, sl st in next st on circle\*, repeat around. Join and finish off, leaving a long tail for attaching to the hat. With a yarn needle, sew around circle and up each ray. Sew buttons in place for eyes with black thread and sewing needle.
RAGGEDY ANNE ANDANDY
Yarns: Worsted weight yarn in light peach (held 2 strands together); Worsted weight yarn in red, or colors to match "hair", black (stitching), medium blue (collar/last rounds) Sample was created using the following yarns: Red Heat Sashay Red (Annie) or Loops & Threads Flaunt (Andy); Red Heart Cherry (top
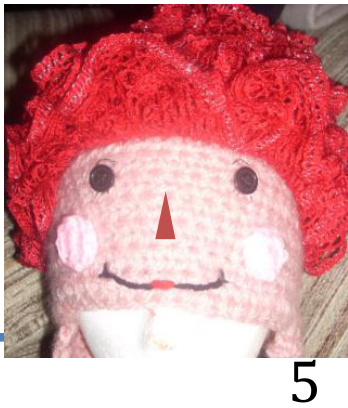
and nose), Lt Peach held two strands together (bottom half of hat). Miscellaneous: 2 small buttons for eyes, sewing needle and thread, large button for flower center (optional). Start hat with worsted weight red yarn (or color to match ruffles), then alternate with ruffle yarn. After "body" section is complete, follow steps below. With ruffles facing you and top of hat pointing down, attach worsted weight peach yarn (held two strands together). Ch 2, hdc in each st to end of round, with 6 decreases evenly spaced,sl st tojoin. \*Ch 2, hdc in each st to end of round, sl st to join\*. Repeat from \* to \*, adding additional rounds based on hat size: For newborn - 24 months: 2 more rounds. Sc in next st, sl st. Change to blue. \*Ch 2, hdc in each st to end of round, sl st to join\*, repeat one more time. Finish off OR continueto"EARFLAPS" For child: 5 more rounds. Sc in next st, sl st. Change to blue. \*Ch 2, hdc in each st to end of round, sl st to join\*, repeat one more time. Finish off OR continue to"EARFLAPS". For teen-adult: 6-7 more rounds. Sc in next st, sl st. Change to blue. \*Ch 2, hdc in each st to end of round, sl st to join\*, repeat one more time. Finish off OR continue to"EARFLAPS" Cheeks (make 2): With light pink yarn and H hook, start with a magic circle of 10 HDC sts (or preferred method for starting a circle of 10 hdc sts). With yarn needle and yarn tail, sew cheeks to hat. See photo for placement. With black yarn or embroidery floss, stitch smile and features. Use red yarn or embroidery floss to stitch mouth and a triangle for nose. FLOwER (optional): With worsted weight yarn and H hook, start with a magic circle of 10 sts (or preferred method for starting a circle of 10 sts), sl st to join. Ch 3, \*4tr in next st, ch 3, sl st in next st, ch 3\*, repeat to end of round, making 5 petals. Finish off, leaving a long tail. Place large button on center of flower. Use yarn needle and yarn tail from flower (or needle and thread if preferred) to sew button in place. Move ruffles out of the way and sew flower to hat. Earflaps: Fold hat in half. With right side of hat facing you, attach yarn with a sl st to one side. Start with the appropriate size: Up to 6 mths: sc 7 6 mths to 4T: sc 8 Child: sc 9 Preteen/teen: sc 10 Teen/adult: sc 12 After first row of sc as listed above, follow these instructions for all sizes. Ch 1, turn. \*Sc in NEXT st, sc across. Ch 1, turn\*, repeat until 2 stitches remain. Note: Each row should be one stitch less then row before. · If wide, flat strips are desired (like on Lala hat), ch 1, \*sc in same st and next, ch 1, turn\*, repeat for 22 rows. Finish off and weave in ends. Continue with second flap. Pompoms will be added later. · If regular braids will be added, finish off, weave in ends and continue with second flap. Fold hat in half to find placement for 2nd earflap. It should start exactly across from the first flap. Starting on the Rs of the hat, attach yarn and follow directions for earflap. Trim: If "flat strands" were NOT added, attach a yarn to bottom round and sc around entire bottom of hat.
Regular Braids (optional)
Cut 2, 20" strands of 3 different colors. Pull end through tip of one earflap. Pull through until even with other end and braid. Tie a knot approximately 2" from end. Trim ends. Repeat for other side.
PomPoms (optional)
Hold one strand of desired color yarn, and wrap 40-50 times around the palm of your hand (wrap more times for a thicker pom). Carefully slide the yarn off your hand and wrap an 8" length of yarn around the center, pulling tight and knotting to hold in place. Do NOT cut this piece of yarn. Cut loops of pompom. NOTE: Lala's poms were NOT cut. I like that loopy look for her. Firmly tie a knot around the bottom of each braid. Trim pompom as desired. A piece of cardboard or pompom maker may also be used. Common Abbreviations: ch - chain sC - single crochet hdc - half double crochet dc - double crochet sl st - slip stitch sc2tog - decrease, single crochet two together 2sc - increase, work 2 in the same stitch fpdc - front post double crochet bpdc - back post double crochet BLO - work in back loops only FLO - work in front loops only
If you have any questions, comments or suggestions please email me at heidi@snappy-tots.com. This patteri has been tested. It is very important to me that information is easy to understand and accurate. I would appreciate knowing any errors found so they could be fixed. Thank you in advance. This pattern is copyrighted to snappytots and may not be copied for resale in part or whole. Items created n this pattern MAY be sold. Please include a link to snappy-tots.com if selling online. HEADANDHATSIZECHART newbabiestoadultmen I prefer to make hats approximately 1” smaller than the head circumference so they will stretch and not be too big. Note: All measurements are approximate and based on “average” head sizes according to several online sources.Hat“height”is the measurement from top of crowm to bottomedge.
| Brandnewbabies Head Circ:12"-13"Hat Circ:11-12"Hat Height:5"-5.5 |
| Newborm Head Circ:13"-14"Hat Circ:11.5"-13"Hat Height:5.5"to 6” |
| Baby-3to6months Head Circ:14"-17"Hat Circ:13"-16"Hat Height:6.5" |
| Baby-6to12months Head Circ: 16"-19"Hat Circ: 15"-18"Hat Height:7" |
| Toddler (1-3years) Head Circ: 18"-20"Hat Circ:17"-19"Hat Height:7.5" |
| Child (3-10 years) |
| Head Circ:19"-20.5"Hat Circ:18"-19.5"Hat Height:8" Preteen/Teen |
| Head Circ:20.5"-22"Hat Circ:19.5"-21"Hat Height:8.5" |
| Adult Woman Head Circ:21.5"-22.5"Hat Circ:20.5"-21.5"Hat Height:9" |
| Adult Man Head Circ:23"-24"Hat Circ:22"-23"Hat Height:10" Snappy-tots.com |
Join me online at http://www.facebook.com/snappytots for giveaways, freebies, sneak peeks and fun events.


