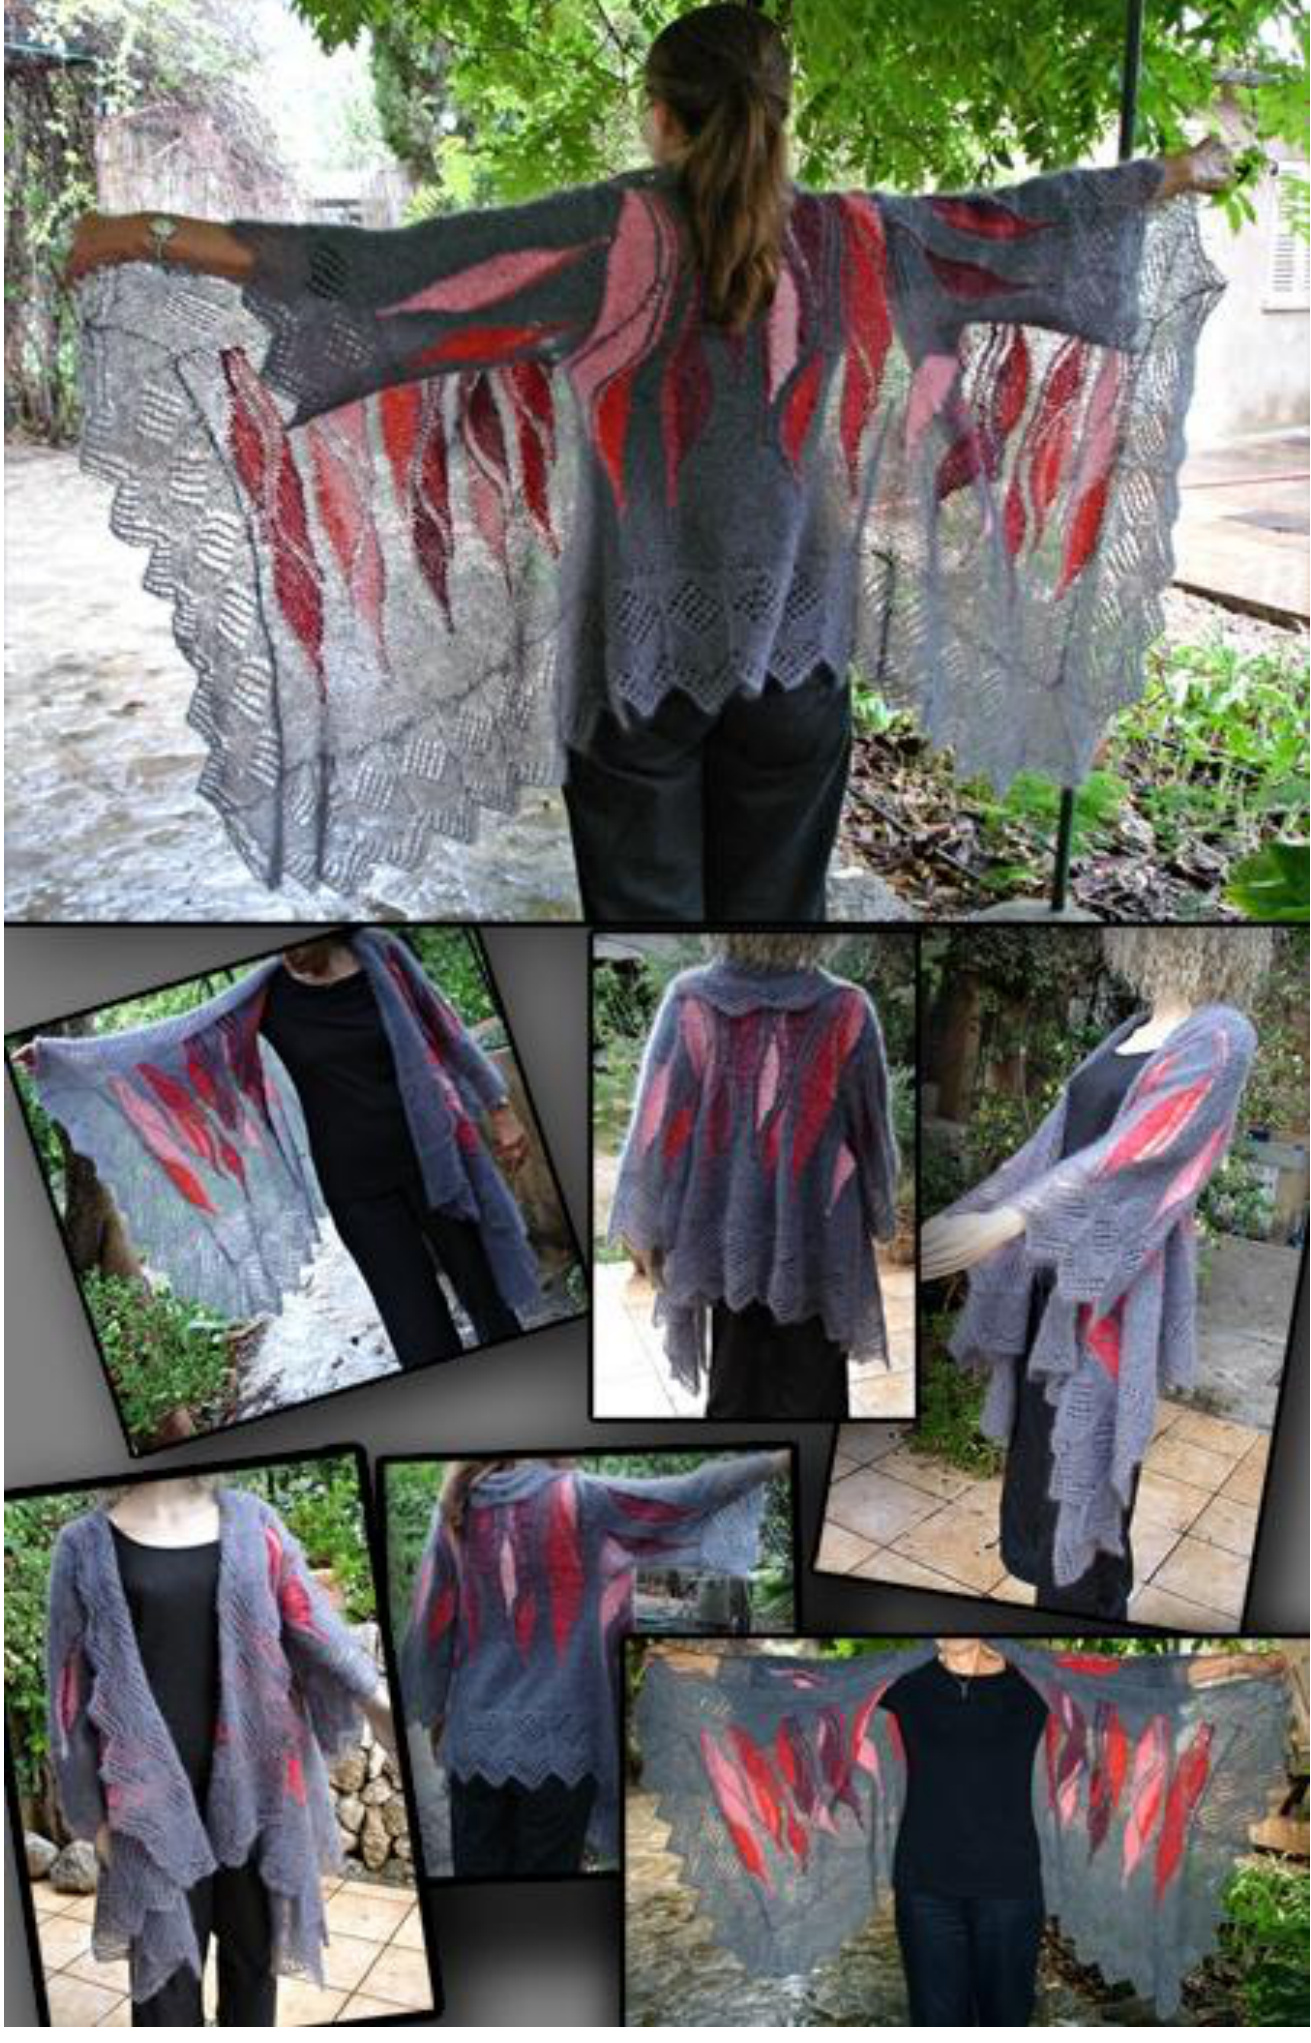
Turkish Delight
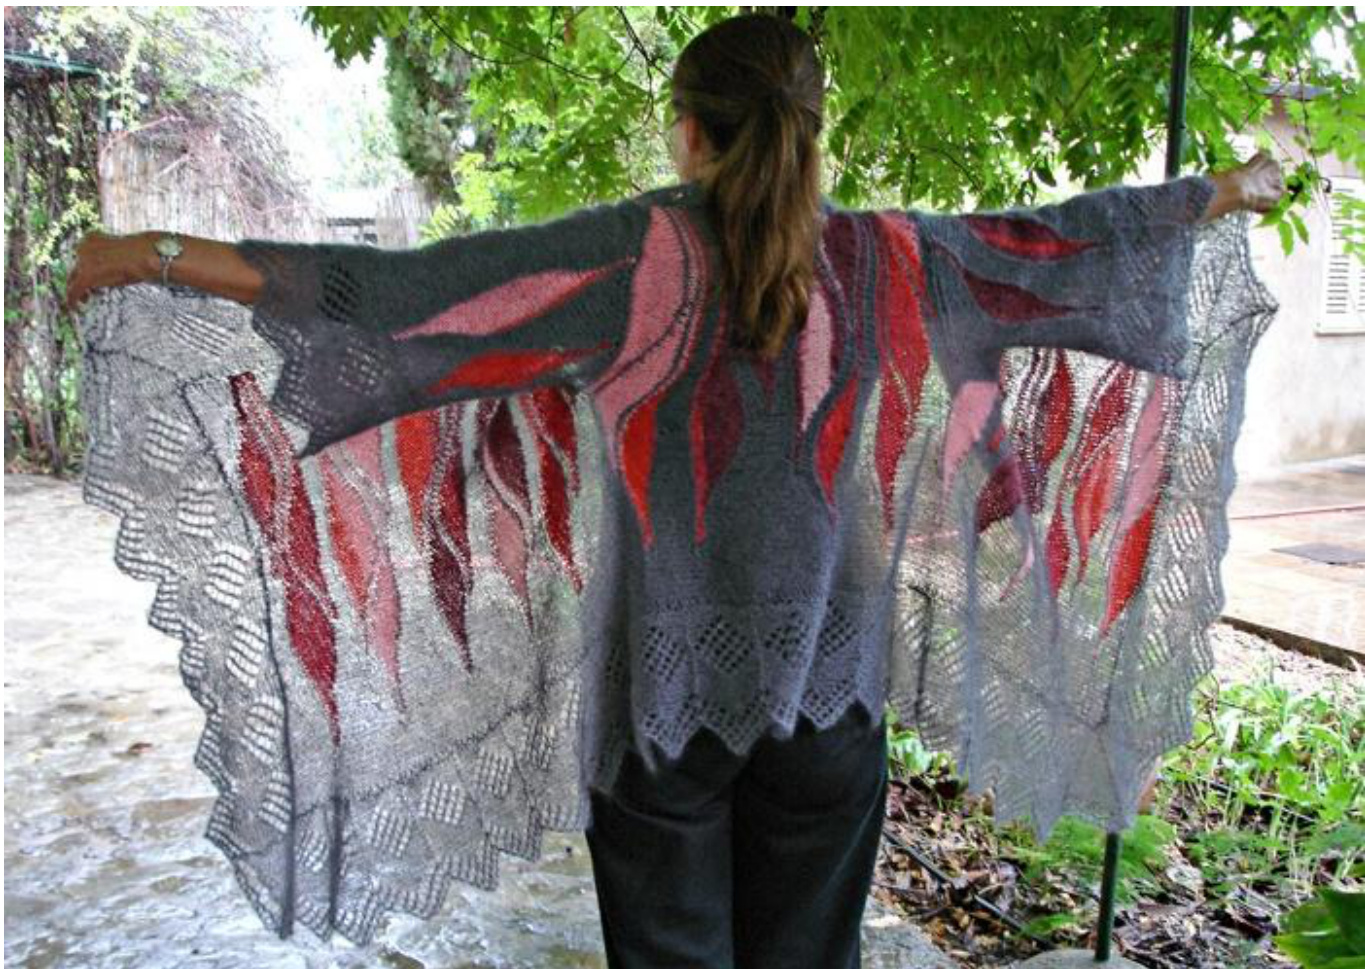
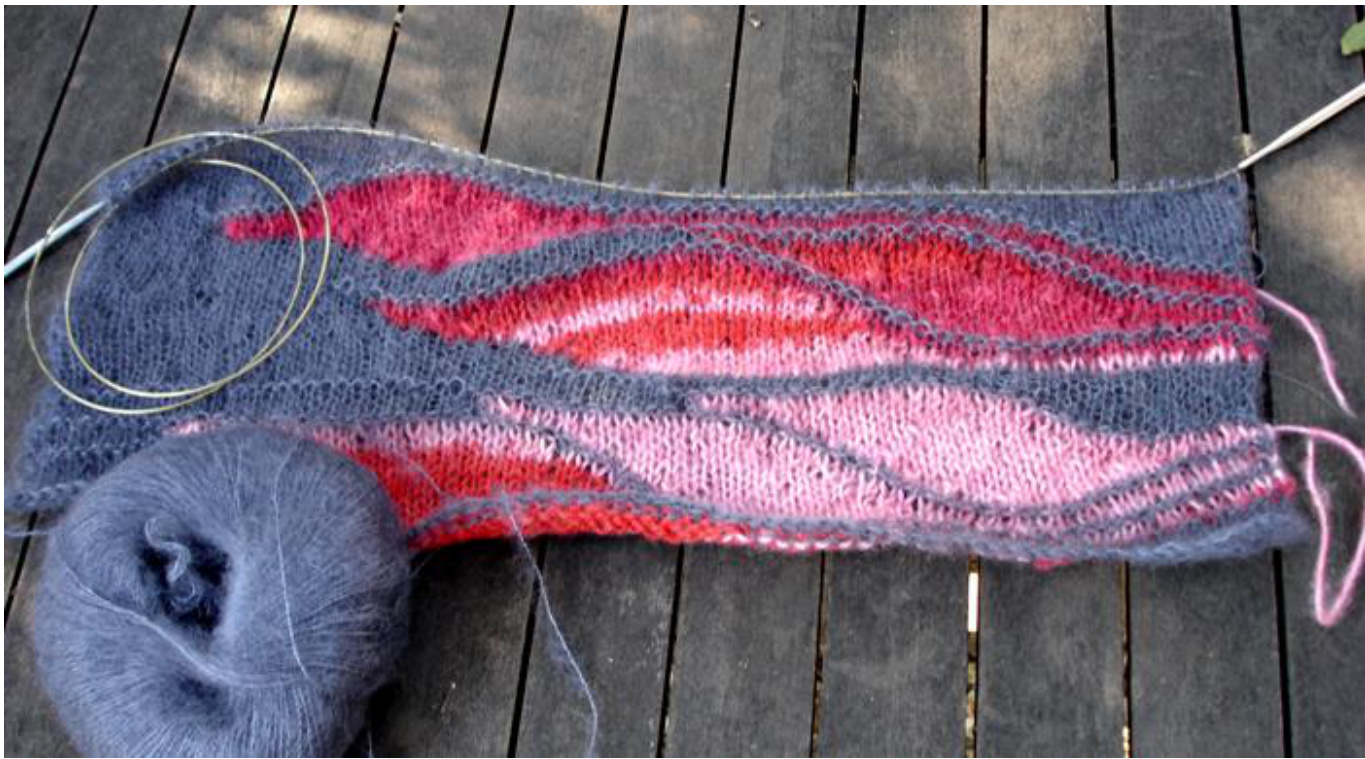
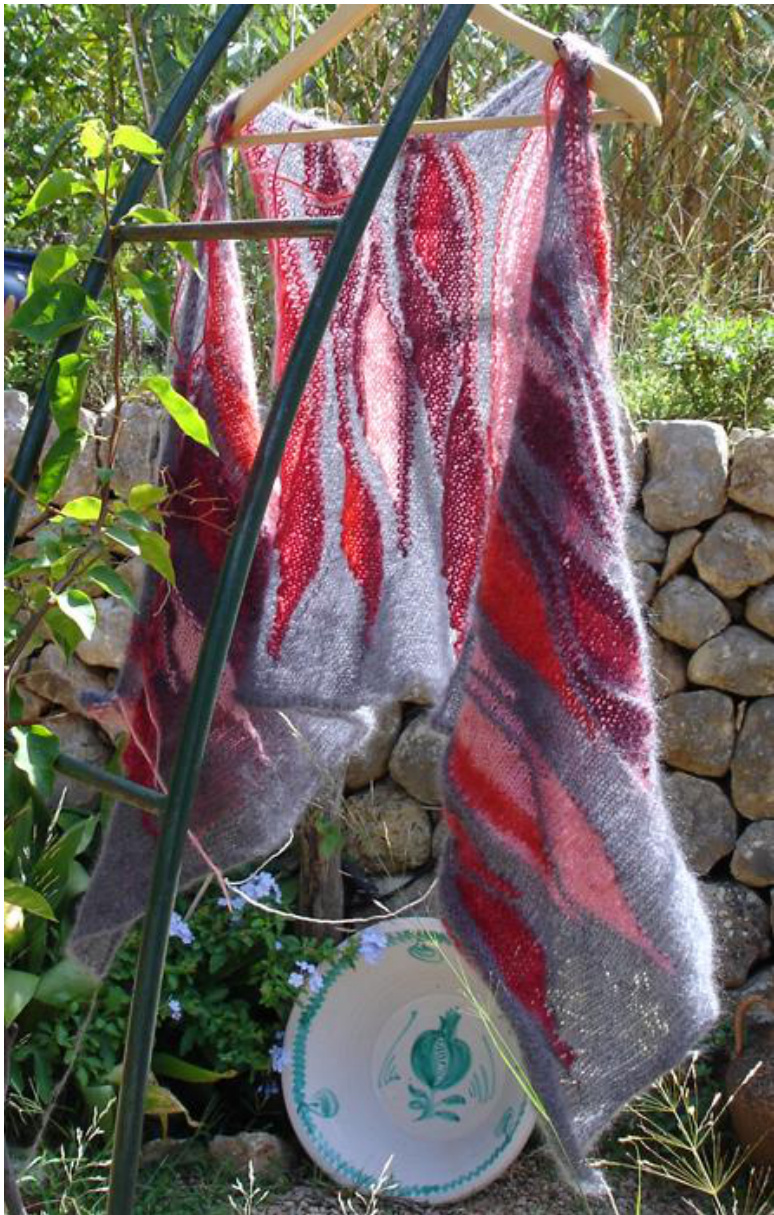
A whimsical tale tells of the creation of Turkish delight: In an attempt to appease his many wives, a famous Sultan ordered his confectioner to create a unique sweet. Eager to please his Sultan, the confectioner blended a concoction of sugar syrup, various flavourings, nuts and dried fruits then bound them together with mastic (gum Arabic). After several attempts, a most delectable sweet emerged from the royal kitchens. The Sultan was so delighted with these delicious little gems that he proclaimed the sweet maker the court's chief confectioner! And this is the story of how Turkish delight was created. Hereafter, a plate of Turkish delight was served at daily feasts in the Ottoman court. I couldn't help but name this pattern after the famous Turkish sweet. Why? It is the first time I ever ordered yarn directly from a Turkish online shop (www.kukayarns.com). I was very skeptical especially because the yarn was incredibly cheap for our standards. But for the same reason I also thought that nothing but a disappointment could happen. When it arrived -ONE DAY AFTER HAVING ORDERED IT!- Ifelt like a child at Christmas. The yarn is soft and light and looks good when knitted. This swing knitted wrap is worked in one piece. We start at the right front piece and end at the left front piece. Sleeves and lace border are added later. The model is basically generous, but I have narrow shoulders. So maybe you have to consider adding a segment or two here. The color work is done by short rows. The technique of Swing Knitting is based on various rules you can learn in specific workshops. You can find these workshops in our Ravelry Group Swing Knitting. But this pattern has been written in a way that every knitter who is not a complete beginner can knit it. Before you start knitting take a look at the following rules concerning short rows: A short row means we turn within a row before ending it. If we shorten a row on the right side of the knitting we mark this by inserting a dark safety pin on the wrong side after turning. Therefore a dark pin means we have to complete this row later from the dark pin to the left end. If we shorten a row on the wrong side of the knitting we mark this by inserting a light safety pin on the right side after turning. Therefore a light pin means that we have to complete the row later from the light pin to the beginning. The moment we complete a short row we remove a pin. To avoid holes we do a so called ,double stitch' after every turning within a row. The term may be misleading but it is called so in German because the resulting stitch has got two legs. The English term for this is ,German Short Rows' and you can find videos on YouTube demonstrating this method. It is by far the fastest way to turn, no need of any wrapping and so on. I will call this specific stitch ,double stitch'in this text When you come across an existing double stitch you knit it as one stitch. Be careful to get hold of both legs, otherwise you produce the hole we wanted to avoid in the first place.
Rule:
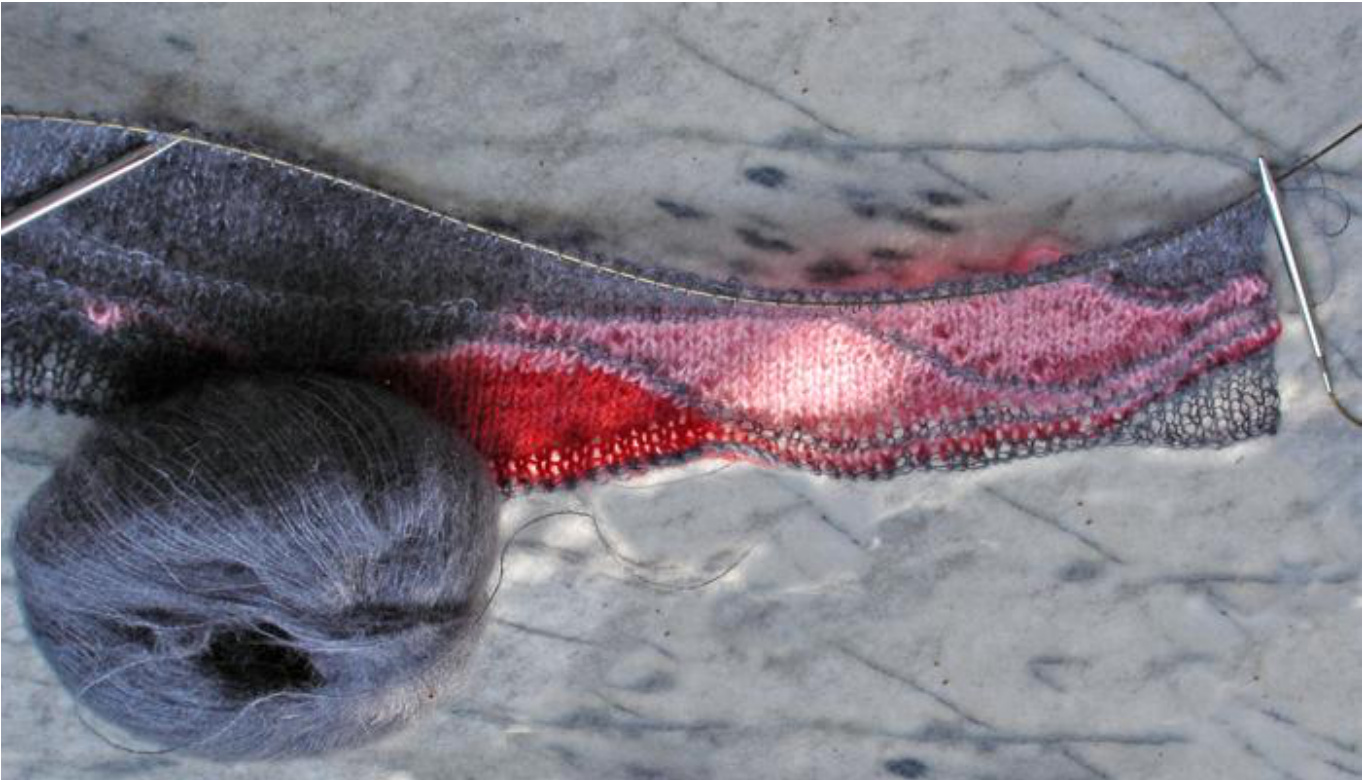
When you turn within a row, you have to either insert a pin or remove a pin. ALwAYs. After every turning within a row you have to do a double stitch. I used less than 100 g of Kuka Angora Magic, 440 meters per 100 g and less than 150 g Debbie Bliss Kid Mohair , which means this abundant piece weighs less than 250 Gramm! You can replace the colored yarn easily with another yarn of comparable yardage. But Kid Mohair is responsible for the sensational fall of the garment. I wouldn't change that. I have knitted with a circular knitting needle of 5 mm. You also need about 10 light and 10 dark safety pins for marking. The model:
It is very easy to adapt the model to your size. Just start knitting the front piece and then take measure of the distance between your shoulders. Decide how many sections you need for the back piece. As you can see in the model the front pieces are straight whereas the back piece has got increases towards the bottom. The advantage is that the wrap sits on the shoulders and doesn't fall over the arms, but you have space further down. Cast on 75 stitches in Kid Mohair with the help of a crochet hook. -knit 5 stitches, turn, insert dark pin, double stitch, purl to the beginning. -Knit up to and including the double stitch, knit 3 more stitches, turn, insert dark pin, double stitch, purl to the beginning. -Knit up to and including the double stitch, knit 2 more stitches, turn, insert dark pin, double stitch, purl to the beginning. -Knit up to and including the double stitch, knit 1 more stitch, turn, insert dark pin, double stitch, purl to the beginning. Knit to the end. -Purl 15 stitches, turn, insert light pin, double stitch, knit to the end. -Purl up to and including the double stitch, purl 3 more stitches, turn, insert light pin, double stitch, knit to the end. -Purl up to and including the double stitch, purl 2 more stitches, turn, insert light pin, double stitch, knit to the end. -Purl up to and including the double stitch, purl 1 more stitch, turn, insert light pin, double stitch, knit to the end. KNIT to the beginning:
Section 1, Secor 1:
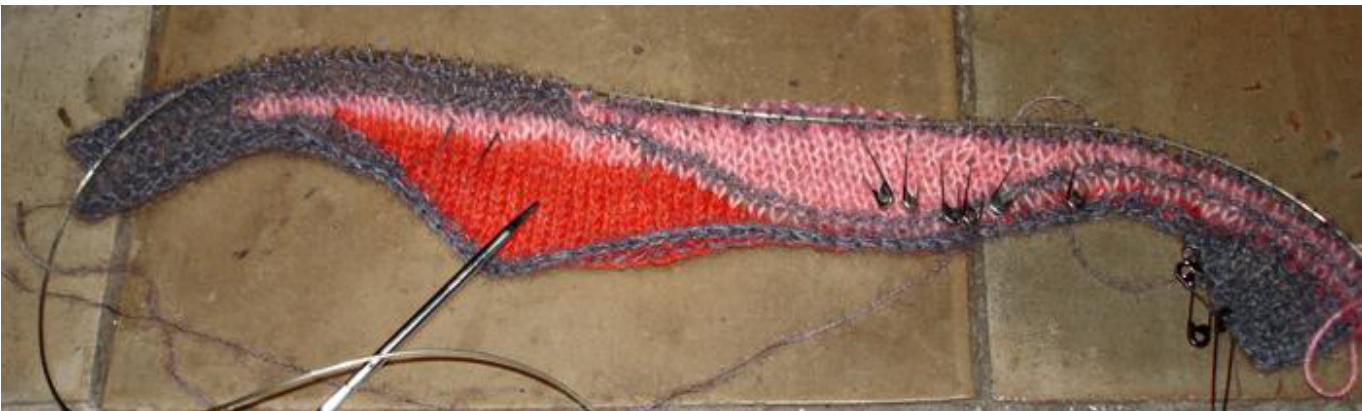
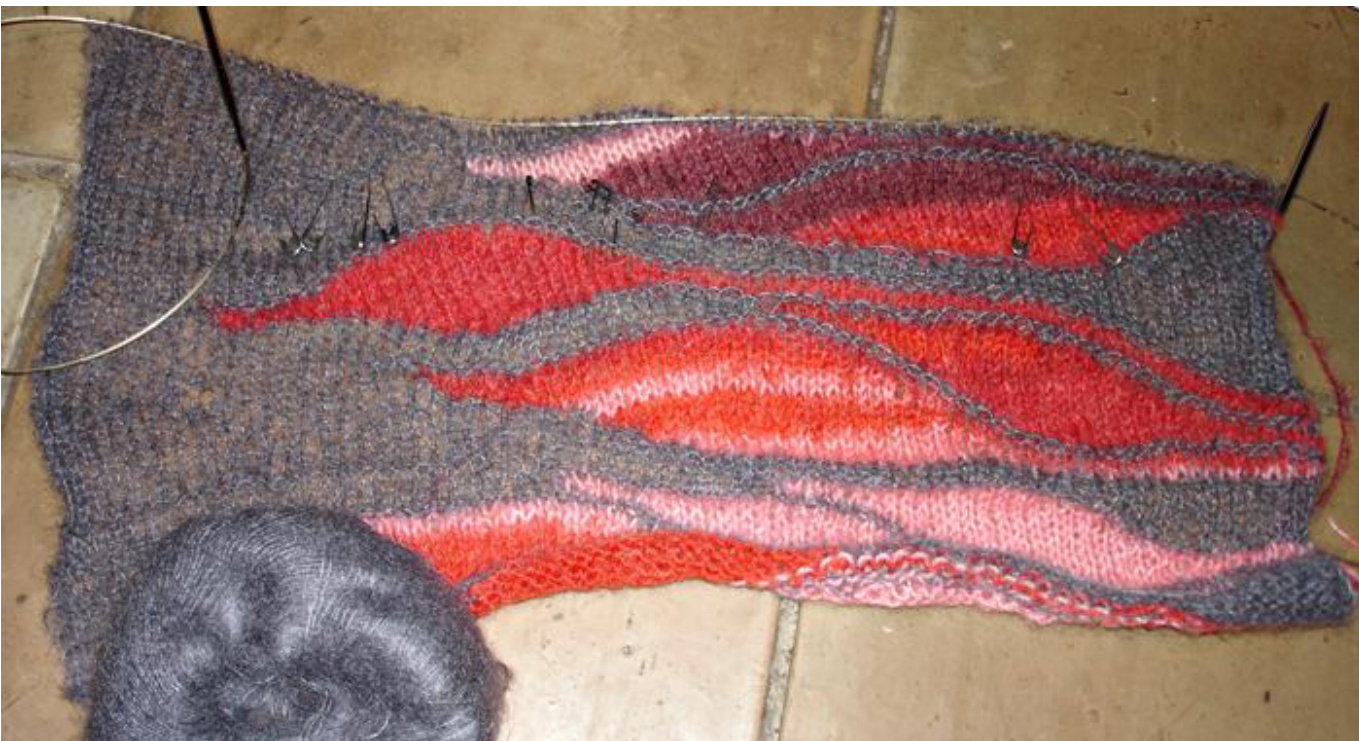
Pick up your colored yarn. Knit up to 5 stitches before the first light pin. -Turn, insert dark pin, double stitch, purl 20 stitches. -Turn, insert light pin, double stitch, knit up to and including the double stitch, knit 3 more stitches. -Turn, insert dark pin, double stitch, purl until 3 stitches before the double stitch of the last row, include double stitch in the counting. -Turn, insert light pin, knit up to and including the double stitch, knit 2 more stitches, remove the light pin. -Turn, double stitch, purl until 3 stitches before the double stitch of the last row, include double stitch in the counting. -Turn, insert light pin, knit up to and including the double stitch, knit 1 more stitch, remove the light pin. -Turn, double stitch, purl until 1 stitch before the double stitch of the last row, include double stitch in the counting, this means stop directly before the doublestitch. -Turn, insert light pin, knit up to and including the double stitch, knit 2 more stitches, remove the light pin. -Turn, double stitch, purl until 2 stitches before the double stitch of the last row, include double stitch in the counting. -Turn, insert light pin, knit up to and including the double stitch, knit 3 more stitches, remove the light pin. -Turn, double stitch, purl until 3 stitches before the double stitch of the last row, include double stitch in the counting. -Turn, insert light pin, knit up to and including the double stitch, knit 5 more stitches, turn, insert dark pin, purl back to the beginning. Knit to the end with your contrasting yarn, purl to the next dark pin, remove it, turn, double stitch, knit to the end, purl to the beginning. If you like it like I do you start the last row purling up to the tip of the colored section and then go on knitting to the beginning. This causes a nice frame for the section. Later I tried to frame the sections with a ridge on both sides. This makes the section look like a shallow valley because the kid mohair tends to stand up which adds volume to the already sticking out garter stitch.
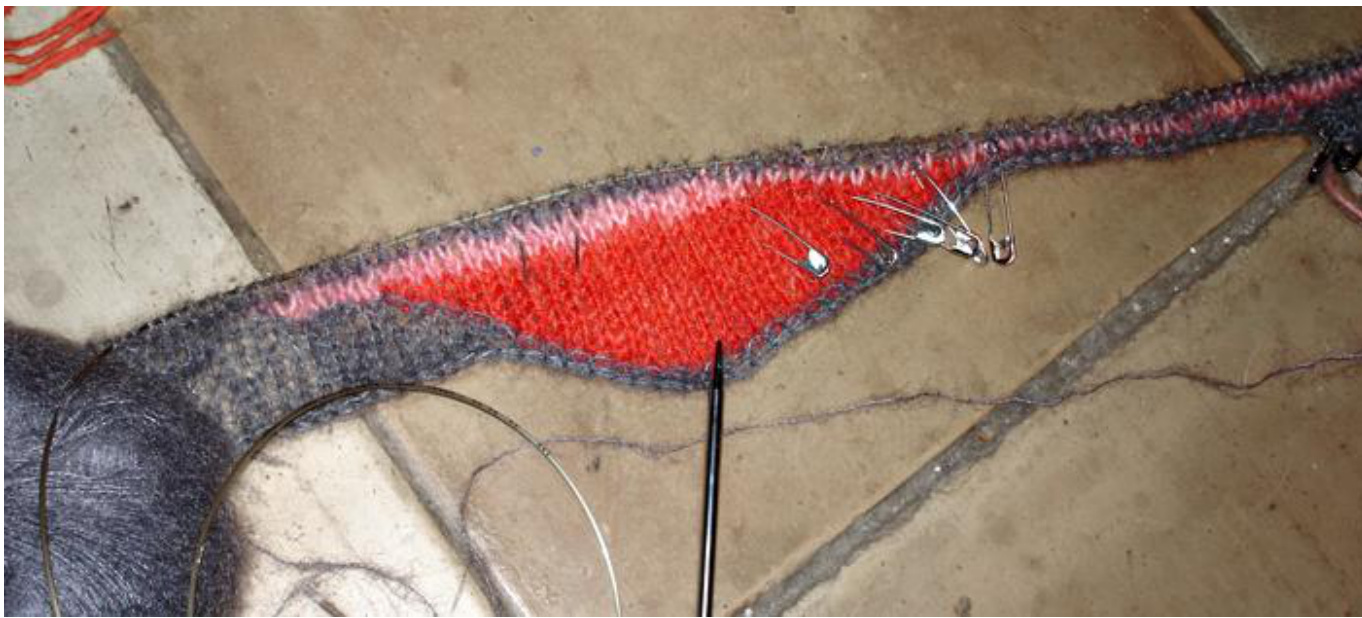
The picture shows that the whole piece is worked in stockinette stitch, just the framing of the sections is done in garter stitch.
Section 1, Sector 2:
Knit up to the first light pin with your colored yarn, remove it, turn, double stitch, purl 12 stitches. -Turn, insert light pin, double stitch, knit up to the next light pin, remove it. -Turn, double stitch, purl up to 3 stitches before the double stitch of the last row. -Turn, insert light pin, double stitch, knit up to the next light pin, remove it. -Turn, double stitch, purl up to 2 stitches before the double stitch of the last row. -Turn, insert light pin, double stitch, knit up to the next light pin, remove it. -Turn, double stitch, purl up to 1 stitch before the double stitch of the last row. n, insert light pin, double stitch, knit up to the next light pin, remove i -Turn, double stitch, purl up to 2 stitches before the double stitch of the last row. n, insert light pin, double stitch, knit up to the next light pin, remove i -Turn, double stitch, purl up to 3 stitches before the double stitch of the last row. -Turn, insert light pin, double stitch, knit up to the double stitch of the last row, knit 5 more stitches, turn, insert dark pin, double stitch, purl to the beginning. Take your contrasting yarn and knit to the end, purl to the dark pin you just inserted, remove it, turn, double stitch, knit to the end, purl to the beginning. Don't forget the effect I told you about if you want to frame the section only, I will not repeat this from now on.
Section 1, Sector 3:
Knit up to the first light pin with your colored yarn, remove it, turn, double stitch, purl back to the farthest dark pin on position 5, remove it. -Turn, double stitch, knit up to the next light pin, remove it. -Turn, purl to the now farthest dark pin, remove it. -Turn, double stitch, knit up to the next light pin, remove it. -Turn, purl to the now farthest dark pin, remove it. -Turn, double stitch, knit up to the next light pin, remove it. -Turn, purl to the now farthest dark pin, remove it. -Turn, double stitch, knit up to the next light pin, remove it. -Turn, double stitch, knit until 2 stitches before the double stitch of the last row. -Turn, insert light pin, double stitch, knit up to the next light pin, remove it. -Turn, double stitch, knit until 3 stitches before the double stitch of the last row. -Turn, insert light pin, double stitch, knit up to and including the double row, knit 5 more stitches, turn, insert dark pin, double stitch, purl to the beginning. Knit to the end with your contrasting yarn, purl to the dark pin you inserted in the last step, remove it, turn, double stitch, knit to the end, knit to the beginning.
With the next step we are going to work off the remaining 2 dark and 2 light pins which will straighten out our work. Take your contrasting yarn and knit up to the first light pin, remove it, turn, double stitch, purl to the beginning. Knit up to the next light pin, remove it, turn, double stitch, purl to the beginning. hit to the end, purl to the next dark pin, remove it , turn, double stitch nit to the end, purl to the next dark pin, remove it, turn, double stitch. Knit to the end, purl to the beginning.
Section 2, Sector 1:
The upcoming section is a variation of the same theme. But we are going to change the distribution for a more vivid look. Take your colored yarn and knit 37 stitches. -Turn, insert dark pin, double stitch, purl 20 stitches. -Turn, insert light pin, double stitch, knit up to and including the double stitch, knit 3 more stitches. -Turn, insert dark pin, double stitch, purl until 3 stitches before the last double stitch. (20 stitches) -Turn, insert light pin, double stitch, knit up to and including the double stitch, knit 2 more stitches. -Turn, insert dark pin, double stitch, purl until 2 stitches before the last double stitch. (20 stitches) -Turn, insert light pin, double stitch, knit up to and including the double stitch, knit 1 more stitch. -Turn, insert dark pin, double stitch, purl until the last double stitch. (20 stitches) -Turn, insert light pin, double stitch, knit up to and including the double stitch, knit 2 more stitches. -Turn, insert dark pin, double stitch, purl until 2 stitches before the last double stitch. (20 stitches) -Turn, insert light pin, double stitch, knit up to and including the double stitch, knit 3 more stitches. -Turn, insert dark pin, double stitch, purl until 3 stitches before the last double stitch. (20 stitches) -Turn, insert light pin, double stitch, knit up to and including the double stitch, knit 5 more stitches. -Turn, insert dark pin, double stitch, purl to the beginning. Knit to the end with contrasting yarn. Purl to the dark pin you inserted last, remove it, turn, double stitch, knit to the end, knit to the beginning.
Section 2, Sector 2:
Now we are going to knit a sector of 12 stitches (the last sector was over 20 stitches) in the same rhythm of 3-2-1-2-3 over the group of light pins. To achieve that you knit up to each next light pin, remove it and insert it again 12 stitches further to the right. Here we go, knit up the next light pin, remove it, turn, double stitch, purl 12 stitches, turn, insert light pin, double stitch, knit up to the next light pin, remove it....etc, ok? When you have completed the rhythm you knit up to the double stitch once more, knit 5 more stitches, turn, insert dark pin, double stitch, purl back to the beginning. With contrasting yarn knit to the end, purl to the dark pin you inserted in the last step, remove it, turn, double stitch, knit to the end, knit to the beginning.

Section 2, Sector 3:
Take your colored yarn and knit up to the first dark pin. Knit 12 more stitches. -Turn, insert dark pin, double stitch, purl to the farthest dark pin (the one you have counted from in the last step), remove it. -Turn, double stitch, up to the double stitch, 3 more stitches. -Turn, insert dark pin, double stitch, purl to the farthest dark pin, remove it. -Turn, double stitch, up to the double stitch, 2 more stitches. -Turn, insert dark pin, double stitch, purl to the farthest dark pin, remove it. -Turn, double stitch, up to the double stitch, 1 more stitch. -Turn, insert dark pin, double stitch, purl to the farthest dark pin, remove it. -Turn, double stitch, up to the double stitch, 2 more stitches. -Turn, insert dark pin, double stitch, purl to the farthest dark pin, remove it. -Turn, double stitch, up to the double stitch, 3 more stitches. Turn, insert dark pin, double stitch, purl to the farthest dark pin, remove it. -Turn, double stitch, up to the double stitch, 5 more stitches. -Turn, double stitch, insert dark pin, purl to the beginning. Knit up to the end with contrasting yarn, purl up to the dark pin you inserted in the last step, remove it, turn, double stitch, knit to the end, knit to the beginning. Now you work off all light pins as you know by now, knit to the end, work off all dark pins, when you have arrived again at the end you purl back to thebeginning.
Section 3, Sector 1:
Take your contrasting yarn. -Knit 5 stitches, turn, insert dark pin, double stitch, purl back to the beginning. -Knit up to and including the double stitch, knit 3 more stitches, turn, insert dark pin, double stitch, purl to the beginning. -Knit up to and including the double stitch, knit 3 more stitches, turn, insert dark pin, double stitch, purl to the beginning. -Knit up to and including the double stitch, knit 1 more stitch, turn, insert dark pin, double stitch, purl to the beginning. Knit to the end. -purl 15 stitches, turn, insert light pin, double stitch, knit to the end. -Purl up to and including the double stitch, purl 3 more stitches, turn, insert light pin, double stitch, knit to the end. -Purl up to and including the double stitch, purl 2 more stitches, turn, insert light pin, double stitch, knit to the end. -Purl up to and including the double stitch, purl 1 more stitch, turn, insert light pin, double stitch, knit to the end. Knit (or purl 3U stitches, knit the rest it you don't want a ridge in the contrasting area) back to the beginning. Knit 25 stitches with your colored yarn. -Turn, insert dark pin, double stitch, purl 20 stitches, remove dark pin. -Turn, double stitch, up to double stitch, 3 more stitches. -Turn, insert dark pin, double stitch, purl 20 stitches, remove dark pin. -Turn, double stitch, up to double stitch, 2 more stitches. -Turn, insert dark pin, double stitch, purl 20 stitches, remove dark pin. -Turn, double stitch, up to double stitch, 1 more stitch. -Turn, insert dark pin, double stitch, purl 20 stitches, remove dark pin. -Turn, double stitch, up to double stitch, 2 more stitches. -Turn, insert dark pin, double stitch, purl 20 stitches. -Turn, insert light pin, double stitch, up to double stitch, 3 more stitches. -Turn, insert dark pin, double stitch, purl 20 stitches. -Turn, insert light pin, double stitch, up to double stitch, 5 more stitches. -Turn, insert dark pin, double stitch, purl to the beginning. Knit to the end with contrasting yarn, purl to the dark pin you inserted in the last step, remove it, turn, double stitch, knit to the end, back to the beginning.

As we have knitted the sector of 20 stitches, the next 2 sectors will be of 12 stitches each.
Section 3, Sector 2:
Take your colored yarn and knit up to the point of the first dark pin, knit 12 morestitches. -Turn, insert dark pin, double stitch, purl to the farthest dark pin, remove it. Turn, double stitch, up to the double stitch plus 3. -Turn, insert dark pin, double stitch, purl to the farthest dark pin, remove it. -Turn, double stitch, up to the double stitch plus 2. -Turn, insert dark pin, double stitch, purl to the farthest dark pin, remove it. -Turn, double stitch, up to the double stitch plus 1. -Turn, insert dark pin, double stitch, purl to the farthest dark pin, remove it. -Turn, double stitch, up to the double stitch plus 2. -Turn, insert dark pin, double stitch, purl to the farthest dark pin, remove it. -Turn, double stitch, up to the double stitch plus 3. -Turn, insert dark pin, double stitch, purl to the farthest dark pin, remove it. -Turn, double stitch, up to the double stitch plus 5. -Turn, double stitch, purl to the beginning. Knit to the end with your contrasting yarn, purl to the dark pin you inserted in the last step, remove it, turn, double stitch, knit to the end, back to the beginning.
Section 3, Sector 3:
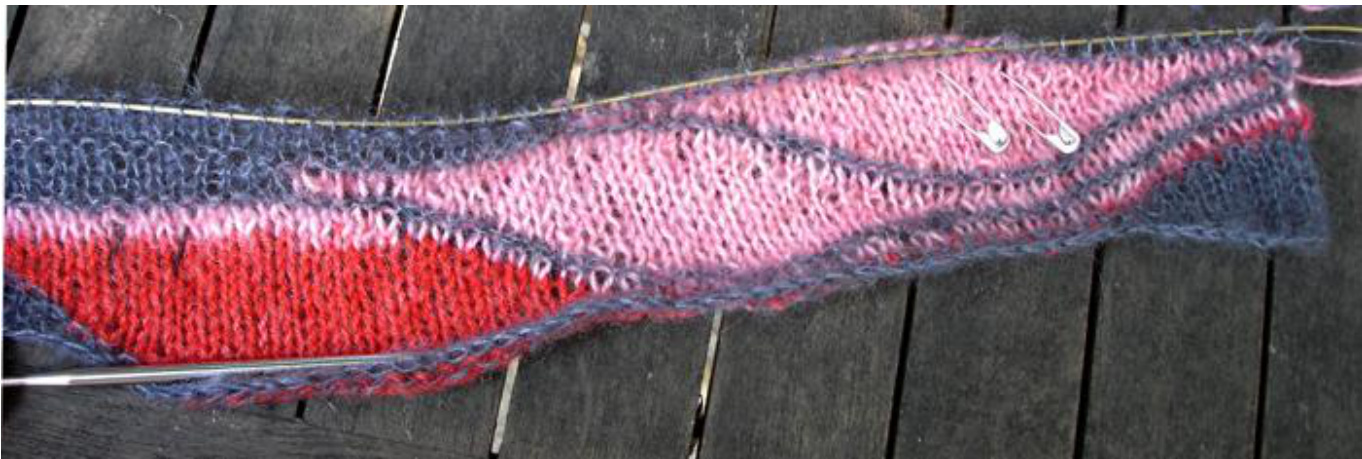
Take your colored yarn and knit until 5 stitches before the first light pin on the left side. -Turn, insert dark pin, double stitch, purl to the farthest dark pin, remove it. -Turn, double stitch, up to double stitch plus 3. -Turn, insert dark pin, double stitch, purl to the farthest dark pin, remove it. -Turn, double stitch, up to double stitch plus 2, remove light pin. -Turn, insert dark pin, double stitch, purl to the farthest dark pin, remove it. -Turn, double stitch, up to double stitch plus 1, remove light pin. -Turn, double stitch, purl to the farthest dark pin, remove it. -Turn, double stitch, up to the double stitch plus 2, remove light pin. -Turn, double stitch, purl to the farthest dark pin, remove it. -Turn, double stitch, up to the double stitch plus 3, remove light pin. -Turn, double stitch, up to the double stitch plus 5, turn, insert dark pin, purl to the beginning. Knit to the end with contrasting yarn, purl to the dark pin you inserted in the last step, remove it, turn, double stitch, knit to the end, back to the beginning. Now work off all light pins with contrasting yarn, then knit to the end and work off ll dark pins. Back to the beginning. Now it is already worthwhile to show the piece in the direction you wear it later:
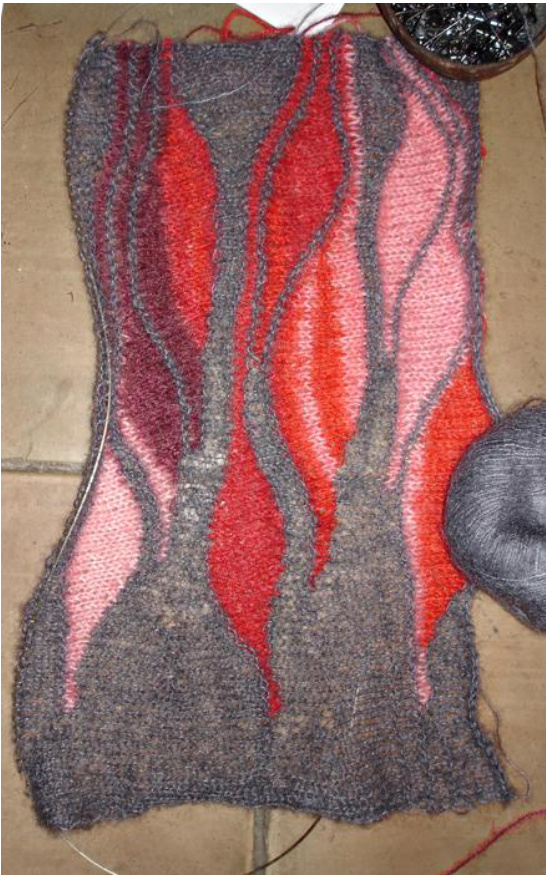
Repeat first and second section in the order you like best. Your picture may differ now from mine depending on the choice you have made:
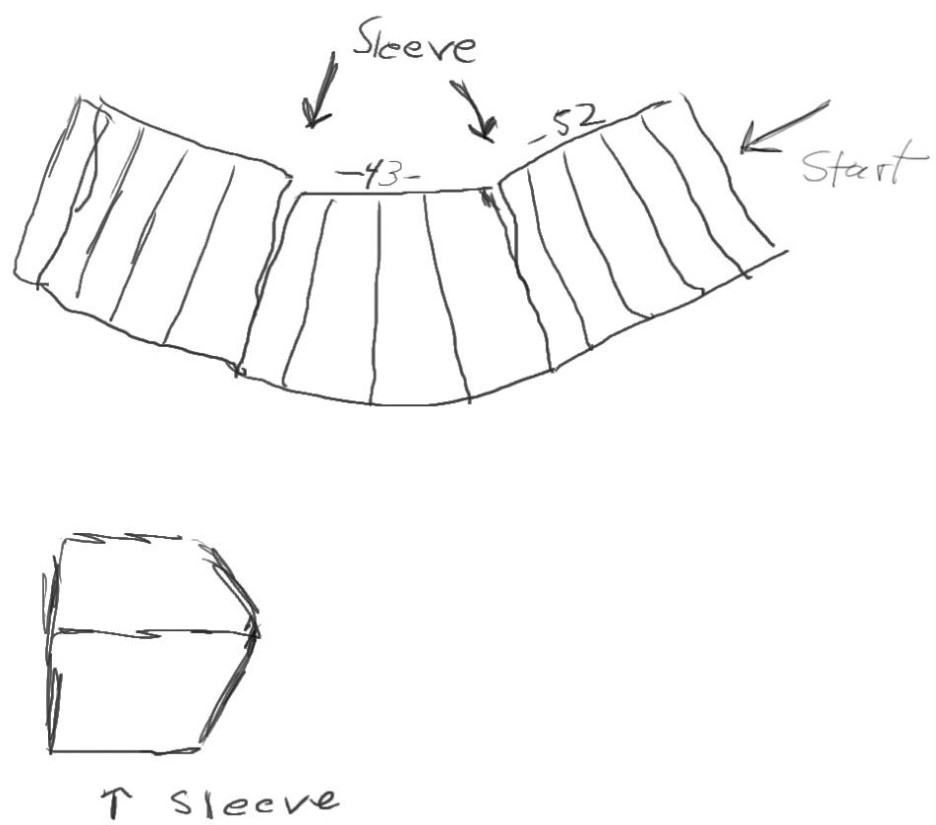
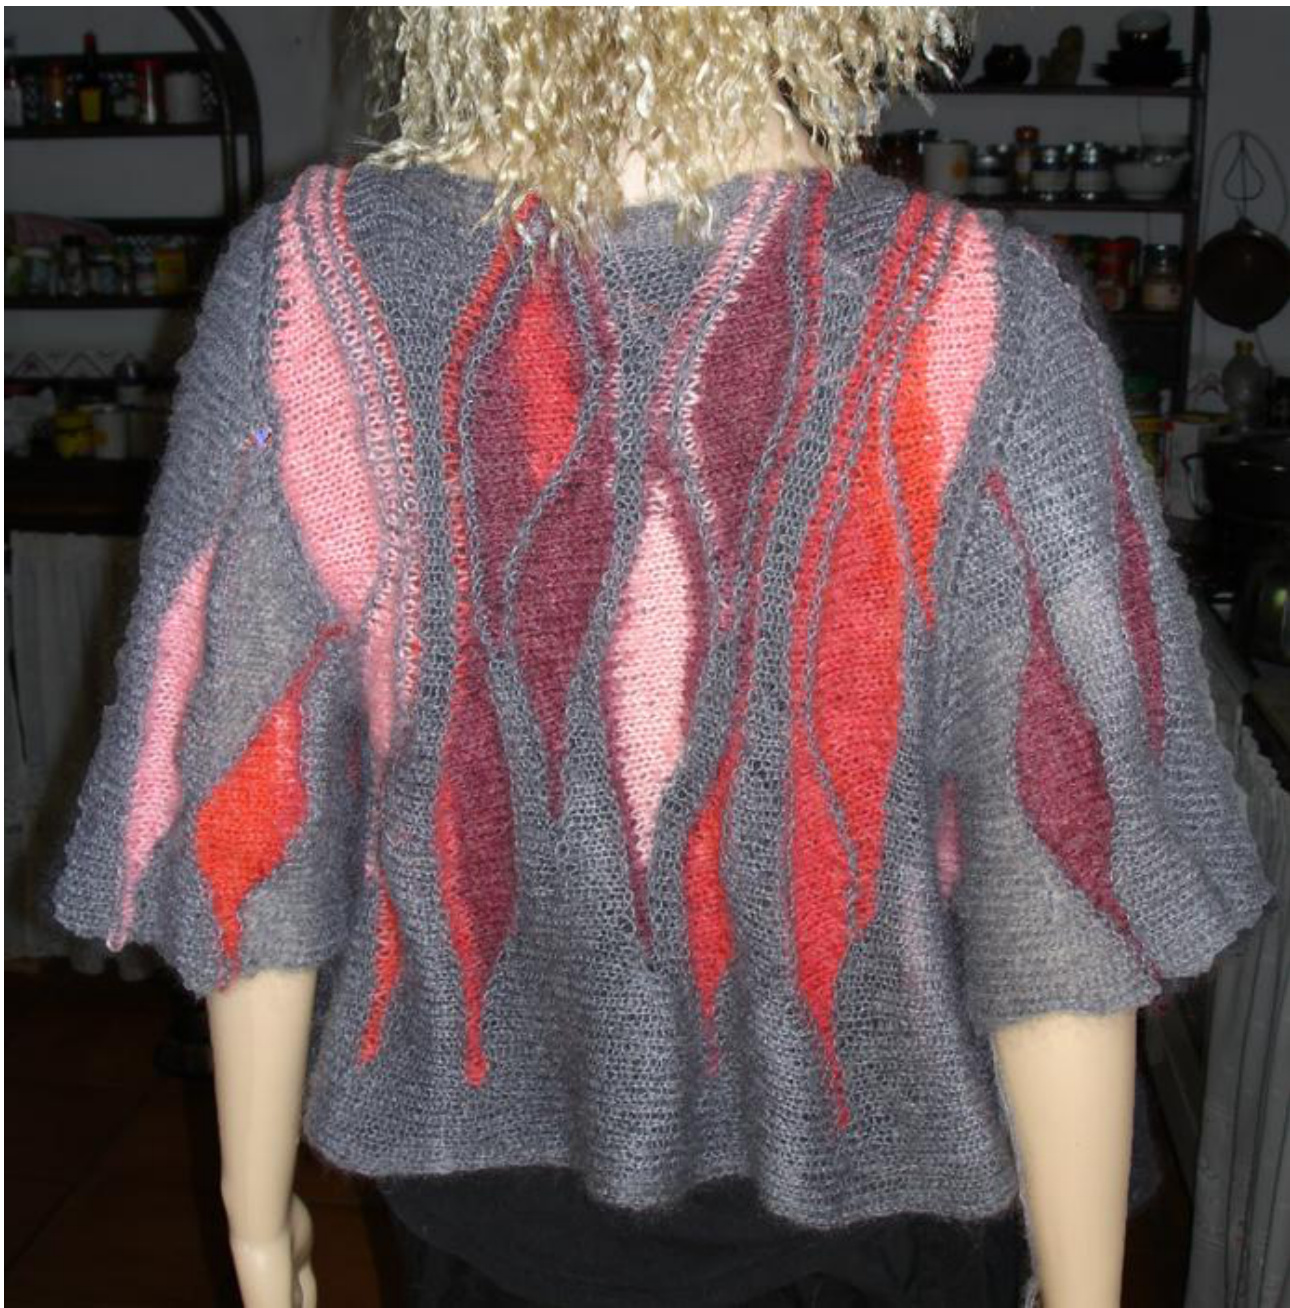
The Back Piece
Knit 40 stitches with contrasting yarn and secure the stitches on a second needle or some other means. We are going to work the opening for the first sleeve. Cast on 40 stitches by creating a loop out of the next stitch, putting it on the left needle, creating a loop out of the last loop and so on. You are on the right side at the beginning of the row now. We are going to work the first wedge now to widen the bottom part of the back piece: Knit to the end, purl 30 stitches, turn, doubles stitch, knit to the end. Knit 25 stitches, turn, double stitch, knit to the end, purl to the beginning. We don't have to insert pins here as we are never going to complete these short rows, because they are meant to give shape:

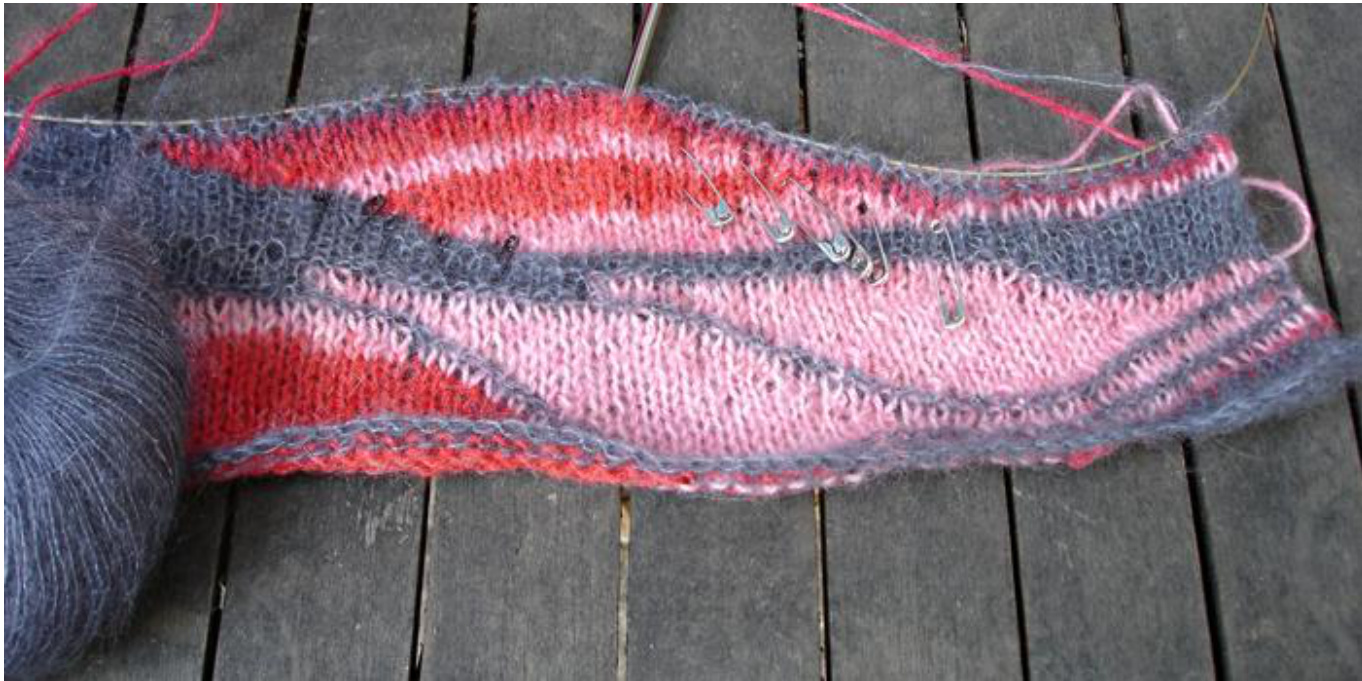
Now follow your taste and knit 4 sections according to the description of the front piece. After section 1, 2 and 3 work short rows in the lower back after 40, 35 and 30 stitches. After section 4 shorten the rows as you did before the first section after 30 and 25 stitches. Now is the moment to decide if you need more sections for the back. Take measure of the distance between your shoulders and add sections as needed. The distance between my shoulders is quite narrow, so 4 sections were enough. When you have finished your number of sections knit 40 stitches and secure these stitches on an extra needle or other device. Cast on 40 stitches for this second sleeve as you did for the first one. This is how your work should look like more or less:

The Left Front Piece
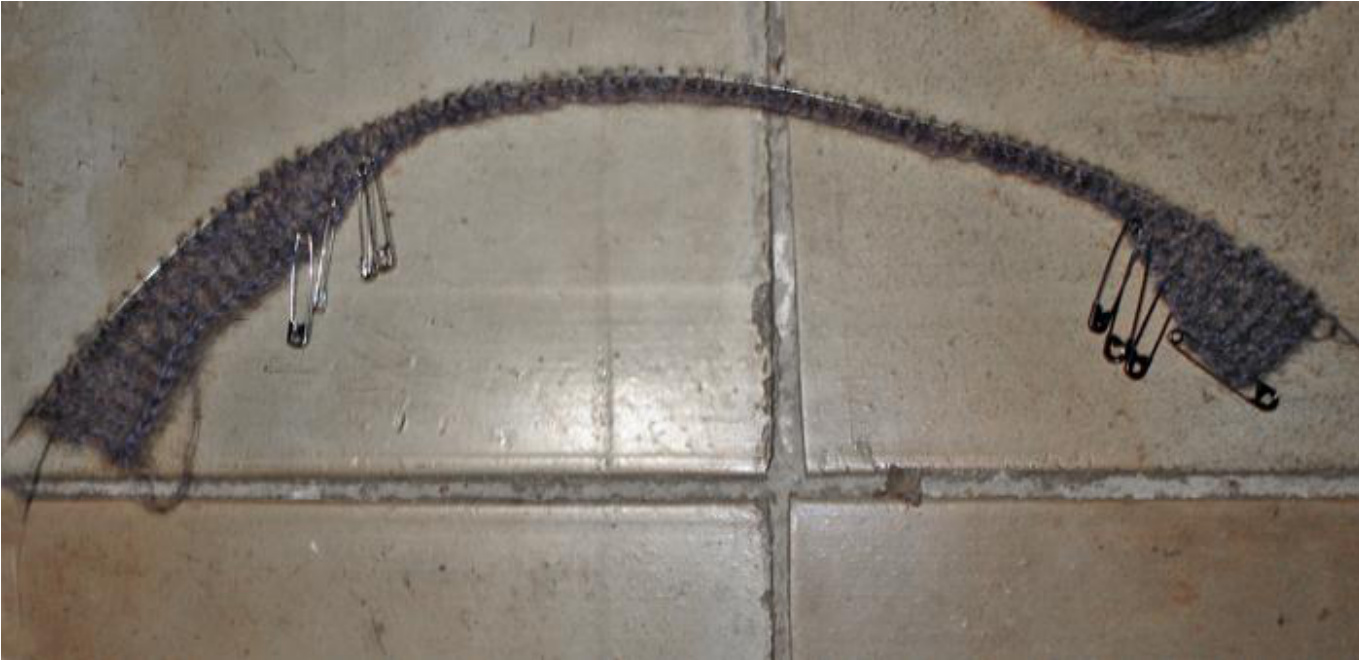
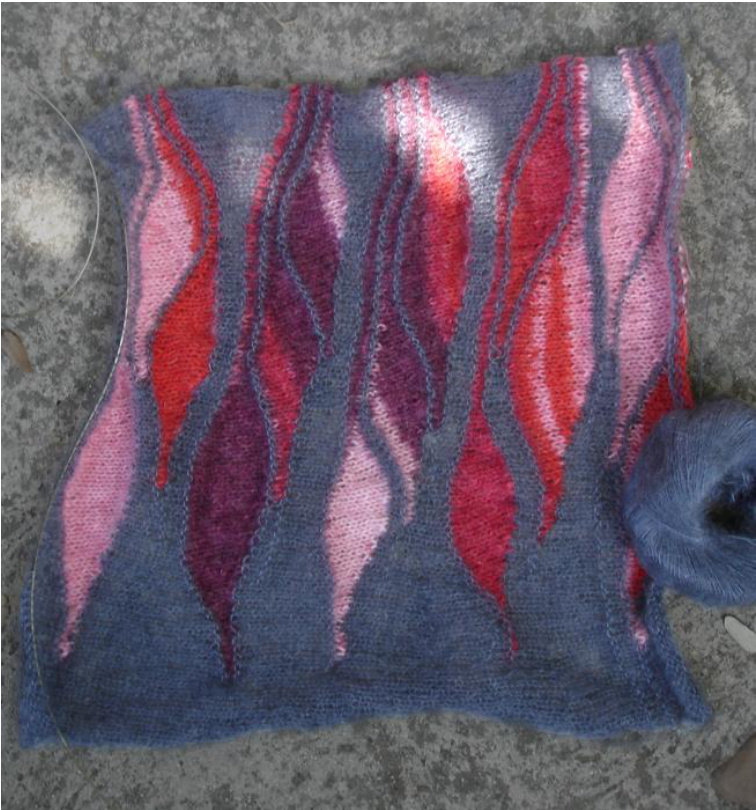
Knit the left front piece according to the example of the right front piece. I closed the shoulders with safety pins for the picture because I wanted you to get an impression of the finished piece:
It already becomes obvious that this piece will be wonderfully warm and light. At this moment it weighs 115 g!
The Sleeves
Take a look at the sketch. You can see that the sleeves are worked sidewise and knitted together with the secured stitches of the sleeve openings. You start knitting together in the arm pit, move over the shoulders and finish in the arm pit on the other side. Work a provisional cast on of 25 stitches in your contrasting yarn. We are going to knit 33 double rows up to the shoulder and another 33 double rows down to the arm pit. As the arm hole has 40 stitches on each side, we have to knit together with 2 stitches seven times. Do this as evenly as possible. Increase 1 stitch for the slope 30 times at the beginning of the row. Doing this there will be a few rows left without increasing. Start the decreasing on the other side of the sleeve after the same amount of rows. Then you decrease 1 stitch 30 times so that you finish again with 25 stitches. I wanted the colored yarn appear also in the sleeves. If you also want that take your colored yarn after 7 double rows in contrasting yarn. Knit up to 14 stitches before the end of the row. -Turn, insert dark pin, double stitch, purl until 3 stitches before the beginning. -Turn, insert light pin, double stitch, up to double stitch plus 3 stitches. -Turn, insert dark pin, double stitch, purl until 3 stitches before the double stitch. -Turn, insert light pin, double stitch, up to double stitch plus 2 stitche -Turn, insert dark pin, double stitch, purl until 2 stitches before the double stitch. -Turn, insert light pin, double stitch, up to double stitch plus 1 stitch. sert dark pin, double stitch, purl until directly before the double stitch -Turn, insert light pin, double stitch, up to double stitch plus 2 stitche -Turn, insert dark pin, double stitch, purl until 2 stitches before the double stitch. -Turn, insert light pin, double stitch, up to double stitch plus 3 stitche -Turn, insert dark pin, double stitch, purl until 3 stitches before the double stitch. n, insert light pin, double stitch, knit to the end, purl to the beginning Work off all pins with your contrasting yarn, the light ones first, then the dark ones as has been described several times. The work is straight again. Repeat this once more on the increasing part of the sleeve. Repeat again twice on the decreasing part of the sleeve. You finish by taking the stitches from your provisional cast on and sewing the sides of the sleeve together in kitchener stitch. Sew all threads invisibly.
Sew back piece and front piece together over about 5 cm for the distance between shoulder and neck.
The Lace Border
Now the true challenge is waiting for me! A lace border! As my lace border is made in kid mohair which is very unpleasant to frog I have decided for border that is worked sidewise. This makes the number of stitch small and if worst comes to worst I can knit back without losing too much time. I knit a total of 6 bands of lace, 2 for the sleeves and one band for each of the four sides of the wrap. The four bands of the wrap will be connected later with an extra piece. The lace band for the sleeves are sewn together in kitchener stitch. Each segment of the lace band is knitted according the following pattern: Work a provisional cast on of 20 stitches in your contrasting yarn, knit one row, knit back to the beginning, you are on the right side of the lace band now. Row 1: K 2; K11, SM; K 2, (YO, K2tog) twice, YO, K1 Row 2: Purl Row 3: K2; K5, YO, K2tog, K4, SM; K3, (YO, K2tog) twice, YO, K1 Row 4: Purl Row 5: K2; K4, (YO, K2tog) twice, K3, SM; K4, (YO, K2tog) twice, YO, K1 Row 6: Purl Row 7: K2; K3, (YO, K2tog)three times, K2, SM; K5, (YO, K2tog) twice, YO, K1 Row 8: Purl Row 9: K2; K2 (YO, K2tog)four times, K1, SM; K6 (YO, K2tog) twice, YO, K1 Row 10: Purl Row 11: K2; K1 (YO, K2tog)five times, SM; K7 (YO, K2tog) twice, YO, K1 Row 12: Purl Row 13: K2, K2 (YO, K2tog)four times, K1, SM; K6(YO, K2tog) twice, YO, K3tog Row 14: Purl Row 15: K2; K3, (YO, K2tog)three times, K2, SM; K5, (YO, K2tog) twice, YO, K3to Row 16: Purl Row 17: K2; K4, (YO, K2tog) twice, K3, SM; K4, (YO, K2tog) twice, YO, K3tog Row 18: Purl Row 19: K2; K5, YO, K2tog, K4, SM; K3, (YO, K2tog) twice, YO, K3tog Purl Row 21: K2; K11, SM; K2, (YO, K2tog) twice, YO, K3tog Row 22: K2tog, knit to the beginning. You have 20 stitches again. K=knit YO= yarn over K2tog= knit 2 together SM= stitch marker SSK= Slip one stitch as if to knit, slip another stitch as if to knit, knit the 2 stitchestogether S2K1PO= Slip two stitches as if to knit, knit one stitch, pass the slipped stitches over theknitted stitch
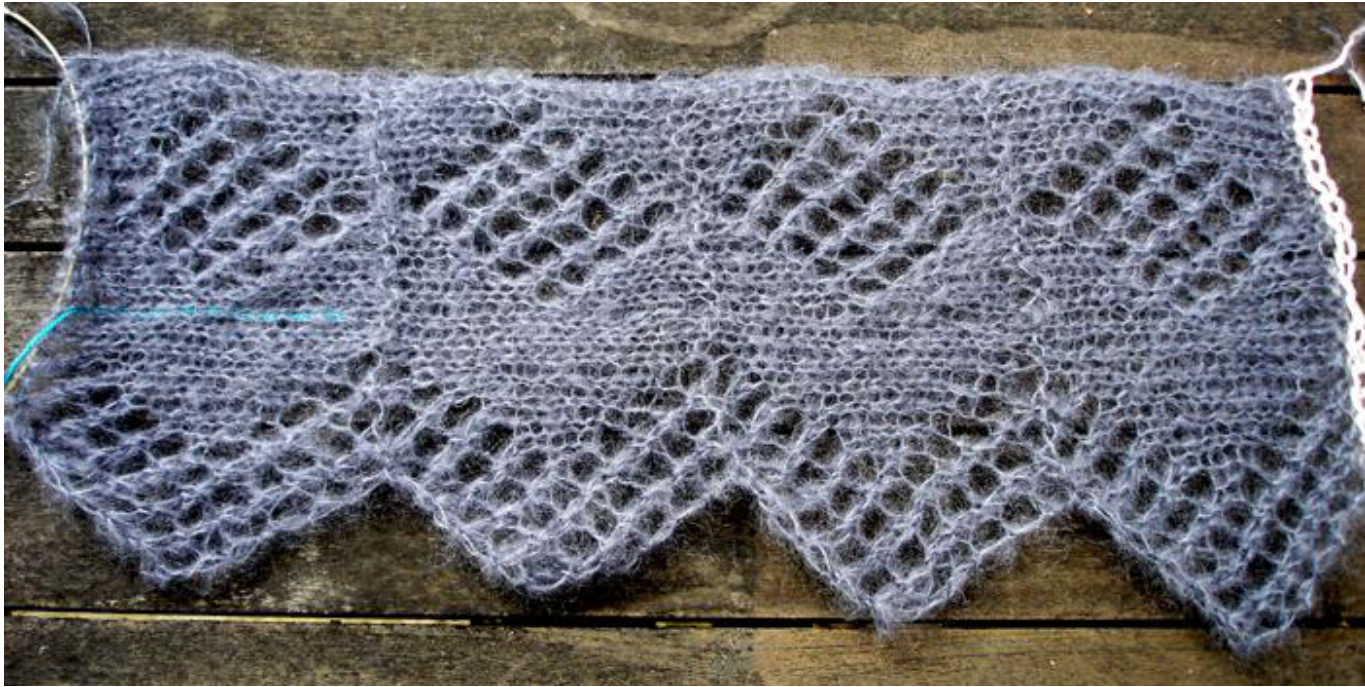
Repeat the pattern for each band as often as you need for your measures. tted 6 segments for each sleeve and for each side of the front pieces. I needed 19 segments for the lower band which runs over the lower parts of the back and the front pieces. I needed 14 segments for the upper part of the back and the front pieces. Knit the sides of the sleeve lace borders together in kitchener stitch. Don't cast off the other bands, we will take advantage of the stitches when we work the 4 corner pieces. Spread the 4 bands on the floor in the way they will be joined later. The upper band should show the wrong side as it will be like a collar so that the right side will be visible when you wear it. Work the 4 corner pieces as follows: Knit over the 20 stitches of one band, increase one stitch as center stitch, then knit over the 20 stitches of the fitting piece. Purl over all 41 stitches. Mark the center stitch.
Row 1:
K1, (YO, SSK)twice, K14, S2K1PO, K14, (K2tog,Yo)twice, K1 You have a total of 39 stitches. Purl back to the beginning. Row2: SSK, (YO, SSK)twice, K12, S2K1PO, K12, (K2tog,Yo)twice, K2t0g You have a total of 35 stitches. Purl back to the beginning. Row3: SSK, (YO, SSK)twice, K10, S2K1PO, K10, (K2tog,Yo)twice, K2t0g You have a total of 31 stitches. Purl back to the beginning. Row4: K1, (YO, SSK)twice, K9, S2K1PO, K9, (K2tog,Yo)twice, K1 You have a total of 29 stitches. Purl back to the beginning.
Row 5:
SSK, (YO, SSK)twice, K7, S2K1PO, K7, (K2tog,Yo)twice, K2tog You have a total of 25 stitches. Purl back to the beginning. Row6: SSK, (YO, SSK)twice, K5, S2K1PO, K5, (K2tog,Yo)twice, K2t0g You have a total of 21 stitches. Purl back to the beginning. Row7: K1, (YO, SSK)twice, K4, S2K1PO, K4, (K2t0g,Yo)twice, K1 You have a total of 19 stitches. Purl back to the beginning. Row8: SSK, (YO, SSK)twice, K2, S2K1PO, K2, (K2tog,Yo)twice, K2tog You have a total of 15 stitches. Purl back to the beginning. Row9: SSK, (YO, SSK)twice, K1, S2K1PO, K1, (K2tog,Yo)twice, K2t0g You have a total of 11 stitches. Purl back to the beginning. Row10: K1, YO, SSK, K1, S2K1PO, K1, K2tOg, YO, K1 You have a total of 9 stitches. Purl back to the beginning. Row 11: K1, YO, SSK, S2K1PO,K2tOg, YO, K1 SSK, S2K1PO, K2tog You have got 3 stitches. Now slip 2 stitches as if to purl, purl one stitch and pass over the slipped stitches. The corner piece is finished.
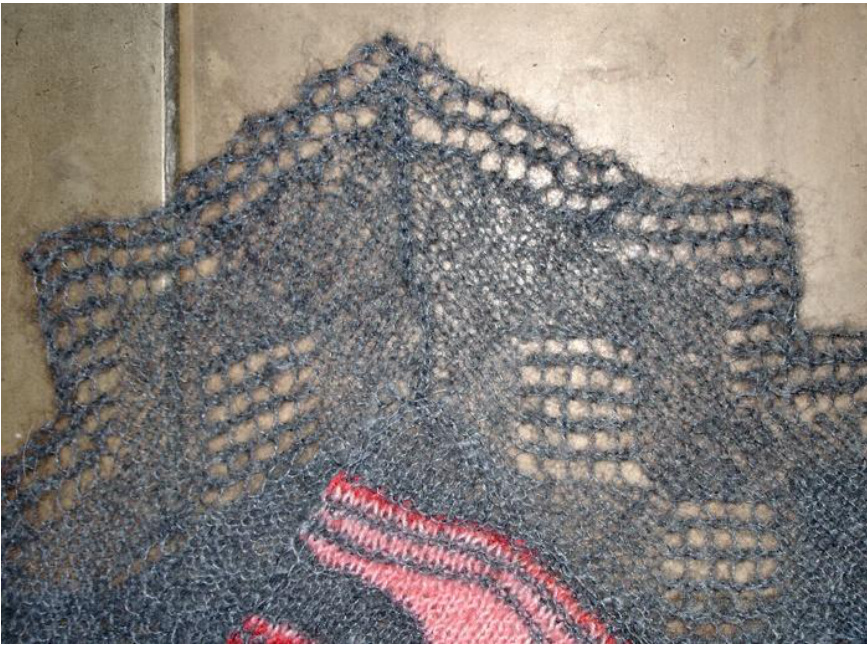
Work the other 3 corner in the same way. The lace border is closed now. Sew it together with the wrap, avoid too tight stitches. Sew the remaining bands to the sleeves. Block the wrap. I had to do this part by part.
I wish you the same fun that I had!


