Baby Brachiosaurus Crochet Pattern by Jessica Whitley
Finished size: approx. 6 to 7 inches (15 to 17 cm) tall. Gauge and tension: Gauge is not important for this pattern. Depending on your tension and yarn choice, finished size may vary. Ideally, you will want snug, dense stitches that will not show the stuffing. Start with an E (3.5 mm) hook; if your stitches are too loose, try a D (3.25 mm) hook.
Materials:
E (3.5 mm) or D (3.25 mm) hook (2) 9mm or 10mm black plastic eyes with safety backing (shank-back eyes available at http://www.joann.com/ or http://www.amazon.com/. Also available at Hobby Lobby.) SAFETY NOTE: If you are making dino for a child under 3 years of age, do not use plastic eyes. Instead, use black yarn or embroidery floss with tapestry or embroidery needle to embroider eyes. 100% acrylic worsted-weight yarn (medium weight) in the color of your choice. One skein will provide ample amount for making many dinos. Dino pictured made with Loops & Threads Impeccable Worsted Solid in Clear Blue, available at http://www.michaels.com/. Other good yarns for this project are Red Heart Super Saver, Deborah Norville Everyday Soft Worsted, Yarn Bee "I Love This Yarn," or Lion Brand Vanna's Choice. If you are using "soft" yarn such as Red Heart Soft or Caron's Simply Soft, I recommend using a D hook. Polyester fiberfill for stuffing Tapestry needle (with large eye for yarn and blunt tip), large-headed pins, and scissors for finishing off and sewing parts together. I recommend crocheting all parts before sewing together
Stitches Used/Abbreviations:
Round number (R1, R2...) Stitch (st) or stitches (sts) ·Chain (ch) Single Crochet (sc) Single Crochet Decrease (dec) I recommend using the "Invisible Decrease for Amigurumi" method. Free video tutorials available on http://www.youtube.com/. Repeat the steps within the asterisks (\*..\* rep) Optional: Magic Adjustable Loop (ML). I recommend beginning the doll parts with the Magic Adjustable Loop (also called Magic Circle) rather than the standard "ch 2, 6 sc in second chain from hook," because you can lasso your first round of stitches together in a tight circle and avoid the "donut hole" that usually occurs. For video tutorials, search "Magic Loop Crochet" on http://www.youtube.com/.
Notes:
The dino parts are made by stitching continuous spiral rounds. Mark the end of the pattern round with a short piece of contrasting yarn or a safety pin in the last stitch of the round to help you keep track of counting. When you complete a round, count the stitches to make sure it matches the pattern, then move the round marker up to the loop/stitch on your hook (see Fig. 1). For this pattern, when you are counting stitches in a round, include the loop/stitch that is on your hook. The last stitch of the current round should end just to the left of the last stitch of the previous round.

Figure 1:Example of rounds worked in spirals, with contrasting yarn to mark end of Always insert your crochet hook under both loops previous round. (front and back) of the previous round, except when you are making your decreases with the Invisible Decrease stitch method and making the legs. For tutorials on amigurumi methods such as fastening off, Magic Loop or Invisible Decrease, I recommend the tutorials section of the http://www.planetjune.com crochet website.
HEAD
R1: Ch 2, 6 sc in second chain from hook, or ML, 6 sc. R3: \*Sc in next sc, 2 sc in next sc\*, rep 6 times. (18 sts) R4: \*Sc in next 2 sc, 2 sc in next sc\*, rep 6 times. (24 sts) R5-11: Sc in each sc around. (24 sts) R12: \*Sc in next 2 sc, dec\*, rep 6 times. (18 sts) R13: \*Sc in next sc, dec\*, rep 6 times. (12 sts)
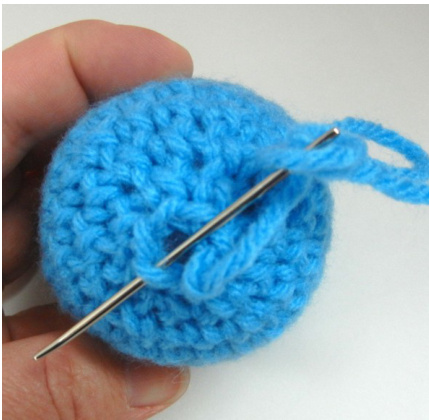
Figure 2: To close hole on back of head, loop needle and end tail of yarn through front loops of last six stitches.
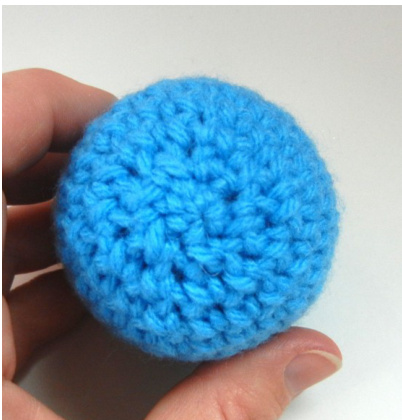
Figure 3:Pull end of yarn snug to cinch holeclosed,thenmake an overhandknotandhidetailinside. Insert 9mm black eye posts between rows 6 and 7, aligned on opposite sides of head. Keep in mind that the first round should be the front, or nose. When you are satisfied with the spacing of eyes, push safety backings on eye posts. OPTIONAL SAFETY EYES: Using a few inches of black yarn or embroidery floss on an tapestry or embroidery needle, make small circles (about 10 mm) for eyes with satin stitch. Stuff head with polyester fiberfill to desired firmness. Fasten off (see Figs. 2 and 3). Hide end inside head.
NECK
Ehook Starting with long tail for sewing neck to head, ch 15, sl st to 1st ch to make circle. R2: Sc in each ch around. (15 sts) R3-4: Sc in each sc arouna. (15 sts) Fasten off, leaving tail for sewing to body. Pin head to neck, aligning eyes with sides of neck. Whipstitch neck to head as shown in cover photo with about 15 stitches.
BODY
E hook R1: Ch 2, 6 sc in second chain from hook, or ML, 6 sc. R2: 2 sc in each sc around. (12 sts) R3: \*Sc in next sc, 2 sc in next sc\*, rep 6 times. (18 sts) R4: \*Sc in next 2 sc, 2 sc in next sc\*, rep 6 times. (24 sts) R5-12: Sc in each sc around. (24 sts) R13: \*Sc in next 2 sc, dec\*, rep 6 times. (18 sts) R14: \*Sc in next sc, dec\*, rep 6 times. (12 sts) Stuff with fiberfill to desired firmness. R15: Dec 6. (6 sts) Fasten off, hiding end inside body. Pin open end of neck to body as shown in cover photo. Whipstitch neck to body with about 15 stitches, adding stuffing to neck when neck is stitched onto body about half-way or two-thirds around. LEGS (make 4) Ehook R1: Ch 2, 5 sc in second chain from hook, or ML, 5 sc. R2: 2 sc in each sc around. (10 sts) R3: In back loops only, sc in each sc around. (10 sts) R4-6: In both loops, sc in each sc around. (10 sts) Fasten off, secure beginning tail, leaving long end for sewing to body. Stuff legs. Pin legs into place on body. Whipstitch legs to body with about 10 stitches around top of leg, adding more stuffing if desired before sewing completely. Fasten off and weave in ends.
TAIL
Ehook R1: Ch 2, 5 sc in second chain from hook, or ML, 5 sc. R2-4: Sc in each sc around. (5 sts) R5: Sc 2 in next sc, sc in next 4 sc. (6 sts) R6: Sc in each sc around. (6 sts) R7: Sc 2 in next sc, sc in next 5 sc. (7 sts) R8: Sc in each sc around. (7 sts) R9: Sc 2 in next sc, sc in next 6 sc. (8 sts) R10: Sc in each sc around. (8 sts) R11: Sc 2 in next sc, sc in next 7 sc. (9 sts) R12: Sc in each sc around. (9 sts) R13: Sc 2 in next sc, sc in next 8 sts. (10 sts) R14: Sc in each sc around. (10 sts) Fasten off, leaving long end for sewing tail to body. Stuff tail, but don't add stuffing to narrowest part of tail, i.e., R1-4. Pin tail into place on last round of body as shown in cover photo. Whipstitch into place with about 8 stitches.
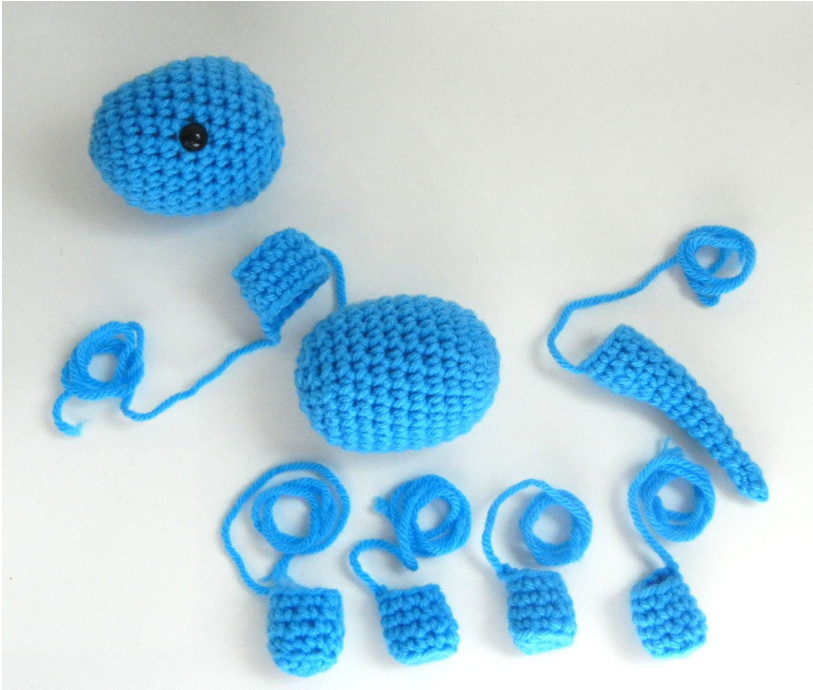
Figure 4: All parts stuffed and ready to be sewn together.
Congratulations! You're finished!
If you have any questions, write to me at janawhitley@yahoo.com. As far as copyrights and intellectual property rights are concerned, I am fine if you want to sell the dolls you make with this pattern, as long as you credit JanaGeek on Etsy.com as the designer or include a link to my shop's website. If you have friends who want to crochet the doll too, encourage them to support fellow yarn artists by purchasing their own copy of the pattern from http://www.etsy.com/. Thanks for your patronage! Happy crocheting, Jana